Portal 2

Portal 2

35 ratings
p0rtalmaster's Hammer Guide Series Part 02/19
By The Sojourner
Hello and welcome to part 02/19 of my series of mini-guides, designed to help you learn perhaps what is the biggest part of the Portal 2 Authoring tools: Hammer.

For a super-quick version of this series, please check out my other guide, Hammer for the Flustered.
   
Award
Favorite
Favorited
Unfavorite
Intro
The last guide showed you how to make a basic room. Rooms really aren't that hard to make, so let's do more with them: glass, grating, and lighting. I'll be using a basic clean theme for these guides. There are others, but that's a different set of guides, yet to be published.
Glass and Grating
In Portal 2, glass (or grating) is not just a textured slab between rooms. It has a frame, which is not well-understood by Hammer newcomers. Fortunately, there are several frame models of different sizes available for the game. This means that you don't really need to create your own frames. The recipe:


Ingredients: one (or more) prop_static(s), one named info_lighting, two env_cubemaps, one worldbrush (or a func_detail if needed).

1) Create the prop_static and other point entities by using the point entity tool.

2) As an example of creating the entities, go into Properties (I do this be right-clicking on the entity), and set the "Class:" field to prop_static.

3) Set the "World Model" keyvalue to one of the following:
  • models\props_test_chamber\frame_64x128.mdl
  • models\props_test_chamber\frame_128x128.mdl
  • models\props_test_chamber\frame_192x128.mdl
  • models\props_test_chamber\frame_256x128.mdl
  • models\props_test_chamber\frame_256x256.mdl
Next, set the "Lighting Origin" keyvalue to the name of your info_lighting.

4) That's it for the frame. Don't touch anything else. Don't even LOOK at anything else, just... well, obviously you've got to look at everything else to find the "World Model" keyvalue, but as soon as you've looked at something and it doesn't say "World Model", look at something else, look at the next thing, alright? But don't touch anything else or look at any... well, look at other things, but don't... you understand (I hope you do anyway).


5) For bigger glass/grating sizes (top image), place several frames side by side. If the barrier bends around a corner (bottom image) or if the window desired is less than 64 units, there are corner models and individual frame models in the same directory:
  • models\props_test_chamber\corner_post_32.mdl
  • models\props_test_chamber\corner_post_64.mdl
  • models\props_test_chamber\corner_post_128.mdl
  • models\props_test_chamber\frame_corner.mdl (24×24)
  • models\props_test_chamber\frame_4.mdl
  • models\props_test_chamber\frame_16.mdl
  • models\props_test_chamber\frame_20.mdl
  • models\props_test_chamber\frame_32.mdl
  • models\props_test_chamber\frame_64.mdl
  • models\props_test_chamber\frame_128.mdl
All of the frame models in your frame should share the same info_lighting (i.e. the same name in the "Lighting Origin" keyvalue should apply to all the frame models).


6) OK, now for the glass/grating panel. Create a brush textured with tools/toolsnodraw (top image). It should be 2 units thick and 2 units off of each edge of the frame(s). For example, a 128×128 frame should have a panel that's 124×124×2, centered around the frame (bottom image).


7) On each of the broad sides of the panel, apply a glass or grating texture. Some good ones:
  • glass/glasswindow_frosted
  • glass/glasswindow_frosted_002
  • glass/glasswindow_frosted_002b
  • glass/glasswindow_frosted_shiny
  • glass/glasswindow007a (also good rotated 45°)
  • glass/glasswindow007a_less_shiny (also good rotated 45°)
  • metal/metalgrate018 (also good rotated 45°)
  • metal/metalgrate018c (also good rotated 45°)


8) Finally, place the two env_cubemaps on both sides of the glass, not touching but close. Do the same with the info_lighting. These three entities will make sure your glass panel shines properly.


For refracting glass, instead of a worldbrush, use two prop_statics (one on each side) for each frame with the "World Model" set to one of:
  • models\props_lab\glass_observation_1.mdl (128×128)
  • models\props_lab\glass_observation_2.mdl (64×128)
  • models\props_lab\glass_observation_3.mdl (256×128)

Make sure to set the "Disable shadows" keyvalue on the glass models to "Yes," otherwise your glass won't let light through (resulting in a darker chamber than you expect)! Though beware, as not even lasers can go through these pieces of glass. This is because the refracting pieces of glass were designed for observation rooms, meant to safeguard Aperture's employees from any crazy test subjects who may try to kill them with lasers. Also, don't use any of the refracting glass textures, as they simply won't let light through.


To make an excursion funnel or hard light bridge go through grating:

1) Make the grating panel a func_brush (Ctrl+T, or "Tie to Entity"), and set the "Solidity" keyvalue to "Never Solid."

2) Create/duplicate the brush and texture it with the tools/toolstrigger texture. Change the class to a func_clip_vphysics.

3) Create/duplicate the brush and texture it with the tools/toolsplayerclip texture. Make it a worldbrush (Ctrl+Shift+W, or "Move to World").

4) Ensure that all 3 brushes are at the exact same location. The grating should be solid to players, cubes and turrets, but allow anything else to pass through. Note also that the grating doesn't have the normal grating footstep sounds.

This same process will also allow player's pings to go through glass in coop mode.
Glass with Holes. Not Bullet Holes...


Ingredients: two prop_statics, one named info_lighting, two env_cubemaps, one worldbrush for clipping.

1) Create a 128×128 or 256×256 glass panel. See the above section for how to do that, but skip the last two steps.

2) Set the other prop static to:
  • models\props_test_chamber\frame_hole_small.mdl (for the 128×128 panel)
  • models\props_test_chamber\frame_hole_large.mdl (for the 256×256 panel)
Set both of the prop_statics' "Lighting Origin" keyvalue to the name of your info_lighting.

3) Place the hole frame in the center of the panel, at the same height as the border frame.


4) Now, use the clipping tool to create a wedge 1/8 of the size of the panel.

5a) Clip from 78 units above the center to 55 units above and 55 units to the side of the center (large hole).

5b) Clip from 21 units above the center to 15 units above and 15 units to the side of the center (small hole).

6) Clone the brush and flip it horizontally. Match edges/vertices.

7) Check texture alignment on the broad faces of the flipped piece: check "world" on both sides using the Face Edit tool.

8) Clone the two objects and rotate then 90°, again matching edges/vertices.

9) Clone the four objects and rotate then 180°, again matching edges/vertices.

10) Group the objects and apply a glass texture on the broad faces. Check "world" again (even though it's already checked, this is necessary) to ensure texture alignment.

11) Turn the group of glass brushes into a func_detail.


The idea behind small glass holes is to allow portal shots and nothing else. The idea behind large glass holes is to allow excursion funnels to carry things one direction only, disallowing the other direction to be traversed. The reason that you're going through all the trouble of clipping out an octagonal hole is because carving generates messy results. Fortunately, all that's needed is 8 brushes, each of which is partially buried inside the frame, so the hole still looks like it's circular.
Light Strips
Most of the time it's best to create or use an instance of a light strip instead of making them from scratch every single time. The core list of light strip VMFs:
  • instances\lights\light_panel_32x128_cool_med.vmf
  • instances\lights\light_panel_32x128_neutral_med.vmf
  • instances\lights\light_panel_32x128_warm_med.vmf
  • instances\lights\light_panel_32x256_cool_med.vmf
  • instances\lights\light_panel_32x256_neutral_med.vmf
  • instances\lights\light_panel_32x256_warm_med.vmf
  • instances\lights\light_panel_32x512_cool_med.vmf
  • instances\lights\light_panel_32x512_warm_med.vmf
  • instances\p2editor\light_strip.vmf (from PeTI)
  • instances\p2editor\light_strip_warm.vmf (from PeTI with BEEMOD installed)
The last two in the list don't require a hole. The other instances are a little nicer looking, but they require a hole of 32×128 for each light strip.

For larger light strips (as seen in Wheatley's third chamber; mapname: sp_a4_tb_wall_button):


1) Cut a 32×256 or 32×512 hole into the wall/floor/ceiling where you want your light strip to go.

2) Create two brushes, both 6×32×256 or 6×32×512. Texture one with nodraw and the other with skip (tools/toolsskip). The front side of the skip brush will be then textured with the hint (tools/toolshint) texture (this helps with the compile process).

3) Duplicate the nodraw brush and resize it to 1×18×242 or 1×18×498, keeping it centered with the original nodraw brush. Texture the front side with one of these textures:
  • lights/light_panel_cool
  • lights/light_panel_neutral
  • lights/light_panel_warm
4) Create a 2×2 frame of the same height and width as the nodraw brush and texture it with the invisible texture (tools/toolsinvisible). Turn this into a func_portal_bumper.

5) Create a prop_static and set its world model to models/props_lab/glass_lightcover_med.mdl (256 units high) or models/props_lab/glass_lightcover_large.mdl (512 units high) and set "Disable Shadows" to "Yes" (so the light in the back can shine through). Skin 0 is cool, 1 is warm, and 2 is neutral. Set it to match the texture's light style.


6) Align everything as in the screenshot above and save. You can now use this as an instance in your own maps.

As noted on the VDC Wiki, you can edit the brightness of your light strips by changing the Texture Scale (both X and Y) of your light texture — higher is dimmer, so a scaling of 0.25 both ways will be a lot brighter than 2.00 both ways.
Observation Rooms
Always watching...

Most of the time it's best to create or use an instance of an observation room instead of making them from scratch every single time. The core list of observation room VMFs (for various themes...) are found in the instances\labs directory.

But if none of those seem fitting for your map, you can edit an instance and save it as a new instance. Another option is to make one from scratch. To do that, you'll need some nodraw worldbrushes, some prop_statics, and a light and light_spot. Optionally, you may use an env_projectedtexture, but beware, as only one env_projectedtexture can be on at a time, despite the pretty shadows they cast.


1) Create your room. Typical sizes are 128×128, 192×128 and 256×128 and 128 units deep. The 64×128 observation rooms are really 128×128 observations rooms with a smaller window than a 128×128 room would have.

2) Texture the walls with something like concrete/observationwall_001b (lower part) and concrete/observationwall_001a (upper part), the floor with a tile texture such as tile/observation_tilefloor001a or tile/observation_tilefloor003a, and the ceiling with something like tile/observation_tileceiling001a or tile/observation_tileceiling001b.

3) For the front of your observation room (i.e. the side(s) that will face the test chamber), you'll need two prop_statics: a frame piece and a glass piece.
For frames, the models to use are:
  • models\props_lab\window_64.mdl
  • models\props_lab\window_64_a.mdl
  • models\props_lab\window_128.mdl
  • models\props_lab\window_128_a.mdl
  • models\props_lab\window_192.mdl
  • models\props_lab\window_192_a.mdl
  • models\props_lab\window_256.mdl
  • models\props_lab\window_256_a.mdl
NB the regular models have a horizontal beam through them while the "_a" models are beamless.

For glass, use these models:
  • models\props_lab\glass_observation_1.mdl (128×128)
  • models\props_lab\glass_observation_2.mdl (64×128, also used for 192×128)
  • models\props_lab\glass_observation_3.mdl (256×128)
NB Do not use the refracting glass textures! They do not work in Portal 2 like they do in Portal — they're 100% opaque and obstructive. Instead you have to use the models and set "Disable Shadows" to "Yes" so that the light will shine through (very important!).


4) Optionally, you can add some more prop_statics to make your observation rooms seem less empty. You can even add bendy figures if you like (models\info_character\info_character_bendy.mdl; use as a prop_dynamic). Some good models:
  • models\props\lab_chair\lab_chair.mdl (has to be a prop_physics in order to show up in your map)
  • models\props\lab_desk01\lab_desk01.mdl
  • models\props\lab_desk02\lab_desk02.mdl
  • models\props\lab_desk03\lab_desk03.mdl
  • models\props\lab_desk04\lab_desk04.mdl
  • models\props\lab_desk05\lab_desk05.mdl
  • models\props\lab_monitor_pose01\lab_monitor_pose01.mdl (I recommend checking out the skins here)
  • models\props\lab_monitor_pose01\lab_monitor_pose03.mdl (I recommend checking out the skins here)
  • models\props\pc_case02\pc_case02.mdl (has to be a prop_physics in order to show up in your map)
  • models\props\pc_case_open\pc_case_open.mdl (has to be a prop_physics in order to show up in your map)
  • models\props\radio_reference.mdl (optionally, you can make some sound/music for this one...)
  • models\props\security_camera.mdl (NB used in testchambers as npc_security_camera)
  • models\props\security_camera_prop_reference.mdl (Portal-style security camera)
  • models\props\terror\hamradio.mdl (used in the Super 8 trailer, but seems to fit well in the Portal 2 universe)
  • models\props_office\... (LOTS of good models for observation rooms and some other behind-the-scenes areas such as Rattman's dens)

You can also apply overlays for doors if desired.


5) Finally, add your light and light_spot and place them at the same location: at or near the center of the room. Tweak the settings until the lighting is just right using Full Compile mode.
Since good lighting varies from chamber to chamber, I do not recommend saving lights inside of an observation room instance.

When tweaking the settings of the light entities, you won't need to adjust much. Just a large value for "Constant," 0 for "Linear," and 1 for "Quadratic" will do it. Color is one thing, but along with it comes a 4th number for intensity. This number is not limited to 255. In fact, the typical observation room might have a light with a low intensity (approx. 50-200), and a light_spot with a high intensity (approx. 500-2000).
Mistakes to Avoid & More Information

  • Not using frames on glass and grating. Even a frame made from brushes is better than no frame at all!
  • Not aligning the texture on the glass (or possibly even grating).
  • Not knowing enough about lighting. Please read my other guide on Full Compile to learn about how to create a fuller lighting effect. THE LAST THING YOU SHOULD TRY TO MAKE YOUR MAP BRIGHTER IS TO ADD MORE LIGHTS! Without full compile, your map will still look bad.
  • Not using a plausible light source. Often just sticking a light entity into a map isn't enough. You'll also need at least a prop_static to add a feeling that the light is coming from somewhere.
  • Using observation rooms at or near ground level. Observation rooms are best placed high up, where they can cast their light downward. It also serves as a light layer of protection for Aperture's employees (i.e. you).

More information from the VDC Wiki:Useful light entities (probably the only ones you will ever need):And a couple more links for information on those entities used to fine-tune glass and grating:
  • func_clip_vphysics: solid to physics objects and nothing else if done right.
  • func_portal_bumper: use around the edges of where glass meets a portalable surface. You can now correct what is still now a long-standing PeTI bug!

A Very Special Guide to Lighting by TopHATTwaffle

http://cs2bus.com/sharedfiles/filedetails/?id=158903426

Master Guide List
Please note that there are still some works in progress. This section will be updated as I finish more guides for you!

You are currently viewing part 02/19 in the series.

| 00 | 01 | 02 | 03 | 04 | 05 | 06 | 07 | 08 | 09 | 10 | 11 | 12 | 13 | 14 | 15 | 16 | 17 | 18 | 19 |

Previous Guide (tour of Hammer and a basic room; a little bit about nodraw on the outside.)
Next Guide (about sound in Portal 2)

Please feel free to leave a well-reasoned question or comment below. Either I or a qualified Test Chamber Associate (you'll know because they make all the good maps on the workshop) will respond. If your question or comment is not well-reasoned, I recommend reading over my guides again until you understand them 100%. No further information is required here or will be provided, and you will become an excellent Test Chamber Designer — using Hammer!

17 Comments
[Axsl_SDK_Base] 23 Oct, 2023 @ 2:07pm 
How do you make grating let Excursion funnels pass through it?
Andi 25 Sep, 2022 @ 6:21pm 
Did an update break the func_clip_vphysics?

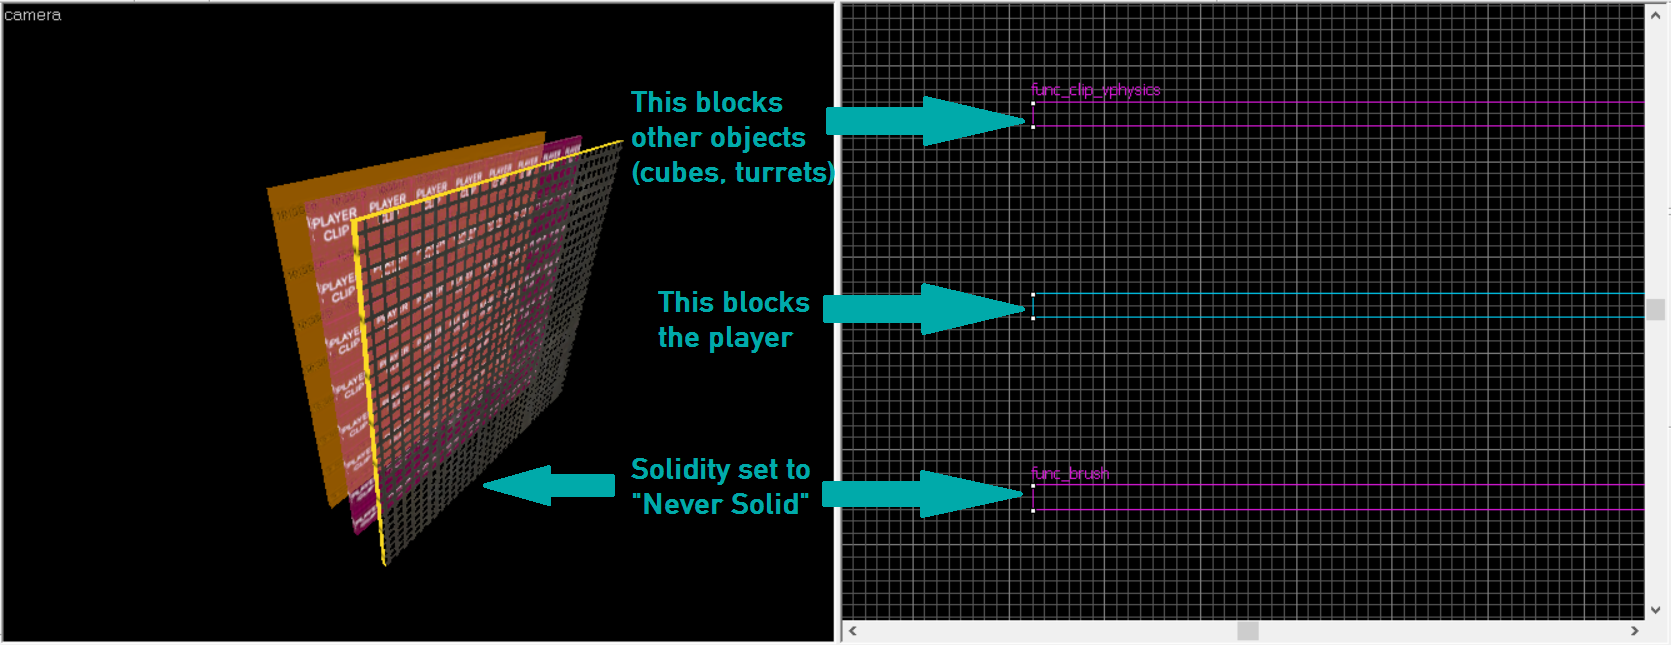
I created a func_clip_vphysics but everything goes through it. I can't figure out why.
Catradora sustains me 17 Mar, 2022 @ 7:37am 
How do I stop Frankenturrets from being pulled through grates by a funnel?
Felix2710 14 Jul, 2021 @ 11:37am 
Thanks so much. This guide was so in depth that it helped me build the observation rooms in Blender. Thanks for pointing out all the models etc that was needed. Helped a ton!
Catradora sustains me 25 Sep, 2020 @ 7:45am 
Cool, but do I need a cubemap specifically for the prop, or can I just use the one I put in the centre of the rooms?
The Sojourner  [author] 19 Sep, 2020 @ 12:12pm 
Quick rule of thumb: if it's shiny, you probably need cubemaps, even if it's a prop.
Catradora sustains me 19 Sep, 2020 @ 8:07am 
Do you need specific cubemaps when making glass with props and, if so, where do I put them? I want to have a platform made with the fractured glass props, but I'm not sure if I need cubemaps.
Catradora sustains me 26 Aug, 2020 @ 7:37am 
I've decided to scrap the glass, it wasn't really needed anyway.
Catradora sustains me 24 Aug, 2020 @ 9:41am 
I have two questions:
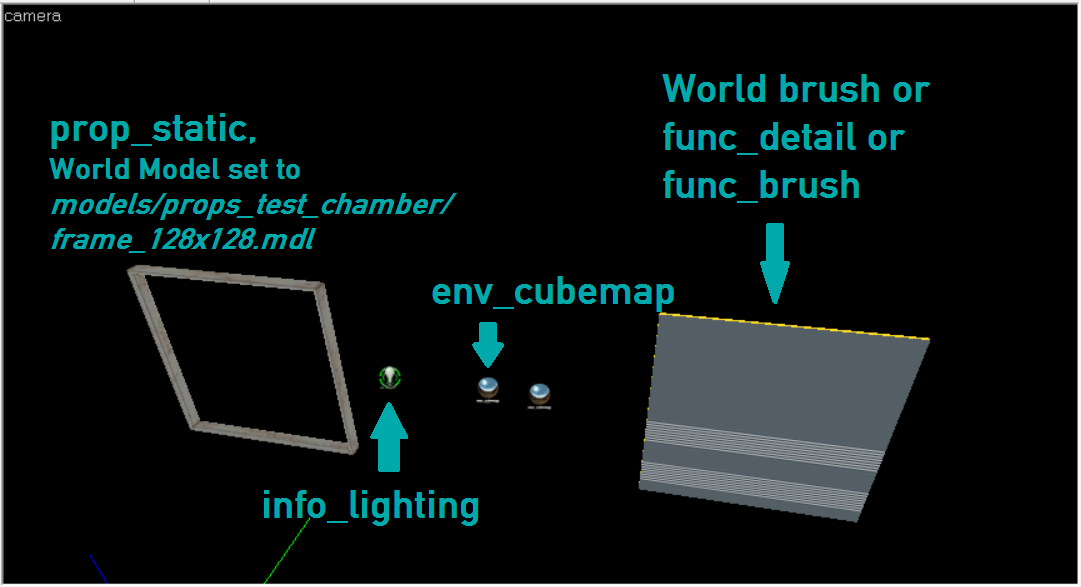
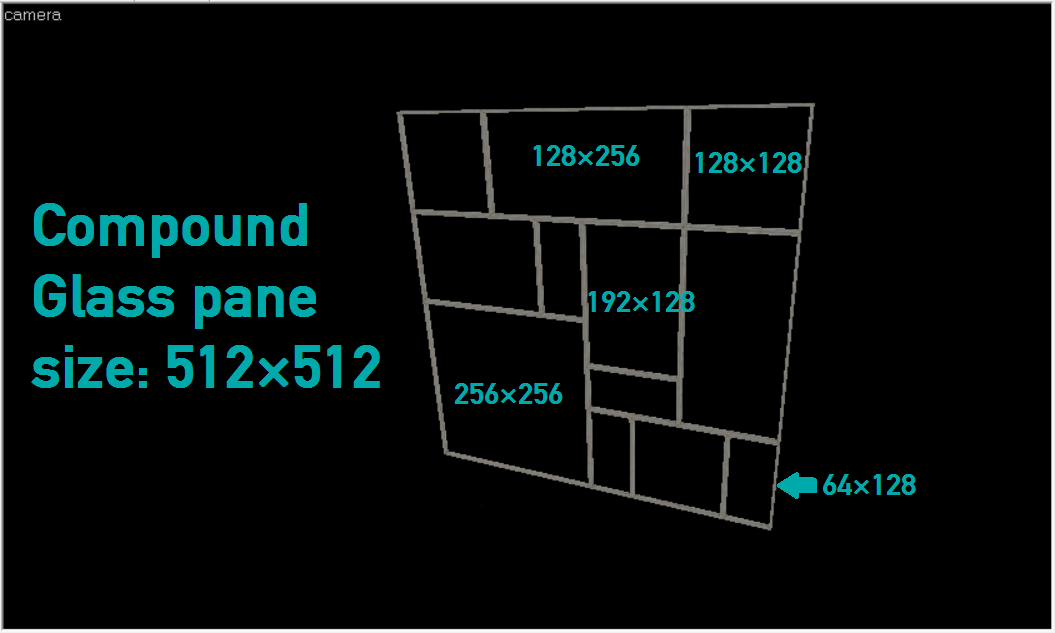
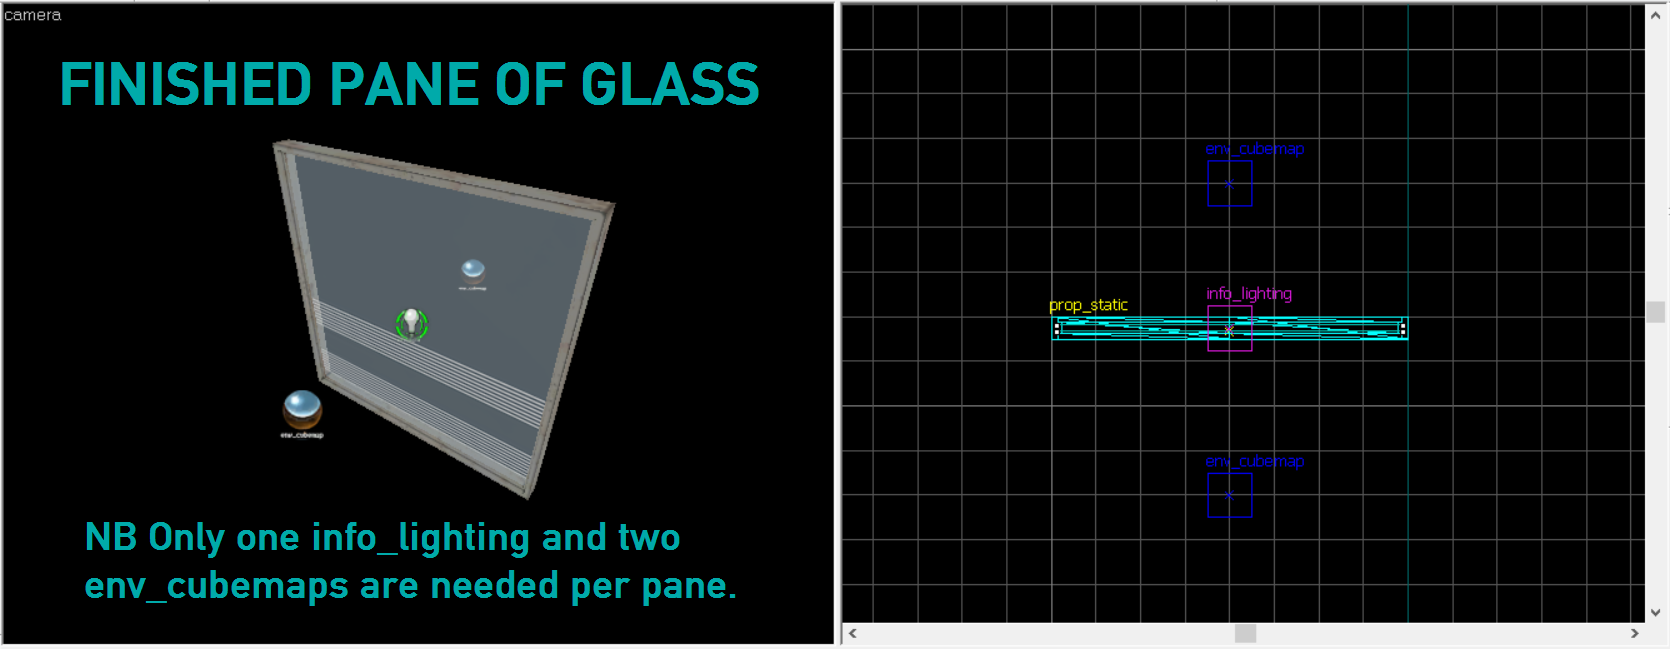
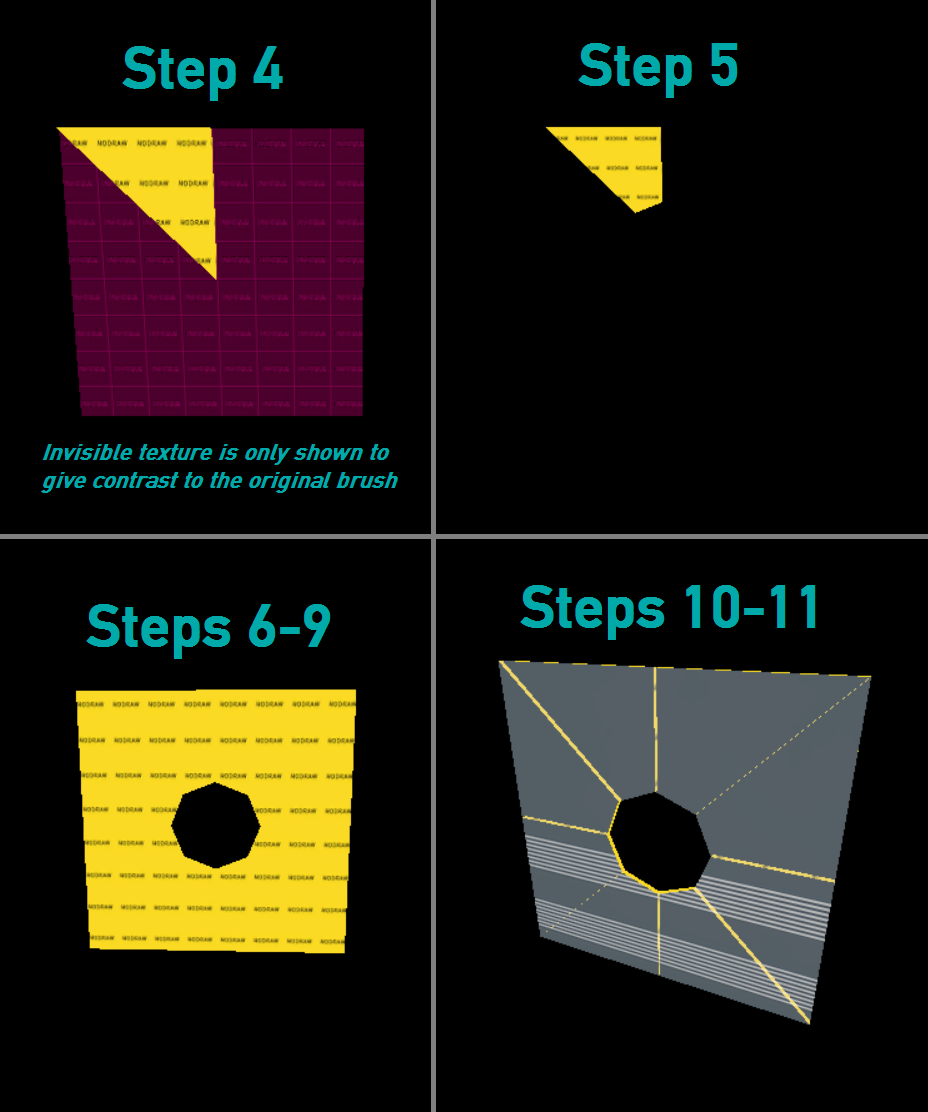
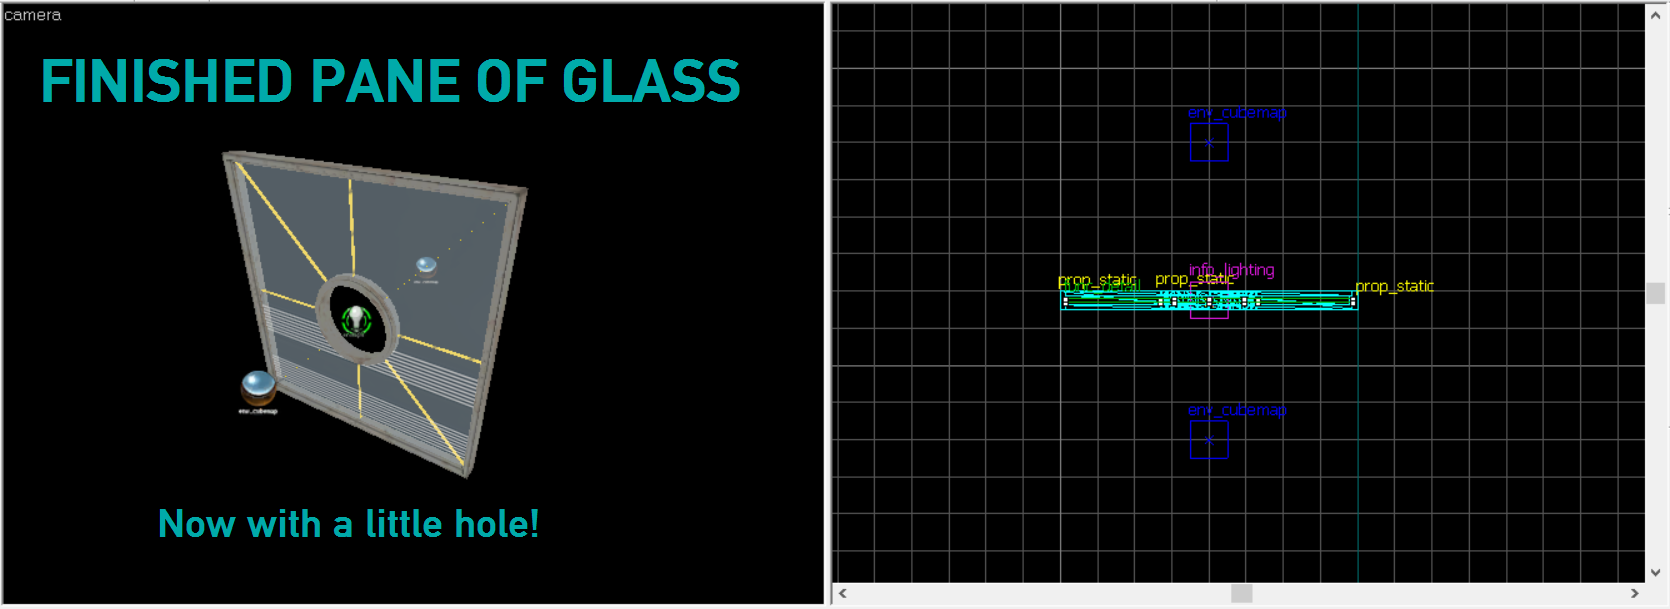
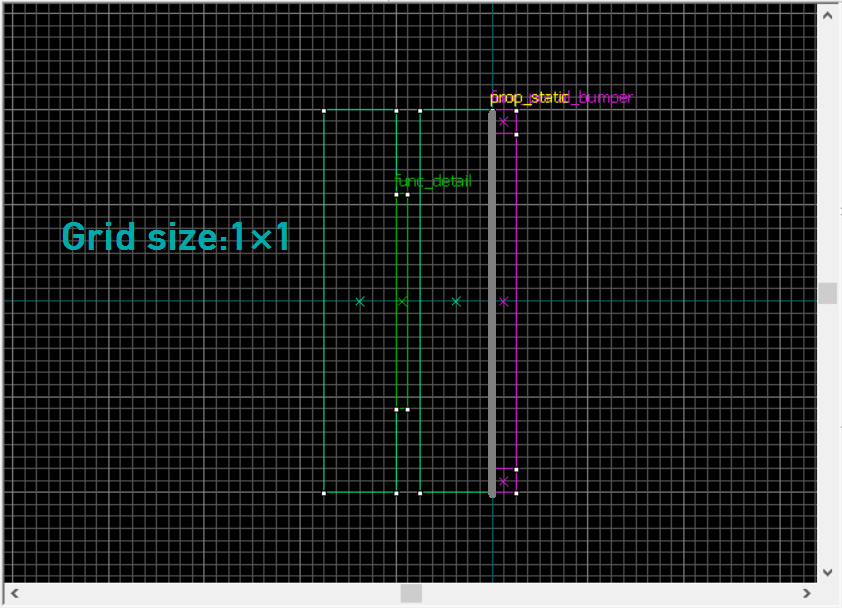
1. When making a massive glass pane (like the one in the picture under Step 4 of Glass and Grating), do I need to have individual sets of info_lighting and env_cubemap entities for each window section?
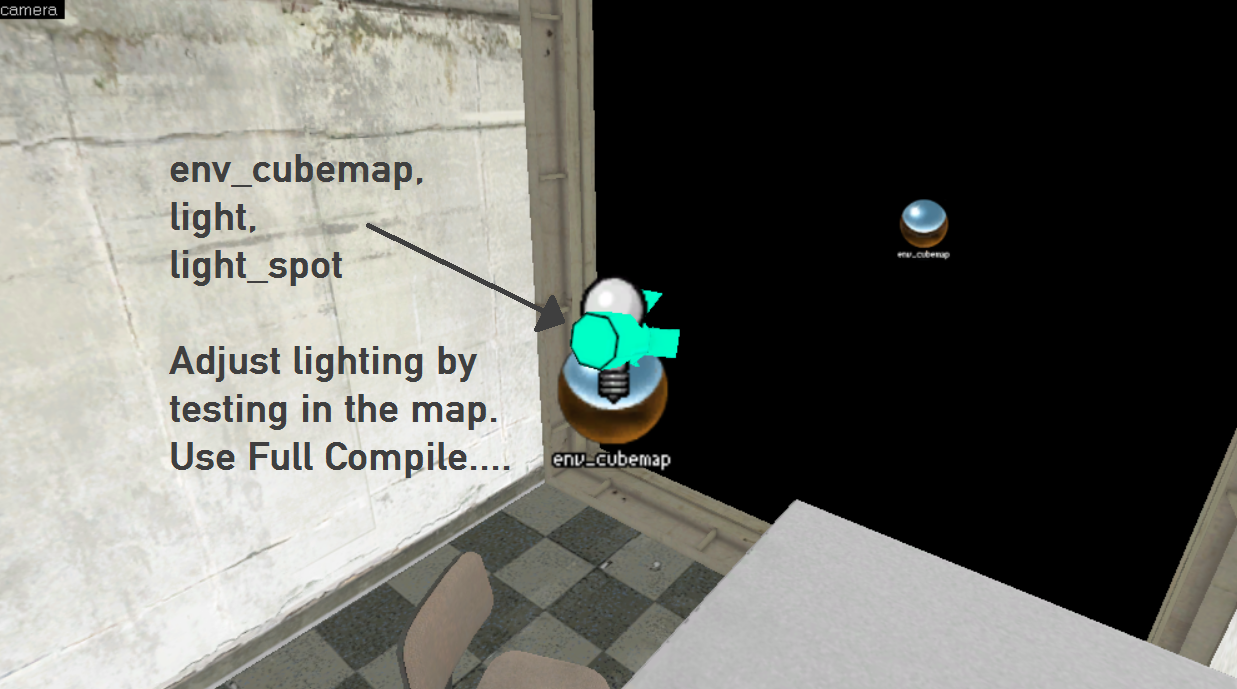
2.Also, I've noticed that, when making windows taller than 128 units, placing the cubemaps at the same height as the brush's centre leads to the glass changing its lighting when looking at it at different angles. I'd managed to fix it by placing the cubemaps 64 units above the ground, but as I want to have a massive window that's high up in the air, where should I place the cubemaps.
The Sojourner  [author] 21 Aug, 2020 @ 1:08am 
You shouldn't need a brush with decimal points in it. If you weren't trying, chances are that Hammer was being weird with you. In this case I recommend checking your "snap to grid" settings to make sure you're snapping to at least the nearest whole number.