PAYDAY: The Heist

PAYDAY: The Heist

444 ratings
The Heisting Guide for New Players
By dogs and 2 collaborators
The guide involves explaining from the basic elements of the HUD and consequently the basic elements of the game (which is overall very simple) to the weapons, enemies and even community contributed tips for each heists - if you're a new player, I recommend having a look at it :)

It was almost 100% written by me (kill - NaOHSpree on the Steam Forums) but several users and sources helped me out with statistics and information so I must thank:
  • {MERC} Jason Voorhees for helping generally with grammar and spelling check and suggesting what to add to the guide.
  • SamusDroid for making video demonstrations and suggesting what to add to the guide.
  • PAYDAY: The Heist Wiki[payday.wikia.com]
   
Award
Favorite
Favorited
Unfavorite
INTRODUCTION: SETTINGS & HUD
Now that you just fired up the game the first you should definetly do is change the video settings to what your computer is (game specs requirement right here) and familiarize with the controls and voice/text chat. You can play online with anyone, play online with friends or, for the lone wolf type: you can play with bots in offline mode! (Note: this has nothing to do with Steam's offline mode)

Now that you're set with the basic of the basics, let's take a look at the HUD (heads-up display) used in-game.

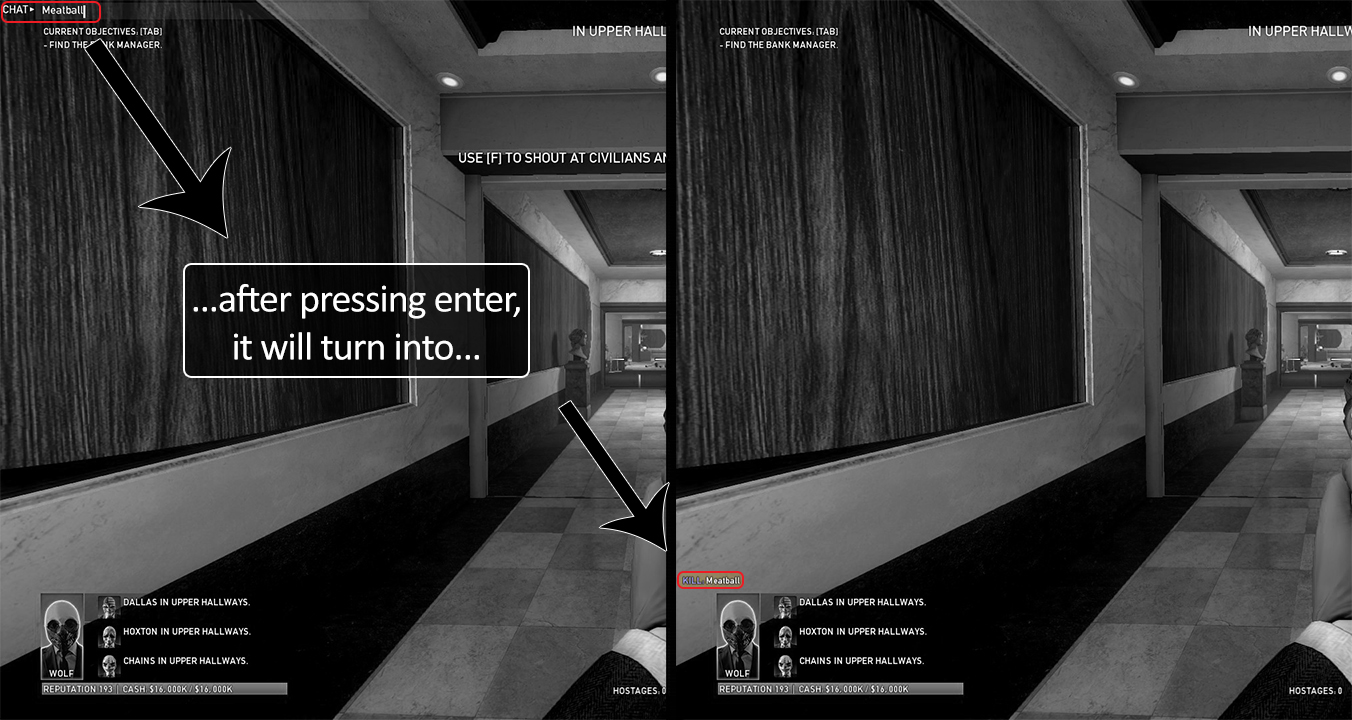
  • The upper part of the HUD simply consists of: the location you're at, the current objectives and the chat box whenever you press 'T' (default key) to open it and send a message. Here's a demonstration of the text message feature before and after being sent.
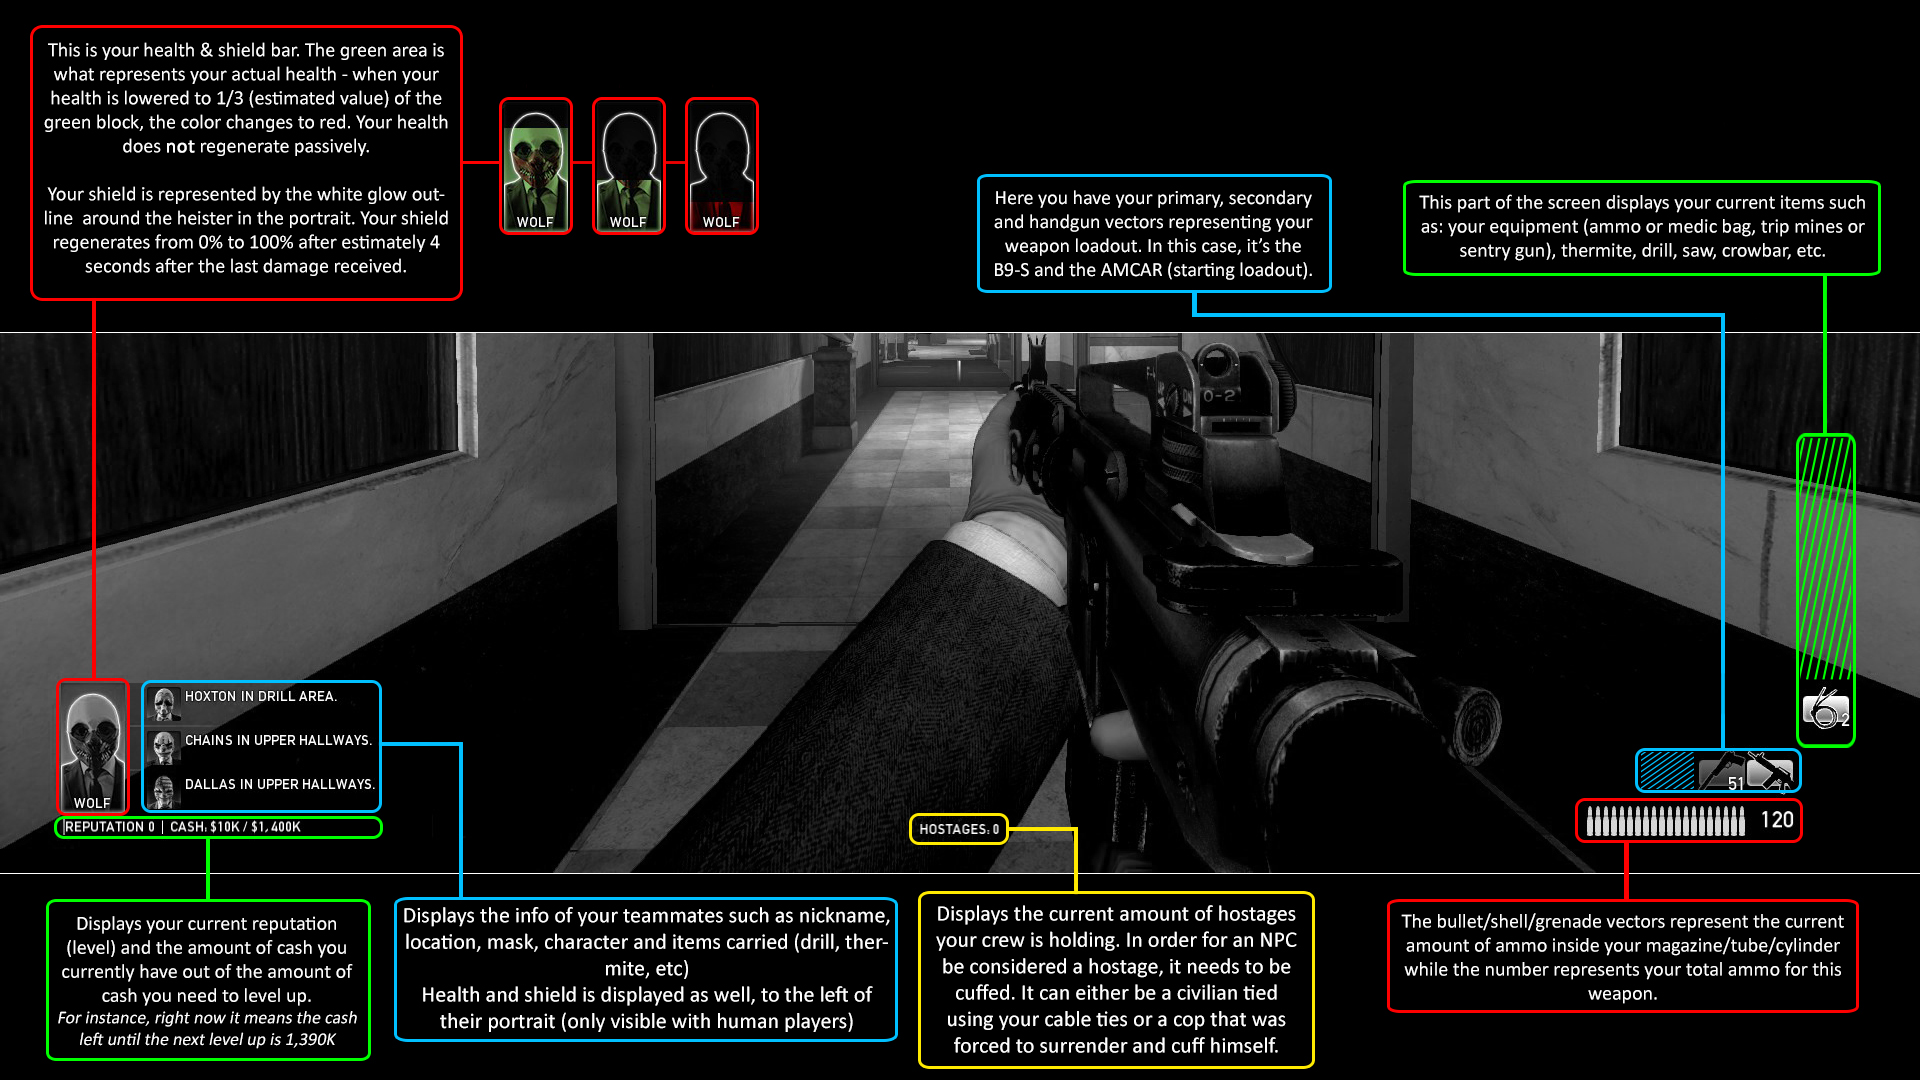
  • The lower part of the HUD is way more complicated as it displays nearly everything you need to know about, so it's easier if you take a look and see this image as well as carefully reading the text boxes.
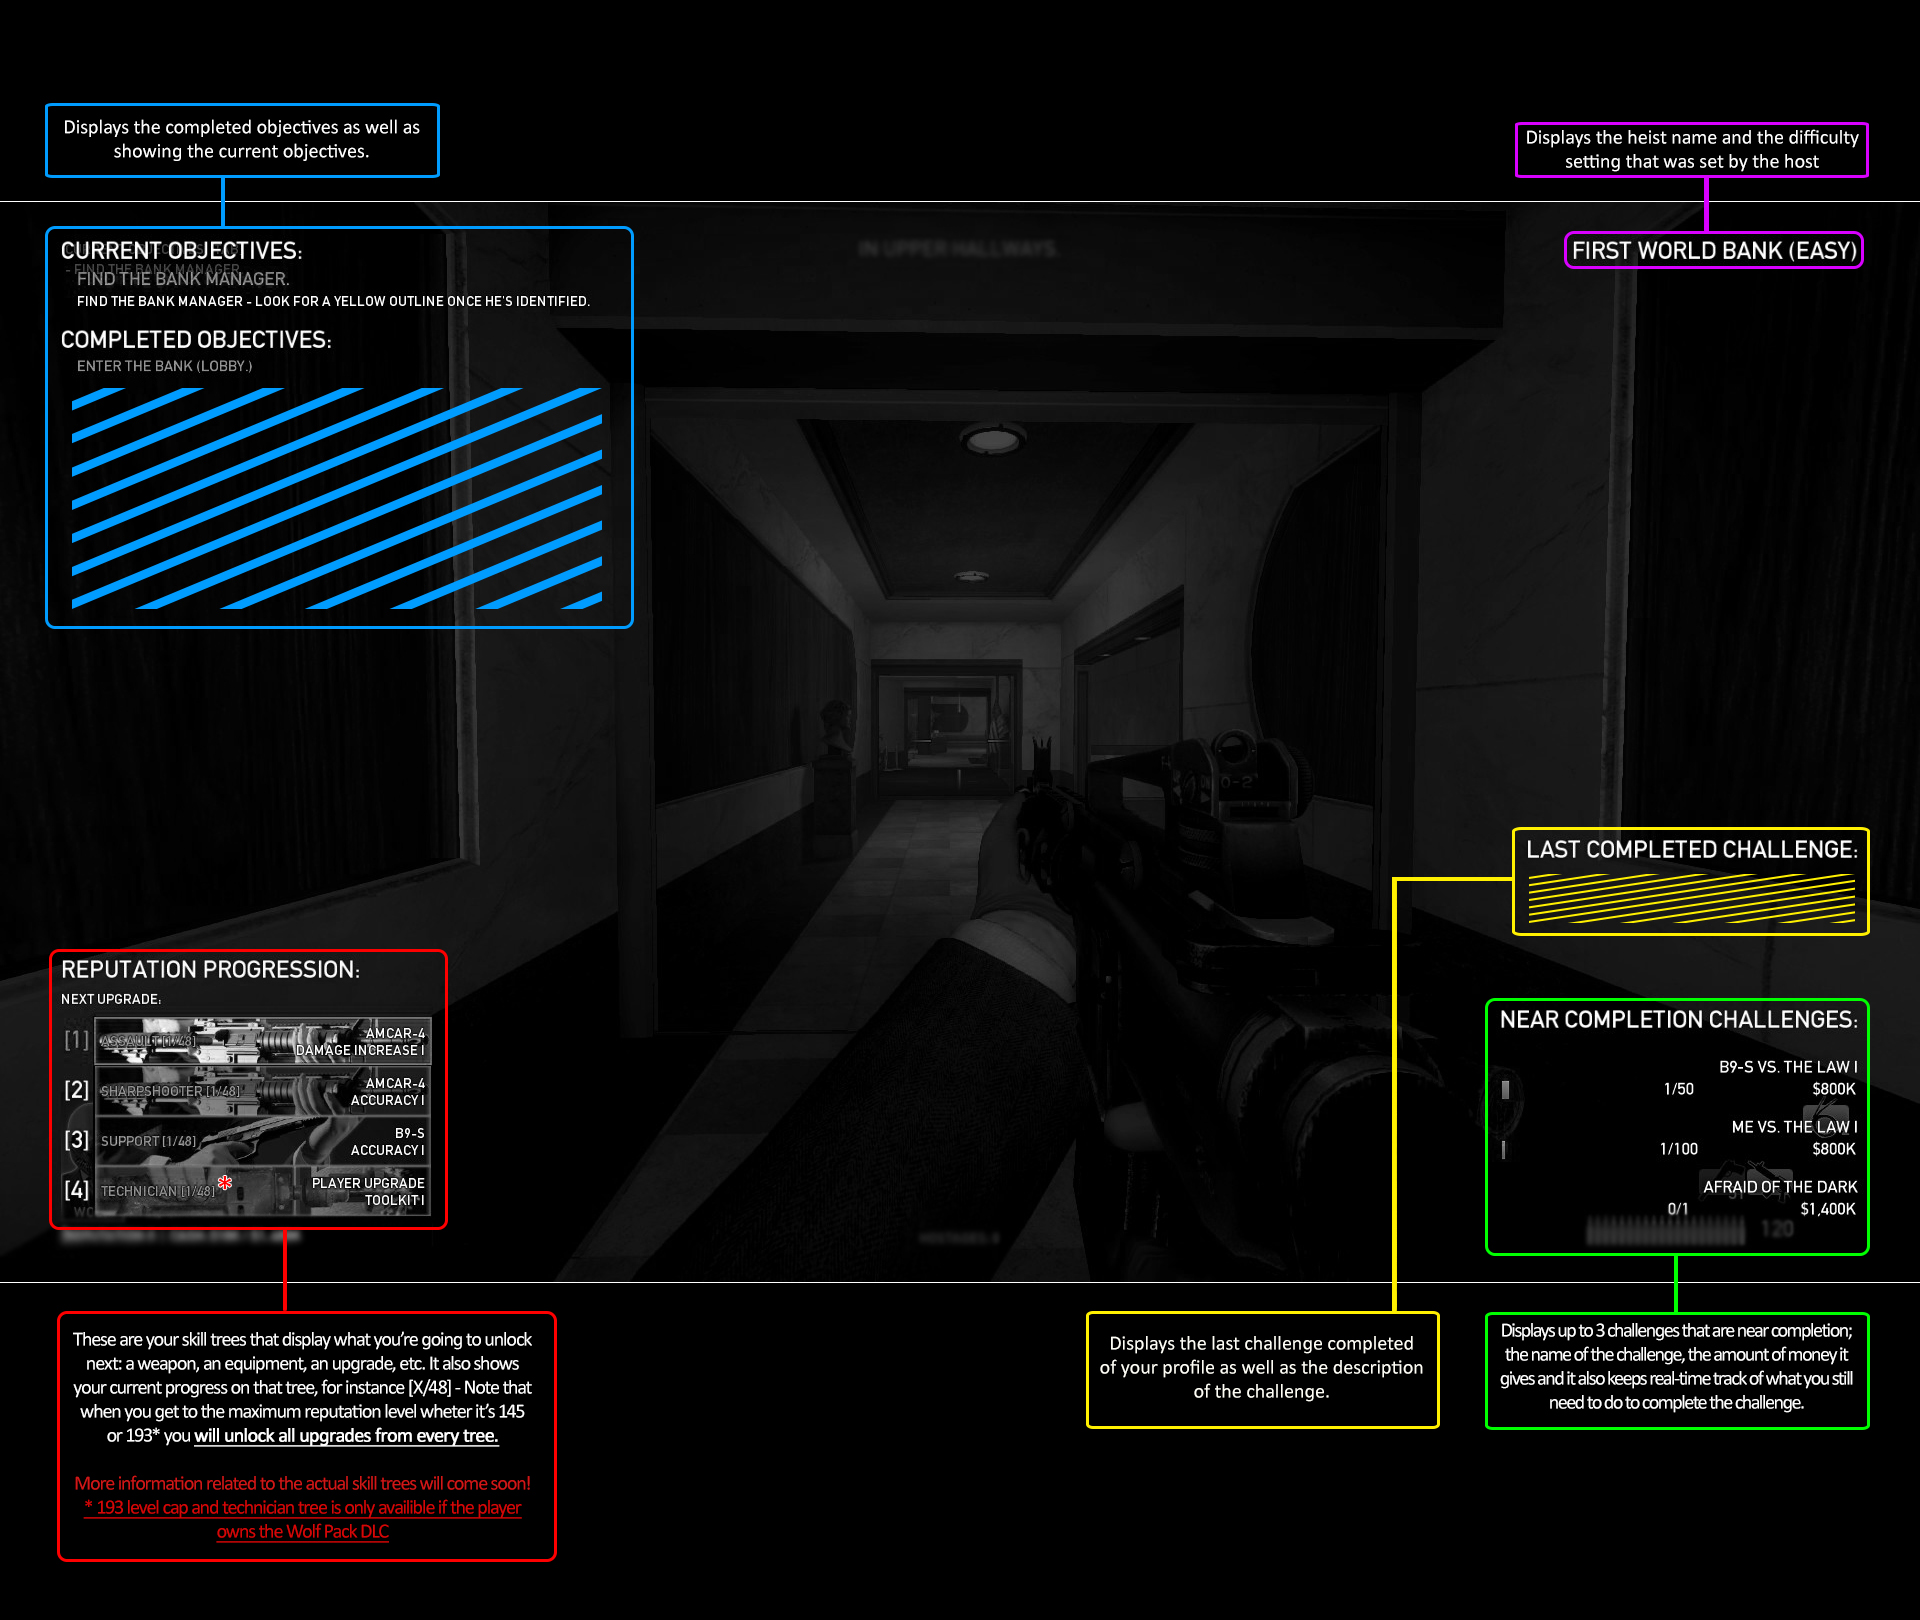
  • By pressing 'TAB' (default key) the game will open a overlay on the screen - this overlay is very important so that the player can switch skill trees anytime. Here's what it looks like and what you need to know about it.
SKILL TREES
We have a total of 4 skill trees (the 4th one is only availible if the player owns the Wolfpack DLC). The skill tree selection only changes what you'll unlock on the next level-up - it has no in-game effect whatsoever.

Assault
For those who want firepower.
  • Weapons unlocks: Mark 11, Crosskill .45 and Brenner 21
  • Equipment unlocks: Ammo bag
  • Player upgrade unlocks: Extra Cable Ties
  • Crew bonuses unlocks: Agressor and Speed Reloaders

Sharpshooter
For those who want precision and range.
  • Weapons unlocks: M308 and Locomotive (and B9-S upgrades)
  • Equipment unlocks: Trip mines
  • Player upgrade unlocks: Thick Skin
  • Crew bonuses unlocks: Sharpshooters and More Blood to Bleed

Support
For those who want to support teammates.
  • Weapons unlocks: Bronco .44, Reinbeck and Compact-5
  • Equipment unlocks: Doctor bag
  • Player upgrade unlocks: Extra Start-out Ammo
  • Crew bonus unlock: Protector

Technician
For those who want more firepower while still supporting teammates.
  • Weapons unlocks: STRYK, AK Rifle and GL 40
  • Equipment unlocks: Sentry gun
  • Player upgrade unlocks: Toolkit
  • Crew bonus unlock: Big Game Hunters
TIPS: DIFFICULTY, GAME AND ENEMIES
Difficulty settings
  • Easy: for the new players that wish for a walk in the park - reputation level: any
  • Normal: for the players that desire a slight difficulty increase from easy - reputation level: 10+
  • Hard: for more experienced players that desire a challenge - reputation level: 40+
  • Overkill: for the veterans that know their way around the game - reputation level: 90+
  • Overkill 145+: You must know your way around the game even while blindfolded; time assaults (7m and 30s); prepare your strategy and share it with your team; win flawlessly. - reputation level: 145+

General tips
  • Your name isn't John Rambo. Stay close to your teammates! Wandering alone will most likely result in failure.
  • Don't wander off in an area with smoke grenades. You don't see the cops but they can sure as hell see you!
  • Remember to take out any cameras that you see! Less cameras means the cops don't have intel on your location thus making the match a lot easier!
  • Make sure you make civilian hostages using your cable ties and police hostages by making them surrender. Demonstration video (by SamusDroid): http://www.youtube.com/watch?v=ZgHBDrsdhbs

  • Pay attention to Bain's announcements through radio such as "The police has sent out an XYZ!"
  • The FOV setting is there for a reason; adjust it to a comfortable value so you can have a better game experience.
  • Cops don't surrender or execute hostage trades during assaults - do not waste your precious time!
  • Assaults are indicated by: the triangle and ASSAULT text just above your hostage counter aswell as the music getting more action-like.
  • Always remember to point out specials with the Use button: [F] (default key)
  • Do not waste doctor or ammo bags - Only use the doctor bags when you were downed at least twice and are in red health. Ammo bags; feel free to use it anytime ("technical" explanation coming soon)
  • Bad players aren't those who lose, they're the ones who quit. Do not quit after getting into custody, it's part of the game and it doesn't mean your rewards for completing the heist will be affected in any way.
  • When reloading the weapons, it's best to leave one bullet in the chamber so you don't waste time by having your character pulling the charging handle. (This does not apply to the Reinbeck or Locomotive).

The five tips below were contributed by the player Arcter - thank you, Arcter ;)
  • Everywhere you go and at all times, think about what's around you can be used for cover. By cover I mean putting something between you and any potential attackers. There is cover everywhere. Tables, pillars, boxes, alcoves, desks, couches, cars, ventilation shafts, stairwells, and even other players. Always be aware of what cover is around you.
  • Never stand in the open if there's avallable cover near you. You're more likely to get downed in a place where your teammates can't get you up without getting killed themselves. This can easily cause a chain reaction of everyone going down. Hug walls and cover everywhere you go and learn to avoid areas that are wide open.
  • Crouch a lot when getting attacked. This does a couple things. It keeps you secure behind cover, and It slightly improves your aim. When fighting off an assault, it's better to pop around cover from the side while crouched than to stand and fire because standing leaves you open to all fire in front of you, while popping around the side still leaves you covered on one side.
  • Never drop a bag in the open. You need several seconds to use bags and getting shot and downed while trying to use them is not fun. Always find a place to drop bags that has cover from at least two angles, and make certain it's in an area where you are actually going to need it. A bag on one end of a level isn't much use if you have to spend the second half of the level in a distant area babysitting another objective.
  • You can use some objects through walls if you are more or less level with them. This means you can get teammates back up through walls, use bags or restart certain objectives like saws. Use this to your advantage in particular by helping teammates back up without getting shot at all yourself.

Special enemies
  • Bulldozers only get damage by shooting the glass on it's helmet, no point in shooting at his armored body!
  • Cloakers are sneaky and sprint extremely fast, always watch out for them and remember they move in groups.
  • Tasers can be very annoying, especially for a player separated from the team - shoot it before it even aims at you.
  • Shields are difficult to handle in some occasions. Often it'll be a tough kill, making you require to distract him or circle around him so you can get a chance to shoot at his body.
  • Snipers, unlike the other specials, cannot be pointed out by the player - they also deal an extreme amount of damage to a shieldless player, since they usually attack from a long distance: it's recommended to fight them only if you have a long-range weapon.
TIPS: HEIST SPECIFIC
First World Bank
  • Click here to view the locations of the cameras[payday.wikia.com].
  • Random chance to spawn up to 3 money bundles inside the two offices near the server room - the money is usually on top of the computer tower and on the white board.
  • Random chance to spawn a money bundle on top of a drawer in one of the offices at the drill area.
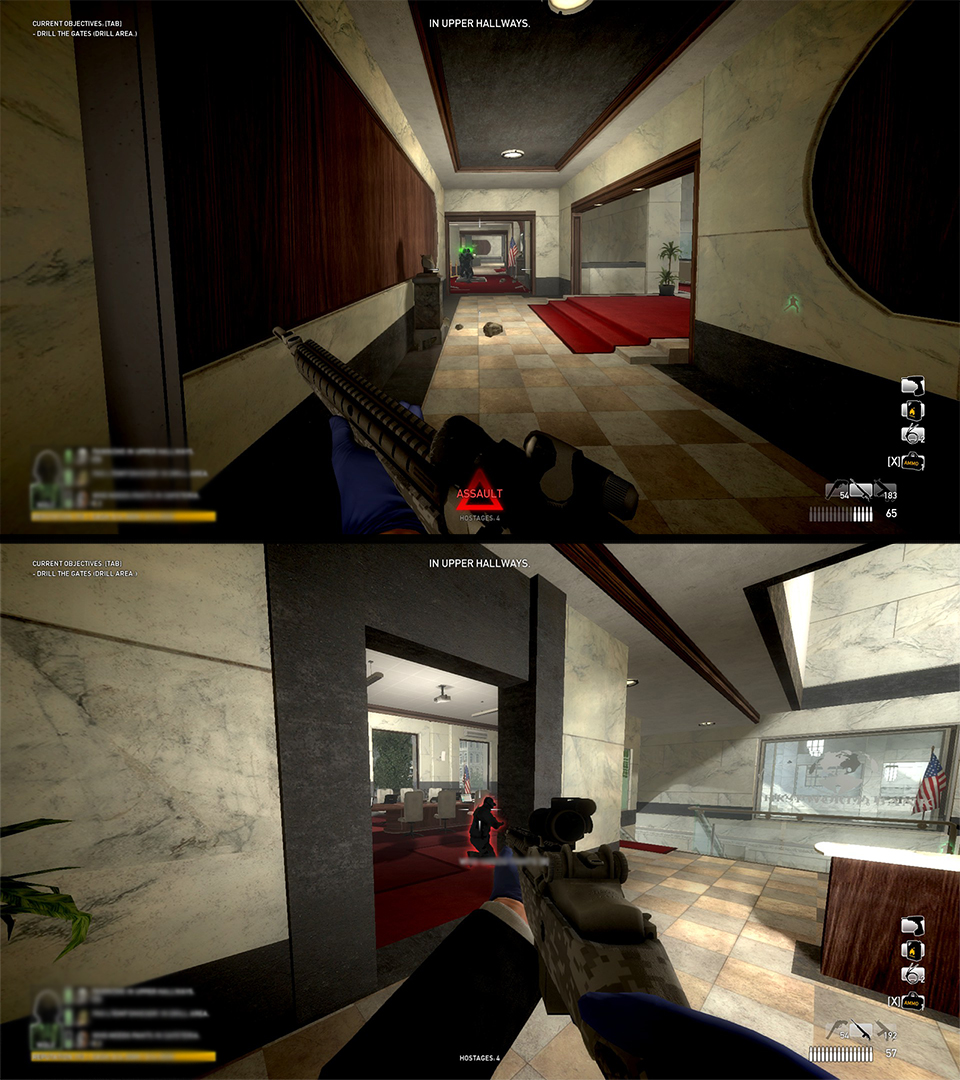
  • "Look out, they're sending some cloakers" or "There are cloakers in the ventilation!" - 2 cloakers will spawn and enter through the office above the cafeteria and 3 cloakers will drop down from the vents on the upper hallway.
  • "The police are sending out some special units" - 2 tasers will drop down using a rope from the glass on the top of the building just by the wall aquarium at the upper hallways.

Heat Street
  • There's a random chance of some money bundles spawning inside the trunk of Bruce's car!

Panic Room
  • You need to be fast on this map. Get to the roof right before the saws finish. Don't bother too much with killing every cop on the way up and down. Get to the roof and clear it quickly before cops build up.
  • You need to kill exactly 6 snipers before Alex comes and drops the C4 - remember they spawn in waves of 2. Once you kill these 2, the other 2 will spawn and finally, after those are dealt with, the last wave will spawn.
  • You can easily jump down from the roof to the alley through the fire escape stairs. Video demonstration (thanks to SamusDroid): http://www.youtube.com/watch?v=sERncfxZyHY
  • "Look out, the police are sending two or more tazers!" - 1 or 2 tazers will spawn on the roof.

Green Bridge
  • The fourth van has a random event that will make it slide down and almost fall, this means Giant will not spawn there.
  • If George misses the balloon, wait until the assault ends and have a teammate raise the balloon while the rest of the crew makes a run for the escape. This will save time and most of the time, guarantee you the completion of the heist. This is especially suitable for 145+

Diamond Heist
  • Click here to view the locations of the cameras[payday.wikia.com]. (you can melee them during the stealth phase but only do that if you're sure there are no guards close to you).
  • Memorize the guard paths and routes so you can anticipate and easily adapt to any player and alarm box spawn point set.
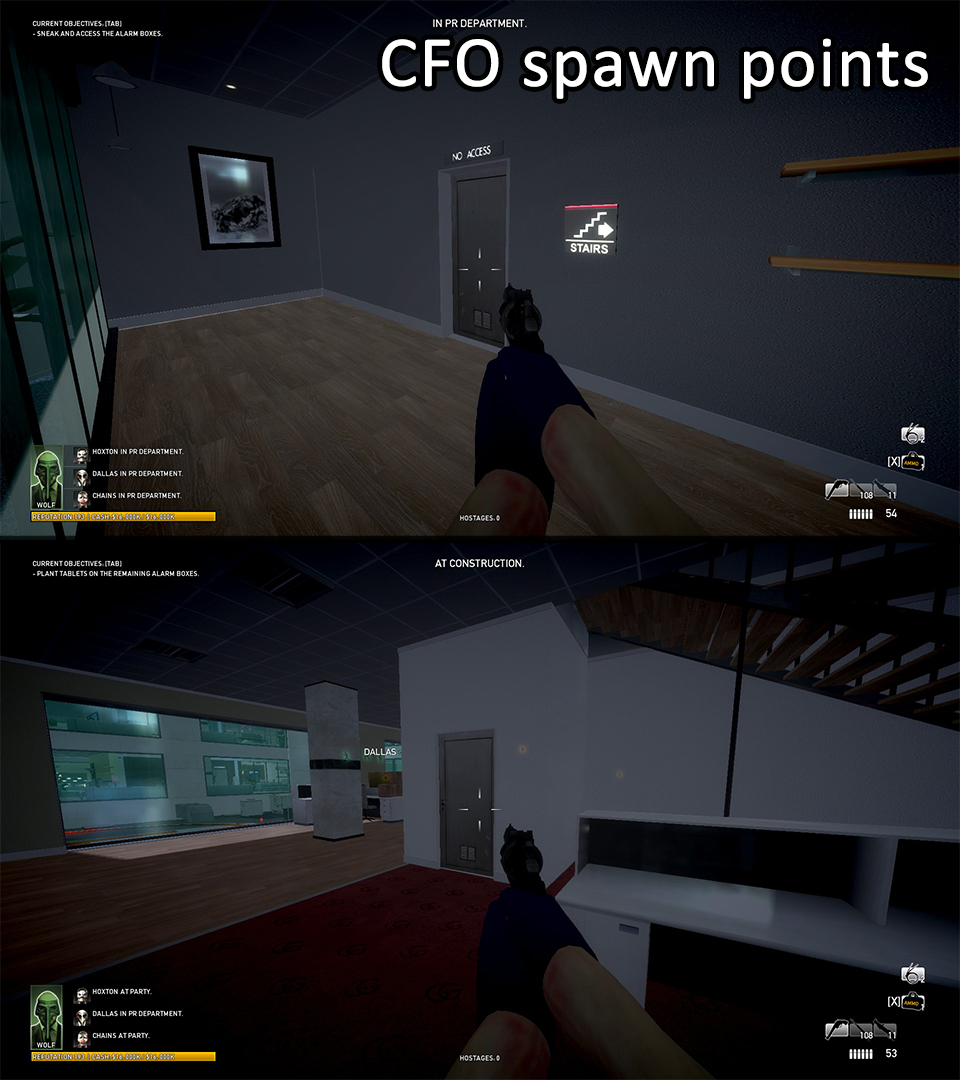
  • If the codes fail, players should already position themselves to the CFO spawn point. Note that there are two spawn locations.
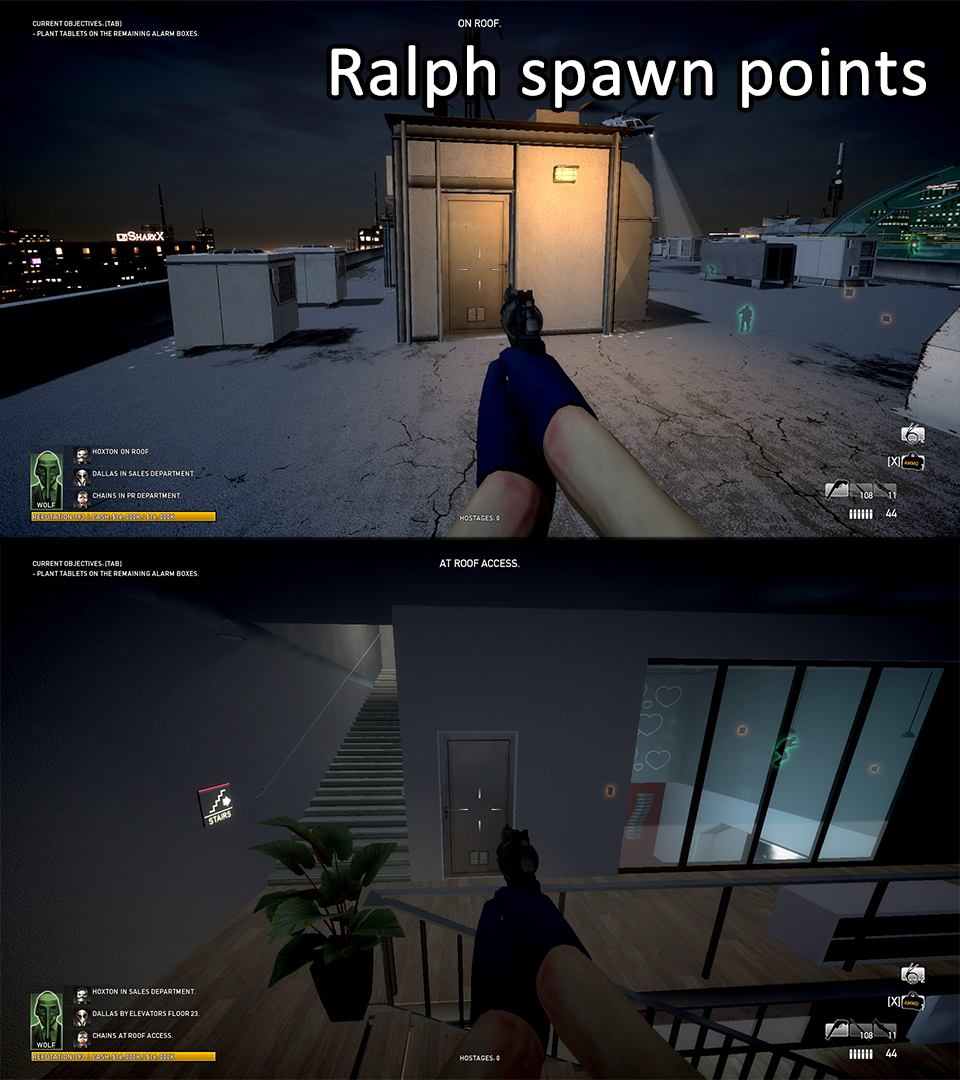
  • If the negotiation with Garnett related to the CFO fails, repeat the steps above: get to Ralph's spawn locations.

Slaughterhouse
  • Click here to view the locations of the cameras[payday.wikia.com].
  • After the safe is drilled open, have a guy in your crew to get his bag and rush to the container yard - this triggers the gasoline cans spawn and eliminates the need to return to the slaughterhouse to get them, thus saving time.

Counterfeit
  • While in pre-heist mode, you can scout the map for the locations of the hose, drill, street power box and the power switch.
  • There's some jewelry that randomly spawns throughout the map, make sure you check: Wilson's living room, Wilson's bedroom and Mitchell's main bedroom.
  • If you forgot to bring a silenced weapon to take out the first two waves of cops that come - only if you manage to tie every civilian or not letting them escape - you can just melee them!
  • If the basement has the C4 trap: coordination is the key so that you don't end up with 2 or more people defusing the same C4 at once - talk to your teammates before prying the doors open and have each one of you to get at least 2 packs of C4. NOTE: There is a bug that even if you end up defusing all of the C4 packs, Bain still says "It's gonna blow, get out!" and the C4 explodes anyway, ultimately killing whoever's inside the basement. Video demonstration here (thanks to Paz for the video, Poubel for the reaction and Jason for saying mudafukas: http://www.youtube.com/watch?v=K5xiRvy6VQk&t=85s
  • Have your crew anticipate the events: while one sets up the drill, two other go after the wall sockets and the fourth goes after the water hose.
  • You can avoid having to deal with the power-shutting bulldozers by doing the following exploit:
- If the bulldozer shuts down the power by the electrical switch: rush and turn it back on without killing him;
- If the bulldozer shuts down the power by the power box on the street: have a teammate circle around him while you turn the power back on and do not kill him;
- By not killing the bulldozer, another one will not spawn to turn off the power again meaning you can just forget about dealing with that problem. Remember that the same can be done for the water valve - it's harder, though.

Undercover
  • Planks completely change the way the heist will flow, so remember it's extremely important - especially on the roof because it will protect you and your teammates from snipers. Here's a little guide also done by me instructing the players to possible locations of planks: http://cs2bus.com/sharedfiles/filedetails/?id=119081524
  • Stay off the roof as soon as the first assault is incoming; players are very vulnerable due to the high amount of snipers and flanking police officers that spawn from the building behind.
  • Anticipate events such as when the limo falls you're ready to place the saw and also when the power goes out, make sure someone stays on the computer to restart it and save several seconds.

No Mercy
  • Forgot to take a silenced weapon? No problem, you can still take out the cameras by meleeing them!
  • Don't forget to take the crowbar in the doctors' lockers near the reception area, it's always good to have a guaranteed crowbar with your team - fun fact: the names in the lockers are references to Valve employees and Dr. Crowbar is a reference to the famous Half-Life protagonist, Gordon Freeman.
  • Memorize the locations of the centrifuges so that you don't waste time looking for them everytime.
  • It's best for each crew member to carry a valid sample. Communicate using text or voice chat so that your teammates know if there's a valid sample they can get. Note that a valid blood sample can get destroyed if the carrier is downed.
CHOOSING YOUR LOADOUT
It should be noted that most of - if not all - the following stuff consists of my personal opinion on them. So it's recommended that you try all weapons by yourself once you get your hands on them. Also note that all the information is based on the player having the max level on the items.

Before anything, the player must know:
Primary weapon: The main weapon you'll use in the heist.
Secondary weapon: Your alternate weapon, it's preferred to pick something that differs from your primary - for example, not to pick two shotguns.
Handgun: Your backup weapon.
Equipment: What you will deploy during the heist in your preferred location.
Player upgrade: Something to give you a boost against enemies; agressively or defensively.
Crew bonus: Something to give your crew a boost against enemies - note that your own crew bonus only applies to your teammates and not yourself.

Note that the information below is only divided by which skill tree the unlock belongs to. It doesn't mean you need to select X skill tree to play with Y weapon.

- The AMCAR-4 is a good starting weapon. It has a high rate of fire but comparatively small ammo capacity.
  • 30 bullets per mag - medium damage, medium accuracy, medium recoil.


Assault equipment
- The Mark 11 is excellent against Blue and Heavy SWAT while also doing the job for taking out weaker specials such as shields.
  • 54 bullets per mag - medium damage, medium accuracy, medium recoil.
- The Crosskill .45 is good for eliminating weaker enemies such as the Blue SWAT and police officers/FBI agents.
  • 14 bullets per mag - low-medium damage, medium-high accuracy, low recoil.
- The Brenner 21 is excellent for players with a happy trigger since it holds a lot of bullets.
  • 160 bullets per mag - medium-high damage, low-medium accuracy, medium-high recoil.
- The ammo bag is a must for the team. 2 ammo bags paired with 2 doctor bags can make you through any heist if they're used properly. After being placed down, an ammo bag can be used anytime the player wants due to the fact that it doesn't have a limited number of uses but an "ammo pool" percentage instead.

- Extra cable ties is not an advisable upgrade unless the player is attempting the Crowd Control achievement.


Sharpshooter equipment
- The Locomotive deals a low amount of damage and is not considered an overall useful weapon. It's recommended that the player uses any other secondary instead.
  • 6 shells capacity - low damage, low recoil.
- The B9-S, when fully upgraded, deals a low amount of damage but has a large magazine and a great accuracy.
  • 20 bullets per mag - low damage, high accuracy, low recoil.
- The M308, when fully upgraded, can one-shot-headshot every type of police (except for special units) - except on Overkill 145+ difficulty, where Heavy SWATs require 2 shots to the head instead.
  • 16 bullets per mag - high damage, high accuracy, medium recoil.
- Trip mines are not advisable for higher difficulty settings due ammo and doctor bags being more useful.

- Thick skin is useful for some players that haven't gotten used to controlling your shield thus losing health unnecessarialy. For others, I recommend Extra start out ammo.


Support equipment
- The Compact-5 can be very useful for it's high fire rate. It should be noted that it's damage output is low compared to the Mark 11 or GL 40.
  • 30 bullets per mag - low-medium damage, medium-high accuracy, low recoil.

- The Bronco's high damage output for a simple handgun makes it extremely useful against Heavy SWATs and special enemies including the Bulldozer.
  • Six shooter - high damage, medium-high accuracy, medium recoil.
- The Reinbeck can be very useful in CQB maps such as Counterfeit, Undercover, No Mercy etc. due to it's high damage at close range. Beware the starting ammo count is low.
  • 10 shells capacity - high damage, medium recoil.
- The doctor bag saves lives. Well, literally. After being placed down, it can be used from 2 to 5 times (depending on the level; 0 = 2 uses, 1 = 3 uses, 2 = 4 uses and 3 = 5 uses. Only use it when you have been downed at least 2 times.

- Extra start out ammo is also very useful since it raises your total ammo carrying capabilities throughout the whole heist.


Technician equipment
- The GL 40 is useful for clearing out a room full with enemies due to it's extremely high damage. However, the small blast radius and damage loss at higher difficulties makes it a useful-but-not-always-necessary weapon. It's very useful against a single bulldozer. One shot to his helmet deals a lot of damage.
  • Single shot - high damage, small explosion radius.
- The STRYK has a low damage output but an extremely high rate of fire making it a very useful weapon in several instances. The main problem is the low magazine ammo and overall ammo capacity.
  • 40 bullets per mag - low damage, medium accuracy, medium recoil.
- The AK rifle deals an extremely high amount of damage making it capable of eliminating a Bulldozer in less than a full magazine, assuming you don't miss. It's not very good at longe range, making it more of a CQB weapon than anything else.
  • 35 bullets per mag - high damage, medium accuracy, medium-high recoil.

- The Sentry gun, just like trip mines, is not advisable for higher difficulty settings because ammo and doctor bags are more helpful.

- The Toolkit is expendable for extra ammo or thick skin but it can also be very useful if a single player on the crew uses it and goes after the objectives such as restarting drills/saws in maps like Green Bridge.


Crew bonuses
Sharpshooters: increases the accuracy of your teammates.
Agressor: increases damage dealt by your teammates.
Big Game Hunters: increases your teammates' total ammo count (stacks with Extra Start out Ammo).
Protector: increases your teammates' health.
More Blood to Bleed: increases duration of your teammate's bleed-out time
Speed Reloaders: increases your teammates' reload speed
Noob Lube*: increases cash rewards by 20% (stacks with Mr. Nice Guy)
Mr. Nice Guy**: increases cash rewards by 20%

* This crew bonus is only availible during reputation levels 0 through 5.
** This crew bonus is only availible after hitting the level cap (193 if you have purchased the Wolf Pack DLC or 145 if you haven't)
ENEMIES AND SPECIALS
Unique:

Thug - dressed in casual, white outfit. Thugs are members of the drug dealing gang that appears in Panic Room
  • They carry Mark 11's and also are trigger happy in most occasions
  • They have a low health. However, meleeing them is not recommended unless you caught one alone.

Disguised federal agents - they use the same model as thugs but are unique to the Undercover heist. They are very rare enemies (0 to 4 per heist) that sometimes go after the players in the beggining of the heist.


Police - Regular:
Guard - dressed in white or red. Appears in: First World Bank (white), Green Bridge (white), Slaughterhouse (white), No Mercy (both white and red), Diamond Heist (red only)
  • A white dressed guard carries a Crosskill and a red dressed guard carries a Compact-5.
  • Least damage dealing enemy and also has the weakest health.
  • Can cuff players if they get too close.

Police officers - dressed in blue, regular police uniform.
  • Carries a Reinbeck or a Crosskill.
  • Has slightly more health than a guard.

FBI agent - two variations: wearing a balaclava or wearing sunglasses. Has the letters FBI stamped on the rear of his vest. Appears in: all maps.
  • They're sneaky and move in groups. They carry a B9-S (balaclava model) or a Crosskill (sunglasses model). They usually go for hostages instead of players unlike other cops.
  • Health level is comparable to of a Blue SWAT (see below).

Blue SWAT - regular blue SWAT armor. Appears in: all maps
  • Carries an AMCAR-4, a Compact-5 or a Reinbeck.
  • They're the most common enemy in medium-difficulty heists such as Normal or Hard. During assaults they go for players and during an assault interval they go after hostages.

Murkywater (often referred to as Murky/Murkies) - they have an armor that is similar to a Heavy SWAT's but with a greenish overlay. Appears in: Slaughterhouse
  • Always carry an AMCAR-4.
  • Murkies are often called "trigger happy" by players due to the fact that they have a great accuracy and shoot incredibly fast, similar to a Tazer.
  • Because of the fact they do not wear head protection armor, it's recommended for the player to use that as an advantage, aiming shots at his head.
  • Health level is between Blue and Heavy SWAT.

Heavy SWAT - they use a heavy body and head armor in a dark grayish brown color.
  • Carries an AMCAR or Reinbeck.
  • Are very agressive towards the player and if attacked by a swarm, chances are you'll most likely take severe damage unless you aim your shots correctly.
  • Like every other enemy, aiming for the head is strongly recommended.
  • On Overkill 145+; Heavy SWATs are the most common enemy which makes it hard for players to execute hostage trades. In order to make it easier, remember to shoot at a Heavy SWAT's body with a Bronco and start shouting at him in order for him to surrender. In some cases meleeing them once also helps the process.


Police - Special
Sniper - uses the same model as a Blue SWAT and uses a high-powered long range sniper rifle (however, the in-game model is actually an AMCAR)
  • Despite being a special enemy because of its triggered spawn rate, it cannot be highlighted due using your shout key (default [F].
  • They have a very low health but deal extremely high damage to the player both at longe and short range.
  • They cannot be forced to surrender [/list]

    Cloaker
    • Cloakers are extremely sneaky and can down players in a single hit if they get too close. Once a cloaker selects a player as a target; he will chase down that target permanently until he's killed or the target is downed.
    • Cloakers usually spawn in groups, especially in the ventilation/office window event that often occurs in First World Bank
    • Don't ever see a special unit and just leave him there; wheter shoot him to death or tag him using your shout key (default [F]).

    Taser
    • Tasers wield a different kind of AMCAR that has a taser device attached to it (you didn't see that coming, huh?)
    • They deal extremely high DPS when using the AMCAR, and with the taser he stuns the heister until he is downed or interrupted. It can be interrupted by shooting the Taser enough so that he flinches and stops firing.
    • Pay attention for the distinct electrical beep that plays when he's charging his taser weapon.

    Shield
    • The main problem heisters would have with shields is the fact that they block your passage. Aside from that; they are enemies that do not deal much DPS unless the player is careless and doesn't get to cover. Note that they wield a B9-S that has the same firing sound and rate as the Compact-5.
    • In several maps such as No Mercy, shields move in groups whereas in Panic Room they tend to camp in Floor 2 or 3.
    • Players should rotate around the shield; that ends up making them confused which allows you an easy kill.

    Bulldozer - kill, Paz, Jason Voorhees and Poubel started calling him "Bodozer", referencing Bo Andersson. COO at Starbreeze Studio. This eventually led to an inside joke between the veterans from the forums which now means most of the people call him a Bodozer
    • The father of the holiest; this guy right here is a friggin' tank.
    • Carries an extremely high-damage dealing shotgun that can eat your whole shield or if yours is still charging, nearly all your health in one shot, assuming you're in close range. If you're in long range the damage is very minimized.
    • He can only be damaged by shooting him in his face glass protection, with an amount of shots, it'll break and you'll finally know you're nearly killing him.
END AND COMMENTS
Thank you very much for reading this guide. I hope it helps you and your crew in future heisting.

Make sure to rate it and leave a comment according to what you liked and/or disliked. Feel free to leave suggestions and if I like a suggestion, I might consider it :)

Have fun!
64 Comments
abstractrat 2 Dec, 2021 @ 12:51pm 
thanks.
antipoda1000 3 Aug, 2021 @ 8:00pm 
nice
yansen 19 May, 2020 @ 7:05am 
Any semi-auto weapons can counter taser shocks effectively. Bronco, M308, Reinbeck, can stun tasers if they hit their mark, making a short breather before running away and/or finishing the job.

They also somehow doesn't shake your screen as much as full auto weapons like the Brenner, AMCAR, and Mark 11 :)
konamarin 1 Apr, 2020 @ 5:45pm 
Tasers are the most OP and cruel special unit in this game. If you get tased and the taser is not 2 meters or less away from you, you can't hit him. Your camera shakes so much it's like you have parkinsons. The reason they are cruel is, they don't damage you if they tase you, so if there are no more enemies shooting you, they will lead you to a slow and shocking death(eyy).
Lebhleb 15 Feb, 2018 @ 9:48am 
Can't say its not heplfull but you are overreacting a bit in some cases, i did very well on higher difficulties and im below your reccomended levels, well until game decides randomly for example once i walked areound first world bank on hard with no enemies then when i got in vault game decided to spam out smokebombs and 5 dozers and have some enemies shoot trough above vault area [killing me and others emedietly without knowing wtf was happening] or having empty roof on diamond heist only for a taser to to come then 5 sec later followed by 2 cloakers and 20 swats that random bullshit is retarded, i can handle 3 bulldozers or 2 shields rushing in with 20 swats but some bullshit i can't , tough its fun going 'oh shit im gonna die' then get revived then reviving other 2 then geting all of us killed because cloaker.
Gun Metal Grey 11 Feb, 2017 @ 10:18pm 
Dude thx, nice tutorial for newbies
It's Adam Lazlow 1 May, 2016 @ 3:20pm 
Nice thread! Helps a lot! Thanks ^^
parasocial catgirl 18 Feb, 2016 @ 2:03am 
The Bronco .44 gains no reload penalty if you reload it whilst empty (I think).
If you scope whilst reloading it, the animation of your character spinning the chamber will not happen, allowing you to get back to shooting stuff faster.

The Mark 11 SMG and B9-S are useful for stealthing parts of Counterfeit, Diamond Heist and No Mercy

Anoraks, suits, pool repair uniforms and tactical armour thingies do not affect your armour in any way.

Stay in groups of AT LEAST 2 people at all times.

At the escapes, become Sanic.
HooliganExtreme 17 Feb, 2016 @ 5:19pm 
Nice!
HomeBoy 16 Jan, 2016 @ 3:51am 
Nice one :steamhappy: