FINAL FANTASY V

FINAL FANTASY V

48 ratings
ABP GRINDING - Mastering Jobs Quickly!
By Rytex
This guide will show you the best spots for grinding for ability points (ABP) in FF5, including going into detail about preparation, strategies, results, and how long you can expect to grind each class at each location.

SO FAR AS I KNOW (I could be wrong), this DOES apply to the Pixel Remaster, except for Advance postgame job classes and the Movers method.
5
   
Award
Favorite
Favorited
Unfavorite
Introduction
For those of you who haven't made it as far as the Wind Shrine yet, Final Fantasy V has a job class system to its predecessor Final Fantasy III, where once you reach a crystal, you will gain new classes that offer you new ways to pwn your enemies. These jobs level up separately from your main level, but unlike III, jobs do not advance based on how many turns you use with them. No, instead, these jobs advance using a separate experience value that is advanced using "ability points", which are gained by defeating enemies normally.

Most enemy formations only give about 1-2 ABP each encounter, but there are a few outliers that give you loads more and can be farmed to make the grind as quick as possible.

Naturally, you can only level up the class your character is currently using, so always equip the class you want to level up, and then equip the side-ability you wish (or that is recommended) to ensure the grind is as smooth as possible.

Let's be real, THIS SUCKS. There isn't a reliable way to get large amounts of ABP unless you're playing the US Advance translation. So strap in, you're gonna be here for a while.

This guide will cover the main ABP grinding spots, where enemies give 4 or more ABP for little effort and/or a short battle time, including the monsters to look for, preparation for the battle, strategies, outputs, and how many fights per class it would take to grind up assuming you start at 0 ABP.
Max Level/ABP Per Job
Jobs are ordered alphabetically.

JOB CLASS
MAX LEVEL
MAX ABP
OBTAINED
Bard
3
175
Chocobo Forest
Beastmaster
4
460
Fire Crystal
Berserker
2
500
Water Crystal
Black Mage
7
680
Wind Crystal
Blue Mage
4
350
Wind Crystal
Cannoneer
3
500
Seafloor Cavern (Sealed Temple)
Chemist
5
630
Earth Crystal
Dancer
3
400
Earth Crystal
Dragoon
3
600 (SNES/GBA/PS), 560 (iOS/PC)
Earth Crystal
Geomancer
3
460
Fire Crystal
Gladiator
4
1080
Seafloor Cavern (Sealed Temple)
Knight
6
690
Wind Crystal
Mime
1
999
Sunken Walse Tower
Monk
7
700
Wind Crystal
Mystic Knight
7
680
Water Crystal
Necromancer
7
500
Defeat Enuo
Ninja
5
690
Fire Crystal
Oracle
4
520
Seafloor Cavern (Sealed Temple)
Ranger
4
600
Chocobo Forest
Red Mage
4
1159
Water Crystal
Samurai
5
820
Earth Crystal
Summoner
6
750
Water Crystal
Thief
7
635
Wind Crystal
Time Mage
7
530
Water Crystal
White Mage
7
580
Wind Crystal
USEFUL ABILITIES
Here is a quick list of some abilities that are explicitly recommended for certain grinding spots. These are listed in order of importance. The level listed is the level at which the command becomes available for the Freelancer class. If not otherwise indicated, this means the ability also only becomes available for the class at that level as well.

ABILITY
JOB
LEVEL
ABP REQUIRED
!Control
Beastmaster
2
60
!Blue Magic
Blue Mage
3 (Default ability of class)
100
!Gaia
Geomancer
1 (Default ability of class)
25
!Image
Ninja
2
40
!Throw
Ninja
4 (Default ability of class)
240
!Animals
Ranger
1
15
MAPS IN USE
WORLD 1


GALUF's WORLD/WORLD 2


MERGED WORLD/WORLD 3

WORLD 1 - JACHOL CAVE
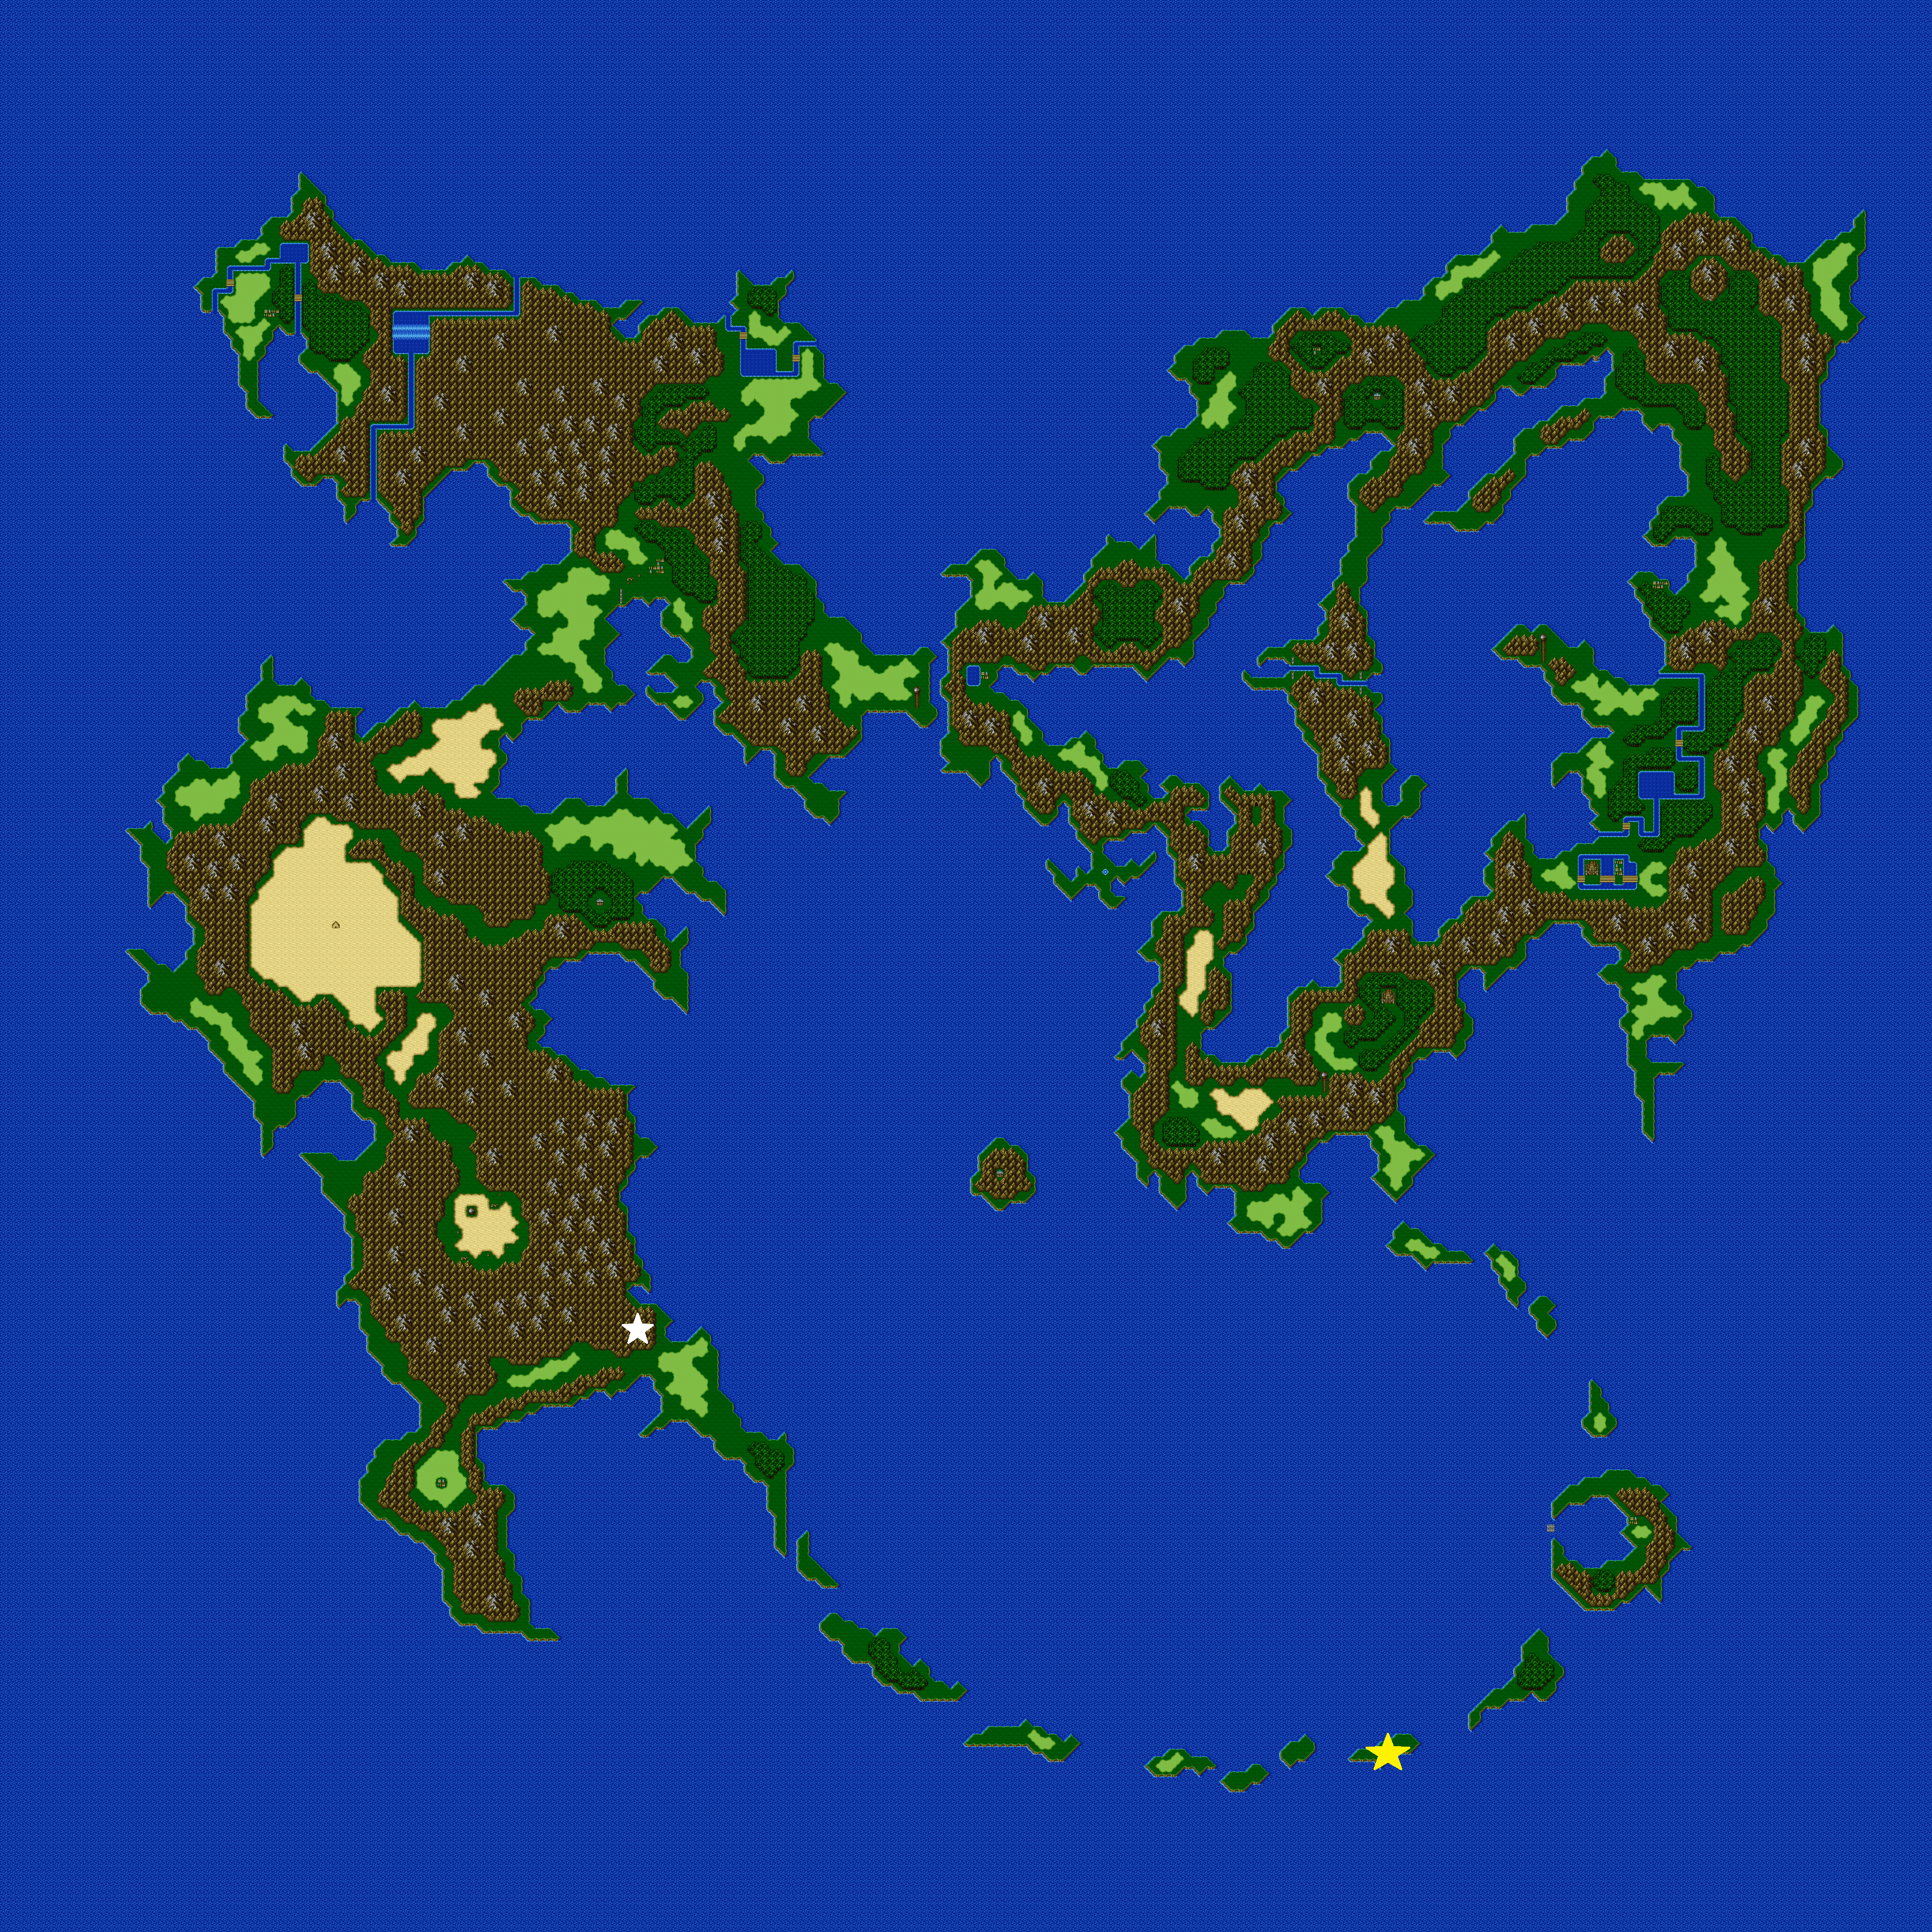
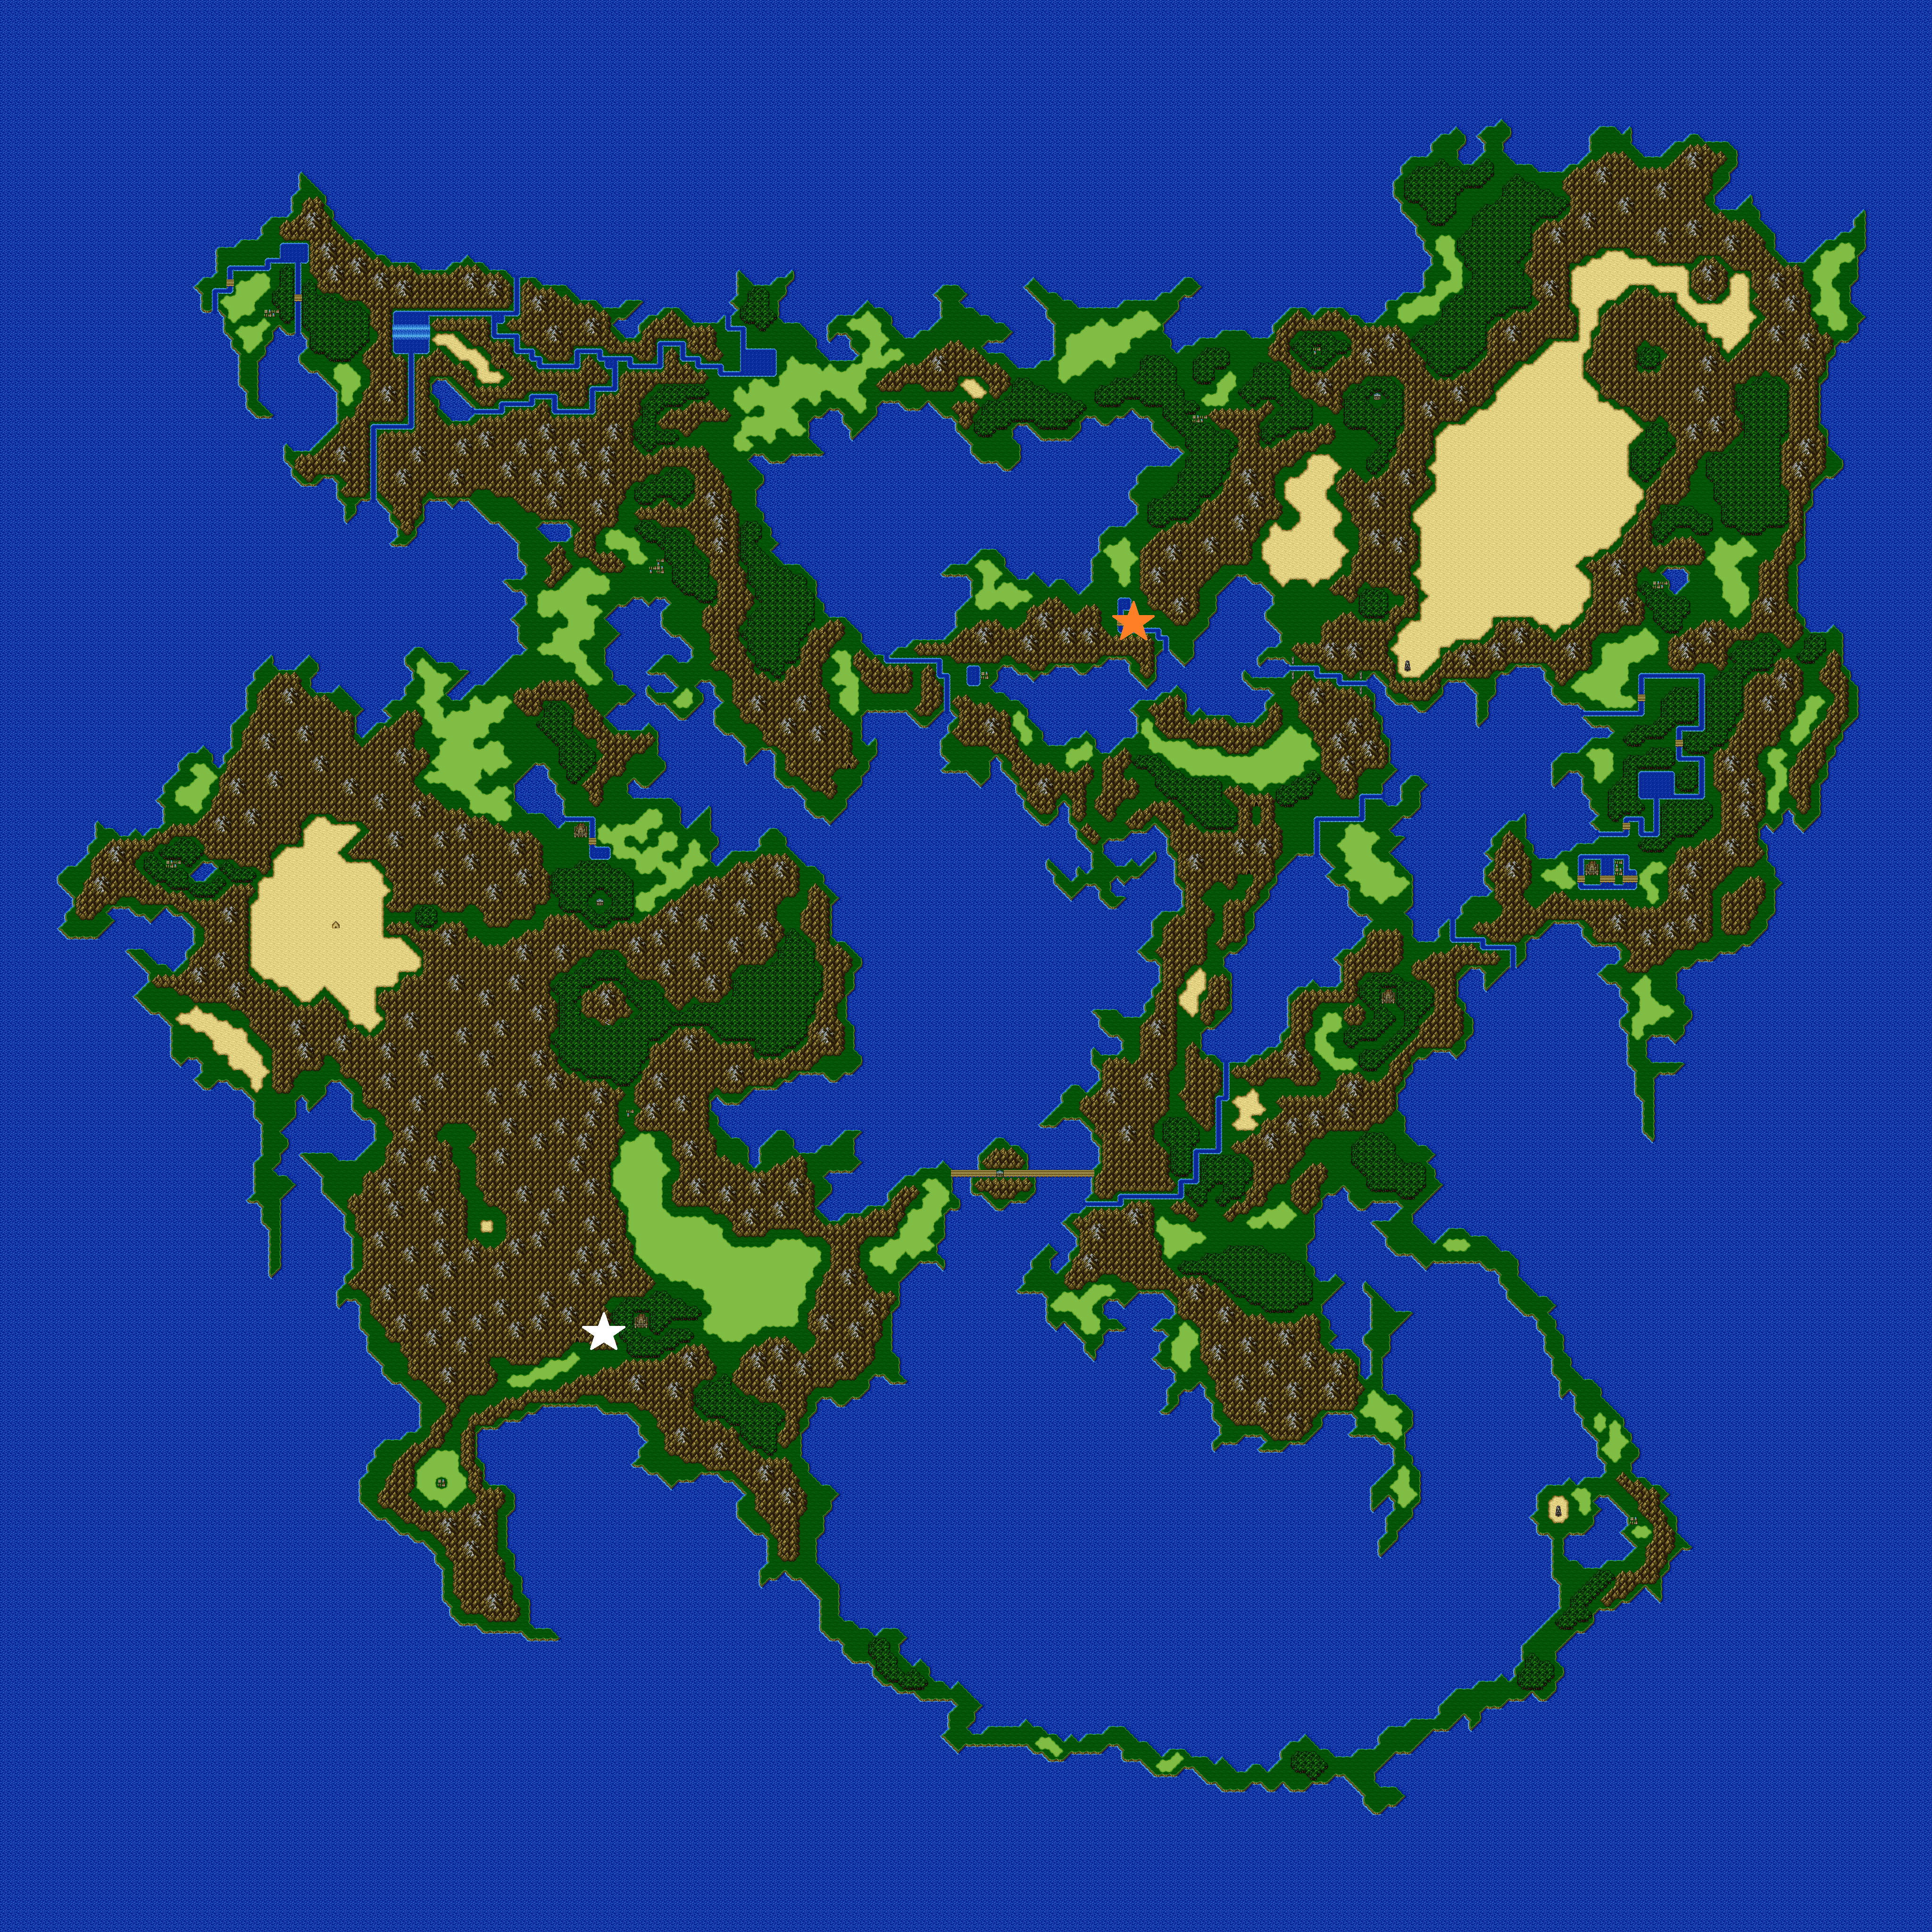
This location is indicated by the WHITE star on the World 1 map and is located just west of the WHITE star on the Merged World/World 3 map.

REWARDS: 5 ABP, 100 Gil, 300 XP

GRIND RATING - D

This is, without a doubt, the worst of these grinding spots, but it gets the job done, and is the earliest available. This location is accessible once you have obtained use of the Fire-Powered Ship, and it is the best early-game spot. This guide will only be covering farming on World 1, because there's a far better spot right next-door in the Merged World.

The cave itself has two entrances. One is nestled inside of a closed-off mountain path, and the only way in is with the airship (and it is the one marked on the map) This entrance disappears once you reach the Merged World. The other entrance is NOT marked on the map ( :-( I missed it ) but is located just southwest of the white star.

The cave itself is quite a challenge for the early part of the game, as there is a valuable object hidden inside (Blitz Whip), and is meant to be tackled once you've made it to the Merged World, as that second entrance is actually replaced with an exit that leads directly into Bal Castle's basement (you go through it to get Odin).

In this cave, you'll find a familiar face from the early game. This little guy, the Nutkin.


Isn't he cuuuuuuute? He's also pathetic. Kick his [HINQUARTERS] if you fight him. The problem, however, is his nasty cousin, the Skull Eater.


THIS. THIS MOTHER[FLUMMERY] RIGHT HERE, IS THE ABSOLUTE ♥♥♥♥♥♥♥ WORST. THIS HELLSPAWN IS THE KIND OF BEING WHO WILL KICK PUPPIES FOR NO DISCERNABLE REASON, IT IS THE KIND OF BEING WHO GIVES CHILDREN UNDERWEAR FOR CHRISTMAS, AND URINATES ON THE GRAVE OF A FALLEN SOLDIER, JUST BECAUSE IT CAN.

"But Rytex, he only has 1hp" you may be saying. "How can he be so bad?"

The answer is his Evasion, Defense, Magic Defense, and Magic Evasion stats. ALL OF WHICH ARE 90. This means that absolutely nothing you throw at this thing in this part of the game is gonna hit it, and even if it does, it's gonna do a whopping 0 damage.

It can, and will, Insta-KO your party members just because it feels like it. Its Incisor attack is capable of leveling entire third-world countries. This thing is a late-game enemy stuck in an early-game cave, and it can go die in a fire. Except it won't, because the fire literally cannot touch it.

So how do we kill this thing and take its ABP? Easy. We spam techniques that pierce defense and have a high hit chance. Alternatively, we wait till it gets bored toying with us and finds some other butterflies to pull the wings off of.

PREPARATION
  • Two party members need to have access to the !Gaia/!Earth ability.
  • Alternatively, all party members with the Ninja's !Image ability.
  • White Magic "Raise" and/or LOTS of Phoenix Downs (can be bought at Jachol Village to the south).
  • OPTIONAL: The Ranger's "Summon Animals" can be handy if you've visited Chocobo Forest.
  • OPTIONAL: The Ninja's !Throw is super-useful if you have enough objects to toss at this spawn of Satan, and throwable objects can be purchased from Lix if you have convenient access via airship or similar.

STRATEGY
  • SPAM !GAIA/!EARTH WHILE YOU CAN! If one spammer goes down, have the other keep casting.
  • If using the !Image method, spam it as well until the Skull Eater eventually flees.
  • Don't cure, just Raise/Phoenix Down the dead party members.
  • If using "Summon Animals" or "!Throw", make sure their weight is low and agility high, so that way they can go first.
  • Rest and revive at Jachol Inn as needed. Also, purchase stuff to throw if needed. Ninja scrolls (like the Thunder Scroll) can be purchased from Lix for only 200 gil, while Shuriken cost 2,500 each.

So how many battles against the Skull Eater does it take to level up each class at this location?

JOB CLASS
BATTLES TO MAX ABP
Bard
35
Beastmaster
92
Berserker
100
Black Mage
136
Blue Mage
70
Chemist
126
Dancer
80
Dragoon
120 (SNES/GBA/PS) 112 (PC/iOS)
Geomancer
92
Knight
138
Monk
140
Mystic Knight
136
Ninja
138
Ranger
120
Red Mage
232
Samurai
164
Summoner
150
Thief
127
Time Mage
106
White Mage
116

Bear in mind, the table above ONLY contains the job classes available on World 1, because there are better places to grind when we can revisit later. For that matter, once you can reach the second place, which is not long after getting the ship that got you this far, you can make it to the second, far better spot.
WORLD 1 - PROTOTYPE ISLAND
This location is marked by the YELLOW star on the World 1 Map. This grinding location is NOT available in the Merged World.

REWARDS - 5 ABP, 0 Gil, 2,000 XP

GRIND RATING - C

Prototype Island may not offer as many ABP as its sister spot in Jachol, but it's far more reliable, and is an excellent way to grind for XP as well as ABP on World 1. In addition to these rewards, you also gain a Dark Matter, which the Chemist can make many useful things with.

You are looking for these bad boys, which are a 100% encounter on that island.


Now, some of you may be saying "Hey, that's the Omega Weapon!" And you're right. It's the exact same sprite. Prototypes must have been an early version of it or something. Maybe the Lufenians from FF1 dumped all their prototypes here before they dumped the Omega Weapon into the Rift, and the Omega Mk. XII into Ivalice. Who knows. Dissidia 012's plot is confusing.

They hit hard, their defense and Magic Defense are 100, but their evasion are 0. So how do we kill them? It'd be easier to kill Skull Eaters to death than these dudes, if we were just attacking them.

But we're not. We're gonna do something far more diabolical. We're gonna make it commit sudoku seppuku suicide.

PREPARATION
  • One or more party members with !Control
  • Plenty of healing
  • OPTIONAL: A party member or two with !Learning (This guy has three Blue Magics to learn).

STRATEGY
  • Tank its attacks, heal as necessary.
  • Have your controllers try to gain control over it. Once it does you win.
  • OPTIONAL: Have it cast Blaster and/or Missile on your !Learning party member so they learn the blue magic. Heal them as needed.
  • Have it cast Self-Destruct. As a Blue Magic spell, this normally does non-elemental damage to a random enemy, but one commenter has pointed out that it does not seem to be targeting his own party members, so be wary.

So how many battles against the Prototype does it take to level up each class at this location? More than the Skull Eater, but potentially less time.

JOB CLASS
BATTLES TO MAX ABP
Bard
44
Beastmaster
115
Berserker
125
Black Mage
170
Blue Mage
88
Chemist
158
Dancer
100
Dragoon
150 (SNES/GBA/PS) 140 (PC/iOS)
Geomancer
115
Knight
173
Monk
175
Mystic Knight
170
Ninja
173
Ranger
150
Red Mage
290
Samurai
205
Summoner
188
Thief
159
Time Mage
133
White Mage
145

Again, only the job classes found on World 1 are accounted for here, but this time, it's because you can't possibly have access to the Merged World classes unless you're cheating, and if that's the case, why are you grinding like this? Just max your levels and be done.
IMPORTANT NOTE - BEFORE LEAVING WORLD 1
Before you hop on that meteor and go to Galuf's World once Exdeath has been revived, you need to make sure you have a certain Blue Magic, which will make one of these grinding spots a LOOOOT easier.

This is how to get Level 5 Death if you don't already have it.

First thing's first, grind up till ONE character has a level divisible by 5 (it ends in a 0 or a 5 for the mathematically-challenged). Set him as a Blue Mage or give him !Learning.

Now, head back to the Library of the Ancients. Make sure you have plenty of healing and offense on your side. Fight the book on the roof or the books in the basement (and be very stingy with your own damage) until you come across this guy.


This is "Page 64", and he knows the Level 5 Death Blue Magic spell. Now, once you've found him, you can do one of two things. First is, you can wait. And wait. And wait. He can take some time to cast Level 5 Death, but that's all you're waiting on. Alternatively, you can use !Control on him and make him use it.

Once he does, and he kills your !Learning party member, revive said party member, then kill him.

Congratulations, you now know Level 5 Death.
WORLD 2/MERGED WORLD - SEALED CASTLE
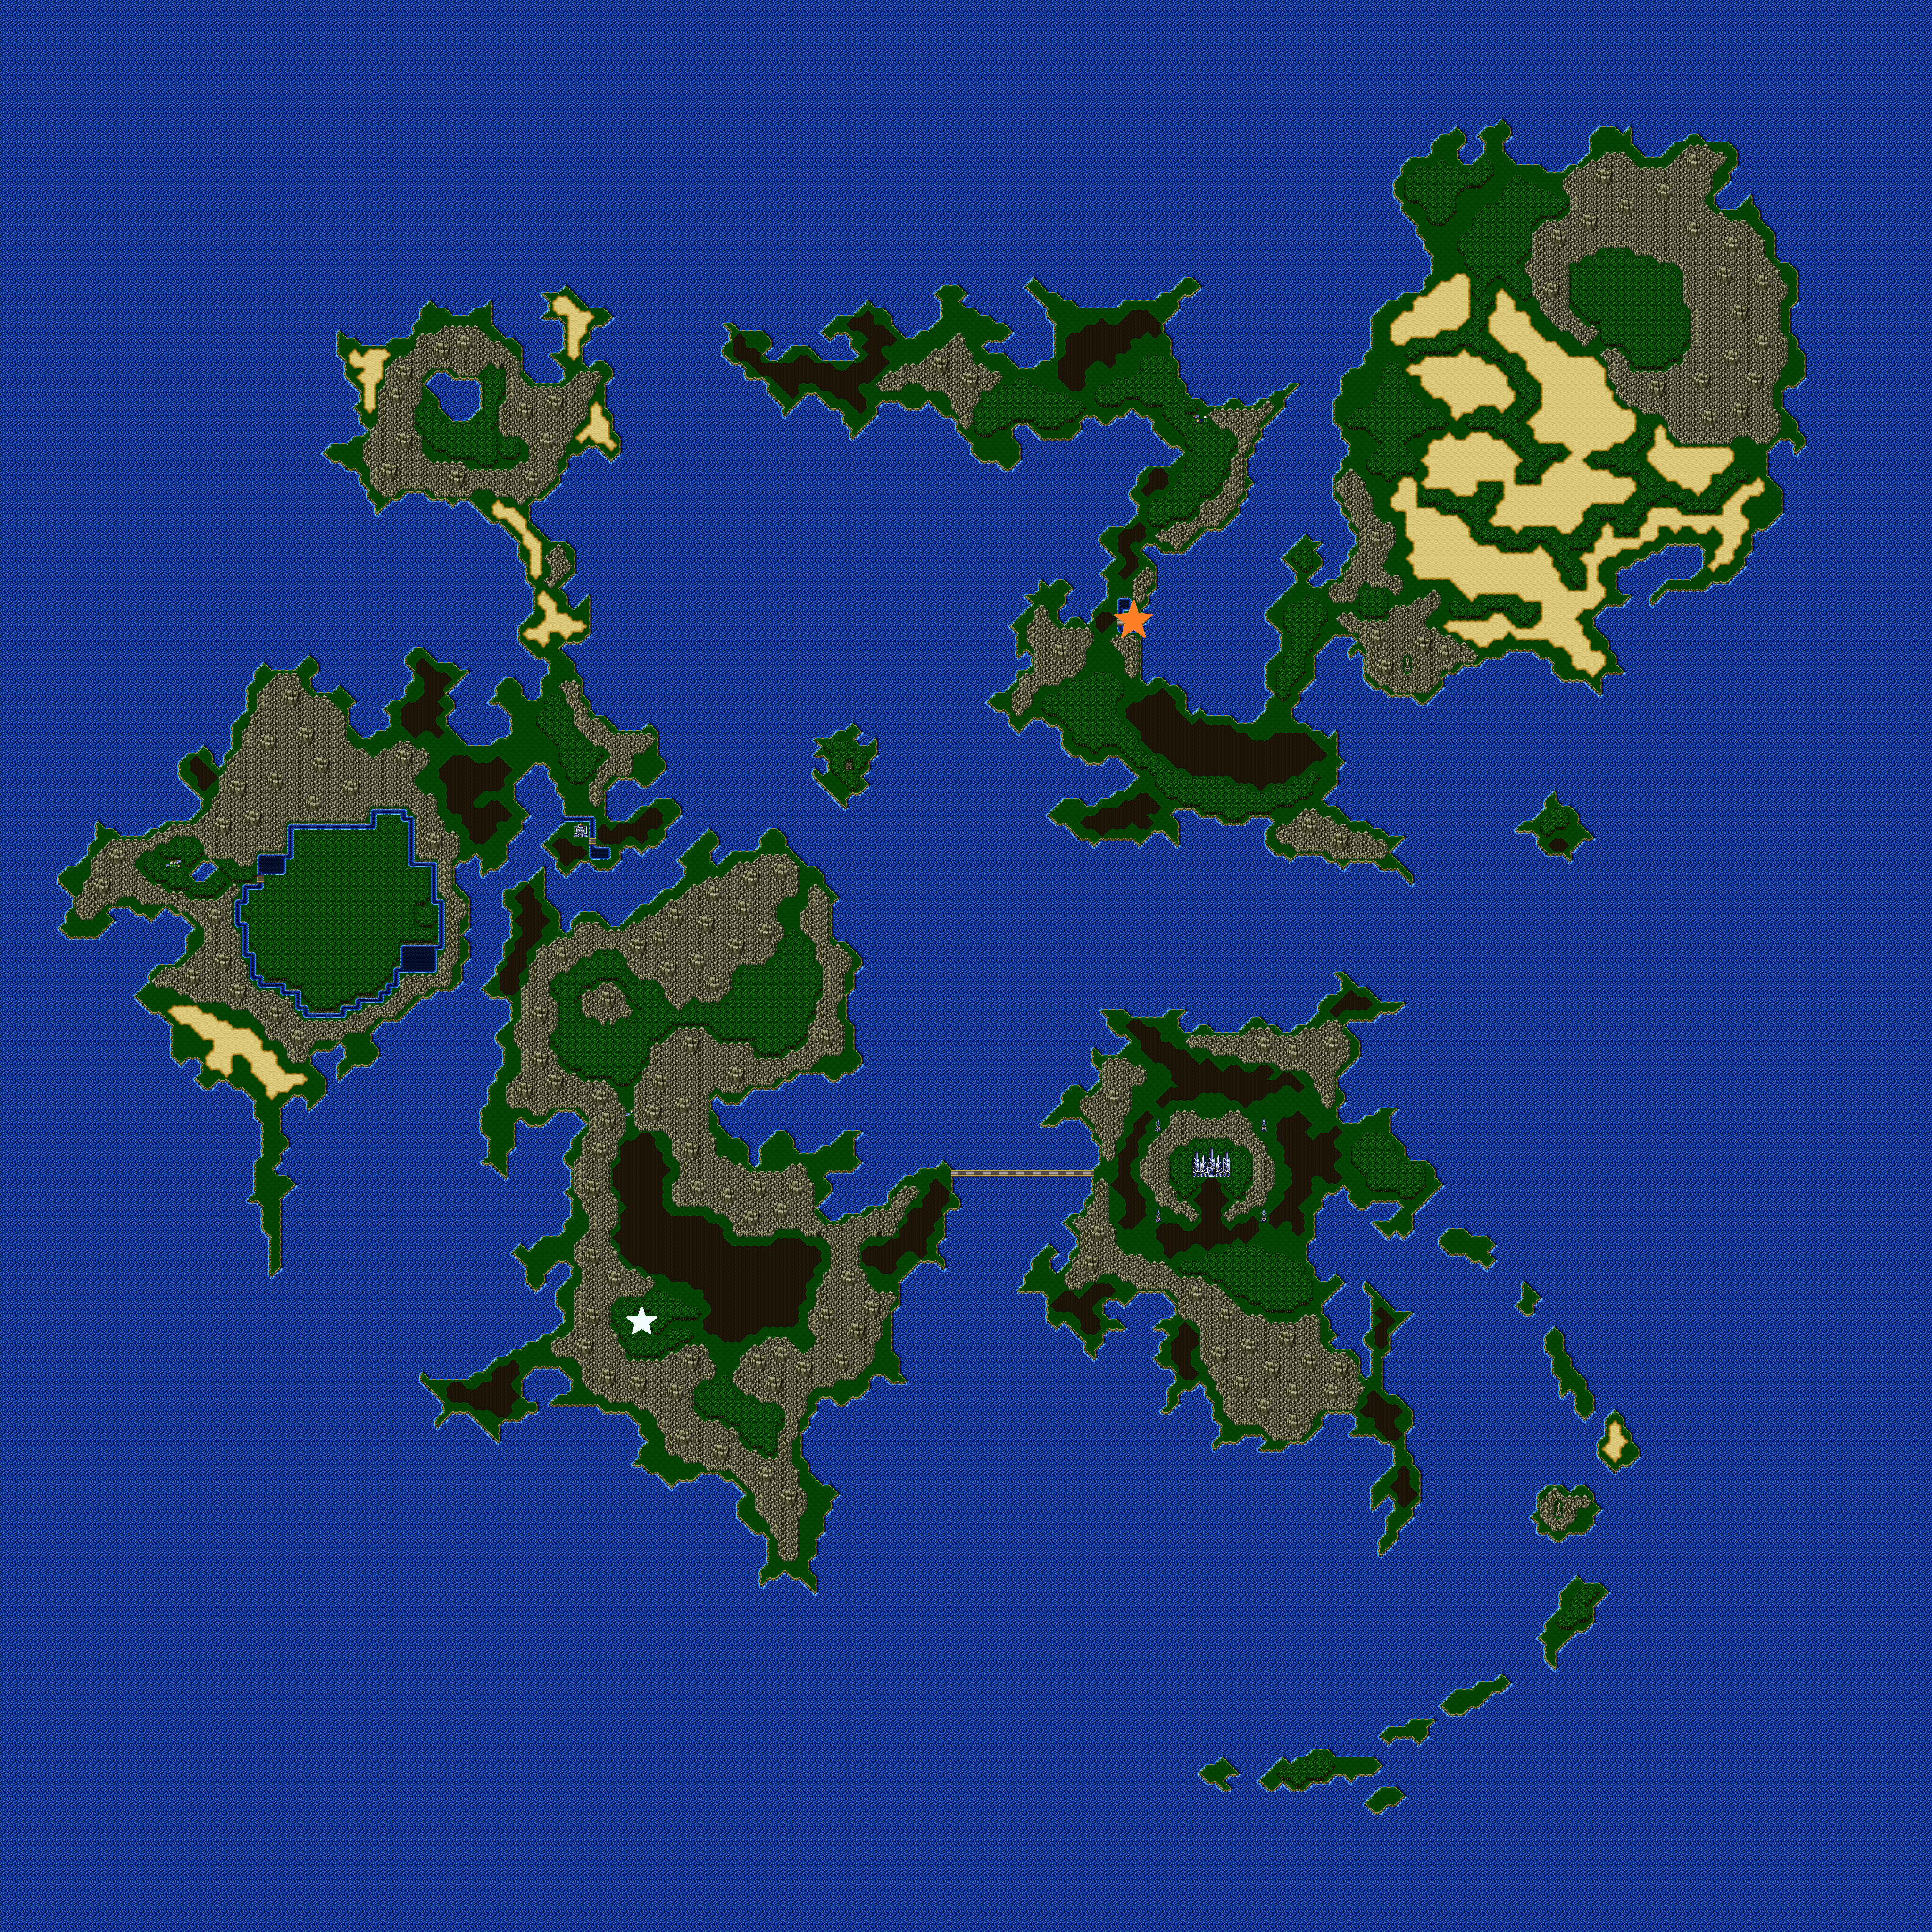
This location is indicated by the ORANGE star on the World 2 map and is located by the ORANGE star on the Merged World/World 3 map.

REWARDS: 5 ABP, 1000 Gil, 10,000 XP

GRIND RATING - C

This one isn't too bad, but it's located not long before the best spot in the game (in all non-US Advance translations, anyway) can be accessed

The Sealed Castle is located just south of the town of Regole, which is the first town you stumble across in World 2. You will be here a lot more in the Merged World, though, as you start unlocking the Twelve Legendary Weapons (They are weapons. They are legendary. There are even twelve of them, believe it or not.) You will find these beasties in the lobby of the castle:


This is a Shield Dragon. It... is not fun to fight. It has 19,999 HP, though its Defense and Evasion are both low, as are is Magic Defense and Magic Evasion. Its attacks hit hard, however, so be careful. On top of all of that, it likes to flee before we kill it.

So here's how we take it down.

PREPARATION
  • One, maybe two party members need !Control
  • Bring along plenty of healing.

STRATEGY
  • Spam !Control until you have it. Now, DO NOT hit it with a party member, otherwie you have to re-!Control it all over again.
  • Have it spam Blaze on itself. It will hit for 4,999 damage.
  • After Blaze-ing it four times, you can either hit it yourself or have it attack itself again. Either way, it will go down.
  • Rest and revive at Regole Inn as needed.

This takes just as long as the Skull Eaters do.

JOB CLASS
BATTLES TO MAX ABP
Bard
35
Beastmaster
92
Berserker
100
Black Mage
136
Blue Mage
70
Chemist
126
Dancer
80
Dragoon
120 (SNES/GBA/PS) 112 (PC/iOS)
Geomancer
92
Knight
138
Monk
140
Mystic Knight
136
Ninja
138
Ranger
120
Red Mage
232
Samurai
164
Summoner
150
Thief
127
Time Mage
106
White Mage
116

Once again, only the World 1 job classes are being considered here because there's a far-better place right around the corner.
WORLD 2/MERGED WORLD - BAL CASTLE BASEMENT
This location is marked by the WHITE star on the World 2 Map, and is just east of the WHITE star in the Merged World map.

REWARDS - 4/8 ABP, 507 Gil per monster, 100 XP per monster

GRIND RATING - B

For non-Advance (US) players, this is almost the best we're gonna get for most of the game. It's still not all that great, but it's the best we've got until we're a good way into the Merged World. Bal Castle, home of Galuf and Krile Baldesion, has a lot of sculptures that live in the basement and attack people who come down there. So we're gonna go and wreck art for fun and profit.

In the basement, you will always encounter these guys:


They are called Objet d'Arts, and will always occur in formations of 2 or 5. Their HP is mediocre and their defense is laughable, but they can still deal upwards of 1,000 damage and cast Break on a party member to petrify them.

They are quite dangerous. So how do we kill them? Easily, actually. Because you see, they have two glaring weaknesses.

1) They are Stone-type enemies, meaning they are susceptible to Gold Needle spamming. this method is slow, but it gets the job done.
2) They are level 45, meaning they are susceptible to Level 5 Death. This method is faster, but is more MP intensive.

If you encounter the 2-stack, you get 4 ABP. If you encounter the 5-stack, you get 8 ABP. Other than that, the XP and Gil multiply based on how many you fight. That being said, this means the two-stack is technically the more efficient way, especially if using Gold Needles, but let's be real, we want to get this grind over with.

So let's get set up and go ruin some art!


PREPARATION
  • Either a lot of Gold Needles (which can be bought at the Bal Castle Items store) OR
  • A party member with !Blue Magic and Level 5 Death (see the important note; if on the MErged World, you can visit the library and obtain it there).

STRATEGY
  • Cast Level 5 Death. Everything dies. Enjoy the ABP, XP, and Gil.
  • Alternatively, use the Gold Needles on the OdAs. Everything dies. Enjoy the ABP, XP, and Gil.

So how licks does it take to get the Tootsie-Roll center of a Tootsie Pop?

JOB CLASS
BATTLES TO MAX ABP
Bard
22-44
Beastmaster
58-115
Berserker
63-125
Black Mage
85-170
Blue Mage
44-88
Cannoneer
63-125
Chemist
79-158
Dancer
50-100
Dragoon
75-150 (SNES/GBA/PS) 70-140 (PC/iOS)
Geomancer
58-115
Gladiator
135-270
Knight
87-173
Mime
125-250
Monk
88-175
Mystic Knight
85-170
Necromancer
63-125
Ninja
87-173
Oracle
65-130
Ranger
75-150
Red Mage
145-290
Samurai
103-205
Summoner
94-188
Thief
80-159
Time Mage
67-133
White Mage
73-145

All job classes listed here, due to it being the best spot in the Merged World. If not playing the US version of the Advance translation, this is almost as good as it gets. It still sucks, but it sucks less, and up until you're capable of taking on some decently-tough enemies on the ocean, it's as good as you'll be able to deal with for most of the Merged World. If you ARE playing the US version of the Advance translation, however, we've got a biiiig one to go.
MERGED WORLD - GEL FISH AND VILIAS
These encounters appear in the bottom-left water encounter cell (see the map here[www.cavesofnarshe.com]), ONLY in the Merged World.

REWARDS:
Gel Fish - 8 ABP, 0 Gil, 0 XP
Vilia - 25 ABP, 10,000 Gil, 0 ABP


GRIND RATING - A

I was completely unaware of this spot, as most of my experience in the game came from the GBA version, in which there is a better method (detailed in the section below). So, many thanks to Player 2 in the comments for pointing this one out.

There are actually two monsters in this method out of three possible encounters that make this method the best way to grind in non-North American GBA versions of the game.

Monster 1, the Gel Fish. These will always be encountered in groups of 4.


Monster 2, the Vilia. She appears solo every time.


There are three possible encounters in this area. The one not mentioned is the Nix, a Sahagin update with red skin, who can use the Goblin Punch blue magic if you don't have it yet, but otherwise, he's worthless. No ABP, no XP, no Gil. This encounter appears 42% of the time, in groups of 2. Kill then or run and move on.

The Gel Fish encounter appears 35% of the time is also practically toothless as well. Based on the sources I'm seeing, they only have 1,000 HP, and pathetically-low Defense and attack. They're also weak to Lightning but absorb water (naturally), so they shouldn't be difficult to take out at all through normal combat. By controlling them, you can learn the blue magic ????, which deals (Max HP) - (Current HP) damage.

Finally, the Vilia, whose encounter rate is 23%. She is, by far, the most dangerous of these enemies, and is not to be taken lightly. 19,000 HP, 10,000 MP, high strength, decent defense and Magic Defense, as well as some pretty good Evasion and Magic Evasion. Not to mention, she absorbs a whole host of elements, including Earth, Water, Wind, and Holy. Her main threat is that she likes to turn your party members into Frogs or Minis, as she knows the blue magicks Pond Chorus and Liliputian Lyric. However, her magic stat is pretty weak. Preparation is the key to defeating her. For doing so, however, you will get plenty of Gil, plenty of ABP, and if you're lucky, an Angel Ring.

PREPARATION
  • One or two party members need to be on status restore/healing duty and should have anti-Frog armor equipped, such as Ribbons. A White Magic caster with Esuna and your best cure spell is your best bet.
  • The other two party members need to have swords equipped and have Spellblade as their ability.

STRATEGY
  • For Nix, kill and move on.
  • For Gel Fish, maybe some lightning spells if you're pressed for time. Otherwise, kill and move on.
  • Have your Spellblade users equip the Break spell.
  • Once Break is equipped, start regularly attacking until it is petrified and dies (a la the Odin boss).
  • If a Support party member is Mini'ed, don't worry about them, as Mini does not prevent magic use. Just make sure your attackers remain tall.

So, how many battles would it take to master jobs?

JOB CLASS
BATTLES TO MAX ABP (All 25 ABP - All 8 ABP)
Bard
7-22
Beastmaster
19-58
Berserker
20-63
Black Mage
27-85
Blue Mage
14-44
Cannoneer
20-63
Chemist
26-79
Dancer
16-50
Dragoon
24-75 (SNES/GBA/PS) 23-70 (PC/iOS)
Geomancer
19-58
Gladiator
44-135
Knight
28-87
Mime
40-125
Monk
28-88
Mystic Knight
28-85
Necromancer
20-63
Ninja
28-87
Oracle
21-65
Ranger
24-75
Red Mage
35-145
Samurai
33-103
Summoner
30-94
Thief
26-80
Time Mage
22-67
White Mage
24-73

All jobs listed here, due to it being accessible after acquiring all job classes, and being the best spot in any non-North American GBA version of the game.

Now, if you are playing on the North American GBA version of the game, at the time you are able to access these encounters, you will have already gained access to the Mover Method, so your best bet is to level grind and make it to that method, rather than stick around here, as these encounters offer no experience. But for non-GBA players, this is easily the best place to encounter. All encounters are fairly easy, and you get some pretty lucrative rewards, especially if the RNG is favorable with the Vilia encounter and the Angel Ring drop.
FINAL DUNGEON - QUICKSAVE-SPAMMING MOVERS !!!ADVANCE TRANSLATION (US) ONLY!!!
This location is within the Dimensional Rift's final section (the one that looks like crystals, where you fight Gilgamesh, Shinryu, Necrophobe, and Exdeath.

REWARDS - 199 ABP, 50,000 Gil, 0 XP

GRIND RATING - A+

For Advance (US) players, this is THE SINGLE BEST PLACE. There is no better. They do appear in all versions, but the US Advance translation has an odd gimmick with Quicksaving to where if you Quicksave and reenter in the room they spawn in, your second battle post-Quicksave and Reload will ALWAYS be these guys. This gimmick was patched out of later versions, and they'reare back to having a paltry encounter rate. Oh well...

In the final area of the last dungeon, (The Interdimensional Rift), you can encounter a lot of nasty things. Shinryu, for instance, as well as Necrophobe. However, the one we're after looks like this:


This is a Mover. No, it's not a film from Avatar: The Legend of Korra (Zhu Li, do the thing!). These always come in groups of three.

They are also pretty dangerous. 10,000 HP, laughable defense (physical and magical) and zero evasion (physical and magical). However, they have what's called Delta Attack, which petrifies one of your party members. Yeah, we want to avoid that.

Despite this, it's actually fairly simple to take them down, all things considered. And there are a lot of ways to do it. This, however, is the way I prefer to do it.

PREPARATION
  • Defeat Necrophobe to have access to the save point. Also, have a lot of Cottages for HP/MP regain.
  • Have the Bahamut and/or Syldra summons.
  • If one party member has mastered Red Mage, give them !Dualcast and make them a Summoner/give them !Summon. Equip them with the Wizard's Rod for the added elemental bonus.
  • If no party members have mastered Red Mage, give as many party members as possible !Summon, either by making them Summoners or giving them the ability. Equip whoever is going to use Syldra with the Wizard's Rod.
  • Quicksave, reload, kill the first enemy formation, then run around until the battle starts.

STRATEGY
  • If one party member has Dualcast and Summon, dualcast summon Bahamut and/or Syldra. May not be enough to kill them all immediately, but will certainly make the job easier. Repeat the process.
  • If not, summon Bahamut and Syldra (with the right party member) and watch that HP fall. May take two or three total casts.

So how Movers do we need to kill (this only accounts for the Movers, and not you killing the formation beforehand)?

JOB CLASS
BATTLES TO MAX ABP
Bard
1
Beastmaster
3
Berserker
3
Black Mage
4
Blue Mage
2
Cannoneer
3
Chemist
5
Dancer
3
Dragoon
4 (SNES/GBA/PS) 3 (PC/iOS)
Geomancer
3
Gladiator
6
Knight
7
Mime
6
Monk
4
Mystic Knight
4
Necromancer
3
Ninja
4
Oracle
3
Ranger
4
Red Mage
6
Samurai
5
Summoner
4
Thief
4
Time Mage
3
White Mage
3

This place was so good, it was patched out. Shame, it made the grind so much more bearable on the GBA. Ah well, I can always play that if I want to do it again.
SUGGESTED ALTERNATIVE GRINDING SPOTS
A couple of comments have already suggested alternative spots to grind as well. One of them I gave its own spot in the guide, but the others, I'll explain why I didn't give it its own spot.

Enemy I - The Catoblepas.


Catoblepas appears as a random encounter on its own little island, first eccessible when you're off to see Ghido in Galuf's World. It has 5,000 HP and offers 3 ABP for defeating it. If you have a BEastmaster and have a captured Ironback, releasing one instantly wins the fight. The first time you kill one, you get the Catoblepas summon too.

All in all, it doesn't look like a bad setup, right? Well, the thing is, by this point in the game, you have access to Bal Castle, already detailed, where you gain 4ABP or 8ABP per encounter, making it a much better spot, especially since Objet d'Arts are a guaranteed encounter, as opposed to the random encounter that is the Catoblepas. If you want to use this method, feel free, but know that there are more efficient methods at the time you can use it.


Enemy II - Unknown

There are actually five different types of Unknown (which is why there will be no pictures of them), all of which appear exclusively in the Great Sea Trench, en route to the Dwarves' home and the Fire Tablet. Two varieties of pink blob, a slime monster, a worm, and some skeletons hanging from the ceiling. All of them are undead, meaning they are especially susceptible to a Bard's Requiem or a Mystic Knight using the Holy Sword Spellblade over and over. If done in Basement 6 of the Great Sea Trench, the Dwarves are just one level down for easy recovery.

They give pretty decent XP and Gil, and according to some comments, they give out somewhere between 4-6 ABP per encounter. For general grinding, this seems like a pretty good spot. Now why doesn't this warrant its own section? Because of Bal Castle and the Gel Fish and Vilias.

The Objet d'Arts at Bal Castle are much quicker to kill with Level 5 death, give out plenty of gil for recovery (either at the Inn or by buying Cottages at the Item Shop), and give out either 4 or 8, meaning you average 6 ABP per encounter. Gel Fish and Vilias are inter-spaced with a worthless enemy, but give out higher ABP at the cost of being harder to kill than Objet d'Arts.

Heck, even if you're grinding so you can go into the Three Stooges battle over the Fire Tablet, don't. The Three Stooges are easy to kill with the Magic Lamp. Just burn two of its summon charges, because the third is a guaranteed Zantetsuken, which will insta-kill all three of them. You can even recharge the Lamp nearby once you're done.

Use this place if you like, it does seem to be great for general grinding before jumping into the Interdimensional Rift, but for focused ABP grinding, in my humble opinion, there are just better, more convenient places.
CHANGELOG
--14 June 2021

  • Included bit about Unknown in "Suggested Alternative Grinding Spots"
  • Including information on easy access to !Throw objects for Skull Eaters.

--7 October 2020

  • Correcting some information under Prototype
  • Including two suggested grinding spots as minor messages, one as an entirely new section
  • Including alternative method for battling Skull Eaters
CLOSING - Credits
Raw maps taken from FantasyAnime.Com, though modified by me.

Job information taken from GameFAQs.

Images of enemies taken from the FFWiki.

Encounter strategies taken from the Nintendo of America Strategy Guide for Final Fantasy V Advance.

If there's anything I missed, leave a comment. I promise I'll get back to it (eventually).

I hope you find this guide useful, and hope that it helps you to make the grind far less of a chore. Have a good day, and happy grinding!
30 Comments
Diacreus Ominus 1 Nov, 2024 @ 10:16pm 
In Merged World, there is a far easier and more efficient farm for both ABP and Gil, and it's even good for those who want to do a low level run.

It also exists on Pixel Remaster.

Between Crescent Island and the Tower in the sand is an enclosed body of water.

You fight Sea Devils and Rukh, whom not only have stealable rares (Murasame > Rukh/Sea Devil < Defender), but Sea Devil groups give 6 ABP per battle in a group of 3, Rukh gives 8 ABP by itself, and Rukh with 2 Sea Devils gives 13 ABP.

Especially fast if you have Thundaga and have mastered Rapid Fire on at least 1 member and equip them with a Judgement Staff as a mage class that supports staff weapons.

Fast enough that you can abuse Auto Battle in Pixel Remaster for top notch results.
Cataclysmia 10 Sep, 2024 @ 6:01pm 
In the very first part of the game after the wind crystal when you have a boat, there's a strip of land to the North of the sluice gate you can land on. The only encounter here is sets of, I don't know, boars? Pretty sure they're called Bandersnatch. They drop 3 AP a piece and come in sets of 2 or 3. At the earliest point you can reach them, they can one-shot most of your party, but you should also be able to one-shot them with barefist monks.
FafnirChaos 9 Sep, 2024 @ 5:46pm 
I use the underwater cave where you fight druids and Iron backs - for 4-5 ABP.

Titan spam kills them in 1-2 hits, the submarine can be used to fully heal, and they drop tents.
Endarire 16 Aug, 2024 @ 9:14pm 
Skull Eaters are easy prey with a Ranger's !Aim or !X-Fight and if you deal enough damage.
no1schmo 7 Aug, 2024 @ 10:39pm 
I honestly just use Jachol Cave because it's so easy; go down one, click Gaia, with every character, in every fight. Good, mindless grinding, with zero strategy. I don't revive the dead, I just finish the fight. He'll run before he kills the whole party almost guaranteed, even if you have the worst luck. Later on, you can swap out Gaia for Rapid Fire or Open Fire or Throw or whatever. Skull Eaters also drop Elixers, albeit rarely, so that's nice.

However, someone shared something about the final Rift area; even if you don't find movers often, that area is good to grind in, and their strategy was Z-whatever (Gil Toss). They claimed to actually gain more than they lost, so they could just spam it every fight, gaining EXP and ABP, and sometimes finding some Movers.
tbone305 13 Apr, 2024 @ 6:50pm 
I have played this game for years starting with the SNES version my favorite place to level up in World 1 is the tiny island right below crescent island you will run into 5 Black Flames they are super easy wipe them out with either blue magic spell Aqua Rake or a Water Skill you will get 1425 EXP and 3 ABP
chocotaku 7 Sep, 2023 @ 3:40pm 
World 1 best spot: Dark Spark island

Instakill with ninja scroll for 3 ABP, no downtime, can go through an entire stack of all 3 types of ninja scrolls before needing to go to an inn. Skull Eater and Prototype deal too much damage, can 1-shot you, and require tons of downtime healing up.

World 2 and beyond: nothing beats Castle Bal's average of 16 ABP/min. Shield Dragon is especially bad by comparison and should be the lowest rank on this list. It takes 4 turns to kill!

Nothing is as fast as Castle Bal for non-GBA folks. The ABP numbers on later mobs look crazy big, but they can't be killed within 1 turn, they aren't guaranteed fights, they do annoying things that require healing downtime, you can't spam 100s battles before needing a full rest, and an inn isn't 10 a second walk away like Castle Bal's.
Astra 14 Jul, 2023 @ 10:31pm 
The Bal Castle enemies are also weak to lightning, so breaking rods, spamming AoE spells, or Throwing lightning scrolls does the trick, if a touch slower. Faster than needling unless you're really low level, and important to keep in mind if, e.g. you rolled Ninja and a high-ABP-requirement job in the Four Job Fiesta.
rubydragon20 7 May, 2023 @ 3:20pm 
You did mention any of the mobs in the Istory falls. Primarily the Aquas which spawn in groups of 3 and give 6 abp every time. They also give gill and exp but I don't remember how much for both.
thurstonstock 26 Apr, 2023 @ 2:23pm 
In world 1 the dhorme chimera has 1,000 hp and nets 3 abp per battle throw on the monks bare handed 2 hit and you get an easy first world grind spot if not a little tent intensive with the critical hit doing around 700 damage