FINAL FANTASY VI

FINAL FANTASY VI

Not enough ratings
Low Level Game (100% Bestiary) Guide
By 3zhang
Guide for low level game with 100% bestiary. Also covers information to build perfect stats characters. Written based on Steam/Mobile version of Final Fantasy VI.
   
Award
Favorite
Favorited
Unfavorite
Introduction
1. What is a Low-Level Game? Why do you want to play a LLG?
Generally speaking, a low-level game is to keep your party’s average level as low as possible in your gameplay. There are various reasons to play a LLG. Probably the most attractive one is to build perfect stats characters. As everyone knows, the only way to boost a character's raw stats in FF:VI is to equip him with stat-boosting magicites upon leveling up. And to achieve this, you have to keep your characters' levels as low as possible before you get certain magicites. Moreover, when a character is recruited, his initial level is determined by your current party's average level. If you want to maximize your magicite boost, you definitely want new characters to be recruited at low levels. So, building perfect stats characters, or a perfect stats game (PSG), is closely related to a LLG, especially in WoB.

Another reason is for personal challenge. FF:VI has a deep and rich combat system. However, this system is overshadowed by overleveled characters in the late game. When characters are above 40~50, they can easily deal 9999 damage in one hit, making the late-game battles a bit meaningless. But if your characters are on low levels, you still need to take advantage of the combat system and try your best to beat the enemies. This makes the game a lot more fun. For a strict LLG, the ultimate goal is to beat the game with the lowest possible party's average level with all characters recruited. Another goal in this guide is to collect all the bestiary entries, which satisfies a completionist like me and makes a LLG more interesting and challenging.

2. Why do you write this guide?
Although there are already a couple of LLG guides for FF:VI, there's no specific one for Steam/Android/IOS version of this game. You may run into trouble in the Steam version if you follow a LLG guide written for GBA/SNES. Also, other guides are not perfect in my opinion. That's why I decided to write my own.

3. Who is this guide written for?
  • If you want to play a LLG (with or without 100% bestiary, rages, dances and lores collected), this guide is perfectly suitable for you.
  • If you want to build perfect stats characters, this guide covers all the steps you need to maximize your characters' magicite boosts.
  • Unfortunately, this guide does not cover the steps to unlock all enemy formations.
  • This guide is not written for LLNMG. Nor does it follow its restrictions. But you can still learn the level management method from this guide.

4. Is this guide also suitable for other versions of FFVI?
  • For mobile (Android/iOS) versions, yes.
  • For GBA version, mostly suitable. I recommend you to read Lufia_Maxim’s guide[gamefaqs.gamespot.com] at the same time. Also, take care of version changes, especially the glitches.
  • For SNES version, only partially suitable. Some game mechanisms are totally different between SNES and Steam versions.

Note: This guide is still in progress. Any feedback is welcome here.
Common Knowledge and Tips (Part 1)
1. Most of the time you should put your characters on the back row. You receive half the damage done by melee attack when you are on back row. Your melee attack’s damage is also halved. But that’s OK since most of the time, instead of using normal attack, you want to use magic, blitz, throw, etc. which are not affected by row.

2. You should try to run away from every battle. You can kill part of the enemies though. This still grants you 0 exp. You can kill one side of the enemies to run if you get surrounded. If you encounter an enemy formation in which some enemies are inescapable, you can kill those enemies and then run. Most of the time you want to equip your characters with weapon/armor boosting defense, evasion and speed to escape safely. This is quite different from playing the game normally.

3. Running away means that you cannot get the enemies’ bestiary. But you will eventually get it when you beat them on the Veldt. Since you can’t get the bestiary immediately, you need to make sure you meet every enemy at least once before you move on to the next place. I will definitely check the bestiary guide before I enter a dungeon so that I know what I should meet there.

4. After a battle, the total experience points are evenly split between each living characters regardless of their levels. The exp gain displayed after battle represents the exp points each character gained after split.

5. Most boss fights don’t yield exp. That’s what makes LLG perfectly suitable for FFVI. There are exceptions though, like the Guard Leader.

6. Characters’ average level (rounded down) is calculated based on all the characters you currently have (characters in your party). Most of the time it means the characters in your current team plus the characters on the airship. There‘s no gold standard though. When you recruit Shadow in Sabin’s scenario, the average level is calculated based on all the characters (Locke, Terra and Edgar). After the Narsh battle, Terra is excluded from the party. After Magitek Facility, Celes is excluded from the party. At the beginning of WoR, the party only has Celes. Note that when you leap Gau at the Veldt, he is excluded from the party.

7. A character’s level is averaged (set to the level of the party’s average level) when he or she is recruited. If the character’s level is higher than the party’s average level, then the character’s level remains unchanged. The character will lose his exp on that level. For example, if Edgar has 1000 exp and the party’s average level is 6, after level averaging his exp will decrease to 672. When a character is recruited at the first time, his or her level is determined by the party’s average level plus/minus a character dependent value (see section 2.4 of Algorithms FAQ for details). There are some moments in the game that some characters’ levels are averaged to catch up with others. These include:
  • After the Magitek Facility event, everyone’s level except those who escaped from Magitek Facility is averaged.
  • After the Imperial Banquet, everyone’s level is averaged.
  • After the event of Thamasa, characters’ levels are averaged based on the party average level of Locke, Terra, Realm, Strago and Mog (if you recruited him already).
  • At the beginning of WoR, Celes’s level is averaged based on the party’s average level when they jumped to the airship.
  • After you get the Falcon, Gau’s level is averaged based on your current party members.

8. No matter what you are doing (a LLG with or without 100% bestiary/formation or a perfect stats run), you should make sure that your main characters don’t get any exp before the Narshe battle. Check your characters’ statuses regularly in case they gain exp accidentally.

9. Sometimes you have to take some exp. Generally, these include:
  • The mine cart ride when escaping from the Magitek Facility.
  • Six random battles with Imperial Air Force (IAF) when flying to the Floating Continent.
  • For 100% bestiary, any enemy that gives you exp but does not show up on the Veldt.

10. Set battle speed to 6 when you find it difficult. Battle speed only affects enemy. The larger the value is, the slower the enemies attack.
Common Knowledge and Tips (Part 2)
11. Different character have different escape success rate. This, combined with a character's speed, determined how fast the character can run away from enemies. See Algorithms FAQ (SNES) by Terii Senshi[gamefaqs.gamespot.com] for details.

12. Character's physical evasion is probably the most important stat you need to consider in early game. Since almost all enemies have hit rates equal to 100, boosting physical evasion is always beneficial. However, for magic evasion, you'd better only consider it in late game. The reason is that most magic abilities have hit rates ranging from 120 to 150. Besides, most characters have poor initial magic evasions. These lead to high thresholds for a character’s magic evasion to even have an effect. Below is a table listing some examples of WoB enemy abilities and their hit rates. MET1 (magic evasion threshold 1) is the threshold that you need to surpass to make magic blocking actually work. In other words, if your character’s magic evasion is lower than MET1, he or she will always get hit by this ability. MET2 is the threshold you need to surpass to have at least 50% blocking rate of this ability.
Ability
Hit Rate
MET1
MET2
Fire
150
43
85
Giga Volt
130
30
78
Blaze
120
22
74
Sand Storm
100
0
64
Meteor (Meteo)
80
0
47
You can see that for most abilities (with hit rates around 120~150) your characters need to have around 70~80 magic evasions to attain a decent blocking rate. But such high magic evasion is nearly impossible to reach in WoB. So, you’d better not bother with magic evasion until late game. In early game, you should use other methods to avoid magic damage, such as Runic and Reflect status.

13. Terms used in this guide for save/load operations:
  • Save/Quicksave: Use Save/Quicksave function in the menu.
  • Load:Load a save (most of the time the latest one).
  • Continue:Load a quicksave.
  • Quit:Terminate the game process (simply close the window) without save or quicksave.
I will use these terms frequently in this Guide. Make sure you know their meanings.

14. The game quicksaves automatically:
  • After you quit a battle. Note that even if you see the exp-gain or level-gain message, you are still in the battle and the game has not been quicksaved. You can still quit and reload your last quicksave to undo what you have done. But there is one exception. If this is your first battle after you continue (load) a quicksave, the game will not be quicksaved after this battle (probably a glitch).
  • After you change from one place to another.
  • After you switch team when controlling multiple teams.

15. Be careful, saving at a save point will automatically delete your quicksave.

16. You should save regularly. If you use up all the slots, backup your save file manually. On Windows system, it’s under:
  • Your_steam_folder\userdata\your_steam_id\382900\local

17. Other guides you may find helpful:
Prologue and Escape from Narshe
1. First, you want to KO Terra. In your first battle, let her cast fire on herself. You don’t want her to gain any exp.

2. Fight some random encounters in the cave:
  • To make some money until you have ~4000 gils. You won’t have such chance before you reach Returners’ Hideout.
  • To stock some potions for the upcoming fight.
  • To meet all the enemies.

3. Just fight Ymir normally.

4. After you wake up, get an Elixir from the clock in Arvis’ home.

5. After you escape from Arvis’ home, enter the cave. There are two chests containing a Phoenix Down and a Sleeping Bag. You may skip these two items as they become a Guard Bracelet and an Elixir in WoR.

6. Battle of Protecting Terra
Actually, you don’t need to avoid the enemies. Use the moogle team without Locke and Mog to clear up all the normal guards. Just don’t let Locke involve in any fight. You can let Mog fight an enemy to learn Twilight Requiem. His exp gain will not influence anything since he will eventually be averaged to level 11. But that’s purely optional. If you still don’t know what to do, here are the steps:
  • Switch team, move Mog’s team behind Terra.
  • Switch team twice, move Locke’s team to the left of Terra.
  • Switch team twice, move the team without Locke and Mog to the front to block the entrance.
  • Quicksave and continue.
  • Do not switch team before you finish up all the guards because that will automatically override your quicksave. If anything goes wrong, just quit, continue and try again.
  • Keep every moogle’s HP above 50 to survive the Snowstorm. Don’t hesitate to use potions. You will soon be able to steal plenty of them. If anything goes wrong, just quit and continue.
When you’re done, unequip all Mog’s equipment and quicksave. Use Locke’s team to fight the guard leader since he can steal the Mythril Knife from him. Everyone attacks the guard leader except Locke who steals every round. If the guard leader dies before you get the knife, quit and continue. After you deal with the guard leader, KO Locke before you kill the lobos to prevent Locke from gaining exp.

7. Enter the Beginner's Hall and grab all the items. There is a monster-in-a-box in the right room. If you open it, you have to fight a Silver Lobo and gain exp. So definitely avoid it.

8. You may want to steal some potions before you leave for Figaro. Keep encountering enemies outside of Narshe and let Locke steal. You’d better stock 15~20 potions. Use the Beginner's Hall for replenishment.

Exp Status:
  • Terra, Level 3, 96 Exp
  • Locke, Level 5, 400 Exp
  • Avg Level = (3+5)/2 = 4
Figaro Castle, South Figaro Cave and South Figaro
1. Before you enter the castle, steal ~5 antidotes from Sand Rays in the desert.

2. Collect all the items in the castle and buy a Noiseblaster and a Bioblaster for Edgar.

3. Go through all the plots.

4. For the fight with two Magitek Armors, let Edgar use his Noiseblaster ASAP. If you are not lucky and the enemies act first, they may attack and KO Terra with their Magitek Laser. Then you have to use a Phoenix Down on her.

5. Don’t open any chest in South Figaro Cave.

6. Be sure to meet all the enemies in South Figaro Cave. The cave will soon have completely different enemies in Locke's Scenario.

7. You may want to steal some Remedies from the Uroks. When you meet the Urok * 3 formation, let Edger use the Noiseblaster, let Locke steal and let Terra defend. Take advantage of the auto-battle command. You will quickly accumulate a bunch of potions and hopefully a couple of remedies.

8. In South Figaro, you are free to collect all the items. However, pay attention to the Gold Needle, the Potion between weapon shop and armor shop, and the Antidote. They become better items in WoR (Elixir, X-Potion and Tent). Also don’t forget to collect equipment and gils in the rich man’s house. Give Terra the Hermes Sandals. You want her to escape faster.

9. Buy a Star Pendant in the relic shop so that you don’t need Antidote anymore. Buy 2 Gold Needles and 5 Eye Drops in the item store, Have at least 2 Phoenix Down. Upgrade your characters’ shields and body armors. Buy Terra a Great Sword.

10. (Optional) Outside of South Figaro, you will find Belmodars. You can steal a pair of Mythril Claws from them for Sabin. Just use the method I described above for Urok. But since they also have common steal, it may take you a long time before you get the Mythril Claws.

11. Go to Mt. Kolts and enter the first cave. You will find Zaghrem * 2 formation from which you can steal Bandanas. Luckily, they don’t have common steal. You can repeatedly steal from one Zaghrem until you get its Bandana. Sometimes enemies die before you get their Bandanas. Don’t leave the battle. Directly quit and continue. You will then encounter the same Zaghrems again. You need three Bandanas for Locke, Terra and Sabin.

12. Whenever your characters are in low HP, go to Duncan's Cabin for free replenishment.

Exp Status:
Terra, Level 3, 96 Exp
Locke, Level 5, 400 Exp
Edgar, Level 6, 672 Exp
Avg Level = (3+5+6)/3 = 4.67 round down to 4
Mt. Kolts, Returners’ Hideout & Lethe River
1. Now go to the Mt. Kolts. Collect all the chests. If you follow this guide, you will pass this area multiple times. It’s nearly impossible to miss any enemy.

2. Quicksave and continue before you fight Vargas. Edgar is your main damage dealer. In the first few rounds, let Terra defend, let Locke steal the Hi-Potions from the Ipoohs and let Edgar use his Auto Crossbow. After you finish the two Ipoohs, Edger should switch to his Bioblaster to deal more damage per round. Terra and Locke should cure Edgar or themselves since their attacks are not that effective. You should keep everybody’s health above 50 to survive the Gale Cut. Again, don’t hesitate to use potions. If Terra still get KOed, just let her stay KOed. Don’t waste your Phoenix Down. You will soon get to the Returners’ Hideout.

3. Collect all the items in the Returners’ Hideout. Don’t forget the hidden chest containing a White Cape. If you want a Genji Glove, talk to Bannon and refuse him three times. Otherwise, you will get a Gauntlet. Note that there are only three Gauntlets in the game so you probably want Gauntlet for a perfect item collection. But Genji Glove is more useful for the upcoming fights, so I assume you choose the Genji Glove. Then after the plot, go back to the Returners’ Hideout and sleep in the inn.

4. You definitely need to level up Banon. I would suggest raising him to level 10. Thanks to Lufia_Maxim’s guide[gamefaqs.gamespot.com], you can use a trick to level up Bannon with other teammates’ help. Once you kill all the enemies except the last one, let Banon pray. During the animation, let other teammates run away. Then cancel the run action and let Bannon finish the last enemy. In this way, Banon get all the exp while others get 0 exp. Equip Sabin with a pair of Mythril Claws and a Genji Glove. In a few cases you can put some characters on the front row and this is one of them. Put Sabin and Edgar on the front row. You can also put Banon on the front row after he gain some levels. Since Blitz is not targetable, you’d better not use it. You shouldn’t use Auto Crossbow either since you may kill all the enemies in one shot and result in a victory.

5. Sleep in the inn and buy some eye drops. Move Edgar to the back row since he will use his tools this time. Terra should stay on the back row of course. I would suggest putting Sabin and Banon on the front row to do more damage (and giving Sabin the White Cape). I don’t like level grinding on the Lethe River. If you accidentally gain any exp for your main characters, you will have to do reload. But you still want Banon to gain some exp instead of running away from every fight. There are four formations on the river:
  • Lesser Lopros * 2
  • Exocite, Nautiloid, Lesser Lopros
  • Exocite, Nautiloid
  • Exocite * 2, Lesser Lopros
If you encounter the first formation, run. You simply cannot afford the damage of Fireball. For other formations, your target order should be Lesser Lopros-> Nautiloid-> Exocite. Let Edgar use Auto Crossbow for only one round. It’s not safe to shoot a second round since you may wipe out all the enemies. Turn left at every cross. Save at every save point and heal all the characters. Use eye drops when needed.

6. When you reach the second save point, put everyone on the back row. Give the White Cape to Terra. Unequip Sabin’s Genji Glove and give him a shield. You’d better unequip Sabin’s relics. You can't unequip him after this point until his scenario. You should have met every enemy at least once. If you don’t, you still have chance to encounter them after you exit the cave and before you meet Ultros. If you still don’t, you will have to reload your save to reset the RNG.

7. Now prepare to finght Ultros. You may want to read the AI script[finalfantasy.fandom.com] first. The general strategy is like this. In the first round, let Terra defend. In the second round, let Sabin defend. Then improvise. Sabin should use Aura Cannon and Edgar should use Auto Crossbow. Banon should pray every round. Terra can choose to defend or cast Fire. Ultros will counterattack Fire with Ink so it’s your choice. If both Edgar and Sabin are KOed, you need to reload. The fight is not difficult if Banon is above level 10. So just be patient and try a couple of times.

8. After you defeat Ultros, you need to choose a scenario to continue. Generally, you should do Terra’s first, then Locke’s, then Sabin’s. In this way, you can meet all the enemies you have encountered during your first two scenarios on the Veldt.

Exp Status:
Terra, Level 3, 96 Exp
Locke, Level 5, 400 Exp
Edgar, Level 6, 672 Exp
Sabin, Level 6, 672 Exp
Avg Level = (3+5+6+6)/4 = 5
Terra and Edgar’s Scenario
1. Run away from every fight you encounter until you reach Narshe. Heal at the Beginner's Hall. Then enter the cave on the left. In the second cave, there are two new enemies. Don’t forget to meet them.

2. In the security maze, fail the test to meet the Darkside, Eukaryote and Specter formation at least once.

3. Don’t open any chest in the moogles’ cave.

4. Unequip everyone after you go outside and then finish this scenario.
Locke's Scenario
1. First, equip Locke. You want him to use Main Gauche instead of Air Knife for that 10% evasion boost. You can save at the basement of Duncan’s house.

2. If you don’t want to spend a long time on Narshe Cliffs to collect bestiary in the future, you should meet Heavy Armor here at least once. Go out of Duncan’s house and go left until you meet a soldier in a Magitek Armor. Talk with him to embark a fight and run away. Heavy armor has an Iron Helm as a rare steal. I won’t take the risk to steal that since It’s only slightly better than a Bandana. But it’s your choice.

3. The steps to reach the rich man’s house have been described by many walkthrough guides. Just pick one and follow the instructions.

4. Go to the basement and rescue Celes. Give her the Hermes Sandals and White Cape. Now head to the second basement and collect all the items. Make sure you get the Ribbon. Then escape from South Figaro. You may heal at Duncan's Cabin. Go through the South Figaro Cave and leave all the chests untouched. Stop at the recovery spring.

5. Now unequip all the relics from Locke and Celes. Also, unequip all Mythril Shield, Iron Armor and Iron Helm. Leave one Heavy Shield in your inventory for Cyan. If you have followed this guide, Sabin should already have a Bandana and a Kenpo Gi equipped. If not, unequip them for Sabin.

6. Make sure Celes is equipped with a sword and everyone is on back row. Then go to fight Tunnel Armor. This is a very tedious fight. Let Celes runic every round and let Locke do all the damage and all the healing. It’s very tempting to put Locke on the front row but you can’t. He will be KOed by one turn of Drill. Keep every character’s HP above 75. An attack plus Drill combo will certainly KO a character with HP lower than 70. Again, don’t hesitate to use potions and don’t be tempted to attack under low HP. The only challenge here is your patience.

Exp Status:
Locke, Level 5, 400 Exp
Celes, Level 5, 400 Exp
Sabin's Scenario
1. Go to Gau's father's house and recruit Shadow. Buy 99 Shurikens and an Invisibility Scroll from the travelling merchant. From now on, Shadow should always use Throw instead of Attack. Don’t use the scroll now. Leave a Plumed Hat in the inventory for Cyan and equip Sabin and Shadow as you like. Put everyone on the back row.

2. Now head to the Imperial Camp. When you get control of Cyan, equip him with a Heavy Shield, a Plumed Hat and an Iron Armor and put him on the back row. Now go straight to fight the Captain. Use Sky to beat him in one hit.

3. When you get control of Sabin and Shadow, enter the tent on the right and kick the chest to meet the Dobermans and run away.

4. Now go down to fight Kefka. After you beat him, don’t fight him again. Go to the tent on the left. Let Sabin wear a Ribbon. You may want to quicksave and continue. Open the left chest to fight a Satellite. Let Sabin use Aura Cannon and let Shadow throw Shuriken every round. After you finished this fight, open the right chest to collect a Mythril Glove. Go up and jump to enter a tent and collect the Barrier Ring.

5. Now head back to fight Kefka again. This is the time when you should use your Invisibility Scroll. Then fight the soldier blocking your way to proceed the plot.

6. After the Doma king died, let Cyan exit the Throne room and go down. Enter the door on your right and get a Remedy from the pot. Then go back to the door of Throne room. Turn right to enter Cyan’s room and proceed the plot.

7. Help Cyan to deal with the imperial soldiers. Then escape the Camp with the help of Magitek Armors. Take advantage of the Healing Force to heal all the characters during fights.

8. When you finally get outside, check everyone’s exp and save. Make sure to give Cyan the Hermes Sandals since he has the lowest escape success rate. Equip all the characters as you like and head to the Phatom Forest. You may want to meet all the enemies on the plain, especially the Stray Cat. Don’t worry about Shadow. He won’t leave the party if you run away from every battle.

9. Enter the forest. Replenish at the recovery spring. Then board the train. You are now on the tenth car of the train. But first you should turn right and enter the caboose. Recruit a level 7 Ghost and save. Then go back to the tenth car. Skip the first ghost. Talk to the second ghost if you want and buy some potions. Don’t let the ghost die. He will be useful in the future. Go past the ninth car and enter the eighth car. Talk to the ghost blocking the door to proceed. Watch Sabin jump and past the seventh car. Now enter the sixth car to detach the rear train and save. Here you should meet all the enemies at least once, especially the Oversoul. You need its rage in future boss fights so you’d better meet both formations (it belongs to two formations) to increase its show-up rate on the Veldt. Go ahead to the fifth car (dinning car) to replenish. Don’t forget to collect the Earring. Enter the fourth car. In the right room, you will meet Siegfried. Defeat him to get his bestiary and a green cherry. In the left room, collect a hidden Tent. Then go to the third car. In the right room, collect a hidden Potion. In the left room, collect all the chests. You will meet a monster-in-a-box, Apparition. Let your Ghost ally possess it to win. Now go to the second car to save. Then enter the locomotive. Flip the switch to fight the Phantom Train. This is probably the easiest boss fight. Use a Phoenix Down on it and you’re done.

10. Now head to the Baren Falls. Before you enter the cave, unequip Shadow since he will leave soon. Also, equip Sabin with Ninja Gear and two Earrings. Equip Cyan with a Green Beret, a Gigas Glove and a Black Belt. Then jump to the fall and fight a series of fish monsters. The last fish boss may cast the deadly El Nino. Quit and continue if you are unlucky.
11. After Gau showed up, go straight to Mobliz. Talk to the man right to the post office and select “No” to learn about Serpent Trench and collect its album. Then go to the injured soldier’s house. You need to repeat this cycle, soldier’s house->post office->item shop (talk to the merchant)->soldier’s house, until you get the Tintinnabulum. Get an Elixir form the clock in the post office. Get free replenishment by sleeping in the relic’s shop. You may also want to upgrade Cyan’s weapon. Buy a Magus Hat for Terra.

12. Now buy a Dried Meat and go to the Veldt to recruit Gau. Equip Gau as you like. I recommend you to systematically collect rages after you acquire the airship. For now, just get the rages you want. There is only one rage that you must collect now: Bio from Trillium. For other rages, you’d better collect at least one multi-target rage: Wind Slash from Guard Leader and Fireball from Lesser Lopros. They are particularly useful if you want to farm on the Veldt efficiently. What makes Wind Slash powerful is that it ignores split damage. Fireball has slightly higher spell power than Wind Slash, but it suffers from damage split. Only use it before you get Wind Slash or when you fight enemies weak to fire. Oversoul’s Will o' the Wisp is the strongest single target spell you can get now. Make sure to get it before Magitek Facility. You may also want an instant-kill spell: Snare from Mu or Break from Commander or Darkwind. For physical damage, you can collect the rage (attack * 8) from Stray Cat. Don’t spend too much time here since you can’t get any AP from these fights now. Leave most of the rages to collect later.

13. Two tips to farm on the Veldt:
  • Reloading a save will randomly pick a formation group to start with (See this wiki page[finalfantasy.fandom.com] if you don’t know the mechanism behind Veldt encounters). If you haven’t met any formation in that group, it will skip to the next formation group until it finds a group whose formation(s) you have met before. That’s why you will most likely meet “Vector Hound *2, Commander” formation after you load a save. Currently, formation group 17 ~ 46 are empty. So, every time you roll these formation groups, it will jump to formation group 47 which only contains the “Vector Hound *2, Commander” formation. Take advantage of this. If you want to meet a formation group which has a small group number, you should try to save and reload to start from group 47. You will meet your target formation group after a couple of fights.
  • When Gau is leaped, there is 5/8 chance that he will return after you defeat an enemy formation on the Veldt. But you can “increase” this chance to 100% by repeatedly quit before the battle ends and continue, until Gau shows up in the battle. Do note that there are formations in which Gau never shows up. See The Rage Guide by Djibriel[gamefaqs.gamespot.com] for details.

14. Now head to Crescent Mountain Cave. Save before you enter the cave. Give the Hermes Sandals to Cyan to let him escape faster. You may want to quicksave right before you find the dive helmet. Jump to the Serpent Trench. Turn right at every cross to get the treasures.

15. When you arrive at Nikeah, buy ~20 smoke bombs. You don’t need to buy too many. Due to the mechanism of auto-save in Steam version, there’s little penalty of failing to run away. So just buy a bunch of them to be safe. Needless to say, it’s expensive. Collect the Elixir from the clock in the inn. Buy a Silk Robe for Terra. Sleep in the inn. Then take the ship to South Figaro.

Exp Status:
Sabin, Level 6, 672 Exp
Shadow, Level 5, 400 Exp
Cyan, Level 7, 1056 Exp
Gau, Level 7, 1056 Exp
Narshe Snowfield Battle
1. If you are playing a strict LLG (with or without 100% bestiary) or you are playing a perfect stats game and want to boost Gau’s strength, split the party as below:
a) Team 1: Terra, Celes, Cyan, Sabin
b) Team 2: Locke
c) Team 3: Edgar, Gau

2. If you are playing a perfect stats game and want to boost Gau’s magic, split the party as below:
a) Team 1: Terra, Celes, Edgar, Sabin
b) Team 2: Locke
c) Team 3: Cyan, Gau

3. Since this is a LLG guide, I will assume you choose (1) with 100% bestiary. But the strategy for (2) is similar. First, equip everyone in Team 1. Give Sabin double Earrings. You may want to unequip other characters first. Save and talk to Banon. Split the party and start the battle with Kefka.

4. I will briefly explain what you need to do if you want to get 100% bestiary. There are four enemy formations here:
a) Green Soldier (75%): Corporal * 4
b) Green Soldier (25%): Hunting Hound, Corporal * 2
c) Brown Soldier (75%): Fidor, Corporal
d) Brown Soldier (25%): Heavy Armor, Corporal * 2
You need to meet all the enemies at least once and get exp as little as possible. You don’t want to meet (a) since Corporal is covered by other formations. If you followed this guide and met Heavy Armor in South Figaro, you don’t need to meet (d) either. All you need to meet is (b) and (c).

5. Although there are many ways to achieve the goal above, I will describe my method here:
  • a) Immediately after you get control of Team 1, move it to the location showed below without fighting any soldier. Quicksave and return to the title screen.
  • b) Continue and meet a green soldier. Any green soldier is fine since the formation you will encounter is determined only by a random number which stays unchanged between battles. So no matter which green soldier you meet, you will encounter the same formation. If the soldier you meet is not formation (b), reload your save.
  • c) Quit and continue. This time wait until green soldiers passed by. Then quickly move the team to the location showed below.
  • d) Immediately switch to Team 2 and walk down to fight a green soldier. It should be formation (b) as you have seen before. Just let Team 2 get defeated. Then quickly switch back to Team 1.
  • e) Now fight the brown soldier moving towards Banon. You may encounter formation (c) or (d). If you encounter formation (c), defeat the enemies to gain 62 exp for each character. Make sure everyone is alive at the end of the battle. If you encounter formation (d), kill the two Corporals and run away. You may even win this battle to gain 65 exp for each character. Theoretically it will not affect your levels in the future. But let's be safe.
  • f) Don’t fight the last brown soldier If you have already met formation (c) in step (e). If you have met formation (d) instead, fight this soldier to see whether it’s formation (c) or not. If it’s not (c), you need to reload. Otherwise, defeat them and make sure everyone is alive at the end.
  • g) Now fight the Hell’s Rider. He is weak to fire so Terra should cast Fire on him. Also let Sabin and Cyan deal their damage. Celes may use potions, cast Cure or simply defend. Make sure everyone is alive at the end. Each character will gain 100 exp. Terra will level up to 4, but it’s harmless since she will eventually be averaged to 6.
  • h) Finally, fight Kefka. Let Celes runic every turn. Let Terra do all the healing. Let Sabin use Aura Cannon and let Cyan use Fang. It’s not a difficult fight.

Exp Status:
Sabin, Level 6, Exp 834
Edgar, Level 6, Exp 672
Locke, Level 5, Exp 400
Gau, Level 7, Exp 1056
Cyan, Level 7, Exp 1218
Celes, Level 5, Exp 562
Avg Level = (6+6+5+7+7+5)/6 = 6
(You will get different exp statuses if you include Edgar in Team 1 instead of Cyan)
Zozo
1. After the plot, you are asked to form a team to find Terra. You need to bring Gau and Edgar. For the other two members, I suggest you to bring Locke and Sabin. Locke can steal items. Sabin is a good damage dealer. Don’t forget to unequip Cyan and Celes. Now head to the house full of chests (on the southeast of the town) to collect all the items. Go to the Elder’s House and collect the Elixir. Buy three Mythril Shields from the armor shop. You don’t need to buy any helmet or body armor. You should already have two Green Berets or more (depends on how many Satellites you've defeated on the Veldt) and you will soon get another one. And you will be able to buy Ninja Gear and Mythril Vest soon. For weapon, you can buy a Chain Flail for Celes. It not only has a decent battle power but also ignores back-row damage penalty. The drawback is that you cannot use Runic with it, but you hardly need Runic for normal enemies, e.g. most enemies on the Veldt. Moonring Blade also ignores row penalty. Buy it for Locke for Veldt farming. But for now, Thief’s Knife is more appropriate since it provides +10% evasion boost. For Relic, give Hermes Sandals to Edgar and give a Reflect Ring to Sabin.

2. If you want Locke to steal more often, try the Thief’s Knife + Thief’s Bracer + Black Belt combo. Thief’s Bracer doubles your steal success rate. Thief’s Knife can steal while attacking. But the biggest advantage is that it can avoid the penalty of Steal (Mug). Some enemies in Zozo can counter Locke’s Steal (Mug) with their Steal (Mug) abilities. Enemies’ Steal ability will steal your gil instead. It’s not a problem if you defeat them at the end. But for LLG you have to run away, which gives you no chance to win back the money. However, if you attack with Thief’s Knife, even if you trigger the Mug effect, the algorithm will still recognize it as Attack. So, you can safely steal in Zozo by attacking with a Thief’s Knife. Black Belt will grant you an extra turn of Mug if Locke is equipped with a Thief’s Knife and hit by an enemy physically.

3. Now go to Figaro Castle. You will go through some plot if you bring Sabin and Edgar together. Buy a Drill and a Flash light (with Edgar to get the discount). Buy a couple of Phoenix Downs if you don’t have enough (at least 5). Then move the castle to the west.

4. Go to Kohlingen. Collect an Elixir from Rachel’s House. Find a Green Beret from the house where Rachel’s body is placed. Buy a Twist Headband if you don’t have enough Green Berets for all the team members. Now leave the town and head north. Go to the Coliseum (currently only a small house) and grab the Hero’s Ring from a pot.

5. Now you need to go to Jidoor. You may find a Chocobo Stable in the northern forest and ride a Chocobo. But you can also take this chance to meet all the enemies in the Kohlingen and Jidoor areas. It’s your choice. When you enter Jidoor, buy two Ninja Gears and one Mythril Vest. Also buy an Earring so that Sabin and Gau each have two. You need those Earrings in the next boss fight. Collect the Ether in Owzer's Mansion. It’s in a pot on the northeastern corner.

6. Go to Zozo. As I said above, you can steal Harvester by attacking him with a Thief’s Knife. He has a real steal, Dragoon Boots, which can be sold for 4500 gil. But don’t stay too long. Harvester will throw a deadly Mythril Knife in his fourth turn. If you encounter Gobbledygooks, let Edgar use the Noiseblaster so that they will cast Vanish on your characters. Invisible characters can avoid physical damage and most of the enemies in Zozo use physical attacks and abilities. There’s only one exception, the Veil Dancer. When he is alone, he will choose an -ara spell to cast and will probably wipe out your team. You can equip one team member with a Reflect Ring to avoid being wiped out, but you’d better simply quit and continue as soon as he cast that spell and try again.

7. Go to the pub to get an Ether on the top of the tower. Then go to the inn. The passcode to get the Chainsaw is 6:10:50. Get a potion from the armor shop if you want. Then go to the relic shop. Climb the tower and collect all the items until you reach Dadaluma.

8. Make some preparation for this boss fight. Equip Gau and Sabin with double Earrings. Equip Sabin with the Burning Fist you have just found. You should make at least two characters invisible. Quicksave and continue. Then start the fight. Gau should use Trillium’s rage (Bio). Edgar should use Drill. Sabin should use Aura Cannon. Locke should attack or steal every round. It’s not a hard fight if you prepared well and finish it within 30 seconds. If Dadaluma eventually summons two Iron Fists, just let Sabin use normal attack against Dadaluma. Don’t attack the Iron Fists since they will give you exp.

9. Finally, go to the top floor to meet Terra. Don’t forget to collect the last two chests. After the plot, collect the four magicites. Unequip Sabin (and Edgar if you want to bring Cyan to Magitek Facility). Then talk to the characters behind you.

10. Now you need to choose two characters besides Locke and Celes to form a team. If you included Cyan in Team 1 in the Narshe Battle, choose Gau and Edgar. If you included Edgar in Team 1 instead, choose Gau and Cyan.

Exp Status:
The same as above (Narshe Battle section).
Preparation for the Southern Continent
Note: From now on, I will assume Edgar is in your team. If you chose Cyan instead, you need to take care of his equipment.

1. First, go back to Jidoor. Sell some Dragoon Boots and buy a White Dress for Celes. You now have two pairs of Hermes Sandals. Give them to Edgar and Celes since they have lower escape success rates. Also give Celes the Tintinnabulum.

2. Now head to Figaro Castle, take a rest and move to the east. You now need to go to the Veldt again. There are two purposes. First, you need to learn some important spells and rages. Second, you need to leap Gau at the Veldt. This will allow you to recruit Shadow at level 5 and raise him to level 6. He will get 1 point of magic by the esper boost. If you don’t recruit him, he will eventually be averaged to level 6 and you won’t have another chance to boost his stats. Just repeat what you did in Sabin’s scenario. Travel through South Figaro Cave, Mt. Kolts, Returners’ Hideout, Lethe River, Phantom Forest and Baren Falls to reach the Veldt. And travel back to Figaro Castle through Serpent Trench, Nikeah, South Figaro and South Figaro Cave. Since eventually you need to get back Gau, you should do this cycle twice.

3. You probably want to meet all the formations of Aspiran and Anguiform to increase their show-up rates on the Veldt. After you leap Gau at the Veldt, you will leave for Nikeah through the Serpent Trench. Make sure you turn left at every cross so that you can meet more formations of Aspiran and Anguiform. So, when you go back to the Veldt again, you will have much more chance to meet these two enemies.

4. After your first cycle of the Veldt tour, move Figaro Castle to the west and go to Kohlingen. You can now recruit Shadow at level 5 in the pub. Give him Cait Sith magicite. Equip shadow and unequip other characters. Enter Figaro Castle and move it to the East. You want to level him up to 6 and increase his magic by one point. Walk around to fight random encounters. KO other characters and let Shadow win these fights alone. Continue fighting until Shadow levels up to 6. Unequip Shadow and go to Narshe. Shadow will leave the party automatically if you try to enter the town. Equip Celes and give her Cait Sith. Just do the same thing for Celes. KO other characters and level her up to 6.

5. Now you can sleep at Figaro Castle and start your second tour of the Veldt. This time you should farm on the Veldt to learn all the necessary rages and spells. In addition to the rages I recommended before, Gau should learn Gigavolt from Aspiran and Aqua Breath from Anguiform. If you want to make the boss fight in Magitek Facility easier, let Gau learn Vanish from Gobbledygook. Other powerful rages include Sandstorm from Fossil Dragon, Blizzara from Veil Dancer and Magnitude 8 from Hill Gigas. But these are optional. Note that enemy formations you encounter on the Veldt are determined by one or two random seeds. If you spend a long time but still cannot meet the formations you need, try to save and reload to reset the random seeds.

6. For spells, you need to let Gau learn Thundara. If Cyan is in your team, let Locke learn Thundara as well. At least one character should know Imp. Silence, Sleep and Libra are also very helpful spells. If you still have time, let everyone learn Cure and Fire.

7. After you are done, return to Kohlingen area with Gau and other team members. In Figaro Castle, let Edgar buy some Phoenix Downs, Hi-Potions, Ethers and Golden Needles if you don’t have enough of them. I recommend you to stock at least 5 Phoenix Downs, 15 Hi-Potions, 10 Ethers and 10 Golden Needles.
Opera House
1. Go to Jidoor. Enter Owzer's Mansion to start the task. Then go to the Opera House. Unequip all the characters except Locke. Give him a Thief’s Bracer.

2. Now go through the plot until you reach the rafters. For the first time, you want to encounter a rat and let you team be defeated (since these enemies are inescapable). The purpose is to let Stunner and Goetia show up on the Veldt. During the fight, Locke can steal Goetia(s). It has Hi-Potion as common steal.

3. Then you will find your team outside of the Opera House. Save now. You have another chance to finish this task (you have four chances in total). This time you want to finish the task completely. Equip Celes and then go to Jidoor to take a rest. Then equip all your other team members and go back to the Opera House. Equip Edgar with Gigas Glove and Ribbon. Equip Gau with Hero’s Ring and Reflect Ring. Save again. Start the task and go through the plot again until you get to the rafters.

4. Your goal is to reach Ultros without encountering any rat. This is not that difficult if you are patient and do it in the right way. All you need to know are:
  • a) The movements of the rats are controlled by some random seeds. If you quicksave, the random seeds will be reset. But the new random seeds and the rats’ locations are stored in the save file.
  • b) Each time you continue from the same quicksave, you will always get the same random seeds and the same initial locations of the rats. This, in other words, means that the rats will always follow the same tracks to move.
  • c) If the rats are not moving in the directions you want, quicksave to reset the random seeds. Then continue to observe whether the rats are moving to the right directions this time. If you observe an opportunity to by-pass a rat, you can memorize this opportunity and then quit and continue. Since the rat moves in the same track as it did the last time, you know when that opportunity will arise. Take that opportunity to by-pass the rat. If you fail, just quit and continue to try again. Note that you should only quicksave when you have a safe distance from the rats.
  • d) Unlike the GBA version, if you open the Menu page, the rats will not walk across you but will treat you as an obstacle. The rats are still moving, but it will neither walk across you nor initiate a battle. Take advantage of this trick if the rats are too close to you and you cannot avoid them. But the safest method is to always keep a safe distance from the rats
  • e) The first two rats are the hardest ones to by-pass. The third, fourth and fifth rats are much easier to deal. Sometimes you need to wait a bit longer to find an opportunity. So again, be patient. The time, though limited, should be sufficient for you to finish this task. It only took me half an hour to by-pass all the rats and defeat the Ultros.

5. For Ultros, it’s not a difficult boss fight. Just let Gau use Aspiran’s rage (Gigavolt) and let Edgar use the Drill. Locke’s damage is low. You may just want him to defend or cure.

6. After some plot, you will head to the Sothern Continent with Setzer’s Blackjack and land around Albrook. Enter the town and go to the relic shop. Buy three reflect rings. You need these rings for future boss fights.

7. I will not go into detail of what you should do before you head to Magitek Facility. You may want to upgrade your weapons and armors. I will recommend some upgrades below. You may also collect all the items in Albrook and Maranda. It’s safe to collect these items since they won’t change in WoR. Collect all the bestiary on your way to Vector. Upgrades I recommend:
  • Maranda: Mythril Mail for Locke & Edgar.
  • Maranda: Green Beret. Buy one if you only have three.
  • Tzen: Hermes Sandals. Buy two pairs of them (if you still have money).
  • Maranda: Trident for Edgar (if you still have money). Use it with Dragoon Boots and Jump. It will deal more damage than Drill or Chainsaw if the enemy is weak to water and have relatively low defense.
I don’t recommend you to buy Bastard Sword, Priest's Miter and Mythril Helm. You will soon get better swords than Bastard Sword. For Priest's Miter, like I said in the Common Knowledge part, magic evasion is pretty useless in WoB. And Mythril Helm is just inferior than Green Beret.

8. When you’re done, head to Vector. Make sure you have the same team members as when you left Zozo. Get some free healing from the old lady in a house west of the inn. You may want to back up your save file manually here just in case anything goes wrong. Then enter the Magitek Facility.

Exp Status:
The same as above (Narshe Battle section).
Magitek Facility
1. Give Locke a White Cape. This will decrease his rate (but still possible) of being KOed by Magitek Laser of Proto Armor in one shot. Needless to say, collect all the items and bestiary. I don’t want to copy & paste so please pick up an item & bestiary collection guide and follow its steps. Note that there are a couple of highly missable enemies in this dungeon, including Flan, General, Trapper, Destroyer, Lenergia and Chaser. Make sure you meet them at least once.

2. After you see Kefka, follow the garbage chute to reach the basement. Enter the left room and save. Now prepare to fight Ifrit & Shiva. Equip everyone with a Reflect Ring. Equip Edgar with Gigas Glove. Equip Gau with a Hero’s Ring. Then equip everyone else with an Earring. Now go ahead to fight Ifrit & Shiva. Let Edgar use Drill every turn. Celes should cast Blizzard to Ifrit and Fire to Shiva. After Shiva appears, let Gau use Oversoul’s rage. Locke should cast Fire to Shiva and defend against Ifrit. Use potions in time. Do not Attack normally since Ifrit or Shiva may counter your attack with Fire or Blizzard, which will be reflected and heal themselves. Do not summon Kirin either since that will hurt Gau in turn. The fight is not difficult and should be finished in 5 mins.

3. Save at the save point again. You probably want to use a Tent to replenish your MP. Then go upstairs. Before you enter the top floor, walk around to meet a General * 2 formation. Let Gau use Gobbledygook’s rage to make everyone invisible. That will make your next boss fight much easier. It’s a bit hard to achieve this in one battle. You can run away after three members are invisible. Then walk around until you meet another formation of two Generals. Let Gau cast Vanish again and see whether he can make the last character invisible. If you are unlucky, just quit before the battle ends and try again. You should be able to make everyone invisible in a couple of tries.

4. Now enter and go through the top floor. Don’t forget to collect the Stoneblade. Make sure you have met all the enemies in this area. Before you fight Number 024, equip Locke with Thief’s Bracer. Quicksave and continue. Then start the fight. Cast Imp on Number 024 to force it to do normal attacks. Since your characters are invisible, these attacks will always miss. There’s no difficulty to win this fight. Just hit the boss as hard as you can. But besides winning the battle, you may also want to steal the Blood Sword. What makes it handy is not its healing effect but its +10 evasion boost. The steal is a bit tricky because Number 024 also has a common steal (Rune Blade). You have to try a couple of times (quit & continue) if you are unlucky.

5. Now unequip Celes. Enter the room full of captured espers and go through the plot. You will then arrive at the start point of the mine cart ride.

6. Equip everyone with a reflect ring. Equip Gau with a Hero’s Ring and Edgar (or Cyan) with a Gigas Glove. Equip Locke with a Thief’s Bracer if you want to steal from Number 128. Give Edgar (or Cyan) the Phantom magicite. Then save at the save point. I strongly recommend you to backup your save file manually if you can.
Mine Cart Ride
This part needs an independent section because it’s too important. You will screw up your LLG completely if you fail to distribute your exp gain in the correct way. I put several related questions and proofs to the Appendix part. Here I will just briefly describe the situation and what you should do to play a strict LLG (or a strict perfect stats game).

Basically, what you will encounter are 5 groups of Magna Roaders and a final Boss, Number 128. The latter will not grant you exp, which is as usual. But you are forced to gain exp in the first 5 fights with Magna Roaders. There are two types of Magna Roader, the red one and the purple one. Red Magna Roader is weak to ice. Purple Magna Roader is weak to fire and absorbs ice. Each red one gives you 198 exp and each purple one gives you 232 exp. There are total of four formations of Magna Roaders:
  • 1) 1 purple (1P): 232 exp in total
  • 2) 1 purple, 1 red (1P1R): 430 exp in total
  • 3) 2 purple (2P): 464 exp in total
  • 4) 4 red (4R): 792 exp in total
What formations you will encounter in the 5 battles are not completely random. Below are the formations appear in each battle and their show-up rates:
  • Battle 1: 1P (75%), 1P1R (25%)
  • Battle 2: 2P (75%), 4R (25%)
  • Battle 3: 1P (75%), 1P1R (25%)
  • Battle 4: 2P (75%), 4R (25%)
  • Battle 5: 2P (75%), 4R (25%)
Unless you want to collect all the formations (which requires you to gain at least 3 levels), you definitely want to avoid the 4R formation. The minimum exp you need to absorb is 8P=8 * 232=1856. If you want to get 100% bestiary, the minimum exp you need to absorb is 8P1R=8 * 232 + 198=2054. In other words, if you want to minimize your exp gain while collecting 100% bestiary, you need to encounter 2P in battle 2,4,5 and encounter 1P1R once and only once in battle 1 and 3.

Now let’s consider how to distribute the exp. You have to gain at least two levels to absorb all the exp regardless of whether you want 100% bestiary or not. (If you need a strict proof, read the Appendix.) Depending on your goal, you need to distribute the exp in different ways. Note that this time you have to make a choice between a strict LLG and a perfect stats game. In order to build perfect stats characters, you can only level up one character in the mine cart ride, which leads to gaining one extra level soon or later in the game.

Strict LLG with 100% bestiary
Eventually, Locke will be averaged to level 6 after the Imperial Banquet, so you definitely want Locke to gain one level. Besides that, you should only get one extra level. The one to take this extra level must be Gau. (If you want to know why, read the Floating Continent section.) There are many ways to distribute the exp. But you want to keep all three characters alive at the fifth battle to make the boss fight well prepared. I will provide you with my method, which I think is the best.
Like I mentioned above, you have to meet the 8P1R formations. I recommend you to distribute the exp as below:
  • Battle 1 (1P/1P1R): Gau and Locke
  • Battle 2 (2P): only Gau
  • Battle 3 (1P1R /1P): Gau and Locke
  • Battle 4 (2P): All three
  • Battle 5 (2P): All three
Last thing is the magicite boost. In LLG, magic is much more useful than strength, so give Cait Sith and Maduin to Gau and Locke. (If you wonder why, do some calculation based on the damage formula. You will find that for level 6 Locke, 2 points of strength will only give him 1~2 points of extra damage, even with high attack power. That’s nearly neglectable. Not to mention that Locke in LLG is more like a support character rather than a damage dealer.)

Perfect stats game (boosting Gau’s strength):
Since you only have one magicite of +2 strength, you should only level up one character and that’s Gau. In other words, Gau will gain two levels in the mine cart ride. It might be OK to gain three levels and still keep the party average level below 7, but I won’t take that risk. I assume you want 100% bestiary so the formations you need to encounter is also 8P1R. The exp distribution is pretty simple:
  • Battle 1 (1P/1P1R): only Gau
  • Battle 2 (2P): only Gau
  • Battle 3 (1P1R /1P): only Gau
  • Battle 4 (2P): only Gau
  • Battle 5 (2P): All three

Perfect stats game (boosting Gau’s magic):
Instead of Edgar, you have Cyan in your team. Actually, you don’t want to level up Gau since you haven’t got a magicite with +2 magic boost. What you should do is to give Locke the +2 strength magicite and level him up to level 7. Do not let Locke reach level 8 since that will raise the party average level to 7 after the Thamasa event and screw up your perfect stats game. To collect 100% bestiary, distribute the exp as below:
  • Battle (1/3) (1P1R): All three
  • Battle 2 (2P): only Locke
  • Battle (3/1) (1P): only Locke
  • Battle 4 (2P): All three
  • Battle 5 (2P): All three

To defeat Magna Roaders, let Gua use Oversoul’s rage. Also let Edgar use Drill or let Cyan use Fang. With other team members, Locke is responsible for healing. If Locke is alone, let him cast Fire or Thundara to finish the Magna Roaders. For Edgar (or Cyan), do not use magic. You need his MP for the final boss fight. Also keep Gau’s MP above 44. Don’t revive or unpetrify any character if there is more than one Magna Roader. Due to a glitch, after a character is revived or unpetrified, he will not get the reflect status provided by a Reflect Ring in this battle. Two casts of Figara in one turn will definitely KO him.

Since everyone is equipped with a Reflect Ring, you cannot cast Fire to KO your characters. One general solution is to put the character you want to KO to the front row during the battle. Then wait the enemies to KO him. If you want to KO two characters, you can put them on the front row during the battle and let them attack each other. But If Edgar is in your team, you have a better solution. Equip him with a Stoneblade and let him attack the target character. Stone Blade has a 25% rate to inflict Petrify status. Petrified character will not take part in the exp split, just like a KOed character. Enemies can still attack a petrified character but cannot deal any damage. Also, after a character recovers from Petrify, he will still have the same HP as before. Basically, Petrify is a better status than KO. Take advantage of this whenever possible.

Obviously, most of you cannot get the 8P1R formations on your first try. If the formations are not correct, you need to reload your save to reset the random seed. There’s a small trick to make it easier. After you reload a save and before you talk to Cid, quicksave and continue. Then in the mine cart ride, defeat the Magna Roaders as quick as possible to see whether the formations are correct. If they are not correct, reload. If they are correct, quit and continue. You will return to the point before you talk to Cid. Since quicksave saves the random seed as well, you will then encounter the exact same formations you have just met. This time you can follow the steps to finish the ride.

Last thing is to fight Number 128. Let Edgar cast Phantom in his first turn immediately. This will let you avoid most of the attacks. You only need to defeat the body of Number 128 to finish the battle. Don’t attack the Right Blade since it can revive in just 15s. You can ignore the Left Blade as well. But since Left Blade may use Shamshir to remove your invisible status and halve your HP, it’s not a bad choice to deal with it first. Gau’s Thundara should finish it in one shot. It will revive in 30s, a bit longer than the Right Blade. To make the fight more controllable, Gau should always use Thundara instead of Rage to attack the body of Number 128. If you want to get Kazekiri, let Locke steal it from the body of Number 128. Luckily, Number 128 does not have a common steal, so you just need to try and try again until you succeed.


Blackjack
1. Finally, you escaped from Magitek Facility. Save at the save point just right above you. You can give Edgar the Blood Sword. Don’t change your other equipment. Now walk around to meet a Chaser. Then save again and head to the exit. Talk with Setzer and you will fight the two Cranes.

2. Destroy the Right Crane first. Let Gau use Thundara and let Edgar use Drill. You can finish it in two turns (Drill * 2 + Thundara * 2). Locke and Setzer are responsible for healing and revival. Setzer can use Slots if he is free. After you destroy the Right Crane, Gau should use Anguiform’s rage to destroy the Left Crane. You don’t need to keep Setzer alive since he can be easily KOed. Wrecking Ball is deadly to a defenseless character. If the Left Crane’s electrification level is raised to 3, it will use a Gigavolt and wipe out the whole team, so you need a bit luck here. Don’t summon the Phantom esper since that will remove your Reflect protection. You can steal a Debilitator from the Right Crane but that’s by no means necessary and you need to be really lucky (it has a common steal).

3. After going through all the plot, you can finally control the airship. Don’t go to Narshe now. If you have a level 5 Locke (which occurs if you chose to boost Gau’s strength in a perfect stats game), you should give him the +2 strength magicite and level him up to 6. Just use the same method as how you leveled up Celes and Shadow. Now check the exp table at the end of this section to ensure you have done everything correctly.

4. Don’t miss the chance to stock up Tents. Go to Imperial Observation Post and make a team consisting of only Locke. Equip him with Thief’s Bracer, Hermes Sandals, Main Gauche, Ninja Gear and Twist Headband. Also give him Phantom magicite. Now enter the post and encounter a soldier. You will see a formation of Sergeant * 4. Now immediately summon Phantom esper to make Locke invisible. Then steal the Sergeants one by one and run away. You will be thrown out from the post, but you still keep the Tents you stole. Repeat this process (you don’t need to summon Phantom this time) and you will quickly stock up many Tents. You probably also stole a couple of Mythril Vests. Sell them to earn some money.

5. Keep your team unchanged. You want to use the same method to steal Gaia Gears. Go to the plain (not the forest) around Thamasa. Let Locke walk around to encounter Briareus. It has Gaia Gear as its rare steal and doesn’t have common steal, so you just need to keep trying. Luckily, neither Briareus nor Devourer have magical abilities, so you are invulnerable under Invisibility status. Take advantage of auto-battle to speed up your stealing. You need to steal at least four Gaia Gears but I suggest you to steal more to earn some money. Each Gaia Gear can be sold for 3000 Gils. You need 33000 Gils to buy the three magicites. You need more if you want to buy new equipment.

6. It’s time to meet some new enemies. You should have already met Briareus and Devourer. Still use Locke. Go to the nearby forest in Thamasa area to meet Chimera. Then fly to the bomb forest west of the Veldt to meet Grenade. If you find it difficult to walk around in the bomb forest, use this trick:
  • Form a team including Gau. Equip Gau with Hermes Sandals, Twist Headband and Ninja Gear.
  • Outside of the bomb forest, encounter a group of enemies. Let Gau use Bomb’s rage. Then turn on auto-battle. Run away without turning off auto-battle. Then quicksave and continue.
  • Now walk in the bomb forest. Note that always keep auto-battle on:
    • If you encounter Bomb * 6 formation, let Gau act one turn to trigger the rage. His physical attack may cause a Bomb’s Self-Destruct, but that won’t KO him. Run away after his first turn. Cure him if needed. You don’t need to keep other characters alive.
    • If you encounter Bomb or Grenade, simply run away ASAP.
    • Sometimes enemies act faster than Gau. Then you may have to quit and continue.

7. After you have plenty of money, go to Tzen. There’s a thief behind the relic shop. Buy Seraph magicite from him. Then fly to Jidoor. Now the Auction House is open. Buy Golem and Zona Seeker magicites.

8. Now go to Narshe and enter the town. Go through the plot. You may want to upgrade your equipment. Buy two Golden Shields and two Hermes Sandals (if you don’t have four pairs of them). If you still have money, buy one or two Earrings. If you are rich, buy Morning Star for Terra and Hawkeye for Locke.

9. For the Imperial Banquet and future boss fights, you need to learn some spells. Pick up Terra, Sabin, Edgar and Gau to form a team and go to the Veldt. Don’t forget to equip them. Let Gau and Terra learn all the -ara spells and Bio. Let Sabin learn Death and Edgar learn Stop and Berserk. Both Terra and Edgar should know Imp. Terra should also learn Slow. Let all team members learn Osmose and Rasp. Switch one team member with Setzer and let him learn Osmose and Rasp as well. If you still have time, learn all the status magic and let everyone learn Cure and Cura. You should let Celes (currently out of the party), Terra, Gau, Locke, Sabin and Edgar learn more spells since they are either characters needed for future boss fights or the characters you can recruit in WoR before you get the airship.

10. In the meantime, collect some new rages. Quake from Litwor Chicken can deal massive damage to non-floating enemies but will also damage your own characters. Use this when your characters are equipped with Gaia Gears or are in Float status. Cyclonic from Briareus can cut down Enemies’ HP to 1/16 of their current HP, making them defeatable in one cast of Fire or one shot of Auto Crossbow. Stop is very effective against some annoying enemies and bosses. You can get Stop as rage from Bug, which will allow Gau to cast Stop every round without losing MP. For the same reason, get Silence from Magna Roader (red). Get Reraise from Destroyer. Sometimes Reraise is your only way to prevent your characters from being wiped out.

11. From now on, you should take advantage of the airship to manipulate the Veldt encounters. This will make your Veldt farming much more efficient. The method is well-described in The Gau Bible. Read the Mechanics - Veldt Battle Formations (Part 1) section for detail.

12. On the Veldt, new enemies are becoming more and more difficult to defeat. Phantom magicite comes in handy. You may also want someone to learn Vanish (so that you don’t need to summon Phantom every time a character’s invisibility is removed). Always check the Bestiary FAQ[gamefaqs.gamespot.com] and try to take advantage of the enemies’ status weakness. Some strong enemies can be easily defeated by one cast of Snare, e.g., Chaser. Another example is Chimera. It has high HP and its Aqua Breath can wipe out your whole team. Luckily, it has one (and only one) status weakness, Berserk. Casting Berserk and Summon Phantom esper to defeat it.

Exp Status:

LLG:
Terra, Level 6, Exp 672
Locke, Level 6, Exp 1039
Cyan, Level 7, Exp 1056
Edgar, Level 6, Exp 980
Sabin, Level 6, Exp 672
Setzer, Level 6, Exp 672
Gau, Level 8, Exp 2159
Avg Level = (6+6+7+6+6+6+8)/7 = 6.42 round down to 6

PSG (Strength Gau):
Terra, Level 6, Exp 672
Locke, Level 6
Cyan, Level 7, Exp 1056
Edgar, Level 6, Exp 826
Sabin, Level 6, Exp 672
Setzer, Level 6, Exp 672
Gau, Level 9, Exp 2800
Avg Level = (6+6+7+6+6+6+9)/7 = 6.57 round down to 6

PSG (Magic Gau):
Terra, Level 6, Exp 672
Locke, Level 7, Exp 1547
Cyan, Level 7, Exp 1507
Edgar, Level 6, Exp 672
Sabin, Level 6, Exp 672
Setzer, Level 6, Exp 672
Gau, Level 7, Exp 1507
Avg Level = (6+7+7+6+6+6+7)/7 = 6.42 round down to 6
Cave to the Sealed Gate
1. Make sure Terra’s Trance is available. Form a team including Terra and Locke. For other teammates, I suggest characters with high speed, i.e., Gau & Sabin. Equip everyone with Reflect Ring and Hermes Sandals. Then go to the Imperial Observation Post and enter the Cave to the Sealed Gate. To avoid copy & paste, please follow other guides to collect all the treasures in the cave.

2. In the entrance and Basement 1, make sure you have met all the enemies (Provoker, Lich, Antares & Outcast).

3. When you get to Basement 2, unequip all the Reflect Rings. Then encounter a group of enemies, summon Phantom esper and run away. From now on, no enemy’s ability can hurt you except Outcast’s Lifeshaver.

4. You may take this chance to stock up some Phoenix Downs. Just equip Locke with a Thief’s Bracer. When you encounter Zombie Dragon or Zombie Dragon * 2 formations, steal. Zombie Dragon has Phoenix Down as it’s common steal. It can’t hurt you since It doesn’t have any magical ability.

5. In Basement 3, you will see two switches on a plateau. Don’t touch the right switch since that’s a monster-in-a-box (Ninja). This single Ninja formation won’t show up on the Veldt, so it’s not worth fighting it. After you are done, go to the Sealed Gate. Go through all the plot. Then exit from the entrance of the cave. Note that this is your last chance to unlock any formation in the cave. Make sure you have met all the enemies at least once. Now go to the entrance of Imperial Observation Post to finish this plot.
Imperial Banquet
1. On the airship, form a team consisting of Terra, Sabin and Setzer. If you are playing a LLG, pick up Cyan. If you are playing a PSG, pick up Gau. Give Terra and Sabin double Earrings. If you have two Kazekiris, you can give them to Cyan and equip him with a Genji Glove and a Hero’s Ring. Kazekiri has 25% chance to cast Wind-Slash, which can deal decent damage on the front row (weapon spells are affected by row). If you are playing a PSG, equip Gau with a Gaia Gear, but don’t equip anyone else with Gaia Gear (also remove Float status of your team members). Give Setzer Phantom magicite. Then head to Vector to join the Banquet. You can find a Chocobo Stable in the forest northwest of the airship. On your way to Vector, summon Phantom esper to make everyone invisible.

2. Unfortunately, since the confuse-item glitch has been patched, it’s impossible to get the Ward Bangle in a strict LLG (see Appendix for a proof). Note that this is regardless of whether you want 100% bestiary or not. But it’s still possible to get the Tintinnabulum without leveling up. Simply avoid one fight with a Sergeant (probably the one on the roof) and defeat all the other enemies (2 Sergeants, 1 Mega Armor and 6 Imperial Elites). Note that you have to defeat Mega Armor here to get its bestiary. It doesn’t show up on the Veldt. Also, you can only meet Imperial Elites here, so you have to fight them during the banquet. Make sure everyone is alive at the end of each battle.

3. However, if you’re playing a PSG, you can get the Ward Bangle without any trouble. Just defeat all the enemies with all the characters alive before the banquet, and let Gau alone defeat the Imperial Elites during the banquet. Gau may gain one or two levels, but that’s affordable.

4. I assume you know the route to meet all the soldiers and know the correct answers to all the questions asked by Gestahl. If you don’t, check this page[www.finalfantasykingdom.net]. Terra or Gau’s Thundara should finish a Sergeant in one turn. For the Maga Armor, let Sabin cast Death to defeat it. For Imperial Elites, it depends. If you are playing a LLG, let Sabin and Terra cast Bio and let others do their best damage. If you are playing a PSG, let Gau use Litwor Chicken’s rage (Quake). It will kill all the enemies and KO all your characters except Gau, which will let Gau take all the exp. Do not Trance Terra during the fights. You need her Trance ability later.

5. Now collect all the items in the palace. Then go to the observation post again to collect all the treasures. After you’re done, go to Albrook.

Exp Status:

LLG:
Terra, Level 6, Exp 672
Locke, Level 6, Exp 672
Cyan, Level 7, Exp 1056
Edgar, Level 6, Exp 672
Sabin, Level 6, Exp 672
Setzer, Level 6, Exp 672
Gau, Level 8, Exp 1552
Avg Level = (6+6+7+6+6+6+8)/7 = 6.42 round down to 6

PSG (Strength Gau):
Terra, Level 6, Exp 672
Locke, Level 6, Exp 672
Cyan, Level 7, Exp 1056
Edgar, Level 6, Exp 672
Sabin, Level 6, Exp 672
Setzer, Level 6, Exp 672
Gau, Level 10, Exp 2976
Avg Level = (6+6+7+6+6+6+10)/7 = 6.71 round down to 6

PSG (Magic Gau):
Terra, Level 6, Exp 672
Locke, Level 7, Exp 1056
Cyan, Level 7, Exp 1056
Edgar, Level 6, Exp 672
Sabin, Level 6, Exp 672
Setzer, Level 6, Exp 672
Gau, Level 9, Exp 2184
Avg Level = (6+7+7+6+6+6+9)/7 = 6.71 round down to 6
Thamasa and Esper Caves
Note: I use rods in the boss fights of this section. If you don’t want to use rods, you can check other LLG guides (GBA/SNES).

1. Head to the port of Albrook. At the entrance of the port, collect the Teleport Stone in a box. Board the ship and go to Thamasa. Go through all the plot. Then Shadow will join you. Equip him and go to Thamasa. You can collect all the items in the village.

2. Buy two Ice Rods for the next boss fight (if Terra don’t know Blizzara, buy three). Buy a Mystery Veil for Terra. Talk with Strago and then unequip Shadow. You need to sleep in the inn to continue the plot.

3. After you wake up, Shodow leaves the team. Talk to Strago and he will join you after the plot. Equip everyone with defensive equipment (Green Beret and Hermes Sandals). Give Strago Phantom magicite. Make sure someone has Alarm Earring equipped. When facing your first encounter, let Strago summon Phantom esper to make everyone invisible. Then go through the burning house. Collect all the items but don’t fight any monster-in-a-box. Run away from every encounter as usual.

4. When you finally reach the last room, change your equipment. Give Terra Icebrand, Mystery Veil, White Dress and double Earrings. Give Strago Mythril Rod, Magnus Hat and double Earrings. Locke is responsible to support the others, so equip him with Main Gauche, Hermes Sandals and Thief’s Bracer to boost his speed. Also give Locke Carbuncle magicite.

5. Now go ahead to fight Flame Eater. Let Locke summon Carbuncle esper immediately. You don’t need to Trance Terra (and you shouldn’t). By using Ice Rods, you should finish Flame Eater in two turns. Strago’s Ice Rod can deal 2648 damage while Terra’s Ice Rod can deal 2450 damage. Terra’s Blizzara can deal ~900 damage. Let Strago use two Ice Rods and let Terra use one Ice Rod plus a cast of Blizzara. Note that you should only hit Flame Eater. Don’t kill any Balloon since that will give you exp. If you are unlucky and get KOed by Fireball, quit & continue.

6. After the plot, buy three Flame Rods. Equip everyone with Hermes Sandals and give Terra and Strago Alarm Earring and Gale Hairpin. Then head to Esper Caves. On your way, let Strago summon Phantom esper to make everyone invisible. Also, try your best to avoid the forest.

7. No enemy in the caves can hurt your invisible characters, so you can explore the dungeon as you like. Collect all the items and meet all the enemies. You can also steal Hi-Potions from Mandrake and Bonnacon. I don’t recommend you to steal from Adamankary because it may counter your Steal by Snort, which will remove Locke’s invisibility.

8. Now go ahead to see the golden statues of Warring Triad. After the conversation, don’t move. Change your equipment to the one with which you fought Flame Eater. Besides, give Locke the Phantom magicite. Now move forward to fight Ultros. In the first turn, let Locke try to steal the White Cape from Ultros. Then let Strago use Flame Rod. Last, Trance Terra and let her use Flame Rod as well. Strago can deal 2564 damage and Terra can deal 4744 damage per rod. Ultros’ first attack will always miss thanks to your characters’ invisibility. After the first turn, Ultros may say something and cast Haste and Protect on itself, but that won’t affect anything. Just use the rods for another turn and then Realm appears. You need to be quick because Terra needs to act two turns in her Trance status. After the conversation, summon Phantom esper immediately. Then let Realm Sketch Ultros. You may have to try a couple of times. Ultros may use Stone and KO a character in its second turn. If that character is Realm, you may have to quit & continue or waste some Phoenix Downs. After you succeed, Ultros will flee and the battle will end.

9. Now equip Realm and give her a Hermes Sandals. Then continue exploring the caves and collecting all the items. After you’re done, go to meet the espers.

10. Go through all the plot. For the battle with Kefka, just let Leo use Shock every turn and heal him in time. After you witness the Floating Continent on Blackjack, you will regain the control of all your characters. Check the exp status of them to make sure you have done everything correctly.

11. Don’t fly to Floating Continent now. We need to recruit Mog and do some preparation. Go to Narshe and enter the house full of treasures. Follow Lone Wolf to Narshe Cliffs. Then choose Mog instead of Gold Hairpin. Return to Blackjack and head to Doma castle. Collect all the treasures there.

12. Now go to the Veldt. You need to learn some spells again. Form a team including Celes, Mog, Gau and Locke. To prepare your upcoming fights, Gau, Mog and Locke should all learn Stop. Gau and Mog should learn all the -ara spells (at least let one of them learn all these spells). One of Gau and Mog should know Silence. In addition, let Gau learn Vanish and Break. Almost all the characters (Gau, Mog, Celes, Terra, Edgar, Sabin and Setzer) should know Osmose. To prepare for WoR, let Celes learn Bio. If you still have time, let Edgar learn Sleep. For rages, collect Zombie Dragon’s rage (Doom) and Adamankary’s rage (Acid Rain). You can return to the Veldt after flying to Floating Continent, so there’s no need to collect all the rages and bestiary now.

13. Last thing, check your inventory. You need to have at least 20 Gold Needles, 15 Phoenix Downs, 30 Hi-Potions and 10 Ethers (If you follow this guide, you should have plenty of Phoenix Downs and Hi-Potions). If you don’t, go to Figaro Castle to buy.

Exp Status:

LLG:
Terra, Level 6, Exp 672
Locke, Level 6, Exp 672
Cyan, Level 7, Exp 1056
Edgar, Level 6, Exp 672
Sabin, Level 6, Exp 672
Setzer, Level 6, Exp 672
Gau, Level 8, Exp 1552
Strago, Level 8, Exp 1552
Realm, Level 6, Exp 672
Celes, Level 6, Exp 672
Mog, Level 11, Exp 3936
Avg Level = (6+6+7+6+6+6+8+8+6+6+11)/11 = 6.90 round down to 6
Avg Level (w/o Gau) = (6+6+7+6+6+6+8+6+6+11)/10 = 6.80 round down to 6

PSG (Strength Gau):
Terra, Level 6, Exp 672
Locke, Level 6, Exp 672
Cyan, Level 7, Exp 1056
Edgar, Level 6, Exp 672
Sabin, Level 6, Exp 672
Setzer, Level 6, Exp 672
Gau, Level 10, Exp 2976
Strago, Level 8, Exp 1552
Realm, Level 6, Exp 672
Celes, Level 6, Exp 672
Mog, Level 11, Exp 3936
Avg Level (w/o Gau) = (6+6+7+6+6+6+8+6+6+11)/10 = 6.8 round down to 6

PSG (Magic Gau):
Terra, Level 6, Exp 672
Locke, Level 7, Exp 1056
Cyan, Level 7, Exp 1056
Edgar, Level 6, Exp 672
Sabin, Level 6, Exp 672
Setzer, Level 6, Exp 672
Gau, Level 9, Exp 2184
Strago, Level 8, Exp 1552
Realm, Level 6, Exp 672
Celes, Level 6, Exp 672
Mog, Level 11, Exp 3936
Avg Level (w/o Gau) = (6+7+7+6+6+6+8+6+6+11)/10 = 6.9 round down to 6
Imperial Air Force (Part 1)
Note: This guide is probably the first one to teach you how to manipulate the IAF sequence. This method not only works on Steam version but also works on most other versions (SNES/GBA/Android/IOS). You no longer need to try many times to get the right IAF formations.

Just as the Mine Cart Ride section, I will briefly describe the situation. When you fly to Floating Continent, you have to first defeat 6 groups of Sky Armor and Spitfire in a row. There are two possible formations:
  • 1 Spitfire, 1 Sky Armor (1SF1SA): 900 exp in total
  • 1 Spitfire, 2 Sky Armor (1SF2SA): 1250 exp in total
Unlike the mine cart ride, every battle of IAF sequence has the same formations. In each battle, the rate of 1SF1SA formation to show up is 25% and the rate of 1SF2SA formation to show up is 75%. That means the minimum exp you can get is 5400 (6 * 1SF1SA=6*900) and the maximum exp you can get is 7500 (6 * 1SF2SA=6*1250).

For a PSG, you don’t need to care about the exp (so skip the formation manipulation and exp distribution part). You can let Gau get all the levels and then leap Gau on the Veldt. In this way, his level won’t factor into the party’s average level. You can then recruit Shadow at level 6. Theoretically, you can even level up Gau before the IAF sequence, just to make those fights easier.

However, that’s different for a strict LLG. You will still use the same method (leaping Gua on the Veldt) to keep the party’s average level at 6 when recruiting Shadow and at the beginning of WoR. But by the definition of LLG, you have to consider Gau’s level eventually. In other words, for a strict LLG, you still need to keep the number of levels you gain in IAF sequence as small as possible.

Actually, the minimum number of levels you have to gain in IAF sequence is 4, and you have to let Gau take at least three levels. The proof is a bit complex, so I put it in the Appendix. Since Gau is more useful in WoR, you’d like to let him take all the 4 levels. If you choose Gau, Mog and Strago as team members, you need to encounter at least three 1SF1SA formations to let Gau gain only 4 levels (900*3+1250*3<6432-1552+5080-3936+2184-1552-3<900*2+1250*4), and indeed you can distribute exp to achieve this (see Lufia_Maxim’s Guide[gamefaqs.gamespot.com]). But if you want to steal the Debilitator from Missile Bay, you should bring Locke instead of Strago, and you need to encounter at least four 1SF1SA formations to gain only 4 levels (900*4+1250*2<6432-1552+5080-3936+1056-672-3<900*3+1250*3). In this guide, I assume you want the Debilitator, so pick up Gau, Mog, and Locke to form a team. Normally, it’s extremely hard to encounter the right formations, because the rate of encountering at least four 1SF1SA formations is only 3.76%. But with the help of my RNG_IAF tables[github.com], you can get the right formations in minutes. You can even predict the formations in IAF. Let me explain how to use this table:
  • 1. Donwload the RNG_IAF tables[github.com]. Since you want to meet at least four 1SF1SA formations, switch to table “1SF1SA X 4”.
  • 2. Fly to Triangle Island. Do not walk into the forest. You want to clear your step counter and danger counter first. Walk around in the plain until you encounter some enemies.
  • 3. Run away, but don’t move after you finish the battle. Save (not quicksave) the game and return to the title page.
  • 4. Load the save slot you just saved and don’t move. Now you want to find out your current random seed. Every time you load a save, a random seed is generated. This random seed determines how many steps you need to walk to encounter your next enemies and the formations you will encounter. I won’t go into detail of the underlying mechanism. You just need to know how to take advantage of this. First, open the menu screen and write down your total number of steps at the bottom-right corner.
  • 5. Now walk around in the plain until you encounter some enemies. Run away and write down your total number of steps again. Your first step count is the subtraction between your current step number and your old step number.
  • 6. Now look at the table. Filter the Encounter_1 column by the first step count you just got. If it results in only one row, you’re done. If it results in multiple rows, repeat step 5 & 6 to get your second (and even third) step count until you filter the Encounter_# columns and get only one row. This row’s Random_Seed is your current random seed.
  • 7. Look at the Extra_Encounters column. This is the number of encounters you are away from the desired formations of IAF which is indicated in F1~F6 columns (F# means the #th battle; Value 1 represents 1SF1SA formation and value 0 represents 1SF2SA formation). Walk around and meet exactly Extra_Encounters groups of enemies. If Extra_Encounters is large, you may want to choose another random seed. Just reload the save and start from step (4) again.
  • 8. Now board the airship. Congratulations. If you fly to the Floating Continent now, you will meet exactly those formations from columns F1~F6 in IAF sequence.
There’s only one way to distribute exp. For one 1SF1SA formation, all three characters should survive. For one 1SF2SA formation, only Gau and Mog should survive. For the other battles, only Gau should survive. By the end of IAF, Gau is probably only 5 exp from level 13, but that’s enough.

Imperial Air Force (Part 2)
Now, some final preparation for the IAF sequence. To make your characters invulnerable, you should make them invisible and silence all the enemies. Mog is responsible to silence all the enemies, so give him Siren magicite. Locke should summon Phantom at the beginning of the first battle, so give him Phantom magicite. Of course, Gau should have Zona Seeker (or Bismarck if you are playing a PSG and want to boost Gau’s strength) since he will level up. To better execute these tactics, equip your characters as below:
  • Mog: Golden Shield, Green Beret, Gaia Gear, Hermes Sandals, Prayer Beads
  • Gau: Mythril Shield, Green Beret, Gaia Gear, Hermes Sandals, White Cape
  • Locke: Main Gauche, Mythril Shield, Green Beret, Ninja Gear, Hermes Sandals, Thief’s Bracer
Before you go, don’t forget to replenish your characters on the airship. In every battle, the first thing you need to do is to let Mog summon Siren immediately. In your first battle, let Locke summon Phantom to make everyone invisible. Let Gau cast Break to characters who should not survive the battle. After each battle, you should raise/unpetrify Mog so he can summon Siren in the next battle. Also, quicksave after each battle so that you don’t need to do all the previous battles again after a game-over. Sometimes, enemies act faster than Mog. If a Spitfire uses Absolute Zero before you Silence it, your team will be wiped out, and you have to quit & continue. If Gau is hit by Magitek Laser or Missile, his invisibility will be removed, so let him cast Vanish to make himself invisible again. If Gau or Mog is lack of MP, let him cast Osmose. Note that do not let Mog use Dance since Sunbath will remove characters’ invisibility. After all these, you can let Gau use Guard Leader’s rage (Wind Slash) to defeat Sky Armor and Spitfire in a couple of turns.

After you finish all the IAF battles, raise/unpetrify/cure your characters. You also need to change some of your equipment for the upcoming boss fights. Give Phantom magicite to Gau and give Zona Seeker to Mog. Locke may have Kirin or Unicorn. Gau should have enough MP to summon Phantom esper. Equip characters as below:
  • Mog: Golden Shield, Green Beret, Gaia Gear, Hermes Sandals, Earring
  • Gau: Mythril Shield, Green Beret, Ninja Gear, Hermes Sandals, White Cape
  • Locke: Main Gauche, Mythril Shield, Twist Headband, Ninja Gear, Hermes Sandals, Thief’s Bracer
Don’t forget to quicksave & continue before the boss fights.

The first boss fight with Ultros and Typhon is easy. You just need to summon Phantom first to make everyone invisible, then you’re invulnerable to Ultros. After two casts of Fira to Ultros, Typhon appears. Cast Silence to Typhon to disable its Fireball, then finish it with a couple of Blizzaras.

The second boss fight is a bit tricky and needs some luck. Locke should cast Stop to Laser Gun ASAP. Then Gau should cast Stop to Missile Bay as well. If enemies act first, especially for Laser Gun, your team may be wiped out by Atomic Rays. Let Mog summon Zona Seeker in his first turn. There’s nothing you can do to limit the body of Air Force. Luckily, its Magitek Laser (it doesn’t have physical attack) will only hit one character in a turn, and its damage is affordable to Mog and Gau thanks to the magic shield. Use Hi-Potion or Cure every time they are hit. Locke is not that lucky and will be KOed if he’s hit by a Magitek Laser. Just use a Phoenix Down, but you don’t need to use any potion on him. To steal the Debilitator from Missile Bay, you need to try ~10 times on average. Stop effect lasts around 3~4 turns, so make sure you cast Stop again after it wears off. Note that Stop will miss when your target is still under Stop status. If you see Missile from Missile Bay or Magitek Laser from Laser Gun, you should cast Stop again immediately. After you get the Debilitator, let Gau and Mog cast Thundara to finish the body of Air Force. Use Osmose if you are lack of MP. Like the battle with Number 128, you only need to defeat the body of Air Force and you don’t want to hit Laser Gun or Missile Bay. If Locke is still alive, he can continue stealing from Air Force and Laser Gun to get an Elixir and a X-Ether. He can also summon Kirin or Unicorn if someone is under Sap status. But these are optional.

If you still find it difficult, look at the video I recorded:


Exp Status:

LLG:
Terra, Level 6, Exp 672
Locke, Level 6, Exp 972
Cyan, Level 7, Exp 1056
Edgar, Level 6, Exp 672
Sabin, Level 6, Exp 672
Setzer, Level 6, Exp 672
Gau, Level 12, Exp 6427
Strago, Level 8, Exp 1552
Realm, Level 6, Exp 672
Celes, Level 6, Exp 672
Mog, Level 11, Exp 4861
Avg Level = (6+6+7+6+6+6+12+8+6+6+11)/11 = 7.27 round down to 7
Avg Level (w/o Gau) = (6+6+7+6+6+6+8+6+6+11)/10 = 6.80 round down to 6

PSG (Strength Gau):
Terra, Level 6, Exp 672
Locke, Level 6
Cyan, Level 7, Exp 1056
Edgar, Level 6, Exp 672
Sabin, Level 6, Exp 672
Setzer, Level 6, Exp 672
Gau, Level >=13
Strago, Level 8, Exp 1552
Realm, Level 6, Exp 672
Celes, Level 6, Exp 672
Mog, Level 11
Avg Level (w/o Gau) = (6+6+7+6+6+6+8+6+6+11)/10 = 6.8 round down to 6

PSG (Magic Gau):
Terra, Level 6, Exp 672
Locke, Level 7
Cyan, Level 7, Exp 1056
Edgar, Level 6, Exp 672
Sabin, Level 6, Exp 672
Setzer, Level 6, Exp 672
Gau, Level >=12
Strago, Level 8, Exp 1552
Realm, Level 6, Exp 672
Celes, Level 6, Exp 672
Mog, Level 11
Avg Level (w/o Gau) = (6+7+7+6+6+6+8+6+6+11)/10 = 6.9 round down to 6
Appendix
Exp distribution tables for the mine cart ride:
Download Link[github.com]
These tables enumerate all the possibilities of exp distributions in the mine cart ride. By filtering the exp columns, you can limit the exp absorbed by each character and get the corresponding exp distribution methods. There are three exp distribution tables (corresponding to 8P, 8P1R and 6P5R formations) and a status table:
  • Status Table:
    • Status Number: Number used to represent characters' status.
    • Locke, Char1, Char2: Character status. 1 represents alive. 0 represents KO.
  • Table Names:
    • 8P: 1P, 2P, 1P, 2P, 2P for battle 1 to 5.
    • 8P1R: 1P1R, 2P, 1P, 2P, 2P for battle 1 to 5.
    • 6P5R: 1P1R, 4R, 1P, 2P, 2P for battle 1 to 5.
  • Exp Tables (8P, 8P1R, 6P5R):
    • Locke, Char1, Char2: Exp absorbed by that character.
    • c1 - c5: Status number representing the characters' status at the end of that battle.
For example, the 16680 row in table 8P means:
Locke and Char2 survive the first battle.
Only Char2 survive the second battle.
Locke and Char2 survive the third battle.
All three survive the forth and fifth battle.
And by distributing exp like this, Locke gains 540 exp, Char1 gains 308 exp and Char2 gains 1004 exp.

IAF sequence manipulation tables:
Download link[github.com]
These tables help you partially manipulate the IAF sequence. It should work on most versions (SNES/GBA/Android/IOS/Steam). See the Imperial Air Force section for detail.

Exp distribution tables for IAF sequence:
These tables have the same format as the mine cart ride tables. Since each exp table has 117,649 rows, it's not possible to put them in a excel file, so I save them as R data. You need to know a bit of R language to use them. Download the data here[github.com].

Several conclusions and proofs about low level game:
1. It’s not possible to gain only one level in the mine cart ride.
To simply the question, let’s assume we get 0 exp in the Narshe Battle and we meet 8P formations (total 1856 exp) in the mine cart ride. To maximize the exp absorbed, let’s also assume we have two level 7 characters (Gau and Cyan) in the team. Obviously, we either want Locke to gain that level or a level 7 character to gain that level. If we let Locke gain that level, the maximum exp you can absorb is 656+496+496-3=1645. Since 1645<1856, it’s not possible to absorb all the exp and avoid gaining one extra level at the same time. If we let a level 7 character gain that level, by filtering the exp columns in 8P table (Locke<272, Char1<1128, Char2<496), we find no row. In other words, we cannot find an exp distribution method to meet the requirement. Statement proved.

2. It’s not possible to gain only two levels with Locke and two level 6 characters in the mine cart ride.
To simply the question, let’s assume we get 0 exp in the Narshe Battle and we meet 8P formations (total 1856 exp) in the mine cart ride. Since Locke will eventually be averaged to level 6, he should get at least one level. There are two possibilities:
  • a) Locke get both levels.
  • b) Locke get one level. One level 6 character get another level.
For (a), filter the exp columns in 8P table (Locke<1152, Char1<384, Char2<384), we find no row. For (b), filter the exp columns in 8P table (Locke<656, Char1<880, Char2<384), we find no row.
Statement proved.

3. You cannot get the Ward Bangle in a strict LLG.
To simply the question, let’s assume we get 0 exp in the Narshe Battle and we meet 8P formations in the mine cart ride. In a strict LLG, we have to gain only two levels in the mine cart ride. Based on the first two conclusions, we can generate a table listing all the possibilities of characters’ levels before and after the mine cart ride.

For each possibility, filter the exp columns accordingly in 8P table. Then calculate the minimum exp gain for each character under the filtration. Then by checking the Exp Guide, we can get the maximum exp to the next level of each character after the mine cart ride:

By the time we participate the banquet, we should have at least three level 6 characters (Terra, Setzer & Edgar/Sabin) who didn’t participate the mine cart ride and can absorb 383 exp without leveling up. We should at most have one level 7 character who didn’t participate the mine cart ride and can absorb 495 exp without leveling up. From the table above, we can see that for a character who participated the mine cart ride, the maximum exp he can absorb without leveling up is 341. Since 341<383, the maximum exp we can absorb in the banquet is 383*3+495=1644. However, you need to beat all the enemies in the banquet to get the Ward Bangle. And the exp you need to absorb is 1706 (Sergeant*3+Mega Armor+Imperial Elite*3=252*3+350+200*3). Since 1706>1644, it’s simply impossible to get the Ward Bangle and avoid leveling up at the same time. Statement proved.

4. At least how many levels do you have to gain in IAF sequence?
Obviously, to form a three-character team to absorb the most exp, you should pick Mog, Gau and Strago. It seems that you can gain only three levels by encountering at least two 1SF1SA formations (5400<=exp<=1250*4+900*2=6800) and let Mog take all the levels (9784-3936+2184-1552+2184-1552-3=7109>6800). But that will lead to disastrous consequence since you will raise the party’s average level w/o Gau to 7 ((6+6+7+6+6+6+8+6+6+14)/10 = 7.1). Actually, to keep your party’s average level below 7, characters except Gau are only allowed to gain one level in IAF sequence. If you let Mog take that level, the minimum exp left for Gau to absorb is 5400-(6432-3936-1)-(2184-1552-1)=2274, which will level him up two levels. Seems like you can still get only three levels in total. But can we find an exp distribution to achieve this? By enumerating all the possible distributions (filtering the IAF exp table), unfortunately, the answer is no. So, the minimum number of levels you have to gain in IAF sequence is four.

12 Comments
LetMeProlapseHer™ 9 Sep, 2024 @ 2:16pm 
tl;dr
ShooPuff23 5 Apr, 2024 @ 3:38am 
Something I just discovered with GBA try with Pixel remaster: Cyan Kazekuri + Dragoon Boots in the back row. It's really great in GBA.
jongmok 12 Nov, 2023 @ 3:06am 
3) After all greens pass, move party 3 left to encounter brown soldier. It should be Fidor and Corporal. (I also assumed you've encountered Heavy Armor before).

4) Lose the battle and go back to the save point. Then suicide-rush to green enemies to get formation. One battle (Hunting Hound, Corporal * 2) is enough but I did this twice to get another formation (Corporal * 4).

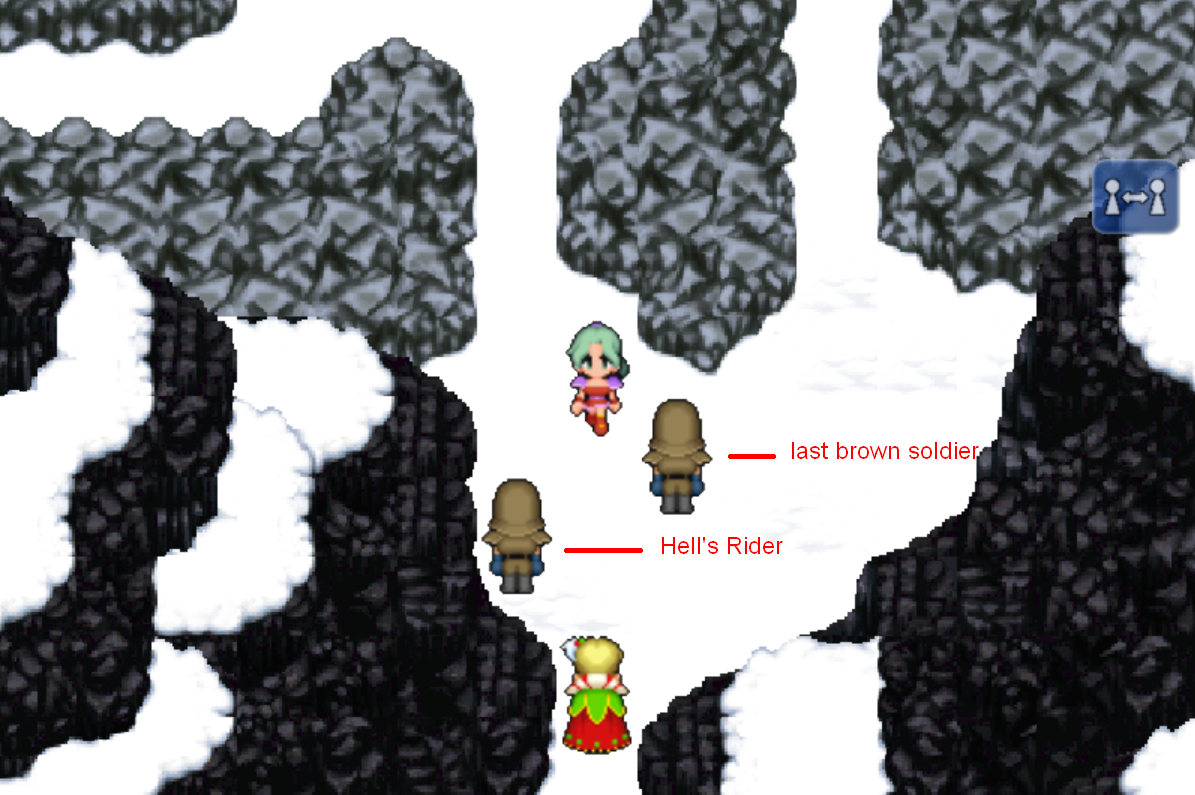
5) Now move your party and fight vs Hell's Rider. I put Locke here to steal something good. Also get defeated, go back, take some rest.

6) Control your party 1 to fight vs Kefka and move forward.


After this, I brought my party to Veldt to find those formations, and I could meet them.
jongmok 12 Nov, 2023 @ 3:06am 
Adding some tips on Defend that Esper event (Narshe Snowfield Battle) here, for whoever plays FF6 PR + LLG + 100% bestiary.

0) For 100% bestiary, just save, make your best party, kill all for bestiary, and then reload and play for LLG. Because bestiary is the global one, you can cooperate through multiple saves.

1) Set your party. Any members are fine since you'll get 0 exp.
Party 1 - Gonna fight vs Kefka (Celes should be here though)
Party 2- Gonna fight vs Hell's Rider
Party 3 - Gonna fight vs 1 brown soldier and 2 green soldiers.

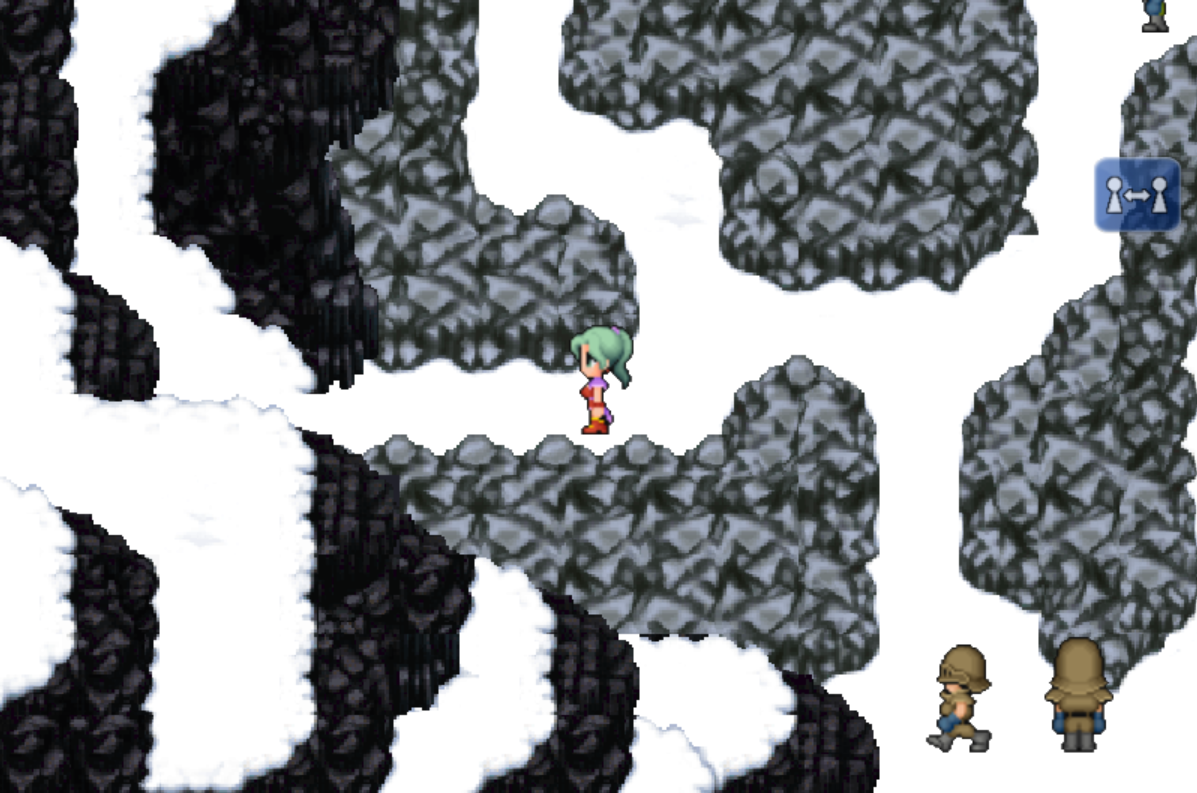
1) In that event, you can move 2 parties to bottom-left corner once the battle started immediately. Move Party 1 and Party 2 to that corner (the second pic of Narshe Snowfield Battle section in this article).

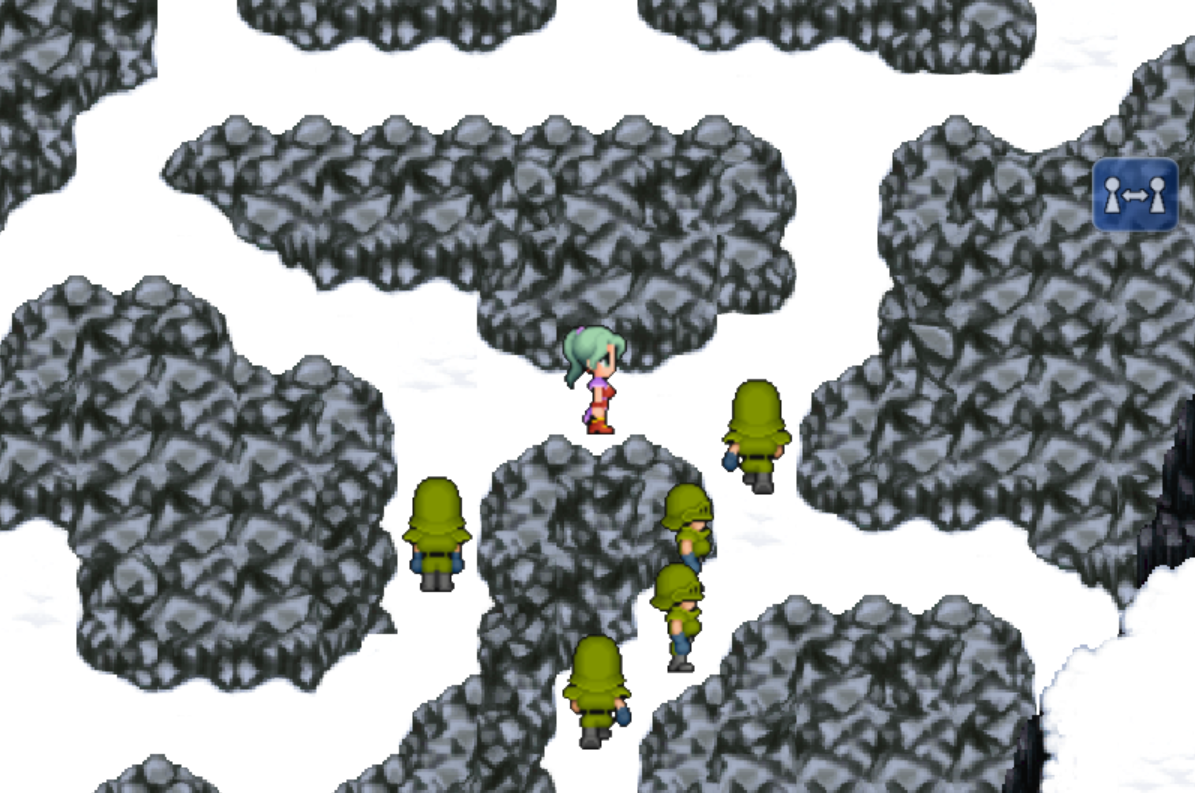
2) Switch control to party 3 and move fast to the middle of the map (the first pic)
§єǫuєᴋʜaɴ ⚶ 20 Jun, 2023 @ 5:59pm 
what about for the Pixel Remaster? the menu option for disabling experience altogether?

For something like returning to Narshe, after the 3 scenarios, why would it matter who battles who? I would've thought Gau could go in party 1 with a full team of 4, and do all the battles, with a bunch of Rages up his sleeve he'd make the LLG easier at this point.
Lost Froggy 1 Jan, 2023 @ 5:21pm 
I dunno why I though the Safety Bit was in Doma - it's in the cultists tower.
Lost Froggy 31 Dec, 2022 @ 1:24am 
p.s.
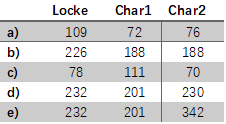
steal is level based, and this also applies to thf knife, but with some save scumming you can still snag some nice things in WoR

Steal formula is 50 + charLV - monsterLV /128

so low lv character on a high level monster can take awhile. quick save before the fight, and reload till you get the item early
Lost Froggy 31 Dec, 2022 @ 1:20am 
For anyone else doing minimal, some tips before you go on to world of ruin:
- Do not miss getting a debilitator
- Be sure to buy multiple stacks of rods in Thamasa before finishing the floating continent ESPECIALLY poison.
- Make grabbing the safety bit in Doma in WoR a priority as soon as you get the Falcon. Without it some bosses will be able to instant kill you.
- Getting force shield or fire/ice shields is also super helpful. Merit award is a tough one, because it requires the Colosseum to get - probably not possible without insane luck or eating some levels.
- if you DO manage a Merit award, it is possible to have one of your characters thief knife some really helpful equipment (several elemental shields, a 2nd safety bit).
- Cactaur will be impossible. It is fast enough to 1000 needles the entire team before you can do anything about it. Killing some of the other optional bosses IS possible, but you will need a lot of prep and some luck (and lots of phoenix downs and rods).
Lost Froggy 31 Dec, 2022 @ 12:34am 
Thanks for the guide. I followed this up till its end at the floating continent, but I messed up and gained 1 level somewhere along the way so I didn't get a perfect run.

I winged it for world of ruin, and I am also trying to do a minimal party: The challenge is to not only be low lv, but also not collect all the character, the absolute theoretical minimum being Just Celes, Edgar, and Setzor.

I've done this on my original SNES cart but its a ton harder on the steam version since they patched out the vanish+doom/banish thing which makes some bosses trickier and AP farming much slower (not efficient to use intangir for it).
Mr.Awesome 30 Nov, 2020 @ 4:43pm 
where is the rest of the game?