FINAL FANTASY VIII

FINAL FANTASY VIII

245 ratings
"Contrived Finish" Achievement Guide
By beamless
This guide will provide you some mandatory information you need to know before attempting to achieve it.
6
   
Award
Favorite
Favorited
Unfavorite
Introduction
Hello there.

I'm writing this guide for the people like me, who wants to get an every single achievement in this game. It will contain the mandatory information regarding avoiding getting exp from battles, basic junction tips and general the-way-of-playing ideas.

As I will offer you to get all of the achievements in one run, my guide will help you to minimize experience, tell you the ways to play with low-level party and avoid leveling up Squall without keeping him dead all the way. That's not a No Level-Up guide. It will be helpful only for achievement hunters.

Originally, I made a complain-post in the forums, but now I decided to gather the information I know myself with ideas got from some gents while discussing.

And the last thing before we start...

If you're playing this game for the first time - I beg you, don't try do this achievement in your first playthrough. You really should taste the game as it is first.
Main Idea
There're 2 opposite achievements:

- "Contrived Finish"
- "Top Level"


In the first one, you must keep Squall at his starting level (7) through all the game.
In the second one, you must level up any character to the maximum level (100).

You could possibly keep Squall dead all the way, and play with other party members naturally, but that's not the way to go. I would suggest you not to do this.

You have the other options:

- You can make several runs for the game, and it's actually worth it. But as for me, I played it all over many times, and I spent thousand of hours on it, so all I want now - is to replay my favourite classic game and grab its' achievements. I'm also lacking free time, so I aim to do it in a single run.

- In the very beginning of the game, on the Dollet SeeD mission you can kill both Squall and Zell and get 100 lvl with Seifer. It will also slightly upgrade your GFs and their abilities while keeping your further enemies at the basic level, but that would take just insane amount of time.

- You actually can get both of these opposing achievements in one run. Just make a save file once you reach Ragnarok. Level-up any character to 100 and then load a save file with your low-level party and finish the game.

In my point of view, the last option is the best choice, because you will experience low party playthrough. Of course, it works more likely for advanced players. This will also take you tad less time to complete everything.

If you agree here, let's move on.


Avoiding Exp. Points
If you decided to make it in a single run, you need to make some preparation before you take off.

Final Fantasy VIII can offer you to pass the game without a common leveling-up, which is required in the most of RPG games.

The best thing is that bosses / mobs are synced to your approx party level. What's more, enemies' stats rise dramatically upon leveling up, while the most effective tool to increase party's power is magic junction.

So, actually, no-level up run will make the game even easier to pass, as you can always get overpowered with the best magic (especially when you'll get Ragnarok), while your enemies will be at their basic condition.

Now, let's move to the section's subject, which is avoiding getting exp from battles.

At first, you need to make a decission that will affect your whole playthrough. To trigger "Contrived Finish" achievement, you need to pass the game having Squall at his starting level. That doesn't apply to the rest. Thus, you may allow yourself few level ups for the others, just to simplify your goal.

There're 3 types of battles you will encounter.

  • Boss fights - you won't get any experience here, so you shouldn't worry here at all.
  • Random encounter - you will get experience here, so you must avoid / flee / turn enemies into rock / cards in such fights.
  • Forced battles with mobs - you will also get exp here, and that's the main issue, because you can't avoid or run away from such battles. They are story-related.
[/b][/list]

Now the decission I was talking about is whether you want to pass the game without leveling up at all (I mean all party) or just Squall. For the first option, you really need to read some advanced guide, if you're not sure about it, because this one won't cover enough info you need.

In my guide, I will try to keep approx party level as low as possible, but still it allows you to get some exp. There're only a few fights, where you are more likely to get exp and I will try to minimize it.

Let's take a closer look:

Random encounters - The easiest way is just to avoid them or run away. However, you won't get any AP along with exp. But you will want getting some AP to learn some skills from your GFs (Summons). Some of them are totally must-have, so you will still have to do some fights.

Forced battles - You can't avoid them or run, but you actually can avoid getting experience.

How to do it?

  • You can use Break magic. Once all enemies are pertified, the fight will end. You won't get any EXP. However, you won't get AP and items.
  • You can use Card command learned from Quezacotl. That's the thing you will use mostly. Once an enemy gets weak (crit hp isn't necessary) - use this command to turn it into a card for Triple Triad mini-game. You will get AP and items but not exp. Don't risk. Use "Scan" magic, if you think you can kill a mob with a single hit. Otherwise, you will have to save your game every 10 minutes.

The second best source for AP are bosses. They give AP and items, but not exp in any case of fight.

There're also some exceptions. You can't turn bosses and human-type enemies into cards. You will encounter some forced battles very early in the game.

The other important zone with forced battles is Laguna's Esthar dream. Please, don't miss it!
Laguna is always synced to Squall. It means, if you will get exp with Laguna, it will sync back to Squall. Same applies for the other party members.

Last few tips before we get to the next section...

- If you damage an enemy and run, you will still get exp. This doesn't apply to Card command. So please don't do it.
- A character who makes the last hit - gets the most exp. If you killed an enemy with GF - exp will separate naturally between party.
- The best spot to grind AP is Cactuar Island. Once you beat Jumbo Cactuar, you will encounter smaller cactuars. They will give you the most AP in-game between mobs. They also give very few exp points.

A cactuar at level 100 will give you only 100 exp points, while level 1 one will give you 1 exp point. You can use LVL Down command from GF Tonberry to reduce mobs' level, thus - incoming exp.


Must-have Abilities and Junction Tips
Here we go.

Junction

As you all already know, your best friend in this game is magic junction. You should already know the best fusion by far, but I'll attach it anyway.

The best magic for stat boost is Ultima. Always use a full stack of magic for junction and avoid using magic at all.

However, you can't fuse Ultima with every stat, so I'll give you my personal preference. I always aim on STR and SPD. The faster fight ends - less problems you have. And you won't really need high VIT/SPR and HP, except last boss fights.

HP: Full-Life
Strength: Ultima
Vitality: Regen or Meltdown (but you will probably use it sometimes)
Magic: Pain
Spirit: Reflect
Speed: Triple
Evasion:Tornado
Hit %: Aura (but you will probably use it sometimes)
Luck: Death

The best spot to draw magic are Islands Closest to Heaven & Hell.


That will be your main source of increasing stats for end-game challenge. Don't forget to draw magic from enemies, you will really need it.

Abilities

The first ability you must learn is...

Card - Turns enemies into cards. Learned from Quezacotl for 40 AP.

You can run away from the enemies all the way up to Dollet SeeD mission. You will also get 20 AP from ifrit boss fight. The other 20 points you will get from Seifer in Dollet, or from Elvoret (10).

Enc-None - No random encounters. Learned from Diablos for 100 AP.

If you think you're enough geared with junction/abilities to pass the bosses, you can just speedrun w/o fighting any mobs at all. This is the best way to avoid exp, obviously.

LVL-Down - An enemy goes down in levels along with stats and outcoming exp. Very useful one. Learned from Tonberry (I think it's learned by default).

The other top-priority abilities are cards/items/magic-refining like Card-Mod. Anything that turn items into magic is always appreciated.

Obviously, you will need all of *Stat*-J abilities. Abilities that boost stats are awesome, but require a good amount of AP usually. Don't waste your time on GFHP+ or SumMagic+ abilities. You simply won't ever use it.

Attention! Next section will have major spoilers!

Walkthrough Part 1
So how to start a game and what exactly to do?

I'll try to state very short how I actually did it step-by-step. Also I decided to point out some places where you can screw up and get exp.

Part 1
  • Once you've got Quetzalcoatl - immediately set skill Card (40 AP) to learn. Next you might want to learn Card Mod (80 AP). After that, I'd suggest to focus on Junction abilities. Same goes for other basic GFs. You will need to raise your stats with magic junction as it will be kind of the only power-up for you during whole game.
  • Just run away from every battle with D+F keys till you reach Dollet SeeD mission. Draw some Scan magic from Bite Bugs.
  • For Ifrit just learn Str-J and HP-J. Then you can focus on Str bonuses.
  • Then you will get Seifer. Don't rush. Kill Squall and Zell and try to grind some AP with him. Once Selphie joins a party - your members will be ressurected and will have 1 HP. Don't forget to heal yourself.
  • If you decide to grab some levels with Seifer - aim to level up Ifrit to 10 to learn Ammo-RF (30 AP). You will need it to get Lionheart - the best Squall's weapon. However, I skipped it cause you can do it more effectively with Edea in Part 3.
  • Don't forget to draw Siren. Learn Tool-RF (30 AP) and Treatment (100 AP, gets available at lvl.12) from her.
  • After SeeD party Quistis will invite you to training center. Avoid fighting T-Rex, and try to master Card ability on Grat (it's not much dangerous). Use Scan on it, it should be about 220 HP, so manage your attacks till he gets weak and then use Card command. Consider, it can miss even if HP is critical. If you're sure your enemy is enough weak - just try again, don't risk killing it.
  • Get Magic Lamp from Cid, save, and prepare for a tough fight. You must get Diablos asap, so you have to fight bare-handed. It might take several tries to get him. Consider, that you shouldn't rely much on your GFs as attacks like Gravija and Demi deal superb damage to them and can wipe them out in 1 shot. You might want to draw and use some Demi, however, my party members couldn't draw it. Try using limits as much as you can. Just wait till Diablos will use Gravija and then your HP will be more likely critical. For Selphie, try to manage her gauge so she acts right after Squall / Zell limits. Use Full-Cure and you should be fine.
  • Learn Enc-Half (30 AP) and then Enc-None (100 AP) from Diablos - that's one of your key-abilities.
  • In Timber, don't attack Galbadian soldiers, just avoid them at any cost - they can't be carded.
  • Here comes the sad part - in an encounter before Pub you can't run nor use Card on G-Soldiers, so you should kill Squall before attacking them, but you will still get around 150 exp for other party memebers. The only alternative option you could use is Break magic through Selphie's slots, but that won't be easy to get.
  • Same goes for Esthar "dreams" sequence. Kill Laguna and keep him dead right to the end. There will be at least 2 forced battles. All you can do here is to minimize the number of Esthar soldiers in the last encounter to reduce incoming exp.
  • Go get GF Brothers. For them, just learn junction abilities and then aim for HP+80% as you will need to have 9999 HP for the other achievement. If you have hard time beating them, I'd suggest to use Protect on every member and hit with limits. Haste would be good too (you should've grabbed it in G-Garden).
  • Before returning to Delling, I'd focus on grinding more AP. Just near the Tomb of the Unknown King you will face Thrustaevis most of the times. He isn't dangerous at all, but gives 3 AP. At that point, I learned Enc-None and the most of basic junction abilities.

Now, a very important part comes!

You can simplify your playthrough a lot if you use Magic Booster at this point of the game.
What are the reasons to use it?

  • If you have hard time playing on low-level formation.
  • If you don't get along well with Card-style fighting.
  • If you want to save a lot of time you will spend on drawing magic.

Each of 6 party members will receive the following magic stocked up to the maximum: Cure, Cura, Curaga, Fire, Fira, Blizzard, Blizzara, Thunder, Thundara, Sleep, Blind, Silence, Berserk, Bio, Esuna, Aero, Confuse, Break, Zombie.

Obviously, attaching 100 of Curaga to HP will raise it up to the heavens. You should have about 2000-3000 HP with it.

Sadly nothing much of that can pump your Str that well, but still you will be at least 2x more powerful.

So what are the benefits?

  • Pretty much you can just set up Enc-None for now and just speedrun to the 3rd disc where you will have a chance to learn the rest of GFs abilities more effectively and faster. HP cap will cover your defences, you just need to grab some smooth magic to increase Str. You can do it on the 2-nd part.
  • You will be fully stocked with Break magic, so now you have better odds to end screwed-up or forced battles w/o getting exp.
  • Again, avoiding fights will save a tonn of your precious time.

Well, to sum up, it's kinda of dirty way, I agree, though it was Square who enforced this "cheating" to the game. You can skip this and just keep up with using Card command to fully experience low-level playthrough. The reason I used it was Rinoa. She can really screw up things with her random Angelo pop-up, plus, you have always chance to kill an enemy with random crit. Such things can make the game less enjoyable. So that's up to you and your patience. You will still need to get back to Card-style later in the game to draw some magic and grind AP anyway, so it's not that crucial after all.

Let's get back to walkthrough.[/list]

  • Don't forget to draw Carbuncle. After learning junction abilities aim for Counter (200 AP).

Well, that's it!
Walkthrough Part 2
Okay, after Laguna's sequence we're back to main party, and here the fun starts!
If you decided to use Magic Booster - this whole part should be a piece of cake, so you can just aim on drawing magic.

Part 2
  • Draw as many Haste, Regen and Reflect as you can from Biggs & Wedge. They also count as bosses, so you won't get exp from them, though Squall isn't in a party anyway.
  • Also at that time I set Mug (200 AP) to learn. It's Diablos' ability. Can be really useful later in the game.
  • Same for GIM52A. Stock up Haste with them.
  • Nothing much interesting in Missle Base, just try to stay undercover till the end to minimize exp.
  • When you return to Balamb Garden with Squall - do a trick. You will have to fight some really weak monsters that will be easily 1-shot killed. So choose 1 member and remove a magic junction from Str. Be careful, make sure to scan every enemy and attack only with your weakened comrade. Use Card to finish them.
  • One of your foes will be a Bomb. If you used auto-junction, Fira should be sticked to elemental attack, thus, the only safe way is to use some neutral magic like Thunder or Bio with the character who has least Mag power.
  • The other tricky one is Granaldo. He can't be carded, so you should kill Squall.
  • Don't forget to draw Leviathan from NORG. Set up Recover (200 AP) to learn.
  • In FH remember to draw Ultima from the hidden spot in Mayor Dobe's house every time you visit this place.
  • Kill Squall before helping Mayor Dobe with G-Soldiers. Remember that you must have some Life magic or Item command to resurrect him for the next battle.

Then you'll take controls on Balamb, so you can do sidequests and stuff. Usually I go play cards, search for magazines, etc. You can also try to get Lionheart for Squall if you leveld up Ifrit with Seifer in Dollet SeeD mission.

But be careful! Don't visit Centra Ruins yet! Or Odin will screw your life really hard.

In Shumi Village there's another Ultima draw point. Try go get as much as you can.

Let's get back to main story.

  • Draw Pandemona and set up Spd-J (120 AP) to learn. Then you can attach it to your damage-dealer (Squall would fit the best) and use 100 Haste for Spd-Junction.
  • In the G-Garden encounter you will fight with 4 Paratroopers. Again, kill Squall first to prevent getting exp.
  • Once you finished with Cerberus, set up Spd-J (120 AP) for him as well. You should have learned other basic juction abilities with other GFs by far.
  • Don't forget to draw Alexander from Edea. There're many abilities to learn, but consider you must have Med Data (200 AP) and Med LVL-Up (120 AP) for summoning GF Doomtrain.

    That's about it.
Walkthrough Part 3 [1/2]
Cool! You're pretty close to Ragnarok now, so soon you will be totally unbeatable. Though again I doubt that you had any problems beating enemies before.

Part 3
  • Be careful with another Laguna's dream world. You will fight Ruby Dragon here. He drains fire attacks, so if you use Fira as Stat-Atk-J - it will heal him. You don't need to kill Laguna here. Just hit a dragon with your limits, but watch out, he should have about 4500 HP only. When he's weakened - just use Card on him.

And here comes another major part. When you get Edea in your party - you must get some level-ups with her. Well, you can grind AP for your newly obtained GFs but that doesn't matter that much at this point.

Your aim should be to level up Ifrit to lvl.10 and Siren to lvl.12.
Well, Siren might be optional, but having Treatment (100 AP) which unlocks only at level 12 is a good idea. Your main goal is Ammo-RF (30 AP) from Ifrit, which unlocks at level 10.

So, once you're in Esthar continent, set Edea in your party and kill the rest. Don't bother fighting with enemies in the world map. Enter the story-related location but don't go further than 2-3 screens from the start.

If you used Magic Booster, she will have all that magic as well, so you don't need to share any with her.

Now comes a tricky part. If you attach all of GFs to her, they will get a lot of AP but exp. will be miserable as GFs will share it between them. Thus, I used Ifrit and Siren only. So my only option was to use Ifrit's Str + % abilities to attack physically.

Your only enemy will be Vysage in many forms - 2 arms + head, 2 arms, 4 arms and rarely just a head. They might be dangerous, especially 4 arms at once. Head is also might be tricky, cause it can easily confuse you. You can stay safe if you keep your HP topped up - but I can't stand long fights, so usually I go with limits. But arms usually cast Slow and you will be a piece of cake for them if your HP is critical and there're 4 of them. So if you have troubles leveling up in this location - here're some advices.

  • Gather all Slow magic from your party members and give it to Edea. Use it for Stat-Def along with Esuna.
  • If the only GF you use are Ifrit and Siren you can cover Vit and Spr losses with Shiva. But it won't be that significant.
  • If you learned HP + 80% from GF Brothers - you can use it so you will have slightly more Critical HP cap. Thus you can stay safe while attacking with limits.
  • And my favourite one - use Pandemona or Cerberus with Spd-J. 100 Haste should make you hit 4-5 times in a row between enemy turns. If for some reason you didn't stock up with Haste in a prison - you can draw it from Vysage. From it's head, to be precise.


Now you should be fine. When you're done there, don't forget to return Haste & Slow and other magic you exchanged from her. Revive your party, make a common character's setup (without Edea this time) and head for Abadon. Don't forget to use juction and attach all of GFs to party members. Switch on Enc-None.

  • In another Laguna's dreams sequence there will be lots of forced battles with Esthar soldiers. They can't be carded and you can't run. You will have to deal with 1st Esthar soldier with Laguna only. There shouldn't be much exp, but still watch out. Kill Laguna for the rest of battles when your comrades will team up with you.
  • During Lunatic Pandrora's attack on Esthar, Zell's team will have to get into another forced battle, luckily you don't have Squall with you.
  • You can stay calm inside Ragnarok. Propagators don't give exp, so you can act freely with them. Just kill the pairs of same-coloured creatures to progress.

And we're up to another, the biggest spin-off from the main story. Now we have Ragnarok so we will visit all of the secret locations, do quests, grind AP, upgrade weapons, stock with magic and etc.

  • My first location were Islands Close to Heaven & Hell. I visited it just once and stocked mostly some Ultima for Squall, as he already used it as Str-J. I don't really need it much now but I'll definetly come back later!
  • Next destination is Cactuar Island. I got GF Cactuar here. Again, nothing really mandatory between his abilities, but I set Luck-J to learn. Might be useful under some circumstances later.
  • And that is the place to grind AP. If you don't want to level up your secondary characters, try to Card cactuars. However, consider, say lvl10. cactuar will have only ~250 HP, so choose your least powerful character and remove Str-J - he will be the only one to attack it, just once and them try to Card asap as they will flee very fast. Remember, they're insanely evasive. I'd rather recommend to kill Squall just for sure and keep just attack them in any way possible. They give insane amount of AP, but like 10 exp for whole party, so you will barely level up there. But don't spend too much time here. My aim was to get Alexander's abilities for summoning GF Doomtrain. You'd better get back here when you will have all or the most of GFs.
  • Our next goal is Centra Ruins. That's pretty sad, cause Odin will now appear randomly and screw things a bit somtimes, but luckily there aren't many fights left. But the main reason to get there is GF Tonberry. We actually need him to get the best weapon for Squall.
  • First, set Enc-None, and go crush Odin freely.
  • Get back to the world map, save, return and go past 2 screens and hunt for Tonberry. Don't worry, they don't give exp. Over time, a big one should appear - give him a warm welcome. For GF Tonberry you should aim for his "shopping" abilities.

Now we can have Lionheart for Squall!

  • First, fly to Trabia continent. You need a place western to Trabia Garden. People might tell you to look in forests around Trabia Garden - but from what I know that's not really correct. Those forests are in Bika Snowfield, while you need forests of Hawkwind Plains - that's there I found low-level Blue Dragon pretty fast. Just one left me 4 pieces of Dragon Fang - that's exactly what I need.

I found a nice map where every region is marked and named, you could use it.


Hope you got that Dragon Fangs too. Now let's move forward.

  • Look at the north of Galbadia continent and you will find a place called Long Horn Island. Fly there and search for Adamantoise in the shores. But the tricky part is that only lvl 30+ Adamantoise will drop Adamantine - another item you need for Lionheart. That's where LVL-Up from GF Tonberry should be used. Kill Squall or you risk getting a lvl-up here easily. Equip this ability to your another party member and just wait for Adamantoise to appear. Then, use LVL-Up on it few times. Scan to make sure it's above 30 - then attack. Eventually, it should drop a desired item. You could also get this item through Card Mod, but we're collecting cards, right?
  • And the last item you need is 12 Pulse Ammo. It would be safer to just refine 20 Elnoyle cards, but if you're up for looting, then I'd suggest to prepare a bit.

Read the next section to continue.
Walkthrough Part 3 [2/2]
Okay, we're back here. Let's continue our quest for Lionheart.

We'll be heading to Deep Sea Research Facility. So, here're some tips:

  • Kill Squall before flying there.
  • Choose 2 characters that won't be participating in the last battles, including Omega Weapon.
  • Make sure Squall has decent Str so you won't have troubles beating Bahamut.
  • Equip LVL-Up and make to have some Scan magic.
  • Enter the facility and carefully sneak to blue shining core.
  • There you will fight Ruby Dragon twice. It's a second source of Energy Crystal - the item we will need to refine Pulse Ammo.

The best source of crystals is actually Elnoyle and you can find him really easily, inside Esthar city:


But...sadly, he's immune to LVL-Up and you can't make crystals drop from low-level Elnoyle, so yeah...let's deal with it.

  • Okay, back to Ruby Dragon fights. Make sure to Scan them and then use LVL-Up. Your aim is 45+ lvl. After that you're free to finish them off. Though they will more likely to drop Fury Fragment, but still there's a good chance for Energy Crystal. Usually, they will drop 2 of them.
  • The third one will be Bahamut. Revive Squall and finish him.
  • Once he's your GF - you're free to learn anything. I would aim for Rare Item (250 AP), but it's up to you. His real treasure is Forbid Mag-RF.

Don't enter the basement yet, return to the world map and find any weapon-upgrade shop. Go get your Lionheart. Now you're super-tough!

If you think you're ready for Ultima Weapon, then prepare yourself. Check your juction for Squall and make sure you're good to go.
  • 100 Ultima for Str-J
  • 100 Haste for Spd-J
  • You have Lionheart as a weapon.
  • Equip Str + 60% from Bahamut and Str + 40% from Pandemona.
  • Now your Str should be 255 - at it's maximum. Additionally, you could use Meltdown on Ultima Weapon, but I doubt you will have problems anyway.
  • You could also use Initiative so you can kill any enemy before they know it if you stay with critical HP all the way, but for this fight - don't forget to draw GF Eden from Ultima Weapon before you attack!

Make sure to talk to your comrades inside Ragnarok and return to Deep Sea Research Facility and get through the hole in the floor. There will be puzzle with RSP units. You should know how to solve it, but here's a little reminder just in case - 4, then 2, then 4 to open Steam Room (left of the screen). There you can gain 7 units back. Now choose 1 to open another. Again 1. And 1 once more. If you have 14 by the bottom floor - you did right. Now spend another 4 to get to the Ultima Weapon's location. And use last 10 units to summon Ultima Weapon. If you did everything mentioned above - you should kill it with 1-2 limits.

Now you've got another GF and 100 Ultima Stones. Use Forbid Mag-RF to refine the stones to Ultima spells. As Squall should already be stocked to the maximum by far, give it to your another damage-dealer. For me, it's Zell. That's simple because if you use his limits in a right way - they can be absolutely deadly.

Now it's time to get the last GF - Doomtrain.
  • If you still don't have 6 Steel Pipes for some reason and you're lazy to play for Elastoid cards which are pretty common - fly to Hasberry Plains near Dollet. There will be a forest surrounded by mountains. There you can find low-level Wendigo. He usually comes with another mobs, so if you want to minimize exp - you can Mug Steel Pipes and run. Removing Str-J from the one who mugs also gives you more chances.
  • Now the hardest part. Fly to Grandidi Forest in Esthar continent. Search the forest on the top of the mountains - that's the place to find low-level Malboro. If you have troubles avoiding Bad Breath - use Quistis. Come with critical HP, set up Initiative and just use Degenerator as soon as battle starts. Alternative option is Card Mod. Refine 4 Malboro cards to 1 Tentacle. In the end you should get 6 Malboro Tentactles. Might take some time, so save frequently.
  • And the last piece is fairly easy. Enter any shop and stock 60 Remedy. Then use Med LVL Up and turn them into 6 Remedy +.
  • Use Solomon Ring in your inventory.

Well, now you're pretty much free to do anything you like. If you want to learn some more abilities - fly to Cactuar Island. If you want to stock some magic - fly to Close to Hell & Heaven Islands. Actually, just your Squall in his current formation is already good to crush all of the remaining bosses. But if you aim for Omega Weapon - you should also have another damage-dealer. I usually use Zell with his limits. I will throw-in some tactics tips in Part 4, but as for now, try to upgrade to upgrade his weapon to the best you can, give him 100 Ultima you got from refining stones and give him Cerberus for Spd-J. Luck-J would also fit Zell, because during his limit breaks he make tonns of hits, so that would help as well. Hit-J could also have a point, but again only for Zell. Squall had 255% all the way.

So if we will be fast enough, we can defeat Omega Weapon before its' deadly moves. We will need the following magic:
  • Str-J - Ultima. You should already have Squall and Zell stocked up with it by far. You can draw it from Islands Close to Heaven & Hell.
  • Spd-J - Triple. You can draw it from Islands Close to Heaven & Hell. If you're lazy to stock 200 Triple - you can alternatively use 100 Haste + Auto-Haste learned from Cerberus for the second character.
  • Luck-J - Death. You can easily draw it from Tonberry. Alternatively low-level Torama in Esthar. But the best option is refining Chef's Knives with L Mag-RF
  • HIt-J - Aura. Again, Islands Close to Heaven & Hell. You need it only for Zell if he's your second damage-dealer.
  • HP-J - Full-Life. Well, that's more likely for the third character who's gonna be just supporting a party and be ready to resurrect, cast Meltdown and etc. It's really recommended to have one with 9999 HP for Omega Weapon fight. With all that HP + % abilities and full stock of Full-Life you should easily reach it. Would also be good to give this character all high-level magic you've got on Islands, but don't use for damage-dealers to improve Spr and Vit.

If you think you need to take care of defenses - read Junction tips section above.

When you done all your business in the game - come back to the main story. But consider the most of locations will be sealed in the last part of the game, so think twice. Then head for Lunatic Pandora. There won't be any forced battles, only bosses, so you can use Enc-None and not worry much. My Squall and Zell had 255 Str, so they just didn't notice the bosses. By the way, here you can find a rare monster called Behemoth. If you didn't get Barrier item for Quistis' limit break earlier in the game - that's the best spot. You can also draw Tornado and Regen from him - these are very useful for junction.

Well, just finish the fights and prepare for Part 4.
Walkthrough Part 4 [1/2]
Hey folks, we're back in business! Go save Rinoa right now!

  • Adel fight was always known for making difficulties for those who don't get along well with the game's mechanics, but for us she will be a piece of cake - cause few physical attacks is all we need here. Don't risk killing Rinoa with your limits.
  • Then you will fight many Sorceress'. All of them should fall from 1 physical attack. Only the last one could give you some trouble. Better to kill her before countdown reaches zero.
  • Before entering Ultimecia's Castle, jump off the chain to the middle portal. Head for the top north-eastern part of Centra continent. There you will find a Chocobo Forest.
  • Ride a chocobo to the south and cross the ocean. You should find a shore not far from Edea's House.
  • Once you're in the sourthern continent, make your way to Kashkabald Desert. Check the map below to make sure you know where you're going. There you will find a Ragnarok.


  • As I said before, the most of locations will be sealed, but still you can draw magic, grind AP and even play cards. If you think you're done everything to finish the game - enter a portal just near the place where you've found Ragnarok and go straight to Ultimecia's Castle.

Okay, now the final battles are about to begin. I really hope you did everything I mention in my walkthrough. I also hope you already passed the game at least once, as I asked in the very beginning, thus you should know that your abilities will be sealed. You can't really screw up here anywhere if your Enc-None is on. And if you don't have some of missable GFs - that's your last chance to get them. You can draw them from mini-bosses.

  • First battle on the stairs is Sphinxara. Just hit it few times and it's dead. Choose Limit Break.
  • Then go right, again right, then down the stairs to the door north of the room. There should be an art gallery. Check all the paintings on both floors, then examine the biggest one at the first floor and enter Vividarium, Intervigilium, Viator. Then burn Trauma with your limits. Choose Magic.
  • Now get back to place of your first encounter and go through central door. Step on the big chandelier. Open a hatch and go down to the basement. Kill Tri-Point and unlock Resurrection.
  • Now you're much more safe. Climb up back and use a door from the left of the room to get back to the main hall. From there return back to art gallery room. Go through the northern door straight into another basement which is armory. You will face Red Giant. He has insane Vitality, so you could use Meltdown before using limits. Choose Save. The order of unlocking other sealed abilities is up to you.
  • Return to the entrance of armory, where you will find a green spot. Switch to another party. Remember to use Junction Exchange for the character who uses Diablos with Enc-None. Don't equip others - you won't fight. Just go up the stairs and through the central door. Again fall down with chandelier but now search for a lever in the right side of the room. Switch back to main party. Exchange Diablos again. With your main party return to the main hall and pass through chandelier which is fixed and won't fall now. You will fight Krysta. It will cast Ultima before dying no matter what, so make sure you have at least one character with full HP.
  • Now find the closest switch point. Get controls on 2nd team and don't forget to use Enc-None. You should be still holding the lever, right? Go to the northern door, pass by fountain and open another door. You sense something evil here, right? ;) But we'll get back here later. For now use a ladder here to climb up - you should see a hinged bridge with key in the middle. Just run straight to it and it will eventually fall down. Now get back to the closest switch point (should be near fountain) and switch to the main party. Again, Enc-None. And go all the way back to armory through art-gallery. There will be a key glowing in the water, pick it up and open a door just near you. Fight Gargantua. Nothing special except pretty powerful counter-attacks.
  • Make all the way back to the main hall. You could exit Ultimecia's Castle to save your progress near the entrance - it was also teleport your 2nd team to the main hall - it will be closer to our next aim. Now switch to your 2nd team, go upstairs, but enter a door from the left now. Just keeping runing forward until you reach elevators. Stand on the lower one and use a switch. With the main party return to the armory entrance, but for now go upstairs and to the left. Another save-point here. Step on the upper elevator and switch. Your second team should pick floodgate key. Now return to the armory's entrance...yeah, again. To the screen where you picked up a key in the water. See another lever here? Use it. Now run to the fountain to pick another key. If you forgot where it is - you should find a room with chandelier (central door upstairs in the main hall). Once you fall down - head north. There will be a fountain with a key. Now...uh, make the same way you did with your 2nd party to reach the lower elevator. There should be a long corridor. Try to examine the western wall there and you should find a secret door. There will be a puzzle, but actually just click anything and eventually all of the chests (or whatever it is) will open at once. Finally, kill Catoblepas. But be careful, he will cast Meteor, so keep your HP high enough.
  • And the last one is fairly easy to find. Remember a hinged bridge with a key in the middle? Pass this screen and enter a door from the left. Go all the way up the tower till you reach pendulum. Stop at the top left point where you can jump on it. There will be a balcony with Tiamat. Just kill it asap.

Ready for Omega Weapon? Then return to the screen with fountain with main party and switch to another. With your 2nd party run to the Save point to the left from armory. Now return to a screen just before art-gallery (as if you used right door upstairs from the main hall). There should be a rope and switch point nearby. If your main party is ready, then hit the bell, switch and enter a door next to the fountain. But better prepare twice.

Read next section to continue.
Walkthrough Part 4 [2/2] + Omega Weapon
Let's back for Omega Weapon fight preparations.

Here's what you'll need:

  • Squall and Zell as damage-dealers. They should have critical HP to be ready to hit with limits immediately. Make sure that both of their limits are manually controlled. Their Str must be 255. You should have Lionheart. You should have Spd-J and Luck-J (you should have obtained Luck-J Scroll for the Obel Lake Quest). Hit-J for Zell would be good too. I told you to prepare a magic for it in Part 3 [2/2] section.
  • Your 3rd character would be a supporter. For this fight, I'd set Initiative to immediately cast Meltdown. If you have Mega Phoenix item - rearrange your inventory the way it would be first in the list. Alternatively, prepare Life and Phoenix Down just in case.
  • Your characters' level shouldn't be multiple by 5 or you'll die from the first move. You could use Death for Stat-Def, but you need this magic for Luck-J, so think yourself.
  • I'd also set Battle Speed to 25-50% cause literally every second matters here.

Now for the tactics. Omega Weapon always acts the same way.
  • First off, it will use LVL 5 Death but it should pass by as we prepared for it.
  • With our 3rd character cast Meltdown. Your HP must be 9999 all the way. Keep your action gauge up to act right after enemy's turn.
  • For damage-dealers burn Omega Weapon with limits. For Zell - always use first 2-keys moves. Just keep your right hand at -> + <- to hit with Booya and left hand on V + X to use Punch Rush. If you're good enough, you can hit every 0,10 - 0, 30 seconds.
  • Honestly, I killed my lvl. 11 Omega Weapon with just one Lionheart. If for some reason you didn't get a good limit with Squall and Zell couldn't finsih it - you're probably doing something wrong.
  • Next move will be Meteor and it will more likely kill your damage-dealers. Now revive them with your 3rd character and you have a second chance to finish the beast. There's no way it can surivive if you went there with low-level party. If it's still alive, I'd rather check it with Scan for its' level.
  • If your party still can't finish it - its' next move will be Medigo Flame with it's 9998 damage. If your 3rd character has top HP - revive others and don't worry much cause next move is Gravija and it can't kill you anyway.
  • From here, I'd actually say that even lvl 100 Omega could be dead by far if you prepared well for the fight...by just in case, its' next moves are Terra Break that will kill whole party, so you should have equipped Defend from GF Brothers - the only good way to avoid it. Then Ultima and Light Pillar that will kill just one character. That's the end of sequence which starts from Meteor. He will also attack physically sometimes.

Well, I hope you were able to kill it before Meteor. If so - final battles with Ultimecia's forms won't last long. Check Tutorial - Information - Proof of Omega for a sweet bonus. From the point where you killed Omega Weapon - go all the way up the tower, as if you went for Tiamat. Ignore pendulum for now and just go further. Get across big clocks and go down, then use a ladder just under them. Run to the last Save point.

That's it, folks! There're no good tactics for the last battles - just do your best with limits.

Hope my guide was a bit of help for you! Thanks for reading :)
Conclusion
With all this information, you shouldn't have troubles with getting this achievement. You just need some time to get use to Card-style way of passing the game. You need to practice with carding mobs and you're better be good at Triple Triad.

I also would like to make additional comment on using Magic Booster. The magic you'll get from that pack is only good for the first half of the game. Of course, battles will be much easier if you used it at the point I mentioned in my walkthrough. Well, mostly because of critical HP cap. You'll have a "safe zone" where you can hit with limits every turn and still have enough HP to keep you alive. But the only real point to use it - to save time on drawing magic. After getting controls on Balamb, you will have a chance to draw the better magic, including Ultima - the best magic for almost any stat-junction. You also will have a chance to meet various mobs and draw magic from them as well. And of course, after getting Ragnarok all that magic from the Booster will be useless. Using it right from the start of the game is silly, to be honest, because you will just make things more complicated. You will be killing everything w/o a chance to use "Card" properly. Meanwhile you still have to learn lots of GFs abilities, including Stat-J and Enc-None before using it. Thus, this Booster is only useful for a very short period of time and you can easily pass on using it.

I hope I helped you in some way, so good luck on your journey to 100% of achievements!

P.S. English is my second language, so perhaps I made some mistakes or typos. Thus, all corrections / critics / questions / comments are welcomed.

Written for all of the FF fans by Beam123

59 Comments
500lbs E-begger 14 May, 2024 @ 10:18pm 
I would recommend killing Squall and making him stay dead. You only get in 1 mandatory fight with Laguna on disc 2 and if you prepare, you can use Tonberry to lvl down the enemy so you only get 2xp
Etherreth 18 Feb, 2024 @ 9:24am 
1. Quezacoalt's Card: Set Quez to learn "Card" right after you get him. Defeating Ifrit gives you 10 AP. You can grind another 30 AP by killing the mobs in the Fire Cavern. If you are a perfectionist, just avoid all battles and wait till Dollet mission, then solo with Seifer until you got Card.

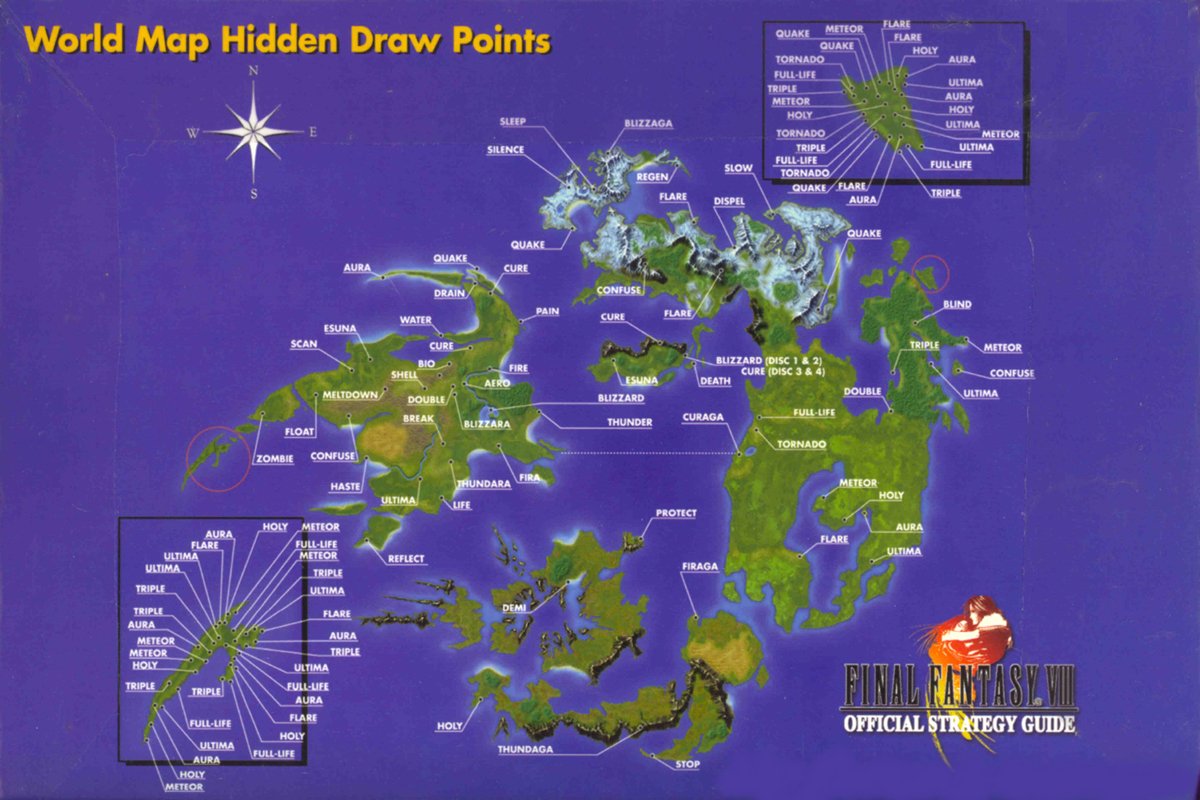
2. Diablos -> ST Magic Refine and No Encounter.
Triple Triad > cockatrice pinions > Break. You can use Break magic on unavoidable battle.

3. Never let Laguna gain a level. Again, get Break magic. When you get in Dreamworld the second time (The tear point dungeon), make sure you set up all the trap to minimize mandatory enemies. You may also want to kill Laguna off if feel like lazy.

4. Breezing. The rest of work is just grinding through, get everything and beat Ultimacia in whenever way you pleased. I recommend just grab some invincible items and storm through the castle.
Alpha-methyl 12 Feb, 2024 @ 7:15am 
Agreed, I think going for all the achievements on the first play through would thoroughly ruin the game for me - or would have, rather, had I not played it back in the day.

I guess I was never much of an achievement hunter though, it always seemed like it turned my leisure time into something akin to having to stop gaming to go to work - it's a similar feeling at times. Definitely not the one I seek when I sit down to do me some gaming.
NeoDraconis 11 Nov, 2022 @ 8:33am 
You can choose not to crush Odin and still get the Tonberry GF by simply hunting Tonberries in that area but leaving whenever the timer gets to low before re-entering to reset the timer.
beamless  [author] 16 Feb, 2022 @ 10:10am 
I believe there're more moments where Squall is fixed in your party, + Laguna shares his exp,so if you accidently level him up, Squall gets it too.

If you are aware of such momemnts, just go briefly through this guide, they're all pointed out. Otherwise yes, you can keep him out of party and KO/d
Jon.Topps 15 Feb, 2022 @ 5:40pm 
Are there any moments where you HAVE to use Squall? Otherwise, just keeping him out of party seems way better. I remember there being a time where you attack some base, and split into two teams, so I imagine that's one place where it would be difficult. Any others?
beamless  [author] 15 Feb, 2022 @ 2:43am 
You can, but enemies level is scaled to your party, so no-leveling at all and skipping random encounters is just much-much easier and faster playthrough.
Birkinsmith 15 Feb, 2022 @ 2:23am 
Cant you just go through the game with Squall KO'ed?
beamless  [author] 2 Jan, 2022 @ 3:40pm 
I did get some exp either on forced battles but still got the achievement (if I remember correct). I didn't use any other guide or whatever so basically my guide is my first playthrough pointing out my mistakes
Psychodelic Ramen 2 Jan, 2022 @ 10:02am 
Does anyone know if the achievement is bound to the level or the exp themselves?
Early game i killed one enemy. Squall gained a few exp through that but is still level 7. Does the achievement still unlock or am i not allowed to get any exp at all?