Natural Selection 2

Natural Selection 2

48 ratings
Commanding as a Sanji
By Schrödinger's Katz
This guide will help you on your way to be a commander in NS2
3
2
   
Award
Favorite
Favorited
Unfavorite
Foreword
Disclaimer: I am no longer playing ns2, and as such this guide will not be updated with upcomming changes or strategies made past the build 340. Modifications done on maps or balance, such as some arc locations or items price, could change in new versions of the game and could invalidate some of the content from this guide.

---

Hello, This guide is a collection of drafts, notes and experiments. You might have seen me ingame named as Schrödinger's Katz [ns2panel.ocservers.com] :p

This guide covers most of the basics of marine commanding, and a bit of alien commanding. Advance commanding including drifters micro management, cyst aggressive expansion, bait hives, forward PVE, tactical scans and beacons, and all the sublte competitive strategies you could find in replay of NSL finals matches.

Still, I hope it will give inspiration for future commanders, and the courage for them to keep climbing that learning curve. You got a lots to learn. Prepare yourselves!

If you want more reading, I would recommand this guide made by Blind about marine strategies, it's rather good:
* https://docs.google.com/document/d/1RIVwXTN9G9NEfTkcou-x_cqL6sxThqlHJA7ptX_ccwU/edit

There is also the youtube videos from ISEGaming (aka "It's Super Effective"). It's a bit outdated but entertaining and covers a good amount of what you need to know.
* List of videos
* NS2 Tactical Operations - Commanding Hub
* NS2 Tactical Operations - Marine Commander Basics
* NS2 Tactical Operations - Marine Advanced Commanding ( Part 1 )
* NS2 Tactical Operations - Marine Commanding Advanced (Part 2.1 and 2.2)
* NS2 Tactical Operations - Marine Commanding Advanced (Part 2.3)
* NS2 Tactical Operations - Marine Comming Advanced - (Part 2.4 and 2.5)
* NS2 Tactical Operations - Marine Commanding Advanced (Part 2.5)
* Natural Selection 2 Marine Commander Strategies, Tactics, Tips, and Tricks
* Battle Report - Field Commanding Done Right


From other authors:
* https://www.youtube.com/watch?v=bxfqlyq9FDI (Natural Selection 2 Marine Commander Tutorial)
* https://www.youtube.com/watch?v=iFGP_XA4a5g (Natural Selection 2 Alien Commander Tutorial)

Thank you @Cat and @foxfromabyss for the spellcheck, and everyone involved for the feedbacks :)
Positive and clean communication (most important part)
A good commander is someone capable of behaving in a way that will lead the field players to follow him. It requires a good amount of self control (I am thinking of you, RTs and Gates I am losing because nobody is phasing or laning for the 10th time in a row). It also requires a good understanding of what your team is capable.

A good commander is also someone capable of adapting himself to the team he has. Sometimes nobody is listening, and that's the beauty of it. The eternal research for opportunities, and influencing the team playstyle with gates, weapons and upgrades. Having two people doing something as a team, even if it's not the best thing to do, is better to achieve victory than having two people doing a different thing. You, as a commander, have the power to either bring the team to follow you, or to enhance the team's native and chaotic behavior in unexpected ways ;).

Expect the team to be a brain dead army of headless chicken, deal with it, adapt, behave, and be grateful with every player listening to you.

I mean, if everyone is working as a team, whatever you do, it will works. It's up to you too adapt depending on that and enhance the flow.

--------------------------------

Tip 1: I hear the following often "the team is bad, that strat is a pro strat ...", if the commander is choosing a strategy the team can't pull off, or don't want to, it's not a good strategy. It's like trying to force your marines to eat vegetable, it's not working :p (eg: don't go sentries first if your team is fed up already)

Tip 2: Keep the voice communication clear. A commander talking non-stop prevents the player from listening for footsteps.

Tip 3: Be gentle, be polite, never be negative, and always cheer your players. Call them by their names, and give clear directions.

Tip 4: State your intention and your strategy, the team needs to be on the same page as you.

Tip 5: You can know how many aliens are biting an RT by looking at its health pool, and how fast it is going down so you can call them and give the marines going to defend precious info.

Tip 6: As a commander, you usually don't need to jump out, but if you do and you are far, remember to call for someone to jump in the chair/hive and start the next upgrade.

Tip 7: Your gorges are usually too busy building stuff, tell them if marines are coming, they will appreciate it.


--------------------------------

Examples:
  • "SuperGorge", once you are done can you rotate there and build the RT please ?
  • "RamboMarine", you got parasited, can you please stand behind "ThatFullGuy" so you don't die in 2 bites? Thank you.
  • RT down! Great job "Max"
  • We have 2 skulks biting the RT there, (you see the RT health bar getting down more slowly), watch out, one is now ambushing you.
  • "Steeve", you are alone, can you wait for the marine behind you so you two can push together ?
  • The lerk in Nano is 20hp, finish him ! (as a com you read the health of aliens, communicate that info)
Tip for new commanders, and non-listening teams
If it's your first few time commanding, I highly recommand sticking to the classic and don't do anything special, yet. I have sadly witnessed willing people trying the role, with all the good will in the world but who get bashed because they brought the team down with sad mistakes.

Not respecting that tip will sadly get you ejected and untrusted.

You are learning, and that is really great but take it slow. If you command more, and people see that you know your job you will be given more room for advanced tactics. They will trust you. You will also have more experience to know when things turn wrong and when it's time to cancel an experimental strategy and adapt.

A tip from a friend:
`As a commander, you have to look at the skill level of your team. Even though you think you can coach them to victory, some low elo teams are just un-coachable. Keep this in mind before doing crazy strats.`

In other words, if you feel that your team doesn't have what it takes for crazy strats, keep it to the classic, well known stuff everyone is used to.
Classic tech path: Marines
Classic tech path: Aliens
How to: Medpack and ammo
There are a few things to account for when it's time to resupply your marines on health and ammo. Most of the time, you will hear a "I need a medpack", press space, and assist then.

The hard truth is that reacting to medpack alert will often make you med too late, let me explain myself: Pressing spacebar to jump to the alert is not always working as intended, and sometime it won't bring you on the right alert, and you could have many (A marine is asking for an RT to get dropped, you get 2 ammo requests, your research just finished, base is under attack by ... a parasite, etc).

As a commander, you need to predict which marines will get engaged, and hover above them. If you don't know how yet, just hover above the marines at the front line trying to push, and get your medpack ready to be dropped. Doing so will save many marines, especially on an ambush scenario.

If your marines are spamming medpack requests, or you see yourself reaching them mid-fight too often, chances are you are not there on time :)

Back to the use cases, here is a small list of situations you will encounter:

  • A marine won a fight and is low on health
  • A marine is shooting an RT, and is low on ammo
  • A marine is under attack
  • Marines are pushing a hive all-in against spore, spikes, fades, hydras and skulks


All those kind of situation will lead to the commander medding differently, and don't have the same purpose. Let's start with the easy one:

1) A marine won a fight and is low on health

This one is pretty straighforward, you give him one or two medpack depending on how wounded he is.

2) A marine is shooting an RT, and is low on ammo

If the marine is still shooting, the best here is to drop the ammopack in front of the marine, and not on him. That way he can pick it on its last clip and get a full refill, giving him a sense of responsibility and reward (it's like money, being handed 10$ from a friendly hand feels better than seeing a +10$ on the bank account, doesn't it? :), let him pick his reward).

However, if the marine is moving somewhere or not doing anything atm, then just drop it on him and move on.

3) A marine is under attack

This one is a bit tricky, usually you want to keep your marines alive, but here, first, you need to know if the marine has any chance of winning the fight. For example, if he is reloading and already being bitten, don't bother and let him die. On the hand, if he is fighting a lerk and the lerk is running low, or a good shotgun against a fade, now would be a good time to give that man a few medpacks.

Beyond the knowledge of winning a fight, there is also a deeper question to ask yourself: is that marine gonna make an impact if he stays alive ? Is he holding a lane on his own? Is he about to kill a low harvester? Is he alone or pushing with teammates ? There is no silver bullet here, and you will learn with experience which situation will impact the game the most. As a general rule, try not to overdo it and don't drop more than 2 medpacks on a marine unless there is something at stake.

4) Marines are pushing a hive all-in against spore, spikes, fades, hydras and skulks

You better have some good reflexes here, because here comes the true med dispenser. When you med 6/7 marines, Tres is going to melt like a snowman facing a flamethrower. Focus on marines under attack first, give medpack to low marines then, and drop ammo last. Your APM (Actions Per Minute) and accuracy can make or break that push. If the push is going to fail, try to judge when medding won't yield any more result, stop the support, and enjoy the show.

If you have enough tres for a beacon, and you have several marines with shotguns or GLs on the push, it might also be wise to just beacon them out if you can keep them alive long enough to bring those back.

Rules of thumbs on when not to med

Think about the impact and map control. If you have a solo marine pushing a hive spot for upgrades, it is not recommended. If you have 5 marines pushing a bit far on the map, it can sometimes be wise to let one or two die before medding (spreading your forces).

If there are two marines, and both are low on health and ammo (they just pushed an RT, repelled a few skulks and killed it), then just let them die. They achieved what they came for: killing the harvester. Resupplying them will cost ~5tres, and they will still be running with no armor. At that point just let them suicide and respawn, healthy and ready.

Medpacking around gates and armories

People tend to ask for med/ammo by reflex. Try to get a glance at where they are first. If there is an armory nearby, obviously don't. If there is a gate in sight, ask them to phase back if they need more than 1 tres of resupply. On my side, I tend to rarely give medpack around gates, as I found out that the area surrounding them is a perpetual fight where meds won't matter. Shotgun gets recycled by the next marine phasing, and people often stand there waiting for the next fade to come.

Unless the gate is threatened by a heavy push, don't med marines close to gates as it will cost you too much for the reward. If people do get mauled, or if you have 3 gates, a forward armory is a bonus.

Medpack and TTK (Time To Kill, or Bites To kill in our case)

A small cheat sheet reminder for when to drop medpacks on wounded marines depending on your armor upgrade:

Armor 0: (2 bites + 1 parasite)
  • A single medpack if the marine has only been parasited once
  • One or two medpacks if the marine has no armor, and has less than 75 hp (1 bite dead)
  • If the marine got bitten once, don't med. He will still be 2 bites down.

Armor 1: (3 bites, or 4 bites with +2 medpacks)
  • One or two medpacks if the marine has no armor, and has less than 75 hp (1 bite dead). If he gets welded, you can med too. If he gets bitten once, a medpack won't change the amount of bites remaining to get killed. It can be hard to tell your marines why you don't heal them, tell them that they are still 2 bites down, and they often understand.
  • A well timed medpack before the last skulk bite (just after the 2nd bite) will save your marine from it, with a single med, but you have to be accurate

Armor 2 (4 bites down, +2 medpack for each additional bite)
  • Mostly med after a fight, if it is relevant. Otherwise, unless a lerk is spiking, you need 2 medpacks.

Armor 3 (4 bites down, up to 5 bite with a single medpack)
  • A3 is really good for you as you will overall spend less tres on medpack, at that point don't drop more than 1 medpack for each fight. After the fight, same as usual: is it needed, is it near a gate, etc.
---

Final note:
  • While not giving any medpacks is a bad thing, spamming them as if they were free is also not doing you any good. Every medpack dropped has a cost, and that cost will snowball on the next upgrade and delay your tech path. Mind every drop, and always remember that medpacks are a side bandaid there to help accomplish a pictured goal.
  • If, for example, W1 is coming out in 20s and you are a bit short of the tres to start W2 instantly, feel free to med way less for a moment, to bank some tres in time, and then you can get the research going and resume the medpacking. Some medpacks can wait, but waiting to research the next upgrade will cost you time.
  • If you are ultra-low on tres, or need to save a lot, don't double med low marines anymore. Limit yourself to marines who only need a single medpack, and those who got welded.

Tip: since the b324, you can hold the medpack grid key and chain clicks to dispense medpacks, you don't need to press the grid button, and then click anymore.
How to: Support a hive push
Pushing a hive with arcs is one thing, push it with nothing but marines is another. If you do that, you need to know in advance what you want from that push.

  • Do you push to kill the hive ?
  • Do you push to kill upgrades or the RT ?
  • Do you push to drag lifeforms and kill them ?
  • Or is it just a suicide push by marines who have no clue what they are doing ?

Having that information will help you on how to assist the push and make it works.

Do you push to kill the hive ?

This is the default most of the time, since the other two require a bit more coordination for the team not to zone and get distracted by shiny flying things or the big glowing hive.

So, let's recap, one type at a time:
  • Early game fast hive drop push: you have nothing but 0/0 marines with rifles. If you have 4+ marines nearby, you can attempt a push, med them and ask them to focus on staying alive rather than rushing in. Aliens have no tunnel and can't reinforce easily anyway.
  • Mid game hive push: You have gates, but you don't have AA yet. You have at least shotguns or grenades researched, ideally 3 IPs, and they don't have fades, or fade timing is 1+min (around 7min, 6:30 if they have loads of RTs, 7:30, 8:00 othterwise). Med them but if things go wrong don't bother as much and let them die.
  • Mid game hive push with AA: During the push, as long as you have enough marine power, don't be shy on dispensing medpacks. You can even drop a few now and then on the ground so marines can re-supply themselves too. Focus the GLs for medpack, and especially GP/GL. A good lerk or fade will chase them down, so just shower them with medpacks as losing one could win or lose a push alone.
  • Late game, all-in one shot push: If by scanning the hives now and then you find an opening, or if aliens are lacking lifeform and you got enough firepower/pres involved, you can get a push on the hive. If this happen, keep enough res to beacon because marines will be highly likely to just unload at the hive without taking care of lifeforms. What happen otherwise is: you kill the hive really quickly, then all your marines just die instantly. Well done you just lost all your team pres, aliens can redrop a hive and can now have all 3 set of upgrades. Unless aliens are truly low on tres it's not something to do.

Note 1: If you plan to have GLs on the push, seriously consider researching catpacks for them. Catpacks enhance the reload spead of GLs by a fair amount and this will make the difference. Ensure your GLs always have a catpack on them. Catpack the rest of the marines if you can afford, but otherwise stay on meds.

Note 2: If you place a gate really close to the hive, don't bother medding as this kind of gate is for pushing a hive with a retentless, constant stream of marines. (the 4 IP, one way ticket, grenade spam kind of push)

Note 3: If it's late late game and you have 5+ RTs, you can start saving tres up to 50/60, and once you are ready you can drop 3 or 4 jetpacks in main base, ask everyone to phase back and rush the hive. You can beacon too but I would advise against it as it's like a jetpack worth of tres wasted, and this will tell aliens you all are comming. Basically the tip here is: ask your marines to buy weapons instead of JPs, you provide them. This will also avoid a scenario where your team is facing lifeforms with nothing but rifles, Jetpack rifles yeah ! but rifles ...

Warning: If you send ALL your marines in that push, you better take the hive down quickly and watch your gates, because those will fall and even killing the hive, if you are down 1 RT, will be a bad trade. Trading a hive for all the map control and the economy is not a good trade. Usually you want 2 marines recapping and/or watching gates.
How to: Phase gates
When dropping gates, there are several things to consider:
  • Do want to pressure, or do you want to secure ground ?
  • Is it a critical gate ? (meaning, if you lose it, do you risk losing the game ?)
  • Do you expect this gate to be mostly defended by nearby marines, or marines phasing ?
  • Where do you want fights to happen around the gate ? (i.e., gate angle)
  • Do I REALLY need that gate ? or can my marines already do what I want them to do with the existing ones ? Sometime having a single gate outside main base is enough.

As a commander, you can drop backup gates, defensive gates, classic gates and offensive gates (and to some extent, trap gates). You can also choose to have an "easy to defend" or "dangerous to bite" gate.

Easy to defend gates are gates placed in plain sight from as many points as possible. They are best if marines are roaming around often or nearby, but aliens will also have LOS on those and can harass and flee easily.

Dangerous to bite gates, on the other hand, have way less LOS. Often placed at the back of a room or nearby a corner to force the aliens to commit deep so they have a harder time leaving it if caught off guard. The kind of gates where aliens can't see marines comming around to defend easily if they chew it.


Gate types and strenghts

A backup gate would be a gate with which your marines could rotate back and secure the lost ground faster. It is usually placed a room away from the front line.

A defensive gate is placed at the back of a room, or inbetween two RTs. Those are for holding backres or defend a room, depending on the situation those can be used a backup gates too, later in the round if you secure an other forward location.

Classic gates are the one you see most of the time in ns2, holding critical areas and providing a good balance for marines.

Offensive gates are more risky since they are placed at the front line and are intended not to secure ground, but to deny and sometime even claim the enemy ground directly. If you start seeing your backres melting too often without making progress on the push, while seeing your marines spending a lot of time behind your own lines, then it would be a good time to move that gate a bit backward.

The angle of the gate is also important as it will define where your marines will tend to go most right upon phasing. If you add a robotics factory, or an armory with it you could also define where you want your marines to be on defense: placing the armory toward the end of the room or a few meters behind the gate will make a difference. To illustrate, a gate placed in the open is easier to keep alive and cover, but aliens will also have a good line of sight on incoming marines but placing a gate in a room corner, forcing aliens to commit deep and with no line of sights will make it waaaaayyy more risky. That kind of gate has more chances to die, but that's the type of placement that will lead to a lifeform kill. Combined with a smart armory block (an armory placed just far enough from an escape route corner for lifeforms to get "stuck" if they are not high enough)

Placing a robotics factory correctly could reduce the vertical space of a room entrance, or allow marines to take cover from spikes, parasites, and jump on it. Use that to your advantage.

The true cost for losing a gate

Losing a gate hurts more than it seems, losing one gates often cost you an extractor as well (with all the tres not gain because you are now one RT down), and the few poor marines who were phasing in vain along with a few medpacks. Total spent: 15+10+5 = 30. At least 30 tres. It's the equivalent of a free W2 upgrade, or the prototype lab.

Looks bad right ? even if losing a gate might not lose you the game, it will slow you down by a fair amount on your way to w3/a3/jetpacks. Lose a few gates and you will end up fighting end-tech aliens with nothing but sticks and stones.

How to defend a gate

The cheap way is to trust your team to hold them with nothing but laning and meds. Needless to say this has its load of risks in regular servers. Depending on your marines, you can do the following:

If you trust your marines and want to rely on them to hold gates:
  • Research grenades: This is good if your team is often off gates and those are saved by the spawners suiciding in with cluster grenades.
  • Research mines: Can be done on top of the grenades, it will buy enough time and could break a push attempt by killing a skulk or wounding a lerk enough to retreat.

If your marines are off gates, too aggressive or not responding you could also do the following:
  • Sentries: Placed correctly, this will fend off most of the assault attempts and will most likely warrant a gorge to get cleared. If aliens don't have any, this will force one to spend pres into a gorge. If you hold your sentries, this is good because it means that very player is not going onos for an other minute or two. Keep an eye on the bile bomb, and get ready to recycle to get your tres back if the sentries start to have trouble doing their jobs. Sentries on a forward gate will also give your marines a breather since they will have a "safe" place to stand and time to get into position correctly.
  • Double gates: An advanced and less expensive way to hold a gate. Combined with a gate order rotation when needed, it fully prevents aliens from grinding a gate. You can also do that before losing a position (like dome on veil), beacon so all the aliens go instantly on the gate, and pinch them with the full team. If done correctly you should be able to kill lifeforms that way.

    Tip: place the original gate first, and then the double gate (ideally close and out of sight from the former so aliens don't see marines phasing and get caught off guard more easily), so that by rotating the gate, spawners will spawn directly to that backup gate: the last gate built is always the one marines will phase to.
    Tip2: Instead of rotating the gate order, you could also just recycle the grinded gate. In a hurry this is way safer than changing the gate order as it will reduce the amount of phasing needed, and prevents marines from phasing into the grind if you screw the order. ([/s]blame the com[s]). You could always redrop it later, or keep a single gate for the rest of the game there and reuse your recycled tres.
    Tip3: Only use the double gate as long as required

    This also allows you, the commander, to phase yourself without being grinded so that you can do the job yourself. Because sometime that's the only way to get things done.


    Warning note 1: only use that on a single gate as having more than 4 gates is risky and slows the rotation of the team down.
    Warning note 2: Watch out for base rushes, if your gate order is wrong, that double forward gate could force marines to phase twice and slow reinforcement down.
How to: Advanced phase gates
WORK IN PROGRESS

As a marine com, once you are confortable with the mighty 3 gates network you can toy with more advanced tactics, allowing you to be creative. The only downside is the maintenance cost is higher as it implies more gates on the field, more build time, and the risk of messing the gate order if you screw the procedure.

The basics regarding how the gates are linked in ns2:
* Gate order and links:
* What happens when a gate is added/removed/unpowered
* Edge cases, powered off gates and powersurge:

Knowing the above, we can play around it to create multiple gates networks. Let's start simple and create a second, third and forth network.

- TODO - : step by step recap of how to build the networks
- TODO - : step by step recap of how to fix the networks
- TODO - : step by step recap of how to maintain the networks (how to add a gate to the correct network, how to fix the whole network if a gate dies)

Pit falls:
- TODO - (not recycling twice a gate in main, knowing which gate was built last, etc)

Main base with 3 gates using the 1-1 network kind: (like aliens tunnels)


Map view using 2 network of 3 gates each:


Map view of 2 network of 3 gates each (side network), and a spare spear gate in hub which can be moved forward as much as you like without sacrifying map control on the flank.
How to: Facing a fade team
As a marine commander, the most frustrating thing you can have is to have the upper hand, and all of a sudden everything starts to fall apart: your marines are dying so fast you have a spawn queue, your RTs start to die, the recapper gets killed by lone fades behind your lines who don't even get trapped.

If this happens, you have to use what I call the turtle strategy: slow, and steady (as fast as possible, but as slow as required). Your goal right now is to secure ground, and keep it !

If you know a fade team is coming soon, and you don't want to risk it, go for A2 (w1 if you can), gates, and get 2 sentries on the most exposed gate ASAP. What usually happens is fades are buying time by hovering all around marines, leading to 5/6 marines getting busy on 2 fades. I'll let you imagine what happens elsewhere on the map. By building those sentries, you effectively free your marines to do other things. Don't get 2 sentry nests too early if you are missing critical stuff, like shotguns, you will start to get too far behind on tech.

Once you got shotguns, chances are your marines won't be far from gates, so you can expect shotguns to be recycled fairly often (even with w0). You can then go slowly for weapon upgrades, or move the sentries to the next potential gate placement. Beware however of onoses, try to save for W2 before those, and watch for bile bomb.

Also, if your marines are getting picked often, don't even bother medding near gates unless it has a chance to go down. You need that tres for upgrades.

As long as you hold at least 4 RTs, you are doing fine, 3 RTs is the bare minimum.

If you are struggling even harder to the point you only hold 1 or 2 RTs, and you start to see your marines starting to have mostly rifles, then it's really, REALLY, important to call the marines holding shotguns, and tell them to stay near the gate. Your goal there is to ensure there are at least 2 shotguns facing those fades harrassing your gates constantly, as those are the one who will secure a kill. Here you need to take advantage of the fades venturing into so many marines to get a kill.

For exemple, on ns2_veil, if you have 2 RTs, a system gate denying sub, and a single arc to deny nanogrid (containing aliens on at most 4 RTs), and a few shotguns holding gates, you have a chance. Tech up to w3 asap, and move your way back by capping more ressources. If you can afford, try to always have 1 marine pushing the other side of the map, it will force one fade to defend and will leave system a bit more relaxed, for a minute, maybe even bringing the aliens down to 3 RTs.

If you are playing aliens, focus then on getting adv metabolize, and a crag/tunnel at a forward position for fades to rotate faster. A whip is usually not needed if fades are doing a good job, and as a khammander, at that point you should have enough pres to go gorge yourself and bunker the tunnel. Since the fades are keeping the marines at bay, you can afford to expand more aggressively and get more RTs. If the marines don't have arcs, I would recommand harassing main base with gorges and an onos to lock marines in base, and increase the odds for the gate to fall. Drifter support also, with the fight happening only at a single location or two, it will do wonders.

Bonus for the marine com:
Mine trap :p
If you got mines researched, you can drop an armory next to a good mine spot, and ask a marine to instantly drop 4-5 mines there and then bait a fade. This will instantly kill it. Usually the spot is somewhere skulks or gorges don't go, but where a fade will rotate you or chase you.

Picture credits: @Rantology
How to: Facing an onos team
The symptoms are the same as the fade team: you won the early game, you control the map, and then everything goes wrong. Marines can't hold gates anymore, and you start to get pressured everywhere at once because your marines are stuck defending your gates from a constant stream of onoses. If this happens, well, you are in a bad position.

That tipping points often happens for the following reasons:
  • You failed to see the signs: no or nearly no lifeforms (usually fades) on the field. If you also only faced 1 or 2 lerks then the onos ball comming will be huge. Don't research shotguns if you miss the AA, as shotguns are primary here to kill fades.
  • You don't have machine guns yet because you either invested too much on early game tech (mines, grenades and shotguns), or went on a siege with ARCs at the wrong moment. With the latter you often get the hive down, but this is followed by an alien team steam rolling you with the onos. W2 shotguns is not enough to kill many Onoses.
  • Your marines are starving pres, and you lack weapons. Like the fade team, here you need to ask the marines holding the remaining guns to stay on gates until you can gather enough of them to repel the Onoses correctly, if you hold that long.

Jetpack will do fine as well, but if the onoses are an issue you probably don't have any on the field.

For the record, a single machine gun clip with W2 is enough to melt an Onos nearly to death, unlike shotguns who only bring it down to half. MGs can be seen as twice as effective and the best part is that a solo marine with one is scary enough for an onos not to push in.

If you see yourself starting to get late on the tech tree, it's fine to skip shotguns and research the AA (Advanced Armory) instead. Flamethrowers and MGs are enough against lower lifeforms.

In short, against Onoses you need power, more power, and more raw firepower. The moar the better as no amount of sentries or gates will save you. Keep an eye on the game timer, and don't let it go past 12 minutes without AA unless you know there won't be many onoses.
How to: Fast hive start
If aliens know they will struggle against marines, dropping a quick second hive when the game starts can be tempting, but that's a risky move.

If done correctly, a second hive will grant aliens eggs, 2 RTs, and a minimal amount of map control for them not to get boxed in. The major drawback of this strategy is the lack of upgrades, and delayed lifeforms as it costs a lot of tres, and deny aliens the hold of 3/4 RTs if they were expanding classically. Usually, you want a second hive at most a minute after gates are up, afterwards the pressure from marines could be too hard to effectively be able to drop a naked hive and build it without marines pushing it.

As a marine you have two choices:
  • The safe strategy is to completely ignore the hive (it is probably well defended with the whole alien team nearby), and go for a high eco game. You need to aim for 6 RTs and ensure the aliens never get 3/4. If they do then you lost the advantage and aliens now have upgrades back. Basically you starve the alien commander from tres. You need to out tech the aliens and starve them, you lost the mobility game already.
  • You can also go for W1 + gates + nade&mines to increase the pressure and take advantage of the late lerks/fades. Lerks will have issues taking gates against grenades and mines will give you time against the skulks.
  • Or, you rush all in on the hive, and properly micro manage + med your marines. If the first wave of marines fail, don't do another one as the hive will probably be up already. Fallback to the classic strategies. If you do that go for W1: marines sustaining the fight on the hive won't have armor anyway so A1 won't help.

If the hive goes up, you will face heavy resbiting. Try to save for mines, and gates. Shotguns are less necessary because lifeforms will get delayed. Focus on killing alien harvesters until gates.

The best timing for a second hive however is between 4 and 6 minutes in the game: you got upgrades, hopefully lerks and fades soon.
How to: Dropping a hive near marines, and keeping it
This part is for claiming a hive spot (usually your third one), mid to late game when marines are close. For example it's ns2_veil, you have cargo and pipe hive and just cleared system. How do you properly secure and grow a hive in sub sector?

As an alien, I often see Khammanders failing to properly drop a hive, and they end up losing it because marines are just walking in. Most of the time, the hive gets killed because it is what I called a "naked" hive: no crag, no whip, no tunnel, a lone drifter: basically nothing. So the Khammander ends up losing a drifter, cysts, the hive and Dedech lerk because he is extra zealous and will try to defend that hive against 8 marines no matter the cost :D (he will let you know you were not there).

What you need to think first, before attempting to drop the hive, is to SECURE the location, and do so quickly. Just like the ARC push, don't try to reclaim a hive if you have less than 50 tres as you will need cysts, a tunnel, a crag, a drifter, 1 whips (at least, 3 is best), and nutrient mist. If you have a shift hive, try to build those in advance, and get them ready to echo. Once the tunnel is up, you can drop the hive and the PVE, and drop nutrient mists. The mist increases the maturation of the hive, and its eHP. Every bit of health help. Also try to get ready to use your drifter abilities to help your aliens, as they're the ones responsible for defending the hive until it gets built.

TLDR: Don't drop a 3rd hive near marine activity if you can't have at least a tunnel, a crag and a whip. (+ drifter abilities)

Robotic: Doing a proper ARC push
Nowadays I see a lot of commanders trying to arc, and failing because of simple things. So let me first explain what a good ARC push is, and then I will enumerate what not to do.  


How to push with ARCs:

When you push with ARCs, your worst enemy is time. Yes, TIME! Not aliens, time. You lose because of the time you took to pull it off. Did I write "time" enough times? Good, now let's keep going.

Try to view the aliens as a giant beehive, and imagine yourself throwing a stick at it. This won't end well, right? Well, now try to drop a 100 tonne rock on it, and you end up crushing the bees, and the hive (sorry Ironhorse, I know you love bees).

In other words, once you kick the hive with an ARCs, they will react quickly and pack play like a bunch of angry mobs (+1000 elo for the aliens). That's why you need to do it FAST. Of course another reason is that the longer you stay here, the longer you have marines doing nothing but holding arcs (leaving RTs undefended), and the higher the chances aliens will manage to win a fight on the ARC once. Aliens just need to kill your marines once and your arcs are gone.

Remember also to undeploy the arcs once they are done, as they gain the armor back which makes them less vulnerable.

TLDR: Wait to at least have 30 tres, build the robotics and 4 arcs in a row, and roll them instantly on the hive. Don't research an upgrade, don't drop another gate, you need to 100% focus on the arc train, and don't forget to recycle the robotic once all 4 arcs are out. Trust me, at that point you will need that tres to drop medpacks, scans, and RTs. Also, even if you can build an observatory for the arcs, scan the hive as soon as the arcs are deployed. Every single volley matters. If you can spread the ARCs too it's even better (don't stack them or bilebomb will hit all of them at once)

Rationale: Each RT generates 10tres a minute, to have 4 arcs and the robotics, you need ~10+5+15*4 => 75 tres. That means if you want to arc fast, you need to hold at least 25 tres (30tres is safer) (10s (robotics) + 20s (arc research) + 15s for each arc (1:30 for 4 arcs, cost 75 tres). It takes 5 volley to kill a fully matured hive, and the hive has like 100hp left on the 4th blast). That means you can kill a hive in no time, fast enough for aliens not to have time to react. With 3 arcs it takes 6 volley, and by the time the hive is low they will have a gorge. Go for 3 arcs if you trust your team, because 4 arcs yields a way higher chance of success.

Once the ARCs are done, make them retreat for welding, and refocus on arcing the remaining alien RTs, or hives. (bonus point if you managed to build and move the arc without them knowing)

Experimental, ARC rush and double robotics:
If you hold a room next to a hive from which you can arc for a bit, you are in position to threaten a beacon rush, or an ARC rush (yes, ARC rush). As a reminder, 4 arcs take a load of time to build and move into position, so for this you will need your marines to build 2 robotics ahead of time. No need to upgrade them for ARCs yet, only do so when you intend to really build the arcs in next minute.

The double robotic has the following advantages:
  • You only spend 20 tres on robotics, and you can recycle them anyway if you lose the position (you will get 16 tres back). If you play safe, this is not wasted res, unlike arcs standing by doing nothing.
  • It will stress the alien com A LOT if he understands the threat that you just put in his face :D (at nearly zero risk for you, you can recycle anytime for now)
  • You can roll arcs twice as fast. It takes 15s to build one arc, with that setup, in 20s from the first 2 arcs deployed to the other 2. This means aliens will have no way, in only 20s of time, to prepare for that if you time it correctly. You can recycle both robotics then to get extra tres for medpack and scans for your marines, and if your marines are told what you are currently doing a beacon is not even needed
  • To do that you need to bank 60 tres (it's a lot), but don't worry, the good thing is that you can start W3 or A3 once you are at 40 tres, and cancel it afterward. Best case scenario ? You cancel it and rush arcs, worst case scenario ? You bought time, recycle the robotics, get tres back and W3 or A3 soon to be up. This opens options for you as a com unlike chaining arcs which is definitively locking you down on your strategy.

Note 1: Both robotics needs to be close enough to the area where then arcs will get deployed (but not so close it get's biled and attacked by every lost skulk in the area), so you don't waste time waiting for arcs to get into position. It's a rush after all.

Note 2: This works best if the area you will arc from is not being attacked by the aliens (you have a gate, but you only have 1 or 2 marines there and aliens pressure somewhere else on the map, so you can actually suprise the aliens and blow the hive fast). If you are under pressure it's often better to fall back to the good old arc chaining and commit to that push.

Note 3: It is possible to kill most harvesters with arcs most of the time, if you want, you could build a single arc, if you control a location close to a hive, and kill it to hurt the alien economy further.

What not do do:
  • Don't build the robo and the arcs one by one if you can't afford them all. Otherwise the aliens will see the robotic, see the arcs, and at least prepare. Worse case scenario, you lose a gate, and all your pre-built arcs and robotic will die for nothing. Basically, if an ARC has been AFK for 5 minutes, you did it wrong.
  • DON'T, JUST DON'T roll the arcs one at a time. This is the worst thing you can do. By building one arc, sending it to arc, building a second one, sending it to arc too, while scanning, will make you lose the game.
  • Use your microphone, your team needs to know what you are doing, and they need to be prepared for that hive push. Don't just tell them when you roll the ARC, have your timing in your head, and tell them "Hive push in 1 minute, stand ready". This greatly increases chance of success.

How to counter an ARC push:

An ARC push is a serious threat, if done properly it requires a great deal of effort for aliens and is truly hard to counter.

Time is marines worst enemy. If you see arcs, you need at least 2 gorges, and a crag. A shade to ink is good especially if they only have 2/3 arcs, but on 4 it will only delay. If you see arcs, you can:


  • Ask for a big pack play, everyone, and use drifter support. I can't stress this enough, a drifter can make the difference between a hive alive and a hive dead. Hotkey the "ink" ability of the shade also if you have one, and echo every upgrade if you can.
  • Sacrifice the hive and kill gates (and then kill arcs), this is to be done as soon as you know the hive won't get saved. It's important to let the hive go in that case because otherwise you will just offer marines even more "safe" time. If marines do defend the arcs, they are not elsewhere and you need to punish them for that.
  • Most marines commander will play it slow, and gather the arc one at a time, often in plain sight near a gate. It will take them around 4/5 minutes to get them all up and running, so if you do see arcs, get ready for them, move your structures away from arc range, get a drifter, bilebomb, and cyst the area where arcs will go. Infestation is slowing down the arcs, don't overlook that.
Robotic: Using MACs
MACs are a niche upgrade: they are weak and slow. At best they make a skulk happy. MACs can be used for a few things still, if you have some spare res:

  • Build a robotic at the start of the game, one MAC, and recycle the robotic. This MAC job will be to repair your naturals (the 2 closest RT from your main base) and ensure they are always full.
  • With 2/3 MACs, you can recap your natural fast without using marines. So your team can keep pushing while you recap. If you need to recap back res a bit further away, try to scan and ensure there are no skulks sneaking. If there is one then pull them back, or at least spread them in different directions so you don't lose them all
  • Keep one mac in main base. Marines are happy to get welded especially once jetpacks are up and nobody is welding
  • To weld gates or low RTs.

Something you can also do, which is a bit more ballsy, is to get 4 MACs, power surge, and to sneak them on a hive to build a gate. Important here: try to place a gate on a spot not covered by infestation, because it will slow down the build time.

Mac build time:
  • 3 macs -> 14s to build an RT
  • 2 macs -> 20s to build an RT

Mac RT repair time (total of 1m10):
  • 50s to repair all the health
  • 20s to repair all the armor
Robotic: Sentries
Blocky_dude wrote a good guide on sentries here, I recommend you to have a look:
* https://cs2bus.com/sharedfiles/filedetails/?id=2089200980

An other note: I recently tried using sentries only as a lane blocker to repel a lifeform timing (when lerks pop, or fade). Because that's the very moment where aliens are more powerful, kill RTs and a lot of marines.

If you know ahead of time where the alien want there second hive (which should come soon after lerks), you could ask marines to rush in, drop sentries and wait for the aliens to come. See the following:


Note: place the sentries off infestation or it will take longer to build.

Classic ns2_caged round, around the 4min mark. Aliens have sewer starting hive, and a tunnel in shipping. I asked my marines there to go ventilation quickly (3 marines is Ok), build the sentries, and wait for the lerks to try to clear them for the hive. This will be a pain for the aliens :p, and they will get forced to secure a generator hive with less rts.

This is what I did on ns2_docking using the same tactic. Either locker_room or departure depending on which side you think the lerks will pressure right at the spawn, around the 3:20/4:00 mark.


Once it's secure, I usually go for gates, drop one, and then recycle the sentries. No need to keep them the whole game the point was to block the hive spot and the lerk first few assaults. You need that money back for upgrades.

Robotic: As a barricade
The robotic can also be used as a barricade on its own for 5tres, I have been experimenting this recently and it worked pretty well so far for making rts harder to bite, and during an arc push to block bile (see the ns2_docking section):


This placement basically removes the cover a skulk could get by standing behind the RT. Making it a really easy for marines to defend the RT.

The skulk can stand behind the robo and chew it for sure, but it takes around ~24s to do so on top of depleting his energy pool. Since an RT procudes 10tres/min, it is already worth the 5tres of the robo. If it ever goes down. In that time, your marines could respond, die, respawn, and respond again before the RT goes down.

The robo will die, eventually, but this will keep the RT alive and pumping ! saving you from the nasty cost of losing an RT (time to rebuild + tres to rebuild + downtime where the rt is not producing.).

Every RT spot is not good for that stuff, but I found it good for RT beind harassed often with marines nearby. On top of it, you could always build a MAC to repair it after an engagement :D (and let it walk back to main then to repair other stuff later).
The importance of marine upgrades
As a marine commander, you need to ensure you are always getting more upgrades, until you get A3/W3. Having a long, strong mid game with arcs is perfectly fine, but always keep upgrades in mind.


Also, try to research your upgrades on-time. On my side, I am chaining most of the time at least 3 upgrades on the arms lab, back to back, with no delay. So I need to be sure I will have enough res to research the next level in time. If I am short, I slow down on meds.

A1 -> Marines are 3 bites down, waste of med, unless below 75hp and no armor.
A2 -> Marines are 4 bites down (or 2 parasite/spike + 3 bites), needs 2 medpack to get +1 bite
A3 -> Marines are 5 bites down with a single medpack, 5 bites down for lerks with no med, 4 bites vs onoses (All marines will also be at least 4 bites down. Unlike A2 where any cheap damages will bring them down to 3 (hydra, spit, spikes, and spore !))

W1 -> most lethal upgrade vs lerks (25 bullets needed to 22), skulks are down to 9 bullets, from 10
W2 -> most lethal vs fades
W3 -> most lethal vs onoses, hives and RTs

A3 is better than W3 for exemple when you pressure a hive hard but suffer spore+bile. If there are no AoE damaging marines w3 is often better.

For the timing, the first level of upgrades takes 1:15 minute, the second level 1:30, and the third takes 2:00. You can have that in mind for if an upgrade will come up in time for your plan.

A0 / W0: Your marines are weak, they die in 1 parasite + 2 bites. Unless you drop a medpack on marines who have just been parasited (this throws off many skulks expecting to kill a marine in 2 bites), they will most of the time die in 2 bites.

A1 / W0 Classic opening, your marines are now 3 bites down. You need to med less and can focus on getting either A2 or W1. Going W1 is fine if your team is not dying that much, and it will also buy you research time back if you can't afford A2 yet. Otherwise, waiting for A2 will delay your research of the whole tech.

A2 / W0 Your marines will die to skulks less often, but you are trading firepower against the lerks for durability. It's a safe upgrade path

W2 / A0 Risky tech path, as you might lose many RTs and map control before lerks. Only do so if you trust your team to play with care, and to make an effort to stay alive. With w2, unarmored biomass 1 skulks die in 8 bullets (compared to 10 or 11 with w0), and lerks in 20 bullets, from 25 with w0.

A2 / W1 Classic, and rather safe strat. The marines are 4 bites down, and you don't need to med them that much. If you want to relax a bit or plan on getting gates, shotguns and/or mines without worrying about fades, it's fine.

A1 / W2 The aggressive counterpart of A2/W1. It is technically better than A2/W1 if you can give accurate meds on marines after the second skulk bite, so they are 4 bites down without A2. This will also allow marines to more easily win a sustained fight where they tend not to have armor for long anyway, and rely mostly on meds. Beware of the fades however, as A2 against them is really valuable. Not having A2 is fine enough if you have shotguns and a good medpack reaction time, but you are pushing your luck.

Spicy strats:

A2 / W3 rush: This is tricky to pull off, but works well if you can still hold ground. This works well on small maps like tram. The idea is to rush A2/W3 and bypass everything else as long as RTs are alive. If you can't affore A2, go for W1 in the meantime do buy some time. The idea here is to get A2/W3 + shotgun before fades. If you do it correctly, you should have A2/W3 by the 7:40 minute mark, even if you have to recycle the armory for that.

A3 / W1: This techpath is uncommon, but quiet good especially if your marines are welding each others. If your marines are confortable enough staying alive and tend to spend time behind enemy lines, this would be a good choice. To summarize, this has the following pros:
  • Gates are harder to grind (each marine phasing is 5 bites down if you med the gate, instead of 4)
  • A duo or trio of marines with welders, hunting harvesters, is a pain for aliens to clean. The goal for them here is not to kill lifeforms, but to repel them. That's exactly what that 5th extra bite is giving them: more chances to stay alive and warrant an alien response.
  • With A3, you can hold ground with only 2 IPs. The margin is thin but it's working
  • All marines will be at least 4 bites down. Unlike A2 where any cheap damages will bring them down to 3 (hydra, spit, spikes)

Anti lerk strat, fast W2 + mines: This is a bit tricky, risky, and relies on marines to not get wiped by skulks. A marine needs 25 bullets at w0/biomass1 to kill a lerk. This amount drops down to 20 bullets at w2/biomass1. The idea here is to get W2 before the alien commander can research biomass 2 and kill the lerks at weakest moment in the game: no biomass, no upgrades. 20 bullets is rather easy to land on a lerk, and w2 pistol is unforgiving. The mines are here to buy time against skulks resbiting. Once you got that the idea is to go A1 ASAP, and gates to potentially push a hive with shotguns, and 3rd IP. With this strategy, A2 comes late, and you can even go for A1/W3 if you trust your team.

Note: A much safer path against lerks is A1->W1->W2. Sure you won't get the TTK right when lerks are out, but with A1 fresh marines are 4 bites down against lerks, just like A2.

A3 rush with sentries / MG A3 is basically the armor upgrade against lerks. A lerk needs 5 bites to kill a marine, and this can get up to 6 or 7 with meds. Since marines lack firepower, you can go for advance armory and get machine guns. This is basically rifles with more damage output. Sentries will help against the fades, and you can use gates to pressure hives.
The importance of biomass levels
Knowing what the next level of biomass brings can be helpful as a Khammander, so in short:


  • Biomass 2 gives lerks +1 rifle bullet to die (+5% TTK, 23 bullets at w0, 22 at w1)
  • Biomass 3 gives skulks +1 rifle bullet to die up to W1 (+10% TTK, 11 bullets at w0, 10 at w1)
  • Biomass 6 gives lerks and skulks +1 rifle bullet to die against w2 (10 bullets for skulks, and 22 for lerks)

For the numbers, for each biomass level, skulks gets +3hp, gorges +2, lerks +2hp, fades +5hp and onoses +50. In public games, when you have carapace, biomass levels above 3 are less relevant for skulks.

It's up to the commander to decide if he wants biomass 2 for lerks, the 3rd shell, or a second hive faster.

It is usually only good to go for biomass 3 on one hive if you have trouble reaching a second hive. The best is to get that biomass only if you are rushing leap with biomass 4, or if you want to quickly get a strong early game.

So, next time try to get the biomass on time for at least your lerk players :)

Khamm: Drifter support
<work in progress>
Khamm: Shift, shade and crag hives
<work in progress>
Map placements, gates and siege locations
The following is a series of pictures about notes I made on optimal structure placements, for various maps.
* ns2_docking
Strategies
todo

Gates location


Pressuring harvesters with a solo arc:


Siege locations and notes:


If you do it well, this is the RT graph you could have against a gen+locker hive even if they have a shade hive. We had a2/w2 upgrades, shotguns and grenades. Arcing locker and maintenance RTs first, and then move 1 or 2 arcs on the right to push stability and generator RT while sieging locker, basically "freezing" the alien economy.

If you can "hold" the line then it's just a time question before aliens either concede or run dry out of pres and lifeforms.


Here is an other example, but with the tech tree on the screenshot. ARC robo was up at 7min, the first arc went out at 7:20. Arcing then locker with an obs, then mezz, then server RT followed by a server hive push with AA research just being done.
* ns2_tram
Tram is a map where gates are not needed as early, and ARCs are strong, unlike ns2_caged. You can afford to go A2/W2 shotguns before gates. If as a marine you get the classic shipping start, your goal is to secure 5 rts, and push platform + ore. Mezzanine is often a waste of time and marines.

I also think that fast gates or fast sentries don't work well on ns2_tram, and are hard to pull off. Unless you know exactly what you're doing, stick to the mighty and classic upgrades :)

Arc locations:
If you control hub, you can arc Warehouse and Elevator hives easily, but don't try arcing Repair, Server, or Shipping. You can still kill Shipping RT from south tunnel, and Shipping hive can be ARCed from Logistic easily however.

Usually, if aliens start Shipping and expand repair, a good tactic is to control Ore processing, bank enough Tres for a proper ARC push and kill repair hive. Because of the vent in ore, try to place the robotics factory below the RT, so marines can jump on it and have a better angle to kill a gorge camping high up there.

Once you are done, and if aliens are weak, the goal is to immediately rush to ore processing with the arcs, all your marines (usually when a hive dies, you get lots of marines near it), and build a gate ASAP. By the time the gate is up, you can arc Shipping without a pause. By immediately I mean don't even finish killing the harvester in repair room, move directly there and secure the ground. You will cap Logistic RT during the hive push.

The last step is of course to retrieve Hub, recap some resources (aliens should have killed most at that point to trade for the hive kill), and finish elevator transfer emergency dropped hive.

Spicy strats:
Especially against a quick hive: go for 6 rts, and rush A3/W3, then shotguns, then gates. Naked marines can hold against skulks and lerks well enough to get a hold on 5 rts. The idea here is not to kill alien harvesters, but to KEEP your RTs alive. If you micro your marines correctly you can rotate between defending and pushing. This strategy is only good for as long as your marines are holding ground. If you see your team losing its foothold, fallback to gates and then resume.


Tram is small enough for the marine commander to be able to build ARCs in his own base, and roll them to the hive next. This is often not needed but it can give aliens a sweet sweet surprise welcoming uninvited ARCs.

As aliens, play slow. Your goal is to get harvesters only if you are pretty sure you won't lose them. If as aliens you spawn shipping, don't try to expand both side, you won't hold. Focus on 3 RTs, crag hive upgrades (2 only, or the second hive will get too much delayed), and a second hive. Shipping start is otherwise great as the top side of the map is really resbiting friendly, but the early game is hard.

If as alien you start top, you need to secure to other side (Mezzanine from Warehouse, or Ore from Server). In both cases, a gorge clogging up north tunnel will greatly help. Watch for arcs, defend your harvesters, and you will be good.

Gates locations:


--

Siege locations and notes:


Tunnel placements experiments, and cyst chaining:

The following placement for the tunnel no longer works due to tunnel restrictions, might work in the future if that part of the code is fixed.
* ns2_veil
ns2_veil is a pretty straightforward map.

Marines
Early game
As marines against a cargo or pipe start, you want to control system waypointing and lane the back res. It is often a good move on this map to research mines early and only go for shotguns once you have gates. That will give you a solid classic early game. If aliens start Cargo, it is often safe to send your marines to sub and pipe while ignoring nano. This is important: if your marines try to push nano while going that deep on the map, you WILL lose skylight and topo constantly, and for sure be late on tech once fades come into play. If they start sub, owning 5 rts will be more than enough until gates.

Mid game
Afterward comes the famous nano push where you could lose system. Ensure you have that system gate watched. If you trust your marines, researching grenades could help with capping nanogrid, otherwise of course you could rely on building 1 (maybe 2) arcs with an obs.

Late game
Congratulations, you survived the fades, and your backres is still pumping. Now it's time for the next move: you can either go for the economy game and starve the aliens (this is done by moving nano gate to dome, and potentially sacrificing nano to arc pipe and C12 harvesters), or you could go for a jetpack hive push following by a beacon to save your marines. A good thing to do as a commander is stating your strats ahead of time, so everyone knows a cargo push will come as soon as there is an opening. Keep scanning the hive once in a while, and if it's either empty, or the aliens are low on lifeforms (especially no fade, ideally no onos), then rush in.

Spicy strats
On veil you can go for the safe A2/W1/mines/gates, or you can do the following:

  • Lemming strats: 2 IPs, gates, and mines/grenades to deny nanogrid. (3rd IP asap). The aliens only have 1 hive, the idea here is to trade quality for quantity and egg lock them. Since lerks are barely up they won't have the firepower to stop you easily. Usually you go for an east junction gate, crush nanogrid to starve the aliens upgrades, and go ASAP for A1. This is a highly aggressive strat with a high reward, especially if aliens can't manage to defend nanogrid. If you lose the gate however, or if you lose too much rts and struggle to get more, you need to fall back to one defensive gate and upgrades.
  • Nanogrid sentries: Sometime your marines do manage to get a foothold on nanogrid. If you trust your marines, you can send them to nanogrid (not everyone, beware of the base rush), build a robotic factory in main base in advance, and if your marines succeed, then you can drop sentries in nanogrid instantly. This is a bold move and it will plumb the alien moral heavily. Once you are done recycle the robotic in main and move on to upgrades and rts.
  • Sub sector hive rush: usually this is done by skipping shotguns to go for Advance Armory with a gate in overlook. You should get GLs up around the same time as your gates. If done properly you will face an alien team without fades. If fades are too close or there, don't do it, your marines will get melted.


* ns2_summit
Experimental placement
Edit: You can now use the ramp below the vent to jump on the armory, then the vent. The obs is still handy but no longer needed to get access to the vent.

* ns2_biodome
If you have resources, and know in advance the aliens will drop a hive in falls, you can save for a gate in filtration, and start building ARCs, so you can roll them over and kill the hive at its weakest. 3 arcs should be enough.

In the late game, if you want to secure ground hard, build sentries in falls, west route, and bamboo pass at the power node. If you do that, and drop jetpacks to your team (so you always have marines capable of responding fast), then the goal is to bank at least 5 RTs, force the aliens on 2, and then proceed to arc hydroanalysis RT and upgrades. Those are often in arc range from the lower side.

If it still hard, despite JPs and sentries, you can wait for one of the good players to respawn and drop mines for him, he will probably know how to place them correctly if you don't.

* ns2_caged
Caged is a high res game, you need gates early. On this map don't go A2/W2 like tram. You can research gates just after your first or second arms lab upgrade, followed by a third IP. At that point it's up to you to go for grenades to clean a fortified tunnel location, or go on with the upgrade path.

* ns2_descent
Experimental, and the clog placement is hard to do
Experimental
* ns2_jambi
ns2_jambi is a nice map. Like tram, marines need to spread to both sides, and control 4/5 rts until gates. Then there is the infamous oxygenation contest followed by aliens killing central. As a marine, if you get oxygenation and central gets down, you need to get it back up or aliens will roam freely all around the map wreaking havocs on your resources.

* ns2_metro
< Studying the map, and filling that part then >


* ns2_mineral
* ns2_unearthed
* ns2_eclipse
Global Stragegy, analysing some rounds
ns2_tram, a mezzanine fatal gate


This should have been a marine victory, but the marine commander made several lethal mistaked. Let's put a bit of context:

This round was classic: marines holding hub and repair with 2 gates. They managed to build ARCs, and took down warehouse. Aliens responded by securing repair with a tunnel near the RT. What the commander could have done here, is to rotate the ARCs to logistic, and fry that tunnel. He got lucky, and marines managed to clean it with grenades.

Here is the mistake: the marine commander then decided to rotate the arcs to mezzanine, and get a gate there to push server (don't forget to rotate the gate order btw, so marines can push faster. Here they have to phase twice to push). Aliens had 1 RT against 4 at that point, and only one lerk, some gorges and one onos. First, server room hive is truly hard to ARC from mezzanine, one arc at most to kill the harvester would have been a safer move. Then, by commiting to Server room, you give the aliens all the space they need to get Warehouse Hive back (see screenshot), up to repair, banking pres for lifeforms.

Marines ended up losing the push, the ARCs, and woke up against an alien team holding 5 RTs, 2 hives again, and no ARCs to contest them.

The good thing to do would have been to contain the aliens on 1 hive, secure Ore processing, north tunnel, or at the very least Repair room. Once done you can safely recap RTs to get w3 and jetpacks up while ensuring aliens don't hold more than 2 RTs with the help of the ARCs or sentries. Late game, if aliens are only on 1 hive, it's really hard for them to face a marine team with upgrades.
Here lies the abyss, shall you find what you came for
Note: most of these were testing within comp mod, and can differ slightly for pub

* Only research spores if a hive will get pushed (otherwise go for chambers, adv meta, leap, bile, pve)
* As alien, expand during strong pushes (no marines will be around to punish)
* Drop more random hallucinations behind lines with sneaky scout drifters
* Bind the hive/shade to a hotkey to fast cyst and ink
* Check for early obs (for Phone, if he goes gate + sentries, and ultra late upgrades)
* Try not to research the hive type (crag/shade/shift) immediately, wait a bit and pick the right one depending on marines' playstyle
* As a skulk, ambushing 2 marines and only killing one is not worth it (because the remaining will rush, and the spawner will rotate)
* Mist unconnected cysts to prevent them dying
* Veils need to be dropped 3 at once (or the risk of getting them killed is increased + you can use the res in emergency if needed, for pve on hive)
* Always move PVE on infestation, especially whips
* As an alien com, try to leave the hive when possible to gather enough pres to go gorge. This will allow you to bunker a tunnel yourself
* Always put a clog in front of whip + hydras (+ tunnels)
* Whips do better if they are a bit away from an angle (or they'll trigger/miss too easily)
* whips can "climb" a tower of clog to reach high places, or be at the floor unkillable (a tower of 2 clogs)
* Use drifters to speed up cyst building
* Adv swipe can be rushed at min 8:00, but you'll have no metab, no chamber

---

3 macs -> 14s to build an RT
2 macs -> 20s to build an RT

---

W1 (1:00) -> W2 (1:30) -> W3 (2:00)
A2 + W1 timing -> 4min
A1 + W1 timing -> 2:35min
Biomass3 -> 1min15 (+1 bullet for skulks at w1 and w2 (11 bullets at w0, 10 at w1))
CragHive + Biomass2 -> 20s + 1min15 -> 1min35 (2min20 if drifter dropped and only 2 rts)
Biomass1 + 2 shells -> 47s (and just 8 tres for rts once gorge is there)


2 tech path
* crag hive + (bio2 and 2 shells insta drop) for 55tres, ready for 47s --> next is bio3 (for +1 bullet) (20 tres)
* crag hive + (bio1 and 3 shells insta drop) for 55tres, ready for 44s --> next is bio2, then bio3 (35 tres)


Recap:
------
* Bio 3 needs 2 shells to increase the TTK with 1 bite (12 bullets) ~4min
* bio 3 + 3 shells with 1 bite (13 bullets)
* Bio 2+ 2 shells (12 bullets TTK as well, but you don't get the free +1 bullet with the bio2)


lerk timing early game (w0/w1):
-------------------------------
* Bio1 vs w0: 24 bullets
* Bio2 vs w0: 25 bullets
* Bio3 vs w0: 25 bullets
* Bio1 vs w1: 22 bullets
* Bio2 vs w1: 22 bullets
* Bio3-6 vs w1: 23 bullets


lerk timing mid game w2:
------------------------
* Bio1 vs w2: 20
* Bio2-6 vs w2: 21


lerk timing end game w3:
------------------------
* Bio1-4 vs w3: 19
* Bio5-9 vs w3: 20

Arms lab timing with powerbuild: (6s build time)
* 1:00 (lvl 1) -> 1:30 (lvl 2)-> 2:00 (lvl 3)


Mucous shield:
--------------
Bio1 vs w0: 11 bullets (+1)
Bio2 vs w0: 12 bullets , +2 <- Bio2 is best with mucous (no need for bio3)
Bio3 vs w0: 12 bullets (+2)
Bio1 vs w1: 10 bullets (+1)
Bio2 vs w1: 11 bullets (+2)
Bio3 vs w1: 11 bullets (+1 +1)
Bio5 vs w1: 12 bullets (+1 +2)


Mucous shield + vamp:
---------------------
* Bio2 + 1 shell: (no impact, still 12)
* Bio2 + 2 shell: (no impact, still 12)
* Bio2 + 3 shell: +1 bonus on first bite


Mucous shield + babblers:
-------------------------
Bio1 vs w0: 14 bullets
Bio2 vs w0: 14 bullets
Bio3 vs w0: 14 bullets
Bio1 vs w1: 12 bullets
Bio2+ vs w1: 13 bullets


Babblers: (21 eHP for 6, always +2 TTK bullets)
-----------------------------------------------
Bio1 vs w0: 12 bullets (+2)
Bio2 vs w0: 12 bullets (+2)
Bio3 vs w0: 13 bullets (+3) <- Best set for hard push
Bio1 vs w1: 11 bullets (+2)
Bio2 vs w1: 11 bullets (+2)
Bio3 vs w1: 12 bullets (+3)


RECAP OF THE STRATS:
--------------------
* 14 bullets TTK (w0) with babblers + mucous (up to 15 TTK with a single 1 shell vamp bite)
* Biomass 2 (mucous gives +2) -> 1 shell (15 bullets)
* Second Hive then tunnel, then metab + 3 shells


Vampirism (naked):
-------------------
* Bio1 + 1shell: 10 bullets
* Bio2 + 1shell: 11 bullets (11 for 2nd bite as well)
* Bio3 + 3shell + 2 bites + mucous: 14 bullets
* TLDR: bio2 + 1 shell is enough for skulks, only lerks need the shells (so, bio2+1shell, then bio3+3shells)

Harvester off infest dies on 2 min with crag (heal waves gives ~5s for 3tres, iff the RT has armor)

medpack and skulk TTK:
----------------------
* A0 + one para: one med
* A1 + 1 bite: no med (still 2 bites left)
* A1 + 2 bites: 1 med
* A2 + 1 bites (hp/ap -> 77/43): no med (still 3 bites left)
* A2 + 2 bites (hp/ap -> 55/17): no med (still 2 bites left)
* A3 => +1 bite first med, +2 bite 3 meds. (even with Adv swipe)
* A3 => +1 adv swipe with 2 meds (total of 5, 4 is default for a3)

TLDR: on A2, med if marines have:
* 71/36 (2 para one bite)
* 49/10 (2 para two bites)


medpack and lerk TTK:
---------------------
* Needs 2 meds with A1 to get +1 TTK
* Needs 1 meds with A2 to get +1 TTK

---

Adv swipe can be up at 10:00 (fastest timing, 3 shells, 3 rts, 1 drifter, no rt dead)
Resbitting tactic: bio4 start at 2:15, leap at minute 3:55, 3 veils at 4:30, then hive, and adv swipe.
19 Comments
NinjaHobbit 4 Jul, 2023 @ 3:50pm 
Updates or not, thank you for taking the time to make this very thorough guide, a lot of it still very relevant and helpful.
Schrödinger's Katz  [author] 4 Jul, 2023 @ 9:53am 
I took notes of those feedbacks, thanks for them, but I don't have much time at the moment to update the guide as I also want to rewrite some of the sections. Mostly to upgrade the notes, and correct them with data from rounds I played since the last update.
NinjaHobbit 3 Jul, 2023 @ 10:51pm 
Would love an update, since there won't be anymore patches. TY Katz
Shiro 4 Feb, 2022 @ 3:06am 
341 changed maps a little - realized that when re-tried locker siege position from countryard and robotics was no longer build-able at that specific spot... biodome and caged also got changes
Shiro 8 Jan, 2022 @ 9:39am 
randomly remembered tables with TTK, but now carapace works differently. Might update that for teh tables? Plus whatelse they changed
Schrödinger's Katz  [author] 16 Aug, 2021 @ 8:42am 
@Shiro: that was when their cost was 5 tres, now that it's 3 it is more in line with what they are worth for. Guide updated, thanks for the follow up.
Shiro 14 Aug, 2021 @ 8:27am 
"MACs are a niche upgrade: they are expensive, weak and slow"
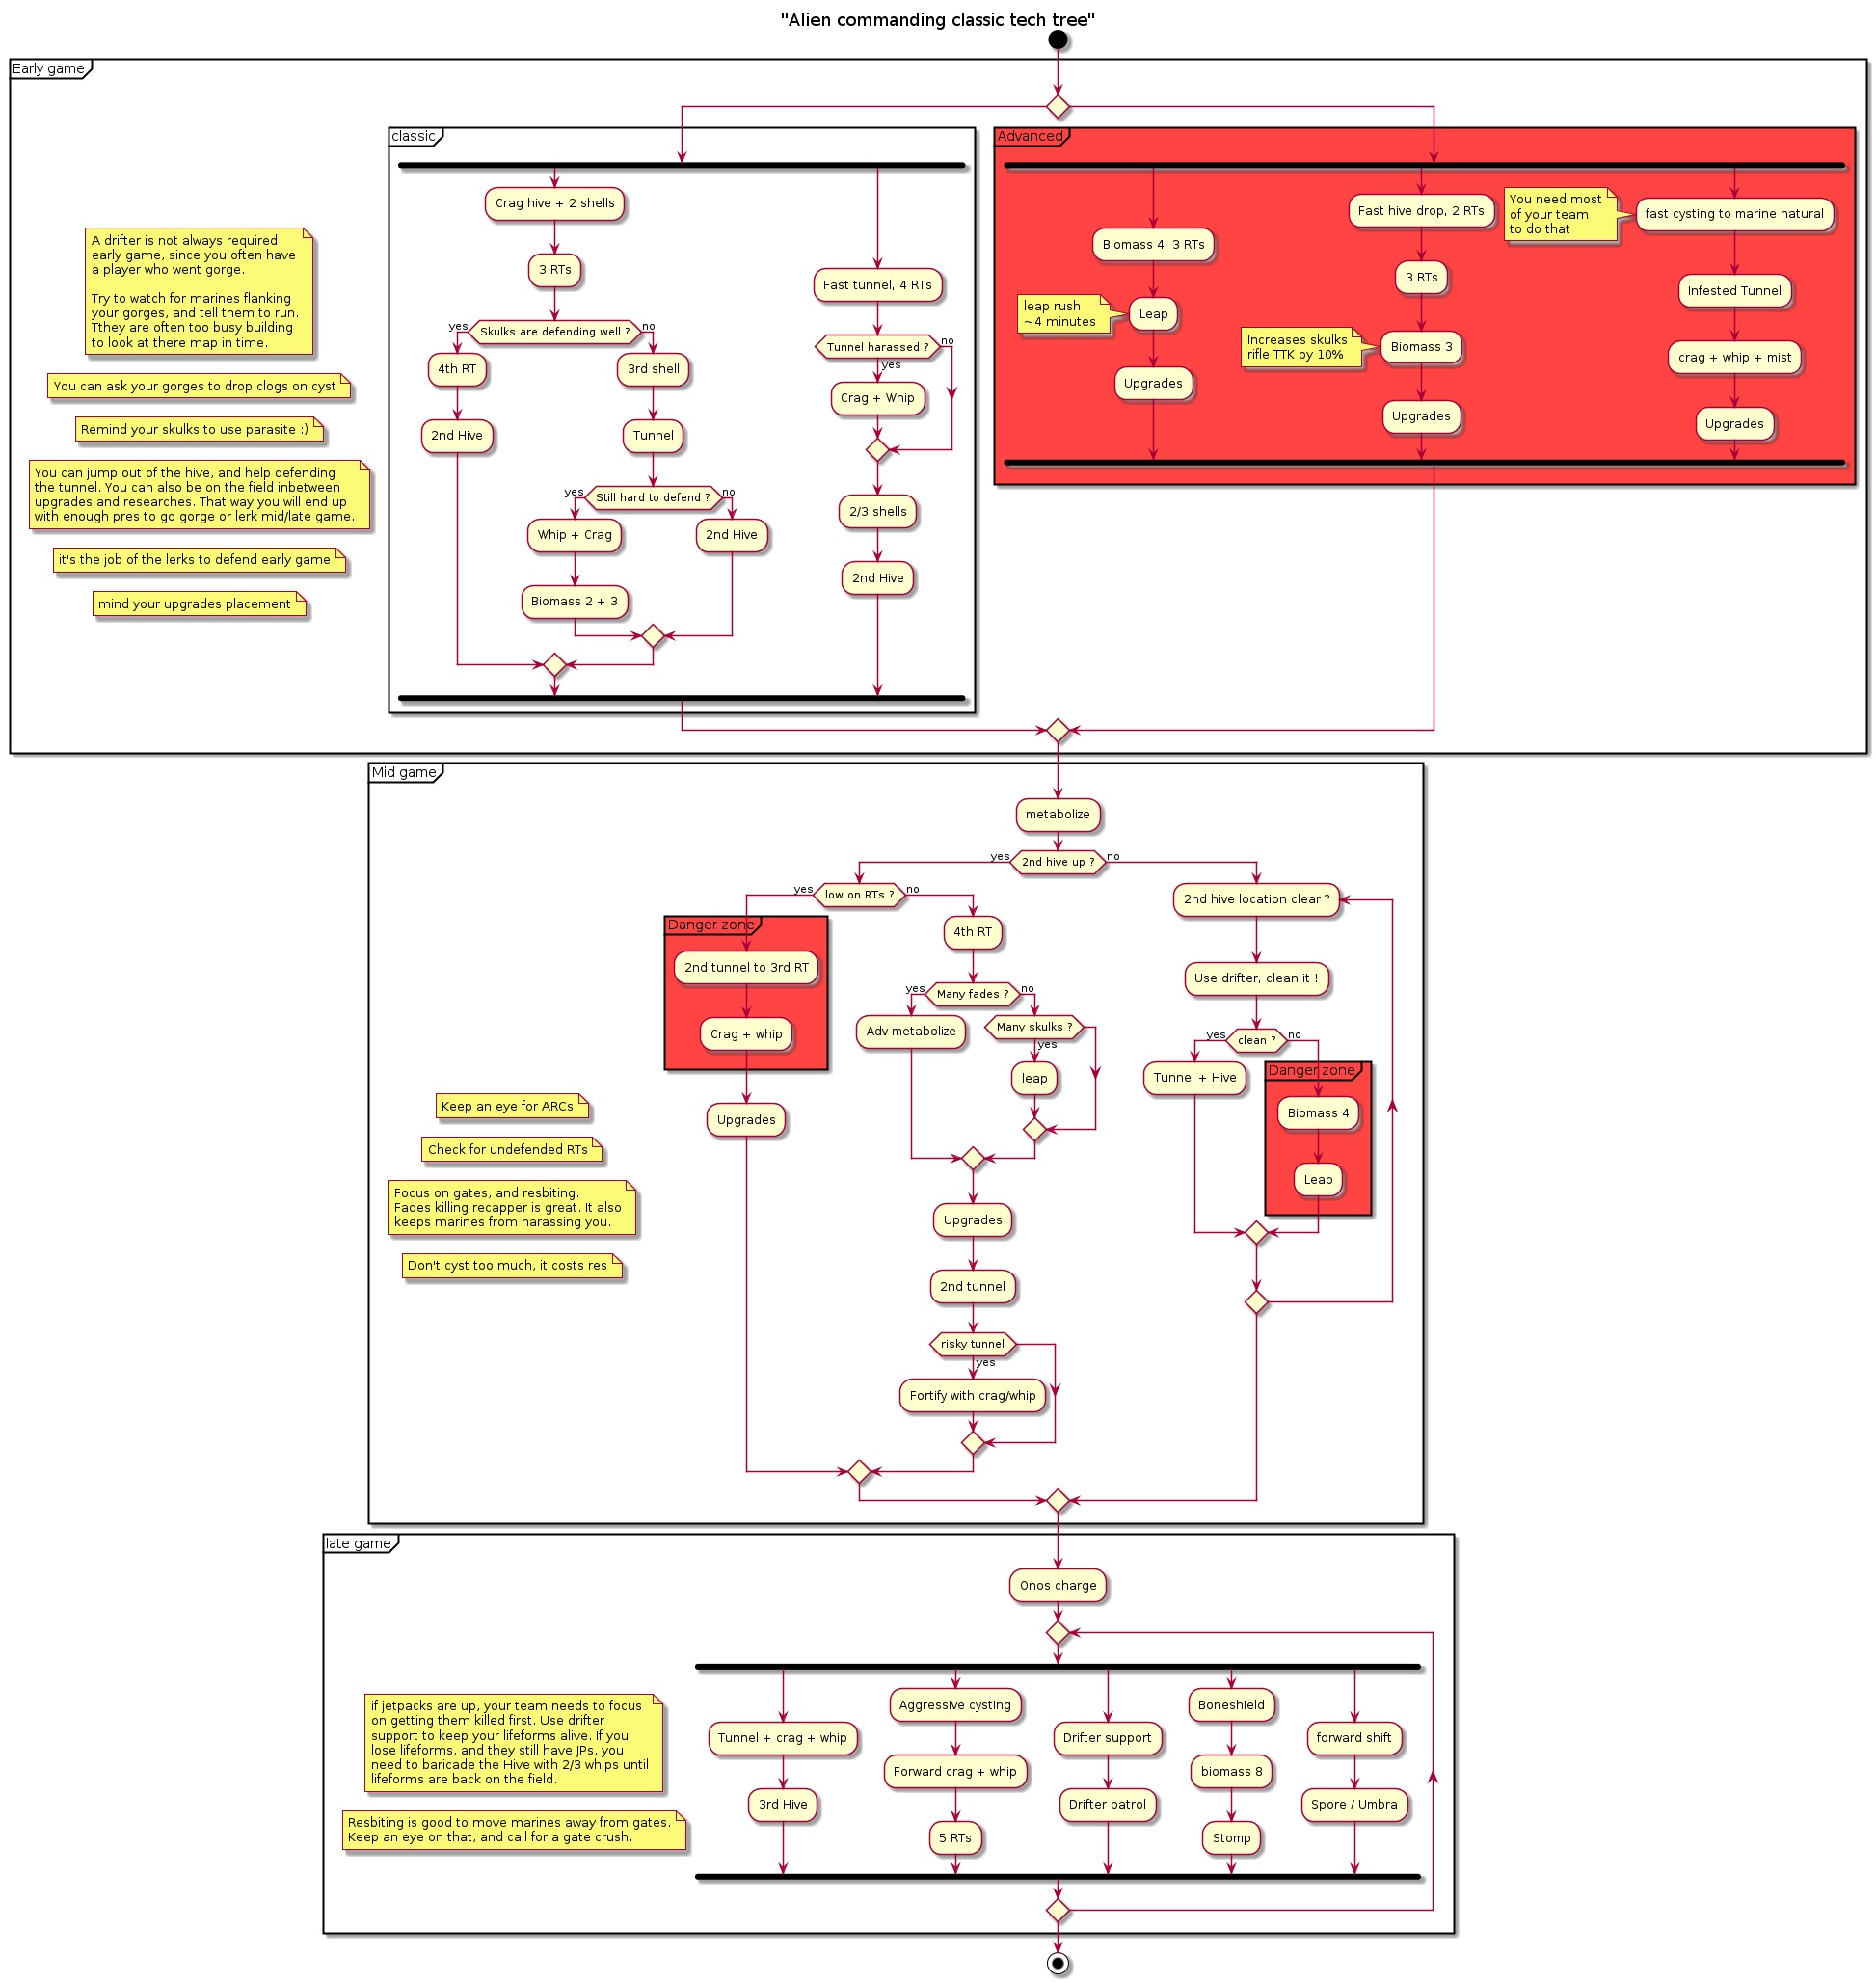
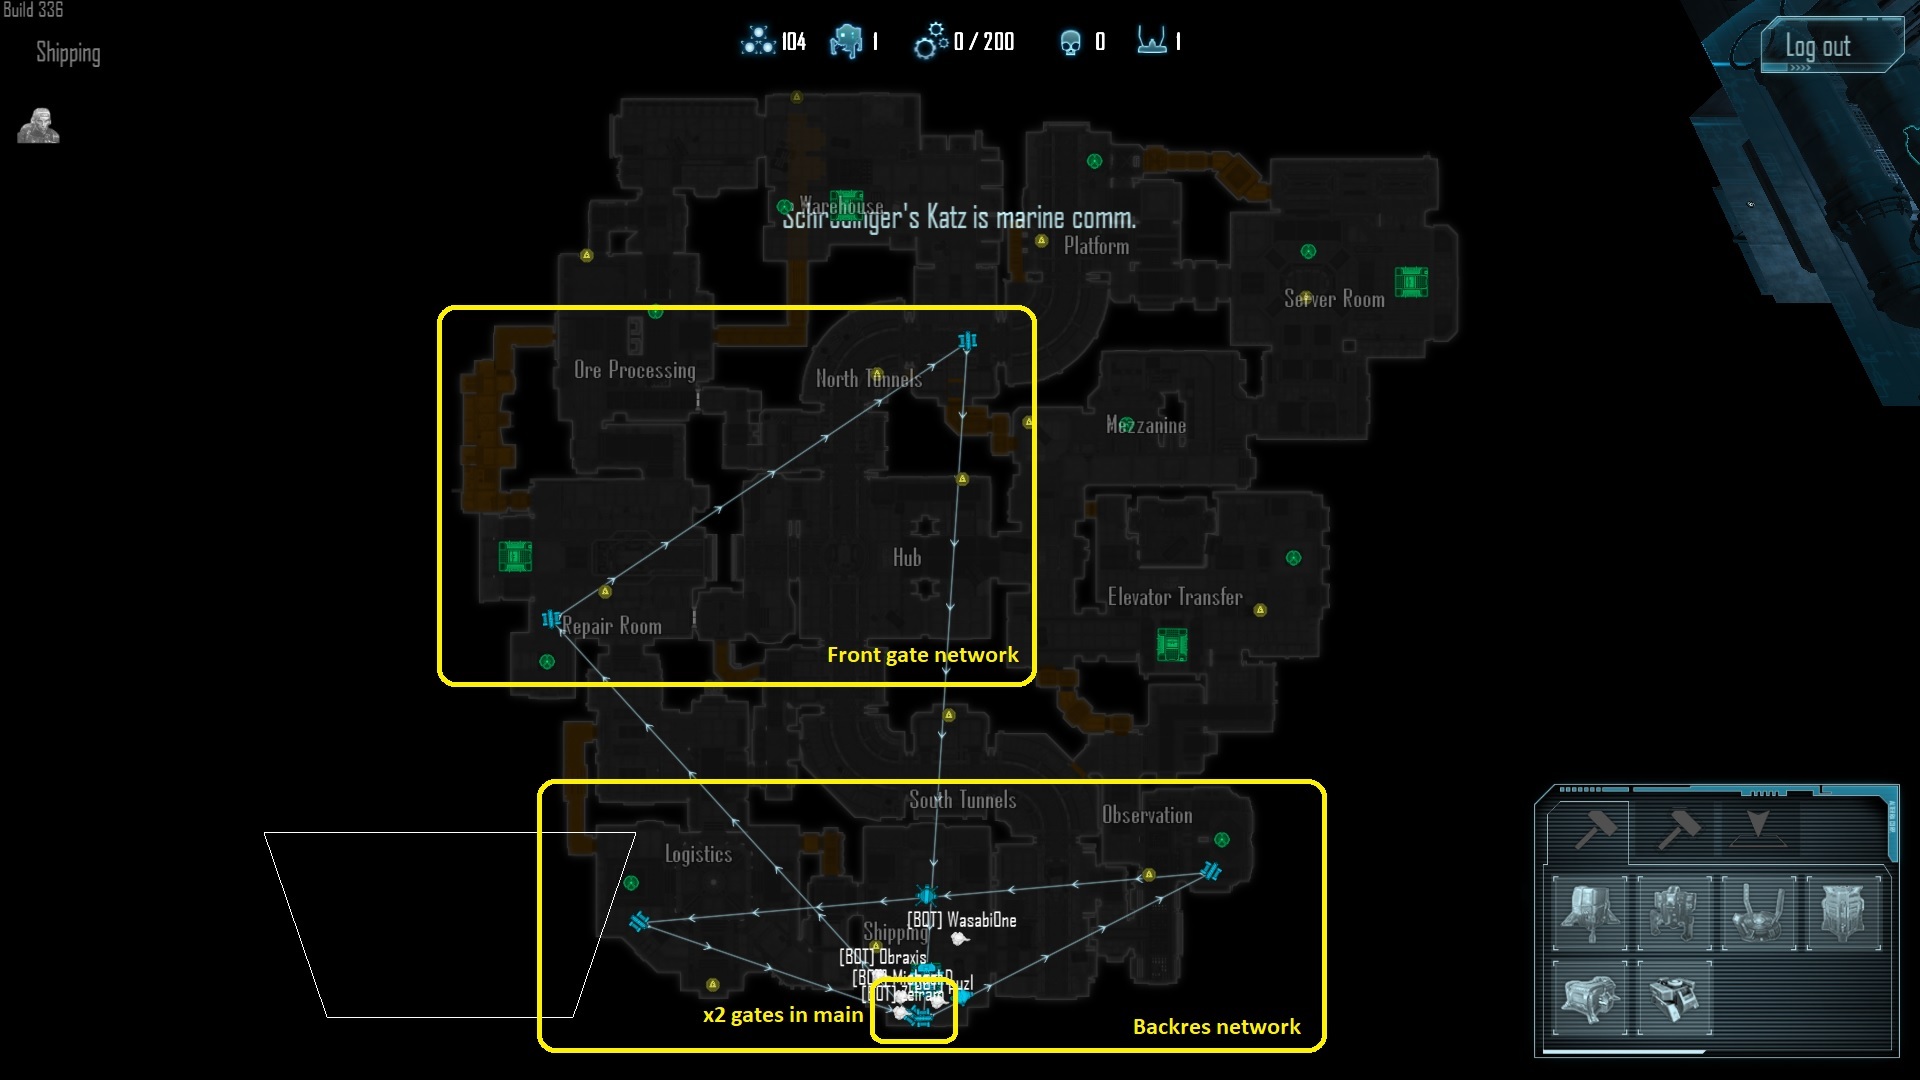
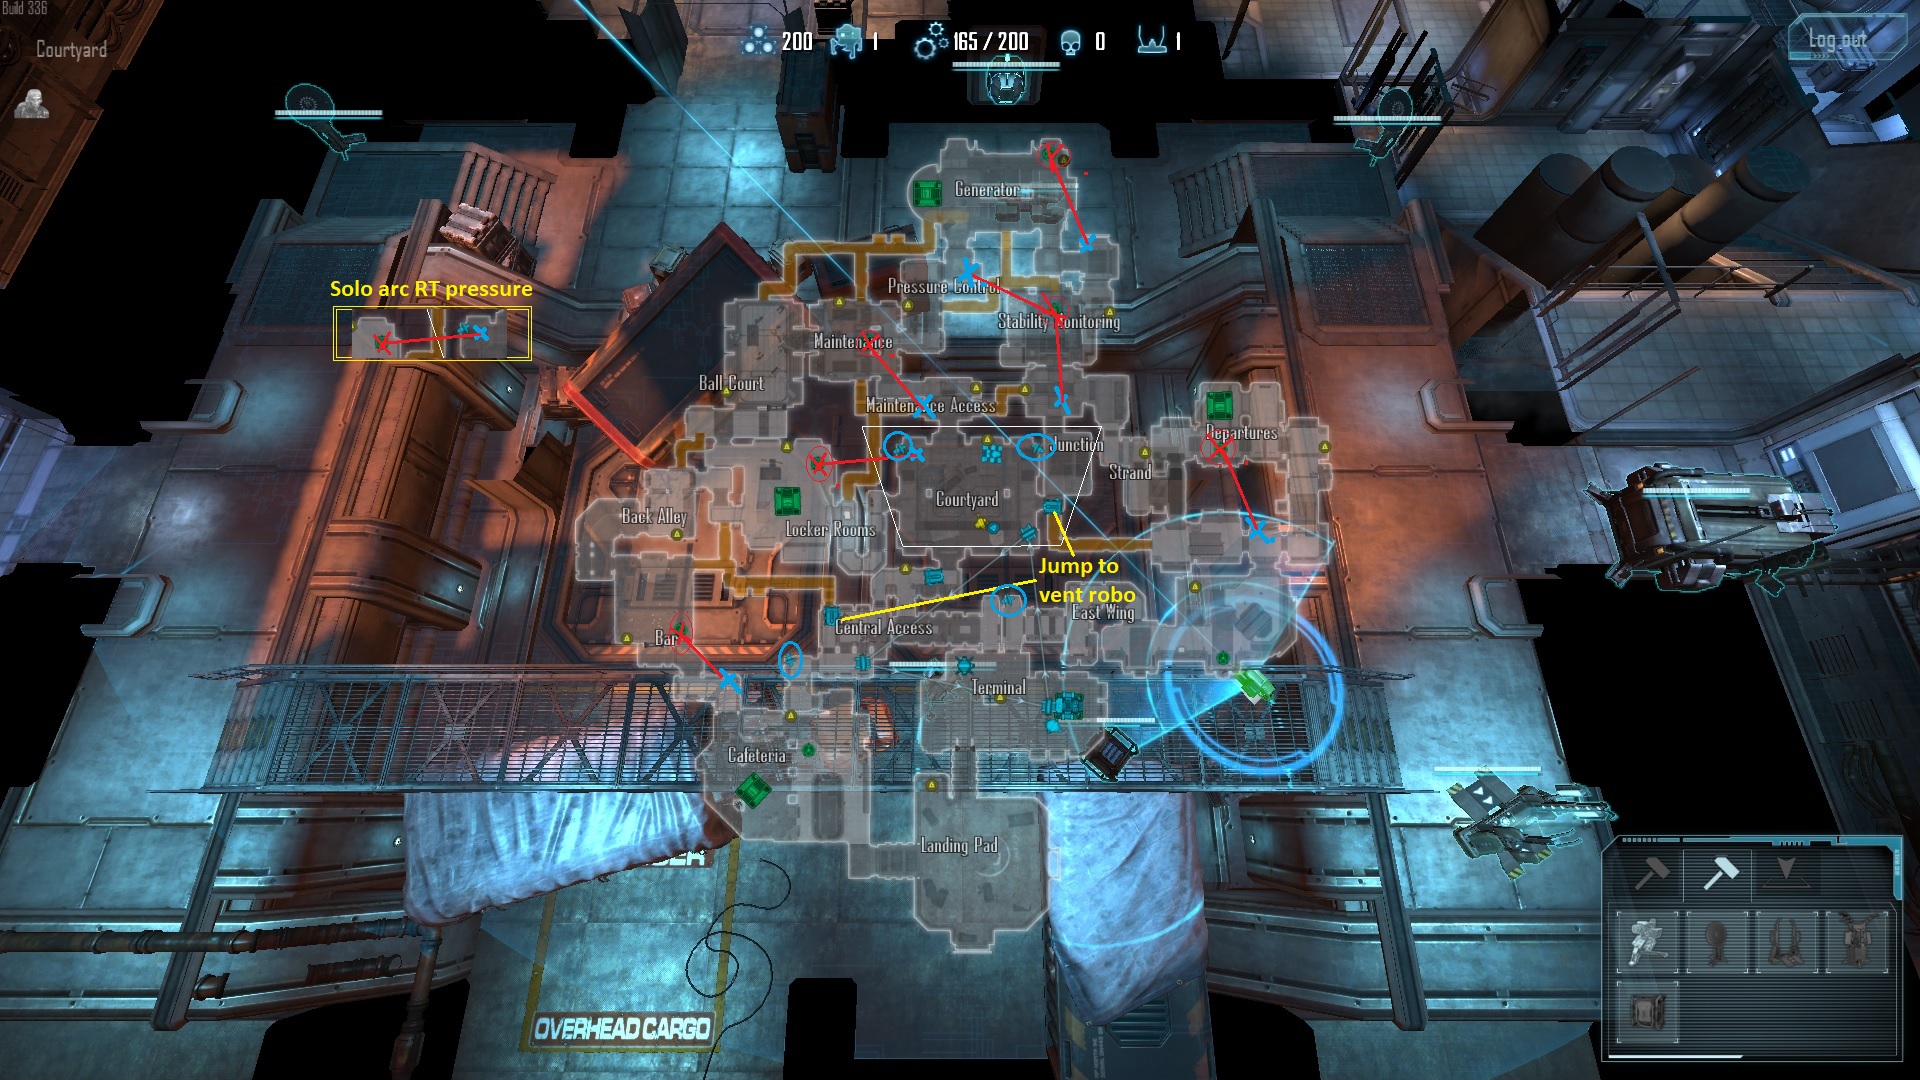
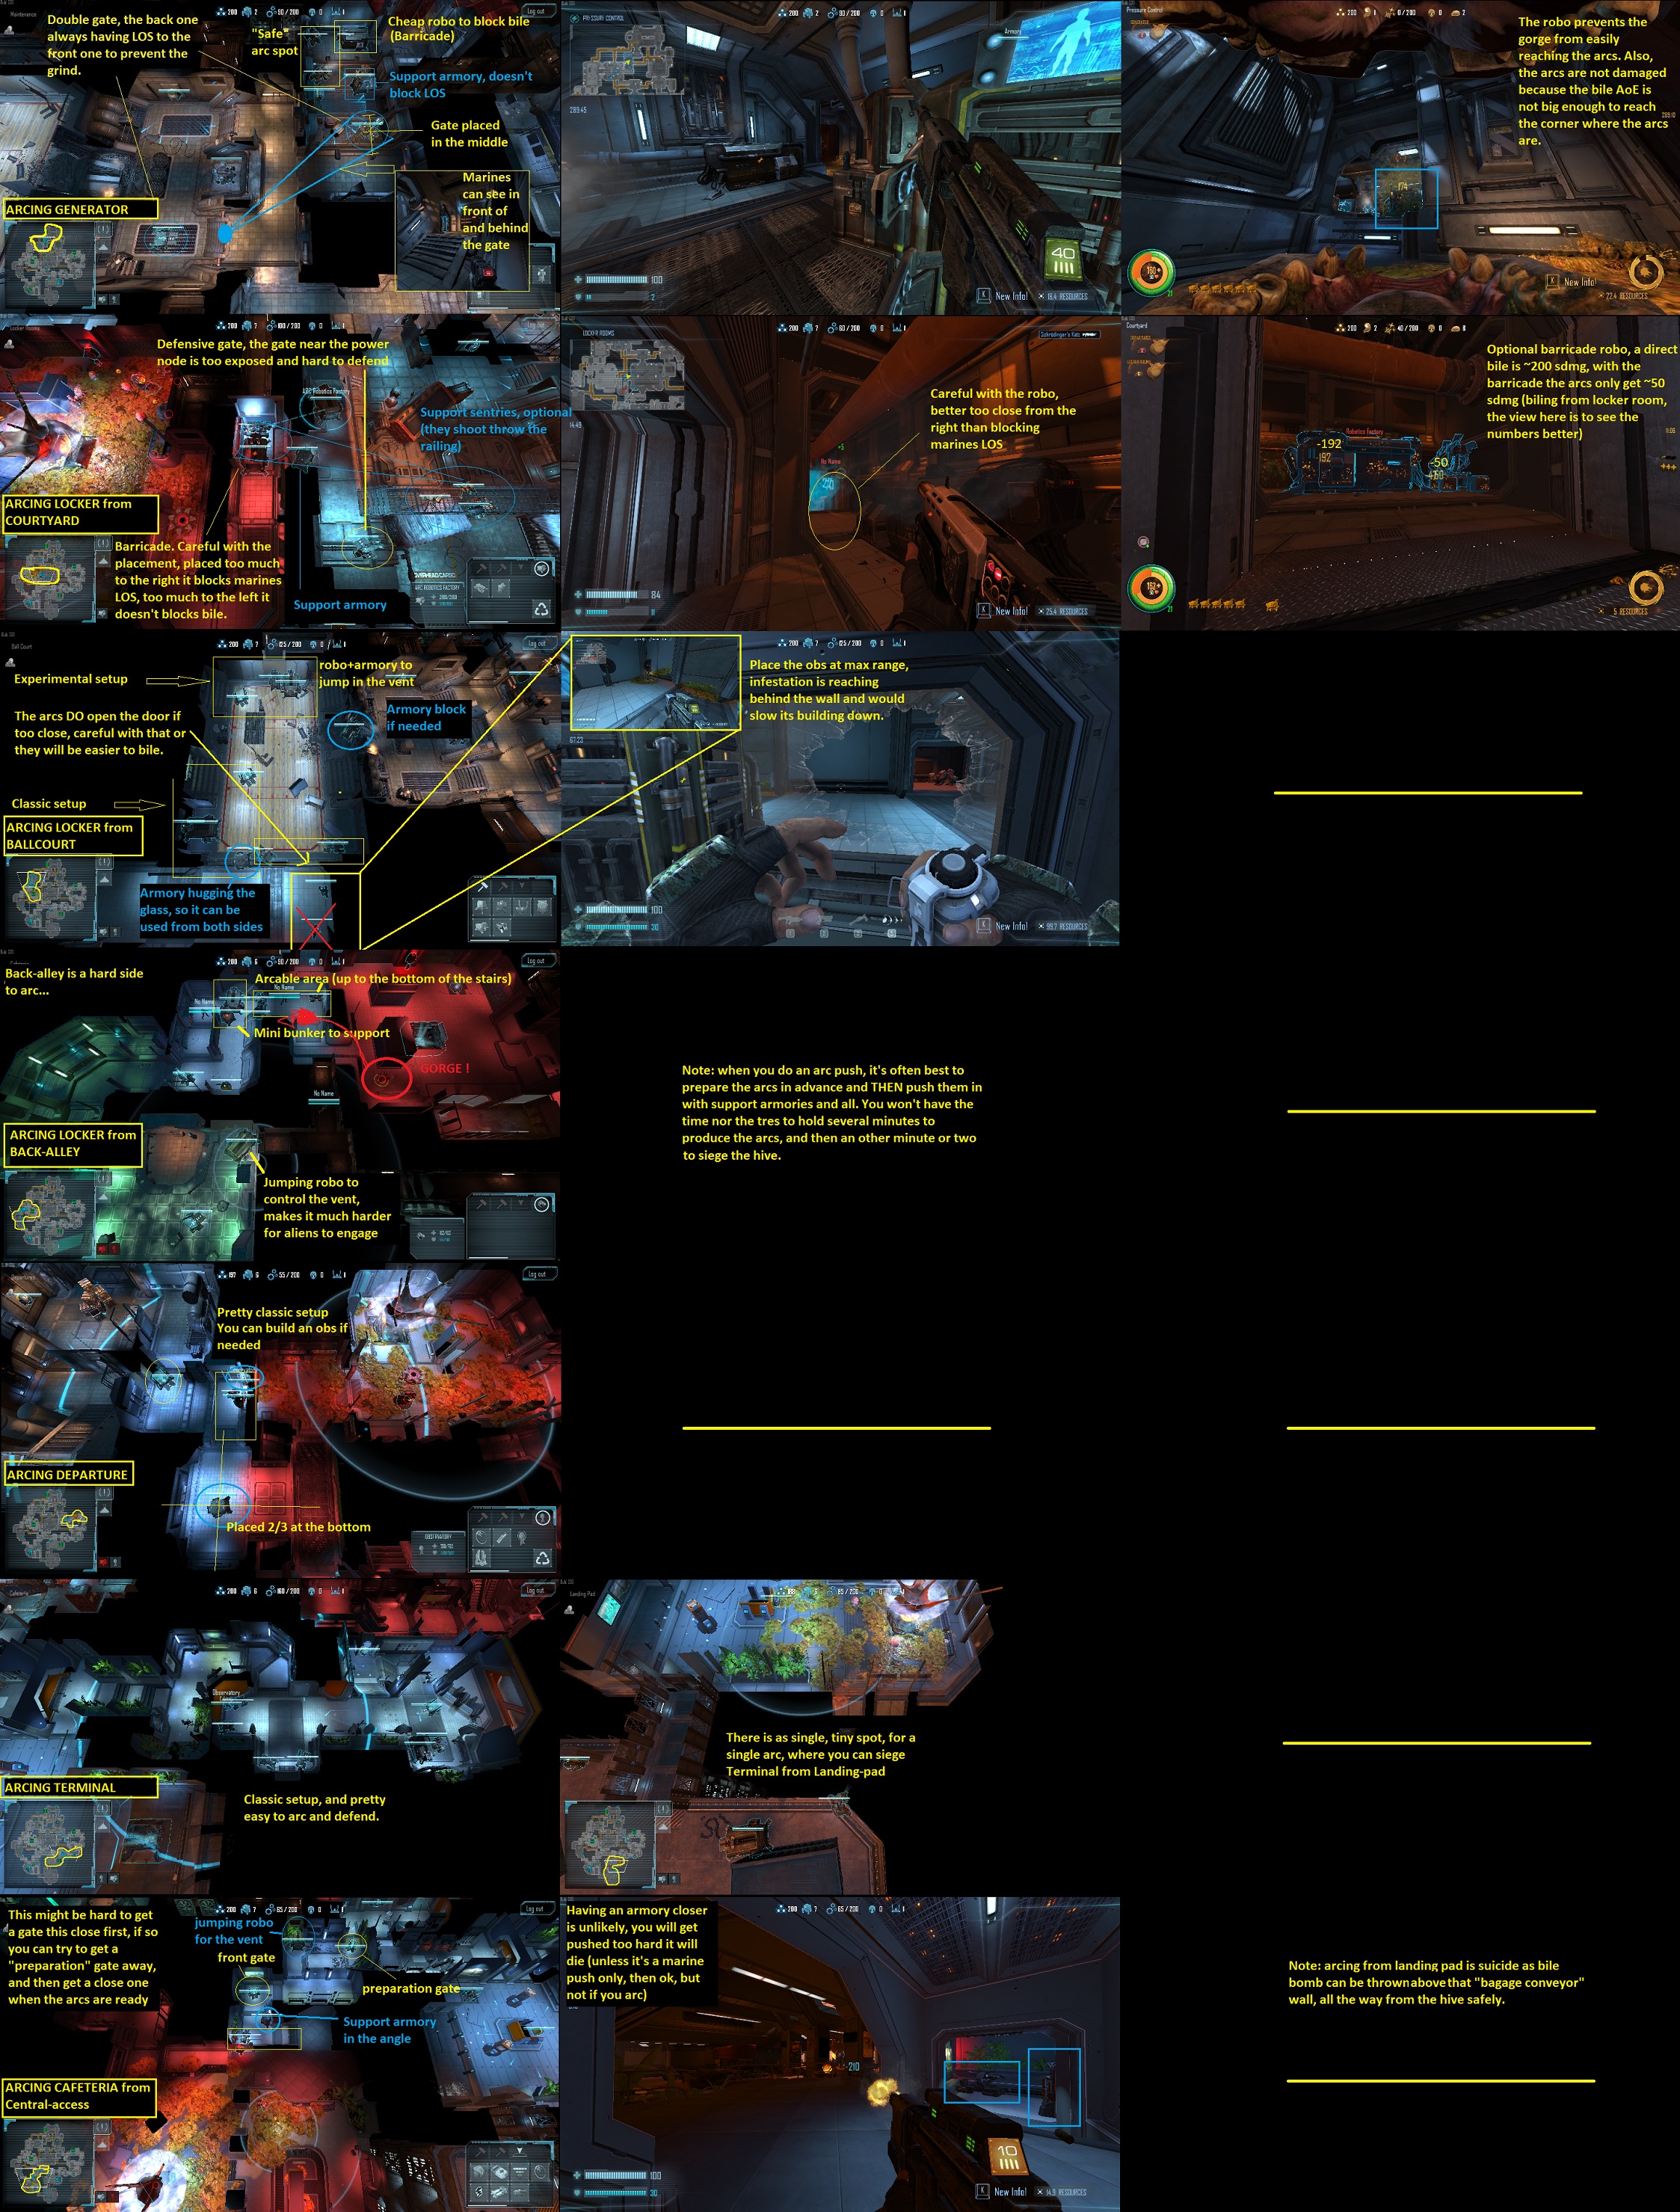
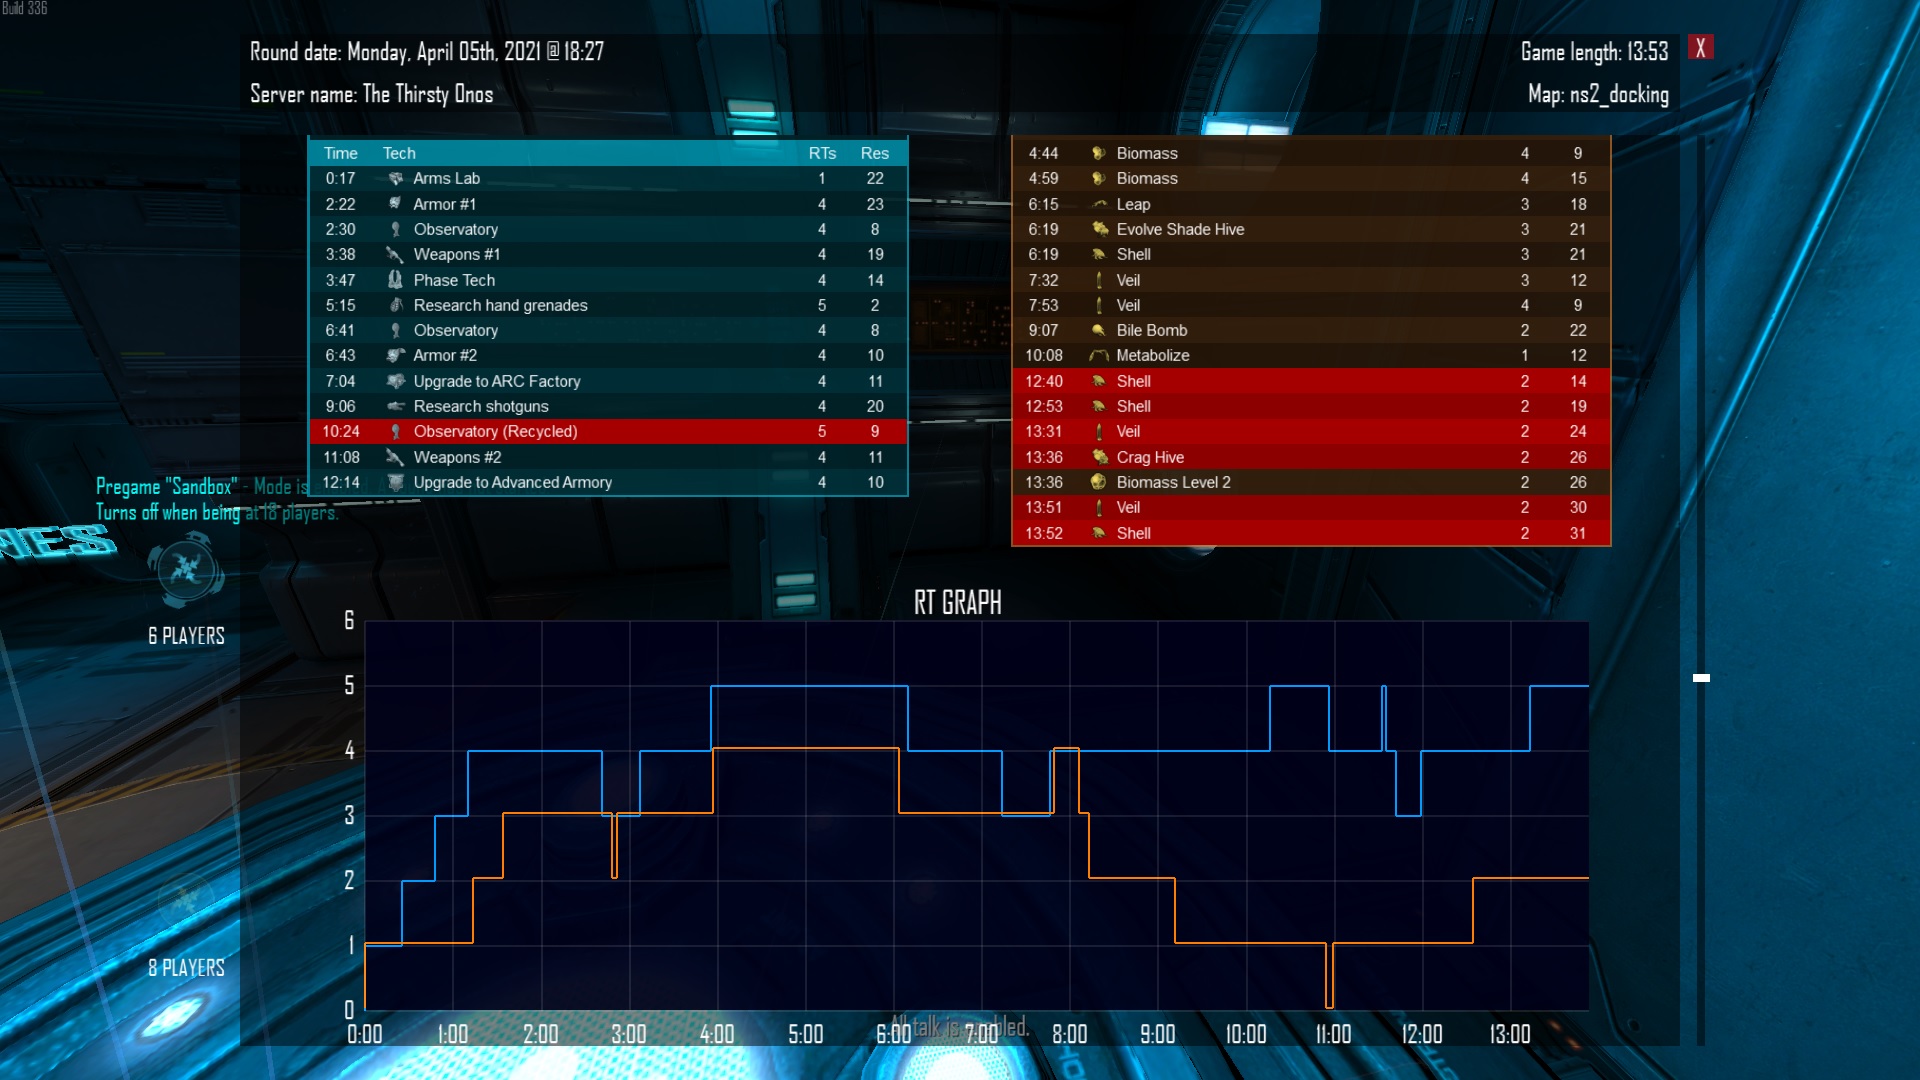
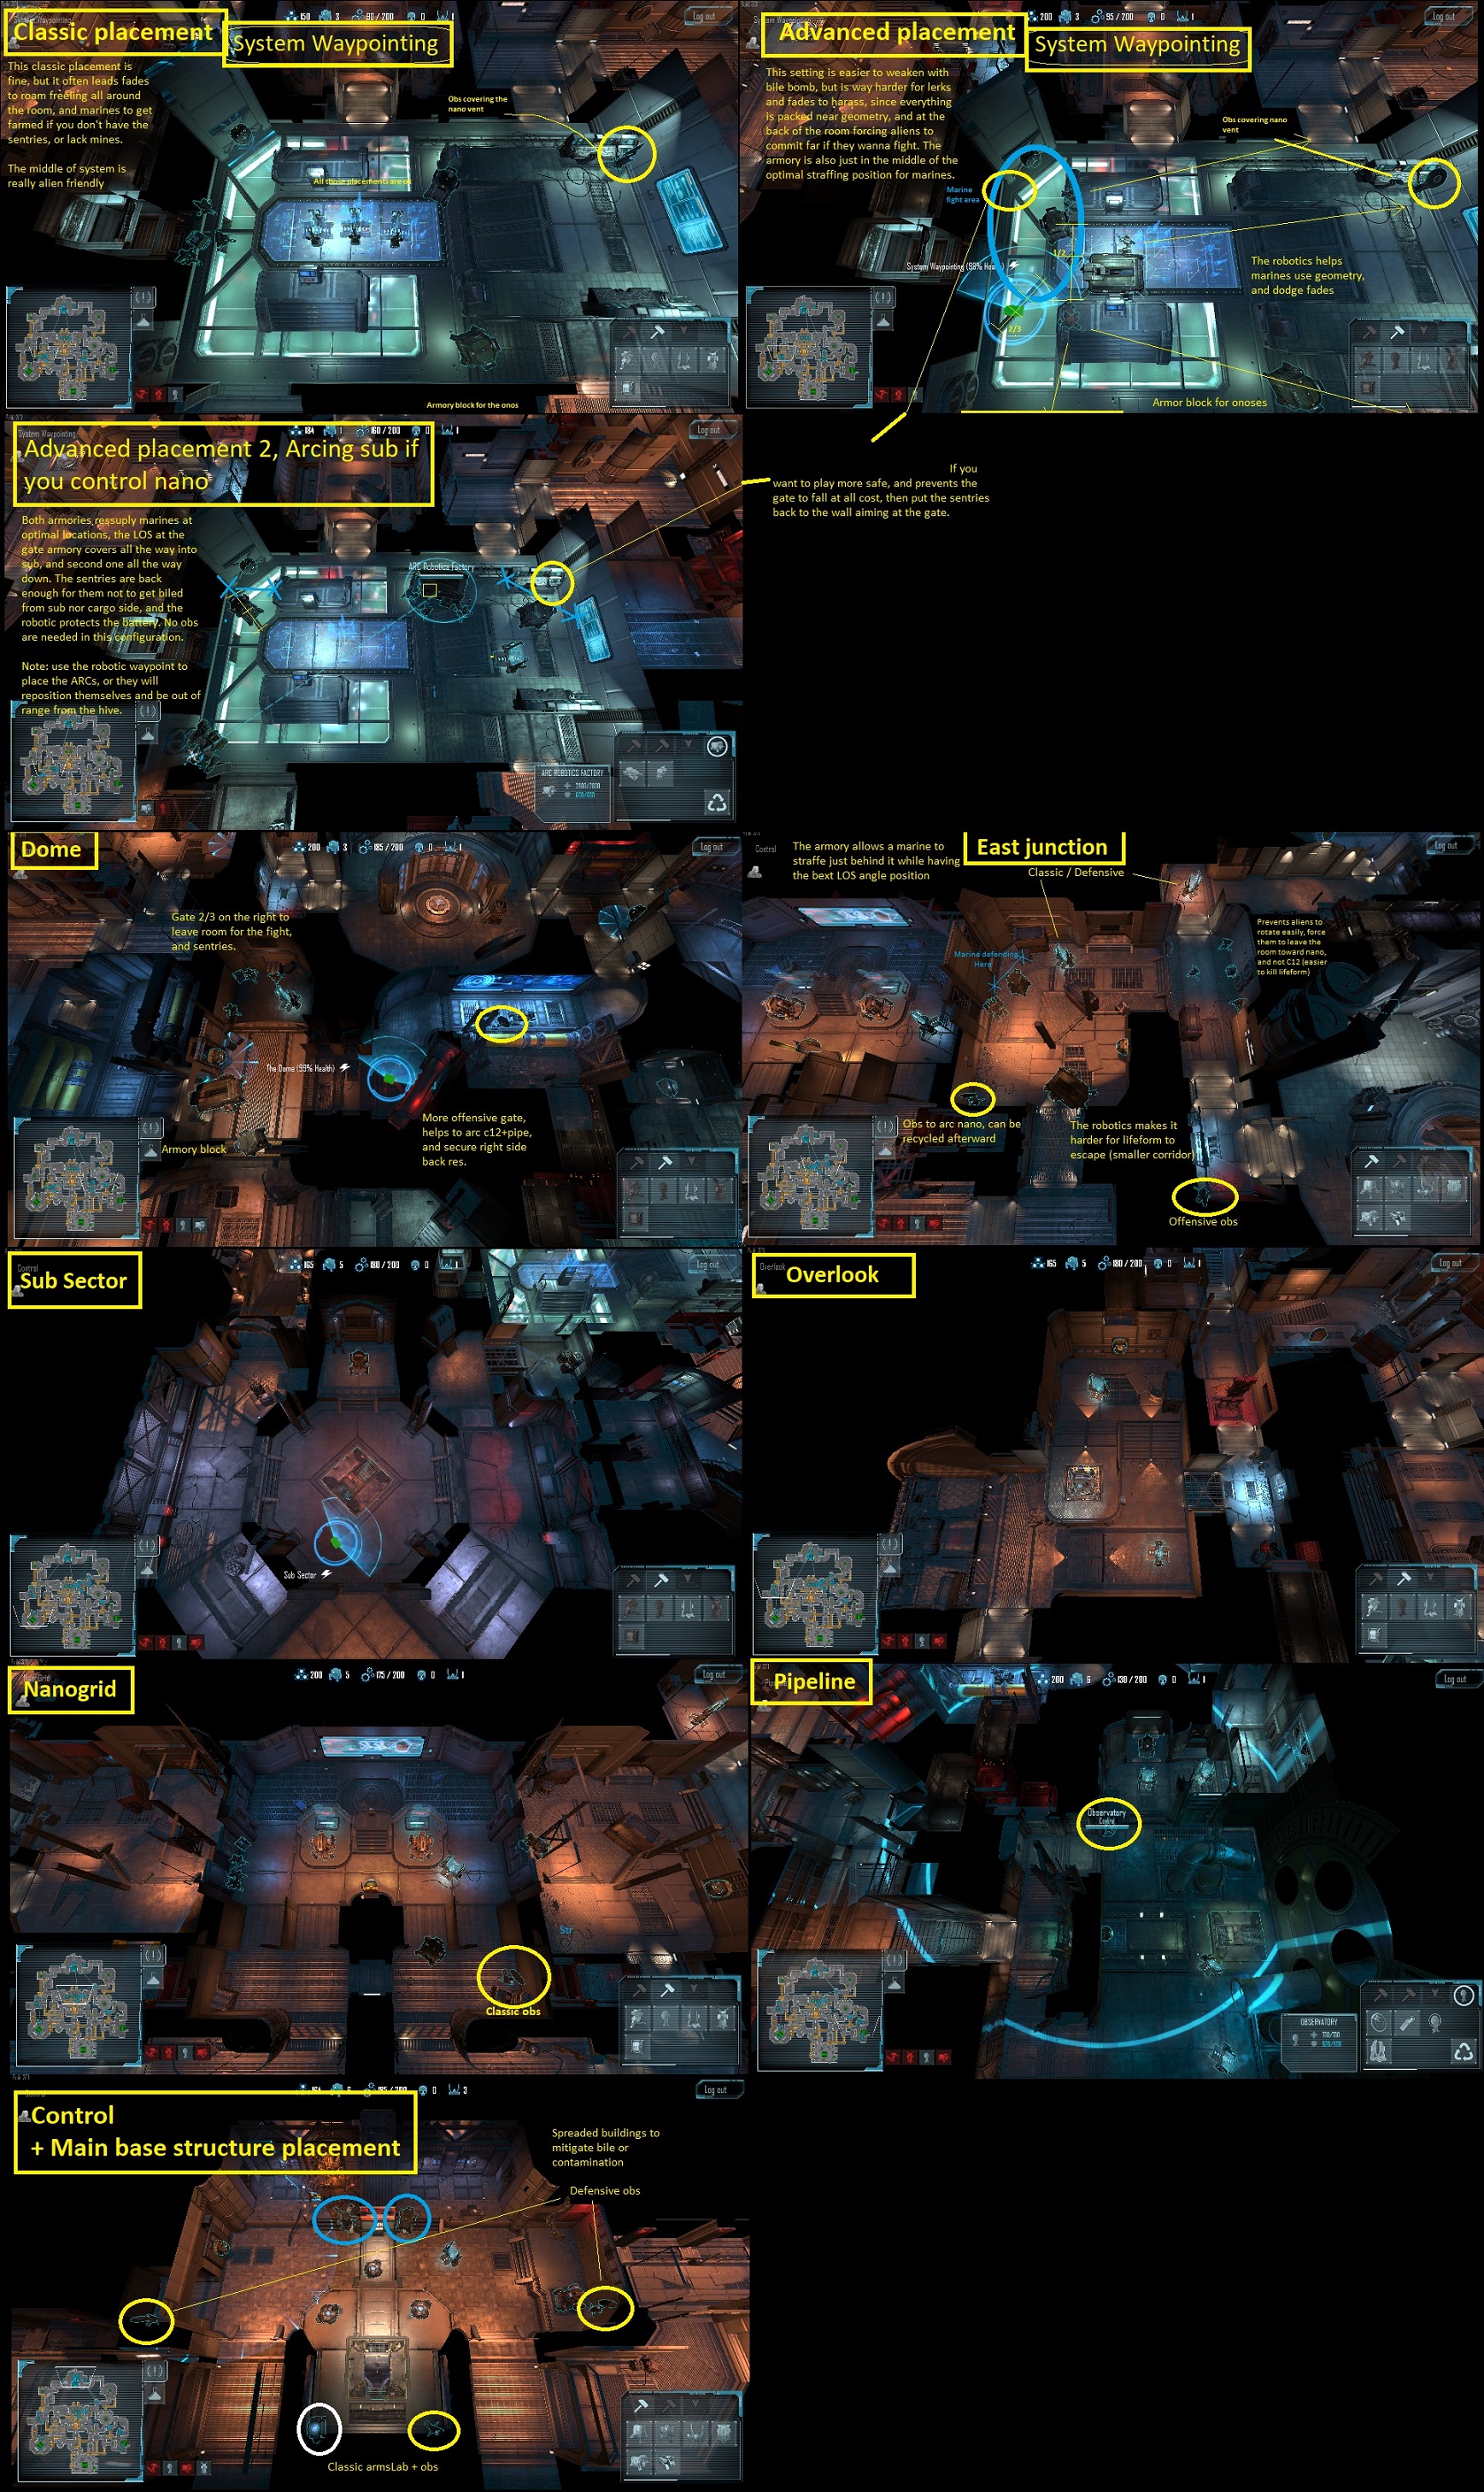
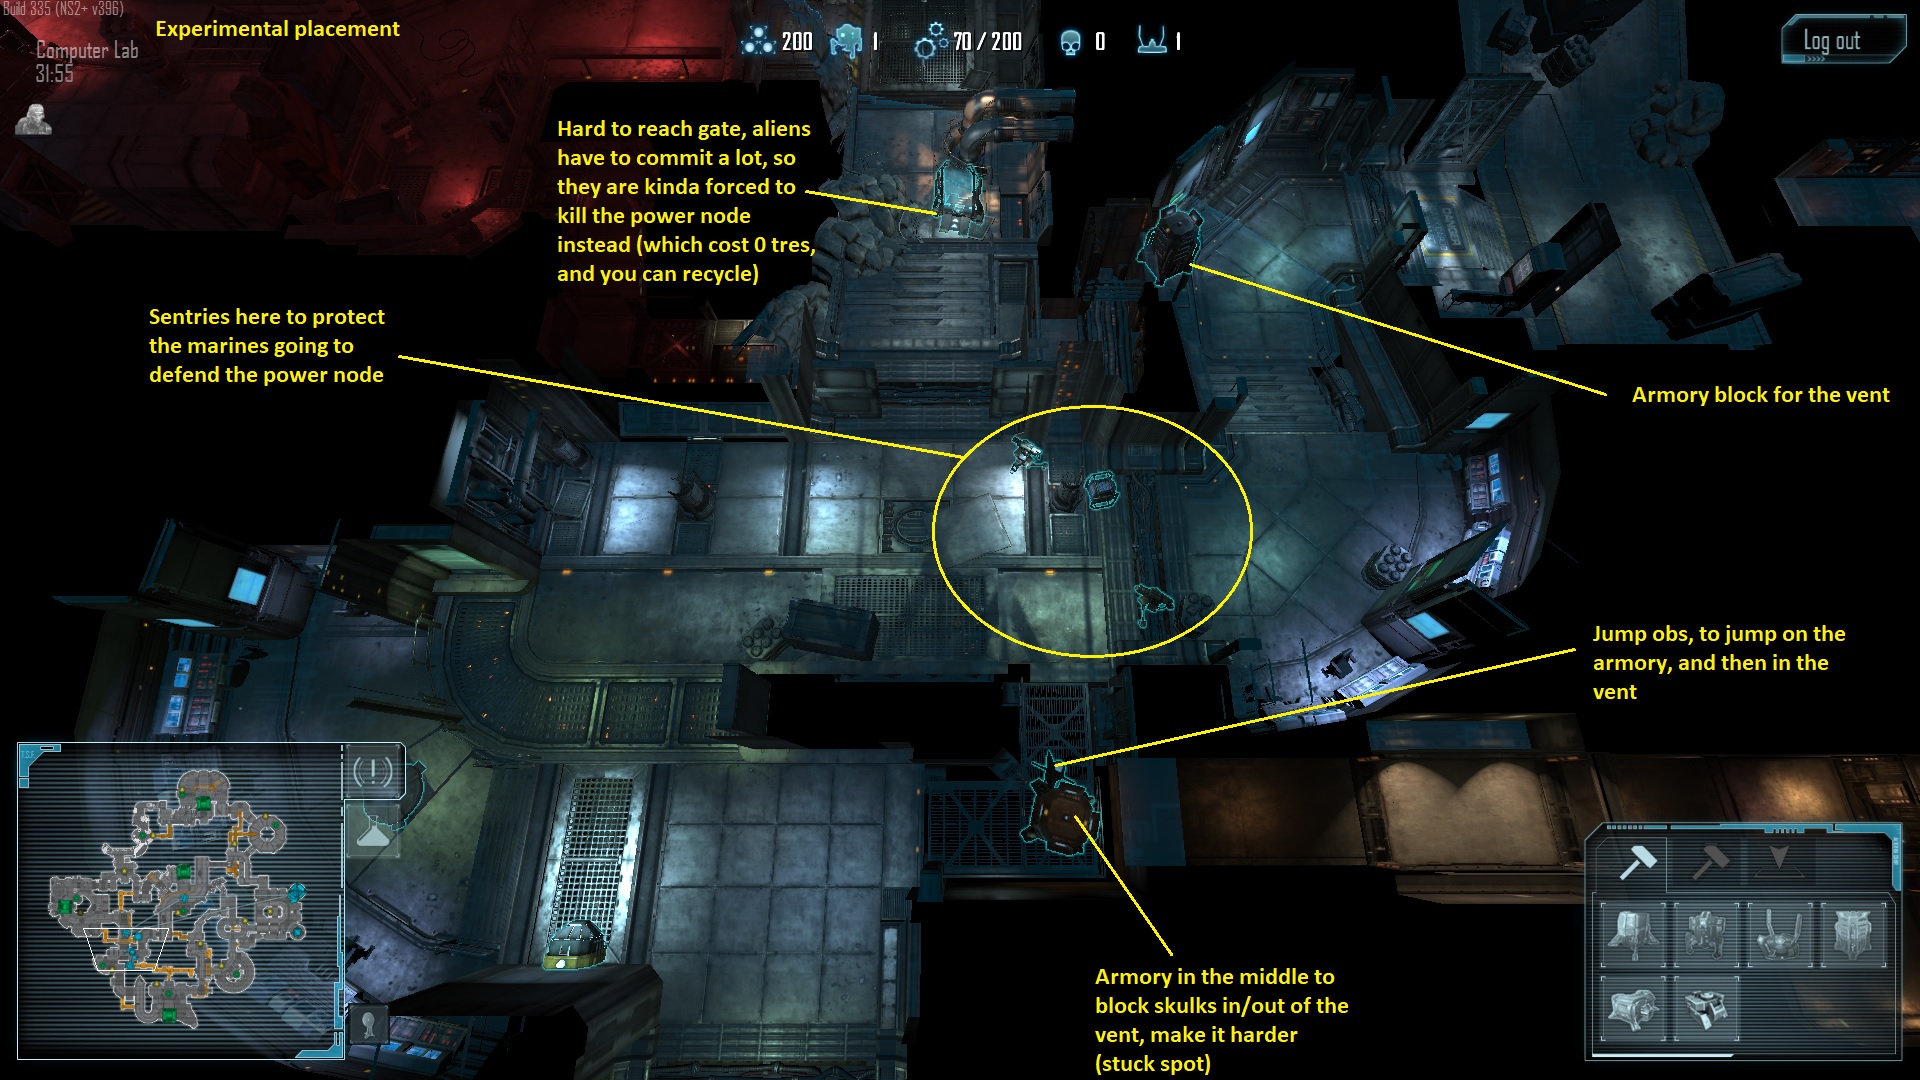
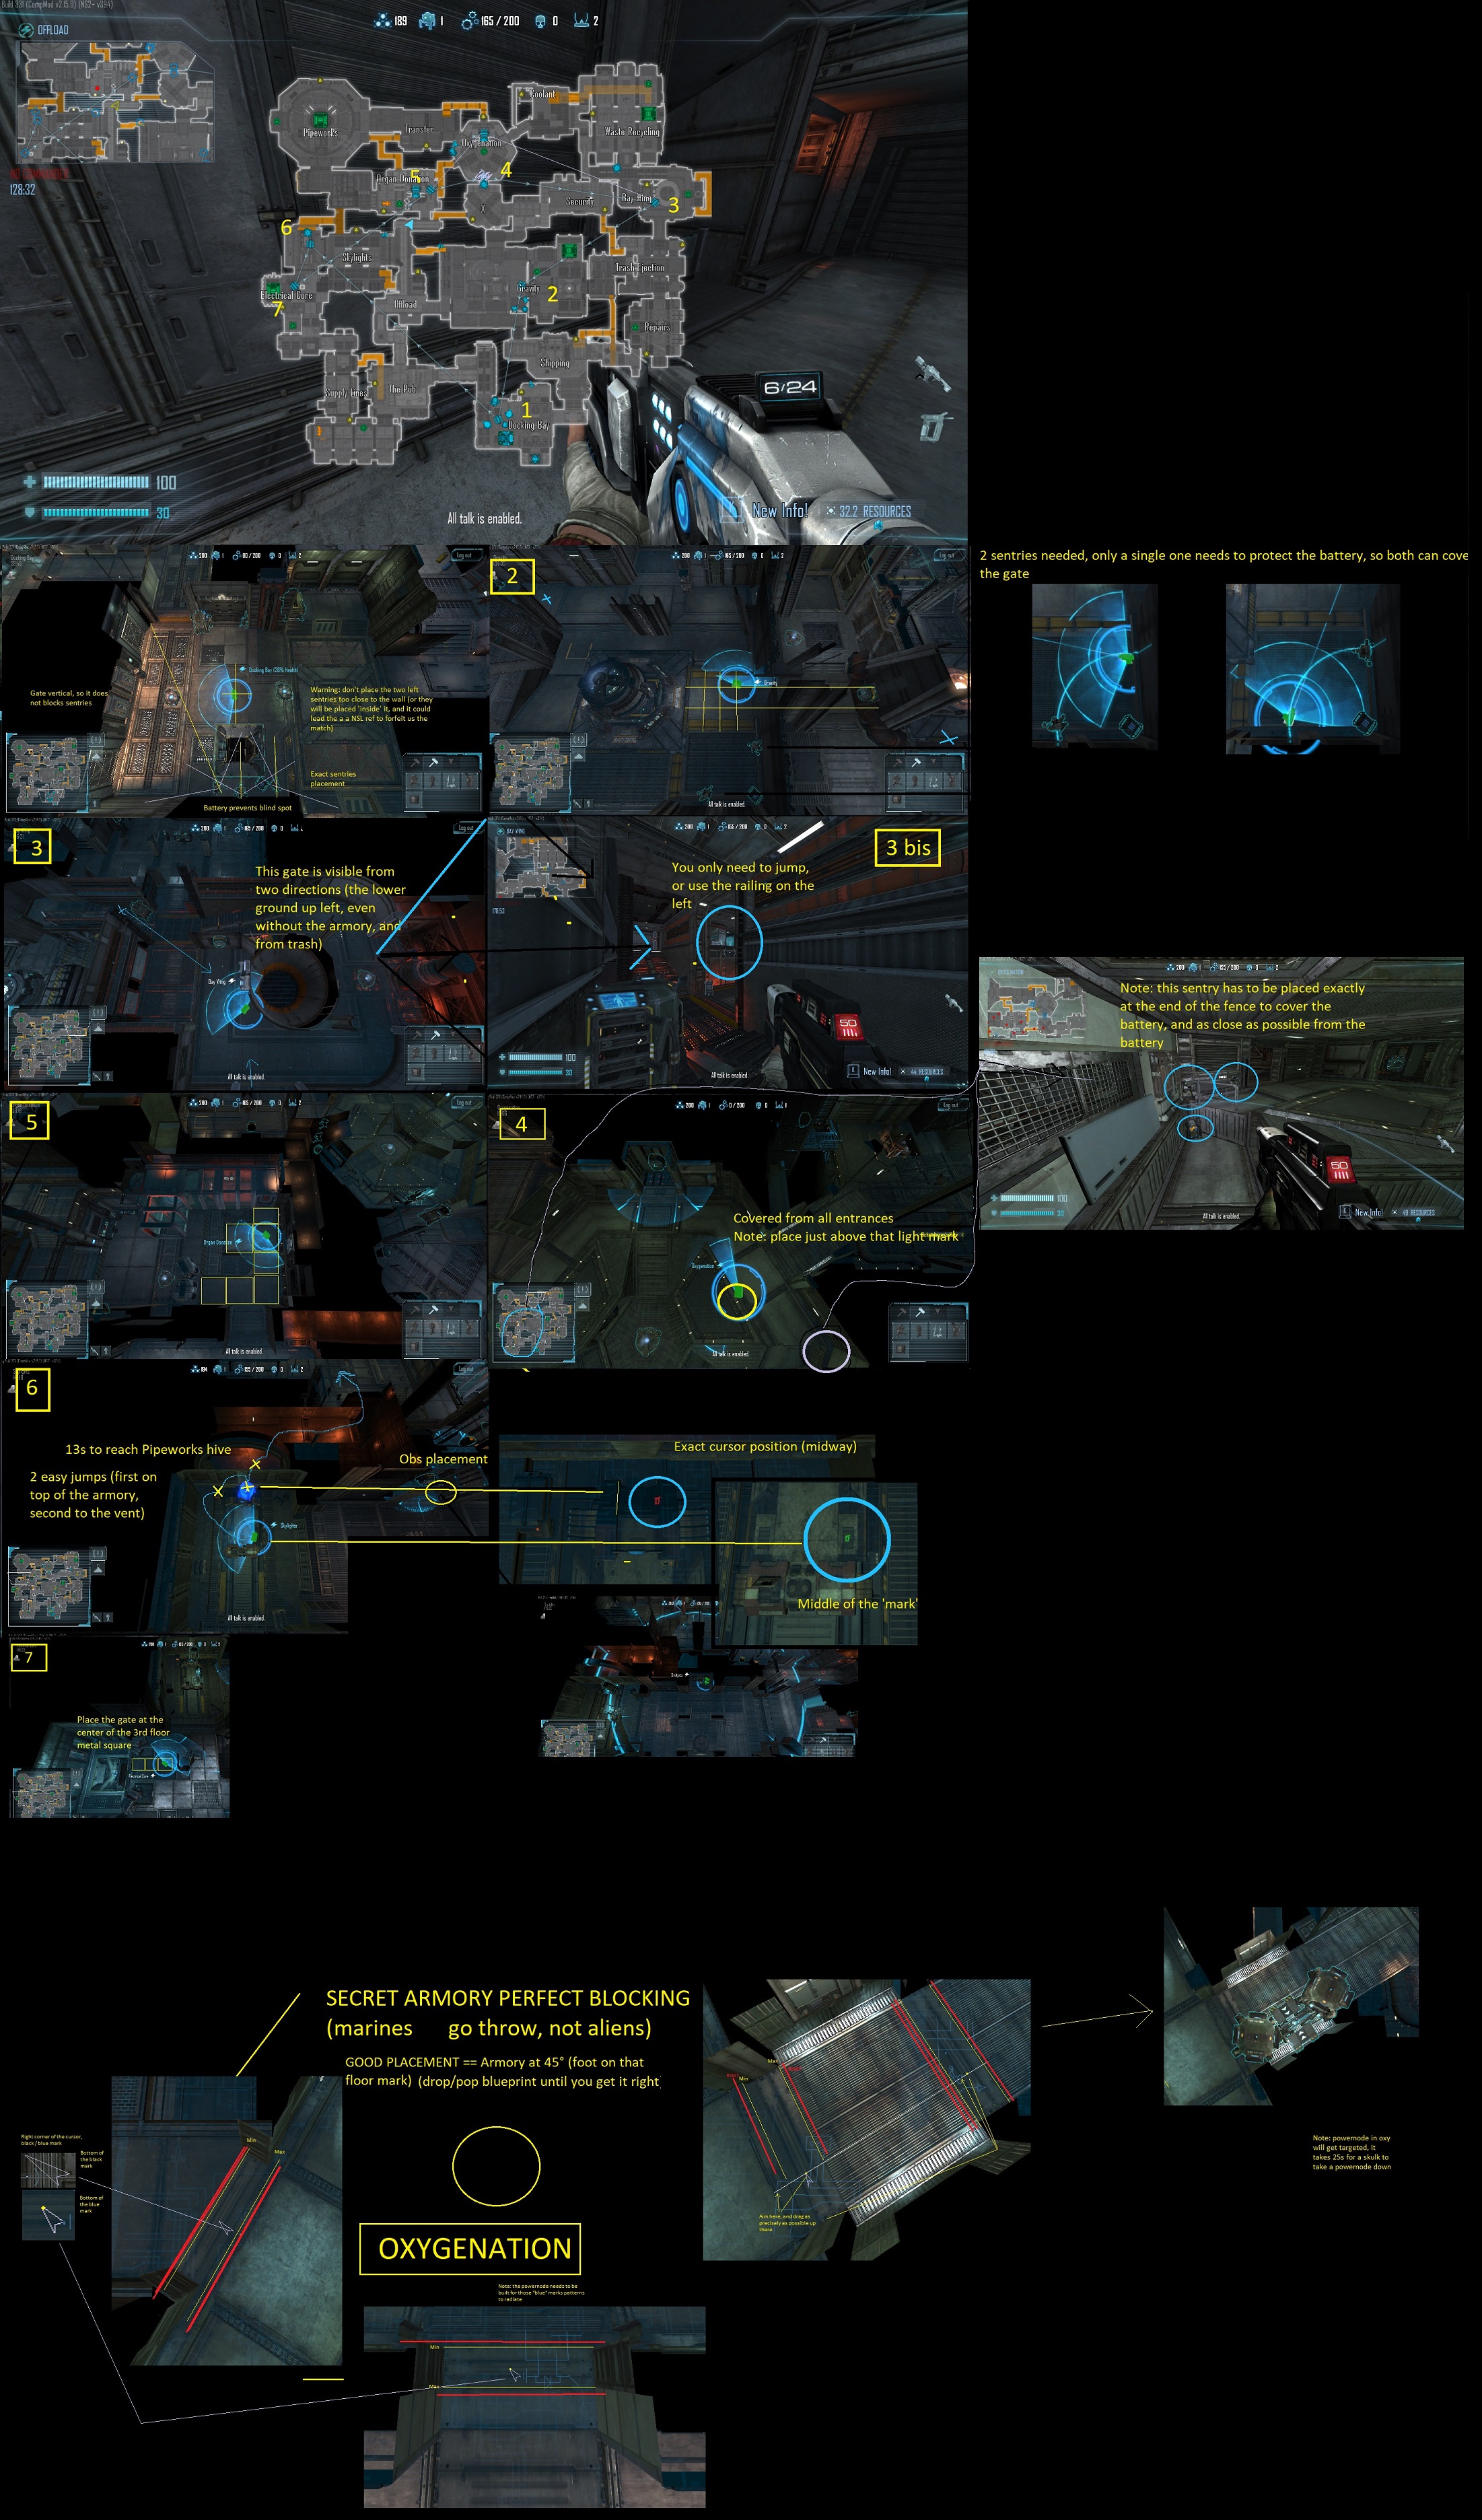
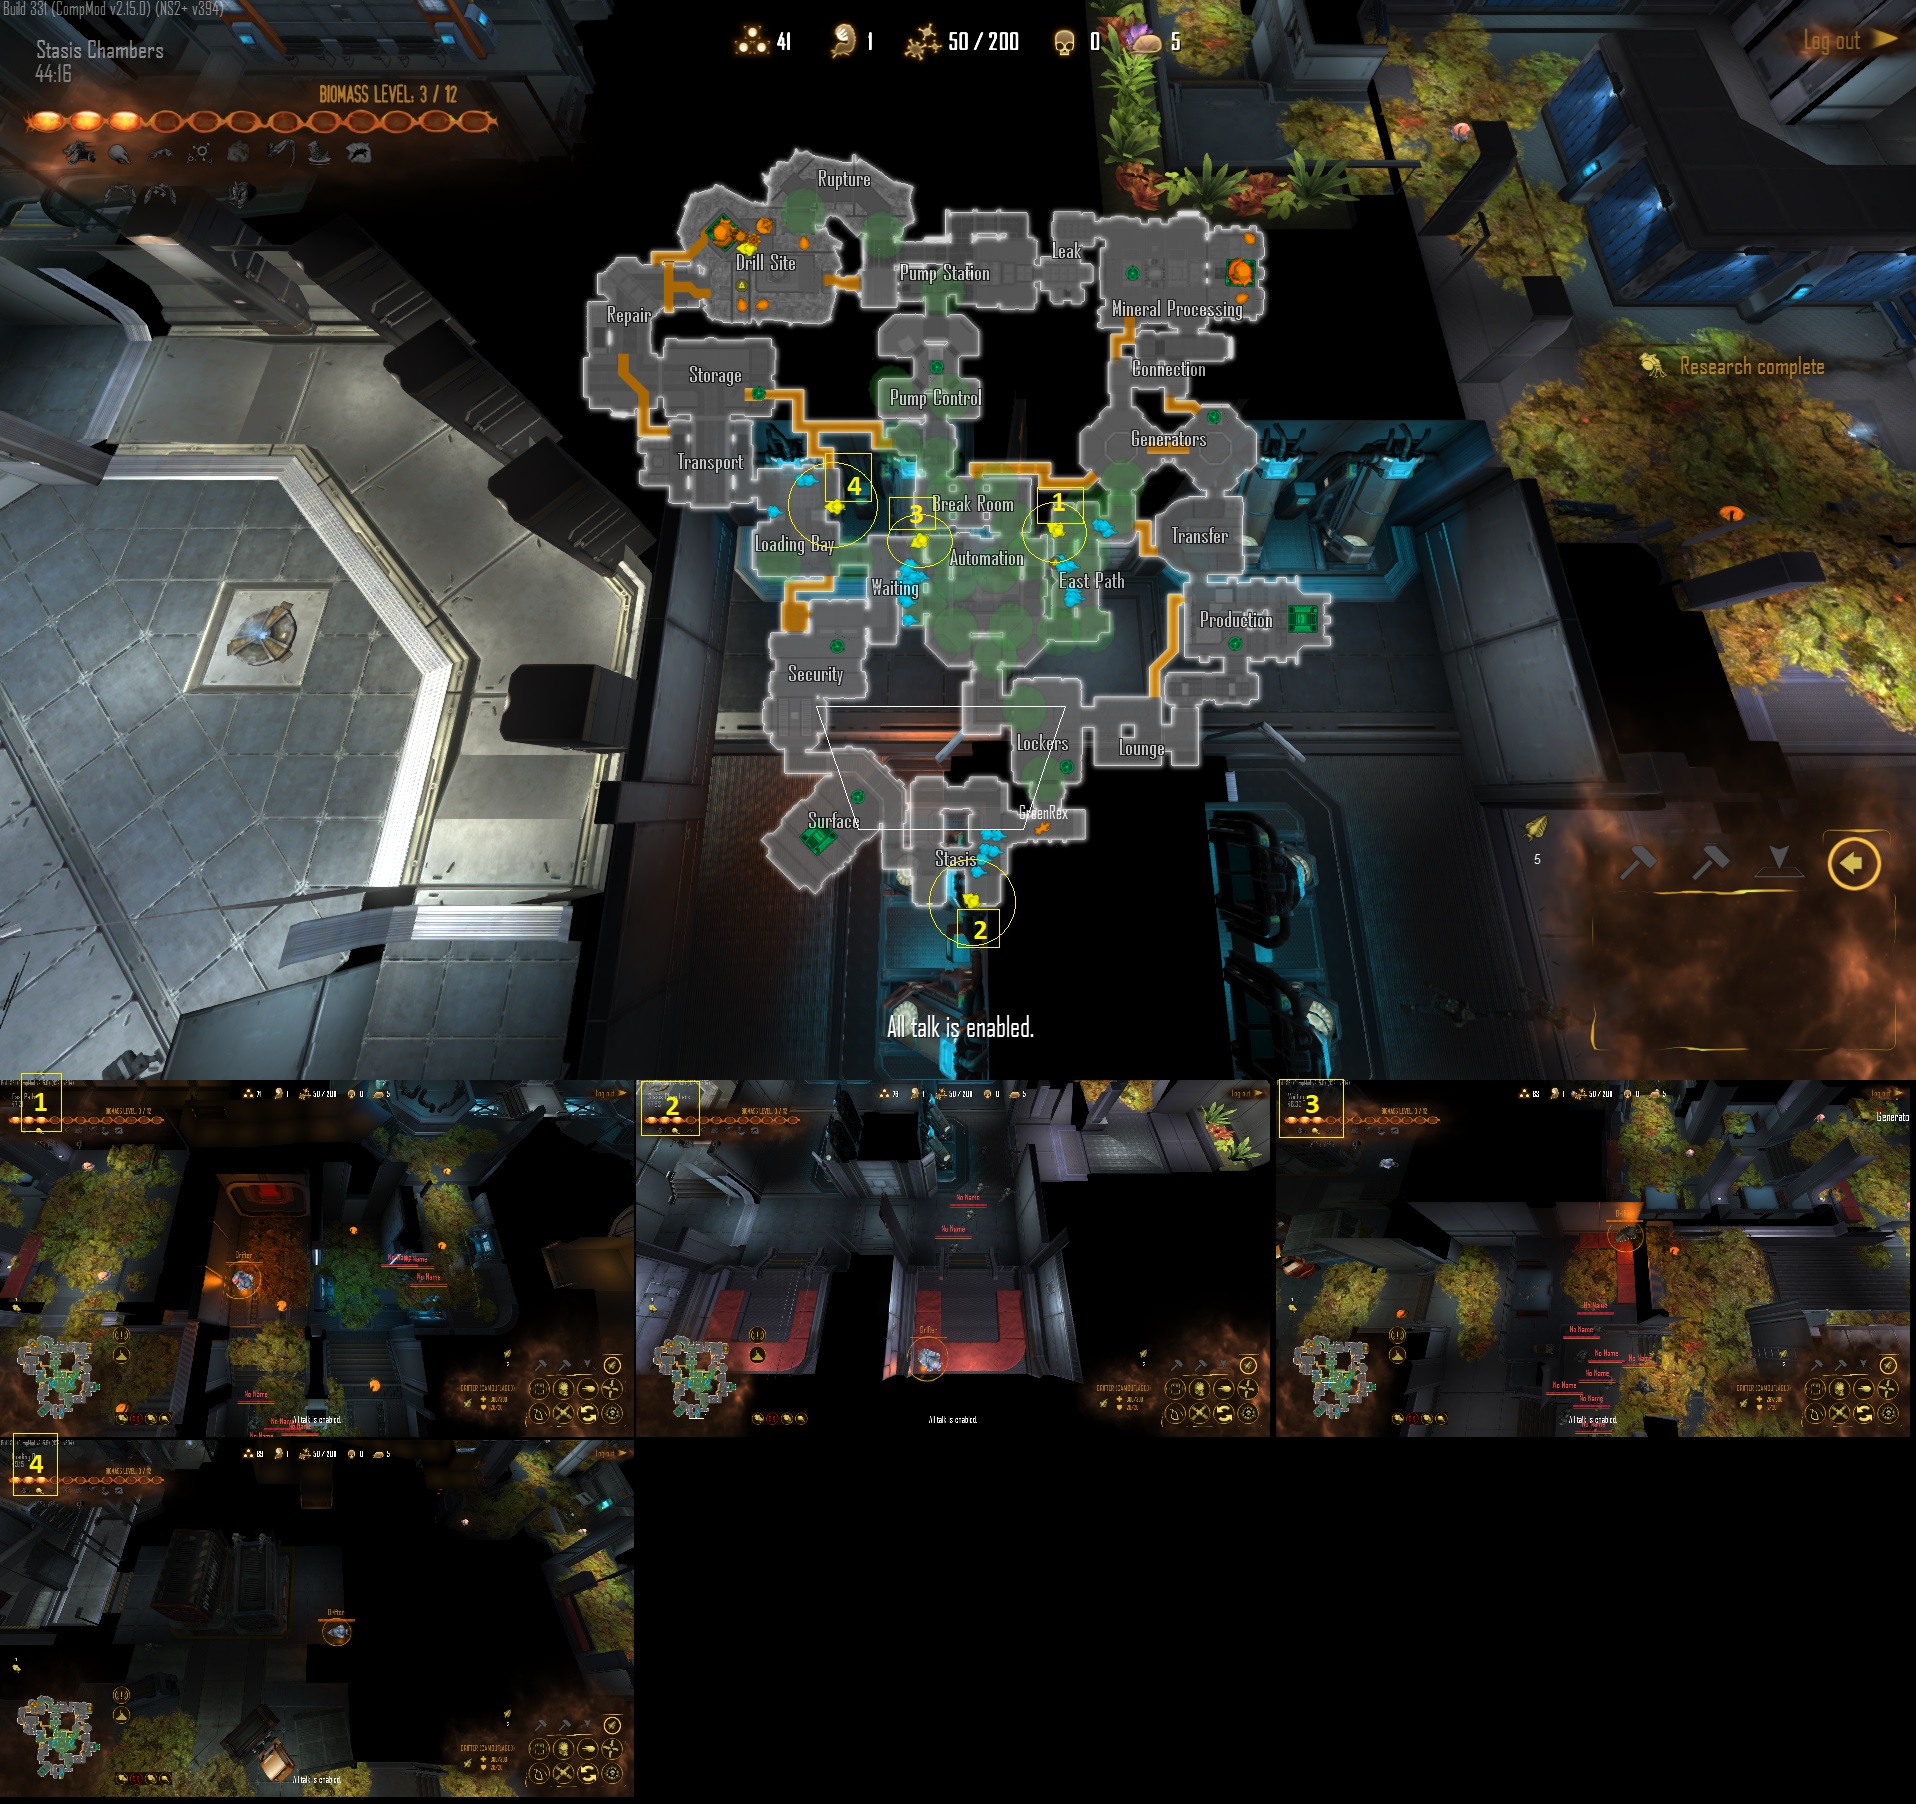
was that written before MACs (and robo factory itself) were made cheaper? now they are not "expensive"
(maybe few other moments to update, but couldn't really remember what is different by now from then)
Schrödinger's Katz  [author] 5 Apr, 2021 @ 1:35am 
Adding links to old "It's Super Effective" videos at the start of the guide. I realized they were not well known, contains good stuff (even if it's a bit outdated) and those videos are pretty entertaining :)
Schrödinger's Katz  [author] 8 Feb, 2021 @ 3:19am 
Update: I will be adding more ns2_docking notes this week along with some biodome updates
Schrödinger's Katz  [author] 22 Jan, 2021 @ 2:28am 
Small update regarding the "Robotic: Sentries" section (using sentries just before lerks pop), and adding a new "Robotic: As a barricade" after some experiments :p