GrandChase

GrandChase

201 ratings
Damage List & Systems Guide
By Tiomasta
A full systems/mechanics guide, and a damage list and explanation for all attacks.
5
9
4
2
9
5
2
2
   
Award
Favorite
Favorited
Unfavorite
1: Opening
This is a damage list.

For skills, alongside damage I will put the rate of damage dealt per point of MP spent (MP1s use 29 MP/0.9 bars, MP2s 63 MP/1.9 bars, MP3s 96 MP/2.9 bars), so 500dmg from a MP1 is MP rate 17.24 and 600dmg for the same cost would be 20.68.

Skills basically do 650 for MP1, 1300 for MP2, 1950 for MP3, 3000 for MP4.

Skills may be counted as 1/3 stronger than listed because they add SpATK to your ATK value (or almost half more with the Chase Level bonus for skills only).


Damage Counting
The game works by having a base damage multiplier like "12" or "16.5" tied to each hit but this number is hidden in the files, and there is also a further hidden multiplier table for base power depending on their category (where a normal attack's multiplier value of 7 ends with damage close to where a skill hit of 21.5 ends, due to the table giving a bigger penalty to skills, and a pet hit of 25 closely matches both, instead of all these values being universal damage). So simply looking at the effective final damage in-game is easier and more uniform (than checking raw damage multiplier times specific category multiplier).

The power of a PvE attack can still be properly quantified by checking the raw damage of the hit on a monster (assuming your level isn't more than 5 higher than the monster), then dividing that damage by your ATK value, or by the ATK divided by 1000 for simplicity (and counting ATK+SpATK for attacks that apply SpATK). So if we divide 1713dmg from our ATK of 14567 we get 0.117594563053477 or simplified into being just 117.59 damage (and the .59 part slightly varies due to rounding final damage depending on current stats, like 57-61), can count with critical hits by increasing your ATK by a percentage equal to your displayed crit bonus value +50 (crit 300.00 = ATK +350%).
The in-game damage values will only show up to 999,999 damage per hit but the game does count damage higher than that properly.
Boss lifebars count for more HP at higher levels, at LV85 it's roughly 24k HP per bar.

All monsters in the game have the same DEF of 100 regardless of level. Your damage is slightly higher if you outlevel to monster by more than 5: raises final damage by +2% per level past the 5th.
  • Monsters with the blue shield icon power-up have +25%DEF to take -20%dmg.
  • There is one hidden stat in the game to cut normal attack damage by a percentage and another for special attack damage, but most monsters use the same exact amounts, except for Tower of Disappearance and Gorgos Queen (halved normal attack damage instead of full, and resists special attack damage slightly more than normal stages too), and Harkion (unique).
  • Monsters with the NormalAttackDEF increase (shield with 1 line) apparently have +0.3 to multiplier, normally resulting in -30% damage from normal attacks (not skills).
  • Monsters with the SpecialAttackDEF increase (shield with cross line) apparently have roughly +23.425 to multiplier, normally resulting in -30% damage from special attacks (not normals).

Normal Attacks & Special Attacks
The game separates attacks into two categories: normal attacks, and special attacks which are skills/techniques so anything you can put on A/S/D/F/G (it wasn't always like this but was simplified like this in GCC).
  • Normal attacks do not apply SpATK (and special defense factors), and in PvE are usually able to recharge MP on hit (for non-AP characters). Only normal attacks like these are able to proc on-hit special effects (HP/MP absorption, Hell Spear, certain buff whenever-you-hit effects).
      There is also a third category for "normal attack (but does not recharge MP or proc effects)"

  • Special attacks directly add SpATK to your ATK value when counting damage (and apply special defense factors), and in PvE cannot recharge MP on hit (even if it's not a skill) or proc special effects.


What's new to GCC compared to old Grand Chase?

Systems
  • Hero Collection gives all characters passive stat boosts for leveling up multiple characters in your account (and you can instantly create new characters without a quest at free character slots)
  • Chase Level lets max-level characters farm an account level that gives universal stat boosts
  • Hero Dungeons have revised opening times and can be played past their daily limit by not receiving exp/items from them past that (to help a friend clear)
  • Characters' job visual sets can be crafted in-game
  • Monster cards can be put into a collection to give passive stat boosts to all characters
PvE
  • New max-level regions, needing a taint resistance adaptability % stat

  • Characters have been "rebalanced" in PvE mostly by nerfing all characters down to the same level:
    • Most player buffs and monster debuff abilities have been extremely nerfed, so a character without support is now on the same level of importance as one with, but this does make many support effects basically useless now
    • Skill damage largely rebalanced into a standard scale of max damage for their MP cost. And enemy-stacking skills are very weak on a single target making them generally useless
    • Most dodge-like abilities gaining a cooldown or getting a longer cooldown
    • Pet damage and therefore pet MP is greatly reduced. Basic MP potions are not on GP shop
    • Many passive skills about MP or crit chance have been hugely nerfed or completely removed from skill tree
PvP
  • All invincible rolls/dashes only have hyper armor instead of invincibility in PvP, or some traditional rolls are invincible but gained a cooldown instead
  • Normal attack damage was unpopularly rebalanced, and skill damage is greatly nerfed in PvP
  • The invisible "combo Down" gauge will make people in PvP auto-counter if taking 40% damage without being knocked down once, therefore stopping any infinites, but skill/technique damage lowers the gauge instead of raising it so skills/techniques that let you combo after them will allow extended combos
2: Game Mechanics - Character Stats
Stats
  • ATK is relative to itself. Raising or lowering 10% of your ATK will raise or lower damage by 10%. If 5k ATK is 500dmg, then 2.5k ATK is 250dmg and 10k ATK is 1000dmg. If an item is giving you 230 more ATK and you have 9582, that's around a 2.4% total increase so it only means +2.4%dmg universally.
  • SpATK is exactly like ATK and directly gets added to it, but SpATK is only applied for skills/techniques so only things that go on A/S/D/F/G (the normal ATK is for everything, including skills/techniques). +SpATK in items is around 70% higher than +ATK.

  • CritChance/CritDamage MUST be raised from item effects, the optimal setup is every item having CritChance+CritDamage and other offensive bonuses (ATK/SpATK/MP). CritChance otherwise only comes from Hero Collection, and +3% Chance as a passive bonus from fully classing up. Getting +CritDamage and +CritChance are EACH worth more damage than getting +ATK, but only if you raise both Chance and Damage.
    The crit damage bonus is the bonus you can see in the stat screen, plus a not-shown +50 (so displaying "crit damage 60%" means +110% damage, or 210%dmg on crit). Taint debuff stages lower CritDmg by 250 and lower CritChance by 20.
    The optimal amount of CritDamage is: take your CritChance, add a 0 to it then lower it by 12.2% (or -10% to make it simple).

  • MP
    Skills/techniques cost a coded amount like 0.9/1.9/2.9 bars of MP, but the in-game descriptions talk assuming that each bar is worth 33 MP points (apparently bar cost divided by 0.03 so 1.9 bars is 63 MP) (update: now they say 0.9/1.9/2.9).
    • MP/hybrid character: base regeneration is 1.5 MP p/s (22.1sec per bar), normal attacks regenerate MP at around 1150dmg per bar (counting base power here, not final damage value, so ATK/DEF/crit differences don't influence MP received) (hitting multiple monsters per hit will give multiple times the MP on hit)
      +MP Regen will increase base regeneration by the exact amount, and will also increase MP on hit from normal attacks/pets at roughly half the amount (so +100% MP Regen is 200% MP over time and only 150% MP on hit).
  • AP character: base regeneration is 3.7 AP p/s (9sec per bar) and starts/revives with 1 bar full
    • Normal attacks do not recharge AP, but pets still do

For MP/hybrid characters, having a minimum of +35%-50% MP Regen can be recommended but collecting more than that (over ATK/SpATK) can stop helping damage output if you get to the point where all your skills constantly stay on cooldown from always using them so more MP Regen doesn't generally mean more skills anymore. AP characters benefit more than double the time regen per point and may use higher amounts to be able to keep several high-cost skills equipped at once in constant cooldown.
Attacking a boss with a section with damage resistance (Berkas, Harkion) will also give less MP on hit.
You still regenerate MP while inside your own skill animations, except in PvP where you have to recover to continue regenerating.


  • Hell Spear is too weak to count. At 10% chance per hit, the spear will appear during the hit to raise the damage by fixed damage equal to Hell Spear amount (so at 440 Hell Spear at 10% chance and doing 10 hits of 5000 damage, the only difference is one of the hits will do 5440 instead). In practice raises the DPM by only 1%-3%, technically benefits more for characters that do many hits fast regardless of damage per hit. Hell Spear also only applies for normal attacks (not skills/techniques or pets).
    Red-tier equipment can have effects to raise the Hell Spear chance or damage but it seems still not worth it compared to normal offensive effects (Hell Spear effects don't increase TotalATK, too).
    In PvP Hell Spear only applies 5%(?) of its bonus.


  • DEF is simple, it's simply dividing the damage by the target's DEF. Raising DEF has diminishing returns (+10% DEF nulls ~9.1%dmg, +20% DEF nulls ~16.7%dmg, +50% DEF nulls ~33.3%dmg) and lowering DEF has exponential returns (-10% DEF adds ~11%dmg, -20% DEF adds ~25%dmg, -50% DEF adds 100%dmg). Take 100 and divide it by what percentage DEF they have to see the damage multiplier.
  • SpDEF is PvP only (and useless in PvP too if equal stats are turned on).
  • Vitality (HP) is MaxHP. Raising HP is a bigger percentage increase than raising DEF (and can influence certain effects tied to MaxHP) but DEF is actually in play more often especially if you never reach low HP.
  • Super Armor resists most attacks but will not resist launch hits or knockdown hits. Hyper Armor does resist anything except throws, even stone/freeze and earthquake.
  • HP Regeneration is set by Level (not MaxHP), a very low ~520 HP per minute at LV85 (basically only recovers 8% HP per minute). +HP Regen in PvP raises the regeneration speed (but not normally because of equal stats in PvP), while in PvE +HP Regen only serves to set a max limit it can regenerate to, in PvE it always regenerates at only 100% speed and only up to X% HP where X is your current value of HP Regen (having 59% HP Regen means it regenerates up to 59% HP); along with the slow speed it is insignificant even on stages that disable potions.
  • HP leech mostly comes from equipment sets. Normal attacks have around 5% chance to refill an extremely small amount of HP on hit (not tied to the strength of the attack). Basically only slightly boosts HP regen rate, but having at least 1 can restore from Fatal.
    • 140 leech: ~0.1% HP
    • 300 leech: ~0.57% HP
    • 1868 leech (LV85 set): ~1.43% HP
    • 1868 + 140 leech: ~1.53% HP
  • MP leech is similar. The LV85 set bonus gives +1868 MP leech which visibly is roughly 16% of an MP bar per trigger (maybe 1868 means 0.1868 bars).

A LV1 character starts with 300 ATK, 260 DEF, 210 HP, and every level up gives 100 ATK, 60 DEF, 10 HP. At LV85 you have 8700/5300/1050, but classing up to 2nd/3rd/4th job gives permanent stat bonuses (reduced in GCC to +100 all/+200all/+300all and +0%/+1%/+2% CritChance) to instead have 9300/5900/1650 with no items, and counting blue items with zero properties you get around 14.466/8.798/3.833 stats.


Item Properties
LV80 item properties table:
ATK +431, SpATK +732, CritChance +2.80%, CritDamage +24.98%, MP Regen +6.03% DEF +231, SpDEF +431, VIT +231, HP Regen +13.50%

Assuming a LV85 character with full blue equipment/accessory set with emptied properties, at max job and no hero collection, counting a full 13 items adding that property will give you:
  • CritChance +36.4% and CritDamage +324.74% (stronger than +ATK)
  • ATK +5603 (+39% base damage)
  • SpATK +9513 (additional +66% base damage only for skills)
  • MP Regen +78.39%

  • DEF +3003 (+34%DEF, -26%dmg taken)
  • VIT +3003 (+79% MaxHP)

The rule of thumb is, you want this for all characters:
  • Crit Damage > Crit Chance > ATK or SpATK or MP > all others
Or about what simply raises TotalATK the most:
  • Crit Damage > Crit Chance > ATK or MP > SpATK > DEF > VIT > SpDEF

    (in TotalATK calculation, some stats raise in value depending on the current amount of a different stat: Crits and ATK multiply how much each other count for, also DEF by MP Regen, and VIT by HP Regen, so two characters don't get the exact same TotalATK raise from the exact same bonus)

The scrolls to reset item properties are the red "GP Property Reset Scroll" (re-rolls all of its properties at once, drops from event dungeons) and the yellow "Single Property Reset Scroll" (you choose 1 property to re-roll so you can fine-tune something that's already near perfect, drops in Tower of Disappearance from Kazeaze 5F or 10F). The cash property scroll buyable on hero shop is for re-rolling properties of VP items (which have selectable effects instead of random, but re-selecting them is random too).
2: Game Mechanics - Items
Progression Guide


Item Qualities
Common (white) items:
  • Base stats
Rare (blue) items:
  • Item drops and GP shop items, most forged items
  • 2 properties, 1 card slot
  • Base stats (not properties) count as if from 3 levels higher
  • You can buy blues from GP shop if you really need a replacement (can re-buy to re-roll properties)
Epic (yellow) items:
  • Random drops & GP shop items have ~25% chance to drop/buy as yellow instead of blue, some forged items can be yellow instead of blue if spending extra materials
  • 3 properties, 2 card slots
  • Base stats (not properties) count as if from 6 levels higher
Relic (purple) items:
  • Mostly only True Iron Dragon set
  • 4 properties, 3 card slots
  • Base stats (not properties) count as if from 9 levels higher
Ancient (red) items:
  • True Iron Dragon crafted into Void set
  • 5 properties including some new ones, 4 card slots
  • Stats can be changed up and down with a scroll

VP (cash) items: items bought inside the VP Shop are yellow quality and let you choose exactly which properties you want on them instead of coming random. They also don't accept the normal property reset scrolls, instead the scroll buyable in the hero shop is only for these items. The highest VP shop items available are only LV78 yellow (which still need LV78 to equip and are weaker than LV80-85 items).


Accessory slots
There are 4 generic accessory slots: arm (shield), head (tiara), upper back (wing or backpack), and lower back (beltline or boot accessory).
There are multiple sets of these 4 with a big level range, they can be rarely dropped in dungeons (headdress and wing are drop only, but shield and low accessory instead are craft-only). But for these 4 slots, their best-in-slots are obtained from the LV70+ hero dungeons (which upgrade further into True Iron Dragon), or before finishing them, the LV84 drops from the Archimedia last stage.

There are other accessory slots for items that are much rarer: ring, mask, and 2 separate earring slots.
  • Rings are uncommon drops from only certain dungeons, which now have been made too rare to matter. But more convenient than any of these is the Harkion hero dungeon, which crafts a LV60 purple ring which can be re-crafted until you get decent properties easier than resetting its properties (then much later you can craft the Infinity Cloister ring). There is also the limited-uses Second Gear Ring bought with P↑ or dropped in Tower of Disappearance, gives a +15% ATK buff.

  • Masks almost don't exist. Only on the second half of the desert continent can you rare-drop one. Then the best-in-slot is the LV83 IronDragon/Berkas hero dungeon set that upgrades further.

  • Earrings are more or less endgame only. Each earring has a PvE temporary effect that they automatically activate randomly, you have 2 earring slots and cannot equip 2 of the same earring.
    • Moonlight Village earring - No longer obtainable, has no special effect.

    • Hero shop LV55+ Persephone earring (flames earring)
      • Randomly gives +50%ATK and super armor for 17sec. May impossibilitate ottoshot.[+15% to PvE HP Regen Limit, PvP Skill Resistance, Respawn Invincibility Time, +5% EXP]
    • Hero shop LV55+ Gnosis earring
      • Gives a 10-second barrier nullifying the damage of 1 hit you take (nerfed in GCC to only have 1 HP). But with Arme the barrier will erase over Magic Shield. [+15% to PvE HP Regen Limit, PvP Skill Resistance, Respawn Invincibility Time, +5% EXP]

    The ATK buff earring is useful, but it can be forgone for the offensive bonus of the two Dimension Guardians earrings which actually raise TotalATK count instead.
    • Dimension Guardians LV85 earring & piercing have no special effect, but have normal item properties so it can give more crit bonuses, and since yellow quality if equipping the 2 together a set bonus gives more CritDmg and CritChance.
      They drop in Other World and can be upgraded further with more materials.
      • [Blue has 2 properties, yellow has 3, purple has 4: CritDmg +26.55% / Crit Chance 2.98% / MP Regen +6.41% / ATK +458 / SpATK +778 / DEF +259 / VIT +259 / SpDEF +470 / HP Regen +14.50% / GP +0.31% / Level Requirement -3]

    • The Phantom Phoenix earring you can craft is useless.
      • Same barrier as Gnosis but light blue instead of purple, with different sub-stats. [4 random effects from these: GP Obtained +30% / ATK +139 / DEF +231 / VIT +231 / HP Regen +13.5% / Level Requirement -2]

    • Harkion stage gives materials for a LV60+ earring.
      • Randomly refills some HP, only useful in Tower of Disappearance 10F to not die until 10F poison gas or in Harkion stage itself to help last the full timer. [+15% to PvE HP Regen Limit, PvP Skill Resistance, Respawn Invincibility Time]


Crests (titles)
Crests for pre-Harrier stages drop without champion mode, Harrier only at champion mode, and some hero/event dungeons also have crests without requiring a special mode. Crests can be obtained either by playing the 100/etc runs or as a random chance (1%-2%?) of instantly getting the crest for beating the stage once.
Crests are not shared between characters.

Most pre-endgame crests have 4 universal effects, their translations vary and their real effects actually are:
  • PvE's HP regeneration percentage limit raised by an additive ~ 15%
  • PvP skill/technique damage taken reduced by ~ 15%
  • Black-blinking invincibility time on revive lasts + ~15%
  • EXP + ~15%

Endgame crests are more useful because they actually raise offensive abilities mostly in ways that actually influence TotalATK count (Crit Chance, Crit Dmg, MP Regen, etc) or work by giving an additive ATK buff to everyone in the party.
2: Reinforcement Stones
Every try only costs GP but you need to place a stone on the item first (you can craft stones, or directly drop stones from event dungeons).

You can easily upgrade until +7 and it's guaranteed to not break until trying past +9. If it breaks only the stone itself will break, the item/properties/cards always stay. +9 of LV85 can be roughly +23% of the item stat.
  • Upgrade normally until reaching +9.
  • For +10-16, you need protection scrolls. The 0-15 scroll works until your item reaches +16. You can get it from Harrier champion mode or event dungeons.
  • To go from +16 to 17, you need a 16 protection scroll from event dungeon King Slime or Harrier champion mode chest.
  • If your weapon's stone is 17, you will get a special animated icon behind your character when waiting inside rooms. Since 15 it appears when starting the match or taunting.
  • Ancient grade equipment uniquely can reinforce up to +18 (+17 to 18 needs its own 17 protection scroll from hero dungeon Void Taint). Reaching +18 will add a bonus of CritDmg +3%.
  • Reinforcing past +9 at all is seen as not worth the effort except for best-in-slot equipment on the slots that increase ATK, which are weapon and glove (boot and cape increase HP, chest and pants increase DEF).


Removing stones
You can remove a stone only with a scroll that drops from Angry Bosses (Eclipse) event dungeon. This is done to move the stone from one item to another, or to re-place an epic stone to re-roll the special effect.

You can also transmute stones with a scroll, where you use 2 items with stones on them then delete them and make one stone ready to use which may be of lower or higher level than the ones spent. Transmutation used to be able to result in a finished +17 stone but not anymore so transmutation is useless now.


Epic stones
The difference between a normal stone and a yellow stone is that yellow stones give around 1/3 more bonus stats and add a random special effect depending on the equipment slot it's in. You cannot choose which effect randomly appears when you place the stone (only remove the stone with a scroll then place it again to re-roll).

You can craft stones as yellow by spending much more of the same materials, but normal stones randomly can turn yellow when reinforcing above +9.

Slot
Possible effect 1
Possible effect 2

Weapon
CritDmg additive +7%/10%
During Fatal, CritDmg additive +10%/20%
(Ancient)
Same
+15%/+20%

Helmet
Its own stone reinforcement success +10%/20%
Its own stone reinforcement destruction resistance +10%/20%
(Ancient)
ATK +300/600
CritDmg resistance +15%/20%

Chest
CritDmg resistance +15%/20%
During Fatal, super armor
(Ancient)
SpATK +400/800
During Fatal, super armor

Glove
Pet gauge speed +7%/10%
During Fatal, ATK additive +15%/20%
(Ancient)
Same
Same

Pants
Grab damage resistance +15%/20% (basically for PvP)
During Fatal, MP Regen +15%/20%
(Ancient)
MP Regen +7%/10%
During Fatal, MP Regen +15%/20%

Shoe
Movement rate +7%/10%
During Fatal, movement rate +13%
(Ancient)
SpATK +400/800
During Fatal, super armor

Cape
Potion HP restoration +10%/20%
(any type of potion, but only HP restoration)
During Fatal, potion HP restoration +50%/100%
(Ancient)
ATK +300/600
Critical Damage Resist +15%/20%

Note that the higher-number version can be much rarer than the lower-number version (1/8 or 1/10 chance).
2: Game Mechanics - Job Differences
Dashing
In addition to jobs that have unique dash types, there is one standard dash shared between many jobs, working the same way even with the differences between them.

The standard dash can be repeated multiple times whether on ground or air, and the general idea is that you're the fastest when dash-jumping out of the ground whenever still on the ground and repeating bursts of airdash when airborne. For a simple easy dash do →→↑→→ and repeat, running again before landing then jumping out of the ground again.
You may also press Down one time during airdashes to activate fastfall. If near a platform you can drop from, this will make you drop through the ledge after you touch it, but pressing Down then Up will activate fastfall then stop the ledge drop from happening after you touch it.
One efficient dash is the shadow step: simply repeat Up+Forward then Down+Forward with a delay between presses, for very fast dashing to one direction (but this will drop platforms if not at bottom level so it doesn't work on platforms, unless also tapping Up once before landing).

There is also the rocket (IAD). From the ground, tap and release Forward, then after a very small delay, tap Forward+Up. This works like a dash-jump except it goes much farther and faster forward than normal, but also not as high as a normal jump. Can still tap Down once to fastfall right afterward, repeating rocket-Down to move sideways (this is called a flash step).
For a rocket you can tap the Forward before landing, but the Forward+Up has to be done from the floor; you may prepare that from the low air as pressing Forward 3 times in the air to airdash, then land only needing to do Forward+Up.

Jumping out of the ground has a jumpsquat animation before the character moves and can attack again (the length of this startup animation depends on the job, pressing Z after jumping may fail if pressing Z still inside the animation), but this animation is completely skipped if you jump while running, or jump by rocket step. For some combos it's better to dash-jump Z (or rocket Z) than to jump and Z.


Here's a simplified list of jobs with the standard dash, with two dash distance values: the first is pixel distance per dash burst (normal around 280), the second is distance from a rocket step (normal around 648), but some jobs have differences if done from ground or air.
  • Standard +2: Lass3 (set slow movement on ground, airdash ~430 and can repeat after Z, rocket ~776), Ryan2 (ground ~330 and air ~372, rocket ~718), Ryan1 (ground ~426 and air ~346, rocket ~683)
  • Standard +1: Elesis3 (~313/~695), Elesis1 (~297/~675), Ryan4-joined (ground ~283 and air ~291, rocket ~728)
  • Fast but slightly shorter rocket: Sieg1 (~317/~625), Sieg2 (~300/~616), Lime (ground ~408 and air ~317, rocket ~615, but no fastfall/shadowstep, no hold if from air)
  • Standard (close to 280/648): Elesis4, Ryan3 (-5% except for ground dash), Ronan1/4 (2 is close too but his rocket is lowered ~558), Jin3, Asin, Edel (can repeat dash especially after jumping once), Rin (~286/~667, but very slow re-dash from air so must hold run then re-dash)
  • Standard -0.5: Ryan4-separated (ground ~248 and air ~260, rocket ~643), Jin1/4 (~248/~627), Jin2 (~242/623), Dio (~257/~622), Rufus (high base of ~276/~591, slower re-dash)
  • Standard -0.5 and worse rocket: Zero (~250/~564)
  • Standard -1: Ronan3 (~260/~548, slower re-dash), Sieg3/4 (~250/~560, slower re-dash)
  • Standard -2: Lire3 (~257/~630, no fastfall/shadowstep, no hold if from air)


Hitstun Recovery Per Job
Like how different monster classes have different hitstun recovery (warrior monsters recover faster than normal between hits and mages slower than normal), different character jobs recover faster or slower when hit in both PvE and PvP: some strings/loops become breakable against fast recovery characters, and in PvP the available time to combo after an airZ or projectile changes depending on whether the opponent recovers faster or slower.

Playing as a fast recovery job, to best ensure that you take advantage of a break in combos, do either a skill (or also grab in PvP) or something else with invincibility.
Against a slow recovery job, more options become true combos, like Lire's ZZZ arrow combos, or followups that normally only barely don't combo.

Very fast recovery (can break certain combos in PvP and PvE)
  • Elesis except 3rd job
  • Lire2/3
  • Lass2/3
  • Ronan
  • Jin
  • Sieghart
  • Dio
  • Zero
  • Asin
  • Edel
  • Veigas
  • Decanee
Fast recovery
  • Ryan
Normal recovery
  • Elesis3
  • Lire1/4
  • Lass1/4
  • Amy
  • Ley
  • Rufus
  • Rin
  • Lime
Slow recovery (has to take some combinations that normally do not combo)
  • Arme
  • Mari
2: Game Mechanics - Job Differences (2)
Ottoshot
Certain jobs can ottoshot whenever standing on a platform you can drop from. Tap ↓ and then Z (so that you fall and instantly do airZ while falling), if the airZ connects on its first active frame the hitstop will push you back onto the platform standing normally, so you can keep doing ↓Z ↓Z ↓Z ↓Z as an infinite combo (possibly holding forward too to walk forward with them as they get pushed).

In PvE it can be the highest singletarget DPS you can get with normal attacks (~493) but most jobs have reduced jump attack power in PvE, so only Elesis1/Lass3/Ryan4 have ~493 DPS, Ronan has ~352 DPS, and others have ~318 DPS which tends to be similar to ground combo damage. In PvP it's an infinite until autocounter, but only works ground-vs-ground on platforms you can drop from.

As a sign that otto really is an allowed mechanic, PvP used to make otto not work for more than 5 hits as a limit to it, but they removed this limit in season 3.
"Otto" is a phonetic translation of Auto, because it's 1 attack that keeps cancelling into itself with button presses.

  • Some jobs have an ottoshot that works but the timing needed for the Z press is harder than the others, trying to press ↓ and Z at the same time could work more often. These are noted as "(hard)" and may not be reliable to use.

    Elesis: all jobs
    Lire: 1st&4th (hard, and float you back up even on miss)
    Arme: 3rd
    Lass: 2nd (from behind only), 3rd, 4th (hard)
    Ryan: 4th (with joined pikes only), 1st (hard)
    Ronan: 1st/2nd/3rd, 4th (hard)
    Amy: all jobs and modes except main mode 2nd (cannot) and main mode 4th (hard)
    Jin: 3rd, and 2nd's air stomp for only 5 hits per jump
    Sieghart: 1st (only with airZ V2 equipped), 2nd and 3rd, 4th (hard)
    Mari: none, except 2nd job can drop-shot repeatedly
    Dio: yes (hard)
    Zero: no
    Ley: no
    Rufus: no
    Rin: no
    Asin: no
    Lime: no
    Edel: no
    Veigas: no
    Decanee: no
    Ai: no
    Kallia: no
    Uno: no


Stat differences between characters
This is not a big or important effect but different characters have slightly different stats. Natural stats are equal but helms/chests/gloves/pants/boots give different numbers depending on for whom it is.
There are 7 different stat groups (the names are not official).

Characters
Group
ATK
DEF
VIT (MaxHP)
Template 2500 HP, 150dmg, hits taken to lose:
Edel, Veigas, Decanee, Ai, Kallia
Heavy +1
95% ATK (5% damage penalty)
120% DEF (83.33%dmg)
112% MaxHP
22.40 hits to lose (23)
Elesis, Sieghart, Dio, Zero, Rufus, Lime
Heavy
95% ATK (5% damage penalty)
120% DEF (83.33%dmg)
88% MaxHP
17.60 hits to lose (18)
Uno
Heavy -1
95% ATK (5% damage penalty)
120% DEF (83.33%dmg)
~60% MaxHP
12 hits to lose (has HP restore attacks)
Ryan, Jin, Asin
Brawler
Normal
110% DEF (90.90%dmg)
88% MaxHP
16.17 hits to lose (17)
Lire, Amy
Lightweight
Normal
Normal
Normal
16.66 hits to lose (17)
Lass, Ronan
Assassin
105% ATK (5% damage bonus)
Normal
88% MaxHP
14.66 hits to lose (15)
Arme, Mari, Ley, Rin
Mage
105% ATK (5% damage bonus)
90% DEF (111.11%dmg)
Normal
14.97 hits to lose (15)

Put simply, there are small differences where assassins/mages get KO'd 10% faster (and do +5%dmg), heavies do -5%dmg with 10% more tankiness and indirectly minorly better regen from DEF, with no big difference from any character except with the newest characters actually being 35% tankier than others.
In PvE with potions, DEF matters much more than MaxHP. (and Sieghart has a passive to have a separate +11% DEF, sitting at 19.55 hits but with the highest DEF for roughly 75%dmg taken)

Originally the stat differences affected PvP where it covertly made some zoners take multiple less hits to KO each other compared to 2 warrior-types dueling even when all 4 had the exact same items, but this is no longer present since balanced PvP stats.
2: PvE Systems
Lives system
Everyone starts the stage with only 1 life and unlimited potions, but if you get hit and your HP reaches 0, you die and cannot use potions anymore even before you finish getting knocked down from that attack. Then after you die you can tap C to spend a bonus life to revive, or spend a Natal ring to revive all dead party members including yourself (cannot revive on Harkion/TowerOfDisappearance). If you have the temporary GC Club for your character, you start with 2 lives instead of 1 (except in the stages you also cannot revive on).

  • Whenever server time turns into a new day, up to 5 lives you've spent that day will be refilled for free. Additional lives need to be bought on the P↑ shop
  • Apparently, lives spent inside hero dungeons will always be refilled the next day regardless of amount spent


Potions
There are 7 different consumable item slots but you can only equip 5 at once.
Each different slot has a cooldown of 5 seconds per use.
  • 1 type of red HP potion - The only potion that can be directly bought with GP. Ones that heal more per use cost exponentially more GP.
    • X: 2.1m GP for 100, heals 1680 (0.080 HP per GP)
    • L: 500k GP for 100, heals 750 (0.150 HP per GP)
    • M: 250k GP for 100, heals 510 (0.204 HP per GP)
    • S: 100k GP for 100, heals 300 (0.300 HP per GP)
    I recommend to always skip to buying Large potions (the 2nd biggest) and use these as the normal potion, then at the highest levels you can switch to the most expensive potion. You can buy potions as any character and put them in the shared warehouse.

  • 1 type of blue MP potion - Normal MP potions observably give only 0.15 bars/5 MP regardless of small/medium/large size, but there may be more to how they work.
    At most can use every 5 seconds for slightly faster MP regeneration, and MP potions cannot be directly bought (they are gotten from leveling quests), but 50% MP potions from the guild vending machine work very well (2 bars, or 1.5 before unlocking 4th bar). Lisnar MP potions from Tower of Disappearance also restore 50%.

  • 1 type of yellow potion - Gives both HP and MP, can be put as slot 2 to use as another HP potion when needed when the red goes on cooldown and also works as an MP potion. Weaker normal-sized yellow potions can be dropped from event dungeons, but percentage yellow potions (50% MP and HP) can be gotten from Harkion.

  • Natal (Proteção) Ring - Revives every dead player including yourself if dead, spending alternatively to bonus lives. Gotten from P↑ shop.

  • 1 type of stat jar - Small temporary stat buff, lasts for a set time or until going to the next room or dying. Gotten from quest rewards or guild vending machine.

  • 1 type of Demons of Yore potion (poção dos antigos) - Sometimes gotten from Harkion's participation-per-character chest, you don't get enough to use regularly but you can save them to help on a very hard ticket stage.
    All have 1 minute of cooldown:
    • Offensive types: doubled ATK for 30sec, doubled crit chance for 30sec, for 20sec has doubled ATK and crit chance then HP lowers to Fatal (rarer), sets pet bar to full
    • Defensive types: invincibility for 20sec (rarer), super armor for 20sec, doubled DEF (halved damage taken) for 30sec, status immunity for 30sec (rarer)
    • There are also HP or MP Demons of Yore potions, but they occupy the red/blue potion slot. They refill HP/MP completely but with 30 seconds of cooldown instead of 5.

  • And the status cure potion for freeze/stone/curse, the least useful slot because you can still use HP potions before the damage is dealt if needed.
The important reason for joining a guild (above 68k points) is so you can enter the guild park (menu -> guild -> guild park) and use the guild vending machine, which sells, only once a day: five 50% MP potions, or five 50% HP potions, or three 50% yellow potions. (this is the only buyable blue potion, and the HP potion is strong but you can already buy some with GP, and the yellow potions are good too but Harkion drops some exactly similar ones for free which don't stack in the same inventory space as these) With higher guild level it also sells buff jars: in addition to those, 3 +15% ATK or DEF or MaxHP jars.

Tower of Disappearance (and Harkion) disallows all consumables, except for Lisnar HP/MP potion, and Lisnar's Prayer to replace the revive ring but for only 1 use per player (all Lisnar items drop from Tower of Disappearance).


Party scaling
Every party member past the 1st increases monster HP only slightly (+17.5% or close to that, also slightly less on 6-player dungeons compared to 4-player dungeons), with no other stat changes to monsters, so stages always are easier and faster the more players there are even if some players are weaker.

And there is bonus exp for every additional player (if 1 player is 100% exp then full room is around 210%). But hero dungeons have set exp regardless of party size.

Stage hazards deal variable damage.
How much raw HP there is per boss's HP bar changes with boss level, but at LV85 there is around 24 thousand HP per bar.


Aerial & Back bonuses
Back hits
  • Hitting a monster from behind (your character must be behind its center point at any height) raises final damage by +30%, which can be raised to +60% with Hero Collection bonuses from Ryan and Amy. But stages with Taint debuff lower this amount by 50 (regardless of Taint resistance amount).

    Back attacks are commonly from attacking a monster that's already attacking, or from particular use when doing a specific skill, but they happen much more inside multiplayer: if two players surround a monster, not only is it going to often attack only one side at once, there will always be one player with Back bonus on it even if it switches around.

Aerial hits
  • Hitting a monster that's been sent into the air will raise final damage by another +50% (if +60% Back, then +50% Aerial, total +140% but landing one Aerial will turn them to face you so a second hit and further won't be Back hit also), and Aerial hits will continue juggling it up on every hit even on attacks that normally don't juggle. But not all attacks that send an enemy into the air enable Aerial hits: I've labeled the attacks that do launches, separately to float or blowaway effects which can send them to the air but not enable Aerial hits. (launches are also special against you or in PvP because the launch player hit pose (head-down) ignores player super armor)
2: PvE Systems (2)
Currencies

GP
  • Gotten from playing any mode. GP is NOT shared between characters. Caps at 40 million.

    GP can be used to buy HP potions, and equipment in the GP shop (which comes in blue or sometimes yellow, with randomized properties so you can re-buy something for one effect) and is constantly needed in high amounts to buy/upgrade runes and reinforcement stones and craft post-TrueIronDragon equipment.

    Farming GP:
    • Hero dungeon dailies: as a LV80+ character, do the hero dungeon dailies for The Crucible (192k GP), Sanctum (256k GP), and Labyrinth floor 03 which is quick and easy solo (768k GP). Doing this is already required for farming cores/coins too.
    • After this you have other options:
    • Spending Hero Dungeon Tickets for Wizard's Labyrinth will be around 768k GP per run (repeating in 2 minutes is 384k GP per minute but can be done in less than a minute for double that)
    • Archimedia dimension door stage: ~38k GP per minute (plus selling drops)
    • Farming Zeruel Border as a max level character: ~30k GP per minute (plus selling drops)
    • Farming Other World stage 1, Siege of Teroka: solo ~290k GP per run (6 minutes ~48k per minute)

P↑ or PP
  • Daily login points, staying logged in gives 500 P↑ and one champion mode and event dungeon ticket. P↑ is one amount shared between characters.

    Necessary for buying more champion mode tickets/event dungeon tickets after you run out of daily/event amounts, or for instantly buying more bonus revives and Natal revive rings without having to farm from Tower of Disappearance.
Hero Bullions
  • Hero coins are gotten in small amounts for each hero dungeon win, or crafting the map pieces together for 3 coins per set (map pieces can drop after any match mode), or get dozens of coins at once from the boss rush event dungeon.
    Hero coins are not shared but easily can be passed to other characters by using the Warehouse.

    Hero coins are needed for crafting True Iron Dragon set. Coins also buy fusion coupons to turn any item into a costume item, and the item to remove a socketed card, or pet gate fragments, or region card boxes. The directly buyable cards are not recommended.
VP
  • Real money. One amount shared between characters.
    You also get a finite amount of VP for free from each character by doing the growth missions.

    Primarily, VP can buy a particular necklace visual effect if you want one, buys seal breaker gacha scrolls for gacha pets and gacha costumes (you can also buy VP armor and transform them into visual items or directly buy VP visual items), inventory space bags and warehouse expansion, and is needed for skill point reset cards (an SP All Reset card is probably better, otherwise you need 1 card per SP being changed so a single skill may cost multiple reset cards).


Dungeon types

Dimension Door stage
  • A more repeatable version of story stages for up to 15 minutes, gives good EXP especially with a room as full as possible to level up alternatively to questing, or if soloing, instead gives good GP especially with sold drops (cheaper to farm with no potions or only cheap ones).
    If playing Zero, take off your sword whenever the campfire appears or the portal might accidentally break.
  • Archimedia dimension door
    • EXP: solo ~8.2m so ~546k per minute (4 player ~17.2m so ~1.144k per minute)
    • GP: solo ~577k so ~38.5k per minute (4 player ~249k so only ~16.6k per minute)

Hero dungeons
  • Mostly played for the regular hero coins and demon cores to craft the highest set, but hero dungeons also give the highest EXP (including for Chase Level).
    Playing hero dungeons after the character's daily limit gives almost no EXP/GP and stops drops (only available to help a friend clear).

Champion mode
  • Only available in Harrier continent now.
  • Costs a champion mode ticket to play (from daily attendance or P↑ shop).
  • Monsters have +5% ATK and roughly +5% DEF and all enemies come with 3 special effects.
  • You can fight a bonus boss after the end of the stage which drops a bonus chest (later Harrier dungeons have a higher chance of dropping it than earlier Harrier dungeons).


Story order
  1. Normal story dungeons in order, until reaching Archimedia
  2. Event dungeon Nightmare Circus, either at this point or earlier
  3. Archimedia stages up to the fourth stage, Relics of Kounat
  4. Hero dungeons The Crucible & Sanctum of Destruction are unimportant but may belong here
  5. Hero dungeon Wizard's Labyrinth (all stages' dialog), uniting many characters temporarily, with the story then continuing back with the main party partially finished through Archimedia
  6. Event dungeon Monster Train 301
  7. Back to the last Archimedia stages in order, making a decisive ending
      Extending with smaller stories:
    • Set immediately after the last Archimedia stage: event dungeon Talin's Revenge
    • Supposedly set some time after this point: hero dungeon Berkas's Lair
    • Event dungeon Moonlight Village is unimportant and may belong here

  8. 2-year time gap
  9. "Twelve Disciples" storyline (not portrayed in-game in any way, except for Veigas's intro scenario being the middle of it), leading into:
  10. Temporary event dungeon Illusions of Memory, then hero dungeon Tower of Disappearance dialog
  11. "Episode &" storyline (not portrayed in-game in any way)
  12. Which sets up another 2-year time gap between this and the mobile sequel, Grand Chase Dimensional Chaser, directly continuing the story from here
  13. Harrier continent, apparently concurrent with Dimensional Chaser

You can find the dungeon dialogs or the storylines in the grand chase fandom wiki.
2: PvE Systems (3)
Inventory management tips
  • You can use one character you don't play with often as your storage character to store all uneeded items you have on everyone else's inventory, and go to that character when you need some of it out.
    • Move all common crafting materials (ruby/sapphire/topaz, colored crystals) and region stones to your storage character, they stop dropping after a certain region so they only waste your slots if you keep them on every character instead of moving to the storage character. Move Xenia essences too.
    • Sell or store all HP potions that aren't the highest potion. Do the same for yellow/blue potions that aren't percent-based.
    • Store all special effect potions that you usually get from stage quests.

  • The warehouse starts with a few slots but you can expand it to more slots, and pages, with items from the VP shop you can easily get a few of with the free VP you get from leveling characters (click the + icon inside the warehouse to use it).

Monster cards
Cards generally drop at less than 1% chance per kill, and monsters who appear less times in one dungeon do NOT have higher chances to drop their card.
The best method to get endgame cards is actually to play Land of Judgment Harkion with many characters to get as many of the card chests as possible every day of the weekend.


Servers
You can freely switch servers anytime, progress is not locked. You can look at the other servers to find more people to play with right now.
The most populated servers are Asia 1 (which is almost entirely korean, with some english) and America-South 1 (primarily speaks portuguese but may speak english).

Despite the names of the servers, all server locations are actually in the USA, except for the America-South servers in Brazil.
2: Hero Collection
Having unlocked more characters/classes gives your entire account permanent passive stat boosts.
But secondary stats matter much more than ATK/DEF/HP, those are so small per character.
I will also put [here] the simplified overall damage boost you get from this character's effect (assuming a max-level character with offensive stats raised to 19k ATK, 33% Crit Chance and 330% Crit Damage, would have around 9400 DEF and 4200 HP).
(Elesis: ATK +140, HP +140) [+0.7%] (Lire: Crit Chance +4%, ATK +140) ! [+7.4%] (Arme: ATK & SpATK +140) [+0.7%/1.4%] (Lass: Crit Chance +4%, Crit Dmg +10%) ! [+8.1%] (Ryan: Back Damage +15%, HP +140) ! [+0%/11%] (Ronan: SpATK +140, SpDEF +180) [+0%/0.7%] (Amy: Back Damage +15%, HP +140) ! [+0%/11%] (Jin: Crit Chance +4%, DEF +180) ! [+6.7%] (Sieghart: Crit Damage +10%, ATK +140) [+2.1%] (Mari: SpATK +140, SpDEF +180) [+0%/0.7%] (Dio: Crit Damage +10%, ATK +140) [+2.1%] (Zero: ATK +140, DEF +180) [+0.7%] (Ley: Crit Damage +10%, SpATK +140) [+1.4%/2.1%] (Rufus: Crit Chance +4%, Reduce Crit +20%) ! [+6.7%] (Rin: SpATK +140, HP +140) [+0%/+0.7%] (Asin: ATK +50, Reduce Crit +10%) [+0.26%] (has 2 jobs instead of 4) (Lime: DEF +70, VIT +50) [+0%] (has 2 jobs instead of 4) (Edel: ATK +50, Crit Chance +2%) [+3.5%] (has 2 jobs instead of 4) (Veigas: Crit Damage +2.5%, SpATK +20) [+0.36%/+0.47%] (has 1 job instead of 4) (Decanee: Crit Chance +2%, ATK +50) [+3.5%] (has 2 jobs instead of 4) (Ai: Crit Damage +5%, SpATK +50) ! (has 2 jobs instead of 4) (Kallia: Back Damage +7.5%, ATK +50) ! (has 2 jobs instead of 4) (Uno: ATK +50, VIT +50) (has 2 jobs instead of 4) At least 1 LV85: VIT +100 At least 3 LV85: Crit Damage +10% At least 5 LV85: Crit Chance +5% (actually good) At least 10 LV85: EXP +2.50%
Maximum total effects:
  • Crit Chance +23%, Crit Damage +57.50%, Back Damage +37.5 from 130% (167.5%)
  • ATK +1040 and SpATK +770
  • DEF +430 (+4.5%, -4.3%dmg) and PvP SpDEF +360, HP +760, Reduce Crit Damage Taken +30% (only for PvP, Taint debuff monsters, and hazard damage in jump stages)
(the room info screen after losing a dungeon even shows a screenshot of the Hero Collection, but the non-secondary effects were multiple times bigger, showing only Elesis at either 3rd or 4th, being 550ATK and 370HP instead of 140 ATK and HP. Apparently some stats from this already launched nerfed, or the system is not completely released yet)

There is also a list for how many characters you've awakened at max level:
It's good to have at least 5 characters awakened.
1+: +1000 HP
3+: Crit Damage +10%
5+: Crit Chance +3%
10+: EXP +5%

Job Coordi Stat Bonuses
Crafting a job's full visual set also gives another Hero Collection stat bonus, but these effects are extremely small and each full set takes an extremely long time to finish. Up to 4 sets/effects per character, with effects drawn from these:
  • Crit Chance +0.30% (+0.5% damage overall) [x4: Ryan, Zero, Asin, Lime, Decanee]
    ATK +50 (+0.26% damage overall) [x8: Ryan, Amy, Jin, Zero, Ley, Rin, Lime, Ai]
    SpATK +40 (+0.21% in skills) [x4: Elesis, Ryan, Jin, Rufus]
    Crit Damage +0.50% (+0.074% damage overall) [x4: Elesis, Amy, Rin, Asin]
    MP Regen +0.50% [x5: Ryan, Amy, Dio, Ley, Edel, Decanee]
    HellSpear +50 [x5: Lire, Arme, Lass, Ronan, Mari]

  • HP Regen +2% [x5: Lass, Ronan, Jin, Dio, Veigas]
    DEF +30 [x7: Elesis, Lire, Arme, Lass, Sieghart, Ley, Rin]
    HP +30 [x8: Lire, Arme, Lass, Ronan, Jin, Mari, Dio, Zero]
    Reduce Crit +0.80% [x5: Arme, Sieghart, Mari, Zero, Edel]

  • GP +0.50% [x5: Elesis, Ronan, Sieghart, Mari, Dio]
    EXP +0.50% [x6: Lire, Amy, Sieghart, Ley, Rin, Ai]
2: Chase Level
Unlocked for the entire account after finishing a LV85 quest with one character.
When playing a LV85 character your level display is changed to instead say "C-Lv X" and with any max-level character all earned EXP will pass to the Chase Level of the account (PvP doesn't give Chase EXP, only PvE). Each Chase Level gives one point to be spent on a passive skill tree, benefits even characters that are not LV85 yet. (the tree's configuration is separate per character, so having 100 points total in one character with 70 point spent will still show 100 out of 100 available for other characters) (there are cash shop items to reset a character's configurations)

Taking the entire tree would cost 1250 points and supposedly the max Chase Level is 999 which gives 999 points total (plus a few more from account bonuses), so even at max you have to choose 251 points to never take with your character; it's very easy to decide to dismiss the defensive-only bonuses (which are not important) which make 300 plus GP gain for 400.
The EXP needed per chase level exponentially raises (what fills around 24% at LV10 is already around 12% by LV40).

(there is a cash shop item to add another page to the configurations, so you can have 2 pages that each spend the same amount of points but in different ways to equip whichever want to equip right now, but that new page is only added for that character instead of the entire account)

Chase Points
Note that in PvP, only section 1 works (and with balanced PvP stats on, only MP on start applies).

Section 1
  • (200) ATK +10 [+2000, so assuming endgame 27k ATK, that's +7.5% damage],+0.00375% base damage per point which is a lower priority than the other offensive boosts, although this is the only one that raises your Total Attack
  • (200) DEF +6 [+1200 so around +13% at max level for only -11.5%dmg difference]
  • (50) Max HP +0.5% [+25%]
  • (50) MP on match start (and respawn too?) roughly +0.025 bars (~1.25 bars), very small effect overall (but works in PvP, ~0.5 at full). Stacks with Arme starting with 1.5

Section 2
The "damage" buffs from here are actually additive ATK buffs (if you currently have +50% ATK from effects, and a total of +25% damage from here, that's 175% of normal damage dealt).
  • (100) ATK buff for skills +0.2% [+20%]
  • (50) ATK buff for all damage +0.15% [7.5%], also raises damage taken by that amount, worth it
  • (50) ATK buff against bosses +0.25% [+12.5%] (specifically those who have a lifebar on the bottom of the screen)
  • (50) Reduced damage taken from bosses +0.4% [20%]
  • (100) Taint Resistance for taint stages +0.07% [+7%, at 20% unresisted taint stages raises base damage and HP by +8.7%, at 50% unresisted taint stages raises base damage and HP by +14%, so final damage +0.087%-0.14% per point]

Section 3
  • (100) Skill MP cost -0.2% [needs and costs 20% less MP]
    • In practice extends your max MP to 5 bars worth since around 70 points, allowing you to cast an additional MP1 for evasion after your MP would have been emptied by a skill.
    • Skills that can spend additional MP apparently have only the initial cost be reduced, not the additional cost.
    • Enables Ryan with MP totem or Ley with Inspire to cast two MP3s in a row.
  • (100) Skill cooldown -0.2% [-20%], more useful for AP characters which can't charge Z to use the skill when it's on cooldown and need to wait for the full cooldown
    • MP/hybrid: 10>8, 18>14.4, 26>20.8, 45>36
    • AP: 8>6.4, 16>12.8, 22>17.6, 45>36
    • Special Awakening H skills are unchanged by this
  • (100) EXP gain +1% [+100%], stacked additively to other EXP bonuses (levels up a character faster and will help Chase EXP too when already max level)
  • (100) GP gain +1% [+100%], unnecessary

  • While there are a lot of nice effects, Chase Level raises so slowly that what you decide is maxing EXP first then thinking about which one offensive boost to get next.


Grinding Chase Level
You will get some EXP from Another World/Hero Dungeon and Tower of Disappearance dailies, but the biggest difference by far is farming high-level Wizard's Labyrinth with as many over-200k characters as you can.
  • The Crucible: ~6.3m base EXP, and Sanctum of Destruction ~5.6m, and Wizard's Labyrinth 3F ~7.5m (19.4m together)
  • Berkas's Lair: ~6.4m
  • Siege of Teroka: ~3.4m

  • Wizard's Labyrinth 3F: ~7.5m
  • Wizard's Labyrinth 15F: ~46.9m
  • Wizard's Labyrinth 24F: ~60.9m but takes longer than 15F
  • Wizard's Labyrinth 30F: ~74.2m, probably needs 300k+ to enter rooms (must be done 4 player, spam MP1s as much as possible to freeze the boss before he summons enemies which makes him invincible)

Hero dungeons don't change EXP/GP gain depending on party size like story dungeons do.
2: Coordi Visual Costume System
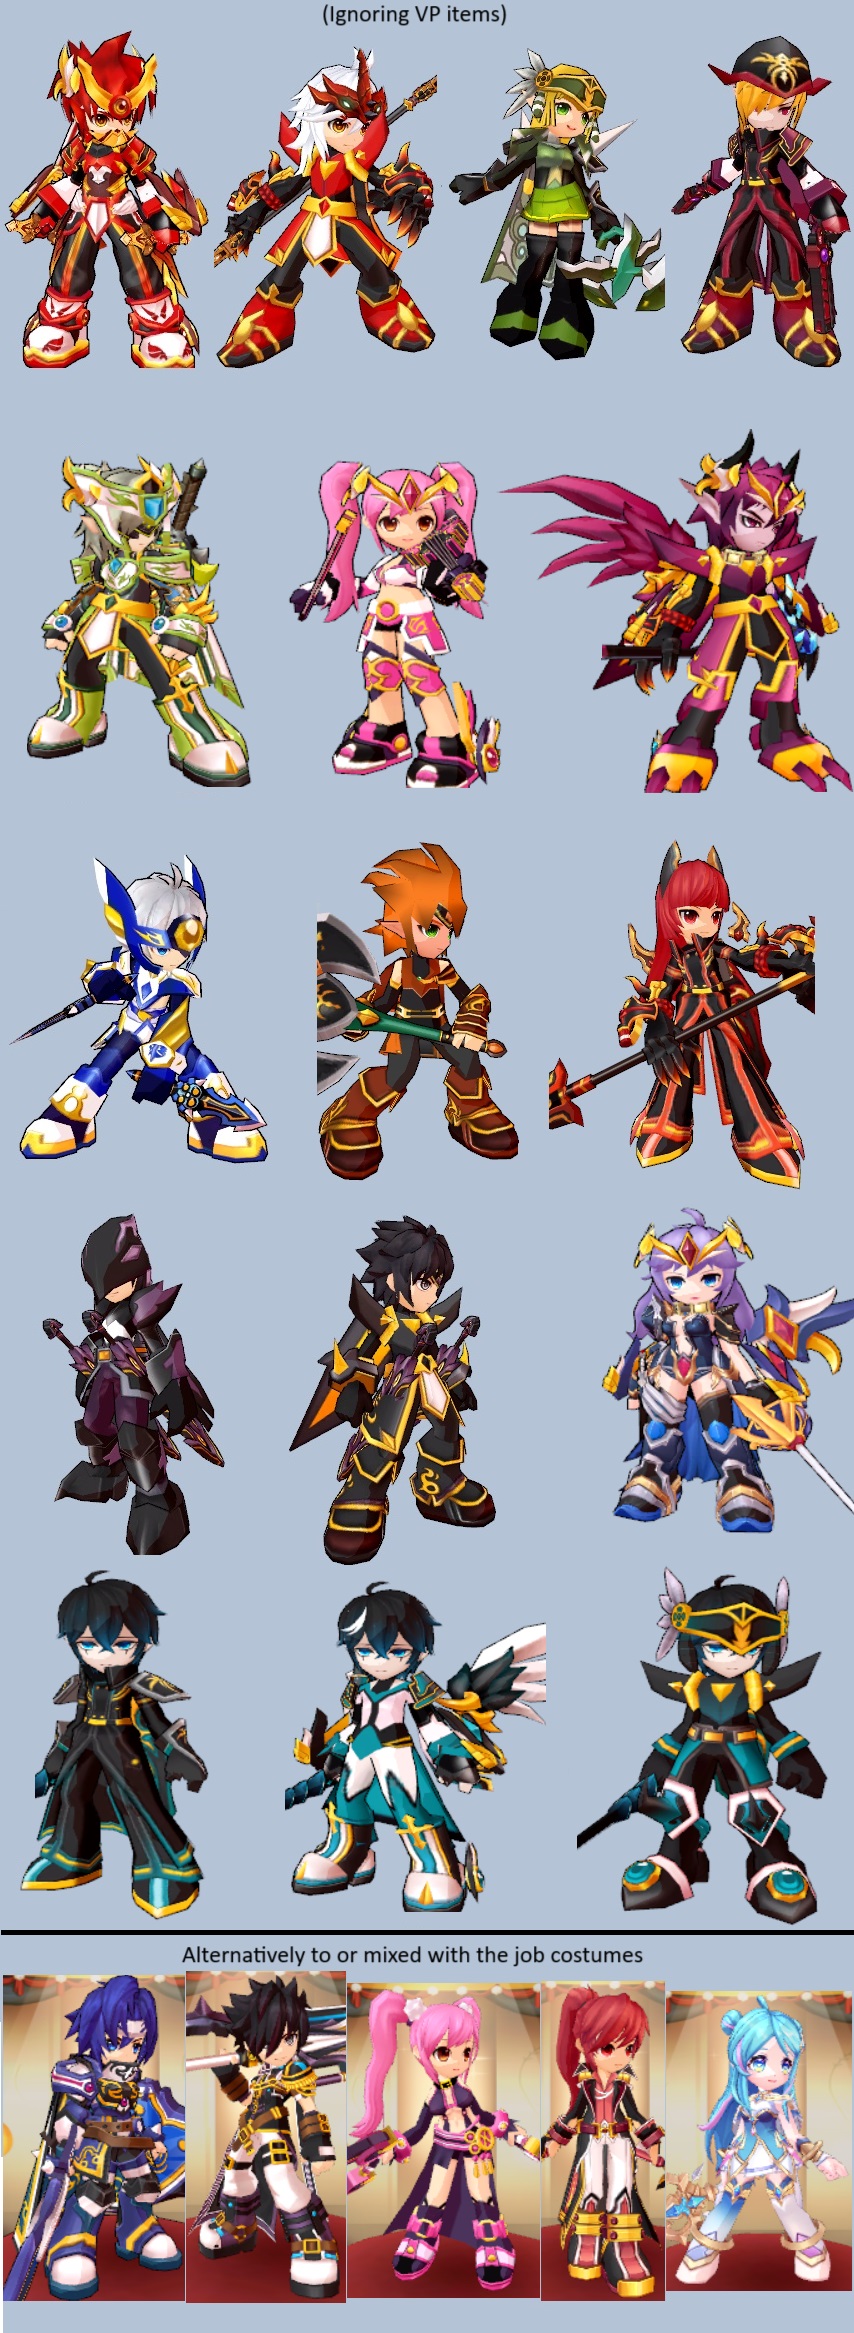
You have ALL ITEMS IN THE GAME available to equip on your visual slots by using a Fusion Coupon to transform a non-visual item into a visual item (and there is a VP/event scroll to combine the looks of one visual item and the stats of another visual item).

You can buy Fusion Coupons on the hero shop. They convert any equipment/accessory into a visual version of it with no stats, visual items go to their own separate inventory. Note that you cannot convert weapons; visual weapons can only be obtained from job coordi craft or from seal breaker gacha.
Job coordi visual items can also be farmed from daily hero dungeon quests (it can be fun to wear even one piece like the canon helmet/hairstyle or Veigas's cape for example).

Instead of using a single full set you can put on items slot-by-slot in the shop:
  1. Put on some dropped/crafted items that you cannot find in shops to test how they look, or go to the shop and uncheck the option to show items you already had equipped.
  2. At the shop try out each different set or choose specific item slots and try out all the options in that slot until you find one you like (the leg can also change what a boot looks like underneath. Both chestpieces and gloves may change your sleeves/gloves).
  3. As long as you don't leave that shop (like changing GP shop for VP shop), all the items will stay memorized on the character model, so you can look at the tab for another slot and try out all slots separately for a custom set.
  4. If you find some items you like, you can get one copy of them and convert them to visual items with Fusion Coupons.

In total you can convert items from the GP/P↑ shop, and VP shop, and directly buy visual items from the VP coordi shop (which also includes the transparent items, which occupy the visual slot for that equipment/accessory slot while having the same look as if nothing was equipped), and you can convert the craft/drop-only dungeon sets too which cannot be found in any shop:

    Serdin/Kanavan:
  • Warrior Saint set, some characters have unique versions, some have a shared male or female version different by color (drop & craft)
      Accessories:
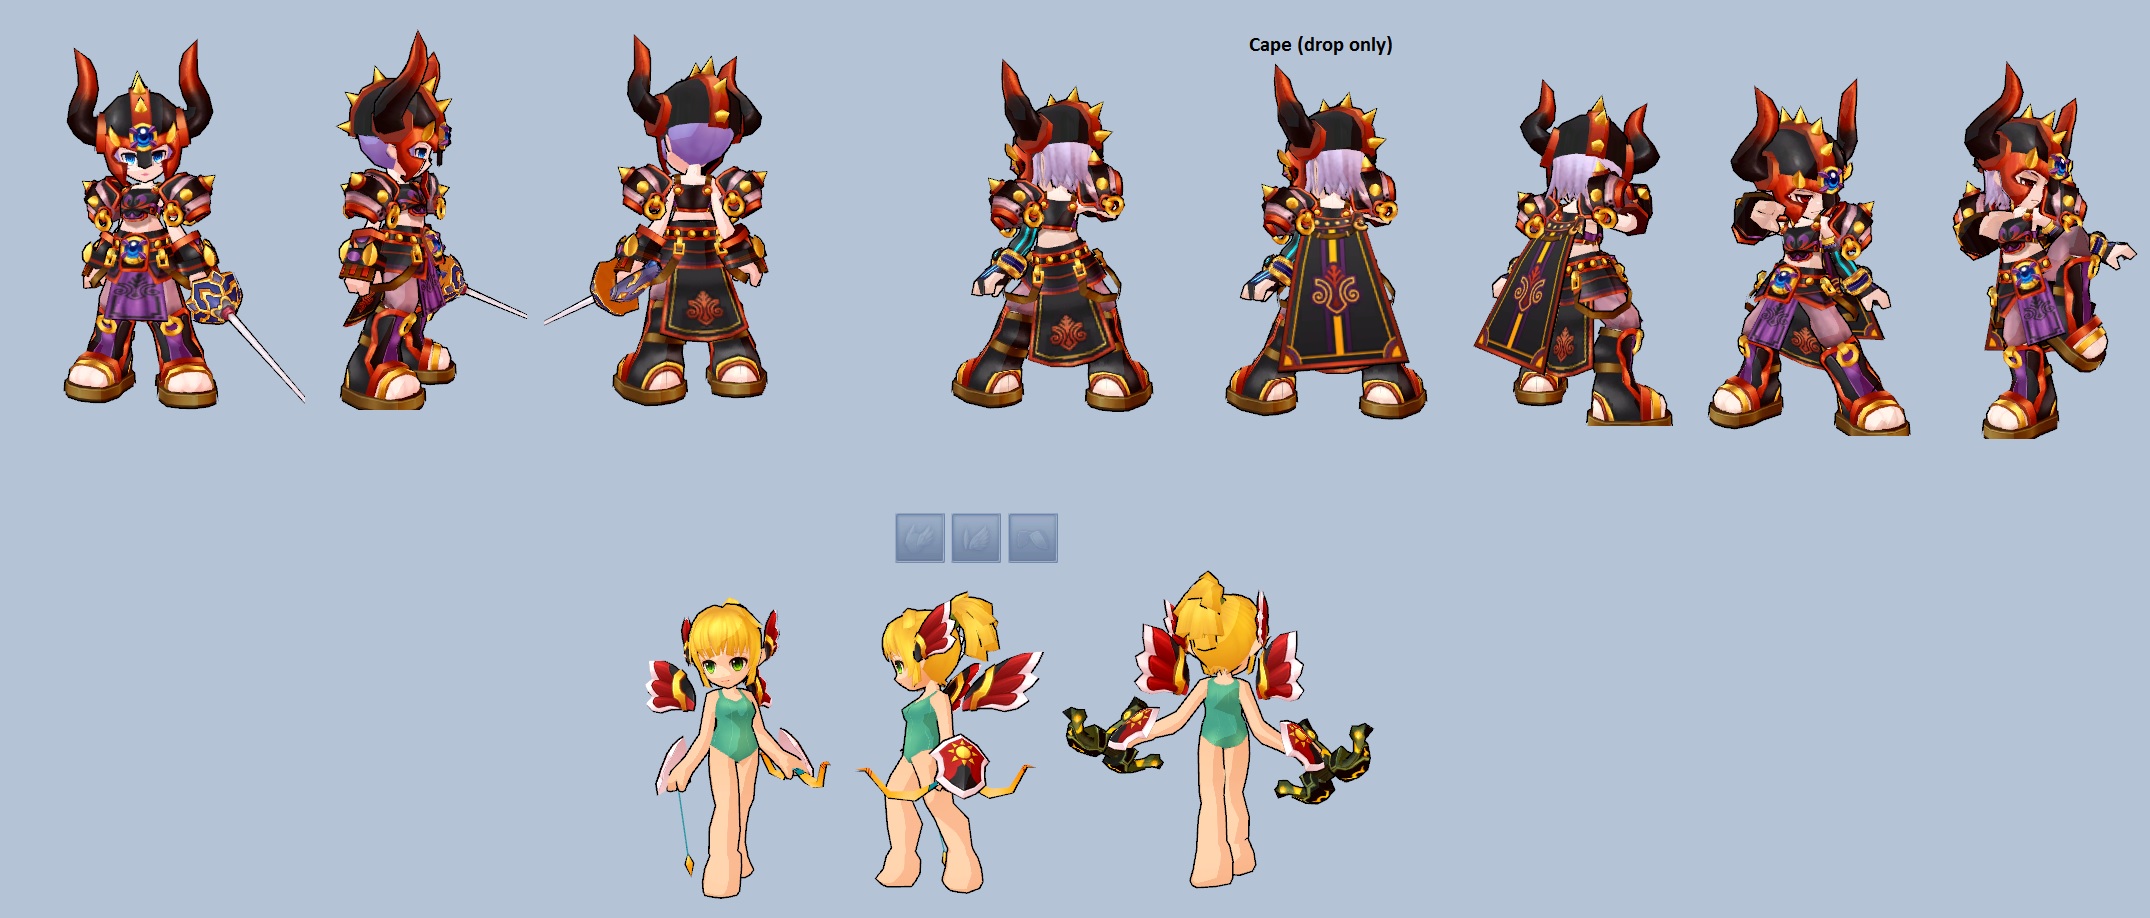
    • Gold wood, same color for all characters. The "wing" is only a plate on the back so it can hide a wing you don't like (shield is craft only)
      (click image to expand)


    Silver Land:
  • Victor set, same shape and color for everyone (drop & craft)
      Accessories:
    • Sun/Sun Knight set, same color for all characters (shield is craft only)


    Ellia:
  • Kazeaze set, no male/female differences (drop & craft)
      Accessories:
    • Wild Force (shield and tail are craft only)


    Xenia:
  • First half has Aron/Sharkaron set, same color for all characters (drop & craft)
  • Second half has Thanatos set, same shape and color for everyone (drop & craft)
      Accessories:
    • First half has King Fang/Worm Dragon set, same color for all characters (shield and knife are craft only)
    • Second half has Perseo/Destruction set, same color for all characters (shield and knife are craft only)


    Alcubra(Aton):
  • Kungji set, same shape and color for everyone (drop & craft)
  • Second half has Barakhufu/Baracoop set, same color for everyone
      Accessories:
    • First half has Aranya/Desert set, same color for all characters (shield and knife are craft only)
    • Second half has Barakhufu/Baracoop set including mask, same color for all characters. The shield is actually a shoulderplate so it can hide a shield you don't like


    Archimedia:
  • The robot Sentry Keeper set, same shape and color for everyone (craft & drop)
  • Zeruel/Karuel set, same color for all characters (drop only, only from the two elf stages)
  • Aernasis set, same color for all characters. The wing is very unique and floats above your shoulders. (this set is gotten only from the last stage, winning the stage always awards 1 piece for every player, may random drop more across the stage)
      Accessories:
    • The green machine set, same color for all characters (shield and knife are craft only)
    • Last stage awards Aernasis accessories including mask, same color for all characters


    Kricktria:
  • Dimension Guardians set, same color for all characters (drop only)


  • There are also the sets from:
    • The Crucible & Sanctum of Destruction, Phantom Phoenix set

  • Train event dungeon (same color for all characters. Has accessories including mask)
    • (Wing is different for male and female version: for males it's a big rectangular shield on the back, for females it's the protruding part of the cool scarf on the neck, can be used to hide the wing slot. And the "shield" piece is a very small red armband for the right side, can be used to hide the shield slot)

  • Circus event dungeon (has accessories including mask)
    • (Male and female version, different color per character)

  • Berkas (same color for all characters and changes hair to white)

Accessories shown by slot (VP items not included):


Costume stats
There are actually some premium visual items that bring small stat boosts or set bonuses instead of being purely visual (and they can be of Season 1/2/3/etc sets, just look at its items to check which set they belong to), and there is a scroll to mix two visual items to keep the looks of one and the stats of the other, but only for a 3000 VP scroll for each pair of items (sometimes given in events too).

While visual item stats and set bonuses mostly tend to be too weak to worry about anyway, some items have +3% Crit Chance which is a much higher effect (around as much as a full endgame critical chance/damage card each), and also the Season 6+ gacha sets can add Taint Resistance from set bonus. Technically the best setup is collecting every visual item slot that gives Crit Chance for your main (and using the scroll to give that effect to another item if you don't want its look too).
  • Crit Chance:
    • Glove with +2.50% (Season 2/8 sets, directly buyable in VP visual shop except for Edel/Veigas)

    • Helmet with +3% (any gacha Season 5 set)
    • Accessory shield with +3% (Season 5 sets, directly buyable in VP visual shop only for male characters or Edel, available as a job costume for Elesis or Veigas)

    • Chest with +3% (any gacha Season 4/9 set)
    • Accessory mask with +3% (any gacha Season 4/8/9 set)

    • Cape with +3% (Season 6/7/8 sets, directly buyable in VP visual shop except characters after Veigas)
    • Weapon with +3% (any gacha Season 7 set)
    • Accessory lower body with +3% (any gacha Season 6 set, directly buyable in VP visual shop except for Uno and characters since Ai)
2: Runes
Runes exist in tier 1-5 with higher tiers having much stronger stats.
  • Since Xenia: drops T1
  • Thanatos, Alcubra/Archimedia: drops T1-T2
  • Other World: drops T2-T5 (higher tiers are rarer)
  • Harrier: depending on stage drops up to T3, up to T4, or up to T5 (higher tiers are rarer)

  • Obtaining a rune will lock the rune to that character. You can only pass a rune to a different character by spending a rune sealing scroll which costs VP. Darkstone CAN be passed normally.
  • The ideal setup for the 5 slots is ATK / ATK / ATK / ATK or Crit / Taint Resistance (with secondary stats for Crit/ATK/SpATK on them all), then for more Taint Resistance for certain stages you can replace the 3rd and/or 4th for more Taint Resistance.

Rune stats
The most important attribute of a rune is which primary stat it has ie either an offensive stat or Taint Resistance (alongside its tier which increases the value of primary and secondary stats), then secondary stats that also boost offensive stats/Taint Resistance. Sets usually are last in importance with the exception that the 5% ATK set is common (available since T1) and good.
The quality of the rune (white/blue/yellow/purple) raises the primary stat but not secondary stats, and decides if it starts with 0-3 secondary stats but all runes will have 3 after leveling them up enough. Leveling up a rune will increase the primary stat value every level, and at 3/6/9/10 will give one more secondary stat (or if already having 3 secondary stats, boost a random secondary stat).
Leveling up a rune has a chance to be lucky which means the bar gets filled extra.

White
Blue
Yellow
Purple
T1
Primary stat 100% Secondary stat 100%
Primary ~140% Secondary 100%
Primary ~180% Secondary 100%
Primary ~220% Secondary 100%
T2
Primary ~173.5% Secondary ~133.3%
Primary ~213.5% Secondary ~133.3%
Primary ~254% Secondary ~133.3%
Primary ~294% Secondary ~133.3%
T3
Primary ~247%
Secondary ~166.6%
Primary ~287% Secondary ~166.6%
Primary ~327% Secondary ~166.6%
Primary ~367% Secondary ~166.6%
T4
Primary ~320.5% Secondary ~200%
Primary ~360.5% Secondary ~200%
Primary ~400.5% Secondary ~200%
Primary ~440.5% Secondary ~200%
T5
Primary ~394%
Secondary ~233.3%
Primary ~434% Secondary ~233.3%
Primary ~474% Secondary ~233.3%
Primary ~514% Secondary ~233.3%

Available primary stats (with base T1 white value for reference, so a T3 white will have ~247% of this value):
    • Rune slot A: ATK 259
    • Rune slot B: ATK 259, SpATK 231, DEF 183, HP 139, SpDEF 154
    • Rune slot C: ATK 259, Taint Resistance 2.07*, MP Regen ~1.65, DEF 183, HP 139, HP Regen 4.76
    • Rune slot D: ATK 259, Taint Resistance 2.07*, CritDmg 7.50%, CritChance 0.98, DEF 183, HP 139
    • Rune slot E: Taint Resistance 2.07*, Crit Damage Resistance ~1.95, Counter Resistance ~1.3

        * = Each 1% Taint Resistance basically gives around final damage/HP +1%-2% depending on unresisted taint amount

The secondary stat cannot be the same stat as the primary stat.
Available secondary stats (T1 values for reference, so a T4 will have around double this value. Also, if the rune would gain a secondary stat at levels 3/6/9/10 but already has 3 then it boosts a random secondary stat by ~15%):
    • Offensive: ATK 182, CritDmg 5.28, CritChance 0.69, SpATK 162, MP Regen 1.19, HellSpear 66
    • Defensive: DEF 129, HP 98, HP Regen 3.37, SpDEF 108
    • Other: Taint Resistance 1.46, Crit Damage Resistance 1.39, Counter Resistance 0.96, GP 1.32

Dismantling runes - To easily clean space, set it to list all T1 runes then dismantle all of these. Then you might move to T2 and dismantle these too (unless you want to keep this T2 for its primary stat or its set).
You can also set runes by primary effect and dismantle all runes except ATK/Taint/Crit.

Higher-tier runes need more darkstones for max level (from 1645 darkstones for T1 which costs ~1kk GP to upgrade, to around 10k darkstones for T5 which costs ~6kk GP to upgrade).
2: Hero Dungeons (Wizard's Labyrinth)
Wizard's Labyrinth
Requires LV80+.
Opening times: always open (max 1 win a day per character, more by spending hero dungeon tickets)
Rewards: demon core #3 of 3 for Berkas set, hero coins, phantom phoenix box

This dungeon has 30 floors and you select one when entering, starting with 1. You can repeat old floors too. Each floor is a single screen full of enemies or bosses with enhanced stats and attacks.
  • Floor 03 is so easy it can easily be farmed solo (sometimes even faster solo than with party) and already gives all the normal rewards. You may not even need to go farther than this with any character. You can also farm 4th skills in this floor (even past the daily limit).

  • Floor 12 (2 Starkilns/Zigs) can be repeated instead for more Chase EXP.
    • Strategy: go to the left corner for them to stay together so both take the same damage. They never do the dash attack if every player stays close enough to be touching them. His "Summon" attack kills from full HP if not evading with skill, but misses behind him or right in front of his foot.
  • Floor 11 (2 Samsaras/Deus da luz) is often slightly harder and slower than Floor 12, but gives double the EXP than 12. (and some skills do bonus hits on his very large height)

  • Floor 15 (2 Perseos/Perietts) is borderline the best place for daily farming of Chase EXP with around twice the EXP of Floor 11, but 100k isn't enough to win easily.
    • Strategy: the blue orbs steal life if they hit someone, so if players get hit with this regularly then the fight can last infinitely. Every player should enter with a 1-bar skill that can hit the orbs inside you 100% of the time, and always reserve at least 1 bar of MP for it (AP characters may need two 1-bar skills for that due to cooldown).
    • The boss's claw attack cannot reach you on the highest floor of the right corner (it can in the left corner). And one player can stay high to attract the orbs first and always block the orbs with that skill. And if another player stays on the floor by his feet, he sometimes does his stomp attack which only harms the one player at the floor.
  • Floor 24 gives around 30% more EXP than Floor 15 but takes over 3x as long.


Floor 30
The last floor Floor 30 is a fight against multiple bosses in a row in only one screen, it can take almost half an hour and too many lives and revive rings to beat with no special reward. Basically not even worth the effort. However it does give more EXP than any other floor for Chase Level.

Floor 30 boss:
  • Phase 1: Grandiel appears alone, demonstrating his few attacks. They will be happening for the entire fight.

  • Phase 2: lower his HP enough and he will summon Drawl and Veron. They will fight you together while he shoots at you too. He cannot be hurt again until Drawl and Veron are beaten.
    • Both their finishing moves are boosted and strong enough to kill you from full health. And Veron's will drain your MP (killing even immortal Jin if not dodged).

  • Phase 3: Grandiel can be hurt again but will create 4 copies of himself, all attacking individually. The copies have less HP than the real one.

Or you can beat this fight the easy way. Get 4 players and all spam 1-bar skills as much as possible next to him. Grandiel isn't immune to skillfreeze time like certain bosses, with 4 players spamming 1-bars it's possible to delay him so much that he barely gets to do any move, and if you keep attacking him this way he won't even get to start the second phase which means he doesn't become invincible and can die before he summons anyone. You still get the full EXP. There are player rooms of this floor trying to do this strategy, doing this daily with as many very strong characters as you have is a lot of Chase EXP but there may be a 300k requirement for the rooms.
2: Hero Dungeons (Land of Judgement)
Land of Judgement (Harkion)
Solo only. This is a score attack stage, either you die or the boss leaves after enough time. You can also leave with Esc once you reach the score you wanted.
You cannot use potions/revives (except Lisnars).

Opening times: Friday-Saturday-Sunday
Rewards: this is the source of percentage yellow potions, and the easiest source for endgame cards with the card boxes, you can play with as many characters as you want for more. With some time can also craft a +5%ATK title.

This is not level-scaled at all so you simply need higher stats for better score.

Aside from the listed rewards, with every character you enter you will get an entry chest in your mail, to open as one character. Usually the chest only gives gems but the chest has smaller chances of useful items like 1 GP property random reset scroll, reinforcement scrolls, 1 gacha scroll, or rare temporary stat potions.


Strategy
Harkion's feet only take 20% damage so you can hit him from the second floor on his torso, or the third floor on the front of his head which sticks out forward farther from his body (you can freely jump up and down through his neck, between his torso and his head).
If you get hit by his 3-hit combo, you can mash skill or an invincible move before being hit by the 3rd strike. To dodge his minefield without skills, run to the other side of the stage because they have a max range.

Using skills would help in DPS but you could keep at least one bar saved for dodging purposes, and Harkion randomly will roll away when hit so skills are often wasted if used whenever (except 1-hit skills), and he can never roll while he's doing certain moves (like minefield or 3-hit combo).

He has special moves always done after certain timings (they may be triggered instantly or delayed by up to some 20 seconds):
  • 1:00 moves right for laser (go to the right corner, you can keep attacking him from behind. If you can't move behind him in time, go to the highest platform which gets hit by the pushing air but not by the laser)
  • 2:00 cutscene, attacks the entire stage coming from right then coming from left (skill to avoid it, twice) [keep MP high before this time]
    • (after this, all his damage is raised, and his ground combo learns to roar afterward for the big shot to either side. He only shoots one way but the hitbox always covers close to both sides of him. The easiest way to evade is to simply skill every time he roars, be prepared for the roar every time he does his ground combo and hasn't roared recently)
  • 2:30 moves right for laser
  • 3:20 cutscene, hits entire stage at once over many seconds (chain skills to be invincible for the entire time) [keep MP high before this time]
  • 3:50 moves right for laser
  • 5:00 cutscene, summons two cyclones that stay on the stage moving
    • (passing through the cyclones with any super armor will still leave you alive on Fatal, or skills and invincible moves can pass through the cyclone without taking damage)
  • 5:40 the fight ends and Harkion flees so you can't score for longer than this per run

Harkion has 30% resistance to normal attacks (takes 30% less damage than standard) and around 43.5% resistance to special attacks (takes around 27.5% less damage than standard).

If you stay on the highest platform in the stage, you can't see where his energy pillars will appear on the ground but also can't be hit by them.
2: Hero Dungeons (Berkas's Lair)
Berkas's Lair
Requires LV85 and TotalATK 60k+
Opening times: every hour at the 00-29 minute mark, only 1 win per day per character
Rewards: exclusive endgame IronDragon equipment (blue and yellow quality) & cards

This fight is very different from how it used to be.

The first room just shows the machines that you can activate with spacebar, the second room is the boss room.
You start in the left in the lower floor, close to a teleporter that goes to the upper floor. At the left at the upper floor there is a supressor, and at the left in the lower floor there is a supressor and a ballista.
Berkas takes 1/3 damage when a supressor isn't activated, so attack him but save all your MP for when he's purple.
At the upper floor, farther from the left, there is a barrier and at the right a catapult. All machines stop working and enter cooldown if a monster hits the machine once.

THE START
  • Always start by taking the teleporter near you to go up, to kill the monsters near the suppressor then return down. Berkas always begins with his JUMP stomp and you're invincible while teleporting so teleport or jump to avoid it.
  • If you're the room leader, you cannot skip the dialog with X until the camera returns down to Berkas (or everyone else will lag and get hit by the stomp).
THE BATTLE
  • Stay on the lower floor and keep fighting Berkas, regularly using the lower suppressor then moving up just to use the upper suppressor and come down. If you stay in the upper floor, Berkas may get angry and start flying.
  • Avoid his flame by being in his middle or behind him. His tail can hit you too so stay closer to his middle. "Wind storm" hits to the left and right of Berkas and is avoided by using a teleporter then returning (or by skill, or by running too far to the side).
FLIGHT
  • When Berkas takes many hits he may fly away (or when players don't leave the upper floors).
    Once this happens, he will move from the lower floor right to left, then the upper floor left to right. He is still vulnerable to damage during these parts so the suppressor may still be used. Once he's in the upper floor he can be hit by the catapult in the upper right, which will drop him back to the ground so you can continue the fight normally.
  • If the catapult is not used (it couldn't, it was hit by monsters recently), he will use his fire breath on the entire stage and this requires the barrier to survive (activate the barrier as "BREATH" leaves the screen). After his fire breath he will either return to the ground, or try to fly and breathe again.


Berkas HP: solo ~7.6 million, 6 player ~13.4 million (so around +1.14 million HP per player after the first)

Support Characters
  • Ryan1 reviving: can cast Resurrection after entering Berkas's room for everyone else to auto-revive on death for 1 time or 1 minute (can cast again for MP whenever), and can prevent party wipe after missed Barrier by switching to base job, pressing CC for invincibility, then mashing D for Resurrection.
  • Hit barrier: Arme2 can give nearby teammates a barrier that has no time limit.
  • MP totems: Mari3 and Ryan have MP totems to use at the start and in the Barrier room. (Ryan: allegedly can bug Barrier's activation if placed near it instead of the edge of the platform)
  • Invincible field: Ronan3 and Mari4 can place a short invincibility field to assist the Barrier if timed slightly early/late, or sometimes prevent a hit from a pre-flight Berkas attack.
  • Mari: has the best damage on Berkas (4th job MP3), and MP totem and invincible field.
2: Hero Dungeons (Tower of Disappearance)
This is meant to be one of the hardest stages in the game, having more than one 200k+ character lets you farm this stage more. The reward is a chance of dropping a Single Property Reset Scroll from the 5F or 10F boss (required for perfecting the best gear and this is the only non-event non-cash-shop way of getting it) (around 5% for 5F and around 15% for 10F).
This dungeon can be played in either 5F runs or 10F runs.
  • "5F" in the room name means everyone plays until the 5th floor to beat Kazeaze, collects any drops until this point, then everyone leaves and can try again. You don't even need to spend Lisnars on these runs, this is for farming them. The dungeon only requires LV85 to enter but good is 200k+.
  • "10F Prayer" is to continue through all 10 floors with its harder second half which has a higher stat requirement than only 5F runs (400k+), and by making sure everyone has their own Lisnar potions and Lisnar Prayer equipped.

Opening times: every hour at the 30-59 minutes mark, 3 tries per day whether you win or lose/quit (per character)
Rewards:
  • 5F and 10F boss each have chance of dropping a Single Property Reset Scroll
  • Lisnar HP/MP Potion and Lisnar Prayer (consumables for this stage and Harkion), 1 use of Second Gear ring (BiS ring, ATK +15%, can be used for Harkion score)
  • Event dungeon ticket, champion mode ticket, hero dungeon replay ticket
  • Revive ring and bonus life, 30%/50% yellow potions (yellow potions are easier from Harkion)
  • Rarely, refine scroll to +10


You cannot use potions/revives in this dungeon except Lisnars, and GC Club doesn't give you a second life. Class-specific party heal/revive skills are useful (Arme/Amy/Lime are taken as healers, Ryan too to primarily repeat Resurrection, sometimes these characters are taken even at lower TotalATK). Harkion healing earring may help.

This is a boss rush dungeon, earlier floors have trash mobs but they will respawn if killed so it's mostly pointless to hit them except to recharge MP as a non-AP character, all you need to do is kill the floor boss as fast as you can.
Normal attack damage is halved against all enemies in this dungeon, so it's important to deal damage with skills often. Pets also charge slower in this dungeon.

Enemies in this dungeon don't get higher stats according to party size, so you should always enter with 4 players over less players. For example the 5F boss will always have 241 lifebars whether you have 1 or 4 players to take that down.
  • 1F: Gorgos can be mostly stunlocked by combos, but always keep an eye out for his Danger: the beam will hit in front of him on his platform and 1 platform above, it can kill you from full HP.

  • 2F: it can be easier to dodge Gardosen's attacks on platforms instead of the middle. Remember to dodge the meteors because they are too strong.

  • 3F: some of Kamiki's shots can be stopped with temporary walls or will need skills/invincibility to avoid.

  • 4F: because Gaikoz easily teleports with a slow counterattack whenever hit, the team can first use only the skills/pets that do only one hit or very few very fast hits, before fighting him like normal. People may say "3" or "4" in chat to signal other people to not attack because they want to unload their MP3/MP4 skill of one hit without interruptions, because if everyone is attacking Gaikoz then he constantly evades skills by accident.
    When Gaikoz is close to dying you can save your MP and keep it high for the next floor.

  • 5F: the best strategy is, as soon as the fight starts, for everyone to keep repeating 1-bar skills on Kazeaze over and over and over, because each skill near her will temporarily pause her, which will delay her from starting any further attacks. If she lives for too long without getting paused by skills she will continuously keep casting a barrier on herself and spreading poison around. Unless playing an AP character, you can also time normal attacks when completely safe during this time just to recharge MP faster to be able to keep repeating 1-bar skills.
    An MP share ability here also helps everyone to do it.
    The most efficient 1-bar skills to have for this are ones that freeze enemies for longer than normal or freeze time two times per skill, or at least ones that start and finish very fast to repeat faster.

    If she does her charged attack from the middle, go to the far left/right and use skills or roll to evade the hit when she raises her arms. If you get close to her, the skill will pause her and mess up the timing so you HAVE to stay far away from her.

Character notes:
  • Gorgos's Jump and Gardosen's stone curse cannot damage you during hyper armor.
    (Elesis's C buff or X block, Zero while holding sword, Lime techniques or spin, etc)

  • Lime: her MP4 will revive all party members on death once every cast. Ryan1 can revive too but he needs to cast it once every floor and doesn't apply to himself.
  • Amy: can help DPS by using the Amy2 MP2 that gives MP to party members using at least once every floor so they clean each boss easier, and Amy1 can heal or revive a mid-dying player with her healing MP3. If playing 10F, Amy1 has a MP2 buff that gives infinite MP when standing on the poison.


10F runs:
  • On a 10F Prayer room, common courtesy is that after everyone dies, the person to spend a Lisnar Prayer to revive the team is whoever was dead first, then that 2nd person who died there is who has to revive after the next wipe if needed.

  • 7F will be making Warnings regardless of boss animations. This hits in a full horizontal line from every Gaikoz in the stage and it's too fast to avoid without using invincibility, so always keep in mind whether you're within horizontal line of one Gaikoz or not.

  • 8F Kamiki's Warning shows a red line first, highlighting the 2 floors it will hit.

  • 9F Gardosen's "red smoke" attack will highlight an area in red first then kill whoever is inside it that didn't skill. This attack counts as a throw so it can instantly kill even through hyper armor (immortal Jin, weapon Zero).

  • 10F:
    The thorns from the background monster don't hit you, they only poison the ground.
    You don't need to beat her thousands of HP bars, simply wait 4 minutes without losing and you win the stage too. Players can also make a "kill" room which means the plan is to kill her instead of waiting the 4 minutes.
    Stay at the farthest corner (letting yourself stay in Fatal, the poison does damage but can't kill you, only the other attacks can) running away to the other side if she teleports to you (note that she may throw the piercing orbs right after teleporting, if you couldn't get to her immediately then using a skill is necessary), then wait in the corner and just skill for invincibility whenever the orbs or spikes come or when she does her charged ultimate attack.

    Because of the endless poison damage that can't finish you off, Ronan3 constantly charges his invincibility barrier from being hit by it, making him great to survive in this fight. Another interaction is Amy1's party buff that charges MP from taking damage, which here will charge so much MP that it becomes possible to simply skill the boss to death in around 2 minutes.
2: Hero Dungeons (Void Raids)
To enter these raids the character must have at least 200k TA.
To pass 200k, craft the True Iron Dragon set and Harkion Ring. The stats you want are CritDmg/CritChance and ATK/SpATK/MP, preferrably you get CritDmg+CritChance on every item or else one crit plus two out of ATK/SpATK/MP. Re-crafting the item may be easier than spending a properties reset scroll to roll stats again. After that to get stronger you need single property reset scrolls from farming Tower of Disappearance with multiple characters.

In raids, the fights have multiple phases and you can still get rewards from clearing only one or two phases while the full thing is for people who already have too much TA, but the bosses have hundreds of lifebars and they do NOT change depending on how many players there are, the purple dragon will start with 669 lifebars whether soloing or with 4 players. The trick is to always try to play with 4 players. You will find more players at Asia-1 the day that raid resets at.

Void raid rooms will be labeled for example "XF X00k" for example "only people with 200k+/500k+ allowed" and 1F/2F/3F/4F for which phase they expect to finish and then not do the rest.

1F, 4 people at 200k+
Common chest x1, gear half-shard x1
2F, 4 people at 350k+
Common chest x2, gear half-shard x1, gear shard x1
3F, 4 people at 500k+
Common chest x3, gear half-shard x2, gear shard x1, chance for chest with a full gear slot
4F, 4 people at 700k+
Common chest x4, gear half-shard x3, gear shard x1, chance for chest with a full gear slot, true title material
  • Gear shards cannot be passed to another character, but the gear chest crafted from them (or dropped in 3F/4F) can be passed around before being opened by a character.


Lifebars per stage

Void 1 - Invasion (dragon)
1F: 5 minutes to beat 669 lifebars (roughly 16m HP)
2F: without renewing the previous 5-minute timer, beat +1003 lifebars (5 minutes to beat 1672 lifebars, roughly 40m HP)
3F: 4 minutes to beat 2674 lifebars (roughly 64m HP)
4F: 10 minutes to beat 3743 lifebars (roughly 89m HP), but no one can use potions/revives except Lisnars

Void 2 - Taint (worm)
1F: normal enemies, beat the tailless monster only
2F: 3 and a half minutes to beat 1003 lifebars (roughly 24m HP)
3F: 4 minutes to beat 2005 lifebars (roughly 48m HP)
4F: 10 minutes to beat 2807 lifebars (roughly 67m HP), but no one can use potions/revives except Lisnars

Void 3 - Nightmare (woman)
1F: go into one of the zones to beat the crystal, once all 3 are beaten touch it to go to the middle and beat the bigger crystal (5 minutes to clear, no visible boss bars)
Killing the small enemies prepares the big enemies to shoot the beam at you, if it hits the crystal then the crystal has 33% DEF, damage is x3.0303.
2F: beat the boss (2:30 to beat 263 lifebars, roughly 6m HP, not giant)
3F: same boss again, sometimes she leaves somewhere random or to go to the opposite side and shoot (3:30 to beat 597 lifebars, roughly 14m HP)
4F: she stays locked in place charging an attack, you have 1 minute to beat 1433 lifebars (roughly 34m HP). Blue orbs give 2 bars of MP, purple orbs give some HP


Important skills to use against giant enemies
Raid bosses can be extremely large which means certain skills do bonus hits and bonus damage, so repeating these skills as much as you can is better than playing without these skills.

Elesis: Elesis2 MP2 and MP3, or Elesis4 MP2 and MP3 and MP4
Lire: Lire1 MP2 Trap Shot LV3, MP3 GuardianAttack (PT: Elite de Eryuell)
Arme: Arme4 ice MP1, thunder MP2 (also meteor MP3, beam MP3 from one screen away)
Lass: Either Lass2 MP3, or Lass1 MP3 Final Strike and MP4
Ryan: Ryan1 MP3 Fright Punisher (PT: Punição da Natureza) and MP4 near wall, Ryan3 MP4, Ryan4 Magnus Dan MP2
Ronan: Ronan1 MP3 Kanavan Strike (PT: Golpe de Canaban)
Amy: Amy1 MP3 PsychoCrashLV2 (PT: Ataque Glamuroso NV2)
Jin: Jin4 MP4 beams, then Jin1 X-gauge Fist of 10.000 Hells LV2 (PT: Fim Dos Dias NV2)
Sieghart: Sieg2 MP3 and MP4
Mari: Mari1 two turrets and two uses of MP2 Homing Missile and MP4, else spend MP on Mari4 MP3
Dio: Just use many high-cost skills
Zero: MP3 Abyss (PT: Abismo) used only inside transformation, MP2 MegaSlash (PT: Dança da Perdição)
Ley: MP2 Flame Roll (PT: Esfera Flamejante) and MP2 TearDrop (PT: Lágrima da Noite), MP4
Rufus: Bullet Time and MP4
Light Rin: MP2 Strong Wind (PT: Tufão), MP3 Final Flash of Light WITHOUT special input and not used from the lowest floor, MP4
Dark Rin: MP2 DesperateForce (PT: ForçaSobre-Humana), MP4
Asin: MP3 King's Wrath (PT: Divisor de Rios)
Lime: MP2 Blast Hammer (PT: Martelo Explosivo), at least one MP3
Edel: MP3 Despair3 (PT: Legado3)
Veigas: MP3 Dark Spear (PT: Lâminas do Tormento) and other high-cost skills
Decanee: MP2 Cursed Flame: Copy
Ai: MP2 Electronic Pulse Type1
Kallia: MP2 Mass Explosion Type1 (PT: Explosão em Massa Tipo1), MP3 Extreme Blast Type1 (PT: Estouro Extremo Tipo1)
Uno: MP2 Demonic Blood 2, MP3 Bloody Rain 1 or 2
2: Hero Dungeons (Abyssal Path)
Abyssal Path is a dungeon where you will fight stages of randomized normal enemies and bosses, and fight a boss 3 times throughout the dungeon, that opens doors with different difficulties, which awards you more awakening crystals the farther you go.

The big detail is that it's easier to clear if you play 4 player than solo.
You will always start at LV0 then quickly face an easy boss, then three doors will appear: LV1, LV2, and LV3.

"LV1" room
Easy to clear for any LV85, and counts for quest kills of equal level.
Max 24/41 awakening crystals, no chance to give the title.

"LV2" room
Requires like 200k or 300k recommended TotalATK with a full party to clear.
Max 60/100 awakening crystals.

"LV3" room
Only for around 700k+.
Max 100/100 awakening crystals, may give the CritDmg card.
2: Event Dungeons
Event dungeons cost 1 event dungeon ticket to play (whether you win or lose). You get 1 from the daily login bonus and can buy more with daily P↑. It's better to play event dungeons with only your strongest character (at least pass Berkas first).
Playing with as many players as possible is better since drops aren't split anymore.

Which event dungeons are open cycle per day of the week, but all are open on Saturday and Sunday.

All of the 7 normal event dungeons have a chance to drop GP Property Reset Scroll (the item that re-rolls all the properties of an item at once). The chance is unknown and might not be the same for every event dungeon.

Angry Boss (Eclipse)
Good rewards: scroll to unequip a reinforcement stone to move to another item or re-roll the yellow buff (the worn one from the halfway point has a chance to break the stone and is useless, the special one from the ending doesn't), around 30 hero coins, rumored to have the highest chance to drop GP Property Reset Scroll among event dungeons
Other rewards: back-upper accessory swords
Open in: Wednesday-Thursday, Saturday-Sunday

A boss rush stage, you start against 2 Samsara with 103 lifebars each when soloing, a full run can take 10-15 minutes.

King Slime Land
You play this stage if you want to upgrade to +17.
Good rewards: 16 reinforcement scroll and 0-15 reinforcement scroll (also instant +X reinforcement scroll)
Other rewards: bad cards, a box with a head-top acessory (one of 3: a fat yellow slime with a red crown, 3 colored slimes on top of each other like icecream, or an ugly yellow slime with a mustache)
Open in: Friday-Sunday

Just one screen with a slime boss three times.


Hungry Pets' Revolt
Good rewards: +10% ATK crest, boss pet level pet (Purrthos the bipedal cat), gives a medal that can be exchanged for 0-15 reinforcement scrolls or 7-day GC necklace, and an exclusive anklet (GP anklet is 391 DEF with no visual effect, VP anklet is 491 with blue runes orbiting around your character sideways, this is 501 and the blue runes are replaced by beige ball-with-3-dots paw icons)
Other rewards: weak pet Duel and other pets weaker than it
Open in: Saturday-Tuesday

A tower defense minigame if you were the tower. Monsters will come from the two sides of the stage at different heights, they will come to the center to steal food then try to reach the edge of the stage to escape with it. The reward for the stage is a number of medals that depends on how much food wasn't stolen by the end (it's easier if playing with many people).

Use items with N.

Character-specific strategy: Mari can use 1st job MP2 Homing Missile.

Talin's Revenge
Rewards: the items to craft the KOG-B pet, necklace/anklet upgrade gem, epic reinforcement stone box
Open in: Thursday-Sunday

This is a shoot-em-up minigame, what your character is doesn't matter.
Z shoots, X spends a bomb and makes you temporarily invincible, spacebar transforms.

Nightmare Circus
Good rewards: a visual set
Other rewards: instant +X reinforcement scroll, card remover (buying them with hero coins is easier), weaker-than-boss-pet Duel and his limited attack, premium transmutation scroll (useless)
Open in: Saturday-Sunday

Very short dungeon with a boss.
In the last boss you need to hit the light switch to turn the lights back on before using a skill on the boss because without lights you do around 70% less damage.

Monster Train 301
Good rewards: a visual set
Other rewards: 0-15 reinforcement scroll, instant +X reinforcement scroll (rare), special transmutation scroll (useless)
Open in: Saturday-Monday

A dungeon with a boss.

This story event happens between Relics of Kounat and the last Archimedia stage.

Moonlight Village
Rewards: drops runes but only around as much as an Other World repeated dungeon run, drops around 60 darkstones which is little
Open in: Tuesday-Wednesday, Saturday-Sunday

Find the secret path below to fight one more boss.
2: PvP Mechanics
PvP rooms can be set by:
  • Team (1v1 or 2v2 or 3v3, or with uneven players can do 2v1 or 3v2)
  • Or free-for-all (also called sobrevivência or sobre in portuguese), with everyone fighting for themselves until only one player is left, but the half of the room that stays alive the longest will count as the winners.
  • Each player starts with 3 lives. Random items can be set on or off, default is off. Inside the match, switch selected items with X and use it with N.
In addition to these settings, the room can also be set to Deathmatch (PT: morte súbita), where instead of 3 lives everyone has infinite lives and the winner is whoever scores enough KOs first, while also forcing a maximum time limit for the match. (goes until one player reaches 10 KOs or can be set to 20 or 30, match will end early after 5 minutes or can be set to 10 or 15)

Why play PvP?
PvP gives some EXP and GP just like PvE (but the amounts have been greatly reduced in GCC), and PvP gives you treasure chests that give a few normal equipment drops of around your level (it can be better to farm LV80+ equipment drops in PvP than actually playing PvE).
5 wins in PvP gives you 1 hero coin (max 3 per day) and playing PvP is also the only way to get emotes.


PvP mechanics
PvP in GCC has permanently disabled pet attacks and MP4 skills.

Your stats in PvP will always be inside this range (one set number plus 10% below it):
  • ATK: 3330-3770, SpATK 5580-6200
  • DEF: 1440-1600, SpDEF 900-1000
  • VIT: 3807-4230

    Apparently it works this way: at match start the game will check for who has the highest ATK, the highest SpATK, etc, in the room and overwrite those stats to the highest set PvP amount, then overwrite all other stats proportionate to the highest one but nothing can be lower than 10% less than the highest in the room. (if you cannot even come close to them, you will have 10% less ATK/DEF/HP than them: base grab damage is 370, with a full 10% difference changing down to 333 and up to 411)
    Crit chance/damage/resistance are also scaled in some way: crits can be observed to result in around 48% more damage in equal stats (with more or less 5% crit chance), to around 56% more damage when uneven.

    But HP Regen and MP Regen still work in PvP and can be built: you can stack each until +100%, where HP Regen applies at -50% effect (maxed +50%) and MP Regen applies at -75% effect (maxed +25%).
    Other effects that may still work in PvP:
    • Rune set bonuses but they are weaker in PvP
    • Super armor when on low HP (chest reinforcement stone, or one rune set) (not verified to work in PvP)
    • Arena invincibility time, from titles and earring
    • Counter Resistance? (cut to 1/4 inside PvP?) (set bonus, runes)
    • Hell Spear? (works at 5% power compared to PvE?) (set bonus, coordi, runes)

    Deathmatch (morte súbita) can set equal stats to on or off (if on they will be 100% similar between players and if off there will be no scaling). Deathmatch and practice mode will use the highest stats from the table for everyone.


  • Battle mechanics:
    • Skill invincibility: all skills make you fully invincible, but because successful client-side grabs take priority over anything and teleport you to their spot to take the hit, using a skill will basically give you strike/projectile invincibility instantly but doesn't give you any grab invincibility until 1/4 of a second after you've been inside skill animations. So starting a skill when close to them is invincible but still can lose to grabs at the same time, but this can be safer with a skill that instantly hits forward before even timefreezing.

    • Standing back up is invincible: when a player stands back up from knockdown, they stay invincible for around 1 second after recovering even though they're not flashing, so it's useless to strike or grab them again that early. Unless you use an attack with very long active frames so that it can hit them as soon as the invincibility runs out.

    • Combo down: if someone takes roughly 1700dmg/40%HP consecutively without being knocked down once, they will be forced into a special knockdown flashing black to note invincibility time. This prevents many infinites.
      But technique and skill damage will lower the combo down gauge instead of raising it on hit (applied negatively at roughly 3x the amount): combo down never triggers from tecs/skills, and using tecs/skills in the middle of a combo will allow for more damage in one combo before it triggers.
      Tanking a hit with super armor/hyper armor will make the gauge not raise or lower. Gauge resets to 0 from any type of knockdown, and also resets to 0 when entering Fatal.

  • Character-specific tricks:
    • If playing against Arme/Mari, their slower recovery make some strings stop not being true combos, and make more combos/infinites possible.
    • Many jobs recover faster instead, where certain strings become breakable with skill or invincible abilities or close grab, so some things don't work as well when playing against them. (full list: Elesis except 3rd, Lire2/3, Lass2/3, Ronan, Jin, Sieg, Dio, Zero, Asin, Edel, Veigas. Ryan faster but not as much)
    • If playing against Veigas, he is taller: some normal attacks and skills that reach down to the bottom of your floor can hit him from the floor above him (the ones that would hit 1 floor below to a platform set a shorter distance than usual).

  • Miscellaneous:
    • Every time you dash, the camera will pan out for a moment so you can see farther; if you keep dashing in place you will keep the camera zoomed out.
    • If your enemy has super armor, you have to think differently: you may mid-range with hits without commiting to any combo until their armor effect wears off, or simply only use attacks that quickly launch or knockdown which will still apply despite the super armor, and grabs always work.
      If they have hyper armor instead (Elesis temporary buff, Jin1 temporary DEF buff) then they do armor every attack except grabs.
      And a few multi-hit attacks actually can do more hits against an armored player than a non-armored player.
    • Wakeup trap: if you use a skill while the opponent is still inside knockdown or still invincible from it, the skill's timefreeze (delay) also won't freeze them in time and they can move as normal when standing up; however, they still lose their invincibility timer inside your frozen time so they aren't invincible by the time you actually strike, depending on your skill. You can use skills as fast as you can when they're knocked down as a wakeup trap to possibly hit by surprise as they recover, especially with skills with long range or a gap-closer.
    • In GCC, grab damage does not change after hitting an enemy with special attacks anymore (it used to raise since Season3).
2: PvP Mechanics (2)
Arrow Defense
Arrow Defense is available to every character except Lire and Arme, and Rufus.
Basic arrow attacks (excluding skills but including some other non-arrow breakable projectiles) can be Arrow Defended by holding either left or right during the time the arrow connects (regardless of the arrow's direction), reducing its damage by 80% and also greatly reducing hitstun and knockback, but each time Arrow Defense triggers it will nullify every direction that you were holding, so you have to release the button and press it again or it will continue counting as not being held since the defense happened. If you were to defend 3 arrows, you hold a side until the first hits, then you release and hold it again for the 2nd arrow, then release and hold it again for the 3rd arrow, then you release and are free to move and attack normally again.
If in the air, any of the 4 directions can defend, not just sides, sometimes doing it on accident.
Randomly when Arrow Defending, you may automatically throw an arrow back at the attacker.

Separately to defending, certain characters have access to Berserk (Elesis/Sieghart, and Arme), which automatically activates if they get hit by a large enough amount of arrow-defendable attacks in a short time whether or not defended, making them quake the screen with fall damage in retaliation (or in Arme's case, refill her MP with no attack). Lire players in PvP have to limit their amount of basic arrow hits against these specific characters (after successfully connecting with many, wait for it to cool down with melee attacks or special attacks or running away, or trigger the Berserk attack from so far away that you don't get hit).

Because Arrow Defense nullifies directional inputs, your arrow-defendable attacks can be used specifically to confuse and trap an opponent momentarily as their dash inputs are messed with, to lead into another attack, which is dangerous because this is a game where everything is unblockable.


Practice mode
Practice mode lets you test jobs and attacks and skilltree options whether mainly for PvE or PvP, but practice mode only uses PvP settings (PvP attack strength and status effects and cooldowns, and knockback amount can be different between PvE and PvP. And hit properties like knockdown, launch, blowaway, etc, are different between PvE and PvP very often).
  • You can choose the character of the training dummy too, and you can set it to Arme because then she charges your MP faster instead of hers.

  • The other reason for choosing a specific character is that different jobs have different hitstun recovery, so different PvP combos look possible or not. The default Elesis has faster-than-normal recovery, the default Lass has normal recovery, the default Arme/Mari has uncommon slow recovery and special combos work on Arme/Mari.

  • Clicking in the stage moves the dummy to that place, and holding the mouse button keeps the dummy in place which can be useful in testing multi-hit attacks.
3: Pets
Pets in PvE can do one attack with the Shift button every so often, with the timer restarting every time you move to the next room.
Pet glyphs can only be obtained with the seal breaker gacha reward system and sometimes events.

(Obtained pets are locked to the character you got it as, they cannot be shared)

How much MP do pets give me?
MP received on pet hit depends on base damage dealt (Crits/buffs/debuffs changing the final damage don't modify MP received on hit). You need around 3800dmg for 1 bar (so 1000dmg on 4 enemies at once is slightly more than 1 bar instantly). +MP Regen% affects this at roughly half the bonus (so with +100% MP Regen you get roughly 50% more MP/need 2500dmg per bar).

AP recovery pets
Previously it used to be that only certain pets could give you MP when playing as an AP character, but in GCC, all pets give you the same amount of MP/AP whether your character is MP or AP, so any pet can be chosen.
3: Pet damage (GP pets)
Boss pets
To craft one of these you need to get the respective rare pet scroll inside that continent which only has less a low chance of dropping (the scroll for Gaikoz is given by a leveling quest).
Then the other materials are stones from stages of that specific continent, and an amount of gate fragments (you may drop a few from dungeons but now you mostly get them from hero shop).

Short recommendation: pick any of the two Archimedia boss pets.

Serdin/Kanavan
Pet Gaikoz (3 gate fragments)
174,54dmg
(forward rectangle, reaches 1 floor up) (last hit launches)
Not recommended over full choices later, weak.
  • 29,09 x6 (last launches)


Silver Land
Pet Krakos (60 gate fragments)
322,02dmg wave hits counting knockback or width for full hits
(piercing small projectile dragging through mid-range) (final hit at the end point launches up and back)
Not recommended to get, weak.
  • 35,78 max x9


Pet Victor (80 gate fragments)
801,36dmg wave hits or around 410 if not starting close for full hits
(forward rectangle but as a progressive wave, blows away forward per hit with it, almost halved damage if they can't get dragged without being giant or if you started from afar) (blows forward)
  • 57,24 max x14


Ellia
Pet Kazeaze (150 gate fragments)
~815dmg wave hits counting knockback for full hits, half or less if not dragged or not extra-wide
(slow piercing shot forward, drags along, long-range) (leaves standing)


Pet Dark Anmon (200 gate fragments)
763,2dmg
(forward rectangle, small knockback forward + float up with each hit if not knocked down or armored, pushable monsters not knocked down may take only ~510 close or less if starting farther) (knocks down forward)
  • 38,16 x20


Xenia


Pet Perseo (Periett) (550 gate fragments)
singletarget 944,67 total
(3 non-piercing orbs shot from one step forward of you aimed in a direct line at the nearest enemy to any direction. Reaches right before screen edge if straight to the side and can angle 1 floor up or down, can home to either left or right regardless of your initial direction. If 2 floors away only 1 orb will hit. Singletarget, may still AoE a very tight group exactly in front of you. Orbs can be destroyed by enemy attacks to do no damage)
  • 314,89 x3


Pet Thanatos (500 gate fragments)
715,51dmg
(forward rectangle with a small minimum range) (pushes forward possibly pushing out of range, then last hit causes knockdown)
Less decent than it might seem because of the small minimum range ahead and the knockback per hit that it now has.
  • 28,62 x23 (knockback) and 57,25 x1 (spinning knockdown straight up then down)


Alcubra (áton)
Pet Kungji (600 gate fragments)
singletarget 622,56 dmg, on two monsters together 1245,12
(non-piercing exploding triple shot forward, disappears after mid range, each hit launches. Can enemy-stack with up to 2 enemies)
  • launch 207,52 x3


Archimedia

Pet Darek (Arawn) (600 gate fragments)
817,88dmg, or non-centered 666,4dmg
(forward line 4/5 to screen edge. Will slightly push them away from AoE center, possibly missing some hits on farthest edges if they're not armored or knocked down) (leaves standing)
  • 33,32 x20 and 151,48 x1 in center


Pet Ashtaroth Rutherford (650 gate fragments)
985,24dmg, 1441,36 on launchable monster
(forward line 4/5 to screen edge, initially launches light monsters then keeps juggling in place doing full aerials for 1441,365dmg if launched raising damage without raising MP gain, then lets fall straight down)
  • 72,99 x1 (launch) and 36,49 x25
More chances to drop in the final Archimedia stage


Harrier
Harrier pets give a small amount of Taint Resistance (Haetae 0.53, Bakunawa and Edna 0.54, others probably the same)

Haetae (stage 1-3, 600 gate fragments)
572,26 - 715,38dmg (very wide monster: 1001,62)
(forward rectangle, starts and ends very fast)
  • 95,41 x2, 143,12 x2-3 (x5 on very wide monsters), ground burn 2,38 x40

Yama (Rei Fantasma) (stage 4-6, 600 gate fragments)
singletarget 890,91dmg
(9 non-piercing shots forward at your height, disappears after mid-range)
Not piercing making this less useful than others for AoE/total MP.
  • 98,99 x9

Medusa (stage 7-8, 650 gate fragments)
583,4dmg
(forward rectangle at the floor. Only last hit pauses enemy for a split second)
  • ~33,35 x16 and ~4,98 x10, plus weak hit that pauses

Bakunawa (stage 9-12, 650 gate fragments)
904,14dmg
(forward rectangle. Only last hit pauses enemy for a split second)
  • 50,23 x18 and 1 hit without damage that only pauses

Edna Jr (stage 12, 650 gate fragments)
around 36 per hit, max 24 on same target if very wide (864)
(piercing forward wave at full character height, reaches slightly farther than screen edge)
Can drop an upgraded attack from harrier guardian chest 3, drops 5 uses whenever obtained. Same wave but taller to reach 1 floor above too and around 45 per hit (1080)
3: Pet damage (GP pets part 2)
Event dungeon pets


KOG B:
~977dmg and as a special effect keeps canceling monster attacks while active and returning them to normal, even against bosses
(basically long melee range hit forward, doing 1/3 of the damage, then drags any non-boss enemies 1 floor above and AoEs that floor for ~2.5 seconds, which keeps canceling monsters out of attack animations, even against bosses to stop their current attack to help yourself or a teammate, even bosses that can't be pulled and are being hit from being 2 floors tall. Then armored enemies release down or others get launched up on end)
[Drop: Talin event dungeon after combining all pieces]


Purrthos (Gato Zoro):
singletarget 667,83dmg, multiple monsters together 1097,13
(instant dash attack almost to screen edge from center, targets get hit once then take a delayed hit that knocks down, delayed hit can enemy-stack with up to 2 monsters)
  • 238,53 x1, 42,93 x10/20
[Drop: craft from Hungry Pets' Revolt event dungeon] (the other Revolt pets are around 330)


Pet Duel:
405,48dmg
(extremely small forward square dealing 60% of it, then non-piercing shot dealing 40% of it) (leaves standing)
Consumable special attack ~630dmg hitting a bigger rectangle than those.
[Drop: sometimes drops chest from 1st form Zidler at Circus event dungeon, open for the pet or only 5 uses of its special attack, special attack is not sustainable for regular use]
  • Normal attack: 23,85 x10, then shot apparently is 3 hits, one does no damage, then 143,13 and 23.85

Pet Zidler:
~275dmg
(stationary poison cloud in front for 5 seconds, leaves standing but pushes away from center early)
[Drop: circus event dungeon]

Pet train conductor:
~314dmg
[Drop: train event dungeon rare drop]


P↑ shop pets
In terms of damage only the adult Slime is worthwhile. But evolving a shop pet also takes longer than farming a pet.

Baby Slime: ~170
Adult Slime: ~428

Baby Gon: ~24 x4 for singletarget ~96 (leaves standing) (4 separate mid-range shots)
Adult Gon: ~149 (like a single melee swing forward, leaves standing)

Baby Pepe: 81,08 (blowaway) (mid-range single melee hit)
Adult Pepe: ~216

Baby Sidt: more or less 62 width-dependent
Adult Sidt: more or less 150


Seasonal pets


Character pre-registration event, Princeon (PT: Frixion):
672,30dmg
(forward rectangle, attacks over a long ~4sec for full hits) (near the start will pause monsters for only half a second) (leaves standing)
  • 12,45 x54

Halloween event, Trickster (PT: Fantasminha):
669,78dmg
(forward AoE only at the tip)
  • 74,42 x9

Christmas event, Mittens (PT: Nyami):
singletarget ~108dmg
(very small shots to a few steps ahead, non-piercing) (leaves standing)
3: Pet damage (gacha pets)
Seal breaker scroll gacha pets
These pets are obtained as one of the random set pieces within their matching seal breaker gacha visual sets. Getting only the pet could take 60 scrolls or over 300 scrolls depending on which part they decide to come out at. The available sets cycle regularly.

On each try you have a low chance of getting a new set item from this collection (however many pieces you're missing is the percentage of it dropping outside of the guaranteed point, so 16%-1% or 13%-1%), but after 14 misses in a row the next try is guaranteed to give a set item so the 15th try/30th scroll is always the first piece, on your first item, then it gets longer with every set item you already have but it always takes several hundred to get the full set. Getting a set item outside of the guaranteed point will still empty the pity gauge for the guaranteed set item.

(MP char/4 weapons, 16 items)
Piece
Max scrolls
1st piece
30 scrolls
2nd piece
+? scrolls
3rd piece
+? scrolls
4th piece
+38 scrolls
5th piece
+? scrolls
6th piece
+? scrolls
7th piece
+? scrolls
8th piece
+? scrolls
9th piece
+? scrolls
10th piece
+? scrolls
11th piece
+80 scrolls
12th piece
+? scrolls
13th piece
+102 scrolls
14th piece
+? scrolls
15th piece
+? scrolls
16th piece
+Over 200 scrolls

(AP or Hybrid char, 13 items)
1st piece
30 scrolls
2nd piece
+? scrolls
3rd piece
+40 scrolls
4th piece
+44 scrolls
5th piece
+? scrolls
6th piece
+60 scrolls
7th piece
+? scrolls
8th piece
+? scrolls
9th piece
+92 scrolls
10th piece
+? scrolls
11th piece
+? scrolls
12th piece
+? scrolls
13th piece
+242 scrolls


"Majority 1 hit" pets
Pets that do all damage in one hit (or over 90% in one hit) have the disadvantage of dealing much less final damage than average if you unluckily don't crit on the hit (although MP regen is unnaffected), and the advantage of dealing full damage in any monster that did get hit without chance of them walking out of the area mid-way or teleporting away after being hit like Gaikoz.


Most pets can be summarized as "forward rectangle attack" but some have different attacks, I'll show the different ones first and the forward rectangles last.

"Attack close to both sides" pets
DK-MARK3
1661,52 dmg
(radius explosion reaching outside melee range forwards with a shorter amount backwards, might reach 1 floor up)
  • 207,69 x8

Bluebell (Flubel)
1593,80 dmg
(radius explosion reaching outside melee range forwards with a shorter amount backwards, and 1 floor up) (leaves standing, slightly pushes from center if not knocked down or armored)
  • 122,60 x13

Havoc (Cérbero)
1574,2 - 1707,76 dmg
(small AoE centered on your own spot when started, reaching only a short amount to both sides. Leaves a ground flame on hit that seems to not happen on all enemies) (leaves standing)
  • 78,71 x20 (1574,2) with ground burn 19,08 x7 (1707,76)

Leona
1560 - 2140,2 dmg
(first transforms yourself with holy white armor for +10%DEF for 10sec and attacks once, can keep using pet button to attack again up to 5 times across the 10sec. Extremely small radius multi-hit from yourself, must stay touching the enemy.
  • Activation 1560,0 then each extra round (max 5) is 9,67 x12 (+116,04)

Cordelia
1583,84 dmg
(makes a bubble centered in front of you active for just 1 second, reaches in a circle to both sides reaching yourself and 1 floor up and down. Aside from dealing damage, you and teammates inside the 1-second bubble are invincible, also working like a roll button) (blows away slightly to the side per hit, light monsters may not take full damage)
  • 197,98 x8

Defensive pets

Minue
1592,47 dmg
Attack also gives you a 1-hit shield for 10sec.
(forward rectangle)
  • 118,77 x4, 1117,39 x1

Wavy
1612,51 dmg (majority 1 hit)
Attack also gives you a 1-hit shield for 10sec.
(forward rectangle)
  • 1574,35 x1, 4,77 x8

Rencia
1717,44 dmg at max, counting knockback/width for full hits, less hits to some targets or if not starting close
Attack also gives you a 1-hit shield for 10sec.
(piercing wave to mid-range)
  • 71,56 up to x24

Cordelia
1583,84 dmg
(makes a bubble centered in front of you active for just 1 second, reaches in a circle to both sides reaching yourself and 1 floor up and down. Aside from dealing damage, you and teammates inside the 1-second bubble are invincible, also working like a roll button) (blows away slightly to the side per hit, light monsters may not take full damage)
  • 197,98 x8

Unique attack patterns
Gale
1711,72 dmg
(4 exploding shots that home in, will curve even to far behind you, max range is around screen size. Easily can be used whenever ready. Against a single stack of enemies will explode to damage them all at once, against spread enemies will split shots among them outside your control)
  • 427,93 x4

Miu
1884,44 dmg (MP recovery counts as 1455,08) (majority 1 hit)
(single homing shot that explodes and leaves a DoT)
  • 1455,08 x1 and 71,56 x6 which doesn't recharge MP and can't back hit

Claunel
1655,40 dmg
(single straight shot to long-range, splash)
  • 165,54 x10

Dark Nightmare (Pesadelo Sombrio)
1705,67 dmg
(dash attack forward, from behind you to very far forward with knockback pushing some monsters, then the main explosion rectangle from a set distance in front of you forward until the same range but stretching 1 floor up. Reaches slightly farther than forward rectangles and naturally hits 1 floor up so extremely large area. Dash attack against an enemy already at max range can push outside of explosion range)
  • 54,86 x7 (384.02), 88,11 x15 (1321.65)

Clara
1703,08 dmg
(pushing shorter dash attack, then an explosion from the end point reaching 1 floor up)
  • 73,94 x12, 815,80 x1

Sellion
835,49dmg + stack with more enemies in the same place up to 3, with 2 1636,64dmg, with 3 2437,79dmg
(slow forward shot with unlimited range that on touch explodes floating up, add another 801dmg per enemy stacked together in the exact same place if the shot spawned and instantly connected on multiple enemies right in front of you to trigger multiple explosions, max 3)
  • 34,34 x1 and 38,15 x21/42/63 if it hits 1/2/3 monsters, burn 8.34 x?

Other attack patterns
Annie and Momo (Bonnie&Bunny)
1658,14 dmg (majority 1 hit)
(very small wave forward to mid range)
  • 0,47 x26 and 1645,92 x1

Chester
1717,02 dmg at max, wave hits but usually not full damage
(triple piercing shot at foot height pushing enemies with it, slightly longer than a rectangle attack, but for near full hits needs knockback or extreme width)
  • 23,85 up to x72 if wide enough
3: Pet damage (gacha pets part 2)
Kiki
1652.06 dmg
(homing shot? Explodes into a big AoE)
  • shot 2,38 x1, then AoE 667,90 x1 and 30,29 x8 and 143,12 x2 and 453,22 x1

Sleuthhound (Sherlockão)
1628,71 dmg
(forward rectangle, doesn't reach high and instead can reach 1 floor down. Pushes away from center per hit and can miss most hits if hitting too close/too far. Takes a long ~4 seconds to deal full hits and does not pause enemies)
  • 65,26 x9, 65,35 x9, 453,22 x1

Aero Kitty (Nekobot)
1496 - 1655,84 dmg
(shoots forward above your head arcing down to the ground, total range is the normal forward rectangle except shots are non-piercing with small splash size. On hits drops flames straight down that constantly hitstun with small damage) (leaves standing)
  • 93,50 x16 (1496), ground burn 3,33 up to x48 (159,84) if they don't move away

"Forward rectangle, 1 floor up" pets

Rexion
~1846 dmg (but MP regen counts as 1545,57)
  • main hit is 145,50 x9 then 26,23 x9 (1545,57), DoT is ~8.37 around x36 across around 12sec which can't back hit or MP regen

Arsen
1663,55 dmg
  • 308,19 x5, 122,60 x1

Ordo (Nortun&Gram)
1664,42 dmg
  • 81,58 x20, 32,82 x1

Sia (Sirius) (black and blue wolf)
1647,63 dmg
  • 43,79 x30, 14,31 x10, 190,83 x1

Sirius (Sirioth) (black wolf with white locks)
1662,50 dmg
  • 54,05 x30 and 2,05 x20

Ariel
1645,16 dmg
  • 149,56 x11

Raven (Hunin)
1662,09 dmg
  • 100,66 x14, 252,85 x1

Ramsay/Ramsey
1626,79 dmg
  • 147,89 x11

Max
1645,90 dmg
  • 524,78 x1, again, 596,34 x1

Rosie
1669,74 dmg
  • 286,24 x4, 524,78 x1

Scar
1663,08 dmg
  • 831,54 x2

Snappy
1655,44 dmg
  • 395,97 x4, 71,56 x1

Glen
1645,83 dmg
  • 114,49 x10, 500,93 x1

Jackie
1645,73 dmg
  • 57,24 x20, 500,93 x1

Belia
1660,8 dmg
  • 41.52 x40

Lisian
1670,53 dmg
  • 136,15 x11, 21,61 x8

Timi
1567,19 dmg
  • 101,14 x15, 50,09 x1

Nox
1633,94 dmg (majority 1 hit)
  • 11,92 x7, 1550,50 x1

Mori
1613,67 dmg (majority 1 hit)
  • 36,97 x11, 1207,00 x1

Killian Knyte (Cavaleiro Gizmo)
1764,48 dmg
  • 39,92 x35 and 367,28 x1

Agatha
1593,45 dmg
(forward rectangle, lasts around 6 seconds, on its last seconds will heal up to 5% HP to players inside the area)
  • 132,55 x10, 53,59 x5

Berry
1667,23 dmg (majority 1 hit)
  • 1622,20 x1, 2,37 x19

Sherbet
1673,58 (majority 1 hit)
  • 1622,06 x1, 6,44 x8

Regulus
1674,54 x1 (majority 1 hit)

Royd
1645,92 x1 (majority 1 hit)

Bastien
1653,06 dmg (majority 1 hit)
  • 1614,91 x1, 7,63 x5

Foamhuahua (bolhuahua)
1667,14 dmg (majority 1 hit)
  • 1622,06 x1, 6,44 x7

Eris
1641,15 x1 (majority 1 hit)

Zet
1673,58 dmg (majority 1 hit)
  • 1622,06 x1, 6,44 x8

Maidy
1651,64 x1 (majority 1 hit)

Veil
1601,54 (majority 1 hit)
  • 1431,23 x1, 169,36 x1, 0,95 x1, 0 x1

Chaku
1651,64 x1 (majority 1 hit)

Luluca
1673,58 (majority 1 hit)
  • 1622,06 x1, 6,44 x8


"Forward, slightly less wide but 2 floors up" pets

Aslan
1631,40 dmg
(leaves standing)
  • 54,38 x30

Pompom
1669,77 x1 (majority 1 hit)

Tuby
1669,77 x1 (majority 1 hit)


"Forward, only your own floor" pets

Dokaebi King (Kiara)
1614,32 dmg
(forward rectangle, short height. Pulls then pushes) (leaves standing)
  • 142,16 x8, 59,63 x8

Keter
1645,69 dmg (majority 1 hit)
(strong hit does not reach 1 floor up, only the second part) (second part will hold launchable monsters on aerial hit)
  • 1478,94 x1 and 6,67 x25

Alt
1657,82 dmg (majority 1 hit)
  • 2,38 x5, 1645,92 x1

Rui (Lebre Maluca)
1641,15 x1 (majority 1 hit)

Canapy
1669,98 x1 (majority 1 hit)


"Forward, not sure about floors" pets

Conny (alpy)
1665,92 dmg
(wider than usual)
  • 416,48 x4
and Mati
1664,96 dmg (majority 1 hit)
(wider than usual)
  • 1311,96 x1, 70,60 x5

Madhatty, similar range to those but slightly smaller and longer
1700,75 dmg (majority 1 hit)
  • 1478,94, 143,12, 26,23 x3

Devilion (Serpion)
1640,25 dmg
(can reach 1 floor down? Longer than usual but can have a dead spot too close in front of you?)
  • 38,74 x30 and 478,05 x1

Mong
1730,36 dmg (majority 1 hit)
  • 1495,64 x1, 13,93 x6, 83,48 x1

"Extremely long AoE" pets

Jusngboogi (Doryung)
1622,06 dmg (majority 1 hit)
(forward AoE but reaching farther than screen edge from center)
  • 1459,86 x1, 32,44 x5

Karen
1622,06 x1 (majority 1 hit)
(forward AoE but reaching farther than screen edge from center)

Poloo
1335,94 x1 (majority 1 hit)
(low-height but can hit certain monsters 1 floor below)

Hyde
1622.06 x1 (majority 1 hit)
(1 floor)
4: PvE Raid Tier List


A tier
Lire
-Lire1 MP2 Trap Shot LV3 (2898, can cast multiple times) and MP3 GuardianAttack/EliteDeEryuell (4186)

Arme
-Arme4, white MP1 snowflake (if 14 hits, 1838 per bar), black MP2 thunderbolt (if 50 hits, 2550, can cast multiple times)
Others: black MP3 meteor (if 68 hits, 3380), white MP3 beam used one screen away (3100)

Ronan
-Ronan1 MP3 KanavanStrike/GolpeDeCanaban (5505)

Jin
-Jin4 MP4 (each beam 2965, up to 6 times for 17790 across 20 seconds, more if you Alt as soon as one beam comes out to recover faster)
-Then switch to Jin1, Fist of 10.000 Hells LV2 with X button meter / Fim dos dias nv2 (if 33 hits, 3649)

Mari
-Mari1 MP2 Homing Missiles cast twice (will total 5148) and two turrets and MP4, spend MP as Mari4 MP3 (roughly 4300)

Ai
-MP2 ElectronicPulseType1 (if 27 hits, 2747, can cast multiple times)


B tier
Elesis
-Elesis2 MP2 (2161, can cast multiple times), MP3 (if 14 hits, 3554)
or
-Elesis4 MP2 (2495, can cast multiple times), MP3 (not used from the lowest floor. 3874)

Lass
-Lass2 MP3 (3026)
or
-Lass1 MP3 Final Strike (if 36 hits, 2916) and MP4 (if 57 hits, 2959)

Ryan
-Ryan1 MP3 FrightPunisher/PuniçãoDaNatureza (3490), MP4 (wait until the dragon is touching the wall then cast it at the wall and try to keep it at the wall. Basically 9k)
-Ryan3 MP4 (1344 per hit)
-Ryan4 joined-pikes MP3 (4550), Magnus Dan MP2 (2021, can cast multiple times)

Amy
-Amy1 PsychoCrashLV2/AtaqueGlamurosoNV2 (4479)
-Amy3 kick MP2 (2283, can cast multiple times), MP3 Idol Stage (4957)

Sieghart
-Sieghart2 MP3 (if 13 hits, 3593. Rage mode if 12 hits, 3506), MP4 (if 5 hits, 3583)

Zero
-MP2 MegaSlash/DançaDaPerdição (if 16 hits, 2470), MP3 Abyss (only while domination is on. If 33 hits, 4524)

Ley
-MP2 FlameRoll/EsferaFlamejante (if 26+151 hits, 2343), MP2 TearDrop/LágrimaDaNoite (if 12 hits, 2278)

Rufus
-Just use many high-cost skills including MP4

Light Rin
-MP4 (wait for the boss to touch the wall, then cast from its center. If 138 hits, 4754)
-MP2 StrongWind/Tufão (input version. If 40 hits, 2667, can cast multiple times), MP3 Final Flash of Light (inputless version. Don't use on ground floor. If 17 hits, 3804)

Dark Rin
-MP4 (wait for the boss to touch the wall, then cast from its center. If 138 hits, 4754)
-MP2 DesperateForce/ForçaSobre-Humana (1884, can cast multiple times)

Asin
-MP3 King'sWrath/DivisorDeRios (if 25 hits, 3641)

Edel
-MP3 Despair3/Legado3 (if 21 hits, 3227)

Veigas
-MP3 DarkSpear/LâminasDoTormento (if 108 hits, roughly 4600)

Decanee
-MP2 Cursed Flame: Copy (if 10 hits, 2276, can cast multiple times)

Kallia
-MP2 MassExplosionType1/ExplosãoEmMassaTipo1, MP3 ExtremeBlastType1/EstouroExtremoTipo1 (if 54 hits, 3305)

Uno
-MP2 Demonic Blood 2 (2285), MP3 Bloody Rain 1 (4127)


C tier
Dio
-If Devil Force use Chaos Hit, if Weapon Force use full-4-bars Onrush

Lime
-No skill is particularly good
5-1: Elesis (general)
GCC notable changes:
-Elesis skilltree roll has cooldown, can't use from dashatk


Story:
The current leader of the Red Knights surpassing Gerard, she was hand-picked to join the Grand Chase to defeat Kazeaze; she joins, secretly because she searches for her father, the previous leader, who went missing looking for Kazeaze.

Fun fact:
Her father is named Elscud, and her younger brother Elsword does not appear in Grand Chase but was shown in one concept art and once in a family tree.

Character traits
  • Skilltree allclass trait - Hyper Armor
    When standing still, Elesis can press C to give herself hyper armor for a while. Lasts 10sec with cooldown +35sec after (+40 in PvP). Useful in PvP but less useful in PvE because it prevents you from getting knocked away but damage taken is still full anyway, instead helps in staying in Fatal without dying for the duration (in hyper armor, only a grab can kill you). Cannot be started when already in Fatal.
    But the activation pose is INVINCIBLE, and also may be used to avoid any one attack if you keep it ready, be it physical or projectile. Can also mash C when being hit with a combo to come out of a breakable combo with the invincible pose to possibly counter afterwards.

  • Skilltree allclass trait - Can ↓ roll from ground combo (or alone as Z↓). Cooldown 5sec (PvP 10sec).

  • Skilltree allclass trait - Firebolt Slash
    All of Elesis's groundZ1 and non-dash airZ attacks can nullify basic projectiles (not all projectiles). This includes both basic arrows and basic magic bolts, from monsters and enemy players in PvP. This ability is only shared with Sieghart and Edel.

  • Natural allclass trait - Berserk
    Elesis will automatically berserk if hit with too many basic arrows in a short time (usually only happens in PvP), launching all nearby enemies with fall damage (571 in PvP), and with an additional passive skill also activates super armor for 5sec afterwards. This ability is only shared with Sieghart.

  • This is a minor effect, but Elesis's match start animations end faster than other characters so she can start moving first.

  • Skilltree allclass trait - Magic Defense - When standing still, or from inside groundZ combo, Elesis can press X for a block pose. This is useful but not for actually reducing damage.
    This is a forced 2-second-long pose, during it you have hyper armor to resist any non-grab and +70% DEF for -41% damage taken (in PvP +35%DEF/-26%dmg), and it also can nullify the same basic projectiles in front of you as groundZ/airZ. The pose must last its entire duration before you can act again or even skill, but you can dashcancel at anytime to instantly allow dashZ/grab or dash-jump or dash-skill.
    Minor cooldown of 4sec. Cannot block during C hyper armor.
    In PvE this block could reduce the damage of an attack but using any roll ability is better, however the hyper armor from the block pose will make you immune to any earthquake or stone/freeze effect, and the hyper armor prevents a non-grab killing blow from reducing you to 0 then killing you. But if this is used from Fatal it only gives super armor instead of hyper, so launches/knockdowns still apply.
    The block also has a very fast minimal-damage physical hit in front with small hitstun (in PvP forces standing state on airhit, can juggle and combo after).

    • In PvP: the block can be useful alone in PvP (in PvP you can't always just avoid an attack) coupled with how countering from that is stronger in PvP because enemies in PvP actually take hitstun from any attack you do; you can block then potentially counter with dash grab, or dashZ (or potentially strongest, dash jump airZ), or dash skill for invincibility.
      You can also mash X when being comboed to instantly hit with block in front if there happens to be a break in their combo because of how extremely fast the block hit is (then you dash and attack somehow, like grab or dash-jump airZ from the other side into groundZZ).
      And block can be used inside combos, because it has fairly long reach forward and it forces standing state on airhit to possibly fit in a juggle combo where Elesis may not be able to hit with any other attack (leading into grab/dashatk/dash-jumpZ).


Which 2 jobs to use in PvE?
(After LV45 you can buy a GP quest to let you equip 2 jobs in PvE and switch between them with Ctrl)
    The most useful jobs are 3rd and 1st.
  • Elesis1 has a stronger ottoshot for very high normal attack DPS, and has Z← for a completely spammable invincibility attack to avoid boss attacks while ottoshotting (Z← can also roll through most bosses if turning around first, additionally to her ↓ roll), and all jobs have the invincibility pose of C but only this job also has V.
  • Elesis3 has a shadow roll from the middle of the combo to use on bosses, and can stunlock non-armored enemies with air↑Z repeated up and down a platform (which also has very high normal attack DPS, around the same as Elesis1 ottoshot).
  • Elesis4 is less useful. Her MP2 and MP3 are strong in raids.
  • Elesis2 is overall her worst job. But she can be useful due to her ranged full-lane MP3 and even bigger MP4 even if brought as the alternate job just for these moments, and her MP2 and MP3 are strong in raids.
5-1a: Elesis 1st job
Standard dash type (slightly above average)
Dash momentum: ~297 pixels, rocket ~675
Has triple-tap-dash burst unlockable in skill tree. Basically, upgrades two things: you can cover a doubled distance for when you only need a single dash burst, and whenever in the air you can tap thrice instead of twice (especially good because the same Forward input can already count as the first Forward needed to then do Up+Forward for rocket as soon as you land).

Hitstun recovery speed: very fast

GroundZ combo
Slightly long range but barely moves you forward during it. Can keep comboing a monster by repeating only until the thrust (~273 DPS).
At any point can tap Up to cancel the combo into the Up followups.
  • stagger 158.74 / 158.76 / 158.76 / 79.37 x2 / knockdown forward 158.76 (793.76)

    • PvP
      Starter has fast speed and slightly long range.
      Can loop by stopping after the 4th tap (the thrust) then start from the beginning again. Not a true combo against fast-recovery jobs. Can happen until autocounter (~1700dmg).
        218 / 218 / 218 / 109 x2 (872dmg so far) / knockdown 218 (1090)

GroundZ combo V2
Has longer range and also keeps moving a great deal forward per swing.
Can keep comboing monsters by repeating until the 3rd tap (~247 DPS).
Also can go into Up.
  • 158.78 / stagger3 113.23 / stagger 194.88 / knockdown forward 281.21 (748.1)

    • PvP
      More convenient movement, but as a downside, loses the thrust loop and has less damage before the ender/Up.
        218 / 155 / 268 (641dmg so far) / knockdown 387 (1028)

GroundZ combos, Up followup
Simply tap Up once, no Z needed. This cancels the combo into a different branch.
V1 launches and knocks down, doing a very small forward jump that may jump over non-giant enemies as a non-invincible dodge.
  • 206.97, 218.07 (425.04)

    • PvP
      This will groundbounce forward for a loop (combo into dash-jump airZZ (or X, dash-jump airZZ) from the other side into ground combo again, until autocounter for ~1700dmg. Or in Gorge of Oath, do the groundbounce into grab to throw into pit). For PvP, V1 already does everything you need.
        142, 150 (total +292 to groundZ combo), plus combo

    V2 - Input changes to ↑ Z Z. Ender slides them forward and can send them 1 floor below. Doing full V2 ground combo then this is ~348 DPS.
    • float-stun small push 126.00 / float-stun big push 126.00 / knockdown forward sending 1 floor down 141.12 + 148.68 (541.8)

      • PvP
        Not as useful because it can't combo afterward like the others, even if comboing into skill it has to be a skill that juggles well.
          launch 86 / launch 86 / 97, 102 (+371 to combo)

    V3 - Input changes to ↑, ZZZZ. One small hit to launch then does an aircombo only 1 floor above the original spot. Has aerial bonus on monsters that can be launched (on others will miss unless they are tall or already were on the floor above), last hit sends them knocking down forward.
    • launch 210.67 / 63.83 x3 and knockdown forward 223.44 (625.6, aerial 833.06)

      • PvP
        It groundbounces after the last hit, and the timing has been made much easier. Can combo after but can need the platforms to be long, and V1 already does the same simpler and sending less far.
        • launch 145 / float 43 x3, knockdown 153 (+427 to combo), plus combo

    V4 - Input changes to ↑, Z. This removes everything and simply instantly launches the enemy very high straight up with two slashes. Ottoshotting after this will keep juggling the monster, not hitting them will make them get knocked down and stand up right in front of you again.
    Doing full V2 ground combo then this on a giant is ~375 DPS.
    • launch 235.88 / launch 226.80 (462.68, aerial 576.08)

      • PvP
        Launches and you can choose to stay close with only the 1st slash or do the 2nd to send them forward. 1st can combo after like V1 but with stricter timing. 2nd can combo like V3's forward groundbounce. Can send into pits but mostly not as good as V1.
        • launch 162 / 156

GroundZ combos, Critical V1
Same as dashatk V1. Only ever used in emergencies to knock down an enemy in front of or behind you (a monster without any super armor).
  • 68.70 x2, 2nd knocks down (137.4)

    • PvP
      Can finish off an enemy in Fatal faster with a Critical than full combos.
      118 + knockdown 118 (236)

    V2 - Only one hit with slightly better reach, staggers non-armored monsters instead of knocking down, and slightly but quickly moves you to that side when used.
    • stagger3 163.79

      • PvP
        Improved from now only being a single hit to connect while also having a slightly taller/longer hitbox. It also now does a little step forward so it can be used as an additional hit while continuing ground combo on miss. And instead of knockdown in place this will do a small diagonal launch, can barely combo afterward but with more strict timing than the Up launches.
          282

Double V2 - Default Double is the same as the default Critical/dashattack (hit knocking down, 137.4dmg). This one does a shorter attack straight forward but also does an additional hit up-left and up-right on the floor above. All 3 hits will launch non-armored monsters. Often connects only 1 hit, 2 in taller monsters.
Ground combo V1 cannot Double on miss but V2 can.
  • launch 147.78 x1 up-left and x1 up-right, launch 155.23 straight forward (2 hits 303.01)

    • PvP
      Often only hits with the straight forward hit, in PvP knocks down like normal. Can scratch 1 floor above to anti-air with the other hits, knocking down from the air.
        254, knockdown 267

airZ
Can ↓Z ottoshot on platforms and this job has the strongest jump attack damage out of her jobs, among the highest possible normal attack DPS in the entire game (~493 DPS). Makes a very good singletarget attack combined with Z↓ rolling and Z← rolling.
  • 117.60

    • PvP
      Simple forward hit, has only decent active frames to hit someone 1 platform below, or hit air-to-air, timing matters.
      Forces standing state on airhit, which is uncommon for jump attacks and her only job with this. Can start or continue a combo with this even on airhit/juggle (and a run-jump will jump faster than normally jumping to start the jump attack faster). You can even continue an air combo with ottoshot.
        force-standing 243

  • V2 - Changes airZ to allow two different swings but reduces the damage (including ottoshot DPS). Better for PvP but worse for PvE.
    • 76.44 / 76.44 (152.88)

      • PvP
        Crucially upgrades airZ so that you may do a second airZ in the same direction, allowing new combo paths from a juggle (hitting once while jumping then hitting again before landing, to combo into full groundZ), or scanning air-to-air hits better. The simple reduction of the airZ damage isn't as bad for PvP.
          157 / 157
5-1a: Elesis 1st job (part2)
Dash attack
A slash of 2 hits forward but only the 1st hit can hit the floor above, and only the 2nd hit straight ahead will cause knockdown.
  • 68.70 x2 (137.4)

    • PvP
      1st hit may anti-air but on airhit both hits will knock down.
      Can be used in full straight ahead, to combo after on cliff because the 2nd hit knocks down a good distance forward, or cancel the 1st hit into skill as an extra hit before the skill.
        118 x2 (236)

  • Dashatk V2 - The swing does 3 hits with the 3rd knocking down, but you can input the move with 2 Z taps, then only if it hits, it won't do the 3rd hit and instead recover and do a minilaunch.
    Weak but sets up a launch on monsters, on launchable monsters can try to repeat →→ZZ to re-juggle them on ground every time, or ottoshot to juggle.
    • 47.09 x3 with 3rd knocking down (141.27) / x2 then launch 48.25 (142.43)

      • PvP
        Can combo into dash-jump airZZ groundZ, because you can dashcancel after the second strike.
        81 x3 with 3rd knocking down (243) / x2 then launch 83 (245)

  • Dashatk V3 - Same as V2 except the 2nd Z timing is changed to a little later, and the second strike is a launch+knockdown hit instead of free launch.
    • 47.09 x3 with 3rd knocking down (141.27) / x2 then launch 71.27 and knockdown forward 71.27 (236.72)

      • PvP
        No combo opportunity. Seems pointless despite the higher damage.
          81 x3 with 3rd knocking down (243) / x2 then 122+122 (406)

Z→ (unlockable)
A mid-range stab with super armor, 2 hits with the last knocking down but may shortcut into skill before the 2nd hit. Can pass through a normal-sized monster if started too close, can pass forward through a projectile if timed exactly right.
Can only be done from ground Z1 and only forward.
  • 86.43 and knockdown 86.43 (172.86)

    • PvP
      Cannot accidentally pass through the enemy in PvP.
      59 x2 (118)

  • V2 - Different advancing attack. Has super armor instead of invincibility.
    A low and very fast jump forward with a huge hitbox across the entire movement, can catch 1 floor above you too, very large range moving forward to close in the distance with super armor.
    Float-stuns certain monsters, so can keep repeating on some monsters (~300 DPS) but will jump over smaller monsters.
    • float-stun 100.80 x3 (302.4)

      • PvP
        Very aggressive fast attack closing in the distance with super armor and can scrape people in the air/1 floor above, forcing your way through neutral game. Floats/knocks down, has time to combo into shortcut skill on proper ground-to-ground hit.
          float/knockdown 69 x3 (207)

Z← (unlockable)
Does an invincible small backward roll then does a knockdown slash forward, still while invincible for a very long time. Very important in PvE and makes Elesis1 a good job for her because any time you would take damage, you don't anymore. You can play Elesis with only ottoshot and this move. And it can roll through an enemy if you turn around first, including Perseo-sized bosses but not much wider (Z↓ roll goes farther). Also good to group up monsters in the corner, can simply repeat to deal safer damage against a group but DPS is very low (~137).

Against a boss it's possible too keep repeating ottoshot then do Z← roll to avoid an attack, or normal combo then ↓ roll then keep repeating only the first Z to be ready to do Z← roll while ↓ roll is recharging. She can also dodge with the cooldowns of C and V.
  • forward knockdown 201.55

    • PvP
      Has hyper armor instead of invincibility. So not much more evasive than Z→ V2.
      Only combos into skills that work well on airhit.
        float/knockdown 138


Skilltree taunt
Only works as 1st job.
All monsters within almost normal full screen range are debuffed with -5% DEF (+5.3%dmg) for 10sec, cooldown 20sec.

This move also forces the affected monsters to run towards players: they will NOT try to focus on Elesis over other players, they just will try to actively chase someone even if they were partially idling before. (might help bringing them together for AoE, but occasionally a bad idea if pulling too many dangerous monsters at once if you could leave them sleeping until later)

But the taunt has a secret: the pose is invincible just like the start of her C (except to earthquakes), so you may keep the cooldown for this invincible dodge pose instead of the debuff in it. It's possible to dodge an attack by simply tapping V (or mashing it during a breakable combo) and possibly counter afterward, or dodge a moving projectile by taunting it. The limitation is the cooldown (20sec).

  • PvP
    Really not useful outside of the dodge aspect. Not-knocked-down enemies within range get -2.5% DEF (+2.5%dmg) for 10sec, cooldown 30sec.
    Can mash either C or V when being hit to escape a breakable combo to possibly counter (especially with grab or skill).
5-1a: Elesis 1st job (part3)
LV1 skills

All of her LV1s are multi-hit combos, in PvE they can look similar except Winding Flash has very long invincibility time and controllable movement.

Mega Slash (corte profundo)
Short range combo.
  • 107.90 x5 (539.5) [MP rate 18.60]

    • PvP
      All variations of this skill quickly start hitting without superfreeze, sometimes this can be useful for PvP (sometimes avoids what would be a get-grabbed-out-of-your-skill situation).
      94 x3, knockdown 94 x2 (470) [16.20]

    V2
    • ~184 x3 (552)

      • PvP
        A faster and more practical sequence, swings twice then immediately superfreezes into the ender which is now a launcher (has same combos after as groundZ Up). The first swing is shorter but not the second.
        160, 160, launch 160 (480) [16.55], plus combo

    V3
    Moves forward with every hit of the combo, ender hits farther ahead and also hits as a radius rectangle reaching 1 floor up.
    • ~197 x3 (591) [20.37]

      • PvP
        171, 171, launch 171 (513) [17.68], plus combo

Winding Flash (giro luminoso)
This combo starts with a forward running stab to fully work even if started at medium range (can hold left or right to greatly influence distance moved during the entire animation). If going forward down on a slope, may jump past the enemy if having to go far.
The animation/invincibility time is very long.
  • 144.82 x4, last launches (579.28) [19.97]

    • PvP
      Launches at the end higher than usual.
      With the range, can wakeup trap.
      126 x4, last launches (504) [17.37], plus combo

    V2
    2 more hits in the combo, even longer invincible animation. It doesn't have controllable movement, always moves a set far distance forward.
    • 130.03 x5, last launches (650.15) [22.41]

      • PvP
        This variation puts zero knockback/push on the target during the entire combo, preventing losing the combo from dropping them off a cliff (and also launching them almost straight up from your spot, which may be worse to combo after than V1, and you recover later in this variation relative to the launch).
          113 x5, last launches (565) [19.48], plus combo

Cruel Cleave (golpe brutal)
Single swing. 3 hits forward with 2 reaching 1 floor up. Total recovery/invincibility time is shorter than others.
  • ~189 x3 (567) [19.55]

    • PvP
      Single swing but still needs to multi-hit. First 2 hits may miss going down a slope.
      More capable of still launching if it hits an airborne opponent than other MP1s.
        164 x2, launch 164 (492) [16.96], plus combo

    V2
    Walking combo, freezes time two separate times. Last hit hits to both sides.
    • ~188 x3 (564) [19.44]

      • PvP
        Higher launch than usual.
        164 x2, launch 164 (492) [16.96], plus combo


LV2 skills

Sword Fire
Sends a forward piercing wave projectile to a short distance in front. An easy AoE to apply. This rarely happens but Sword Fire can be reflected as a projectile.
  • 223.76 x5 (1118.8) [17.75]

    • PvP
      Any hit knocks down but they combo together anyway, it attempts 5 hits and 4 connect in PvP, possibly 5 midair.
        194 x4-5 (776-970) [12.31-15.39]

    V2
    Superfreeze now happens instantly at the beginning with less startup.
    Lasts farther with 10 hits and sends enemies forward along the way. In PvE can also be less consistent because normal-sized unpushable enemies won't take more than 6 hits, and leaving enemies in place may be more useful in multiplayer.
    • ~117 up to x10 (1170) [18.57], or x6 on small armored (702) [11.14]

      • PvP
        Outright better than V1 (usually 8 hits, also can juggle afterward on cliff), except if you did prefer V1 knocking down in place close as this one floats them forward with it instead.
          float/knockdown 102 x8-10 (816-1020) [12.95-16.19]

    V3
    The difference from V2 is that this adds a gap-closing jump attack at the beginning to make it even better. Damage is high.
    • 143.91 and 157.75, 157.75 up to x10 (1563-1879.16) [24.82-29.82]

      • PvP
        The wave floats higher per hit to only land 5 hits.
        The hop attack may accidentally pass through the enemy if on airhit (or hitting down a slope).
          91 x2, 83 x3 91 x2 (613) [09.73]
5-1a: Elesis 1st job (part4)
Cross Slash (onda flamejante)
Does one dash forward, then one strong melee forward, then does a longer forward pillar. From mid-range misses 1 hit. Both the melee and pillar hit 3 times and both can barely hit 1 floor up scratching 1 hit each. Must hit as groundhit to fully connect or hits half anyway. Interesting for PvP but the AoE is not very large for PvE.
  • 196.37 x2 and 218.01, 196.37 x3 (1003.49/1199.86) [15.92/19.04]

    • PvP
      171+171+187, 171 x3 (871/1042) [13.82/16.53]

    V2
    Dashes and does the forward pillar twice instead, doing an AoE moving forward but will be careful to not walk past any enemy, sends forward.
    • ~210 x6 (1260) [20.00]

      • PvP
        launch forward 186 x3 and x3, but normally lands only 4 hits (744) [11.80]

Round Stream (arco fatal)
Does a forward dash attack but it has a longer hitbox than you move to so it has good medium range (in PvP forcing standing state on airhit to fully combo even on juggle) but may lose one or two hits if going too far, then does a simple forward ender that knocks down.
  • ~236 x5 (1180) [18.73]

    • PvP
      205 up to x3 depending on how close you started (205-615), 205 x1 (410-820) [06.50-13.01]

    V2
    First part downgrades to start hitting from a much shorter distance lawnmowering forward but the extra proximity hits now can do very high damage. And the ender is an explosion that hits both sides and barely scratches 1 floor up.
    • ~51 x16, ~142 x3 (total 426 at medium range or up to 1242 close) [06.76-19.71]

      • PvP
        The explosion will let you juggle afterward if this skill itself started meleeing as airhit.
          45 x16, 124 x3 (total 372 at medium range or up to 1092 close) [05.90-17.33]


LV3 skills

Critical X / Air Spiral
Has an awkward sweetspot for PvE so that others are better, and in PvP used to be very strong but has been nerfed.

AoEs forward as a pillar, with 5 box hits that progressively move upward (can connect only 3 hits on same floor if not starting with them midair or higher in a slope, spreads 2 hits on the floor above you, on tall monsters always lands 5), then does 3 hits forward only at your own floor.
Because of the double skillfreeze, bosses often walk out of this skill, only use when they aren't red-armored and even then it's not a guarantee.
  • 229.78 x3-5, x3 (1378.68/1838.24) [14.36/19.14]

    • PvP
      launch 200 x3-5, knockdown 200 x3 (1200/1600) [12.50/16.66]

    V2
    Has a newer animation where the first part does a better more consistent 5 hits across the total pillar now to be simpler. Technically better than V1 in PvE but still can miss from pausing twice.
    Maybe this was originally made to replace V1 but got demoted to side-grade alternative.
    • ~250 x5, x3 (2000) [20.83]

      • PvP
        launch 218 x5, knockdown x3 (1744) [18.16]

    V3
    Worse multi-target AoE.
    The first part now moves farther forward like an airdash (2 hits close, only 1 hit from afar or 2nd floor) also bringing targets up for the second part which is now a diagonal down exploding AoE shot from the air. Apparently the AoE deals 3 hits on the ground but can deal 6 if you did hit them from the air first. Works in PvP but is a less reliable AoE for PvE.
    • ~228 each (max 9 on giant, 2052[21.37], split AoE otherwise)

      • PvP
        float 199 x1-2, ground AoE center knockdown 3 hits or less near edges and gets +3 hits if starting with them in air (995-1592) [10.36-16.58]

Magnum Break (ataque magno)
Easy and good AoE. Swipes forward with fire twice stepping forward for each swipe, making a forward square AoE that also reaches 1 floor up (but on 2nd floor they need to be past half its starting range or you can walk past them if not being blocked by an enemy in your own floor).
Most of the damage is on certain hits only so it has to land fully to deal proper damage.
  • 6.29 x6 and 479.23 x4 (1954.66) [20.36]

    • PvP
      Forces standing state on airhit (combos on airhit) and only knocks down at the end.
        PvP: 5 x6 and 417 x4 (1698) [17.68], last 2 float/knockdown

    V2
    Slightly more damage but possibly worse.
    Simply does 3 flame swipes instead of 2, and longer duration which also means more invincibility. But the total damage is barely higher and the damage is still spread badly so it now needs 3 full swings instead of 2, so bosses could walk away early (safe in PvP except for hitting 1 floor up and walking past them).
    • 6.29 x9 and 343.61 x6 (2118.27) [22.06]

      • PvP
        5 x9 and 299 x6 (1839) [19.15]

Meteor Slash (ataque meteoro)
Does a forward short dashing hit that launches, then from the air shoots diagonal down with 3 non-piercing fireballs close, immediately ending standing closer to them ready to continue attacking. Can be weak in PvE because of the damage not splashing well to multiple targets.
  • ~384 x2, ~384 x3 (melee hit 768, blast 1152, both 1920) [20.00]

    • PvP
      Recovery was nerfed to not be able to combo after it, only attempt to.
        launch 318 x2, force-standing 318 x3 (melee 636, blast 954, both 1590), potential combo

    V2
    Skips the first part and now just shoots fireballs forward, now piercing, essentially just a rectangle AoE forward and 2/3 of the damage reaches 1 floor up. Hit count depends on enemy size, stronger on raid bosses and kinda weaker on normal enemies.
    • ~124 per hit (max on raid x25 for 3100[32.29], if x12 only 1489 [15.50])

      • PvP
        Has similar recovery to V1 but sets a farther distance than V1 and does low damage.
        73 per hit (often around 12 hits in the inner half for 876[09.12], outer half 365-146)
5-1a: Elesis 1st job (part5)
LV4 skills

Bravery (estilo da espada)
Changes your normal attacks for 20 seconds with +10% ATK and you can still skill, for the full time you also take only 1 damage per hit and have super armor. Has a different dash that passes through enemies.
The start also has a small skill explosion hit left and right (465.14 damage)
    The rest are normal attacks/do not apply SpATK:
  • GroundZ combo - Square-hit slashes forward reaching 1 floor up (like Magnum Break), last 3rd slash is a beam forward to screen edge reaching 2 floors up pushing non-armored monsters along with it. Damage singletarget is below average but is an AoE that also pushes monsters to the same place.
    • 1st swing: stagger ~32.77 x5 (163.85)
      2nd swing: float-pull ~32.77 x5 (163.85)
      3rd swing beam: ~32.77 xN dragging forward (commonly 5 hits), explodes on wall for more hits knocking down slightly away
    • Doing nothing but the first swing repeatedly has time for around 22 swings so 3604dmg (203 DPS counting start explosion, which is lower than standard ground combo for everyone which is around 300).

  • airZ - Weak and loses ottoshot, only do when jumping between platforms as a free hit.
    • stagger ~26.55 x3 (79.65)
    • Time for around 34 swings, 2708dmg (158 DPS counting start explosion)

  • Dash attack - Smallest area but highest DPS during this.
    Straight slash that passes through enemies and knocks down forward, can dashcancel afterward to keep it looping left and right (or always same side if against a wall).
    • knockdown forward ~173.31
    • Time for around 36 swings, 6239dmg (335 DPS counting start explosion) (may apply back bonus on half of hits)

Awakening
Forward slashes. Hits 1 floor up and down, reaches a bit behind you too.
Can hold a direction to hit the other way.
  • ~589.43 x4, ~785.92 x1 (3143.64) [24.18]

H
Hits basically the entire screen.
Also gives you ATK +15% and Super Armor for 20sec after it finishes.
  • 4245.03 [32.65 if it cost as much as MP4]
5-1b: Elesis 2nd job
Dash type: ground-only single bursts
In PvP can still airgrab when dashing on ground.

Hitstun recovery speed: very fast

GroundZ combo
Weaker combo.
Can infinite combo monsters by repeating the first 2 taps (3 hits) for ~195 DPS. Tapping until the spin instead is ~181 but can hit multiple enemies at once easier.
  • 158.71 / 55.6 x2 / 55.6 / 38.92 x5 / 55.6 x3

    • PvP
      Has very long range and also fast startup! The only problem is that it still has to connect as groundhit instead of airhit and barely hits above the ground.
      Can loop until auto-counter with the first 2 taps (or until the spin if moving forward).
      The ender leaves standing and would combo into Double (changes into grab if in range) but looping the first 3 hits is simpler.
        219 / 76 x2 / 76 / 53 x5 / 76 x3 (940)
Its Critical/Double are exactly the same as the dash attack.

Z↑, or ↑ during ground combo, or mashZ
Only good for PvP.
  • 34.73 x7 (243.11)

    • PvP
      Has near-instant startup, strikes with range similar to groundZ. Does several quick hits then blows them away. Less beneficial than using groundZ, but can be used for the emergency fast startup, or as an attack with high active frames to catch after invincibility or a jump because of the multi-hits in the beginning. Could work as an airhit combo ender but run grab is stronger if possible (370).
        23 x7 (161)

Dash attack
Launches but you don't have time to combo into your own normal attacks.
  • 93.84 x1-3 (281.52)

    • PvP
      With fast startup does a giant swing going from forward to up to back, reaching far in every direction except below you. Great for anti-airing into instant knockdown.
      Will connect 3 hits against a grounded enemy in front, 2 in front if they're higher, 1 in the back half.
      On groundhit will leave them standing to combo after with groundZ (or recover roughly equally if you hit behind you).
        161 x1-3 (483)

airZ
Big but not useful.
Can ottoshot, even up or behind, but it's Elesis1 that has the strong ottoshot.
  • 76.4

    • PvP
      This is a great attack because it hits essentially 360 degrees around with good length, starting diagonal up-back to forward to diagonal down-back, controlling space very well with one swing per platform jump. But active frames are low. Its knockback doesn't push away from you, it pushes to where you're facing.
      Ottoshot: yes, also catches diagonal up or straight up, or from behind which will pull them to you instead of pushing away.
        157


LV1 skill
Swings from behind to up to forward, can get up to 4 hits depending on position/size.
  • 162.13 up to x4 (648.52) [MP rate 22.36]

    • PvP
      Can fully hit an enemy right in front of you (-1 hit if not very close), and scratches jumping enemies for 1 hit. Last hit forward will launch and can hit 1 floor below.
      Good to use as anti-air or to use inside juggle combo (her only move like this) because it is moderately good in connecting and still launching if on airhit. No good followups except Z↑, or ground dash grab if possible.
        141 x2-3, launch 141 (423-564)[14.58-19.44], Z↑ +161 or dash grab +370

LV2 skill
Keeps moving forward with a spinning attack, when moving will attempt 4 very short hits forward and separately 4 hits backward.
Knocks down, and can do double damage on certain big monsters if used very close by hitting them with both sides at once.
  • knockdown 270.18 x4 (1080) [17.15], close on boss can hit 8 times (2161) [34.30]

    • PvP
      Unless it connects as airhit they will stay standing, easily comboing into groundZ combo, meaning this skill can be used just to cover your advance. And can be used mid-combo (with shortcut or held Z as the spin starts) before the auto-counter point to do more Z loops inside one combo before they auto-counter.
        138 x4 (552), into combo

LV3 skill
Slow piercing projectile forward, infinite range on one lane. Non-pushable enemies take less hits, extra-wide bosses more.
Besides being useful AoE for hitting an entire lane of monsters (and not knocking them down), it's nice in that it lets Elesis dump MP on an actual ranged skill at all, along with this job's similar LV4 skill.
  • 253.91 per hit. Less pushable small monsters x7 (1777)[18.51], most x10 (2539)[26.44], extra-wide bosses x13 (3300)[34.38]

    • PvP
      Could even be used to create a big slow projectile while you advance and attack along with it or from a different place (it won't knock down on airhit so you can groundZ after it).
        130 often x10 (1300) [13.54], less hits if they almost jump/roll past it

LV4 skill
Throws the spear straight forward, instant beam across the entire stage also reaching 1 floor down (it even starts behind you instead of in front of you), great for hitting most/all trash mobs instantly.
Leaves a burn on the enemies to do more damage.
  • ~2441 launching straight up and knocking down in place, DoT adds ~36 x19 (+684) (3125) [24.0]
5-1c: Elesis 3rd job
Standard dash type (fast)
Dash momentum: ~313 pixels, rocket ~695

Has a very slow held run but her dash bursts are bigger than normal to be a faster-movement character: even just continuing to double-tap Forward is much faster than running. Faster with rocket or rocket-down (→, →+↑, ↓ to fastfall).

Hitstun recovery speed: normal (the only non-fast recovery job from Elesis)

GroundZ combo
You can keep doing the combo while being ready to press Up to shadow step as an invincible roll through the monster (has to be done from combo, not Critical or Double).
  • 158.71 / 201.07 / knockdown 211.64 x2
    Critical: launch 163.79
    Double: knockdown 151.3 x2 (302.6)
    Shadow step: knockdown 178.07

    • PvP
      Has very long range and fast startup too. If the opponent is 1 floor up you can actually combo with ZZ-Critical.
      If hitting them on the ground, can do full combo without Double (1077) or ZZ-Crit and airdash grab (1147), you can do ZZZ and cancel between the two hits into Double for a standing reset with 1306 (grab is the safest option afterward, but if not against a fast-recovery job you can loop back into groundZ).

      In neutral you can keep doing the first two Zs, on the chance that it might hit someone, where you can continue with the last swing or cancel into Critical to either side, or Up to shadow step (which also extends the reach of MP1 from here, hold the 2nd Z to charge), or recover from the two Zs to move and start again. Doing ZZ even hits behind you and combos into Critical backwards.
      • 218 / 277 / 291 and knockdown 291 (786 before knockdown hit, or knockdown1077)
        Critical: launch 282
        Double: 260 x2 (520)
        Shadow step: 122

Dash attack
Can repeat to attack while keeping them in place.
  • 141.96 x2 (283.92)

    • PvP
      Simple hit forward, but leaves standing afteward at roughly equal recovery to lead into a reset.
      The only safe combo after this is to hold forward and grab. Or if against Arme/Mari can repeat dashatk until auto-down.
      On airhit knocks down.
      Can actually catch from behind, where then you can try groundZZ-Critical because the first 2 taps can hit from behind and the Critical will turn you around.
        244 x2 (488)

airZ
Ottoshot: yes, but only reliably works behind you, if you turn your back to them first, or forward against a tall monster.
  • 76.4

    • PvP
      Forward hit with good active frames. The start will also hit behind and above you.
        157

air ↑Z
This float-stuns them back on every hit to infinitely stunlock non-armored targets when jumping up and down one platform doing the move every time which has extremely high normal attack DPS (~513, around the same as Elesis1 ottoshot) and is great for bunching up normal monsters into the corner.
  • float-stun 317.49

    • PvP
      Alternate airZ, less active frames but hits in a complete circle except diagonal back-down.
        218

air ↓Z
Useless in PvE.
Forces yourself to move straight down with a hit plus another hit upon landing.
  • knockdown 317.49 x2

    • PvP
      Can combo into held MP1.
        218 x2 (436)


LV1 skill
AoE forward, knocks down.
  • knockdown ~640 [MP rate 22.06]

    • PvP
      Can airhit but the vertical reach is only moderate.
      Launches, can fit in combos (then go into one air↑Z, or itself again). If it hits them high in the air (either because they're airborne or you hit air↓Z>this) you can combo into more, like dashZ, which can then combo into more dashZs or into ZZZ.
        launch 557 [19.20], plus hit

LV2 skill
Useful AoE forward leaving them standing still, with 4 bars can cast twice.
Has additional weaker hits behind you when used next to giants.
  • 76.70 x15 (1150.5)[18.26], back part: 25.20 up to x15 (378)[06.00], both parts close on giant: 1528.5 [24.26]

    • PvP
      Hard to miss with the 2 parts, but extremely weak in PvP because it will knock down too early. Does only 3 hits (5 on airhit), only good for finishing off someone in Fatal including catching after shadow step.
        55 x3-5 (165-275)[02.61-04.36]

LV3 skill
AoE a short distance forward reaching 1 floor up. Will only do full hits on tall monsters on both levels (or roughly equal damage to a launchable monster if you launch with Critical first).
This skill will hitstop enemies in its range for the entire duration (monsters are frozen in time, full back hits if started from behind, not even Harkion can roll away mid-hit until after it finishes).
  • 300.06 x3-5 depending on height/altitude, then knockdown 300.06 x2 (1500.3/2100.42)[15.62/21.87]

    • PvP
      Can anti-air and fully connects even on airhit.
      Last hit will float them up for airgrab.
        force-standing 261 x3 on ground or x5 on air, float 261 x2 (1305/1827)[13.59/19.03], airgrab +370

LV4 skill
This will make a fire pillar hitting a short distance to your left and right reaching 2 floors up, and will also make a very weak auto-aimed AoE on up to 4 separate enemies in the stage.
The main pillar will launch light monsters to enable aerial bonus.
  • 1 monster: launch ~444.34 x6, auto-aim float-stun ~38.50 x10 (total 3051) [23.46], on launchable monster almost half more
    Auto-aim alone on far monsters: each 385 damage (very small)
    2-4 monsters together: 3436-4206 [26.43-32.35]
5-1d: Elesis 4th job
Standard dash type (average)
Dash momentum: ~280 pixels, rocket ~648

Hitstun recovery speed: very fast

Dash then Back (ground only)
Useless in PvE, except that this can be used to pass through monsters.
  • knockdown 211.64

    • PvP
      Backdashes, with long distance and also fast recovery, with super armor. Passes through opponents, can even do this to change sides as they stand back up from knockdown.
      If you press Z inside the animation it will do an attack (you lose the super armor when pressing Z), a single big hit forward with knockdown to reset yourself in a better position after doing the dodge to whatever was happening, but it could be better to not do this followup and instead let yourself recover fully to attack like normal afterward.
        364

airZ
Can swing twice. Not good in PvE.
  • 76.4 / 76.4 (152.8)

    • PvP
      This is one of the best airZs in the game. It has very long range forward, and it has infinite active frames (you can even drop from 5 floors on them and it still hits). You can continuously jump/dashjump with this attack and it's like you have an impassable wall of damage in front of you. You can also do this attack to automatically catch them as they come out of invincibility frames.

      And this airZ can do 2 taps for 2 swings, where the main idea is that you can hit the 1st swing even if still going up in the jump, then do the 2nd right before landing to add more damage and re-apply hitstun to still be able to convert that into full ground combo (can even do airZ when landing, then "dash jump airZZ, dash jump airZZ" in repetition, although this has very hard timing against fast recovery jobs so they may skill).

      The 2nd swing has different range: it has shorter range forward (even though it doesn't look like it) so you may NEED to get closer for the 2nd swing, but it also has extended range backward where it's better for when jumping close to someone and falling onto them instead of straight from the side. The 2nd swing has infinite active frames too.
        157 / 157 (314)

air ↑ZZ
Alternate airZ that swings in an upward 180-degrees angle forward and up and back, with 1 or 2 swings, angle can be more useful and is big enough to hit people 1 platform above you, but those hits don't last.
  • 176.35 / 176.35 (352.7)

    • PvP
      121 / 121 (242)

GroundZ combo
  • 158.71 / 137.57 / 137.57 / 137.57 / 110.04 x2
    Critical: launch 81.89 x2 (163.78)
    Double: knockdown 299.85

    • PvP
      Decent range starter.
      The ender blows away but only in the 2nd hit of the ender (technically you get slightly more damage if you cancel the first into Double, or can skill from here). Or you can do 4 taps into Critical which launches (into X>dash>dashZ, or MP2/3).
      You can attempt to loop the first 4 taps over and over but there is a gap they can act on.
      Only when cornering the opponent on the wall, can do ZZ and repeat.
        219 / 189 / 189 / 189 / 151 and knockdown 151 (937/knockdown1088)

Dash attack
Similar to Elesis1.
  • 141.96 x2 (283.92) knockdown

    • PvP
      One swing of 2 hits, 1st can hit straight up or diagonal up, 2nd only hits straight forward and knocks down, can cancel 1st hit into skill hotkey.
        244 and knockdown 244 (488)

air ↓Z
Slower forward airZ, active single hit until landing, its only purpose is to knock down on any touch. Can hit straight up from the small hop it does at the beginning.
  • knockdown 235.18

    • PvP
      162


LV1 skill
2 very small hits forward.
Invincible time is short.
  • 320.00 x2 (640.00) [22.06] knockdown

    • PvP
      2nd hit will float them up but only if it hit them on the ground. Will combo into X then cancel into dash (dashZ will do more damage than a grab, or with certain timing you can dash from the X, jump airZ, second Z moments after, land and groundZ combo)
      This skill will start hitting even before fully freezing time.
        278, float 278 (556) [19.17], plus combo

LV2 skill
Spins in place doing hits a short distance to both sides, then a mid-range piercing shot only forward that knocks down.
On some giants can hit with both sides of the spin at once if very close.
If pressing Z will end and shoot early.
  • spin 125.94 x6 (755.64) then shot dragging ~196.8 x5 (total 1739.64) [27.61]
    Close on boss with both sides of the spin 2495.28 [39.60]

    • PvP
      The spin will force standing state on airhit so it can combo as a juggle or even if the opponent is airdashing around, and they can come to you because this skill doesn't timefreeze at the beginning to give them time to notice.
      If hitting only behind you, after the shot misses you recover somewhat faster than them (combos into grab).
        force-standing 91 x6 per side, knockdown 285 (831) [13.19]

LV3 skill
Just a stronger version of the LV2 skill. The spin will keep moving forward, then the shot moves farther away and is angled diagonal down.
In PvE, damage can be lower on AoE damage from not doing full hits to every enemy if they don't stand very close to each other, but can do more than its normal 13 hits on certain bosses for more damage.
  • ~148 x9 per side (possibly x18 on certain bosses), ~121 x4-10 depending on size/knockback
    One side + 6 hits: 2058 [21.43]
    Close on big boss, two sides + 10 hits: 3874 [40.35]

    • PvP
      force-standing 123 x9, shot knockdown 100 x3 (1407) [14.65]

LV4 skill
Makes a cyclone that moves in the 8 directions homing in on enemies and circling around a living enemy with continuous contact damage, lasting around 10 seconds and staggering non-armored monsters.
Has great crowd control for stunning many normal monsters while your team starts or continues to attack them, and also has very high damage overall.
  • ~226.4 x27 (6112.8) [47.02]
    Launching a light enemy with combo Critical will enable aerial hit for +50% damage on the rest of it for that target
5-2: Lire (general)
GCC notable changes:
-1st job teleport removed from the game
-Dropshot ottoshot made harder/too unreliable to work
-1st job DEF debuff orb nerfed like with other DEF debuffs


Story:
As the continent of Bermesiah is troubled by a war between its two kingdoms Serdin and Kanavan, the elves in the isolated southern island of Eryuell decide to assist the humans and discover that Kazeaze had instigated Serdin and Kanavan to fruitlessly fight each other in their lands, even ruining the elven forest elves were trying to grow in Bermesiah, while Kazeaze's own army grew stronger to be able to crush both and achieve world domination. While usually peaceful and not very involved in outside affairs, elves largely have a combat training regimen alongside defending nature, and they immediately form the elven corps from their warriors and send them to undo Kazeaze's evil, with one of them, Lire, joining the Grand Chase to personally hunt Kazeaze.

Fun fact:
Humans and elves and dwarves all originated from around Archimedia and humans were favored from being the most compatible with the deities in multiple senses who bestowed them technology and magic that were shared with the other races, but after the Great Explosion of Kounat, humans and some elves fled southwest through the sea (dwarves supposedly just buried into the mountains). Humans discovered the continent of Bermesiah and quickly colonized it but the elves continued searching, later staying on an island close to it they then called Eryuell Island, similar to Zeruel. The elves that stayed in the stressful war-torn Archimedia were physically changed across generations over more than a thousand years to become the cruel dark elves.

Lire is the archer. She has below-average movement but can doublejump or roll in some jobs to sneak her way out, and has reduced melee combo usability but her main range is infinite. In PvE her normal attacks tend to have only average damage with little AoE but can compensate with skills (and her 2nd job air↓Z is very strong on giants that can take the full damage), while having doublejump or one roll to sneak away.
In PvP she is a keepaway sniper that can repeat separate streams of arrows to any point in the stage at no cost, but even arrows that hit can be Arrow Defended if done exactly properly in anticipation (except vs Arme or Lire who cannot ArrowDefend at all), and if they predict your arrow path you can be locked in place firing it while they move around it. As the keepaway character of the game she is the most banned character in PvP.

Character trait - Lire herself cannot do Arrow Defense against enemy arrows, so in a bow vs bow encounter any hit is a full hit. But Lire does get an allclass passive that makes her own basic arrows break enemy basic projectiles if colliding correctly (not just enemy basic arrows but basic magic bolts too).

Skilltree allclass trait - Elven buff - Equips 1 of 3 self-buffs, done with X↑.
  1. Somewhat raises Lire's basic walking speed (and run speed only for 3rd/4th job) for 15sec, cooldown 35sec. This is redundant for Lire1 and not very good for Lire3, and Lire2 walks faster but can roll instead anyway, but Lire4 does get much faster.
  2. Regenerates MP over 10sec (gives ~0.5 MP bars), cooldown 30sec.
  3. Raises the attack speed of Lire's groundZ combos by around +25% and also makes airZ shots slightly faster (but doesn't help 1st job rapid fire ZZ). Good for DPSing monsters when not spending MP but only lasts 10sec with cooldown 40sec. (Lire1's groundZ combo arrows actually combo together during this. Lire3 doesn't seem to benefit well)
5-2a: Lire 1st job
Dash type: single bursts only

Hitstun recovery speed: normal

GroundZ combo
Shoots a chain of up to 5 shots that barely arc down, you can aim up and down only before 2nd shot. Final 5th hit knocks down as does the Critical/Double which attacks the exact same way but with a dash back/forward.
Canceling into Critical/Double recovers much faster than letting the whole animation end normally.
In PvE, the knockdown from this combo/Critical/Double knocks down without pushing them forward as much as the knockdown of any other Lire job.
  • 109.99 up to 5 times, last knocks down (549.95)

    • PvP
      The arrows force standing state on hit so it's possible to catch in the air and continue that combo as they land.
      You can shoot only 4 arrows then combo into skill (through skill shortcut, or by holding Z for LV1 skill).
      The arrows cause hitstun but don't actually combo together, barely there is a gap in-between arrows hitting where they can mash skill or invincibility ability. During the X↑ option that raises attack speed, these arrows do combo together.
      • 151 up to 5 times (755), all force standing but last knocks down

    V2 - Simply upgrades to let you aim up and down until the 3rd shot instead of the 2nd, allowing aim for longer than her other jobs.

Ground combo ZZ (unlockable) - Basically, this happens if you keep tapping Z very fast instead of slowly. It cancels where you are in the combo to shoot an extra 3 arrows of similar properties of pre-ender and returns you to normal standing state fast or can still combo into Critical/Double. Can only be done after 2nd shot and before 5th. In PvE it's good to use this by always mashing Z because this shoots the fastest (~302 DPS).
It seems this ability doesn't get boosted by the X↑ attack speed boost.

  • PvP
    Because it keeps the pre-ender properties (including leaving them standing afterward with them recovering first unless you skill) this is just an upgrade for the shoot-only-4-arrows trick by making it 7 arrows instead. Also, these arrows will true-combo together (and into Critical/Double if you want), but still won't true-combo from the first arrow fired to start this.

Ground combo ↑↑ followup (unlockable) - Cancels the combo (similar to Crit/Double) into a forward-only kick, faster than arrows and also works alone as Z↑↑ before shooting.
In PvE can help in blowing away non-armored monsters.
  • 72.87 + blowaway 116.67

    • PvP
      Small launch instead of simply knocking down so it can easily combo into skills instead of only interrupting for a knockdown.
      • force-standing 49 + small launch 79 (128)

    V2 - Instead the attack is a moving melee combo forward doing 4 hits (slightly longer reach, walks forward farther, halved damage at only the tip) where the ender blows away.
    • 65.62, 91.90, 120.76 x1-2 depending on knockback (399.04)

      • PvP
        Launches very high. Combos into airgrab (+370) or skills. In the corner can loop into groundZZ.
        • force-standing 44 and 62, launch 82 x2 (270)

Dash attack
Same as Critical/Double, dashes to one side while shooting one arrow to the other. Important for moving and attacking at the same time, damage sucks but knocks down instantly to buy time.
It's even faster to run by doing dash attack at the end of the dash in repetition, instead of simply dashing.
  • knockdown 109.99

    • PvP
      knockdown 151

  • V2 - Now also lets you, when done on the ground, fire one additional shot with Z (functioning the exact same way) to make it slightly more possible to land a hit. The Critical/Double also gains this extra Z shot.
    It has more recovery than the first so doing the second shot makes you slower if the dashatk is used just for movement.

Dashing V2
Upgrades dash to be able to be done from the air too. It's good for moving around platforms when not thinking about attacking, and makes a new fastest way of moving (ground dash in full without dashatk, jump and airdash doing dashatk, repeat).

airZ
Her airZ shoots an arrow diagonal down while pushing you backwards and can repeat as long as you're still in the air, helping you run away (or hold forward to do a few shots to the same place).
Can repeat dash-jumps into one airZ, to keep shooting without having to plant yourself in place at all.

With very hard timing, can ottoshot at any range even on miss because the momentum can float you back up the platform.
  • 109.13


    • PvP: force-standing 150

    V2 - Basically, on repeated airZ shots, you can mash ZZ to shoot twice per shot. This is faster than groundZ but you need a wall behind you to not keep being pushed back.

During doublejumps her airZ is swapped for a divekick falling straight down. The hitbox is very big and all around you, can doublejump as soon as possible just to do this move near the ground. In PvE just causes light hitstun with no effect to armored monsters to land faster. In PvP is a great defensive move when used alone and knocks down to buy time.
  • 115.88

    • PvP
      knockdown 79

air ↓Z (unlockable)
Can only be done before doublejump. Throws a ball straight down, it has no damage or hitstun, it only places a debuff on that enemy; for a short time their DEF lowers so they take slightly more damage from your entire team (PvE -5% for +5.26%dmg, PvP only -2.5%). Nothing major but can be free to add before a big attack due to fast recovery. Lasts only 5 seconds with 10 seconds of cooldown.

Raising its level costs skill points to increase how many balls it shoots straight down for better range/AoE but the effect is the same. V2 costs an additional 2SP to upgrade it into 2 balls side by side where it can catch 2 enemies and is harder to miss on one. V3 is 3 more SP to upgrade it into 3 balls side-to-side where it's almost impossible to miss now.

X↓ stance (unlockable)
Plants yourself in place with a special long-range shooting stance. Z will fire a single heavy arrow (cannot be reflected or ArrowDefended) that goes fully straight and goes 2 screens long, at a long reload, can aim up and down. Tap left/right to return to normal, can still skill.
V2 lets you mash Z on initial or repeated shots for two arrows per shot.
In PvE can deal higher DPS singletarget than normal arrows and can reliably hit even from where you can't see the monster (fully straight and almost infinite range, can hit your entire lane, jump up or down to aim through it), especially in a party with monsters going after them instead of you.
  • stagger with very far knockback 403.14 (repeating double shot is ~403 DPS)

    • PvP
      Launches sideways on hit. The reload time is actually timed to wait out the invincible wakeup period after knocking them down in PvP to where any next shot is guaranteed to work if it hits, but they still get around a second to move between hits.
      • launch 277
5-2a: Lire 1st job (part2)
LV1 skills

Iron Storm (rajada de flecha)
Shoots a spread of 5 arcing arrows, non-piercing so singletarget. If used from groundZ will keep the aimed angle.
  • ~122 x5 (610 singletarget) [21.03]

    • PvP
      Forces standing state on airhit and leaves them standing, if used from close they recover before you do but can combo into MP2 or another of this or at least try to grab them before they grab you.
      Can be used during groundZ combo to really make sure you land at least one hit on the enemy from the wide spread, or used to add damage to combo.
        force-standing 95 x5 (475) [16.37]

    V2 - Each arrow explodes for partial splash damage, doing more hitstun than before. 5 arrows so 10 hits.
    • ~65 x10 (650) [22.41], splash only 325

      • PvP
        The longer hitstun now lets you always grab first if used close instead of them recovering first.
          force-standing 50 x10 (500) [17.24]

    V3 - Different upgrade, will shoot a non-exploding spread then another spread again with 3 instead of 5.
    • ~122 x5, ~35 x3 (715 singletarget) [24.65]

      • PvP
        The two waves don't combo together and have the same properties and recovery disadvantage as V1.
        force-standing 95 x5 and 22 x3 (541) [18.65]

Rapid Shot (tiro veloz)
Instead of one wide wave of 5 arrows, this shoots a straight stream of 5 (can aim before and also during). Needs V2 for full potential.
  • ~48 x5 (240) [08.27]

    • PvP
      force-standing 102 x5 (510) [17.58]

    V2 - Upgraded to also do the default LV1 skill afterward but at reduced damage. Very hard to fully miss in PvP.
    • ~48 x5, ~48 x5 (480) [16.55]

      • PvP
        force-standing 40 x5 and 40 x5 (400) [13.79]

Flaming Arrow (flecha de fogo)
Hits like a normal arrow with a DoT.
  • 555.03, DoT 3.56 x19 (622.67) [21.47]

    • PvP
      force-standing 483, DoT 1 x19 (502) [17.31]

    V2 - The arrow deals less damage but leaves 5 ground flames where it hits for small constant damage. Less damage overall but non-armored monsters will be hitstunlocked from the flames unless countering.
    • 435.06, DoT 3.61 x19 (503.65), drops 5 flames each ticking for 1.63 (18 times?) and monsters often take 2 at once, with 2 flames in full 562.33 [19.39], 5 flames on big boss at right angle 650.35 [22.42]

      • PvP
        The flames don't hitstun in PvP and do low damage per tick, worse than V1.
          force-standing 378, DoT 4 x19 (454), each flame flame ticks for 1

Freezing Arrow (tiro congelante)
Single arrow that freezes. In PvE does lower damage and freezing will stun a monster for a short time canceling their attack animation, but only works if they don't have any super armor.
  • freeze ~325 [11.20]

    • PvP
      Frozen players have to mash left/right to recover or you combo them any way you like, but hitting them unfreezes them. Can combo into Z↑↑, or afar will aim into a full ZZZ.
        freeze 278, plus combo

    Poison Arrow (tiro tóxico)
    Single arrow, in PvE will DoT or has a different status effect in PvP.
    • ~628, DoT ~6 x19 (742) [25.58]

      • PvP
        The shot itself has long hitstun to combo afterward, and the status effect reduces their MP and movement speed. Wears off faster if they mash left/right.
          force-standing 537, plus combo


LV2 skills

Rain of Arrows - Instantly shoots 10 arrows straight up while time is frozen, in a narrow angle that only hits if you're directly below the enemy. Then regardless if these arrows hit, after one second, more arrows will rain down in a V pattern. All arrows are non-piercing/singletarget.
  • up shots: launch 54.63 x10 (546.3, or 792.13 counting aerial), falling arrows: 311.72 x1-3 (+311-933) (up shots + 1 hit 858.02, up shots + 3 hits 1481.46)
    Raid boss 8 falling arrows (total 3040.06) [48.25]

    • PvP
      The up arrows will launch for the rest to connect, but if they are at least 2 floors above you then the falling arrows will miss all except 1 or 2 hits so you have to be close enough.
      The falling arrows will push enemies towards the direction you faced when casting the skill, if you face towards the opponent they can get hit with the entire line then have time to combo into groundZ. If facing away from the opponent, only 1 or 2 will hit.
      • up shots: launch 47 x10 (470), falling arrows: push and force-standing 18 x3-6 (max 578 [09.17] plus possible combo)

Head Shot (tiro certeiro)
Does a single perfectly-straight shot with infinite range and can aim up/down and keep the aim from groundZ.

It's said that this skill has a chance to put to Fatal in PvP or deal extra damage in PvE but this looks outdated.
  • ~1113 [17.66]

    • PvP
      Same on-hit properties as normal arrows (they recover first).
      force-standing 970 [15.39]

    V2 - Afterward will give you one second to aim and shoot another shot before ending, but they don't combo by so much time that they may evade it.
    • ~582 x2 (1164) [18.47]

      • PvP
        The 2 shots will combo if close enough, for the 2nd skillfreeze to stop them in place.
          force-standing 507 x2 (1014) [16.09]

Sharp Shoot (tiro élfico)
Single shot (can aim before and during), doesn't pierce, keeps exploding them for one second. Will backdash before recovering. Needs V2 for full potential.
  • 628.24, 46.49 x10 (1093.14) [17.35]

    • PvP
      Leaves standing and only just barely won't combo into groundZ.
      force-standing 547, 40 x10 (947) [15.03]

    V2 - Modified to pierce enemies dealing splashing damage from each one. Lire's enemy-stack skill aside from 3rd job's LV4 skill.
    The initial shot now doesn't do damage and pierces targets to affect almost an entire row of enemies, where each enemy hit explodes for splashing damage, for bonus damage per enemy stacked in the same place. Also is a great giant line AoE on its own right but in PvE deals low damage against enemies alone, and can only affect 4 enemies per cast.
    • ~49 x10 (1 enemy 490dmg, 2 together 980, 3 together 1470, 4+ together 1960 [31.11])

      • PvP
        force-standing 73, 94 x10 (1013) [16.07]
5-2a: Lire 1st job (part3)
Dark Shot (buraco negro)
Aimable shot, it goes perfectly straight and explodes at mid-range unless it hits an enemy earlier, wherever it explodes it makes a wide AoE (can reach up or down) that keeps pulling and hitting enemies and keeping them in place for a second.
If it hits an enemy, the AoE is forced to center on them, where it will reach half a platform up and half a platform down. If you deliberately miss and hit the air, it will instead hit one full platform up, to hit 2 floors at once.
  • 36.13, 36.13 x30 (1120.03) [17.77]

    • PvP
      Deals enough damage to completely empty down gauge and lets you combo after into at least groundZ.
        force-standing 31, 31 x30 (961) [15.25], plus combo

    Scatter Shot (campo dispensor) - Not very good.
    Makes a non-hitting mark a mid range straight forward (by tapping up/down you can aim diagonal up/down or straight up/down). Your normal attack arrows that pass by that area will convert to 5 copies of itself at a wide angle and now they count as special attacks/skills instead of basic arrows, but their damage is reduced.
    Will keep the aimed angle of arrows, or with jumpZ always spread-shots downward. The mark itself lasts very long at around 25sec but it is spent after 5 arrow triggers.
    If the enemy is close to the mark it's possible for every copied arrow to hit the same enemy. Arrows are singletarget.
    • converts normal arrow into 5, applying SpATK but lowering its power by ~67.44%, where those 5 will deal around 170% of one normal arrow's damage
      Normal shot 5 times is 35.81 x25 (singletarget 895.25)[14.21], for stronger arrows can use 3rd job dashatk 5 times (singletarget 1367)[21.69], or 4th job Critical/dashatk (singletarget 1338)[21.23]

      • PvP
        from 151 to 40 x5 (200), full 5 triggers 1000dmg [15.87]

Trap Shot (armadilha élfica)
Can do bonus damage against raid bosses in V1 or V3.
Shot (can aim during skill animation but not before from groundZ), at whatever enemy or place it lands on it will leave a wide trap. When an enemy gets close it instantly makes a very wide AoE. Trap can stay for up to 10sec, but if the arrow itself hits it will explode instantly.
  • ~442 x2-6 depending on width (884 [14.03], giant boss 2652 [42.09])

    • PvP
      Will launch and combo into groundZ combo.
        force-standing 119, launch 164 x6 (1103) [17.50]

    V2 - This version can't get bonus hits on very giant enemies.
    Makes a rectangle explosion centered from the enemy that is not as wide as before and reaches 1 floor up. The initial arrow does no damage.
    • ~189 x6 (1134) [18.00]

      • PvP
        A much better version that explodes centered on the enemy that touched it and launches even higher. The splash is not as wide as before and reaches 1 floor up.
          force-standing 0, launch 164 x6 (984) [15.61]

    V3 - The explosion isn't as tall as V2 but is less narrow. Hits in 3 different parts across its width.
    Can do more damage than V1 against supergiant bosses.
    • ~161 x6-18 depending on width (966 [15.33], giant boss 2898 [46.00])
      Shot on a light enemy launches and makes 8 hits with many aerials for around 1600

      • PvP
        Too weak. Damage is divided between the 3 parts but you can't land all 3 parts at once in PvP.
          force-standing 0, launch 58 x6 (348) [05.52]


LV3 skills

Arrow Explosion (tempestade de flecha)
This is more of a PvP skill because it's so hard to predict where they'll appear and dodge both parts, sort of a meteor skill. In PvE it's weak in AoE from arrows being split per enemy.
Some arrows may hit on the beginning like a melee skill especially to bosses but they don't pierce so they disappear and won't reappear for the second part when they spiral back into the stage forward of you.
  • 150.29 up to x16 (singletarget max 2404.64) [25.04]

    • PvP
      140 xN (often 1400) [14.58]

Meteor Strike (flecha meteoro)
Easy AoE. Essentially hits as a wide rectangle AoE in front of you that also reaches 1 floor down, then another rectangle but not going down.
  • 166.52 x10, 170.62 x3 (2177.06) [22.67]

    • PvP
      First part will leave standing on airhit (airhit OK), second part knocks down.
        force-standing 135 x9, launch 138 x4 (1767) [18.40]

    Stardust Rain (estrelas cadentes)
    Does one shot straight up (a lot of the damage is in this), then it shatters and rains explosive arrows to its sides hitting as a rectangle to both sides from you and 1 floor up. The way that the projectiles rain down for more hits is inconsistent across distance and depends on enemy size.
    • up shot 861.31, each arrow that hits is 272.17 x1 plus 77.76 x5 (660.97 per arrow: 1 arrow total 1522.28 [15.85], big target 3 arrows total 2844.22 [29.62], maybe more on raid bosses)

      • PvP
        Will hit with 1 to 3 different arrows for 2-6 hits.
          up shot 1200 float, 2-6 hits of 108 (only AoE 216-648) which on airhit will force standing and knock down on groundhit

Demi Shock (canhão celestial)
3-floor AoE and pushes enemies, but needs full wave hits for full damage. Stronger on raid bosses but GuardianAttack1 is stronger than this at that.
Creates a damaging vertical beam right in front of you that stretches 2 floors above, and it moves forward barely past screen edge, dragging enemies along with it and constantly dealing damage. Big area but damage is partially lost easily depending on how long it hits the enemy in its lifespan.
  • 136.21 up to x23 if pushed along or very wide (3132.83) [32.63], less hits on any unpushable enemy that isn't giant enough

    • PvP
      Forces standing state on airhit (airhit OK) and leaves standing to combo into groundZ unless you are too close forward into the corner.
        force-standing 79 x23 (1817 if hitting since the beginning) [18.92] plus combo, less damage if not starting close or if they have super armor

    Magic Missile (disparo engenhoso)
    Guidable AoE.
    A guidable crosshair appears and you move it with the arrow keys (can go somewhat past the screen), after a short time it makes an explosion on that spot (other players can't see it until it explodes, enemies may move away before it explodes). Can be useful for dealing full damage at any distance and angle, like when used with X↓ stance from long range.
    • ~251 x8 (2008) [20.91]

      • PvP
        Launches and can combo into ZZZ if aiming slightly up.
        Because of how it launches and deals its damage across some time, must aim at their head instead of feet otherwise it can deal 2-4 less hits. The explosion can cover the floor above but for less hits due to launch.
          launch 214 x8 (1712) [17.83]

Guardian Attack (elite de eryuell)
Huge AoE forward slightly past screen edge and stretching 2 floors up. Number of hits depends on size.
  • 155.04 xN, normal size x8 = 1240.32 [12.92], max x27 (4186.08) [43.60]

    • PvP
      Forces standing state on airhit (airhit OK) and barely hits for enough time to combo into groundZ.
      The start has a weak diagonal-up shot that bounces them into the AoE but if this hits on 3rd floor they get bounced away from the range.
        108 around x9 (972) [10.12], plus combo

    V2 - Now more of a simple forward beam for simple damage, reaches screen edge, reaches 1 floor up and down too at two-thirds damage.
    • ~105 xN (10 hits 1050 [10.93], giant on multiple rows can take up to x20 for 2100 [21.87])

      • PvP
        Forces standing state on airhit and rises per hit but doesn't have time to officially combo into groundZ.
          force-standing rise 109 xN (around x16, 1744 [18.16], or around x10 if one floor up or down, 1090 [11.35])
5-2a: Lire 1st job (part4)
LV4 skill
Very underwhelming AoE skill.
Basically a slightly better version of her default MP3, arrows still don't pierce so damage is divided between trash mobs. Shoots a storm from 2 points above you mirrored left and right from the diagonals, and also has a Rain of Arrows come down from above too. Most effective if used from below the main target (or if the monster is tall enough to be 1 or 2 floors above you).
  • On boss: ~436 x1, ~127 around x14, ~23 around x13 (2513) [19.33]
    Max on supergiant boss 3553 [27.33]

Awakening
Explosion around you reaching 1 floor up.
Single hit so weak if it does not crit.
  • 2608.12 x1 [20.06]

H
Hits basically the entire screen.
Also gives you ATK +15% and Super Armor for 20sec after it finishes.
  • 84.05 x19, 88.37 xN but max 19, 1380.90 x1 (2 hits 3154.59, giant boss max 4656.88)
5-2b: Lire 2nd job
Dash type: ground-only invincible roll
It passes through enemies and it's invincible for the entire animation (invincibility is lost after pressing Z for dashatk), but her groundZ does not hitstun enemies except on last hit or Critical/Double.
In PvP, the roll has hyper armor instead of invincibility.

GroundZ combo
This job's groundZ can freely angle up and down throughout the entire animation and has a wider spread of bolts (and bolts reach slightly longer than screen edge), but the downside is that it doesn't deal any hitstun to enemies so they can continue moving and attacking, except that the last Z (or Critical/Double anytime) will knock down.
Critical/Double will roll through and shoot backwards for knockdown. Can easily pass through monsters to dodge, but unlike the dash, Critical/Double has invincibility for only a very short time at the start.
Crossbow bolts across this entire job do not count as basic arrows or basic projectiles, they do not trigger Berserk and cannot be nulled/reflected as projectiles.
  • 52.86 x2 up to 5 times, last shot knocks down forward (528.6) (~209 DPS)
    Critical/Double: blowaway 109.17 x2 (218.34)

    • PvP
      72 x2 up to 5 times (720) (pushes with no hitstun), last shot knocks down (full hit 720)
      Critical/Double: knockdown 150 x2 (300)

Dash attack
The dash itself is great for going a long distance and can pass through enemies while being invincible, and the dash attack simply adds a backward knockdown shot without interrupting the dash, and from the attack you can press ↑ for a launcher kick forward. But you lose the invincibility if you do an attack.
  • blowaway 109.17 x2 (218.34), launch 167.95

    • PvP
      Has hyper armor instead of invincibility.
      Launcher can combo into MP1 ↑.
        knockdown 150 x2 (300), float 289

airZ
Keeps shooting more normal bolts diagonal down.
While attacking can instantly cancel into fastfall.
  • 52.86 each

    • PvP
      72 each

air ↓Z
Shoots straight down instead, while being able to keep horizontal movement midair. Must keep mashing Z very fast to successfully get the full animation. The necessary distance away from the floor also makes it harder to plan the full animation.
While attacking can instantly cancel into fastfall.
The 7th shot and forward will knock down to the side which makes it hard to land many hits on lone monsters, but groups are easier to land hits on and heavy monsters can take all hits: this attack has above-ottoshot DPS when it fully lands, charging MP extremely fast if you can fully land it.
  • 52.86 x6, 109.17 x18 (full 2282.22 damage, ~570 DPS)

    • PvP
      The first 6 shots don't cause hitstun and the rest will instantly knock down on hit, probably not hitting more than once since then.
        72 x6, knockdown 150 x1

air ↓↓
Fastfalls straight down. Can also be done from inside airZ and air↓Z to cancel them instantly as an evasive option whenever doing them.
But this existing also makes it less possible to do air↓Z after trying to drop from a platform.


LV1 skill
A defensive attack that shoots to both sides to mid-range with instant knockdown.
Shoots 4 per side but needs to be closer for more hits. Normally shoots sideways at slightly downward angles, but you may tap ↑ to change them to slightly upward instead (better for a juggle, or anti-air).
  • ~169 x4 (676) [23.31], from inside boss two sides 1352 [46.62]

    • PvP
      Often only lands 1 hit, or 2 if closer. If used after dashatk↑ can land all 4.
        knockdown 93 x1-3 (93-279), x4 372 (12.82)

LV2 skill
A piercing kick forward to screen edge moving you there while time is frozen, essentially a forward beam AoE that also teleports you there.
In PvE can get the back bonus if used close.
  • leaves standing, 1228.94 [19.50], back 1966.30 [31.21]

    • PvP
      knockdown 1070 [16.98]

LV3 skill
A slow piercing projectile straight through the entire lane, it will try to knockback them along for more hits if they aren't super armored. Deals average damage on most bosses, less to smaller monsters that can't take knockback, and much more to enemies that can take knockback.
  • 90.30 per hit
  • Draggable monster 49 hits (4424.7) [46.09] but less if you started too close to them
  • Undraggable monster 15 hits (1354.5) [14.10]
  • Boss standing still 21 hits (1896.3) [19.75]

    • PvP
      Hitstuns long enough to combo after.
        force-standing 65 roughly x16 (1040) [10.83]

LV4 skill
AoEs straight forward to mid-range, then causes an explosion basically hitting the entire screen from that point (won't hit all the way behind you and reaches past the edge forward).
Very high damage for a very large AoE, possibly kills every trash mob on the screen at once.
  • shots push 279.93 x6, explosion 258.60 x9 (explosion alone 2327.4[17.90], explosion plus shots 4006.98[30.82])
5-2c: Lire 3rd job
Standard dash type (slowest)
Dash momentum: ~257, rocket ~630
*Cannot fastfall for advanced steps
*Has no held run unless on ground

Hitstun recovery speed: very fast

GroundZ combo
Her 3rd job's groundZ combo does combo every arrow together. Goes 3 taps and 3rd knocks down.
Has one UpZ and DownZ followup, they can be done as the 3rd shot or immediately after the 3rd shot.
  • 101.57 up to 3 times, last knocks down forward (304.71) (roughly 188 DPS)
    Critical/Double: 109.12 knockdown forward

    • PvP
      Loop: see the Up followup.
      139 up to 3 times, last knocks down (417)
      Critical/Double: 188 knockdown

You can replace the 3rd shot with one of 2 melee attacks instead, depending on whether you're holding Up or Down when about to do the 3rd shot or after it (doesn't work if you're still holding Up/Down from aiming during the first shot).

Up Z - Her launcher dash attack. On monsters can try to juggle from it once.
  • launch 167.94

    • PvP
      Can loop with Z Z ↑Z, repeating those 3 hits (except against cliff or an upward incline, but can also do the launcher into airgrab, or MP1 then attempt ground combo).
      • launch 193

DownZ - A melee stab, similar range to UpZ but you stay in place instead of walking forward.
On groundhit will actually leave them standing where they are, so this is a way to do the full shot combo without having to knock down, but you recover a bit after they do except this easily combos into skills. On airhit knocks down.
  • 176.39

    • PvP: 202

air↑Z
Actually like a normal melee character's airZ. Has good range forward and greatly extends both down and up to hit when falling or to anti-air. But it has floaty recovery time.
  • 117.57

    • PvP
      Because of its bad recovery, landing as you hit with this can leave a moment before you can act from the ground to combo after it so groundZ after this is not a true combo. Grab is a true combo. Dash-launcher can be tried.
      • 81

Dash attack
She actually has 2 different dash attacks depending on context: normally it's the usual Lire knockdown backshot.
But if you started the dash on the ground, and then tap Z when not holding the side anymore, it's a forward melee launcher, same as the Up followup from groundZ.
  • arrow 167.94 knockdown forward, melee same as from combo

    • PvP
      This is the same launcher from the ground combo but faster to start and still can loop combo from it.
        arrow 289 knockdown, melee 289 (launch on groundhit, knockdown on airhit)

airZ
Shoots diagonal down.
If doing dash-jumps into airZ with this job, it does not move you backward and you can keep moving forward to the enemy.
  • 101.57

    • PvP
      force-standing 139

air ↓ZZ
Shoots straight down once or twice while keeping aerial movement, cannot do more than 2 shots per jump. More for hassling in opportunity than making big DPS (in PvE, 2nd job shoots this angle for high damage). Can also be done just to gain altitude to pass 1 more platform per jump.
  • 101.57 x2 (203.14)

    • PvP
      force-standing 81 x2 (162)


LV1 skill
Perfectly straight shot forward, has infinite range and pierces enemies to hit an entire lane.
PvE: knocks down forward and can have very good AoE, can use for damage even many times in a row, even over using more expensive skills.
  • knockdown forward 597.96 [20.61]

    • PvP
      Forces standing state even on airhit and will always make a standing reset for you two at wherever distance they got hit, even if used inside combos, but you recover late after they do unless going into MP2.
        force-standing 520 [17.93]

LV2 skill
Spins with controllable movement while hitting enemies very close to both sides.
  • ~161 x8, last hit knocks down forward (1288) [20.44]

    • PvP
      Knocks down in every hit. Attempts 8 hits over a few seconds but the knockdown property here makes it hit less times depending on enemy job.
      • 133 per hit:
        • Normal recovery jobs x3, or x4 if they tumble off a cliff (399/532) [06.33/08.44]
        • Fast recovery jobs only x2 (266) [04.22], then they stand back up and you can may hit them twice again
        • Slow recovery jobs (Arme/Mari) can take all 8 hits if you don't move past them (1064) [16.88]

LV3 skill
Kind of like meteor, doing weaker damage to a big area. The arrows spread a set distance to your left and right (basically the width of your screen unless you're in the corner), and they fall down ignoring platforms above your altitude to explode on platforms near your altitude or the next one below, there will be almost no damage except on the platform they explode on so you need to match their platform first.
  • 19.14 xN
    Around 36 hits for normal enemies (689.04)[07.17], around 67 on giants (1282.38)[13.35], around 100 on very wide bosses (1914)[19.93], around 200 hits on Berkas from barrier room (3828)

    • PvP
      Useless after the PvP rebalance. One main hit used to do over 50% HP so it could kill with 2 hits, now it's 8% HP.
      Has one strong hit and sometimes also does multiple weak hits.
      The arrows will do 1 strong hit above the platform, 2 strong hits at the platform, and 0 hits below the platform.
      • knockdown 340 x1 or x2 when exploding at their platform (340/680) [03.54/07.08], explosion may do a few hits 11

LV4 skill
Single straight shot that reaches 1 floor up and down (and can angle it up and down too), on hit it makes a big explosion. Doesn't stack per enemy anymore.
  • ~538.3 plus ~2067.2 (2605.5) [20.04]
5-2d: Lire 4th job
Dash type: ground run only

GroundZ combo
5 aimable shots, after starting the 2nd shot can cancel into Up for a kick that sends up or Down for a forward roll that shoots for knockdown.
  • 3 shots of 98.43 then 2 shots of 116.37 (295.29), last knocks down (roughly 242 DPS counting Double, 276 during attack speed buff)
    Critical/Double: 164.58 knockdown forward

    • PvP
      Only the first 3 arrows combo together, none of the 2 loud shots do. Last arrow knocks down.
      • force-standing 135 x3, 160 x2 (725), last knocks down
        Critical/Double: 226 knockdown forward


  • Up - Forward melee that sends up. In PvE will enable aerial bonus but launch very far diagonally.
    • diagonal launch 161.22, x2 on armored monster (322.44)

      • PvP
        Only combos from the first 3 shots, then after it only leaves time to combo into delayed ground dash grab, or skills (into MP2, or MP1 with very delayed timing to not slide under them).
          force-standing rise 111 + float/knockdown 111 (222)

  • Down - Does a shadow roll forward (invincible, and passes through enemies: you can keep doing groundZ with this job because you can cancel into roll anytime since the 2nd shot) then does one knockdown backshot, which won't combo from previous arrows.
    Note that you only count as facing backward after fully recovering, so technically you can do the shadow step just to cancel into skill farther forward from where you are.
    • 164.58 knockdown forward

      • PvP
        226 knockdown forward

Dash attack
Lire4's dash attack is split in an easier way: any normal dash attack is a kick slide forward which slightly launches them and tries to keep moving forward, and the knockdown backshot is done with dash-backZ.
The dash attack launches them and keeps still going forward, but in PvP it only easily combos into shortcutted LV2.
  • melee 166.30 small launch, shot 164.58 knockdown forward

    • PvP
      The dash attack can easily combo only into shortcutted MP2.
        melee 286 small launch, shot 226 knockdown forward

airZ
Shoots diagonal down.
Can repeat dash-jumps into airZ, to keep shooting but without having to plant yourself in place.

With very hard timing, can ottoshot at any range even on miss because the momentum can float you back up the platform.
  • 117.57

    • PvP
      243

Doublejump airZ
Kick down same as 1st job.
  • stagger 115.85

    • PvP
      79 knockdown

air ↓Z
Does 2 shots straight down, but this one doesn't affect your jump trajectory at all and you keep falling in the normal falling arc, possibly leading into close grab/dashatk or attempted groundZ.
  • 117.57 x2 (235.14)

    • PvP
      force-standing 81 x2 (162)


LV1 skill
Does a short dash attack forward, then 4 piercing straight shots with the last knocking down.
  • 133.62 x5 (668.1) [MP rate 23.03], last knocks down

    • PvP
      The dash attack is hard to connect against airborne opponents but does force standing state on airhit to continue comboing. Since only the last arrow knocks down, could cancel before it into MP2 or this skill again for more damage in one combo.
        force-standing 116 x4 (464 so far), knockdown 116 (580) [20.00]

LV2 skill
Makes two damaging pillar AoEs on your left and right that can reach 1 floor up, they stay on the stage for 7 hits. And in the center you shoot non-piercing arrows straight up.
  • up shot 17.22 x14 (241.08dmg, or launch aerial 353.01), pillar ~168.3 x7 (pillar alone 1178.1, plus up shots 1419.1)
    Near giant hitting with up shots + 2 pillars: 2597.2 [41.22]

    • PvP
      The AoEs may combo into groundZ (can adjust yourself with one dash-jump airZ first). If hitting with the up arrows, launches very high and can walk to the side, shoot ZZZZ angled up then combo into up kick.
        up shot 30 x14 (420), AoE force-standing 213 x4 (852), plus combo

LV3 skill
Shoots a continuous stream of piercing arrows like a beam while freely continuing to aim up and down, then does a knockdown spreadshot.
Can press Z to spend 0.3 bars of MP to fire another 5 shots before the finish, up to 3 times (total cost 3.8 bars).
  • 65.93 x15, 180.86 x5 (singletarget 1893.25) [19.72]
    0.3 bars for 65.93 x5 (329.65) [32.96]

    • PvP
      force-standing 57 x15, force-standing 157 x5 (1640) [17.08]

LV4 skill
Does 3 aimable shots in sequence, each makes a big lasting AoE wherever it hits, forcing airborne and pulling into the center to trap them for a few seconds. Can put all 3 in the same place or split the 3 shots around.
  • shot ~274 and area ~733 (1007), done 3 times (3021) [23.28]
5-3: Arme (general)
GCC notable changes:
-Base job MP drain skill does not refill a full bar, DEF debuff weakened
-2nd job cure doesn't heal self anymore
-Arme3 DEF buff is weaker but is given to all teammates in the stage too
-Arme4 ground combo is buffed to combo the hits more reliably
-XX recovers less MP

Story:
Born in Serdin near the Violet Mages guild, Arme miraculously had naturally extreme magic powers in her as if she already had a lifetime of experience; her parents feared her for as a child she accidentally caused destruction around her with her uncontrolled magic power and instead abandoned her to the Violet Mages, where the grand mage did adopt her, and had her enlist the guild at an unusually early age with her prodigious abilities, which may have dialed up her mocking childishness. With training she did learn perfect control.

While she did get hand-picked to the Grand Chase to ultimately defeat Kazeaze, Arme would also prefer to study more new facts about magic and ancient lore in their adventures instead of just beating up bad guys again, although she would have no trouble beating up any mean person, probably even without magic if needed.

Fun fact:
Arme is supposed to be the cute one and her inventory screen facial expression is winking at the camera, but with her relative lack of unique-looking outfits or high-motion animations from being one of the oldest characters made, this can get extremely overshadowed by some of the newer female characters.

As the mage of the game, Arme's skills often are bigger and stronger and more useful than usual, she can switch between black magic and white magic by pressing X to carry 2 sets of skills at once (except in 3rd job), and she can charge MP faster by idling to focus on skill use (adds +230% MP Regen worth, from 22.1sec per bar to 6.7sec per bar). She also starts matches with 1.5 bars of MP already ready.

Teleport - All of Arme's dashes are a phasing short teleport. During most of the animation she is completely invincible from the beginning and easily passes through enemies (invincible for 1 second, or 0.5 if faster dash is equipped). The limitation is that Arme is one of the few slow-recovery characters in the game, so if she does get hit it takes longer for her to be able to press buttons again instead of simply being able to mash dash to escape when able to move again, so more combos are possible than normal against her too.
Arrow Defense - Arme is one of the few characters who cannot do Arrow Defense when hit by enemy arrows.

Skilltree allclass trait - When neutral, can tap XX to lose 20% of your HP to restore roughly 2/3 of a bar of MP. Can be good to get that last bit of MP to shortcut-cast a decisive strong attack, or to help cast CureV2 to others as you will heal yourself with it anyway.

Dash type: invincible teleport
Side teleport is invincible for 1sec, or only 0.5sec if faster teleport is equipped.
Can equip an UpUp/DownDown version of it too.
Can equip a passive to be able to reverse a side teleport to the other side but this could be done unintentionally if not careful.

Dash momentum:1st job ~420 pixels (~393 with faster teleport), 3rd/4th job ~416 (~384 with faster teleport), 2nd job ~412 (~384 with faster teleport)
5-3a: Arme 1st job
GroundZ combo
The old magic circle attack was removed around Season 5.
Two melee hits stepping forward, then two AoEs forward that end in a small launch. Against normal monsters, can repeat the first 3 taps as an infinite combo on monsters instead of launching (stunlocking even groups but with lower ~184 DPS). Against a heavy monster that can't be knocked around, repeating ZZZZ is stronger (~271 DPS), and against a giant that takes full hits from the yellow wave you can repeat ZZ↑ for ~295 DPS.
At anytime when using the combo, can cancel into ↑ wave for its short invincibility frames at the very start.

Critical/Double will do a very short dash into one side while shooting her dashatk fireball to the other side.
  • 65.75 / 65.75 / 65.75 x3 / 124.15 x2 (577.05)
    Critical: 170.3, Double: 340.7

    • PvP
      The melee combo doesn't true-combo the 2nd hit into the magic hit (except against Arme/Mari), opponents can attack/skill/grab during this break: to be completely safe, you need to do only the melees into a skill or Critical V2.
      If successfully doing the full groundZ combo, can combo into dash grab (+370) or a backward Critical fireball (+293dmg), the fireball will leave them standing to leave a combo opportunity into skill if you then turn around.
      Can also loop ground combo although they can break every time if not Arme/Mari: do the combo cancelling into ↑ wave as soon as she stomps the ground which will stun them to combo into groundZ again. The timing for the ↑ wave is hard.
        90 / 90 / float 90 x3 / float knockdown 171 x2 (792)


Critical V2 - Substitutes the fireball Critical (not Double) with a radius melee attack that pushes away, weaker in PvE.
  • 44.4 x3 (132.6)

    • PvP
      Having this also allows a safe true combo from the melee combo, and can lead into skill.
        launch 76 x3 (228)

Double V2 - Substitutes the fireball Double (not Critical) with a radius melee attack done twice in a row. Much weaker in PvE.
  • 28.5, 57 (85.5)

    • PvP
      float 49, knockdown 98 x2 (usually only connects 1 hit of the 3 before knocking down)

GroundZ combo, Up followup - Can only be done since the 2nd tap of ground combo. Cancels the combo into a different move, it has slow startup (breaks any combo that you were doing) then sends a wave that will hit a decent length to both sides as well as straight up and diagonal up, launching normal monsters or dealing extra hits to heavier monsters.
*Also, this move is invincible in the first half of the animation: it's a dodge that doesn't move. You can time it like a parry against a physical attack or projectile and it will pass through you. While you can dash for invincibility when not attacking, this one can be done instantly from ground combo.
  • launch 23.1 up to x21 on giants (485.1) (repeating ZZ↑ on boss is ~277 DPS)

    • PvP
      The wave has decent active frames to catch anyone advancing on you (even from the air) and forces standing state even on airhit, gives time to combo into grab or skill. And it's still invincible to avoid any advancing attack then hit them out of it.
        force-standing 15 around x6 (90)

Dash attack
Her only ranged normal attack. Hits 1 enemy and has infinite range straight forward, can be spammed but has low DPS.
This counts as a basic projectile so it can be nulled/reflected by certain reflectors.
  • 170.3 (~160 DPS repeated)

    • PvP
      Forces standing state even on airhit. Can hitstun for long enough to combo into a skill.
      Using fireball halts your MP regeneration momentarily, so spamming this move makes you recover MP slower than moving or attacking in other ways. This also happens in the Critical/Double fireball.
        force-standing 293

airZ
Short range but has a helpful downward angle. Sometimes does 2 hits on monsters, easier against giants.
Ottoshot: no.
  • 76.4

    • PvP
      Unusually for an airZ, this one instantly knocks down on any hit, the purpose being that this helps you run away but it can't lead into groundZ combo like others. It also has very fast startup and this job has very fast jump startup speed so you can jump and instantly airZ into an enemy as a defensive attack possibly faster than ground combo (the downward angle helps too).
      Will do 1 hit, or 2 hits if they are in the air.
      This attack can be reflected as a projectile but this is rare to see.
        knockdown 157 x1, possibly x2 on airhit (314)

Z↓ doll (unlockable)
Backdashes and leaves a physical object on your old spot. It lasts 4 seconds, bodyblocks enemies, and absorbs 1 physical or projectile hit until it dies. There is no limit to how many you can have, you can walk backward this way leaving several in front.


LV1 skills (black side)
Petrify (Stone Curse)
A cone AoE forward to screen edge, the outer half reaches 1 platform up and down. Very big range for a LV1 skill. In PvE will force-stun monsters out of their attack animations.
  • 447.89 [MP rate 15.44]

    • PvP
      knockdown 476 [16.41], can be less than half


    V2
    Simply adds a bonus DoT to the hit.
    • 429.10, plus DoT for ~9.3 x8 (503.5 total)[17.36]

      • PvP
        476, with 9 x8 (548) [18.89]

Debilitating Aura / Blood Pest (drenagem)
Shoots a homing projectile directly to the nearest enemy aiming even straight behind you, in a straight line reaches up to around screen edge distance before it disappears. Does light hitstun then returns and gives you around 2/3 of an MP bar back.
In PvE very good for being able to easily use for invincibility frames while paying back its MP cost, and doing damage meanwhile.
  • 515.26 [17.76]

    • PvP
      Halved MP gain.
      force-standing 345 [11.89]

Fire Shield
Self-buff. Simply gives you +100% DEF (-50% dmg) for 3sec, 5sec at V2. In PvP +50% DEF (-33.3% dmg). Can be used for short invincibility time and gives some protection after that.
Will not erase Magic Shield.

Ring of Holding (raio paralizante)
Piercing shot forward inflicting bind. Only works if they are on the ground, not in the air.
  • 447.89 [15.44]

    • PvP
      Must hit while they are standing on the ground. Traps them until they mash out, hitting them more while they are trapped will not break them free but once they mash enough they instantly recover without hitstun from the previous hits. You can attempt multiple combos, or do one full or partial groundZ combo then end with walking grab before they recover.
      • no damage, plus combo

    V2 - Same skill but during recovery it adds a non-piercing shot afterward for damage to 1 enemy.
    • initial piercing hit 258.56, non-piercing shot same damage (517.12 first enemy, 258.56 AoE) [17.83/08.91]

      • PvP
        initial shot no damage, non-piercing shot force-standing 187, plus combo
5-3a: Arme 1st job (part2)
LV1 skills (white side)
Magic Shield
Self-buffs with a shield that nulls 2 hits you take (launch hits will still apply, making you lose both hits), doesn't wear off over time so you can set it up again anytime you don't already have one.
    V2 - Reduces it to only 1 hit, and adds one ability: during the first or second presses of groundZ combo, tapping Forward will lose the shield and throw it forward as a multi-hit magic circle attack that hitstuns them for a second while dragging them away.
    • ~46 per hit (max 10, 460) [15.86]

      • PvP
        Combos even on airhit, gives enough time to skill or approach and groundZ.
          force-standing 38 x9 (342) [11.79], less hits if they can't get pushed along

Fear (amedrontar)
Shoots a spread of 3 non-piercing projectiles forward , straight and diagonal up/down. At close range they can all stack on the same target for more damage but same effect. Does only light hitstun, and slightly debuffs their ATK for 12sec. You can actually turn to shoot backward by tapping to the other side.
  • 151.59 x3 (454.77 singletarget) [15.68], -7% ATK/dmg for 12sec

    • PvP
      Light hitstun and forces standing state on airhit.
        force-standing 110 x3 (330) [11.37], -3.5% ATK/dmg for 12sec

    V2 - Changes the ATK debuff into a DEF debuff, raising the damage they take from your entire team. Weaker than it used to be but still common for PvE groups, has multiplicative stacking with DEF debuffs from other characters.
    • 156.82 x3 (470 singletarget, or 493 counting debuff) [17.03], -7% DEF (+7.5% dmg) for 12sec

      • PvP
        force-standing 82 x3 (246 singletarget, or 252 counting debuff) [08.68], -3.5% DEF (+3.6% dmg) for 12sec

Wall of Ice (barreira de gelo)
Makes a 2-floors-tall wall on your two sides that last 2sec, won't absorb attacks but it physically blocks enemies from entering and nulls certain projectiles, you get a moment to run away or attack. Enemies caught inside at the beginning at your own floor get hit and get knocked outside.
Casting this twice in a row may shove them back in.
  • 260.67 x2 (521.34) [17.97]

    • PvP
      If doing melee combo on an enemy and you're very close to the cliff almost pushing them off, using this skill will knock them off but keep pulling them back in because of the wall, to combo into ZZZZ↑ then one more ZZZZ.
        knockdown 189 x2 (378) [13.03]

Frost Ring (raio de gelo)
Piercing shot until screen edge from center, hits at your entire height, light hitstun and has a bonus small hit at the ending spot.
  • 162.06 up to x2 depending on width, ending spot hit 117.62 (all 3 on giant 441.74) [15.23]

    • PvP
      On any hit will stop their HP regeneration for 10sec (doing around +100 damage?).
      Has long range as an attack, can be used from combos to make a standing reset at that range even on airhit (if used close can attempt to combo into groundZ).
        force-standing 171, ending spot hit force-standing 171 (171/342) [05.89/11.79]

    V2 - Ending hit is stronger and PvP debuff is different.
    • 162.06 up to x2 depending on width, ending spot hit 146.64 (all 3 on giant 470.76) [16.23]

      • PvP
        Instead of HP, this nullifies their MP regeneration for 10sec, basically removing half a bar. If used when you know they have less than 1 bar, they now cannot Counter or skill for at least 10 seconds.
          PvP same damage as V1


LV2 skills (black side)

Lightning Bolt (relâmpago)
Shoots an infinite-range piercing beam straight forward, you keep the beam for a few seconds and can angle it up/down a little.
  • 36.09 per hit, around 77 hits close (2778.93)[44.11], 63 mid range (2273.67)[36.09], 21 far (757.89)[12.03]

    • PvP
      Almost unavoidable damage every time you can use it. Forces standing state on hit to continue comboing even if they're in the air, and the ending leaves them standing and can combo into MP1, or if close can combo into groundZ.
      Damage has been lowered from ~60% HP to ~20% HP.
        force-standing 31 x26? (806) [12.79]

Creeping Death (nuvem da morte)
Single shot forward at slightly farther than screen edge, explodes for damage and leaves a DoT that deals extra damage per enemy in the same place (max 4). In PvE will hitlock them in place for it.
  • shot ~638, DoT ~12.4 x14 (173.6, total 811), add around 173 per additional enemy (1-4 enemies 811-1331) [12.87/21.12]

    • PvP
      shot force-standing 777, DoT 15 x14 (987) [15.66], add 210 per additional enemy

Shock Stun (impacto atordoante)
Often in PvE it's either this or its V2 due to the enemy stacking.
Shoots 3 non-piercing shots forward until screen edge distance, explodes with bonus splash to each side per stacked enemy (max 4). Forces standing state on airhit leaving standing far.
  • shot ~78 with explosion ~45 x3, done three times: main target 639 and others 405 [10.14/06.42], all take +405 per additional stacked enemy (2-4 1044-1854) [16.57/29.42]

    • PvP
      shot force-standing 110 with explosion 63 x2, done three times: main target 708 and others 378 [11.23/06.00], all take +126 per additional stacked enemy

    V2 - This is actually a modified Lightning Bolt beam that causes the Shock Stun explosion, per enemy hit together. Has a much bigger total area than ShockStunV1 but low starting damage and lower stacking bonus, so you're trading base and max damage for damage to more enemies in the stage at once.
    • beam ~12 per hit, explosion ~34 x4: around 77 hits close (1012)[16.06], 63 mid range (844)[13.39], 26 far (400)[06.34], +136 per local stack, 2-4 enemies together: close 1148-1420, mid 980-1252, far 536-808

      • PvP
        Slightly stronger than Lightning Bolt and much stronger with enemy stacking. Unlike Lightning Bolt, this will push enemies forward, losing some possible combos after it.
          beam force-standing 10 x13, explosion 90 x8: base 850dmg [13.49], +720 per local stack

Energy Ball
Slow big piercing shot forward to almost screen edge from center, drags them along and leaves them standing afar. Deals less hits total if it took time to begin hitting them, resistant monsters can take less hits from not being dragged along but some giants take the full 6 hits at the right range.
  • ~198 x3 against small resistant monsters (594) [09.42], average x5 (990) [15.71] max x6 (1188) [18.85]

    • PvP
      The shot is big and forces standing state on airhit to combo even on airhit, will drag them along and leave them standing afar.
        force-standing push 172 up to x6 (1032, some hits lost over distance) [16.38]

    V2 - Reduces damage per hit while doing 3 shots in the same total area instead of only 1. Pushes and hits easier but can this can result in less damage as it only will deal max hits on a wide monster that can't get pushed.
    • 88.52 xN, 9 hits for 796.68 [12.64] or less, giant max x18 (1593.36) [25.29]

      • PvP
        Complete downgrade in PvP because it shoves away to still deal the same amount of hits but at less damage per hit.
          force-standing push 67 xN
5-3a: Arme 1st job (part3)
LV2 skills, white side
Reverse Gravity
Just as Lightning Bolt has infinite range horizontally, this has very long range vertically. Essentially an instant radius AoE, reaching a decent amount to both sides but also stretching up and down around 3 or 4 floors, often the entire stage.
  • ~965 [15.31]
    *Can aerial for +50% damage after launching with combo

    • PvP
      Launches with fall damage. Damage isn't dealt if they're hit again while launched before landing.
        launch 924 fall damage [14.66]

    V2 - Instead of instantly superfreezing into the move (which is undodgeable), the beginning instead has an added second of invincible startup that will try to pull all nearby enemies closer to you into its range before doing the move for more total range, scary to see someone else do this. Damage is raised too.
    • ~1088 [17.26]
      *Can aerial for +50% damage after launching with combo

      • PvP
        launch 1041 fall damage [16.52]

Ice Trap
GIGANTIC rectangle AoE forward, reaches 20% past the screen edge from center and also stretches 2 floors up. It explodes 3sec later but explodes instantly if you tap Z while time is still frozen.
  • ~1061 [16.84]

    • PvP
      Sends them up into the air. If exploded early, can combo into full groundZ combo as the melees miss but the wave lifts them up. If they were too close to you, you have to slightly wait until starting the melee or it hits and they fall down.
        high float 923 [14.65]

Ice Strike (esquife de gelo)
A radius AoE hitting to your sides reaching one floor up. Smaller than Gravity but in PvE will leave non-armored monsters in your floor frozen.
  • ~121 each, max 8 on giant (968) [15.36], freeze

    • PvP
      Freezes but knocks down right away.
        freeze, 274 x3 knockdown (822) [13.04]

Frost Explosion (prisão de gelo)
Just worse than other AoEs from the same slot?
Makes a line of 3 separate explosions going forward to before screen edge, floats with knockdown. Consistently hits with 2, or only 1 too close or too far.
  • ~351 x2 (702) [11.14], possibly 3 hits on wide monsters (1053) [16.71]

    • PvP
      launch forward 458 x2 (916) [14.53], x1 if very close or very far [07.26]

    V2 - Also 3 separate hits forward in a line, but instead of blowing the 3 hits in order and blowing away forward, they appear at the same time and first will freeze with no damage, then explode at the same time knocking down in place, making it harder to deal multiple hits.
    • 450.28 x1 or x2 if sweetspotted (450/900) [07.14/14.29], wide monsters can take all 3 hits (1350.84) [21.44], freeze

      • PvP
        freeze, knockdown 603 x1 or much harder x2 if sweetspotted (603/1206) [09.57/19.14]
5-3a: Arme 1st job (part4)
LV3 skills, black side
Meteor
AoEs practically the entire stage for damage to everyone. Extremely weaker in PvE where you're instead comparing total damage in the stage to the total singletarget damage of a different skill, her 3rd and 4th job LV3s do better area damage instead.
How you aim this matters: it likes to not pierce platforms below your own altitude, and it does more meteors in front of you than behind you. Damage varies depending on how many meteors stacked close to that enemy.
  • maybe around 300-900 damage on each monster depending on height and width, hard to tell

    • PvP
      Will hit everyone but they can still evade with a skill.
        force-standing 72 xN then 90 xN (bad hit ~330, decent hit ~800, best hit ~1000) [03.43/08.33/10.41]

Living Bomb (múrmuro)
Simple light projectile forward. DoTs the target, then when it ends it explodes for weaker enemy-stacking damage with a small launch. If the target is touching another enemy it explodes instantly per enemy.
  • shot ~344, DoT ~51 x9, explosion ~482 (total 1285) [13.38], add ~482 per stacked enemy, max 4 (2-4 enemies 1767-2731) [18.40-28.44]

    • PvP
      shot force-standing 420?, DoT 63 x9 without hitstun, small launch 588 (total 1575) [16.40], add 588 per stacked enemy

Finishing Touch (toque final)
Simple big AoE. Huge rectangle AoE forward to screen edge reaching 1 floor up. The ball cannot be stopped, it always hits in a pre-set AoE.
Sometimes does double hits if you are not room leader...
  • ~186 x10 (1860) [19.37]

    • PvP
      Launches but alone only combos into skills.
        launch 162 x10 (1620) [16.87]

Big Bomb (esfera explosiva)
Downgrade over Finishing Touch.
One piercing shot forward that drags them along, then an explosion starting from there. The explosion can hit one floor up and down but it unreliably bounces away if launchable to land very few hits. The explosion won't hit a closer-half enemy if they couldn't get dragged, and from afar will miss the dragging shot.
  • dragging shot 216.69 x4, 185.98 x6, 153.56 x3 (if not losing any hits, 2443.32) [25.45]

    • PvP
      force-standing push 188 xN, launch back 133 xN, repeated once (max ~1600)

Satellite Bomb (grande explosão)
Bigger AoE than Finishing Touch.
AoE forward reaching 75% until screen edge from center, stretches 1.5 floors up and 0.5 down, can get aerial bonus on light monsters. Will walk backward before casting, if walking off a cliff might lower the aim by 1 floor.
Monsters 2 floors up will take halved damage if they can be launched.
  • ~372 x5 (1860, aerials 2604) [19.37/27.12]

    • PvP
      launch 324 x5 (1620) [16.87]

    V2 - Downgrade. Simply hits more times on the same spot but damage per hit is lower, and not connecting every hit from launching away non-giants before it finishes lowers it more.
    • ~196 x10 (1960 if unlaunchable [20.41], misses many hits if launchable)

      • PvP
        launch 170 x10 (1700) but won't connect all


LV3 skills, white side
Cure
Restores a lot of HP to teammates close to you, and will spread to mid-range in 360 degrees, but teammates at mid-range get healed for around 1/3 less. Can revive teammates before they disappear, can heal on portal. Doesn't restore your own HP except in V2.

Healing is done with each heart that hits, with hit count being inconsistent but higher if close.
  • close will heal ~34% HP, mid-range ~22% HP

      V2 - Now it also heals yourself for a set 30% MaxHP on cast (15% in PvP).

Holy Strike (onda de choque)
Radius AoE also reaching one floor up. First hit leaves standing (to catch airhit), last hit knocks down.
  • ~776 each (1552) [16.16], possibly 3 hits on giants (2328) [24.25]

    • PvP
      force-standing 675, float/knockdown 675 (1350) [14.06]

    V2 - Summons the mages but it's still essentially the same, radius AoE but stretches out farther, and same amount of hits regardless of angle.
    • ~170 x11 (1870) [19.47]

      • PvP
        force-standing 148 x11, last knocks down (1628) [16.95]

Divine Fortitude (círculo divino)
Explosion on your spot also hitting 2 floors up (with 1 less hit only at the 3rd floor), blows them to the side not very far.
  • ~310 x6 (1860) [19.37]

    • PvP
      launch 270 x6, last sends to the side (1620) [16.87], 2 floors above x5 (1350)

Gorgos Flame
Shoots a piercing spread fire AoE from diagonal down to diagonal up, can reach 1 floor up and down. It's stronger closer in the inner half and almost powerless by screen edge. It starts by quaking in a radius from you so it can pull them from one platform below yours into the AoE. Quake hits behind you, not the fire.
In PvE needs to be done on giants, or pulling from 1 floor above them, for near full damage.
  • 25.49 xN, max 81 (half is 1019.6 [10.62], max would be 2064.69 [21.50]), radius quake 218.53

    • PvP
      force-standing 25 xN (decent hit ~1150, losing damage after half the range) [11.97], fall damage 142

    V2 - Simple good AoE, this is only a beam straight forward. Reaches around 2 whole screens forward, leaves standing. Has full damage in its entire range, except roughly halved only near the tip.
    • ~34 x56 (1904) [19.83]

      • PvP
        force-standing 30 x56 (1680) [17.50]


LV4 skill
Electric Spark
Low damage with very large area.
Does several lightning bolts across the stage, and does a big radius hit from you reaching mid-range on both sides and 3 floors up and down (stronger if very close or above them). Also leaves a minor shock DoT that will hitstun the enemy 3 times after that.
  • normal target 42.10 x20 (842) or wide monster x30 (1263) hitting across the stage, with hit near you 33.68 up to x20 (+673.6 from being close, both parts 1515.6/1936.6) [11.65/14.89]

Awakening
Large long AoE forward reaching multiple floors up.
It's 90% in the last hit so it's weak if that does not crit.
  • 4.91 x48, 2536.95 x1 (2772.63) [21.32]

H
Hits basically the entire screen.
Also gives you ATK +15% and Super Armor for 20sec after it finishes.
  • 94.46 x13, 1511.61 x1, also 55.82 x6, 34.11 x7, 893.22 x1 (4206.5) [32.35 if it cost as much as MP4]
5-3b: Arme 2nd job
airZ
Throws one arcing bomb forward that explodes on touch or a set time in mid-range for a light hit, and you can shoot faster by going up and down a platform to repeat faster (dashing before going up to jump faster), while freely moving around looking for a more advantageous place. But the damage output is lower than meleeing.
Doing dash>jump>airZ whenever going up lets you airZ much earlier than doing a normal jump into airZ but this forces some forward movement.
  • 114.6 (~181 DPS repeated)

    • PvP
      Bombs force standing state even on airhit (on close-range hit can combo into groundZ even on airhit).
        force-standing 197

GroundZ combo
Range is average but startup is fast.
Two melees into a bomb throw, can start as a miss to throw the bomb forward.
  • 200.9 / 200.9 / 65.4 x3 (644.95)
    Critical: 45.4 x2-3, Double: 90.8 x2-3

    • PvP
      After the full 3 taps you can do Double for 1 more hit of Double. Critical is weaker than going fully, only useful for forced knockdown or hitting behind you.
        276 / 276 / float-knockdown 94 x2 (740)

Dash attack
Her only melee besides groundZ. Short melee forward that also hits slightly behind you, knocks down, has moderate active time to hit after starting to be able to use defensively from the teleport (even if they slightly passed through you) and has good range forward after coming from the dash.
  • 45.4 x3 (136.2)

    • PvP
      It's possible to put a MP1 mine after this, where they'll trigger it when possible if they don't manually leave the range.
        knockdown 78 x2-3 (156-234)

dash-backZ
Not listed in the movelist. From the ground, shoot an airZ bomb behind you without having to involve jumping. But it has increased recovery so rate of fire is much slower and you and the opponent recover at around the same time.
Cannot be used if you have skilltree allclass teleport backdash enabled.
  • Same hit as normal jump attack


LV1 skills
LV1, black
Without timefreezing before or after, puts a mine one step in front of you. It explodes when an enemy gets close for damage and sending them up. It can stay in place for up to 8 seconds before detonating. Can also be used as a direct attack when close to trigger almost immediately.
  • 559.86 [MP rate 19.30]

    • PvP
      The mine is invisible to the enemies, they will only hear the voice when placing it and will need to memorize where you placed it, or if you use it with them offscreen they will only hear the sound.
      On hit launches to possibly combo into jump mid-fall airZ into ground combo, or mine into dashatk.
        blowaway 390 [13.44]

LV1, white
Refills a moderate amount of HP to teammates that are close to you but never yourself, costs only 1 bar of MP so can repeat for as much as needed. Can revive teammates before they disappear, can heal on portal. Amount scales to your ATK and can crit.

Because it's a super short animation that freezes time for longer than the animation lasts, in PvP it might also be used simply to freeze time and scan the situation and possibly get a free grab or combo afterward like Lass3's MP1 (or then escape an attack by dashing to keep invincibility). In PvE has better invincibility than black MP1.
  • heal is 3% of ATK (at max level with 19k ATK heals 570 HP which is around 12% HP), per bar spent


LV2 skills
LV2, black
Puts a poison cloud in front that lasts around 6 seconds. It constantly damages enemies inside, in PvE locking them in hitstun while doing damage but super armored enemies can evade early.
  • 2.55 x554 (1412.7) [22.42]

    • PvP
      It does damage without any hitstun but gives them a slowing poison, making them recover slower from all hitstun inside it, to do combos that can continue as long as the cloud lasts. You can do ZZ into charged MP2, then ZZ, ZZ, ZZZ Double.
        around 900 [14.28]

LV2, white
You and nearby teammates gain a barrier that protects against 2 hits. Has no time limit to wear off. In PvE can be given even to people already inside the room end portal.


LV3 skills
LV3, black
Shoots an arcing shot forward to mid-range, can aim up and down, exploding on touch.
Explosion stacks per enemy but getting the bonus is hard because it knocks back between hits except on corner or against heavy monsters.
  • ~386 x1, ~154 x4 (1002) [10.43], 2-4 enemies together 2004-4008 [20.87-41.75]

    • PvP
      float/knockdown 670, 270 x4 (1750) [18.22]

LV3, white
Creates 5 mines at a set pattern around you in different ranges, these do high damage and are positioned so that 1 hit from a mine often bounces into a second mine in PvP. They still only last a moderate 8sec.
  • ~1166 each (will do 1166[12.14] against multiple parts of the stage, one giant taking two mines is 2332[24.29], luckily three 3498[36.43], if somehow all five 5830[60.72])

    • PvP
      blowaway 634 each (may bounce to a second mine for 1268) [06.60/13.20]


LV4 skill
2 seconds after started there will be an explosion in front to screen edge (reaches 3 floors up, if you threw it forward off a cliff it will land downward first) and the explosion also spreads 7 mines across the stage like her white LV3 but at more damage and can wait 20 seconds before detonating.
  • explosion ~1895, each mine ~283 (1 on its spot plus 3 per side, if at stage end they stack 4 together, boss with explosion and triggering 4 is 3027 [23.28])
5-3c: Arme 3rd job
Has complicated normal attacks that let her do high damage at long range.

Dash attack
Arguably her real melee combo. One melee starting with good range (stopping here is plus frames for you), next tap launches then can do ↑↑ to directly do her fire hit for a full combo.
  • 45.85 / 30.5 / 152.8 x2 (381.95)

    • PvP
      PvP loop: keep repeating only the first hit of dashatk, release Forward before pressing Z or you will grab.
      Can also do dashZZ into MP1 (more than once) into dashZZ↑↑.
        79 / launch 52 / knockdown 105 x2 (341)

GroundZ commands
Her groundZ is unique: it will first rub the lamp then this gives 2 different attacks if you double-tap either Up or Forward, plus a third command for Back Back, or you rub the lamp a 2nd time which takes a moment longer but gives different attacks on the same commands. You can still walk and jump while it's charged before spending it.

First charge:
  • Up Up - This is her melee attack out of this, it's more of a defensive one. A single fire explosion forward with instant knockdown. Easily anti-airs and has good active frames (enough to catch past wakeup invincibility in PvP).
    • 152.8 x2 (305.6) (~235 DPS repeated)

      • PvP
        It attempts 2 hits but because of the knockdown, only 1 will connect in PvP except if it's airhit.
          knockdown 105 x1/2 (105/210)

  • Forward Forward - Interesting in PvP, simple average damage in PvE.
    Shoots 3 projectiles up from you, they curve slightly backward, in PvP forces standing state on airhit. It can hassle and damage the entire vertical area above you, or the other edge of the stage in a wide stage if you look against the corner.
    It also works as a melee attack if at closest distance with an enemy in front of you or against someone directly above you, with all 3 projectiles connecting at the same time and leaving standing.
    • 92.35 x3 (277.05) (~256 DPS repeated)

      • PvP
        force-standing 63 x3 (189)

  • Back Back - Puts a projectile reflector in front, it only lasts one second but can be upkept if repeated.


Second charge (takes more time to combo into):
  • Up Up - A very strong shot diagonal up that then heavily arcs down, works as a mid-range attack or better up as a 2nd floor/3rd floor/anti-air attack. Can be Arme's highest singletarget/boss DPS and is Arme's best ranged attack, and it also enemy-stacks for multiplied damage if the ball hits multiple enemies at once up to 4 (easier if very close to the enemies, but can be very hard on smaller monsters).
    The number of secondary hits that the ball can do depends on monster animation and size, max is 8 but can miss some.
    • 369.6, 36.96 x8 (max 665.28dmg, ~459 DPS repeated) (+295.68dmg/+203 DPS per additional enemy stacked, up to +3 times)

      • PvP
        Forces standing state on hit and leaves standing at the end, can hitstun for enough time to combo after it with dashatk or help prepare the next projectile out.
        Often hits well but sometimes misses most hits, especially when still going up.
          force-standing 190, 22 x8 (max 366)

  • Forward Forward - A blue fireball straight forward like base job.
    Freezes the monster for a set time, only freezes if they don't have any armor. Can keep supporting teammates but doesn't work on monsters that have permanent armor or ones that are using a red-outline armored attack.
    • 120.1 freeze

      • PvP
        Freezes on any hit even in the air, allowing any combo starter you want, or to reposition away and shoot more.
        In PvP this move has a minor cooldown, so that if you want to freeze and re-freeze the opponent by repeating this it'll be forced to have enough time for them to possibly mash out of it. It takes a total of 10 left/right presses to break off.
        • 82 freeze

  • Back Back - Not an attack, simply cancels the lamp charges so you can move like normal again.

airZ
A simple melee attack forward that can lead into dashZ combo or ottoshot, but it has good reach both straight downward and straight upward too. And this is Arme's only class that can ottoshot.
  • 76.4 (ottoshot is ~318 DPS)

    • PvP
      157

air ↓Z
Worse version.
  • PvE: 76.4

    • PvP
      This version knocks down on any hit. Has slower startup. Only reaches straight forward and a little backward which may hit someone passing under you or someone you're trying to jump into.
        knockdown forward 52


LV1 skill
Sends a hurricane moving forward, reaching 1 floor up. It drags enemies along with it. Actually strong depending on enemy, strong enough to repeat this skill over doing a bigger skill.
  • 63.09 xN
  • Stationary monster ~12 hits (757) [26.10]
  • Normal monster ~19 hits (1198) [41.33]
  • Average boss ~17 hits (1072) [36.98]
  • Wide boss ~20 hits (1261) [43.51]
  • Raid boss max 22 hits (1387) [47.86]

    • PvP
      Forces standing state on airhit and easily hits enemies in the air. Hard to avoid as a zoning tool to use out of nowhere and on hit guarantees freeze shot into dashatk, or just dashatk. If hitting at very long distance, can combo into the exploding shot, then freeze shot, then dashatk.
        16 xN (usually ~160) [05.51], plus combo

LV2 skill
Gives +100% DEF (halved damage) to yourself and all teammates in the stage for 10 seconds. Can make melee play safer, or be used for party in a very dangerous attack.

  • PvP: only +50%DEF (-1/3dmg) for 7.5sec

LV3 skill
Arme3's version of meteor. It's a single AoE that hits a set distance to your left and right (more or less the entire screen when not in the corner) and then stretches up 3 floors, and a partial floor down.
Since this needs to be close you can teleport behind them for back bonus first.
  • freeze 96.22 x14 (1347.08) [14.03], back hit bonus 2155.32 [22.45]

    • PvP
      In PvP this is a nasty wakeup trap to use because of the wide area and long active frames to hit past invincibility.
        knockdown 1000?

LV4 skill
Hits more or less the entire screen. Knocks down in place.
  • ~3090 [23.77]
5-3d: Arme 4th job
air ↓Z
Her fireball, it's from the air and diagonal down. Has to be midair but cannot be done immediately after dropping down a platform.
Only one fireball per jump but can repeat faster by going up a platform by using one fireball, jumping down the platform, then jumping up with another fireball. Works as a ranged attack but DPS is still lower.
  • 168 (~200 DPS up and down a platform)

    • PvP
      Reliable ranged attack that can lead into her meleeing or zoning. In PvP has a minor cooldown to not be able to repeat on platforms as fast as in PvE.
      On hit it actually pushes the enemy toward you instead of away from you to combo into grab if close, or attempt to combo into groundZ, or combo into skills.
      Doesn't lower MP regeneration to use unlike Arme1's fireballs.
      • force-standing pull 115

GroundZ combo
Short range but good.
Has only 2 presses, each swing does 2 hits. Critical/Double will knock down but you have slightly better DPS by just repeating ZZ which also continues comboing without knocking down (~347 DPS).
Also, can pretty safely attack bosses/minibosses by only repeating the first Z of the combo, so that you can teleport left/right to dodge whenever you want (~328 DPS), maybe the safest Arme job to attack with.
  • 127.2 x2 / 127.2 x2 (508)
    Critical/Double: 163.75

    • PvP
      Average range, relatively slower startup among groundZs.
      Will easily combo the two swings together, and combos into ZZ again so you can do ZZ-ZZ-Double.
      Before Double, can combo into lightning MP2 into ground combo again.
      Both swings will force standing state on airhit, so they can combo on anti-air or juggle combo.
      • force-standing 175 x2 / force-standing 175 x2 (700)
        Critical/Double: knockdown 282
        • (Old version PvP combo notes:
          1st tap does not true-combo into the 2nd tap normally, they may have time to skill/grab if expecting it. Starting with Z→→ (to do 1st tap into Critical with no time to check if it hits) will always combo, or 1st Z into skill shortcut button.
          But the 2nd tap WILL true-combo if the 1st tap did not connect as soon as possible, so ZZ works if the first Z takes a moment to hit by using it against an opponent just coming out of knockdown/invincibility, or anti-air against a jumping opponent or mid-combo when juggling)

Dash attack
Big disjointed melee attack forward hitting at your entire height (can anti-air).
  • 56.75 x3

    • PvP
      Launches far per hit, can combo into ground combo near the corner whether or not it hits in the air.
      • launch 97 x3 (291)

dash-backZ
Puts a projectile reflector in front, it only lasts one second but can be upkept if repeated. Only works on basic projectiles.
Also hits, not full times if they get pushed early.
  • 56.75 x2-4 (113.5-227)

    • PvP_

airZ
Simple hit, doesn't angle downward like Arme1.
If this is used right before landing down on a platform you will pass through it.
Ottoshot: no.
  • 76.4

    • PvP
      Quick knockdown hit, doesn't angle downward like Arme1.
        knockdown 157


LV1 skill, black
Makes a single fire pillar in front of you like a damaging barrier, hitting constantly but lasting only 2 seconds. Pushes enemies forward away from it. Not very useful, on corner can help infinitely combo a non-armored enemy but normal combo can already try to do that.
  • 36.00 up to x20 (720) [MP rate 24.82]

    • PvP
      The barrier forces standing state on airhit and pushes per hit. Normally will only deal 3 hits then leave them standing outside its range, but near wall will reach 5 hits then knock down instantly.
        force-standing push 71 x3 (213)[07.34] or x5 then knockdown (355)[12.24]

LV1 skill, white
A piercing shot forward at your entire height that freezes to combo afterward. Reaches 2 entire screens away (for certain stages this is like infinite range).
Monsters are only frozen if they don't have any super armor.
  • 131.31 xN, number of hits depends on width, normal 3 hits 393.93 [13.58]
    Void dragon 13 hits 1707 [58.86]

    • PvP
      Easily combos into groundZZ.
      • 322 [11.10], plus combo


LV2 skill, black
Makes a series of thunderbolts close around you to both sides, reaches 2 floors up, leaves them standing and can combo after. Does extra damage to wide bosses.
Also, if this skill hits it shocks them; for 9 seconds, every 3 seconds they will take a DoT for almost zero damage but this damage will hitstun them when it happens even if they were mid-attack (unless they were armored), so it's harder for them to rush you during this time.
  • ~51 normally x20 (1020) [16.19]
    Very small normal monsters can take only 10 hits (510) [08.09]
    Extra-wide bosses, especially ones you can walk through, can take 40 or 50 hits (2040/2550) [32.38/40.47]

    • PvP
      On hit leaves standing even on airhit and can combo into air fireball into grab, or this skill into groundZ. Since it hits around you can use as a trap on them as they finish recovering from knockdown especially if they're in the corner.
      The shock's 3 hits are troublesome in PvP and might give you another combo.
        force-standing 49 xN, roughly 637 [10.11], or roughly 931 behind you [14.77], DoT

LV2 skill, white
Essentially a beam to screen edge, reaches 1 floor up and down. Does up to 6 hits but only lands 2 hits at its farthest left and right.
  • 291.23 up to x6 depending on width (x2-6 582-1747) [09.24-27.73]

    • PvP
      Because of the launch, it can deal 3 hits against the same floor, 4 hits against the floor below, and 1 hit against the floor above. May combo into groundZZ.
      At the farthest left and right can only do 2 hits.
        launch 271 x3 (813) [12.90], x4 below (1084) [17.20], x2 (542) [08.60], plus combo


LV3 skill, black
Compared to Arme1 meteor, this meteor has limited range (this won't hit at all farther than around 50% past your screen) but deals reliably higher damage in the entire affected range, fully hitting with either 1 meteor or 2 meteors together for double damage (giant monsters sometimes more). When casting it reaches farther forward than backward.
  • each meteor ~77 x1 and ~48 x16 (845 [08.80], 2 meteors 1690 [17.60]), very giant monsters possibly more

    • PvP
      force-standing 74s and 46s (~800, sometimes ~1600) [08.33/16.66]

LV3 skill, white
Almost-infinite beam forward, around two and a half full screens (the entire Gorge of Oath stage). Most of the time it deals 14 hits, but at extremely far ranges sometimes it deals apparently 9, and sometimes only at barely over screen edge it deals over 20.
  • main target at screen edge 110.74 x28 (3100.72) [32.29], others in the AoE x14 for 1550.36 [16.14]

    • PvP
      Doesn't knock down or push, in PvP won't even kill from Fatal.
        force-standing 53 x14 (742)[07.72], or very far sometimes around x9 (477)[04.96], or around x22 barely beyond screen edge (1166) [12.14]


LV4 skill
Summons slower straight-down meteors, 1 above you and 4 to each side (around twice past screen edge to both sides), they multi-hit while passing through enemies then can explode on platforms also leaving a flame carpet (might not explode on a platform except for bottom level). Does 2 waves.
  • falling meteor ~37 xN (normal boss 10 hits x2, less on normal-height enemies), bottom explosion ~757 x2 (boss total 2254), plus flame carpet (presumed 180-630?)
5-4: Lass (general)
GCC notable changes:
-Lass1's skilltree combo down roll has been removed from the game

PvP-specific:
-Lass2's trail dash has hyper armor instead of invincibility
-Lass4's teleport cooldown 3sec>12sec
-Lass3's dashatk will automatically grab if possible when dashatk starts to hit


Story:
Secretly a half-breed of a haros-race demon father from the underworld and a human mother, Lass was born with a bizarre appearance with scale-like or stone-like growths over his skin. His father soon disappeared and his mother was demonized by others for having such a monstrous child, and eventually the nightmare circus took an interest and kidnapped the child to forcibly use him for years.

One day he comes to himself to find a mysterious power within him had awakened, and burned down the circus allowing him to flee; the blue flames, the power of his father.

With his skin marks permanently burned off from the flames, Lass travels the world alone until being brought to the Silver Cross Thieves where he learns to fight for himself with the way of the assassins, unaware that his previous escape may have been influenced by Kazeaze, who plots to use his unique body for a physical vessel and successfully possesses him. Lass would not become free again until Kazeaze is defeated by the Grand Chase in Ellia, where he immediately begs to repay his actions from when he was possessed, now fully capable of setting his own path. His name is later written as Lass Isolet, apparently copying Knight Master Lothos Isolet's family name after being accepted into humankind again.

Fun fact:
"Lass" is an interpretation of the Arabic word for thief. Old assets for Lass art and armor sets were also Middle-Eastern inspired.

Skilltree allclass trait - When neutral you can X↓ to temporarily turn yourself invisible until the next time you hit an enemy or get hit. Can be used regularly, has 15sec cooldown after it wears off once. Invisibility can last up to 20sec (10 in PvP).
In PvE: while invisible, monsters don't realize you exist and don't react to you, easily letting you run into position for an AoE back hit skill, or use to escape a bad spot without them starting another attack.
    In PvP: enemies can only see you as a faint shadow below your position (start this offscreen from them, so they might not notice you approaching or even know that you turned invisible, or so they might not see you when they walk forward into you).

Skilltree allclass trait - When neutral you can X→ to do a special jump that is basically a doublejump and an airdash at the same time. You recover still in the air ready to attack/doublejump/airdash. Moderate cooldown of 10sec.
With hard timing, can X→ then cancel into certain skills to use them from the air, easier if pressing A/S/D/F/G instead of holding Z. Doesn't work with all skills.

Skilltree allclass trait - When neutral you can X↑ to buff your own ground walking/running speed somewhat. Lasts 10sec, cooldown 20sec.
5-4a: Lass 1st job
Dash type: ground run only

Hitstun recovery speed: normal

GroundZ combo V1
Moves forward, has the problem of walking through a small monster on the first hit.
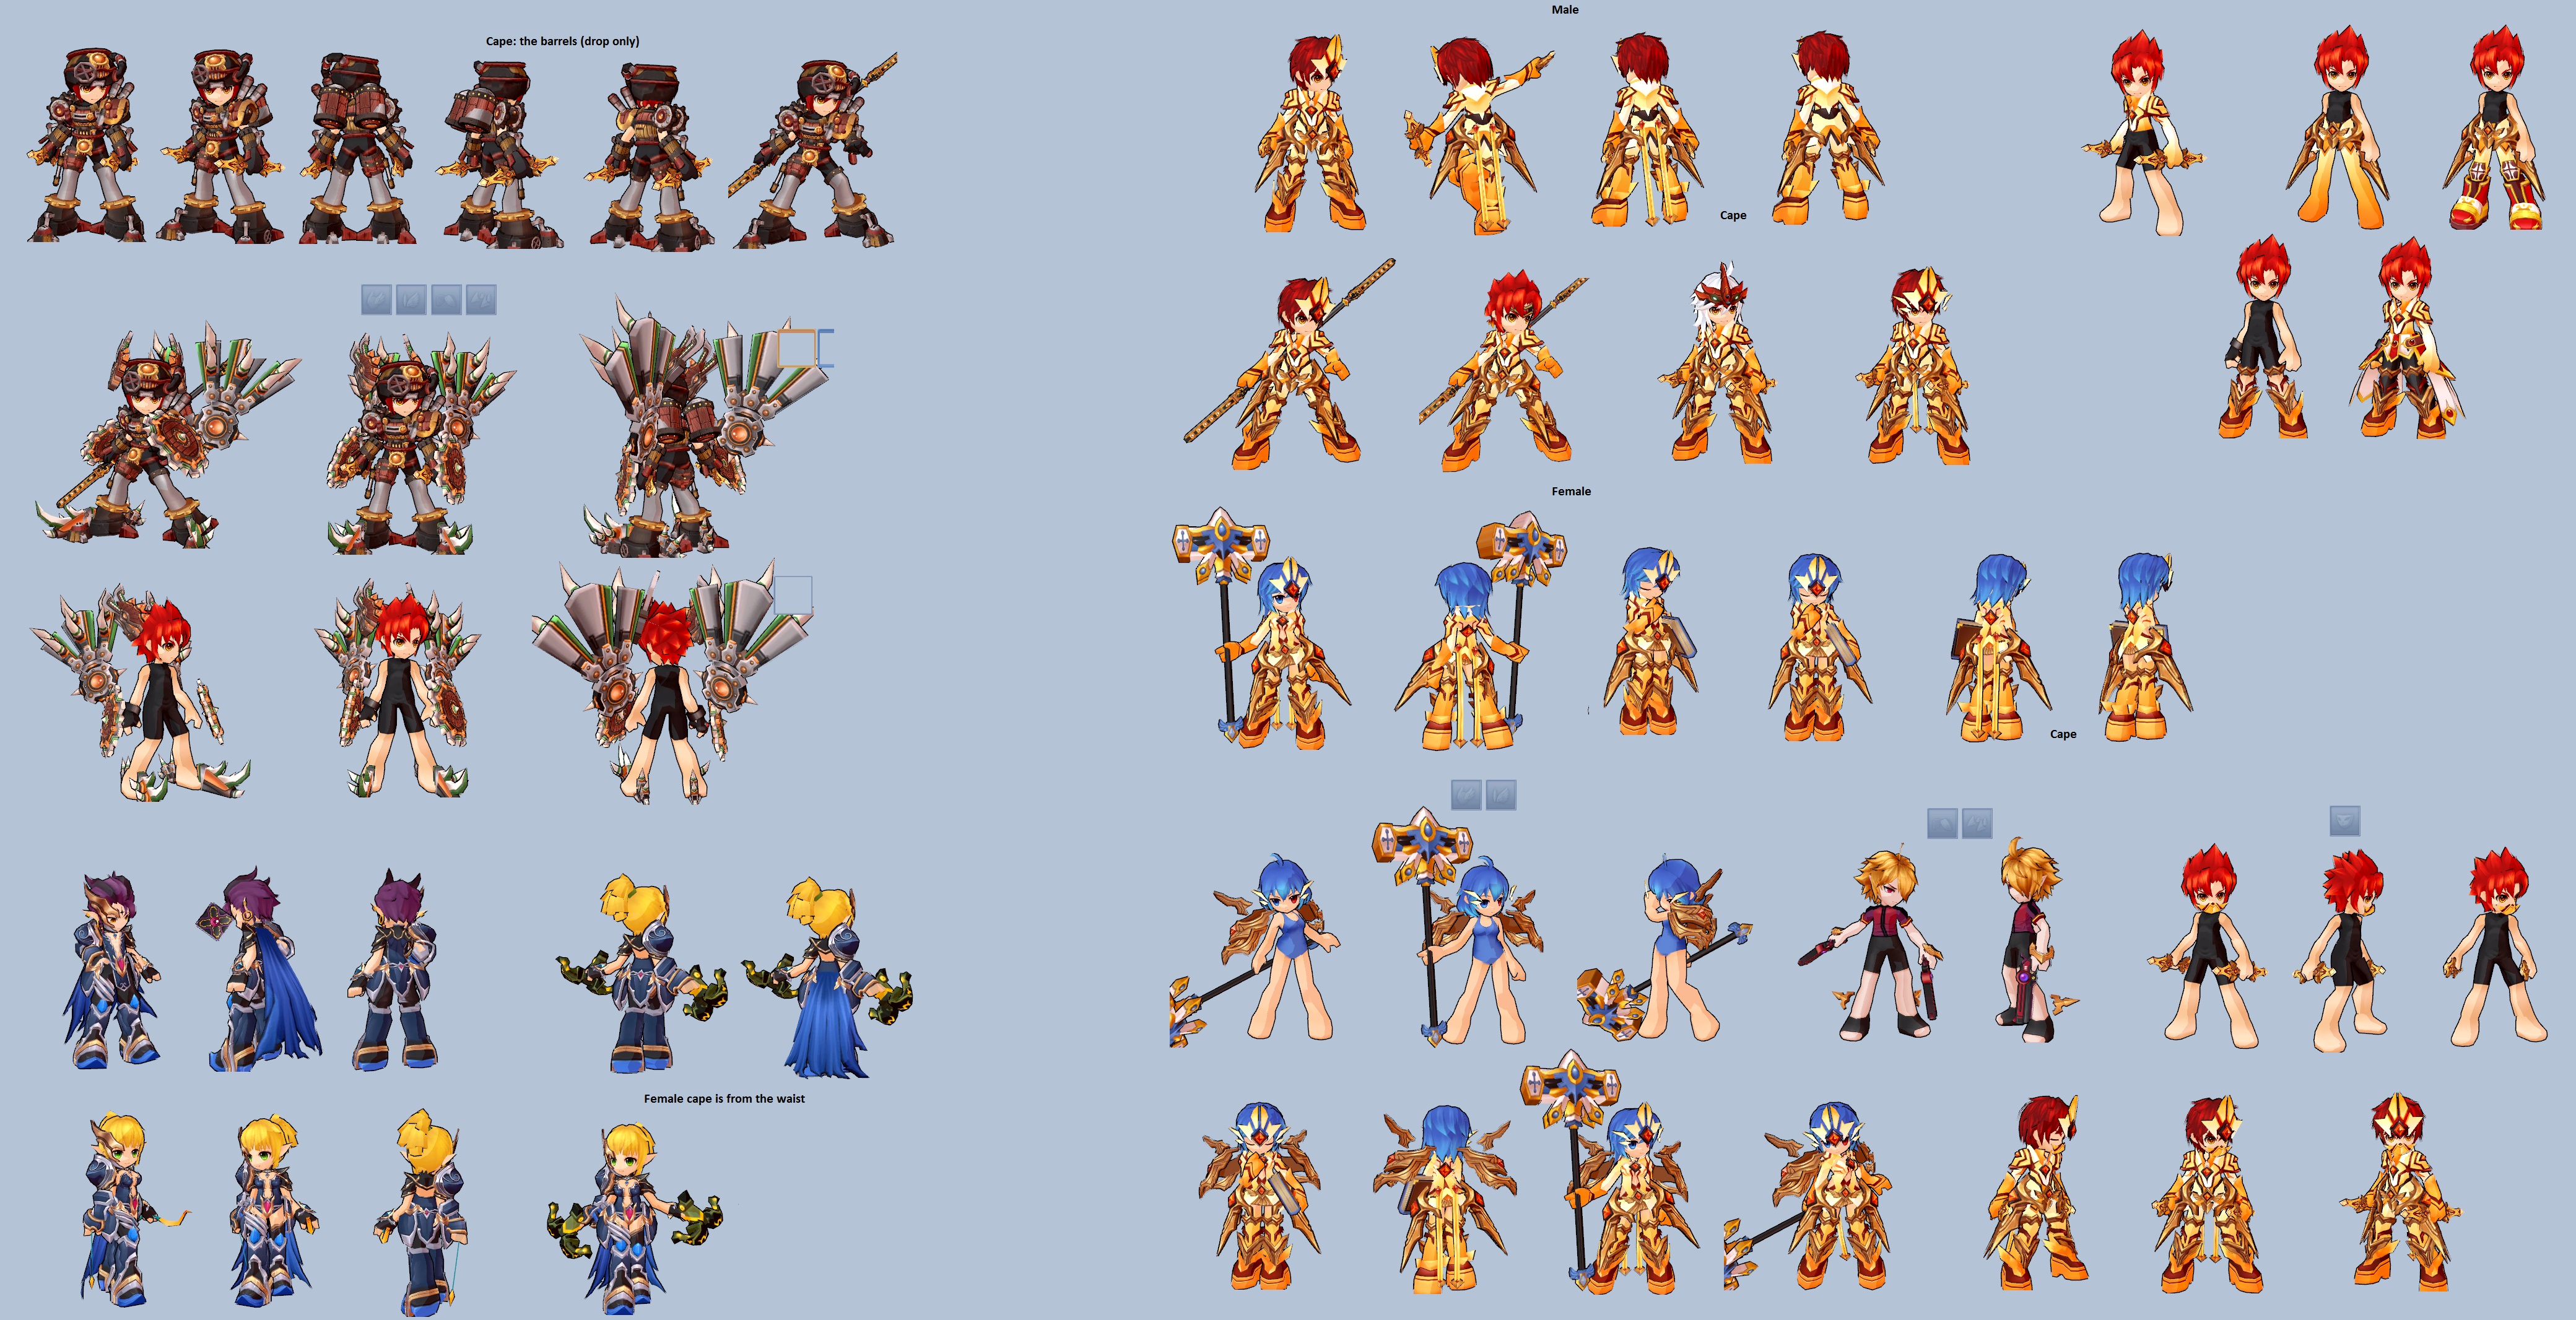
V1 has the best DPS on boss with full combo plus Double kick (V2 is slightly less damage) and can infinite combo monsters by repeating the first two hits at much less damage (V2 can repeat the first 3 for more).
  • 123.47 / 123.47 / 282.23, no knockdown (529.17)
    Repeating ZZ is ~220 DPS, repeating ZZZ ~275 DPS, ZZZ+Double ~397 DPS

      • PvP
        The starter hit has fast startup speed and slightly longer reach than you might think. Good at hitting as it moves forward with more hits.
        Can do all 3 hits into Double to launch into one more hit (you need the float from that 3rd hit for the Double to launch even higher), but instead you can combo by repeating the first two Zs until autocounter or comboing into skill (if against Arme/Mari must repeat only the first Z), will keep pushing forward, if sliding off the cliff needs to continue normally.
        170 / 170 / float 388 (728)

    GroundZ combo V2
    Starter is similar but the rest is split into more parts as it moves forward at a slower pace.
    Can infinite combo monsters by repeating the first 3 hits, or bounce farther with 4th.
    • 105.83 / 123.47 / 176.39 / float-stun 123.47 / launch far forward 176.39 (705.55)
      Repeating ZZZ is ~251 DPS, full+Double ~358 DPS

      • PvP
        4th tap launches and 5th knocks down (combos into Double but without launching), to combo into mashZ has to do 3 taps before it.
        V2 has unreliable timing where it may delay enough to momentarily break the combo between hits.
        145 / 170 / 243 / launch 170 / knockdown 243 (971)

    GroundZ combo V3
    Consistently moves forward per tap. The ender blows away and no longer combos into Double kick.
    • 126.96 / 126.96 / 126.96 / 100.74, blowaway 100.74 (582.36)
      ~210 DPS any part

      • PvP
        174 / 174 / 174 / launch 138, knockdown forward 138 (798)

Ground combo Up (unlockable)
Has 2 versions but the second just adds one more optional attack in the end.
Can only be done since the 2nd tap of ground combo. Does quick hits forward sending away. Works even when missing to reach even farther ahead.
  • 100.74 x2, float/knockdown 180.24 (381.72 so far) / 50.37 x4, blowaway 100.74 (683.94)

    • PvP
      Can be used going forward from combo, even if this part hits on air it forces standing state until ending. Blows away or combos into skill before the last hit.
      force-standing 69 x2, launch 138 / launch 34 x4, knockdown forward 69 (481)

Critical/Double V1
Both are very small simple hits to that side. Critical is only useful for emergency knockdown but Double is stronger and launches.
    • Critical: 149.16 knockdown forward
      Double: 317.50 launch

      • PvP
        Critical is a small knockdown hit but Double can send a high way up to combo into a single airZ (+225) or try skill or grab, but it only sends high if the opponent already was airborne like after hitting the end of combo.
        Critical: 256 knockdown forward
        Double: 546 high float

      Critical/Double V2
      This actually replaces both your Critical and Double, so you lose your strong launching Double too.
      Two big hits to one side, not bad at reaching up into the air.
      Instead of knocking down monsters sets them with short stagger while stepping forward, in PvE with any version of combo can keep repeating a few Zs into Crit, but with its lower damage and speed has similar DPS to doing no Critical/Double.
      • 86.89 x2 short stagger (173.78)

        • PvP
          Better range, easier to hit whether used forward or behind, may hit a jumping opponent and knock them down.
          Both hits individually will launch on groundhit or knockdown forward on airhit, normally launching then knocking down right away (or comboing into skill). If used when opponent is standing on ground lower than yours, it can miss the 2nd hit so that it will combo into walking grab.
          149 x2 (298)

mashZ V1
Usually done by cancelling from ground combo animation by mashing Z enough, but if still recovering from some animation it's possible to already start with mashZ as the first attack, including out of hitstun which is useful against non-armored enemies because this is his fastest attack.
    • 52.91 x8 (423.28), no knockdown

      • PvP
        Not used inside combos with V1 combo because that one can infinite, but V2/V3 might branch into this for more damage.
        Very good to mash this when recovering from hitstun in PvP because the attack has extremely fast startup, can even beat out a grab/re-grab attempt if there was some distance for them to cross first.
        Combos into nothing but skills.

      mashZ V2
      Replaced by a completely different attack. Throws dual kunais forward 3 times, like the aerial down throw, but on the ground and shooting forward + diagonal up (until more or less screen edge), while stepping backward.
      Actually decent DPS as a melee combo with every kunai hitting the same monster (~326 DPS) or works as a good mid-range attack especially against bosses. The more damage you do with normal attacks the more MP you charge.
      To do this move without walking, do Z↓ first.
      • 90.68 x6 (544.08)

        • PvP
          Can hassle at range and due to Arrow Defense troubles their dash just like aerial kunai.
          When close barely has enough time to combo into groundZ (can loop groundZZ kunai, repeat).
          force-standing 62 x6 (372)

      mashZ V3
      Only useful for PvP.
      Same as V1 with a new move added, dash-backZ. Turns around to throw two kunais, one straight forward and another diagonal up, useful in that it covers both ground approach and aerial approach with an interrupt, and the total animation time finishes much faster than the triple throw. Has no damage potential for repeating.
      • 90.68 x2 (181.36)

        • PvP
          force-standing 156 x2 (312)

Dash attack
A ground combo, fast startup and due to movement has longer range than groundZ and like groundZ goes into Critical/Double the same for PvP combos. Completely useless in PvE because it has lower DPS and you can stop running and use normal groundZ instead.
    • 76.41 / 20.12 / 20.12 x4 / 20.12 (197.13, +Critical/Double)

      • PvP
        131 / 34 / 34 x4 / float 34 (335, +Critical/Double)

      Dash attack V2
      A single tap into 2 running hits forward with decent length forward and fast recovery, but 2nd hit knocks down right away.
      • 65.46, knockdown 50.37 (115.83)

        • PvP
          Useless.
          112, knockdown forward 86 (198)

      Dash attack V3
      V2 but better because it doesn't knock down, leaves you two standing together if not continuing or continues into ↑Z launching combo into two kunais forward, and the disconnected range forward from the first attack might be useful.
      • 65.46, 17.28 / 17.28, 100.74 x2 (301.5)

        • PvP
          If not going into skill the enemy recovers before you but you can true-combo into its ↑Z, or charged MP1 or shortcutted MP2/3.
          112, 29 / launch 29, knockdown 173 x2 (516)
5-4a: Lass 1st job (part2)
airZ
A diagonal-down angle hit, can work as air-to-ground to start a combo, will stay in the air for a split second to defend from another airborne enemy.
Can be reflected by reflectors.
Also, doublejumping will force extra recovery on landing time, but doing any air attack will skip that recovery, so you can do airZ or down kunai after doublejump to not get the heavy landing.

Ottoshot: no, but if you have two platforms you can go up and down them doing airZ every time, being an infinite as long as the opponent doesn't get pushed away from the necessary platforms.
  • 109.15

    • PvP
      225

doublejump ↓Z
Throws two kunais straight down like arrows. Can be a free attack to do on any doublejump but works as a much safer way to keep DPSing monsters below that other characters cannot do (be on top of a platform, hold Down and press UpZZ, repeat. ~252 DPS).
Upgrade simply lets you throw twice in a row instead of only once per jump, always get this.

Lass1 kunais count like basic arrows like Lire's. They can be reflected or nullified like any basic projectile.
  • 90.68 x2/4 (181.36/362.72) (doubleshot has ~252 DPS)

    • PvP
      Can be reflected/nullified as projectiles, can trigger Arrow Defense and Elesis/Sieg Berserk.
      They force standing state on airhit so even if hitting them in the air they will flinch and fall straight down where you can go in and hit them in full. Them triggering Arrow Defense is a bonus because whenever it triggers, the opponent loses their current left/right held inputs and have to release and tap/doubletap again to move, so whenever they Arrow Defend they can accidentally stand still for longer than they want, where you can hit them again with melee (Lire/Arme cannot Arrow Defend).
      force-standing 62 x2/4 (124/248, -80% on Arrow Defend)

doublejump ↓↓ (unlockable)
During doublejump fastfalls a great distance straight down to go into ground combo faster, can be done even after throwing kunais. This landing has a small forced recovery animation.


Z↓ trap (unlockable)
Puts a trap in the ground just in front of you. When an enemy gets close it hits and launches very high, but very weak in PvE. Can wait for up to 6 seconds, placing another removes the previous trap.
If standing by a cliff it will fall below until hitting the ground and still work.
  • high launch straight up 51.85

    • PvP
      Leaving them around is more useful in PvP. Placing has cooldown 3sec.
      After it hits, potentially has time to combo into airhit-OK skills, or one airZ, doublejump kunai to re-stand into combo.
      high launch 35

    V2
    This one hits for a microstun instead of launch, and can have 2 at once, and does more damage.
    • 155.55

      • PvP
        Interrupts them but for a very short time, may combo into melee but it's not guaranteed.
        If used to instantly hit an opponent from the front will combo into grab or mashZ V1.
        forces standing state, short stagger 107

Z↑ (unlockable)
Temporary kunai buff with a cooldown. In PvE raises kunai damage by 11.111% and makes it delay the monster for a very short time. Not very useful.

  • PvP
    Reduces kunai damage from 62 to 34 (dash-backZ 156 to 86) but also raises their hitstun slightly so that comboing after them is slightly more possible (potentially a true combo). They also deal small knockback now.
5-4a: Lass 1st job (part3)
LV1 skills
Impact Slash
Short wave attack forward, both knock down. Split in 2 hits but they easily connect in every scenario except only 1 reaches the tip.
  • 241.14 x2 knockdown (482.28) [MP rate 16.63]

    • PvP
      210 x2 knockdown (420) [14.48]

    V2 - Superfreeze takes longer to start (harder to juggle into) then does an extra hit before the attack.
    • ~173 x3 (519) [17.89]

      • PvP
        force-standing 151, knockdown 151 x2 (453) [15.62]

    V3 - Instead starts with a short-range melee combo without moving then does 1 wave. Stronger in the inner half and weaker in the wave-only half.
    • ~101 x4, ~101 x2 (606, only wave 202) [20.89/06.96]

      • PvP
        The melees force standing state on airhit so it works on airhit (and V1 already connected too).
        force-standing 88 x4, knockdown 88 x2 (528, only wave 176) [18.20/06.06]

Spinning Slash (dança das adagas)
Does a very short hit to both sides (can hold left/right to move), then a dash attack to forward or the side you held. Can also be equipped just to safely move through monsters in PvE doing MP1 for invincibility time.
  • 198.06, blowaway 198.06 but likely with 1 back hit (396.12/515.01) [13.65/17.75]

    • PvP
      First part will force standing state on airhit to combo, ender knocks down.
      force-standing 172, knockdown 172 (344) [11.86]

    V2 - Now launches when going forward, to slash again moving back then through again, knocking them farther. Might back hit with 2 hits.
    • ~103 x5 (515/618) [17.75/21.31]

      • PvP
        force-standing 89, launch 89, force-standing 89 x3 with last knocking down (445) [15.34]

Aust Hammer (shuriken das sombras)
One short upward melee slash. Reaches 1 floor up but with halved hits there. On hit launches.
  • launch 141.48 x5, heavy enemies take the 5 hits (707.4)[24.39], launchable enemies take 4 hits with 3 aerials then knock down in place (778.14)[26.83]

    • PvP
      Launches, can do one airZ or grab, or doublejump-kunai to force standing then attempt groundZ or combo into grab.
      launch 102 x4 (408) [14.06], plus combo

    V2, Kagemusha - No attack, this is a self-buff (animation still has invincibility time). Lasts up to 15sec, if you get hit before it wears off you instead teleport above+behind the enemy with no hit, only lasts one trigger.
    Could be repeatedly upkept in PvE, losing some MP for more attack skills to make it less likely to take hits when trying to avoid taking even one hit.

    • PvP
      In PvP only lasts up to 3sec after starting. And the blue aura you have means opponents can see it even before it's triggered.
      Can make it easy to set up into a grab (370dmg) into someone close even if you have to jump and airdash first.


LV2 skills
Fatal Fury / Evil Attack
Has long startup time before the timefreeze (harder to launch then combo into this). Single forward stab then backsteps before finishing. In PvE simply does damage in a single forward hit without having to knock down, small area potentially hits multiple monsters in the same place but can pass through a monster if starting too close.
  • 1133.94 [17.99]

    • PvP
      In PvP, randomly will either instantly put them to Fatal or do no damage. Then leaves them standing afterward even on airhit: by surprise can attempt groundZ afterward, or dash attack for longer range if the skill landed at its tip because of the backstep it does at the end. Or always run and grab to be safer. Can still cancel into MP1 afterward to finish them off if they did get sent to Fatal.
      force-standing hit, 50% chance to reduce to Fatal, 50% chance to do no damage (chance is better during X↓ invisibility)

Weapon Disarm (roubar arma)
Does one walking forward hit, then another hit rolling through them. AoE is still not very large.
  • ~462 x2 (924) [14.66]

    • PvP
      If the 2nd hit connects, they cannot use attacks/skills for 7 seconds, so they're free to hit and can only run away, and will leave them standing up for you to attack right away (grab is safe but can try to turn and groundZ/mashZ). Also good to simply extend a combo before auto-counter triggers.
      Either of the hits will knock down on airhit, so this has to connect with them or ground or the 1st hit knocks down with the 2nd completely missing.
      403, 403 (806) [12.79], plus combo

    V2, Hornet's Sting (ferrão da vespa)
    Steps back and throws forward a piercing projectile to mid-range that drags non-armored enemies with it, then continues hitting and trapping them in its ending spot.
    Good at grouping up monsters and avoids knocking them down. Must be aimed at mid-range against monsters that don't take knockback or most hits will miss.
    • ~78 x15 (1170) [18.57]

      • PvP
        Forces standing state on airhit to trap those in too. And this is one of the skills that can combo afterward, easily combos into dash attack, or better if with minimum-distance dash into groundZ combo.
        force-standing 67 x15 (1005) [15.95], plus combo

Scorched Earth (mil agulhas)
Puts an object in front, it counts like a solid 1-floor wall for enemies. Once the object gets hit once even by yourself it will explode, making a large explosion that sends very high (or you can tap Z during the animation to slash it so it explodes instantly), the explosion can reach 1 floor up but launchable enemies on the 2nd floor only take 1 hit instead of 2.
In PvE, the 2nd hit will aerial normal enemies and knock them diagonal down.
  • blowaway 400.83 x2 (801.66)[12.72], optional melee 100.42 (902.08)[14.31]

    • PvP
      launch 349 x2 (698) [11.07], optional melee can't hit

    V2 - Puts a different trap in front of you, once an enemy gets near it it makes a large explosion that damages and binds them, leaving them standing even as they're hit more afterward. Also can multiply damage with stacked enemies but not as reliably as other skills like this.
    If not triggered on start can stay waiting in the stage for 10sec.
    • 799.40 [12.68], optional melee 100.42 [14.28]
      Might do 1 additional hit to the same enemies with 3 monsters (1598)(799-3197), 2 additional hits with 4 monsters (2398)(1199-4796)

      • PvP
        Easily can combo into this skill even on airhit, then easily combos after. Bind only stops after they mash enough. After they recover they don't have hitstun from previous hits so a full combo is not guaranteed.
        bind only releasing with mash 696, optional melee 87, plus combo

Shadow Stranger (lâmina proibida)
Does a sequence of AoEs forward teleporting forward every time, dragging enemies along then blowing them all away forward. Can hit from screen edge distance but then only 2 hits land out of the 4.
Halved hits on armored enemies, except on corner.
  • ~195 x4 (780) [12.38], if 2 back attack then 1014 [16.09]

    • PvP
      Forces standing state on airhit until blowing away at the end.
      force-standing 170 x4, last knocks down forward (680) [10.79]

    V2 - Without moving, does the 3 AoEs forward. Floats on hit then an explosion from that area sends up, can hold left/right to set the explosion farther/closer. 4 hits can connect on 1 floor up.
    • ~111 x7 (777) [12.33]

      • PvP
        Can doublejump and air kunai to force them to stand before they knock down then try to combo into grab, or try groundZ.
        force-standing rise 96 x4, launch 96 x3 (672) [10.66]
5-4a: Lass 1st job (part4)
LV3 skills
Final Strike (golpe final)
An AoE of awkward range and below-average damage. But is Lass's strongest skill on Berkas (when he's flying, aim to the right).
Jumps to 1 platform above and a little behind, then you do 4 piercing shots diagonal down that will drag enemies down then the shots also burn on the nearest platform they touch for a moment. Works ahead of you in your platform, or 1 floor above but damage can be less.
  • PvE: ~81 per hit, around 18 on most bosses (1458) [15.18]
    50 hits on raid boss 4050 [42.18]

    • PvP
      Leaves standing pushed away where you may attempt dash attack afterward.
      The sweetspot of this skill is to keep a small minimum distance, unless casting from the floor below the target.
      force-standing 64 per hit, good hit ~750

Thunder Slash
Essentially a forward beam to mid-range, then it comes back dragging normal enemies to you, and it leaves standing to hit again.
  • ~232 x8 (1856)[19.33], less hits depending on size/knockback

    • PvP
      Combos into this even on airhit and easily combos after, pulling even from afar.
      force-standing 589, 202 x3, 202 x3 (1801), plus combo

    V2, Raven Walker (assalto tornado)
    Shoots piercing projectiles in radius lines from you but only in the upper half 180 degrees, going 2/3 across the screen. Base damage is low and does more damage by being closer and using on tall monsters so more parts can hit. Then struck enemies explode, explosion stacks per enemy together.
    Hits in 11 different angles over 5 waves (1 straight up, 5 to each side) alternating as two patterns of 5 and 6, last wave marks on hit for explosion.
    • ~11 x5 and explosion ~22 x5, per angle, close on giant boss 9 angles (1485)[15.46], 2 giants together adds +990 to each, much less hits to normal enemies

      • PvP
        Initial hits force standing state on airhit, explosion launches.
        force-standing 9 x5 and explosion 19 x5, per angle, 140 per angle, often 280dmg

Exploding Scroll (explosão de shuriken)
Essentially a mid-range beam forward pushing enemies to its tip with low damage, then the tip explodes for the real damage, hits 2nd floor.
  • 61.17 up to x10 pushing, far explosion 344.52 x4 (1989.78, only explosion 1378.08) [20.72/14.35]

    • PvP
      Launches afterward but you only have time to combo with 1 hit and only if from the corner.
      force-standing 4 up to x10 pushing, launch 300 x4 (1240, only explosion 1200) [12.91]

    V2, Venom Slice (corte venenoso)
    Does a radius explosion hitting to both sides reaching 1 floor up and half a floor down. Enemies too close together multiply damage to both. Good big area, but in PvE this needs at least 2 monsters together to deal close to as much damage to each enemy as another MP3 deals, significantly stronger only with 4.
    The starting explosion already is the full damage, except for only one slash forward at the end reaching 1 floor up.
    • apparently 17.47 x9 and 64.32 x5 (628.83), forward melee 258.36 (base 887.19 [09.24], +628.83 per additional enemy together up to the 4th target, 2-4 1516-2773) [15.79-28.89]

      • PvP
        Forces standing state on airhit and either way very suddenly leaves standing very close too to try to continue, though they recover a moment before you.
        apparently force-standing 54, 15 x9 and 82 x5, forward melee 225 (824) [08.58], add 545 per stacked enemy?

Shadows of the Past (memória das sombras)
AoE forward almost to screen edge, also reaching a decent amount behind you. The 4th hit is bigger (including reaching 1 floor up) and ends launching higher.
  • ~588 x4 (2352) [24.50]

    • PvP
      Can combo into doublejump kunai, to go into grab or try groundZ.
      force-standing 426, launch 426 x3 (1704) [17.75]

    V2 - Great simple big AoE skill.
    Rectangle AoE forward reaching slightly farther than screen edge, and hits the 2nd floor for around 3/4 of its damage. In PvE launches for aerials for bonus damage.
    • ~320 x1, launch ~213 x10 (heavy monsters 2450 [25.52], launchable monster 9 hits with 8 aerials for 3089 [32.17]

      • PvP
        Forces standing state on airhit (airhit OK), end launches but you don't have time to do anything about it.
        launch 154 x10 (1540) [16.04]

LV4 skill
Has high AoE potential but has low damage to anything except the main target.
Piercing projectile forward hitting 1 floor up and down (and can slightly aim diagonal up and down), then you automatically teleport to an enemy it struck and do another one backward at it (if the first misses you just do it backward from your spot), hitting the main target twice for concentrated damage plus weak AoE to both sides.
Damage could be said to be lower because the other ones let you deliberately aim it at a boss from the back first for the back bonus and this one is forced to be one from each side with enough time for them to turn.
  • 51.92 per hit, main area with 2 throws around 28 hits (1453.76) [11.18] or boss around 48 hits (2492.16) [19.17], farther away to both sides 15 hits (778.8) [05.99]

Awakening
Explosion around you reaching 2 floors up.
  • 402.43 x5, 134.12 x3, 812.85 x1 (3227.36) [24.82]

H
Hits basically the entire screen.
Also gives you ATK +15% and Super Armor for 20sec after it finishes.
  • 128.31 x15, 812.84 x1, 76.94 x15, 494.65 x1 (4386.24) [33.74 if it cost as much as MP4]
5-4b: Lass 2nd job
Dash type: burst dash only

Hitstun recovery speed: very fast

Dash
Lass2 has no held run, every time he dashes he moves a set distance whether on ground or air. Cannot do advanced dashes, always moves the rocket step distance.
On ground, if dashing twice in a row it becomes a trail dash, leaving a small dot trail visual effect. This trail dash is invincible and passes through enemies, being able to dodge attacks. On air instead of being able to dash twice, every dash is the invincible trail dash.
Ground combo Critical will also cancel into a trail dash to that side before either attacking or jumping, still with invincibility and passing through before doing the attack or jump.
(in PvP, trail dash has hyper armor instead of invincibility)

GroundZ combo
Fast startup. Launches for Double to launch even higher.
Double is a strong launching hit, but Critical is an evasion: from 2nd or 3rd tap of combo you will cancel into an invincible trail dash left/right passing through enemies, so continuing normal combo can have an evasion ready.
Critical will trail dash for a certain distance, then with no input will turn around with a single knockdown hit. While still dashing, can press Z to cancel early into full dash attack instead or press Up to jump instead. It only has invincibility while still dashing.
  • 152.39 / 152.39 / launch 152.39 / knockdown 152.39 (609.56, aerial 685.75)
    Double: launch 308.07 (repeating full combo into Double on heavy monster is ~403 DPS)
    Critical (full): 174.46 knockdown forward

    • PvP
      Can start groundZ alone, or combo into it after airZ or ground dash attack 1st hit.
      Full combo into Double will combo into airdashZZ-Double which can combo into skill, or do combo Double into ground dash grab for invincible time.
      Can also do only ZZ into dash, release forward, ZZ-Double, dashZ, start ZZ again.
      *The 3rd/4th taps can reach 1 floor above, knocking down.
      *The first two hits can hit from behind then combo into grab.
      209 / 209 / force-standing rise 209 / float 209 (836, with Double 1368)
      Double: launch 532
      Critical (full): 300 knockdown forward

Ground dash dashattack
In PvE does one stun+push hit of almost no damage, then with more Z presses skips to the 3rd hit of groundZ combo but doing that alone can be better. Not good but repeating the first hit can help in pushing monsters together to the corner for AoE. Can also spam →→Z →→Z.
  • float-stun 26.16 / skips to 3rd hit of groundZ

    • PvP
      Actually an anti-air attack and a combo starter, landing this attack in any way gives you a full combo.
      It has slower startup speed, but it hits forward stretching up almost 2 full floors to anti-air better than it looks, and it forces standing state on airhit too and hitstuns long enough to wait and combo into full groundZ combo from the start. Directly continuing from it into the 3rd hit is only useful when continuing on miss (and those parts can reach 1 floor above for knockdown).
      The first hit of the dash attack also can hit 1 floor down.
      force-standing 45 / skips to 3rd hit of groundZ

Air dash dashattack
This is two small hits forward and this will actually go into Double for big damage and launch, if the aim was precise enough for all to hit. Good air combo for finishing after a launch.
In PvE the first part staggers, so you can keep repeating just the first part with ↑→→↓Z to infinite combo monsters or push them to the wall (~260 DPS. Repeating with Double on heavy enemies is ~398 DPS).
  • 134.36 stagger x2 (268.72) / combo Double (577.79)

    • PvP
      Can combo from ground combo Double. After airdashZ-Double, may be able to combo into charged MP1, or shortcutted MP1/MP2.
      You can walk off a cliff, then airdash back with airdashZ-Double, which will hit the floor below but move you back up.
      launch 92 x2 (184) / combo Double (716)

airZ
AirZ with decent active frames, and good air-to-ground hitbox on your own body to hit a grounded opponent and turn into ground combo.
Ottoshot: yes but only works behind you so you have to turn around first and can push monsters (~320 DPS).
  • 76.41 stagger

    • PvP
      157

Doublejump
Not in the movelist. Doublejump prevents you from airdashing afterward but only until he finishes the flip, and he can ↓↓ fastfall but only during the flip.


LV1 skill
Quickly steps forward and does a 3-hit sequence in place. Blows monsters further ahead.
  • float 197.5, launch 197.5, launch 197.5 (592.5, due to timing won't get aerial hit bonus) [20.43]

    • PvP
      First hit forces standing state on airhit to combo even after sending them into the air, and the step in the beginning helps in range. But if this first connected on groundhit instead of airhit, it can combo into itself one time before sending them too far.
      Also useful in PvP for hitting at the beginning without a timefreeze (could even hit to avoid being grabbed if there's a short distance they have to cross first).
      force-standing rise 172, launch 172, float/knockdown 172 (516) [17.79]

LV2 skill
Essentially a short-range beam AoE, decent for hitting multiple monsters. Blows them forward, can do twice if near wall or if they can't take knockback.
  • 163.52 x2, blowaway 163.52 x5 (1144.64) [18.16]

    • PvP
      The first two hits will pull and force standing state on airhit, comboing even on airhit or far hit.
      Also hits at the beginning before timefreezing.
      force-standing pull 142 x2, knockdown forward 142 x5 (994) [15.77]

LV3 skill
After some startup time, does essentially a beam to around screen edge from center. It often does 2 hits to the same enemies but only 1 if they're too close or too far in the range.
Giant monsters can take 3 hits if aimed at mid-range.
  • 1008.82 x2 (2017.64) [21.01], wide monster 3 hits 3026.46 [31.52]

    • PvP
      Forces standing state and leaves them standing afterward. If you use this inside a combo via shortcut button (right before autocounter happens), even as a juggle, it puts them back standing where you can attempt groundZ by surprise but they recover before you.
      force-standing 585 x2 (1170) [12.18]

LV4 skill
Does an auto-aimed AoE on up to the 4 closest enemies across the entire stage. Deals MP2 damage on its own to each enemy but does multiplied damage if stacking the enemies in the same place.
  • ~930dmg [07.15] on each enemy, and +100% per additional stacked enemy: 2-4 1860-3720 [14.30-28.61]
5-4c: Lass 3rd job
Dash type: very fast dash midair, slow single burst on ground
Dash momentum: air ~430 pixels, rocket ~776

Hitstun recovery speed: very fast

Lass3's airdash travels much farther than normal, and for every time you do airZ you can airdash again (whether or not it hits).
Lass3 can also airdash up or down, but only before doing an airdash or airZ in this jump.

Ground dash is invincible for the first 1/3 or so of the animation.

airZ
Basic airZ forward attack but its range decently stretches some amount up and down. Then during the striking part of this move you're free to input a side airdash again, possibly just repeating sidesideZ until landing. You can mash for that or you can calmly time 2 or 3 sidesideZs per jump until landing.

Ottoshot: yes (~458 DPS), also works straight down to the floor below. Against Harkion must be in front of his head or above his head.
  • 109.16 stagger

    • PvP
      Unless this hits on the air which makes them fall down, can infinite combo with only this move until autocounter happens. Time 2 or 3 attacks per jump, then after landing jump and do another 2 or 3 times. To adjust your position you can even do airZ, Back Back Forward Z.
      Or you can continue with ground combo to make it easier.
      225

GroundZ combo
Average starter, 3 taps with range actually lowering per tap. 3rd will launch which makes Double miss on monsters that can get launched.
Has a dodge: instead of having a Critical, since 2nd hit can ↑↑ to roll forward and do a knockdown hit behind turning around, which is more of an emergency dodge especially for passing to the other side of the monster.
  • 152.38 / 152.38 / launch 152.38 x1-2 (457.14/609.52)
    Double: 317.47 knockdown forward (repeating full combo into Double on heavy monster is ~370 DPS)
    Combo ↑↑: 176.35 knockdown forward

    • PvP
      Not used very often in PvP because dash-jump airZ can result in more damage.
      Full sequence will combo into delayed Double, or ground dash grab. But the launch also combos into held MP2, or shortcutted MP2/MP3.
      If hitting too far for the 3rd hit to connect can combo into ↑↑ instead.
      209 / 209 / launch 209 x1-2 (627, sometimes 836 especially on wall), plus Double 1173/1382
      Double: 546 knockdown forward
      Combo ↑↑: 121 knockdown forward

Ground dash attack
His least useful attack. 3 weak hits with last knocking down ahead.
  • 99.92 / 99.92 / knockdown forward 99.92 (299.76) (repeating the first 2 hits is ~161 DPS)

    • PvP
      If not playing against a fast recovery job: doing only the first two hits can combo into groundZ or dash-jump airZ, or for an easy combo until counter/autocounter can repeat dashZZ but the DPS is low (~149 HP per second).
      Knocking down forward with this can be useful to make them slide off a cliff to air combo, or in Gorge of Oath.
      172 / 12 / knockdown forward 13


LV1 skill
Self-buff, you are invisible to enemies and have +50% ATK. Stops after you deal damage once or get hit once or after 10 seconds, but the ATK buff will remain for 4 seconds after that. Although if you really needed the invisibility to sneak to a certain monster or get back bonus for a skill you already can do X↓.

This skill can work for invincibility time but its invincibility is very short and doesn't protect against earthquakes.
Can be used just for the ATK buff before using your AoE MP3/MP4.

  • PvP
    Can be used for the invisibility effect. Enemies in PvP can still see glimpses of you while invisible by seeing the dust upon landing on a platform and the silhouettes whenever you airdash, but that also means you can trick them by airdashing to one side then a moment later holding to the other. Or airdashing up then fastfalling.

    Also can be used by melee range simply to freeze time to scan the situation and possibly get a free attack or grab in, because your animation ends faster than the timefreeze ends.

LV2 skill
Short AoE forward starting and ending quickly, knocks down. Simple direct damage, also can keep pressing Z to spend 0.4 bars into 2 more hits before it finishes which has a better MP-to-damage rate than normal skills (essentially being Lass's Onrush)
Remember that you can go invisible (X↓) to start with back bonus before casting it.
Chase Level MP cost reduction only reduces the initial cost, so +1 loop.
  • ~200.1 x6, last knocks down (1200.6) [19.05]
    0.4 bars for ~200.1 x2 (400.2) [30.02]
    Full 4 bars, 5 loops for 3.9 bars cost: 3201.6 [24.62]
    Full 4 bars, MP1 then 3 loops for 4.0: 3601.8 [27.70]

    • PvP
      Hits pretty instantly, can combo even on airhit/juggle combo and knocks down on last hit.
      Barely can hit 1 platform down too.
      force-standing 166 x6, last knocks down (996) [15.80]

LV3 skill
Not as good for damage as MP2 but this is a big AoE forward that stretches 1 floor up and down.
You also change sides in the middle for possible back hits from the front.
  • 150.44 x6 and ~105.3 x8 (1745.04, if 2nd part back hits 2250) [18.17/23.44]

    • PvP
      You can knock down the opponent, for example with grab, then immediately do MP3 for a wakeup trap.
      force-standing 131 x6, force-standing 91 x7, last knocks down (1423) [14.82]

LV4 skill
Giant radius AoE reaching far to both sides and 2 floors up and down.
  • ~223 x12 (2676) [20.58]
5-4d: Lass 4th job
Dash type: double burst

Hitstun recovery speed: normal

His 2nd dash can pass through enemies, but in PvE only against smaller monsters.

Dash attack
His main attack.
He has two dash attacks: attacking from a single dash will do 1 slash forward, and attacking from a double dash will do 2 slashes, but the first dash can still cancel into double dash after attacking, so doing →→Z →→Z will dash twice with 3 slashes zooming across the stage. They don't knock down monsters so this can be repeated (~259 DPS).
And whenever you do the double dash attack, you can press ↑ to teleport diagonal up with some time of invincibility.

There are some tricks about the dash: if on ground, after any dash can cancel into jump, ready to airZ or first dash again. If on ground, the second dash can be done with rocket input (instead of Forward Forward, do Forward then Up+Forward) which does the second dash diagonal up instead of straight forward.
Can keep repeating only the first dash attack with ForwardForward Z, Forward, Up+Forward Z, ↓.

  • Dash1: push 163.79
    Dash2: push 141.90 x2 (283.80, all 3 447.59)

    • PvP
      Can constantly keep moving around with these hits but will knock down on any hit, so it can be better to hit then keep moving and run away than to wait for them to stand back up.
      Or, let the knockdown happen then move to one of their sides and try to ground combo or airZ>ground combo them, waiting a moment before attacking for their invincibility to run out after they stand back up.
      Dash2 doesn't knock down on initial hit so it can do more damage with its double swing (or first into shortcutted skill) than if already hitting with the first dash attack.
      ↑ teleport has cooldown 12sec in PvP (shared with ZZ↑).
      Dash1: 282 knockdown
      Dash2: 244, 244 knockdown (488)

airZ
Long range and long active frames.

Can ottoshot but very hard timing.
  • 76.40

    • PvP
      Very good active frames, can act as a wall with good range, and work as anti-air to knock them down.
      Hitstun is short and doesn't always guarantee comboing into groundZ if it hits too early before you land.
      157


GroundZ combo
3rd tap launches, allowing the 4th or the stronger Critical/Double to aerial.
Can do Z↑ to teleport from the first hit, or ZZ↑ to do a launcher then the teleport. Fast when starting the groundZ but they can't be done after that point to easily dodge when attacking.

For the highest DPS can repeat ZZZ-Critical (~311 DPS), or for crowd control can repeat ZZZ to launch and continue after they've fallen (~243 DPS), or to hit monsters without knocking down can repeat ZZ (~192 DPS).
  • 121.71 / 121.71 / launch 121.71 x2 / knockdown forward 121.71 (608.55, aerial 730.26)
    Critical/Double: 312.31 knockdown forward (aerial 468.46)
    ZZ↑: launch 135.23

    • PvP
      Fast startup starter. Has 4 taps but the 3rd doesn't true-combo into the 4th, would knock down but they can mash invincible buttons before it: instead you can Critical from the 3rd, but then weirdly they stand back up much before you can act again which is bad, except that this could work as a surprise reset to combo them again with ZZZ or dash/jump airZ from another side into ZZZ, or after Critical knockdown use MP2/MP3 as wakeup trap.
      Or ZZZ then stop which pushes them and sets you two standing, to try dash-grab or another full Z combo.
      For only guaranteed damage, do ZZ↑ for the launcher + teleport, into airdash grab (grab is +370, for 797dmg), if the teleport is on cooldown the slash still happens to combo into grab but needing one jump first. Or instead of ZZ↑ grab, can do ZZZ-skill.
      • 167 / 167 / 167 x2 / non-comboing knockdown forward 167
        Critical/Double: 537 knockdown
        ZZ↑: 93 high float


LV1 skill
One forward slash then another slash rolling forward through enemies.
  • 309.68 x2, last blows away (619.36) [21.35]

    • PvP
      Needs groundhit instead of airhit or it misses the 2nd hit.
      245, knockdown 245 (490) [16.89]

LV2 skill
A square AoE forward that almost reaches 1 floor up and down, then 2 hits only at your own floor knocking down. Can press Z to do another hit at the end rolling you forward through monsters but misses light monsters from blowing them away earlier.
  • 139.19 x6, x1 and blowaway 150.81 x1 (1125.14) [17.85], extra Z 309.67 (1434.81) [22.7]


    • PvP
      First part forces standing state on airhit to combo even on air.
      Hitting above or below and missing the last part will leave them standing.
      force-standing 121 x6, 131 and knockdown 131 (988) [15.68]

LV3 skill
Much longer AoE rectangle forward, the 1st hit reaches 1 floor down and the 3rd hit 1 floor up. Knocks down.
Good AoE for PvE and launches monsters for aerial bonus.
  • launch 676.50 x3 (2029.5, aerial 2706) [21.14/28.18]

    • PvP
      Forces standing on airhit to work on juggle, with last hit knocking down.
      force-standing 589, force-standing 589, knockdown 589 (1767) [18.40]

LV4 skill
A forward beam with infinite range stretching 2 floors up, after the hit is dealt you teleport all the way forward 2 floors above where you are.
Also can cheat certain jump stages.
  • ~2575 [19.80]
5-5: Ryan (general)
GCC notable changes:
-Nephilim PvE damage reduced basically to half (now between average damage and ottoshot damage, instead of much higher than ottoshot)
-Wolf's damage buff works and can be activated without transforming by using another skill right away
-Ryan1's airdash exists naturally instead of being unlockable in skilltree
-Transformations changed from equippable to simply being in the skilltree

Story:
A very simple and heroic character, an elf from Eryuell Island like Lire, Ryan originally was a simple civilian who loved nature and wanted to expand the Elven Forest that was being grown in Bermesiah. But after seeing the elves' efforts be thwarted by monsters, as well as humans being misled by the Serdin-Kanavan Kingdom War, Ryan took up training to be a warrior druid and fiercely stand up to himself.

Fun fact:
Ryan has different body paint patterns on his belly depending on equipment set chestpiece.

Skilltree allclass abilities:
  • Z↑ totem
    Places a support effect totem in front of you, it affects everyone in your team staying near it. Enemies can destroy the totem early with any attack. Totem can still be placed inside Wolf form.
    • DEF totem - Gives +15% DEF for -13.1%dmg (PvP +7.5%/-7%dmg), totem lasts up to 20sec and effect lasts 3sec after leaving the area. Cooldown 30sec. The only totem that lasts a long time but the effect isn't useful.
    • HP totem - Lasts up to 5sec healing up to 20% HP (PvP 10%). Cannot heal players already on Fatal. Cooldown 30sec.
      Convenient for story dungeons and good for no-potion endurance stages. In PvE you can place this near the ending portal between rooms every time, affecting even people already inside the portal and totem cooldown is instantly reset when you enter the portal yourself (if not playing solo, can place the totem, enter and leave the portal and place another totem infinitely).
    • MP totem - Same as HP totem but refilling MP instead, gives ~1.0 MP bars (PvP ~0.6 bars) over 5sec with a smaller cooldown of 20sec. Can be just as useful as the HP totem or more.

  • CC nature's shield
    Invincible but cannot act for 4 seconds. Cooldown 1 minute. Good to evade strong skills.

  • C↑ tenacious vitality
    Self-buff, if dying within 90 seconds has a chance to revive with 30% HP. Has a 5 minute cooldown counting since starting the buff.

  • C→ stone wall
    Creates a solid object a short distance in front of you, you and your team can move through it but it's solid for enemies. It lasts 5sec with cooldown 6sec, it can absorb 2 physical or projectile hits where it then breaks early (except piercing projectiles pass through). It can bodyblock enemies except bosses and when placed it can force non-bosses to its left or right depending on distance.

  • Held C charged blow
    Holding C with no other inputs will sit in place and charge an attack until released, doing a short strike forward that also hits 1 floor up/anti-airs. Can reposition monsters forward (minimum charge pushes with a small stun, others send them to the other side of the stage). Has super armor on the attack after releasing the button.
    • PvE
      Low charge: float-stun medium forward 349.45 (~244 DPS repeated)
      Medium charge: blowaway 425.05
      High charge: far blowaway 677.05 (~358 DPS repeated)

      • PvP
        Can anti-air and has super armor after releasing the button. Can combo into this after some 1st job launches. After launching, if near corner, can combo into groundZ if playing as Ryan3 or Ryan4 joined-pikes.
        Low charge: launch 240
        Medium charge: launch very far 292
        High charge: launch very far 466

  • C↓ wild roar
    Can be done alone or from groundZ combos except Critical/Double.
    A forward AoE strike that can reach 1 floor up and down, blowing monsters forward closer to the wall doing slightly high damage for what is only 1 move and can be done from groundZ combo. Cooldown 10sec.
    • PvE: 100.80 x3 (302.4), blowing away but apparently the 2nd launches for 1 aerial (352.8)

    • PvP
      Can be used as an attack alone for a quick disjointed big wall attack. Does no damage, knocks down (even through super armor), and reverses their left/right inputs for 5 seconds.
      Can also be used to end a groundZ combo with this, to leave them reversed as they recover to make it harder for them to defend themselves as they stand back up.
      Cooldown 15sec.
      launch 0dmg, confusion for 5sec

Which 2 jobs to use in PvE?
(After LV45 you can buy a GP quest to let you equip 2 jobs in PvE and switch between them with Ctrl)
  • Ryan3's ground combo AOEs full groups at once for high MP and it float-stuns monsters (can repeat ZZZZ, or ZZ-Critical), airZ launches per hit, near wall can repeat backdash flower for a small ranged attack. Has a good MP4.

  • Ryan2 IMO is almost the same as Ryan3 minus the combo and flower, with an airZ and dashatk that can juggle well but only if you're the room leader for 0 latency, and his LV3 is an easy big AoE.

  • Ryan4 with joined pikes can ottoshot (best singletarget DPS) and his 1MP can pass through monsters (which may be good or bad). 4th-job-only Magnus transformation keeps ottoshot and his basic combo is nearly the same DPS as ottoshot but with extreme MP gain due to only airZs having a penalty to MP gain, he gets so much MP that he can dodge boss attacks every time or constantly do 3MP skill against mobs. Magnus can de-transform with X at anytime to cast 4MPs or the special 1st job skills, or to place totem.

  • Ryan1 has boring and unhelpful normals except for a decent Up branch combo, but is necessary even as the secondary job if you want his party Resurrection skill or his HP drain skills or enemy-stack 1MP.

  • Nephilim's damage is not high like it used to be. Has above-average damage and quick knockdowns for crowd control, with one ranged attack, and a skill only for long invincibility, can duel enemies better than average but still doesn't have a proper dodge other than 1MP.
5-5a: Ryan 1st job
Standard dash type (fast, long ground dash)
Dash momentum: from ground ~426, from air ~346, rocket ~683
*No held run.

Hitstun recovery speed: between normal and fast

Dash attack
Moves a very long distance while doing 2 hits forward, the 1st can hit 1 floor above like an anti-air. They can barely catch from behind too while moving.
The first hit will push monsters away and into the air very far without knocking down, low damage but oddly good at grouping up monsters at the wall for AoE or sending one away, if it doesn't push away the 2nd hit will connect which knocks down.
If pressing Z a second time will do Critical which isn't good except for knocking down if needed.

Anytime on the dash attack before doing a second swing, you can hold Back for a back step with very short invincibility time. Because of the necessary back movement and short invincibility it's not as useful as you would think, except as a fake-out in PvP to be ready to attack again or dash.
Might evade an attack or projectile if doing →→Z, waiting for timing, then backstepping through the hit. Doesn't work on attacks that linger for a moment. Might dodge through a fireball especially if running into the corner first.
  • rise-far-push 28.55, knockdown 28.55 (57.10)

    • PvP
      None of the hits will knock down if they hit on ground instead of air, so if you hit dash attack (from whichever distance you came in from) you can then true-combo into full groundZ combo, which is better than doing its own second attack which is only good if missing the first part.
      49 x2

    V2 - Only changes the second attack, instead of Critical becomes a quick single hit, float-stuns enemies sending them a shorter distance, without knocking down just the same.
    • 141.11 float-stun

      • PvP
        Blows away uselessly. This one knocks down blowing away, the other would more usefully leave them close.
        243 blowaway

    V3 - Removes the V2 change. Upgrades the first swing of the dash attack to be able to branch into ↑ instead of the second swing, which cancels the animation into a normal jump attack while still on the same movement, landing very quickly after this hit to attack or move again. After upgrading the jump attack separate to this, it can then dashcancel midair whether or not it hits.
    In PvE you're deciding between two bouncing stuns in a row, or one into a normal attack that can go into ground combo easier or move faster.
    • 117.59 stagger

      • PvP
        Made for PvP. This is fast and can be used very often, constantly moving across the stage with multiple hits and the ↑ swing can dashcancel to instantly repeat dashZ↑ left or right as much as you want, all of the hits easily combo afterward (except on airhit which will knock down).
        202


GroundZ combo
The starter has more range than the other swings so mind that. There is also a problem of missing the 2nd or 3rd hit if walking down a slope, or against slimes/frogs.
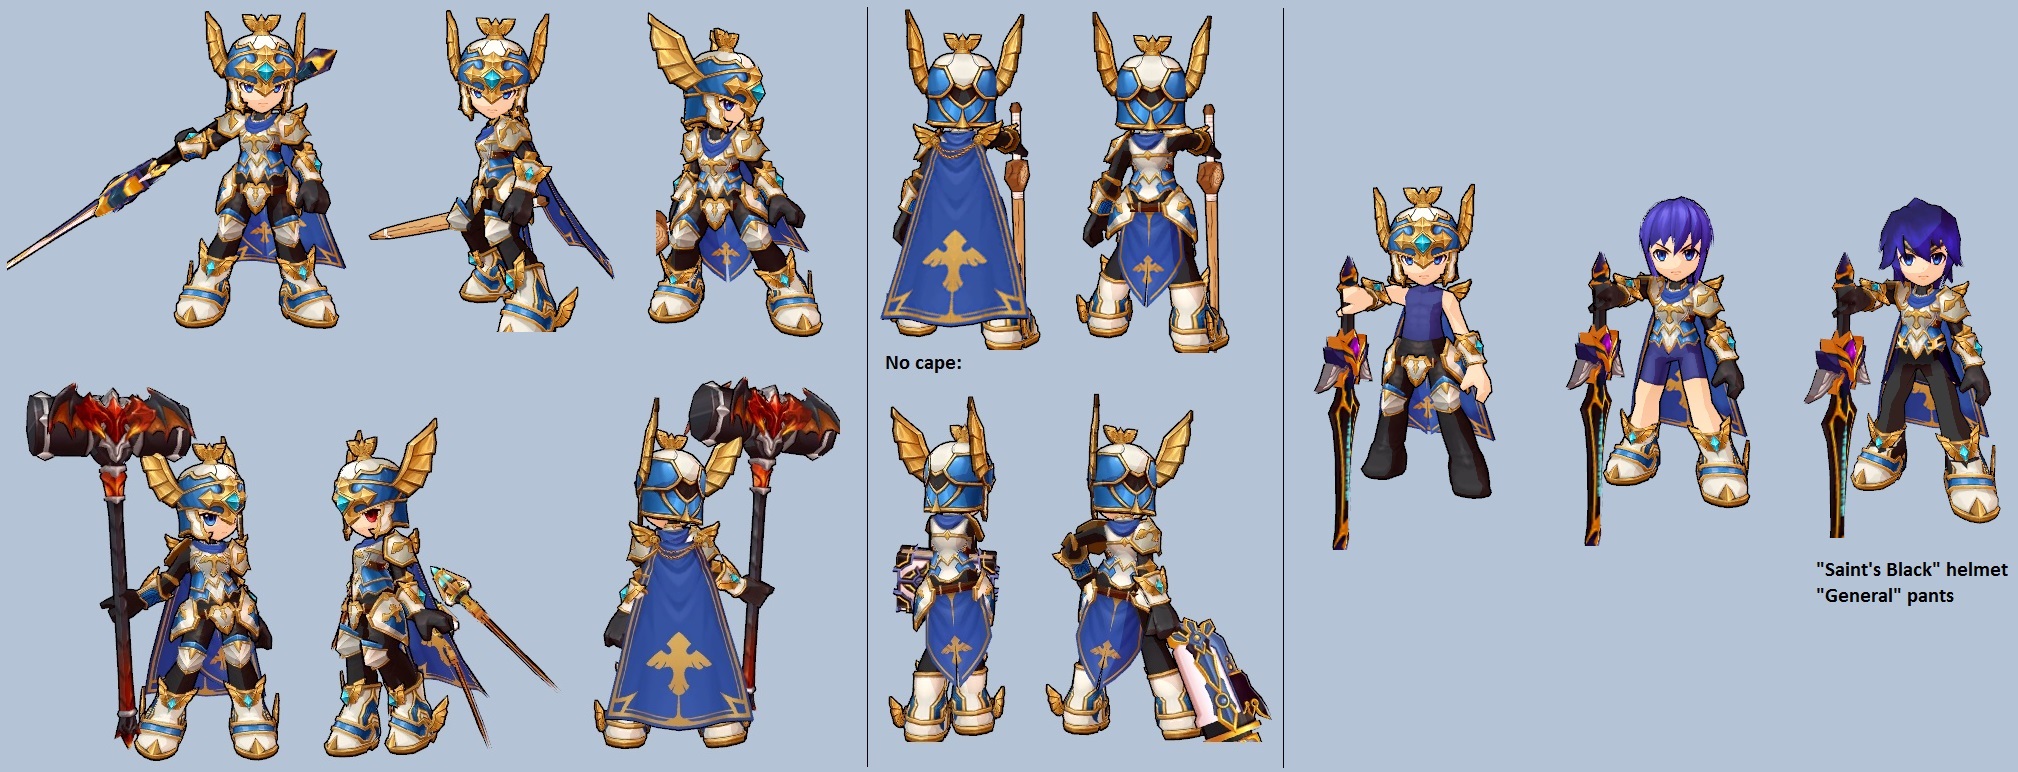
4 taps, last launches which sets up for Double. To not knock down, can repeat ZZZ (good ~322 DPS).
Critical is weak hits to that side and knocks down, 3 hits or even less if not close enough.
Double is a jumping slam forward knocking down, does 2 hits but the 1st only hits diagonal up so normal-size enemies need to be midair for full damage.
  • 165.47 / 165.47 / 165.47 / launch 165.47 (661.88), launch into aerial Double is 1089.26
    Double: knockdown 142.46 x2 (142.46/284.92)
    Critical: 38.63 x1-3 (115.89), last knocks down

    • PvP
      Starter has less range than the other hits. And 2nd and 3rd miss if opponent is downhill from you.
      Launching into Double will knock down to mid-range, and knockdowns with this job can easily go into dash-jump airZ for the airZ to instantly hit them as their invincibility wears off, going into ground combo again if they don't dodge or counter in time. If knocking them down closer than that with a different attack you can choose to jump in from the left or right.
      You can keep looping just ZZZ until autocounter (~1600dmg), or ZZ which pushes less but is easier to do by tapping instead of mashing until the right part.
      • 227 / 227 / 227 / launch 227 (908), full+Double 1398
        Double: knockdown forward 245 x1-2 (245-490)
        Critical: knockdown 66 x1-3 (66-198)

    V2 combo
    Has normal hitboxes now, and also is better at hitting multiple enemies at once. 3 taps and all leave the enemy standing up with shorter stagger, can infinite combo monsters by repeating (~274 DPS, slightly pushes them forward, great MP with multiple monsters).
    Can also hit enemies 1 floor up but normally will walk past them.
    • stagger 100.54 x2 / stagger 100.54 x3 / stagger 100.54 x2 (703.78)
      Same Critical/Double, won't launch for Double's other hit

    • PvP
      Hitboxes don't have problems. Startup is slower, in PvP may not combo after all the same things as before.
      Hits 1 floor up which means it anti-airs well, although it only knocks down.
      Won't launch for Double's full damage.
      138 x2 / 138 x3 / 138 x2 (966, plus Double 1211)

Combo ↑Z (unlockable)
Can only be done from combo before Critical/Double, basically substituting them as another choice.
↑ will do a single bouncing hit, then Z spins moving forward with 3 more hits knocking down. In PvE can keep repeating ZZZ↑ without the next hit because ↑ is a mini dizzy that pushes them.
  • float-stun 75.59 / 61.80 x2, knockdown 90.71 (289.90)

    • PvP
      Knocks down similar to Double and does less damage than Double even if Double misses one hit.
      Only good for going longer on miss and possibly cancel into skill, or doing full combo into this then skilling before the last knockdown hit.
      launch 52 / launch 36 x2, knockdown forward 62 (+186 from combo)

    Combo ↓
    Replaces ↑.
    Does a very low hit forward (from V1 combo must do before 4th tap launches them) which rises them on hit, then does one small melee hit directly above you slamming the axe for a defensive ground pound which hits in melee range to both sides and reaches 2 floors up.

    In PvE the radius pound will knock down monsters and also send them 1 platform down from where they are. The up hit won't connect on all enemies because they won't be launched into proper range but can hit 1 floor up before the pound.
    • rise 82.31, situational up hit 169.40 float-stun, ground pound knockdown 1 platform below 82.31 (164.62/334.02)

      • PvP
        Launches then the pound launches even higher for a combo (into airgrab +370 or an airhit-OK skill). Great to hit by surprise because of the invisible range (melee range left and right at once, extends 2 floors above you) but when used alone might not combo afterward as well.
          launch 56, 56, high launch 340 (+452 from combo, may combo afterward)

Critical V2
Changes the weak tornado knockdown Critical into a walking combo... That's still weak and now just takes longer to end and to knock down.
This changes the second swing of the dash attack too but even there it's sub-optimal.
  • 37.12, 37.12, launch 37.12, knockdown 37.12 (148.48) (other is 38-115)

    • PvP
      Can be more useful in PvP.
      The normal Critical instantly knocks down with 198 damage at most, this one does slightly more damage and can combo into skills before the last hit if you want. It also has more total range and spreads its hits slower for extended range if the initial combo was missing.
      Can be done as Critical from combo and as the default ZZ of dash attack.
      63, 63, launch 63, knockdown forward 63 (+252 from combo, 189 before knockdown)
5-5a: Ryan 1st job (part2)
airZ
Has decent range forward, but it has infinite active frames until landing to act as a damaging wall and also stretches diagonal down and straight down to catch close even by falling straight on top of them.
V2 upgrades it to be able to dashcancel anytime after the swing, whether it hits or misses.

Ottoshot: possible but very hard timing. Also works straight up or behind you.
  • 117.59 stagger

    • PvP
      Great wall to repeat in the neutral game (this job even has very fast jump startup speed so that starting with airZ or repeating it on platforms is faster and more reliable), and it can dashcancel on hit or miss to reposition and attack again. If it hits them on ground will combo into groundZ, on airhit will make them fall, usually knocking down or sometimes comboing into one more hit or airgrab.
      The infinite active frames also make it good for hitting after enemy wakeup/skill to catch as soon as they come out of invincibility to then combo into groundZ.
      Can loop until autocounter (~1600dmg) by jumping up and down a platform if they can't get pushed too far.
      202

air ↓Z
Another infinitely-active dropping airZ, this has more startup time but reaches farther forward to be more exploitable for PvP (but doesn't reach below you as much). In PvE knocks down monsters but sending them 1 platform below, if that would make it easier to group them up.
  • 146.99 x2 knockdown sending 1 platform down

    • PvP
      Takes longer to start than the other and has more recovery. Has worse range below but longer range straight forward.
      On airhit makes them fall down like the other, on groundhit will launch instead, to combo into airgrab for +370 or skill (Poison Spores will catch then combo into groundZ, unless too close).
      101 x2, launch on ground or knockdown on airhit

    V2
    This upgrades the normal airZ instead of air↓Z, for airZ to be able to chain into air↓Z.
    This can be used to jump 2 floors above, if you jump then do airZ at the highest point into ↓Z, it will skip you to the platform above, only if the first attack hits.

    • PvP
      Sometimes can do the trick to skip 2 floors up. Also can be useful if jumping up with airZ extremely early in the jump, normally would easily combo into groundZ but if early can land to merely attempt groundZ (or hit and airdash, turn airZ and groundZ), this gives early airZ a guaranteed combo into air↓Z then airgrab (673dmg).

    V3
    Removes the V2 upgrade, and gives air↓Z a 2nd Z press while still airborne and falling (and can't be done from minimum jump height). Not useful.
    Single hit forward not being infinite like the other. In PvE this is another pushing short stun on monsters but this is impossible to fit after the previous knockdown + blow down hit. DPS is very low too.
    • float-stun 131.03

      • PvP
        Second hit to air↓Z, launches or knocks down on hit exactly like the first hit, launching higher to combo into skills easier but because of longer recovery can't combo into normal attacks/airgrab anymore. Slightly extends its range when timed correctly but still not very good.
        launch/knockdown 90

Z↓ (unlockable)
Temporarily increases your movement speed: your dash can re-dash earlier than normal and you can hold dashes to do a continuous ground run that's very fast. Normal walk is also slightly faster.
Lasts 10sec, cooldown 25sec.

  • PvP
    This lets you keep dashdancing left and right and left and right even faster than this job normally can.


LV1 skills
Twin Blade (lâmina gêmea)
Does 2 hits forward while walking, 1st launches and 2nd blows away.
  • launch 244.18, blowaway 244.18 (488.36, aerial 610.45) [MP rate 16.84/21.05]

    • PvP
      Can combo on airhit too but only difficultly because it has noticeable startup time to make that harder, and the exact range to juggle with both hits is very specific.
      launch 202, blowaway 202 (404) [13.93]

    V2
    Does a walking 2 hits then a 3rd that slightly lauches.
    • 181.22 x3 (543.66) [18.74]

      • PvP
        The first 2 hits now force standing state on airhit to easily combo on juggle, launch can combo into airgrab or skill.
        force-standing 150 x2, launch 150 (450), plus grab 820 [28.27]

    V3
    Exact same as V2 but with one more strike before the last hit.
    • 119.38 x5 (596.9) [20.58]

      • PvP
        force-standing 99 x2, 99 x2, launch 99 (495), plus airgrab 865 [29.82]

Boulder Crash (fúria da terra)
Similar to the default skill but done faster. Timefreezes right at the beginning, doing a single forward strike without moving.
  • 115.76 x5 (578.8) [19.95]

    • PvP
      Much easier to combo into in ground or air, and launches too.
      force-standing 84 x3, launch 84 x2 (420), plus airgrab 790 [27.24]

    V2, Leeching Slime / Poison Spore (esporo venenoso)
    Refills your HP on hit and avoids knocking down on hit.
    Places 3 slimes in a short line in front of you with barely no gap between them, in total reaches halfway to screen edge, or can have all 3 hit the same enemy if near the wall where they stop at the same place (or barely go up a ledge). Not counting the corner, often connects with 2 hits except at closest or farthest edge with only 1. Each of the 3 slimes refills 10% HP on hit so refills 10%-30% HP per cast (doesn't stack per target hit anymore), halved recovery in PvP.
    They can stay active for around one second on miss.
    • 185.99 x1-3 (185/371/557) [06.41/12.82/19.24]

      • PvP
        Refills less HP on hit and potentially can combo after for very high damage.
        On ground or air, forces standing state and leaves them with enough hitstun to combo into groundZ V1 for full combo, but won't true-combo into groundZ V2 which is slower, there grab is still guaranteed for +370 (or airZ↓Z airgrab if you have airZ V2 instead of V3 for +673dmg). After hitting with this skill, if there is a platform below, you can drop airZ then jump up again with airZ, then loop this if there is enough space forward or continue with full groundZ.
        On certain scenarios won't force standing state on airhit to then knock down on airhit?
        This skill can also be used right after knocking them down to wakeup trap because the hit will linger, but if they're too far away it won't combo into anything.
        force-standing 85 x1-3 (85/170/255), plus combo

Freezing Attack (poder do inverno)
Instantly timefreezes and does a long melee forward that also almost reaches a full floor up, freezing/stunning monsters out of their animations for 3 seconds (can't freeze monsters with super armor).
Will enemy-stack for more damage per enemy up to 4 if they are together in the same place.
  • freeze ~109 x1, ~95 x2 per target in range, then ~62 x2 and ~24 x1 (single target 447 [15.41], 2-4 enemies: 637-1017) [21.96-35.06]

    • PvP
      Hits easy with the instant timefreeze and although it doesn't reach a full floor up it can still anti-air. Normally this will freeze on the first part and knock down on the second so the freeze doesn't matter and this simply hits and knocks down, but what makes this skill different is that there is a certain altitude where this can airhit then miss the last hit that would knock down, where they'll fall with you two recovering standing near each other, where you can turn around to combo into groundZ or grab.
      freeze 75 x1, 114 x2, then force-standing 49 x2 and knockdown 14 (415) [14.31], or mostly misses then combo
5-5a: Ryan 1st job (part3)
LV2 skills
Titan Axe (fúria do titâ)
Keeps walking forward with a few melee swings, 3rd launches and has a 4th which leaves a rectangle AoE forward quickly blowing monsters away. Light monsters get blown away too early and only heavy monsters take full hits which still is nothing good.
  • 97.12 x2, launch 97.12, 97.12 and blowaway 111.88 x5 (heavy monster 947.88 [15.04], light monster 548.92 [08.71])

    • PvP
      Somehow too weak. The combo itself is weak and only combos on ground hit. Uniquely, the last hit will earthquake around you (melee range to both sides and 2 floors up and down) to hit enemies that were standing on the ground (not counting ones being hit by the combo as it launches them) to bounce them for fall damage, but even that was reduced to almost nothing.
      169, 169, launch 169, knockdown 169 (676) [10.73]
      Earthquake fall damage: 114 [01.80]

    V2
    Timefreezes at the beginning. Does a more consistently-hitting combo while walking forward (the first 4 hits can hit behind you too but then you still go forward), then hits forward stretching 1 floor up with a few more hits if tall.
    • ~95.0 x4, ~27.0 x4-9, ~120.5 x3 (849.50/984.50) [13.48/15.62]

      • PvP
        Launches very very high at the end. All hits after the spin reach 1 floor up.
        82 x4, 23 x4, 105 x2 and high launch 140 (770), plus airgrab 1140 [18.09], floor above 442 plus launch

    V3
    Doesn't timefreeze at the beginning. Quickly does only 2 wide slams forward that each float on hit then a launch hit.
    • ~358.6 x2, ~120.5 x3 (1078.70) [17.12]

      • PvP
        Fully combos on airhit now.
        rise 312, rise groundhit float airhit 312, 105 x2 and high launch 140 (974), plus airgrab 1344 [21.33]

Canyon Carver (terra estilhaçada)
Instantly timefreezes with a short melee strike forward stretching 1 floor up, then launches 5 splinters away from it in many directions that do damage but don't pierce. With more than one target may do some 3 less hits to some. Smaller AoE. Both parts float-stun monsters forward, hitstops monsters so they can't react until it finishes.
  • float-stun 118.97 x5, splinters float-stun 118.97 up to x5 (1189.7 [18.88], may do less hits to multiple targets)

    • PvP
      First part forces standing state on airhit to combo midair (and can reach 1 floor up), then second part knocks down.
      force-standing 103 x3, launch/knockdown x2, splinters launch/knockdown x2 on same floor or x4 on floor above (721/927) [11.44/14.71]

    V2, Big Axe Destruction (glória da terra)
    Biggest AoE on this slot.
    Does a wide hit forward, then tries to jump up with two hits, and drops down with a 4th. Technically all 4 can hit on your own floor and the one above, but against launchable monsters might miss some hits if they are on the platform above.
    If there is a cliff in front of you when casting you will fall down during the animation.
    • rise 283.28, launch 283.28, 283.28, launch/knockdown 283.28 (1133.12 [17.98], launchable monster gets 2 aerial hits for 1416.4 [22.48])

      • PvP
        Combos on airhit. Usually only does all 4 hits on groundhit and on your own floor, anywhere above can miss 1 or 2 hits.
        force-standing rise 246, launch 246, launch 246, knockdown 246 (984) [15.61]

Thunder Pull (relâmpago)
Mid-range beam that pushes forward then hits again pulling back, leaves enemies standing. Can do less hits depending on knockback/width.
  • ~206 max x8 (1648) [26.15]

    • PvP
      Hitstuns long enough to easily combo into almost any attack like groundZ, and works well even on airhit. Works to extend combos before autocounter point into another combo.
      force-standing 166 xN, normally 6 hits or 5 if extremely close (996) [15.80] plus combo
5-5a: Ryan 1st job (part4)
LV3 skills
Resurrection
Useless solo.
The only big team support ability that Ryan has, in all jobs. Buffs all teammates regardless of distance (but not you) so that for 30sec they automatically revive one time if they would get KO'd restoring to 20% HP (better in V2).

Only Ryan and Lime have a skill like this. You can even bring Resurrection in PvE as another job by using 1st job only as your second equipped job (after the LV45 buyable quest where you can equip 2 jobs in PvE).
You can keep the skill shortcut button for this skill ready, to still prevent a KO after you hear their KO scream because they have to blink in the floor for 5 seconds before they leave the stage.
  • V2
    Simply upgrades the timer to 1 minute max and the HP refill to 50% HP, so that it's much more reliable as a buff.
    You can upkeep the buff if you look at the top-right timer when you use it to see when it will wear off. You may start it again early if one teammate gets KO'd and spends it.

    • PvP
      Useless if there isn't anyone else in your team. MP is much harder to get in PvP so it can't be used as often.
      Refills to 25% HP (10% in V1).

    V3, Hammering Crusher (força titânica)
    Simple big AoE attack, forward rectangle reaching 2/3 to screen edge from center and stretching 2 floors up (but launchable enemies in the 3rd floor might not take full hits).
    • ~201 x10 (2010) [20.93]

      • PvP
        Good but Nature Commander is better.
        launch/knockdown 175 x10 (1750) [18.22]

Nature Commander (chamado da natureza)
Another forward AoE but slightly longer forward and by screen edge can still deal 5 out of 8 hits. Also stretches 4 hits to 1 floor below now. The only downside is stretching only 1 floor up instead of 2.
Ending this skill buffs you and nearby teammates for +7% ATK for 10sec.
  • 238.16 x8, ends with a small launch possibly doing 1 aerial hit (1905.28/2024.36) [19.84/21.08]
    If 4/5 hits 952/1190

    • PvP
      Buff lowered to +3.5% ATK for 10sec.
      207 x8 (1656) [17.25]
      If 4/5 hits 828/1035 [08.62/10.78]

      V2, Phoenix Assault (fênix flamejante)Worse than others.First whips forward the bird to screen edge which attempts 4 hits across some kind of pattern with knockback: aside from giants can do 3 hits close, 2 mid, 1 far. Then does an explosion at the middle which can have the enemy pushed out of the way from the first part if they were at the far part.
      • ~282 max x7 on giants (1974) [20.56]

        • PvP
          Often the first part does 3 hits close, 2 mid, 1 far, then explodes for +2 hits if not pushed away at the edge.
          245 x2-4, explosion x2 (980-1470)

Fright Punisher (punição da natureza)
Forward wave to screen edge dragging enemies along without knocking down. Both the melee at the start and the wave can reach 1 floor up. Can help in grouping up monsters at the corner but costs too much MP.
  • ~349 max x10 (3490) [36.35], less hits if resisting knockback or not starting close

    • PvP
      Forces standing state on airhit, won't knock them down, could attempt dash attack but apparently you don't recover faster than them (and MP2 Thunder Pull does let you combo after it).
      165 x2, 165 up to x8 (1650) [17.18]

    V2, Bloody Funeral (vingança da natureza)
    Less AoE and damage, but heals you.
    Leaves a lasting attack hitting a mid-range area in front of this spot. Monsters take hitstun with barely any push at all, apparently only hits whichever 1 monster is farthest away inside the area.
    Hitting for its full time deals 22 hits, each hit refills 2% HP (44% HP for 3 bars of MP).

    He also has a 1-bar skill to restore HP on hit which is 1 bar for probably 20% HP or sometimes 30%, which heals at a better rate for MP spent, but does so little damage that it's only for self-healing or skill invincibility, this one has more decent boss damage when used regularly regardless of HP. If you want a drain skill you can sacrifice either the 1st or 3rd skill slot.
    • 66.71 x22 (1467.62) [15.28]

      • PvP
        Deals damage without hitstunning them at all, and keeps pulling them back to the beginning of the area. Can actually pull behind its own striking range which is harder at longer distances.
        Recovers 1% HP per hit (max 22%).
        no hitstun 46 up to x22 (1012) [10.54]

LV4 skill
Heaven's Guardian (chamas espirituais)
Makes a fire totem that keeps shooting flaming pebbles at the ground in random locations, each one stays still doing small damage over time next to it (will try to hitstun monsters in place) then explodes at the end of their separate lifespans.
Will slowly do damage at unpredictable areas on your screen and around it, but against bosses can do extra hits especially if you lure the boss to the wall and cast the totem there, so that any shot to that side stops at the wall and stacks in the same place to hit the boss.
  • ~20.5 x18 then explodes blowing away for 1024.0 (1 full pebble 1393)
    12 pebbles total. Takes 10 seconds for the last to explode after initial cast.
    7 full on boss in corner = 9751

Awakening
Forward hit, hits the full screen forward and a little bit backward. Hits 2 floors up.
Single hit so weak if it doesn't crit.
  • ~2610.83 x1

H
Hits basically the entire screen.
Also gives you ATK +15% and Super Armor for 20sec after it finishes.
  • ~124.05 x14, ~49.22 x19, ~1310.18 x1, ~705.49 x1 (4687.55) [36.05 if it cost as much as MP4]
5-5: Wolf form
Press Spacebar to toggle transformation skills, Wolf is a LV1 skill. Lasts 20sec or 45sec with a passive, can press X to cancel early.
Wolf form costs 10% HP whenever starting (still usable with less), if not PvP you can easily use potions in most stages, or simply equip the HP totem to be able to heal once more than it costs (Wolf form is the only transformation that can still place totems).

Wolf has gained Hyper Armor in PvE.

There are buffs to Wolf form but it's also not restricted to Wolf form, any Ryan job can use these buffs anytime by starting the Wolf transformation and cancelling into another skill before transforming (like your normal MP1 after pressing spacebar again).
The Ryan himself will gain +20%ATK, at the cost of -20%DEF/+25% damage taken, for 45 seconds. Also gives all teammates +7%ATK for 20sec.
    PvP: Ryan buff +10%ATK/-10%DEF, team buff +3.5% ATK

Wolf's dash goes farther than a standard dash (the rocket even more) while being able to cancel the dash's recovery into another dash to just keep doing Forward Forward (better if tapping it twice in rhythm than mashing it), and every time he starts a dash he has momentary invincibility and passes through enemies.
Wolf's power in PvE is being able to dash through monsters when not attacking, and attacking with groundZZZ (or jumpZ on boss).

Wolf transformation will always be the orange form, or in PvP it will be white if playing as 1st job but this doesn't change anything.


GroundZ combo
The attack that you want to land when transformed.
The 3rd tap has very high damage and also easily hits multiple enemies at once for fast MP gain. The 4th knocks down so sometimes it's better to just repeat until the 3rd instead (~366 DPS). You do the 3rd and whenever about to start from the beginning again you may dash through monsters first for dodging.
  • 86.68 / 86.68 / 221.35 x3 / knockdown forward 50.59
    Critical/Double: launch 190.50

    • PvP
      Has above-average range but misses the middle if hitting the start at its tip (only comboing 1 Z into shortcutted skill).
      Instead of doing full combo into Double, you can ZZZ-Critical, dash-jump into delayed airZ, turn around and groundZ again. For more damage in one combo do ZZZ-skill.
      109 / 109 / 279 x3 / blowaway 63 (1118)
      Critical/Double: 300, launches on groundhit or knocks down on airhit

air ↓Z
Dive attack, can angle left/right. Has extremely short range aside from the movement. Cannot hit anymore after falling for more than 2 platforms. In PvE blows away so instead of an advance this is for crowd control to attack another one with groundZ.
Deals two hits and a landing explosion hit.
  • 201.59 spinning blowaway x1-3 (403.18)

    • PvP
      Very good because it hitstuns long enough to combo into groundZ, and it also forces standing state on airhit so continue with groundZ on them too.
      Used to have a bigger hitbox and last longer before being nerfed once, along with airZ spin hits lasting longer than they do now.
      force-standing 127 x1-3

airZ
Places stationary projectile in the air across your jump arc. They multi-hit in their spot for the one second they're alive in your trail. You recover midair and can continue attacking or airdashing. Can work to deal an early hit while advancing before using groundZ but doesn't hit far from you. Can repeat as an attack on boss while going into dash faster than groundZ.

This rarely happens but they can be reflected as projectiles (stays in place but now hits your team).
  • 60.47 up to x6 (max on giant 362.82)
    Repeating up and down a platform does 6 hits on the way up and 2 on the way down (~338 DPS)

    • PvP
      Low range by itself but lasts a second in place when they come to you too, and can repeat without advancing to make a wall to prevent them from advancing. Forces standing state on airhit to combo into groundZ even if they were jumping.
      force-standing 74 usually x4 (296)

Dash attack
Very long dash attack active over a big distance, 2nd hit blows monsters away like dive does.
Can press Z another time to do a jumping attack forward.
  • 134.05, spinning blowaway 134.05 (268.1)

    • PvP
      Knocks down on 2nd hit (slightly stronger than a grab), can combo 1st hit into shortcutted skill.
      If doing the followup attack, you can loop jump attack while going forward until they autobreak.
      211, knockdown 211 (422)


LV1 skill (unlockable in skill tree)
Walks forward dealing contact damage for a moment, then a forward slash.
  • 114.37 x6 (686.22) [23.66], last knocks down forward

    • PvP
      Only fully combos on groundhit (the first hits will force standing state on airhit but easily walks through under them anyway).
      force-standing 91 x4, knockdown 91 x2 (546) [18.82]

LV2 skill (unlockable in skill tree)
Multiple slashes forward with some movement, then a radius explosion that blows away and reaches 1 floor up. Explosion will either push away extremely far before ending (grouping up monsters forward but dealing almost no damage) or fully hit a monster that can't be knocked back or already is at the wall for more damage.
  • 78.02 x4, blowaway 78.02 x1 on normal monster (390.1) [06.19] or up to x14 (1404.36) [22.29]

    • PvP
      Too weak. Weaker than LV1.
      62 x4, blowaway 62 usually x3 or x5 near wall (434/558) [06.88/08.85]
5-5b: Ryan 2nd job
Standard dash type (fast, faster in air)
Dash momentum: from ground ~330 pixels, from air ~372, rocket ~718

Simply doing a rocket then airdash (or doing a rocket-down) covers so much space and puts you on the ground again right away.

Hitstun recovery speed: between normal and fast

GroundZ combo
Long range to start. To not knock down can repeat until the second kick (~197 DPS), strongest is repeating second kick + Critical (~260 DPS) instead of full.
Critical/Double will launch slightly.
  • 100.54 / 100.54 / 100.54 / 100.54 / launch 100.54 / launch or knockdown 100.54 x2 (703.78)
    Critical/Double: launch/knockdown 141.95 x2 (283.9, with 1 aerial 354.875)

    • PvP
      Long range, slightly slower startup than normal (commonly loses to another character if you and them start at the same time).
      Full combo will do around 966dmg, but you can do 4 Zs into Critical (1040) then dash-jump airZ, land and do ground run grab (1702, autocounter). Or dash-jump airZ ↓Z to combo into skill.

      The second tap of the combo will force standing state on airhit, letting you do ZZ after certain juggles to stop them from falling, then attempt the full groundZ from the beginning again or comboing into run grab.
      138 / force-standing 138 / 138 / 138 / launch 138 / knockdown 138 x2 (966)
      Critical/Double: high float 244 x2 (488)

Ground dash attack
Launches them for crowd control, can hit 1 floor up.
  • launch 98.27 x2 (196.54, with 1 aerial 245.675)

    • PvP
      Knocks down ahead, but also works as a very fast and repeatable anti-air to keep using while the enemy is moving as it does reach 1 floor above with good range forward too, combos into MP1.
      float/knockdown 169 x2 (338)

airZ
Lower damage but float-stuns per hit, stunning non-armored monsters and possibly grouping them up.
Can chain to air↓Z.
  • float-stun 109.19 x2 (218.38)

    • PvP
      Has short range forward but decent range both up and down to better catch in the air, and can hit below while jumping over them too. Being separated in 2 hits also makes it have 2 chances to hit instead of only 1 at the beginning. It also forces standing state on airhit so hitting in any way can lead to combo like groundZ or at least grab, especially because if you don't have the position to do groundZ after this it can chain to air↓Z on hit to continue that way instead.
      Can also be used mid-combo to force standing state on airhit, then chaning into air↓Z or landing into grab or attempting groundZ.
      force-standing 146 x2 (292)

air dash attack
Spins far forward with two contact hits, launches monsters like ground version. If you press Z again it will spin a second time but not a third.
Can chain into air↓Z.
  • launch 65.51 x2 (131.02, with 1 aerial 163.775)

    • PvP
      Floats/knocks down, can repeat a few times still hitting. Can combo into air↓Z which stops the knockdown to continue that way.
      float/knockdown 45 x2 (90)

air ↓Z
Falls down constantly hitting to all directions. In PvE float-stuns monsters away.
After landing will take a moment to recover while stepping forward, but the moment you land you can cancel into left or right dash or jump.

If you jump and do airZ/airdashZ then cancel into this move you can land 2 floors above.
  • float-stun 35.69 xN (5 hits 178.45)

    • PvP
      Works either as an attack on its own that attacks from any angle and works on both groundhit and airhit dragging them down with you, or mid combo chained from airZ or airdashZ. Leaves you two standing up at nearly equal frames (or comboing into skill). Can dashcancel after landing to combo into grab, or dash and wait to attempt groundZ combo.

      When standing on a platform, can do ↓ Z ↓ Z to drop with an airZ comboed into air↓Z puts you back on the same platform on hit or miss, comboing into grab or almost comboing into groundZ.

      It would be possible to attempt only combos that go into this as an ender instead of a knockdown to never give them the temporary invincibility after knocking down, but autocounter will trigger every ~1600 damage anyway.
      force-standing 24 xN (~120)


LV1 skill
3 strikes moving forward, similar range to groundZ but hitting 1 floor up, knocks down.
  • 145.16, 145.16, launch 145.16 + knockdown 145.16 (580.64, with 1 aerial 653.22) [20.02/22.52]

    • PvP
      Forces standing state on airhit to combo even on juggle combo or alone against a jumping enemy, hitting 1 floor up helps in hitting midair too.
      On hit barely can combo into dash-jump airZ↓Z, or into any skill including itself again.
      fs 105, fs 105, launch 105 x2 (420) [14.48] plus combo

LV2 skill
Radius explosion reaching 1 floor up, hits the same spot across some 2 seconds but blowing away too early.
Monsters get pushed away unless super armored/immune to knockback, so only deals full hits to those monsters or to normal monsters if against the wall, too weak normally.
  • blowaway 78.25, partial x4 (313)[04.96], full x14 (1095.5)[17.38]

    • PvP
      Too weak now. Deals very few hits, slightly more against corner. 68 xN, first few hits force standing state with no knockback then quickly floats far away.
      Normally around 5 hits (340)[05.39], around 6 on corner (408)[06.47], max on super armor 14 (952)[15.11]

LV3 skill
Single dash attack passing through enemies, hitbox is big and easily deals all 6 hits to every enemy inside the AoE instead of more or less hits depending on distance. Good in PvE for dealing full damage quickly and has decent AoE.
  • 329.80 x6 (1978.8) [20.61] knockdown forward

    • PvP
      Forces standing state to work on airhit too. Leaves them standing to combo into groundZ even after turning around.
      Doing groundZ ending into Critical, comboing into this by skill shortcut then into another groundZ might kill from full HP.
      force-standing 287 x6 (1722) [17.93] plus combo

LV4 skill
You jump up outside the screen then can aim a vertical line anywhere in the stage, in a few seconds you drop back to the bottom of the stage in that line hitting enemies near the line then quaking almost that entire screen (assuming the camera isn't touching the corner). Hits even airborne enemies.
Often will easily get the back hit bonus on monsters for bonus damage.
  • fall 180.46 x5 (902.3), plus screen quake 1975.06 x1 (2877)[22.13]
5-5: Nephilim form
Not available on 1st job.

Press Spacebar to toggle transformation skills, Nephilim is a LV2 skill. Lasts 45sec, can press X to cancel early.
Nephilim has extremely short range attacks, but fast movement when not attacking and has one repeatable shot diagonal down, and defensive buffs.
Nephilim has Hyper Armor in PvE (in PvP it's super armor, he still takes launch/knockdown hits). While transformed you have +50% DEF for -1/3 damage taken, and gives teammates in the stage +20%DEF/-16.7%dmg for 20sec.
    PvP: also immune to grabs. DEF buff is lower: +25%DEF/-20%dmg for 35sec, teammates +10%DEF/-9.1%dmg for 20sec

He used to have broken damage in PvE which now is closer to normal, along with some easy knockdowns for crowd control.
Repeat dashatk for ~408 DPS (or ZZ-Crit for ~400), against certain giants you can repeat jump and airZZ↓Z (~537 DPS), to deal damage without knocking down can repeat groundZ until before the last hit.


Dash attack
Goes very far straight with a big hitbox. Helps quickly knock down or re-arrange monsters. Also high DPS to repeat against monsters if they can't be knocked around.
  • 277.19 knockdown (~408 DPS repeated)

    • PvP
      Safe long approach thanks to super armor, knocks down and resets to standing surprisingly fast.
      477 knockdown

GroundZ combo
Average starter hit.
The Critical/Double is very strong, repeating ZZ-Crit is the strongest DPS from this move at ~400 DPS but against normal monsters repeating this might only work when they're already near the corner. Can also keep repeating groundZ until before the last hit, to hit monsters without knocking down and to push them forward to the wall.
  • 123.98 / 123.98 / 82.65 x2 / 82.65 x2 / knockdown 185.97 (764.53)
    Critical: knockdown 54.59 x6 (327.54) (as Double, 109.20 x6) (655.2)

    • PvP
      In PvP this is the hardest attack to connect but is the most damage Nephilim can do in one combo (and can do his skill instead of the final hit for more damage).
      Critical/Double does very low damage because it will knock down on the first hit and miss the rest, 2 hits if they're in the air.
      The final hit resets back to standing surprisingly fast, especially with Critical.
      170 / 170 / 113 x2 / 113 x2 / knockdown forward 256 (1048)
      Critical/Double: knockdown 94 x1/x2

airZ
Short diagonal down punch done twice. Can't ottoshot.
If you jump up without changing platforms, after the two punches you still have time for one more punch, or ↑Z or ↓Z. Against certain giants you can repeat jump airZZ↓Z for Nephilim's highest DPS (~537).
  • 251.99 x2 (503.98)

    • PvP
      Can combo into groundZ after landing but only if they didn't get hit while in the air otherwise they will be knocked down.
      182 x2 (364)

air ↓Z
Drops to the floor with a ground pound that hits both sides after landing. Instantly knocks down monsters to make yourself safer.
  • 336.00 knockdown (~369 DPS repeated)

    • PvP
      Hitstuns enemies long enough to directly combo into groundZ.
      Also, the shockwave has very long active frames, so you can do this move after any knockdown so that the shockwave can still stun them the moment their invincibility wears off, if they don't move out of the way quickly enough.
      231

air ↑Z
Diagonal down projectile with no max range, can repeat faster by standing on a platform then repeating Down, UpZ.
Great move for singletarget damage in PvE when it would be dangerous to do melee attacks but its DPS is lower than average. Can do twice per jump.
Using this move lifts you higher into the air, can reach one more platform per jump this way.
  • 277.19 (~235 DPS repeated from one platform)

    • PvP
      Can hassle at longer ranges to pressure the opponent into coming closer to you. But damage is very low now.
      Will not knock down if it hits midair so on any hit it might combo afterward if close enough.
      force-standing 190

airdashZ
Like the airZ double punch but cannot do anything else until landing, but keeps the airdash arc while moving and can lead into combo if not hitting them on air.
Waiting for the airdash to end first lets you start a different air attack.
  • 161.27 x2 (322.54)

    • PvP
      111 x2 (222)


LV1 skill
Forward step hit 3 times, last hit blows away.
This is his only skill and it's not good offensively but it's great for long invincibility time. Nephilim's higher DPS gives him high MP recharge in PvE so you will always have MP to spend on this for invincibility.
  • 200.97, 200.97, blowaway 200.97 (602.91) [20.79]

    • PvP
      Good to deal some damage with invincibility, or completely avoid a skill, and can use before the last groundZ hit to deal slightly more damage. Can also chain this skill before the last hit to spend more MP for more damage in one combo.
      While transformed you will get slightly more than 2 bars of MP by the time the transformation runs out. If you wanted to transform again it's good to keep the use of this limited.
      175, 175, knockdown forward 175 (525) [18.10]
5-5c: Ryan 3rd job
Standard dash type (slightly below average)
Dash momentum: from ground ~280 pixels, from air ~273, rocket ~614

Hitstun recovery speed: between normal and fast

GroundZ combo
Great combo: slightly long range and easily AoEs all monsters in range at once, getting decent MP gain on one target and extremely fast with multiple. The last hit staggers instead of blowing away, so you can infinite combo monsters by just repeating the full combo without any Critical/Double, for ~350 DPS. And it's usually better than using Critical/Double which launches to knock them down.
You get slightly more DPS if doing full combo plus Double against a heavy monster that can't be knocked around (~385).

If you're recovering from any animation and try to start groundZ combo by mashing Z, holding Forward while mashing can make him start the spin instead of the combo so don't hold Forward.
  • pull stagger 176.05 / float-stun 176.05 / 176.05 / stagger 176.05 (704.2)
    Critical/Double: launch 139.77 x2 (279.54, with 1 aerial 349.425)

    • PvP
      Slightly long range but slightly slower startup. Forces standing state on airhit to catch jumpers or use on juggle combo!
      Normal ender leaves standing, naturally combos into Double (1448dmg, if opponent isn't uphill combos into grab for 1818, can grab again if they tumble off a cliff). With MP, can do ZZZZ>Double>MP1 (charged or shortcutted), ZZ>Critical (2832dmg).
      If landing holdC near the corner, can combo into full groundZ, or run MP1 into groundZ, or run jumpZ and attempt groundZ.
      • fs pull 242 / fs 242 / fs 242 / 242 (968)
        Critical/Double: float/knockdown 240 x2 (480)

    Combo Down / Combo Back
    In any part of the combo, even after Critical/Double or even alone as Z↓, pressing ↓ will cancel into a different attack. Spins the scythe ahead to make a multi-hit wall of damage forward stretching 1 floor up and down, then striking only straight forward blowing away. Less useful for PvE.
    The spin does 4 hits but can do 6 if you press Z more.

    Pressing Back from combo, or after Down ends, chains further into a simple strike forward. In PvE has knockback to knock down enemies sending them behind you.
    • Down: 45.35 x4-6 (181.4-272.1), blowaway 45.35 (226.75)
      Back: stagger 107.52, blowaway to slightly behind you 107.52 (215.04)

      • PvP
        Z↓ is a great move alone or readily canceling from combo, because of its disjointed range forward that can catch enemies as they advance (reaching 1 floor up and down) and won't knock down even on airhit. You can even use this after knockdown to hit them as their invincibility runs out. If this hits, can add comboBack if on corner, then either way can combo into MP1 to combo back into full ground combo.
        Chaining early combo into Double into Down gives enough time to hold Z for any level of skill.

        Down: force-standing 31 x4-6 (124-186), blowaway 31 (155)
        Back: small rise and pull fs 74, small launch 74 (148)

Dash attack
Forward hit faster than groundZ. Launches/knocks down monsters.
Has a followup with another Z which spins in the air for knockdown, deals around as much damage as one combo.
  • launch 108.86 x2 (217.72, with 1 aerial 272.15)
    Followup 74.84 x2 and 149.68 x2 (449.04)

    • PvP
      Easier to hit with than groundZ from being faster, but on hit only combos into MP1.
      There is a certain timing where this can hit an airborne opponent then juggle into groundZ for more damage than just groundZ, but the exact altitude for this to work seems too unreliable.
      float/knockdown 166 x2 (332)
      91 x4 (364)

air dash Z
Has short range but hits in all directions. Float-stuns monsters leaving them up to lead into combos, or could repeat to push them around first.
  • float-stun 133.05 x2 (266.10)

    • PvP
      Very easy to hit while moving around blindly because of the spinning hit, but knocks down quickly without much damage, just resetting you two closer.
      If you rocket into this (Forward, Forward+Up, Z) you will cover the air and still hit the head of people that stayed on the ground. If it hits there barely is time to combo into another rocket then grab (+370dmg).
      force-standing 91, float/knockdown 91

Dash-backZ
Backdashes and throws forward a seed that will sprout a flower in a set distance forward where it lands (it can fall down a hole), dealing damage without moving them around.
In PvE can repeat near wall as an improvised mid-range attack that's safer than melee attacks.
  • 215.04 (~257 DPS repeated)

    • PvP
      Can be used defensively or before advancing to possibly catch an advancing enemy, hitstuns for a decent amount of time and forces standing state on airhit, can try to combo afterward if it hits.
      It can also be planted on their wakeup or skill ending because it has long active frames to catch as invincibility runs out.
      Has 3sec cooldown.
      force-standing 370

airZ
Hits straight down and straight up stretching forward a decent distance, easily hits up or down while moving.
Launches monsters on every hit, possibly making a long juggle, and air↑ZZ can hit more.
Ottoshot: no.
  • launch 107.52

    • PvP
      Does nothing on groundhit and forces standing state on airhit, leading into groundZ combo even if it hits midair. Hitstun is shorter than average so airZing into ground combo needs to be done close to landing time.
      Can't ottoshot but if you have platforms to go up and down from you can repeat if they won't get pushed out the platforms.
      force-standing 222

air ↑ZZ
Despite the different animation it hits exactly like airZ, but it can Z again for a spinning hit for more damage.
On monsters the first swing launches like the other, the second swing will knock down from the air after more damage but if they hit a different grounded enemy it float-stuns them leaving them on the ground.
This move can also be started as X in the air, which can go up farther.
  • launch 123.64 / float-stun on groundhit or knockdown on airhit 32.84 x7 (353.52, full aerial 468.46)

    • PvP
      On hit it's the same as normal airZ with even less hitstun so it's worse if trying to combo into anything other than its second Z, which is very weak but converts that into knockdown guaranteed even if they land on your back.
      force-standing 85 / knockdown 22 x2 (129)
5-5c: Ryan 3rd job (part2)
LV1 skill
A smaller AoE forward consisting of 3 pillars, may not hit all 3 depending on size/distance.
In PvE has bad damage output, and recovery time is very short which means invincibility time is unusually short for a skill, which is bad for your 1-bar skill, but can timefreeze monsters for teammates every time used.
  • launch 279.74 x3 on giant (839.22) [28.93], normal enemies 2 hits with 1 being aerial (699.35) [24.11]

    • PvP
      Launches high on any hit, easily letting you hold forward walk then combo into groundZ combo. Can be done at the end of combos to restart into groundZ but autocounter will trigger soon, probably with just ZZ-Critical.
      Also, they have high active frames, so you can use this while they're in knockdown/skill and it catches them when their invincibility ends.
      launch 140 x3 or x2 if too close or too far (420/280), plus combo

LV2 skill
Big line AoE forward then again moving back into place. At least the first hit will back hit if used close from the front. Damage could be lower than average but it's good because the AoE easily hits all in a line. Blows them away to the sides.
  • launch 344.45, blowaway far 344.45 (688.90)
    With 1 back hit from close 895.57 [14.21], 1 back hit and 1 aerial on launchable monster 1067.795 [16.94]

    • PvP
      Timefreezes pretty early and deals full damage to any enemy in range, even if they were midair.
      Works as wakeup trap, activating this as soon as possible after they get knocked down, making you invincible and only striking as their invincibility runs out.
      Also works if timed right as autocounter triggers after a ZZ-Critical if calculated exactly, triggering the autocounter from your combo then hitting its two strikes anyway because of the time freeze.
      force-standing 480, knockdown 480 (960) [15.23]

LV3 skill
Timefreezes nearby enemies if possible, sending out a crow image forward to hitstun enemies until sending an AoE to a set mid-range forward.
In PvE the crow will push enemies that aren't immune to knockback into the AoE (can miss most hits if they stay too close, and except for giants often misses the first two anyway because they start too high).
  • crow push 447.89, AoE 130.80 up to x12 (max 2017.49, often 1755.89) [21.01/18.29]

    • PvP
      The AoE pulls them to its center leaving them standing where you can attempt to hit after it, dash-jumpZ groundZ would be big damage if it works (the skill damage will have reset their down gauge to empty so a full combo works before autocounter). Deals around 10 hits on ground or 12 if they already were midair close to you.
      Like MP2 can use right after autocounter with shortcut after a combo Critical, to still fully hit.
      hitstun force-standing with no damage, force-standing 159 x10-12 pulling to center (1590/1908) [16.56/19.87]

LV4 skill
Basically a beam going 2 screens forward stretching 1 floor up.
Attempts 9 hits across the distance but commonly deals exactly 3 hits on monsters, sometimes only 2 on normal monsters. Certain long bosses take more hits.
  • launch ~1344 xN, most enemies 3 hits (4032) [31.01]
    Berkas 9 hits (12096)
5-5d: Ryan 4th job
Standard dash type (separated-pikes is slightly below average, joined-pikes is slightly above average)
Dash momentum:
  • Separated-pikes: ground ~248 pixels, air ~260, rocket ~643
  • Joined-pikes: ground ~283, air ~291, rocket ~728
*Both have slow re-dash (can repeat dash faster if holding until run starts then dashing again).

Hitstun recovery speed: between normal and fast

Press X button to switch between his 2 weapon modes with separated pikes or joined pikes, which changes his entire moveset (the switching animation can be canceled instantly into groundZ). He also has a 3rd by transforming into Magnus Dan with his 3rd transformation skill.

Separated-pikes

GroundZ combo
Average range and not high damage (repeating either full+Double or ZZCrit is ~265 DPS). Could stun monsters by repeating only the first hit or first two hits which is much less damage. Critical/Double launches.
  • pull rise 88.03 / stagger 88.03 / 88.03 / 88.03 x3 / 88.03 x2, last floats (704.24)
    Critical/Double: launch 278.46

    • PvP
      Average starter. Naturally combos into Double, easily comboing into airgrab or MP1/MP3.
      121 / 121 / 121 / 121 x3 / float 121 x2 (968, plus Double 1447, plus airgrab +370 1817)
      Critical/Double: launch 479

Dash attack
Can do up to 3 taps and 3rd knocks down forward, but after either the 2nd or 3rd can chain into Up attack (launches) or Down attack (knocks down without pushing as much).
  • 58.79 / 58.79 / knockdown forward 58.79 (176.37)
    Up: launch 92.39
    Down: knockdown 92.39

    • PvP
      Good because it can be done the same way whether from ground or air, and continue with any of the attacks even on miss, repeating this while moving through the stage (can do 3 Zs instead of 2 Zs before Up/Down if it would hit air-to-air).
      Up is a faster attack and launches (comboing into airgrab or MP1), Down is slower to hit and has worse recovery time but better to land because it forces standing state even on airhit and hitstuns long enough to directly combo into groundZ for a full combo out of it.
      • 101 / 101 / knockdown forward 101
        Up: launch 159
        Down: force-standing 159

Dash-backZ
Backsteps with a disjointed melee hit forward.
Even if repeating on wall to not move yourself away it's still not strong (~179 DPS), but it can be good to quickly recharge MP on multiple enemies because it connects on many enemies at once easier than combo.
  • 168.00

    • PvP
      It's a good defensive attack that catches advancing enemies and leaves them standing (even on airhit) with small knockback, if they followed you they are in range to immediately attempt groundZ afterward (or run grab would be more guaranteed). Cooldown 2sec.
      force-standing 289

airZ
Similar to Lass1, a momentary diagonal-down angle hit, good as air-vs-ground to lead into ground combo.
Technically a projectile and can be reflected.
  • 109.20

    • PvP
      Can't ottoshot, but if you can jump up and down the platforms with airZ every time it keeps comboing until autocounter.
      121


LV1 skill
Quick multiple stabs. Can keep pressing Z to spend MP on more hits.
  • 34.4 x4, 172.2 x2, 124.0 x1 (606) [20.89]
    0.4(?) bars for 172.2 x2 (344.4) [25.83]

    • PvP
      Good in PvP. Starts striking very quickly (may win against a grab), does several short hits in front without moving (forces standing state on airhit to catch jumpers/juggles), then later does one longly-active hit that floats them away.
      You can also time it as they're falling to completely miss the first part, then they fall into the last hit to get sent up right before it finishes, comboing into airgrab (+370) or skills or C↓.
      Also works as wakeup trap as they get knocked down near you, hitting with only the last hit still comboing after it.
      force-standing 60 x6 (360), high float 60 (420) [14.48]

LV2 skill
One small kick, then a wave of up to 5 hits forward teleporting forward. Can blow monsters either left or right.
Might be useful for a roll but the other mode has a roll skill for 1 MP bar.
  • launch 273.17, blowaway 273.17 x2-3. Normal enemies get launched than take 2 aerials (1092.68) [17.34]. Only AoE 546-819
    Large monsters can take as much as 1+5 hits if giant enough (1639.02) [26.01]

    • PvP
      Starts with one non-instant small and very low-on-the-ground kick without timefreezing yet, then the dash hit.
      Might bait an enemy into approaching because it doesn't timefreeze until later and as any skill you're invincible (and the kick will hit if very close to force them to stay in range, but the kick easily misses if they aren't on the ground) then does the big AoE. Damage is low even counting the kick.
      237, knockdown 237 x2 (711 with kick, 474 without kick) [11.28/07.52]

LV3 skill
Long-ish AoE forward, light monsters get blown away possibly before the full explosion hits.
  • ~632.4 x1, blowaway 140.53 up to x10 (2037.7) [21.22] or possibly less hits on light monsters

    • PvP
      Big damage combo extender. If you start a groundZ combo and have enough MP for this it's possible to kill from full HP (combo until before autocounter, for example ZZZZZ>Double, into MP3, then combo after it).
      All hits will force standing state to still combo on airhit, and the last hit won't blow away, it leaves them hitstunned in place for so long that not only can you combo into groundZ again but you can do dashZZ↓ groundZ, or even switch to joined-pikes and do ottoshot.
      fs 550, fs 122 x10 (1770) plus combo

LV4 skill
Makes a black hole above you, hitbox is a rectangle reaching only slightly to your left and right equally then stretching 3 floors up. Pulls non-bosses to the center. Can hit many floors to AoE enemies but horizontal range is short.
  • rise and pull to center per hit 269.07 x10 (2690.7) [20.69]
5-5d: Ryan 4th job (part2)
Joined-pikes

Joined-pikes mode has bigger general melee range, and can ottoshot (the only Ryan job that can ottoshot well).

airZ
Can ↓Z ottoshot when on platform and ties for the strongest ottoshot in the game (~493 DPS, very high normal attack damage when possible), but doesn't work against non-armored non-giant enemies anymore because it causes float-stun back on hit so they bounce to out of range.
Can ottoshot diagonal up or straight up.
  • 117.59 float-stun back

    • PvP
      Hits straight up and down stretching forward, long range forward. The visuals don't show how far up it really goes. After the start it also tries to hit diagonal down-back behind you too. Very exploitable to control space, aside from low active frames per swing.
      243

GroundZ combo
Long range and staggers on first and last hit, can repeat in full without Critical/Double to infinite combo monsters (~274 DPS). Full with Double on heavy monsters is ~362 DPS which is worse than ottoshot.
  • stagger pull 140.77 / 140.77 x2 / 140.77 / stagger 140.77 (703.85)
    Critical/Double: 277.20 blowaway

    • PvP
      Long range starter with relatively slow startup.
      The combo hits force standing state on airhit to continue comboing on jumpers or on juggle, last hit combos into Double which floats them up, which can combo back into full groundZ until autocounter if the scenery allows it. Timing is easier to just combo into a skill instead.
      • fs pull 193 / fs 193 x2 / fs 193 / fs rise 193 (965)
        Critical/Double: float 477

Dash attack
Fast attack with decent range forward that also hits 1 floor up, knocks down forward.
  • 100.46 x2 (200.92), second knocks down forward

    • PvP
      Because of its decent range forward and 1 floor up this can interrupt as an anti-air for knockdown, or check space for knockdown in general. Similar to 2nd job dashZ but works on both ground and air. Misses the first hit if hitting at the tip.
      172 and knockdown forward 172 (344)

Dash-backZ
Same as other mode.
Backsteps with a disjointed melee hit forward.
Even if repeating on wall to not move yourself away it's still not strong (~179 DPS), but it can be good to quickly recharge MP on multiple enemies because it connects on many enemies at once easier than combo.
  • 168.00

    • PvP
      It's a good defensive attack that catches advancing enemies and leaves them standing (even on airhit) with small knockback, if they followed you they are in range to immediately attempt groundZ afterward (or run grab would be more guaranteed). Cooldown 2sec.
      force-standing 289


LV1 skill
Steps forward with a hit 2 times (reaching 1 floor up), then timefreezes and attacks only straight forward rolling through enemies blowing away either left or right.
Passing through monsters can be useful sometimes, occasionally this passes when you don't want to after using this for invincibility but turning around and using it again fixes that.
  • pull rise 168.82, pull rise 168.82, blowaway 168.82 (506.46) [17.46]

    • PvP
      The first two hits that reach 1 floor up can anti-air/juggle and they force standing state to continue comboing in full. And because of the special timefreeze slow, if this hits and you are now on a platform you can drop from, you can repeat ↓Z ottoshot on them without them falling until autocounter triggers. (vs Ryan can only add 4 hits for +972, vs fast-recovery jobs can only add 2 hits for +486)
      If landing holdC near corner, can combo into this skill into ottoshot.
      force-standing 140 x2, knockdown 140 (420) [14.48]

LV2 skill
Boomerangs the weapon forward (until screen edge from center) and back to you. Will miss some hits if too close or too far, can spend for damage and AoE groups of monsters decently but for full damage must start a few steps away so that it hits them for the entire time it's live. Too close or too far is around halved hits.
The first half can hit the floor below, the second half can hit the floor above.
Knockback will slightly pull monsters from where they started.
  • ~215 up to x8 (4/6 hits 860/1290, max 8 1720 [27.30])

    • PvP
      Forces standing state to fully work on airhit, and the 2nd half can reach 1 floor up so it might anti-air.
      On any hit leaves them standing and pulls them to you, where you can attempt groundZ which is barely not a true combo or grab to be safe (but if on a platform you can do ottoshot from, can combo into ottoshot which is faster). If it hits at max range it won't pull into groundZ range, must walk or dash for something first.
      force-standing 142 up to x7, first half has no knockback and 2nd half pulls (994), if 4 hits 568

LV3 skill
Must be used mid-range. Does 3 straight piercing shots pushing them forward if possible, then jumps and sends diagonal down a piercing spear at mid-range that explodes on the ground it touches, blowing away.
  • push ~136.1 usually 2 or 3 hits done 3 times (6/9 hits), diagonal spear ~159.6 usually x2, blowaway ~1236.7 x1 (2372-2780) [24.71-28.96]
    On wide raid boss, first part may hit as many as 22 times (4550) [47.39]
    On hole against a giant monster occupying both floors, diagonal spear may hit as many as 5 times

    • PvP
      Does not push anymore so needs mid-range for full hits.
      All hits force standing state so they can combo on airhit too.
      • no push 134 x6, 126 x3, knockdown 126 x1 (1308)

LV4 skill
Same as other mode.
5-5d: Magnus Dan form
Only available in 4th job. Costs 3 MP bars.

Magnus form has no time limit, you exit whenever you want by pressing X.

Activating this gives Ryan +5% crit chance for 45sec, teammates +1.5% for 20sec.

In PvE, Magnus has average skill damage with usable AoE on mobs (and his MP2 is fine for raids) and adds hyper armor, and his normal attacks have a bonus to MP recharge on hit (he has the fastest MP recharge in the game especially if hitting more than one monster at once).
  • In PvP: he is an initially bland warrior type, but he has extremely large melee reach without losing standard angles of attack or normal movement and keeps Ryan4's backdash attack, doing rushdown and zoning despite being melee only. He also has grab immunity in PvP.

Transformation explosion:
  • 401.79 no knockback
    • PvP
      349 high launch (can combo into dash-backZ, groundZ)


GroundZ combo
Each hit easily connects on all monsters in range for reliable damage (and very fast MP recharge).
To avoid knocking down a group of monsters you can keep repeating ZZZ (~359 DPS) on them, but the strongest DPS on a monster that can't get knocked around is repeating ZZZ-Critical (~453 DPS).
  • 176.40 / 176.40 / 245.79 / knockdown forward 176.40
    Critical/Double: launch 326.34

    • PvP
      Very long range starter. Doing the normal ender blows away forward with you recovering at the same time as them, so skipping the ender to do Critical instead is better (1385dmg, comboing into airgrab for 1755, or charged or shortcutted MP2 which combos back into groundZ).

      The hits cannot continue if missing, and the 2nd hit has slightly less range than the 1st, so at peak range it will hit only connect the 1st hit and miss the 2nd or 3rd, but still combos into Critical while missing the 2nd. Both the starter and Critical reach 1 floor up so this long-distance combo works even against the floor above.
      With MP, at max range, can also do tipped groundZ into charged/shortcutted MP1 (into airgrab or charged MP2) or tipped groundZ into shortcutted MP3.
      • 243 / 243 / 338 (824 so far) / knockdown forward 243
        Critical/Double: 561 (launches on groundhit, knocks down on airhit)

airZ
Cannot ottoshot anymore.
  • stagger 117.59

    • PvP
      Has long range and good active frames, knocks down on air but if hitting on ground easily combos into groundZ.
      243

Dash attack
Big attack of 2 hits. Can then press Forward or Back for one more followup hit knocking down.
In PvE this has low damage but can be useful to start with while running then recover with no followup to continue with groundZ.
Because it staggers monsters this can also repeat without followup for an infinite combo for certain enemies/minibosses without them doing anything, but it's much weaker (~179 DPS).

  • stagger 117.93 x2 (235.86)
    Forward Z: launch 79.37 / launch 176.40
    Back: 113.40 no knockdown

    • PvP
      The 1st hit is big and reaches up and diagonal up, but the 2nd hit only hits in front of your feet near the ground.
      Because of the large range you can keep moving around doing this left and right, on miss you still have the option to attack left or right, and on successful hit can go into the Forward followup (542dmg) or charged MP1 or any shortcutted skill. Along with doing dash-backZ which directly combos into groundZ.
      • 203 x2 (406)
        Forward Z: launch 136 / launch _
        Back: knockdown forward 195

Dash-backZ
Bigger than unstransformed.

  • PvP
    As Magnus, this move has no cooldown in PvP, is bigger, does massive damage, and launches to combo into ZZ as they fall which will autobreak them.
    289 x3 (867)


LV1 skill
1 forward hit below waist level, then a taller 2nd hit that launches.
Not especially useful for PvE but good for invincibility time. You can also launch anytime with Critical/Double.
  • 319.71, launch 319.71 (639.42) [22.04]

    • PvP
      2nd hit launches (but needs to connect on ground or the 2nd misses).
      Can easily combo charged or shortcutted MP1 from groundZZZ or dashZ, then comboing into either airgrab (+370) or charged or shortcutted MP2.
      278, launch 278 (556) plus combo

LV2 skill
Short AoE beam forward. Leaves monsters standing only slightly pushing them forward, great to use to spend MP as Magnus to deal AoE damage while invincible and avoiding knocking monsters away, after unlocking 4th bar can be done twice in a row.
It actually first deals 4 hits up close only then 3 more hits moving forward (4 against very long bosses), so it only deals full hits to the first half of its range and 3 hits on the second half.
  • 189.49 x4, 315.82 x3 (full 1705.42 [27.07], mid range 947.46 [15.03])
    Raid boss: 189.49 x4, 315.82 x4 (2021.24) [32.08]

    • PvP
      Forces standing on airhit (easily works in juggles but only hits early if close enough).
      Pulls on the second part and always combos directly into groundZ on hit.
      force-standing push 100 x4, force-standing pull 166 x3 (full 898, mid range 498) plus combo

LV3 skill
Does 2 walking melees that push them forward into an AoE explosion in front. Good damage to spend MP for, knocks light enemies forward which can be useful or sometimes a hindrance.
  • small push 349.96 x2, blowaway 349.96 x4 (2099.76) [21.87]

    • PvP
      Needs to connect on groundhit to work or they get knocked down early.
      Leaves them standing to directly combo into groundZ for big damage.
      push 304 x2, force-standing push 304 x4 (1824) plus combo
5-6: Ronan (general)
GCC notable changes:
-Greatly nerfed Holy Bless, and 3rd job's MP barrier skills

Story:
Ronan Erudon, a knight of the royal guard of Kanavan from the prestigious Erudon family tree, among the strongest and most important in Kanavan known for making Spell Knights. Ever since a child he was co-raised and mentored by the somewhat older Harpe from the Existor unit of the Erudon family, Ronan always excelled in both sword and magic techniques.

He was always in the thick of it when the Serdin-Kanavan Kingdom War broke out and apparently has an unspoken history of fighting other human forces, neither of which he truly wished to fight. But as it came to a close it became clear that Kazeaze had been inciting the war the entire time for her own purposes, and Ronan alongside others assault Kazeaze's minion Gaikoz in the edge of Kanavan where the Grand Chase arrives at the same time, the Grand Chase's main purpose being to pursue Kazeaze. Ronan politely thanks them for their assistance and himself joins the chase.

Fun fact:
Ronan is marked as 21 years old, which is the oldest age among the playable characters not counting Sieghart or the demons.

Ronan has enough skill points to max EVERYTHING in his 1st job/shared skill tree.

Character traits
Skilltree allclass trait - Erudon Gauge - All of Ronan's jobs have a gauge that when filled can press C↑ to start a temporary power-up mode, different for each job. Can be done alone or cancelled into from groundZ combo, doing a weak attack on start that also is invincible for the animation (can be kept ready to evade one attack).

Skilltree allclass trait - Enchant Sword
When neutral can press CC to temporarily buff your normal attacks for 15 seconds (including X-button attacks but not skills). Can only equip 1 type per match.
  • Flame - Damage option better for PvE than PvP.
    Every hit makes the enemy drop a flame onto the ground that continously hits enemies on top of it, will hitlock non-armored monsters in place unless they can react when hit too much.
    36 hits over 3 seconds, cannot have more than 4 flames at once.
    • PvE: 0.814 up to 36 (29.30) per flame, DPS +39.07 from being upkept, includes SpATK/doesn't gain MP
      Recharge 10sec

      • PvP
        Useless because every hit is 1dmg and it cannot hitstun in PvP, often missing just because your own attacks push them away on hit.
        Recharge 20sec

    Lightning - Damage option better for PvP than PvE.
    Only lasts 1 hit, doing an extra hit on that enemy. They take shock damage once, then 2 more times on the 4th and 7th second.
    • PvE: 68.38, shock 18.64 x3. Single monster total 124.3dmg, 2-4 monster together instantly 174.04-348.08 (full DoT 248.6-497.2)
      Recharge 10sec

      • PvP
        1dmg on every hit, but the initial hit will force standing state on airhit to possibly combo into groundZ. And the 4th/7th second shocks will hitstun, stopping them even if they were the ones hitting you during that time.
        Recharge 15sec

    Curse - Useless in PvE.
    Only lasts 1 hit, in PvE just does damage lower than shock.
    • PvE: 68.38, 06.20 x1
      Recharge 10sec

      • PvP
        1dmg, they are cursed for 3 seconds (losing HP with every Z press) and also stop regenerating MP (losing around 0.15 bars).
        Recharge 15sec

    Vampiric - Each hit dealt refills 2% of your HP. Great in endurance stages.
    Ottoshot has fast hit rate and highest DPS, but full Z or X combo can splash.
    Recharge 10sec

    • PvP
      1% HP per hit, doesn't work when hitting enemies who are on Fatal.
      Recharge 20sec

Skilltree allclass trait - Rune Shield
When in the air can do ↑C or ↓C to place a wall a set space in front of you, diagonal up/down, resetting in front of you as you move, lasting for around 1 second. Cooldown 4sec.
It can try to push certain enemies in or out, and it can erase basic projectiles (not most projectiles) and block a physical attack if spaced correctly, lasting apparently 2 hits or more before breaking.
  • V2 - Instead leaves a stationary wall in that spot for 3 seconds, can bodyblock enemies except bosses. Still can block attacks but breaks on the first hit.


Which 2 jobs to use in PvE?
(After LV45 you can buy a GP quest to let you equip 2 jobs in PvE and switch between them with Ctrl)
  • Ronan2 is the most consistent job because it has an evasion for enemies especially bosses (his Z→/Critical/Double isn't invincible, but passes through monsters to avoid their attacks by going to their other side). His combo can lock and push enemies and he has an enemy-stacking magic MP3 though positioning the skill can take some effort.
    He can also cheat jump stages with airZ↑. Has no team support.

  • Ronan4 is a mobbing expert. He has a stronger locking combo for faster MP on groups and can teleport enemies with Z↑, and also with his magic MP3 which teleports them into one place and hits for enemy-stacking. He can be good as one of the 2 jobs against groups of enemies.
    Only Ronan job with bad ottoshot and has no other ability, other than hitting bosses with Z combo and cancelling into MP1 for invincibility.

  • Ronan3 has blander offense, but one single-hit MP3, and has the 3-second invincibility and regeneration team barrier (free regular recovery in PvE even as the second equipped job).

  • Ronan1 isn't as good after Holy Bless nerf and not very unique. His C↑ gives him huge locking AoE but his normal attack damage is low aside from ottoshot.
5-6a: Ronan 1st job
Standard dash type (average)
Dash momentum: ~280 pixels, rocket ~648

Hitstun recovery speed: very fast

Ronan1 can learn all normal attack upgrades in skilltree without downsides to existing moves (and also has enough SP for all attacks and skills).

Z combo
Can do up to 3 presses, then another 2 which cannot go into Critical/Double anymore, or 2 or 3 then UpZ (UpZZ after upgrade).

The normal combo is very weak. The strong version is to repeat ZZZ then UpZ and not UpZZ (doing ~301 DPS. Easier to repeat by not equipping the UpZZ in skill tree). Normal combo is only ~228 DPS and repeats worse on launchable monsters.
Because of staggers on first and third swing, can infinitely combo one monster or a group of monsters by repeating ZZZ, but this makes a very low ~122 DPS.

Critical isn't strong, its use somehow is blowing monsters away to 1 floor below you.
  • pull stagger 58.94 / 58.94 / stagger 58.94 / rise 58.94 x3 / launch 58.94 x2-3 (530.46, last aerials 589.4)
    ZZZ, Up (launch 239.31), Z (knockdown 239.31), Z (knockdown 68.37 x3)
    Critical: knockdown 1 floor below 74.99 x2 (149.98)

    • PvP
      The starter actually has high active frames, it with the 2nd swing can even catch as their invincibility time runs out. You can walk off a cliff forward with groundZ and it hits them on the floor down.
      You can make a wall forward with 1 or 2 Zs then into Critical even on miss (Critical reaches 1 floor up and down).

      The 5th swing combos into shortcutted fast skills, or dash and delayed dash attack, or sometimes grab.
      • 81 / 81 / 81 / float 81 x3 / float forward 81 x3 (729)
        ZZZ, Up (float 164), Z (float 164), Z (launch 47 x3) (712)
        Critical: float/knockdown 129 x2 (258)

X combo (unlockable)
A ground combo with almost as much range forward as a spear ground combo, with two disjointed hits forward then two piercing shots to mid range.
Damage is not better than Z combo, but can splash a group of monsters better than Z combo and charges erudon sword faster.
Can dashcancel from X combo in the first press, or since the 3rd.
  • 55.02 x2 / rise 55.02 / 55.02 x3 / small launch 55.02 x3 (495.18)
    XZ: small launch 158.74

    • PvP
      First hit will interrupt them in place then you can dash in or out, easy to repeat even when likely missing (comboing into dashZ↑ then airgrab, 743dmg). Also can do the knockdown 3rd/4th shots and dashcancel too.
      If the opponent is against a wall, technically you could keep harassing with only the first X repeatedly which has range and pushes, to charge your erudon sword faster.

      XX will hit then launch on both groundhit and airhit, comboing into the rest of the shots, or XXXZ-grab which is stronger (891 damage, but instead of the grab doing 370 can do certain fast skills).
      The XX launch awkwardly can launch them a full platform above and drop the combo.
      • 70 x2 / high float 70 / floatknockdown 70 x3 / floatknockdown 70 x3 (630)
        XXXZ: small launch 101 (can grab)

To unlock the Z and X branching paths you also need the Combo passive.
  • Z combos can cancel into a single X.
  • X combos can cancel into a sword hit.
  • Both can cancel into Double.

Dash-backXX
Ragna bolt. After dashing the minimum distance, shoots a basic projectile straight forward to screen edge from center. With upgrade can do another hit striking at melee range from your new spot knocking down.
  • 184.80 / knockdown 184.80

    • PvP
      The first shot forces standing state on airhit. Without doing the second hit, if they advanced on you or if you dashed over them, you will end close enough to them to quickly attempt groundZ afterward (barely not a true combo). Or can be shot for small zoning while waiting for a better opening, but in PvP has cooldown 2sec.
      If doing the first shot into a skill, it's possible to cast the skill to either direction depending on how long you wait (you only turn around if the entire animation finishes).

      Melee hit can defensively cover yourself better or be a guaranteed combo from the shot. Can combo into shortcutted fast skills like Homing Buster.
        force-standing 318 / floatknockdown 318

Dash Z
Swing of 2 hits forward, extremely fast recovery and can be easy to repeat. In PvE launches monsters high on every hit which can be good for crowd control before focusing on one.
Has a penalty to erudon gauge generation.
With upgrade, can cancel after the 1st or 2nd hit for two more hits with much longer recovery but it's not useful in PvE.
  • launch 84.36 x2 (168.72)
    ↑: 77.60, small launch 77.60 (155.2)

    • PvP
      It hits forward at your entire character height so it's a good advancing attack whether on ground or air, quick to repeat even with a rocket step start.
      It has 2 hits but only the 2nd knocks down, so unless it hits while they're in the air you can do dashZ↑ for a combo that launches, then airgrab (total 603dmg) or platform drop X into grab (776) or platform drop X into attempted groundZ. Or stronger but less reliable, after the launch can try X combo.

      If they're on the ground, it's possible to airdash over them hitting with only the first hit of the first swing, leading into turn and groundZ as a non-combo.
      Because it also hits behind you, if near wall, can keep doing dash attack against the wall to hit one enemy right behind you, comboing until autocounter (~1700dmg) but it isn't a true combo against fast recovery jobs.
      • 101, knockdown forward 101 (202)
        ↑: 66, 66 launching only on groundhit

Dash X (unlockable)

Hits forward until screen edge. Against monsters does small damage and makes a small launch that will knock them down in place for crowd control, or keeps dealing low damage at a safe distance.
Can dashcancel from the recovery time.
  • 88.19, small launch 88.19 (176.38)

    • PvP
      Great as a surprise ranged hit from its long range, damages and pushes farther. In PvP has cooldown 2sec and costs noticeable MP.
        force-standing 151, force-standing far push 151 (302)

airZ
Basic airZ. Can ↓Z ottoshot on platforms for this job's highest DPS (~353 DPS).
  • 84.15 stagger

    • PvP
      Has high active time to last a full jump to the same floor.
        173

airX (unlockable)
Shoots a basic projectile diagonal down for a short distance. Has very fast recovery going into attacks or airdash, if done from peak jump height can attack again before landing.
  • push rise 83.99

    • PvP
      Can be used for zoning and it's very strong because it can lead into combo. If you do airX around peak jump height, it combos into a falling airZ into full groundZ. Or do airX from any height then you may attempt full groundZ. (if the airX hits them midair, they need to land before you hit them with the sword or else they get knocked down)
        force-standing 173
5-6a: Ronan 1st job (part2)
C↑ Erudon Sword
This is his only job whose erudon gauge doesn't refill automatically over time and needs to raise from damage dealt with normal attacks (faster with X attacks), it's an actual transformation with its own 3 skills. All of its damage is standard level, but has extreme range/AoE on attacks. Can try to evade monster attacks by backstepping through them.

Once started, the mode lasts 20 seconds, but the timer is extended 0.3sec for every hit you land (can be infinite as long as hitting multiple monsters at once) and stops dropping during your skills. Activating this mode WILL make you lose HolyBless/DarkMyst buff before you can recast it because it switches your skills. Can cancel the mode early by pressing C↑ again.

C↑ activation: invincible
  • 129.52 blowaway

    • PvP
      89 blowaway


GroundZ
Absurdly long groundZ combo forward, reaching one and a half floors up and also 1 floor down. Moves forward per strike. Critical/Double strikes forward again, can also do BackBack which strikes only at your own floor both left and right while backdashing for positioning.

Keeps pushing all monsters forward and walking with them until grouping all of them to the wall, except super armored monsters stay still and block your way. Can simply repeat ZZZ to keep infinitely comboing all monsters at once without knocking down (~274 DPS), but you get ~320 DPS if doing 3 or 4 hits into ForwardForward.
Combo BackBack will move you some steps back if you accidentally walk forward past your enemy. It's not invincible but it walks back through monsters, so it also can be used to evade an attack by putting your back to the monster and backdashing through them.
  • stagger far push 132.68 / far push 132.68 / rise 132.68 / launch forward 132.68
    Critical: blowaway 331.56 (Double: 463.64)
    Back Back: knockdown forward 178.69

    • PvP
      The sword swings force standing state on airhit, so it combos even if they're jumping or mid-juggle, easily comboing full combo into Double into another full combo if there's enough space forward.
      BackBack normally knocks down but can combo into charged or shortcutted MP1 to continue comboing.
      • force-standing 182 / force-standing 182 / launch 182 / blowaway 182 (728)
        Forward Forward: 485, launches on groundhit, blows away on airhit
        Back Back: 307 blowaway

airZ
Huge AoE too but loses ottoshot, hits enemies before leading into groundZ.
  • 93.07 stagger

    • PvP
      Forces standing state, can catch after they slide off a cliff mid-combo to go into full Z combo.
      force-standing 192

Dash attack
Only hits at your own floor.
  • launch forward 138.60

    • PvP
      Will knock them down forward but can combo into charged or shortcutted MP1 then continue comboing.
      blowaway 238


LV1 skill
Instantly timefreezes. Big AoE straight forward to screen edge from center. His only erudon sword skill that won't knock monsters away.
  • ~145.2 x5 (726) [25.0]

    • PvP
      Leaves standing even on airhit and hitstuns long enough to combo into groundZ.
      Can repeat ZZZZ-Double-MP1 to continue comboing without autocounter triggering.
      force-standing 79 x5 (395), plus combo

LV2 skill
2 slashes forward reaching 1 floor up, then a radius explosion blowing away also reaching 1 floor up.
  • pull 402.05 x2, launch left or right 402.05 x1 (1206.15) [19.14]

    • PvP
      Forces standing state on airhit, ender blows away extremely far but near corner combos into groundZ.
      fs 269 x2, blowaway 269 (807) [12.80]

LV3 skill
Instantly timefreezes. AoE forward reaching 1 floor up and down, the animation is very long and as it hits you can move and jump.
  • ~88.1 x25, float ~88.1 x1 (2290.6) [23.8]

    • PvP
      force-standing 66 x25, blowaway 66 (1716) [17.87]
5-6a: Ronan 1st job (part3)
LV1 skills
For PvE can use Homing Buster for simple damage, and Blazing Slash for simple damage with a forward roll.

Rune Spiral
Very long startup. Rectangle AoE forward to 80% to screen edge distance but has halved hits near the end. Large area for a MP1.
  • blowaway 134.93 x4 (539.72) [18.61]

    • PvP
      The long startup makes it very hard to use this in combos, and also to generally use its long range.
      float/knockdown 97 x4 (388) [13.37], only 194 near the end

Holy Bless
No attack, buffs you and nearby teammates with an ATK&DEF buff, but the range can be too short to upkeep for other party members often if there isn't one exact place for everyone to be in this fight.
Gives +5% ATK&DEF per stack up to 5 casts, for max +25% damage done and -20% damage taken. Whenever cast it resets to 25sec duration, if it wears off all of it is lost. The limit is that once Ronan himself has 5 stacks he cannot cast Holy Bless anymore until it wears off, forcing it to be reset to 0. This also means Ronan cannot use MP1 skills during this time even just for invincibility time (except in PvE by switching to another job).
    (old: could still renew to 5 after having 5, was +10%/6%per stack in PvE and PvP, casting also buffed with a 2-second inv barrier)
    • PvP
      Very weak and worthless since latest version. Only gives +2.5% ATK&DEF per stack (at max is +12.5% damage done and -11.11% damage taken) and upkeeping it is basically all of the MP you get. And equipping this skill means you cannot combo into MP1 skills.

Dark Myst (névoa sombria)
A buff that really only matters for your teammates.
Gives invisibility to nearby teammates but not yourself for 7 seconds, also giving them and you +5% ATK for 7 seconds.
Monsters don't see invisible players even if being attacked by them. Could help teammates at the start of a room to make them do damage for free with easy positioning for skills, or keep distracting enemies away from them even in boss fights, possibly with you upkeeping the buff from the other side of the boss while they get back bonus. But Holy Bless gives the same ATK buff except it can stack.

Also, in a party of multiple Ronans with this skill, you can actually make 100% of players invisible indefinitely and cheat most enemies/bosses this way since they won't attack if they don't see anyone.

  • PvP
    Their invisibility only lasts 3 seconds and the ATK buff is only +2.5%.
    In PvP only, this skill can hit enemies, with a light forces-standing hit of 4dmg. Hitting with this (in a combo or not) can lead into attempting groundZ combo, or dash grab which is safer. With its area and active time it can also wakeup trap enemies in PvP.
    4 + grab 370 = 374 [12.89]

Wind Fist (punho do vento)
One hit forward at foot height launching, then 5 hits forward also reaching 1 floor up. Against monsters will miss most hits if they can be launched.
  • launch 99.75, launch 99.75 x5 (heavy monster 598.5 [20.63], launchable monster only 2 hits for 249.37 [08.59])

    • PvP
      Might work defensively against an approaching enemy. Medium startup time (can be harder to use mid-combo).
      On hit combos into nothing except skills.
      Starting hit also slightly reaches behind you (where they'll recover by the same time as you).
      launch 86, launch 86 x5 (516) [17.79]

Homing Buster (explosão teleguiada/ruptura negra)
While time is frozen, does 3 small orb hits in the air ahead and diagonal up, with two slashes forward blowing away.
  • pull 120.52 x3 (smaller enemies only x2), 120.52 x2 with last blowing away (602.60/482.08) [20.77/16.62]

    • PvP
      Fast startup (easy to fit in a juggle combo) and also anti-airs well.
      Hits with the 3 orbs, or 2 at mid range.
      force-standing 104 x2-3, knockdown 104 x2 (520/416) [17.93/14.34]

Blazing Slash (corte incandescente)
Does a small wave of 3 hits forward, then rolls through forward with a melee strike that blows away left or right. Works as an MP roll whether or not you want to move. Last hit can gain back bonus from the front.
The timefreeze happens early in the animation, when dodging attacks may need to have to time this late or else you pause their attack until you finish.
  • 128.39 x3, spinning blowaway 128.39 (513.56 [17.70], with 1 back hit 590.59 [20.36])

    • PvP
      Only this and Homing Buster hit fast to use easily.
      If used from as close as possible, will miss the first hit which also makes the ender miss.
      Hitting with the 3 hits then makes the last hit bounce them even higher, can then airgrab, or jumpX and attempt groundZ.
      Can be used in juggle combos but juggles unreliably if not close enough.
      launch 111 x3, high float 111 (444) [15.31], plus combo (airgrab +370 = 814) [28.06], can miss 2 hits if too far away


LV2 skills

Giga Crush (cruzada estrondosa)
Short melee hits forward then a pillar AoE forward. Both parts can hit 1 floor up.
Has trouble hitting more than 1 monster at once unless you're very close and they're not too far apart from each other, if they don't let you walk forward you can even miss the last hit.
  • 225.66 x4 with last launching, launch 205.16 (1107.8) [17.58]

    • PvP
      The sword hits force standing state on airhit and startup is fast enough to catch mid-combo on ground or air, and has massive damage because the end will launch very high to combo after it (jump airX, delayed airZ to hit after they land, groundZ combo).
      196 x4 with last launching, launch 178 (962), plus combo

Blast Bomb (alma em chamas)
Medium startup time. Drops 3 meteors on your own spot as you recover from the animation (can hold left/right to make them fall slightly farther to your side), hitting monsters without knocking down or pushing them. Number of hits depending on how tall they are.
  • 186.33 per hit
    • Normal monster: 1 hit for each of the 3 meteors (558.99) [08.87]
    • Tall monster or average boss: 2 hits each (1117.98) [17.74]
    • Raid boss: around 6 hits each (3353.94) [53.23]

      • PvP
        Knockback pushes to the side per hit, may need to hit near the corner so they can't get pushed.
        On hit leaves standing to combo after it. Can catch early on airhit/juggle.
        154 x2 for each of the 3 meteors (full 924, push often makes 462), plus combo

Wind Shield (escudo do vento)
Does no damage. Leaves a 10-second AoE on your spot reaching 1 floor up, automatically sends away monsters with hitstun, has no effect on super armored monsters including bosses.
Monsters will be sent to the side away from its center and moved up into the air while still standing up.

If placed near the corner will restrict them to the corner by pushing them if they try to walk, if placed touching the corner will keep them stunned in the air for the full 10 seconds if not hit away.

  • PvP
    Launches enemies diagonal up to mid-range, either left or right and the side is practically random. Will block a path from being entered for 10 seconds if they can't get through it with invincibility.
    Also reflects basic projectiles (mostly arrows/kunais and a few non-skill magic bolts).
5-6a: Ronan 1st job (part4)
Energy Circle (círculo de energia)
Big forward AoE reaching 1 floor up, leaves enemies still in place standing up. Great range and won't knock down.
It has a dead zone right in front of you, but you can hold Back to pull it slightly to avoid that, and you can actually hold Forward to guide it up to around 40% past the screen.
  • 65.84 x17 (1119.28) [17.76]

    • PvP
      Will combo after it, forcing standing state to work midair too (whether mid-combo or by catching them in airdash, but has medium startup time). Not only does it have enough time to combo into groundZ, but you can add a ZX before that (or jump attack into groundZ if afar). This skill also slightly lowers their MP on hit.
      Can be used mid-combo right before autocounter triggers to go into full groundZ combo again.
      force-standing 49 x17 (833), plus combo

Ray Freeze (raio ragna)
Two small slashes then a forward beam that knocks down forward.
  • 139.25 x2, knockdown forward 139.25 x6 (1114, only beam 835.5) [17.68/13.26]

    • PvP
      Worse than Spinning Circle.
      The slashes force standing state on airhit to fully combo midair. The beam pushes without knocking down, leaving them standing up at mid-range recovering at around the same time as you.
      force-standing 110 x2, 110 x6 (880, mid range 660) [13.96/10.47]

Spinning Circle (círculo giratório)
Forward wave AoE, pushes monsters forward without knocking down.
  • ~72 per hit. Often around 20 hits (1440) [22.85], max on giant 26 hits (1872) [29.71]

    • PvP
      Fast startup (easily to juggle into) and leaves them standing up slightly farther than Ray Freeze, but has time to combo into rocket airZ into groundZ.
      32 around x22 (704), plus combo


LV3 skills
Kanavan Strike (golpe de canaban)
One hit mid-range to both sides from you, then from that area keeps making small projectiles that go straight up reaching 1 floor up.
Number of hits depends on monster width. Does extra damage on large monsters.

  • first hit launch 134.30, 268.57 xN
    • Small monster around 5 hits total (1208.58, counting aerial 1745.72) [12.58/18.18]
    • Heavy monster around 9 hits total (2282.86) [23.77]
    • Normal boss around 11 hits total (2820) [29.37], possibly a few more if they move or stretch
    • More on raid bosses (max 21, 5505.7) [57.35]

      • PvP
        Too slow to combo into, but very strong because it can juggle after (airX into groundhit airZ, into groundZ). Also might work as wakeup trap.
        float 116, launch 233 x5-8 (1281-1980), plus combo

Lunatic Force V1 (congelar V1)
Shoots 2 very slow projectiles straight forward, on hit they explode reaching a very small distance to their left and right but reaching 1 floor up. Won't freeze or anything.
  • 1022.67 + 06.83, and 915.76 + 06.83 (2 shots 1952.09) [20.33]

    • PvP
      Timefreezes the enemy in place even stuck mid-air, easily comboing after.
      850, 757 (1607), plus combo

Bram Gash (explosão arcana)
3 fast big shots forward to screen edge from center, one straight forward and another diagonal up and diagonal down, each on hit explodes in a short forward wave. Has normal damage but divided into all 3 so you need to shotgun it at close range for normal damage, the lower shot can miss unless they're tall and you're above them.
The waves will do extra hits against extra-wide monsters.
  • blowaway ~115 per hit
    • If 7 hits per shot, 805 for each of the 3 shots (805/1610/2415) [08.38/16.77/25.15]
    • Normal boss around 2990 [31.14]
    • Extra-wide boss for 11 hits per shot, 3795 [39.53]

      • PvP
        Very weak but very hard to dodge big skill.
        Will only hit with 1 shot, or 2 on same floor with the middle and upper shot.
        float/knockdown 70 x7 each shot (490/980) [05.10/10.20]

Lunatic Force V2 (congelar V2)
First prepares the AoE without damage, marking a mid-range zone to your sides closing above you, then from that fires 5 shots coming from your straight left and right, diagonal up left and right, and straight up, all moving to your center then disappearing if they don't hit anything. Each on hit explodes in only a very small area, freezes non-armored monsters for 3 seconds.
Can lose a lot of damage by splitting on different monsters, or using against only 1 but still not hitting from all directions.
  • freeze 234.84 + 180.64 done in 5 projectiles, 3 on same target 1246.44 [12.98], all 5 on same target 2077.4 [21.63]

    • PvP
      Medium startup (can juggle into from skill shortcut button), timefreezes them to combo after.
      force-standing 257 and 201 per shot?, 3 on same target 1374, all 5 2290, plus combo

Shadow Slicer (retalhador das sombras)
Forward wave AoE. Very little knockback on monsters and doesn't knock down.
For max hits needs to start a few steps away and use on a wide monster.
  • 82.96 per hit, often around 23 hits (1908.08), max around 29 (2405.84)

    • PvP
      Slow startup but it's possible to juggle into with shortcut button.
      Pushes in PvP to deal less damage in the outer half, knocks them down very far away.
      • 55 per hit (first half forces standing, second half floats pushing very far), around 1375 damage if there's space for them to get dragged through the stage, around 1100 if not, around 990 at outer half range

Astral Vine (hera astral)
Simple square AoE forward. Last hit blows away far.
  • 265.45 x6, far blowaway 265.45 x1 (1858.15) [19.35]

    • PvP
      Last hit floats to mid-range, but on corner can combo into one dash attack before knocking down.
      force-standing 231 x6, float 231 (1617) [16.84]


LV4 skill
Illusion Edge
Huge AoE forward reaching 2 screens forward, stretching 2 floors up. Hits are split by height.
  • ~391 per hit
    • Tall monster or boss 7 hits (2737) [21.05], 6 hits if standing 1 platform above them
    • Normal monsters 5-7 hits (1955-2737)
    • Raid boss 15 hits (5865) [45.11]

Awakening
Makes the sword huge and drops it on them. AoE forward to screen edge reaching 2 floors up.
Single hit so weak if it doesn't crit.
  • 2603.20 x1

H
Hits basically the entire screen.
Also gives you ATK +15% and Super Armor for 20sec after it finishes.
  • 138.75 x14, 96.42 x14, 832.53 x1, 578.54 x1 (4703.45) [36.18 if it cost as much as MP4]
5-6b: Ronan 2nd job
Standard dash type (average, shorter rocket)
Dash momentum: ~276 pixels, rocket ~558

Hitstun recovery speed: very fast


GroundZ combo
Very long range combo. Does damage and at any point can Critical/Double which hits passing through enemies (in PvE working as a non-invincible dodge for safety).

Due to stagger can infinitely combo monsters by repeating ZZZZ pushing forward (~275 DPS) but does more DPS by doing 4 or 5 hits into Crit/Double (~365 DPS) which also will avoid knocking down. Can use this to pass through then keep doing only ZZZZ from their back for back bonus (~440 DPS).
  • stagger pull 120.99 / stagger2 120.99 / stagger2 120.99 / stagger 120.99 / small launch 120.99
    Critical/Double: stagger 102.30 up to x4 (409.2)

    • PvP
      Excellent very long range, but still only combos on the ground. Slightly slow startup speed.
      Critical/Double will knock down in PvP and works as a good move on its own.
      The ender can set up for skills too instead of Double (shortcutted MP2s/MP3s, or charged MP1 once or twice then sword MP1).
      small pull 166 / 166 / 166 / force-standing 166 / float 166 (830)
      Critical/Double: float/knockdown 176 x2 (352)

Ground Z→
Normally you can only do Critical/Double after starting the second swing of the combo, but during the first swing you can press Forward once to use this alone version of it faster. Doesn't work backwards.
Doesn't stagger monsters as much.
  • 73.91 up to x4 (295.64)

    • PvP
      This version won't knock down in PvP (on groundhit or airhit), can turn around and attempt to hit them with your longer groundZ.
      force-standing 50 x4 (200), no knockback

Dash attack
Even longer range than groundZ if counting the movement. Weaker in damage but doing just the first hit will stagger monsters to combo into groundZ.
  • stagger 151.39 / launch 77.61 / knockdown forward 77.61 (306.61, aerial 345.41)

    • PvP
      Longer range but weaker than combo, does some damage by itself or combos into skills.
      Can do only the first two swings, then input a dash to instantly recover.
      Against Arme/Mari, can keep repeating the first hit of the dash attack over and over.
      260 / 133 / launch 133 (526)

airZ
Can ↓Z ottoshot on platforms, hitting forward or even up.
After doing the attack in the air can cancel the animation into air↑Z/↓Z.
  • 84.16 (ottoshot ~353 DPS)

    • PvP
      Excellent airZ, long range and also reaches 1 floor up straight and diagonal, and slightly stretches the hitbox downward too to straight below and diagonal down. Great air-to-air and air-to-ground.
      173

air↑Z/↓Z
Same as ground charge but has to be done from the air and angles diagonal up or diagonal down. Can move farther than airdashing and can jump an extra platform up.
On giant enemies that take all 6 hits, repeating this is ~412 DPS.
  • stagger 73.91 x2-6 (147.82/443.46)

    • PvP
      Goes a great distance looking for the enemy, great rushdown and can try to move above or below projectiles.
      This version on hit sets up to combo into groundZ, but may need to turn around first depending on the starting distance.
      force-standing 115 usually x1

C↑ Erudon Spear
20-second buff. ATK +10% (5% in PvP), and while activated you can shoot piercing shots straight forward with Z↓ (mid range and higher DPS than ottoshot and pierces, getting MP very fast. Pushes normal monsters possibly needing a small forward step every time), or Z↑ for straight up which can be just as strong when hitting a tall boss from below.
Activation animation is invincible and can be done from combo.
Gauge takes 45sec to charge, but fills 0.9sec for every hit of airZ or dash attack.
  • Z↓: push stagger 73.91 x4-7 (295.64-369.55) (repeated DPS ~375/656), +10% from ATK buff
    Z↑: stagger2 69.88 x2-7 depending on height (repeated DPS ~139/645), +10% from ATK buff
    Activation animation: blowaway 117.74, +10% from ATK buff

    • PvP
      Shots leave standing.
      Z↓: force-standing 53 x4 (212)
      Z↑: force-standing 50 x3 (150)
      Activation animation: blowaway 89


LV1 skill, spear
Melee sequence forward knocking down.
  • 119.98 x5 launching after the first (heavy monster 5 hits for 599.9 [20.68], launchable 4 hits with 1 being aerial for 539.91 [18.61])

    • PvP
      Combos on groundhit and still works on airhit if the 1st hit misses, or on particular altitudes.
      Has quick hits even before timefreeze (may avoid a grab).
      104 x5, all after first launch (520) [17.93]

LV1 skill, magic
This used to be a buff but was changed for an attack.
Single-hit small explosion AoE forward, easily hits multiple monsters at once.
Gets full bonus on aerial hit after combo launch or dash attack launch, and also launches slightly forward by itself to always be able to use a 2nd time with aerial bonus.
  • small launch 591.44 [20.39], aerial 887.16 [30.59]

    • PvP
      float/knockdown 429 [14.79]


LV2 skill, spear
Moves forward with 3 hits, then slams for 2 more. Bad in PvE as it easily moves through non-giants to miss some hits, the AoE of the other is much more useful.
  • ~248 x5, last launches (full 1240) [19.68]

    • PvP
      First part forces standing state even on airhit and they reach 1 floor up. Except if too close will still pass below them. If not missing, can combo into airgrab or skill.
      force-standing 187 x3, launch 187 x2 (935) [14.84], plus airgrab 1305 [20.71]

LV2 skill, magic
Good AoE forward reaching 1 floor up. On monsters has a small push and won't knock down, can cast twice.
  • 65.94 x18 (1186.92) [18.84]

    • PvP
      Puts them higher in the air per hit then blows them to your side, might combo into airgrab or skill.
      float pull up to center 54 x18 (972) [15.42], plus airgrab 1342 [21.30]


LV3 skill, spear
3 different pillars in a small range forward they try to launch forward but may need correct distancing to hit with all 3 hits instead of only 2 hits.
Can reach 1 floor up but enemies there only take 2 hits if launchable.
  • 681.12 x3 (3 hits 2043.36 [21.28], 3 hits on launchable monster 2724.48 [28.38])
    Full aerials after launching with combo or dash attack: 3065.04 [31.92]

    • PvP
      launch far forward 593 x3 (1779) [18.53]

LV3 skill, magic
Weak on a single enemy but stronger per enemy together, bonus on launchable monsters.

Does a radius explosion to mid-range (reaches 2 floors up and 1 down), then a slightly bigger radius circle scans for enemies inside the circle, each one receiving a bonus small AoE up to 4.
  • launch 557.96, 96.32 x6 (1135.88) [11.83], or launchable monster 1424.84 [14.84]
    2-4 enemies 1713-2869 [17.85-29.89], or launchable monster 2290-4024 [23.86-41.92]

    • PvP
      force-standing 485, float/knockdown 83 x6 (983) [10.23], 2 enemies still only 1481 [15.42]


LV4 skill
AoE forward to beyond screen edge, reaches 1 floor below to 2 floors above.
Summons the dragon to do 3 piercing fireballs that do contact damage pushing far forward into the AoE, leaving there burning pillars in a large area.
  • ~120 per hit
    • Normal boss: around 27 hits (3240) [24.92]
    • Normal enemy: around 16 hits (1920) [14.76], if used from close range and not being pushed can do only around 4 hits (480)
    • Raid boss 54 hits? (6480) [49.84]
5-6c: Ronan 3rd job
Ronan3 is a simple warrior character with extremely few attacks (only ground combo and dashatk, and jump attack), trying to offset it with also passively being able to parry and having a deflector. He also has a few support abilities.

Standard dash type (slow)
Dash momentum: ~260 pixels, rocket ~548
*Slow re-dash (can repeat dash faster if holding until run starts then dashing again).

Hitstun recovery speed: very fast

Parry
Ronan3 can tap to the side to block an attack at the exact moment you would be hit, can be done even when already being hit mid-combo. Works on both physical attacks and projectiles. The timing is very hard (presumably less than 5 frames, harder than a parry/JustDefend in a fighting game).
This will prevent Ronan from being hit by that strike and make him do a small shield bash forward of very small damage. In PvE also debuffs the monster for -5% DEF for 5sec.
(Sieg and Lime have an option to parry too, but only Ronan's works on projectiles as well)

Parrying works by tapping either left or right, but if being hit by a projectile it has to be towards the projectile.
  • bash 17.67

    • PvP
      Still works (even in the middle of being comboed!) but after triggering once cannot parry again for 2 seconds.
      bash 11 ministun

Dash-backZ
Less useful in PvE.
Temporarily blocks with the shield. In PvE this will only block projectiles (coming from the front), and also has a very short period of invincibility at the beginning but usually it can't avoid the attack because of how short the invincibility is.
  • bash 16.78

    • PvP
      In PvP this is a counter. It will block physical attacks to ministun the opponent if you are hit (much longer window than parrying. "GUARD" will appear if it works, but for some reason only if it was blocked on the first moment possible), and it can block projectiles from the front. For a shorter time than both it is invincible at the beginning.
      Also has a weak shield bash forward whether or not they are attacking, which ministuns just like a successful counter.

      If you do this move midair then recover, pressing Z will let you do groundZ combo from midair, which is good because that's your move that combos on both groundhit and airhit.
      • PvP
        The ministun can give time to attempt groundZ but it won't be a true combo, but can combo into grab if extremely close.
        bash 11 ministun

GroundZ combo
Slightly long range but very weak in PvE, except for hitting many monsters at once for fast MP.
Has staggers and can repeat ZZZZ but for lower damage (~188 DPS). The strongest is full combo plus Double which is still ~261 DPS. Ottoshot will be stronger damage singletarget.
You momentarily have hyper armor during shield strikes.
  • stagger2 98.17 / 98.17 / stagger 98.17 / stagger 98.17 / launch 98.17 / knockdown forward 98.17 (589.02)
    Critical: high launch 150.14 (if Double, 314.15)

    • PvP
      All hits except the last ones force standing state on airhit to fully combo even when catching them midair. Can't reach 1 floor above but stretches up farther than average.
      Has slightly long range, but slightly slow startup time (can lose to other groundZs if close to the enemy and starting at the same time).
      The hyper armor parts are super armor in PvP.

      If there's enough platform space forward can do full combo into Double (1242dmg), or instead replace the last Z with Critical (933dmg sending less far, combos into skill better).
      If you have a rune charge ready you cannot do any Critical/Double, instead you can replace the last Z with Psychic Force.
      • fs 135 / fs 135 / fs 135 / fs 135 / float 135 / float 135 (810)
        Critical: small launch 258 (if Double, 432)

Dash attack
One swing of 2 hits without knocking down, leaving you two standing up very close. Can press Z again for a weak knockdown hit.
Can cancel the recovery animation into another dash to repeat dash attack.

  • stagger 106.17 x2 (212.34) / knockdown forward 314.15 (total 526.49) (can dash again immediately, repeating only this is ~526 DPS, twice as strong as combo)

    • PvP
      Doing dashZZ will float them to allow you to do another dashZZ which will already hit for enough damage to trigger autocounter (1592).
      Can do just the first swing if it's going to hit them on ground, to make you recover at around the same time (grab is the safest option after that, and ottoshot starts faster than groundZ, or against Arme/Mari can repeat just the first swing until autocounter (~1700dmg)).
      182 x2 (364) / knockdown forward 432 (796)

airZ
Basic airZ, has high active frames to start in early jump and fall on them with it.
Can ↓Z ottoshot on platforms.
  • stagger 84.07 (ottoshot ~353 DPS)

    • PvP
      173

C↑ Erudon Shield
Places a 3-second barrier in your own spot and on every teammate in the stage.
For those 3 seconds, anyone of your team inside any of these barriers is completely invincible and can walk through enemies and vice-versa, and they will also regenerate HP and MP (6% HP and ~0.33 bars of MP, but spawning multiple barriers for multiple players will stack their recoveries if you stand on multiple barriers at once).

Can at least use for free in PvE every time before going to the next room for small regen, could be saved in a fight to protect you or a teammate for one attack (and can be canceled into from ground combo for that, except during last part shield hit or in Critical/Double).

Also activates erudon sword and shield for 10 seconds, +10% ATK and hyper armor.

Takes 30 seconds to charge, but fills 0.6sec whenever hitting airZ or the first swing of dash attack, and also charges with damage taken.

  • PvP
    Halved recovery amount from the barrier, erudon sword and shield is +5% ATK and super armor.
5-6c: Ronan 3rd job (part2)
LV1 skill, sword
Melee combo, knocks down forward.
  • 131.95 x3 with last launching, knockdown forward 131.95 x2 (659.75 [22.75])

    • PvP
      Forces standing state on airhit (easily combos on juggle even after Double). Last hit knocks down but gives time to charge/shortcut into any skill.
      Hits early before timefreeze (may beat out a grab).
      fs 104 x3, knockdown 104 x2 (520) [17.93]

LV1 skill, magic
Too weak for PvE.

Gives you 2 rune charges to be used later. This skill has no timefreeze, but still is invincible.
Can have up to 6 charges at once. During Z→ groundZ combo animation (from first swing or in the middle) you can press Left/Right to spend 1 charge into Psychic Force, an instant mid-range beam. Also can be done midair as air↓Z/↑Z.

If you don't spend the charges, using any other skill (other than MP4) will spend all charges you currently have to increase the damage of that skill one time, but it's a waste of MP, only around +5% strength per charge. This actually makes it harder to use Psychic Force because you will lose the charges the moment you use any other skill.
  • 271.79, Psychic Force blowaway 132.94 x2 (265.88), down version knocks down, up version launches

    • PvP
      Psychic Force will sap some MP on hit, and may combo into groundZ.
      Forward beam (able to do from combo) sends up far enough to combo back into groundZ.
      Air↓Z can land and groundZ, air↑Z can launch through super armor and instantly recovers to do groundZ.
      high float 178 x2 (356), plus combo
      Up version launches


LV2 skill, sword
AoE forward reaching 1 floor up.
Launches to make 1 hit aerial on launchable monsters, or both aerial if used after launching with combo/Critical.
  • 561.80 x2 (1123.6) [17.83]
    1 aerial 1404.5 [22.29], 2 aerials 1685.4 [26.75]

    • PvP
      Barely has time to combo into sword MP1. But if this hits while they already were midair (or standing sufficiently above you) can combo into full groundZ.
      launch 444 x2 (888) [14.09]

LV2 skill, magic
Buffs yourself and nearby teammates.
For 10 seconds you have super armor and +30% DEF (-23%dmg). The buff will end early if taking too many hits.
If you have rune charges, the duration and max hits will increase, spending more MP total to make it last longer from a single cast. (1 charge 15sec, 2 charges 20sec, 3 charges 25sec)

  • PvP
    Has a chance to block basic projectiles depending on angle.
    DEF is +15% (-13.1%dmg).

    • (old: same effect on PvE and PvP, attacks would be completely absorbed by the shield without affecting the user until the shield took enough HP damage to break. Projectiles would pierce the shield but be armored and reduced to 1dmg)


LV3 skill, sword
1-hit forward beam almost to screen edge. Pauses enemies on start, for enough time to guarantee back hit bonus from the back or to slow a boss (pause doesn't work when they have red super armor).
Being single hit makes it great to use on bosses that randomly teleport when hit, and it fully gets the aerial bonus after launching a monster with combo/Critical.
  • blowaway far 1995.41 [20.78], aerial 2993.11 [31.17]

    • PvP
      Can be used inside a combo so it can deal full damage even if the opponent is about to counter.
      knockdown 1738

LV3 skill, magic
Great AoE in PvE. And avoids knocking down.
Giant rectangle forward to screen edge from center and reaching 2 floors up.
Although it reaches 2 floors up, enemies 2 floors above you may not take full hits if they can be launched.
  • stagger 221.70, stagger rise 221.70 x8 (1995.3) [20.78]

    • PvP
      On hit launches them to your side, easily comboing into groundZ for big damage.
      The first hit reaches 1 floor up, only the second part reaches 2 up and there they still will get floated off too early.
      The first part will only combo into the second part if inside the first half of the range (afar they can mash an invincible button before they get hit again).
      fs 193, launch 193 x8 (1737), plus combo


LV4 skill
Does a radius explosion reaching 1 floor up and down, final hit blows away. Will also buff yourself and all teammates in the stage for +200% DEF (-2/3 damage) for 10sec.
  • 497.66 x5 (2488.3) [19.14]
5-6d: Ronan 4th job
Standard dash type (average)
Dash momentum: ~270 pixels, rocket ~653

Hitstun recovery speed: very fast

GroundZ combo
Can infinitely combo an entire group of monsters by repeating only ZZZ↓ (~376 DPS), getting MP extremely fast if hitting multiple monsters at once, easily giving you enough to keep casting magic MP3 on the same group of monsters (press ZZZ holding the 3rd Z, then press ↓ to stall them for time while holding Z for the skill).
Before meleeing, can Z↑ to group them up more properly first. The Z↑ teleport catches from behind you but the MP3 teleport doesn't.

When hitting a single monster, can do the same combo for DPS, or if launchable can repeat ZZZ↑ to try to keep juggling them forever.

The 3rd Z and the first part of ↓ can hit 1 floor below too.
  • 4 presses: 83.80 / stagger 83.80 / stagger 83.80 x4 / launch forward 83.80
    Critical: launch-knockdown 50.46, 23.29 x2 and 57.79 (154.83)
    Double: launch-knockdown 117.37, 54.17 x2 and 144.47 (370.18)
    Combo ↓: stagger2 94.07 x3, launch-knockdown 109.19 (+391.4)
    Combo ↑: 166.31, launch 101.39, 40.64 x3 (+389.62)

    • PvP
      Long range especially if counting the 2nd swing.
      Forces standing state on airhit (the first two swings catch airhit/juggle easily). Can combo any ender into magic MP1 then back into groundZ, until you either run out of MP or kill (autocounter won't happen because the skill deals enough skill damage to lower it nearly to empty).
      Can do ZZZZ↓Z every time, comboing into skill if needed, and also has the option to stop at the ↓ to attempt to reset into groundZ again.
      Very effective to prepare first as a wall against a possibly advancing enemy. Even on miss can cancel into Up/Down followup, or Critical/Double.
      Can go forward doing only ZZ↓, which has advantageous range forward and all these 3 hits leave standing on airhit too.

      And all hits of this groundZ actually may hit forward 1 floor down, depending on the exact distance from your platform to the one below (particularly the 3rd Z, and the first part of ↓).
      • 4 presses: fs 115 / fs 115 / fs 115 x4 / float knockdown 115 (805), DoubleZ: float 80 / fs 37 x2 and launch-knockdown 99 (1058)
      • 4 presses, ↓ fs 64 x3 / Z float knockdown 75 (1072)
      • 3 presses, ↑ 114 / Z launch 69 / Z knockdown 28 x3 (957)

Z↑ charge
Z↑ on the ground will give you a charge, that is spent to do any of 3 attacks as Z↑ or Z→ or Z↓. Charging it costs nothing and takes less than 1 second, has no time limit to spend. Quickly charging and repeating one of these attacks is possible.
  • Z→
    Magic blast with slightly longer range than one melee swing. By repeating can infinitely combo monsters too, compared to ZZZ↓ is harder but pushes less (~351 DPS).
    • stagger 192.18 x3 (576.54)

      • PvP
        Longer than one groundZ, it's angled slightly diagonal down so that it cannot catch enemies midair, but the first hit can reach one floor down. If it hits, hitstuns long enough to directly combo into groundZ for big damage if not too far away.
        You can also use it offensively sliding off a cliff forward, hitting then comboing into falling airZ groundZZZZ.
        On any hit will disable tec/skill use for 3sec.
        fs 132 x3 (396)

  • Z↓
    Throws 3 ground mines forward that last 4 seconds or until proximity. Very weak but technically a spammable ranged attack for when you have nothing to do, can hit floors below yours if throwing off a cliff, or on tall monsters.
    • each of the 3 mines is 54.17 x1 and 83.59 x2 (221.35/442/663) (repeating with all 3 mines hitting is ~360 DPS)

      • PvP
        The mines have no hitstun on hit, and since the latest version they also do almost no damage. Lowers their MP on hit.
        Technically a ranged attack that is free to constantly keep doing, and they don't disappear if you lay more. They can also reach 1 floor down from where they are.
        each mine is 17 x3 and (51) (usually 2 mines, 102dmg)

  • Z↑
    AoE forward going 2/3 to screen edge and stretching 1 floor up and down, also reaches both left and right. Deals minimal damage to them and teleports all enemies hit to the same place in front of you for better AoEing, with combo or skills. This attack has 10sec cooldown.
    Teleport doesn't work on bosses, but hits other monsters even during red super armor.
    • stagger 16.78

      • PvP
        Doesn't hitstun long enough to true-combo into groundZ making it not a guaranteed attempt, but could combo into skills. Good at catching people out of the air too.
        force-standing 11

Dash-backZ
An AoE from yourself to mid-range, it's wider than it looks but it still has a small dead zone immediately in front of you that won't hit. Pressing Z afterward will shoot a ragna bolt from your newer location that blows away.
Costs MP to do the first part.
  • launch 168.00 / blowaway 201.58

    • PvP
      The first hit lasts a pretty long time to interrupt any advancing enemy. Great move but costs MP and has 2sec cooldown.
      Forces standing state on airhit, resets you two to standing a few steps away but apparently they recover slightly faster than you (or instead easily combos into skill). Adding the second hit will knock down without comboing from the first hit but can cover an enemy advance.
      fs 289 / knockdown forward 347

airZ
Has very hard timing to ottoshot, any other Ronan job can do it properly.
On hit or miss can chain this move into air↓Z.
  • stagger 84.07

    • PvP
      Normal swing with only average active frames. On hit or miss can chain into air↓Z.
      173

air↓Z
Small explosion diagonal down, staying in place for its short duration instead of following you like the airZ. Has 3 hits and if the 3rd hits it will knock down.
  • stagger 40.64 x2 and knockdown forward 40.64 (121.92)

    • PvP
      fs 28 x2 and knockdown 28 (84)

Dash attack
In PvE only good for the crowd control knockdowns.
One swing of 2 hits without knocking down, Z followup will knock down forward. Can instead do ↑Z for a launch and knockdown.
  • 96.09 x2 / Z knockdown forward 96.09 (288.27)
    96.09 x2 / ↑ small launch 58.79, 40.64 x2 and knockdown 40.64 (372.89)

    • PvP
      First swing won't knock down if hitting them on ground instead of the air, then can go into any continuation into magic MP1. Or can do only the first swing then attempt groundZ combo which apparently only barely is not a true combo.
      • 165 x2 / Z knockdown 165 (495)
        165 x2 / ↑ launch 101 / Z 28 x2 and knockdown 28 (515)

C↑ Erudon Tyrfing
Self-buff. ATK +10% and you have a circular aura, at random it will automatically hit enemies inside the circle for bonus damage but these hits will cause stagger too.
Charges over 30 seconds (fills 0.6sec when hitting airZ and second tap of dashatk), lasts 20sec. Can activate again to cancel early.
  • stagger 29.89. More or less 20 total (597.8), and +10% from ATK buff
    Activation: blowaway 117.75 and +10% from ATK buff (invincible and can evade an attack)

    • PvP
      The bonus hits will cause hitstun, and they force standing state on airhit. Sometimes they can hit after the opponent would be knocked down after your ending attack, to let you combo into groundZ again.
      The buff is +5% ATK instead of +10%.
      • force-standing 43
        Activation: float 89 (invincible and can evade an attack)
5-6d: Ronan 4th job (part2)
LV1 skill, sword
Melee combo knocking down forward.
The invincibility/recovery of this skill takes much longer than the other one (this is better for chaining, the other recovers faster).
  • 105.19 x6, last knocks down forward (631.14) [21.76]

    • PvP
      Forces standing state on airhit to still combo, ender knocks down.
      fs 83 x6, last knocks down forward (498) [17.17]

LV1 skill, magic
Wave hit forward than then launches them pulling onto you. Only light monsters get pulled.
  • 130.06 x2, launch pull 130.06 x3-4 (780.36)

    • PvP
      Maybe the best 1-bar skill in the game.
      The wave forward combos even on airhit (that is, after any combo or skill) then pulls them back in directly comboing into full groundZ combo. Can keep doing this as long as you have MP, possibly killing them from full HP in one combo.
      force-standing 87 x2, launch pull 87 x3 (435), plus combo


LV2 skill, sword
Small forward AoE of 7 hits where the last 5 also hits 1 floor up. Last hit knocks down.
  • 158.32 x7, last knocks down (1108.24) [17.59]

    • PvP
      All hits force standing state until the final one that knocks down.
      fs 137 x7, last knocks down (959) [15.22]

LV2 skill, magic
Creates one AoE left and another right (close to certain bosses will hit with both), reaching 1 floor up, each pulls to their center.
Launches for aerial bonus, knocks down.
  • launch 187.04 x6 (1122.24) [17.81], launchable monster aerial 1589.84 [25.23]
    Certain bosses x12 (2244.48) [35.62]

    • PvP
      Floats at the end but you don't have time to combo afterward except into skill.
      launch 162 x6, last floats down (972) [15.42]


LV3 skill, sword
Shoots forward like a boomerang, knockback will drag monsters forward along with it then pull all of them together some steps in front of you without knocking down. Only hits 1 floor. Heavy monsters/bosses are not moved.

Commonly deals 18 hits, or against heavy monsters can deal 8-13 if not starting at mid-range, heavy monsters should be standing at the peak of the boomerang.
  • 114.07 x18 (2053.26) [21.38], last hit staggers
    8-13 hits 912-1482 [09.50-15.44]

    • PvP
      Forces standing to work on anti-air/juggle, pulls close to you to combo into full groundZ combo.
      fs 99 x18 (1782), plus combo

LV3 skill, magic
It's a rectangle AoE forward to screen edge stretching 1 floor up and down. First teleports enemies caught in it to its center, then blasts that area with a hit launching them forward. Compared to the other MP3 will pull from a bigger AoE but sends them forward after it.
  • ~24.0 x1, 1766.1 x1 (1790.1) [18.64]

    • PvP
      Instead of blowing away, leaves them with mashable bind recovery (won't break from hitting them but lasts a short time).
      20, 89, 859 (968)


LV4 skill
For 10 seconds you have hyper armor and only take 1dmg from hits, and have +10%ATK and an aura that continuously hits nearby enemies as you can still move and attack.
Circular shape and reaches 1 floor up and down. Will keep knocking back light monsters per hit easily pushing an entire group to the wall, ending blows away.
Activating C↑ before using this skill will add another +10% ATK buff and the other damaging aura on top to make the most out of it.
  • Counts as normal attack/no SpATK
    ~133.1 x28 (3726.8) [28.66]
5-7: Amy (general)
GCC notable changes:
-4th job's debuffing 4th skill greatly nerfed
-X-button party DEF buff nerfed
-1st job Photo Shoot does not restore MP
-Amy2 dive has super armor
-C Blessing has higher odds to cure status


Story:
Extremely cheery and even more bratty, Amy the dancer of Silver Land is one of the Oracles of the magical land of the modern gods of Xenia and Silver Land's representative Oracle. As Baldinar's dark influence in Xenia and elsewhere was reaching its peak, she warned the Silver Knights and supported them in her own way, but despite her (appreciated) efforts, Baldinar's influenced creatures almost completely annihilate Silver Land as she goes to help Xenia by herself. Nearly crossing the Grand Chase inside Silver Land as they go on their way to Victor, Amy reaches Xenia earlier to reach the god of light Samsara who asks her to guard his essence, until the Grand Chase arrives after Samsara telepathically guiding them in as well. With them completely saving Samsara and his essence from danger and devising a plan against the apparent evil the ascendant god, she immediately joins the party to finish the job.

Fun fact:
The number of male playable characters that mentioned her cuteness once is so high I don't even know where to start to count.

Notable traits:
  • Amy is like a rogue, being a melee character with speed and simple high mobility that always has an air↓Z mid-range shot to spam when needed, but she also has team-support buffs and heals scattered around her jobs.
  • All her jobs have 2 modes, switched with X: officially each job has different names for them but I'll be calling them simply Playful Mode and Serious Mode. Modes can be switched even mid-air and even during attacks including possibly mid-combo for new strings (has a small recovery animation, will reset air momentum to combo aerial shot into ground melee combo).

Natural allclass trait - MP gift - Taunting with her Playful Mode throws blue confetti which refills around 10% of an MP bar to nearby teammates other than yourself (including teammates in PvE already inside the room end portal), the refill happens when beginning to taunt instead of when the confetti appears. Disabled in 2nd job which has a MP2 skill that does a stronger version of that.

Skilltree allclass trait - Free DEF buff - Whenever switching back into Playful Mode, a minor DEF buff is given to yourself and all teammates in the stage. Fully upgraded it lasts 15sec, +5%DEF/-4.8%dmg (PvP +2.5%DEF).

Skilltree allclass trait - C-Button Blessing - Does a flash that heals nearby teammates from freeze/stone, and blackened Curse. Has only a chance to work per try (apparently 50% LV1, 90% LV3).
5-7a: Amy 1st job
Serious mode combo↑ from skill tree is very important in PvE, it's the only PvE evasion Amy has in all jobs: it lets you keep doing groundZ combo on monsters then readily dodge with ↑ to walk forward through the monster so they miss. Has no actual invincible time.

Playful mode

GroundZ combo
The fastest-ending groundZ combo in the game. It launches in the 2nd to knock down and away in the 3rd, for early crowd control (and can do ZZ then aerial hit Critical), but on heavy monsters instead you can repeat full combo + Double (~317 DPS).

V2 adds one more swing to the combo which doesn't change much (makes it take slightly longer to reach Double which is the strongest part).
  • 110.00 / launch 110.00 / knockdown on air or stagger push on ground 110.00 (330.00, aerial 385.00)
    V2 4th hit: knockdown forward 159.24 (489.24, aerial 618.86)

    • PvP
      Fast startup and good range. 3 taps and none of them knock down so they combo into Double.
      3rd tap has shorter range so if you hit at the tip you have to cancel into Critical/skill after the 2nd.
      1st and 3rd taps stretch their hitbox up far enough to hit 1 floor up/anti-air.
      Against Arme/Mari, can loop until autocounter (~1700dmg) by doing ZZZ, X-switch, repeat.

      V2 is bad because it knocks down and is weaker than doing Critical/Double instead. Technically lets you repeat ZZZZ as a potential anti-air with every hit except the 2nd.
      • 151 / 151 / 151 (453, + Double totals 999)
        151 / 151 / 151 / knockdown forward 219 (672)

  • Critical/Double
    Simple emergency knockdown hit, reaches slightly farther than one hit of combo.
    Can dashcancel animation, to on hit combo into dashZZ.
    • knockdown forward 160.11 (Double is 317.47)

      • PvP
        knockdown forward 275 (Double is 546)

    • Critical V2 - Only changes Critical, not Double.
      Worse option in PvE.
      Two extremely small hits forward, the first has small range behind too. If not hitting midair leaves monsters still standing up but the combo already launches before you can do Critical.
      • 84.55 x2 (169.10)

        • PvP
          Makes a new main combo route going from V2 ZZZ into this Critical. If the Critical's 2nd hit connects on groundhit, they take a spinning blowaway without moving from place, having a moment of airtime long enough to directly combo into dash grab or skill (Photoshoot/ShyShyPunch3).
          • 145, 145 floating in place (290)
            V2 ZZZ this = 743 (+ grab 370 = 1113, or skill)

DashZ
One press doing two hits forward (also hits diagonal down to work coming from the air), can press Z again for a knockdown hit or instead combo into groundZ combo.
  • stagger 38.07 x2 / knockdown forward 72.00

    • PvP
      After the first press can do Z again to knock down with more damage, or hold that Z to combo into MP1 instead (or a skill by shortcut).
      Or hit the first part and do no followup, to reset you two next to each other to attempt groundZ combo although they recover much faster than you.
      65 x2 / knockdown forward 124

  • DashZ V2
    Downgrade in PvE.
    Single press, spins forward hitting both sides for a longer time, last hit knocks down.
    Can press Z once to extend for more hits, this will make Amy get dizzy before recovering but you can skip this with X to switch modes.
    • 58.73 x3 or x5 (176/293), last hit always knocks down

      • PvP
        Could be used in PvP because of its very long active frames while moving with normal trajectory while running in ground or air, then either cancels into skill or X-cancels to leave them standing although they recover faster than you. If not cancelled into anything will knock down fast.

        Will spin for a hit forward, then back, then forward, then if not extended does a knockdown hit to both sides. If you press Z after the 2nd hit, does 2 more hits to each side before the knockdown hit and adds recovery that's X-cancellable.
        101 x3 or x5 (303/505), last always knocks down

airZ
Can ↓Z ottoshot on platforms (~320 DPS).
  • 76.44

    • PvP
      Standard airZ, decent active frames, can lead into ground combo or ottoshot.
      157

air↓ZZZ
Fires a single short-range projectile diagonal down with some damage and hitstun, twice. With another Z continues with a knockdown divekick.

The projectile is free to throuw every time you're coming up a platform: simply shoot it once when jumping up, right before landing, and you will instantly recover standing due to its air momentum reset.
You can spam the projectile in place while jumping up and down one platform, shooting once whenever moving up or down (↑ ↓Z, land above, ↓ ↓Z) which is safer but this is lower DPS than meleeing (~170 DPS).
  • stagger 109.13 / same / knockdown forward 167.94

    • PvP
      The divekick will knock down, with you two standing back up at around the same time but closer.
      You can also directly combo the shot into groundZ combo (possible if not very far from their ground, probably better than divekick if the first part already hits) by doing the shot into X-switch, which will stop the shot animation before it finishes forcing your aerial momentum up so you fall straight down faster to land and do groundZ right after as a single combo. The projectile forces standing state on airhit so you can combo juggles into it then into ground combo.

      The shot can be ArrowDefended (except by Lire/Arme). This reduces the damage by 80% but also removes their directions from being held until they press them again so it can work to trap them in place for your next attacks, not necessarily the divekick.

      The projectile can be reflected/broken.
        force-standing 75 / knockdown 115 (190)
5-7a: Amy 1st job (part2)
Serious mode

Aside from having separate skills, her only changed move is her groundZ combo. And has a different alternative choice for dashZ.

GroundZ combo
Can infinitely combo monsters by doing the combo until one of the last hits before the final hit then starting over, but DPS is very low (~139).
  • normal 95.21 / stagger 95.21 / short stagger 95.21 / stagger 95.21 / stagger 95.21 / stagger push 95.21 / knockdown forward 95.21 (666.47)

    • PvP
      Average startup speed instead of fast.
      While not very well can try to make a hitting wall while walking forward (then before the final knockdown hit canceling into Critical or skill). All hits after the 1st will almost reach 1 full floor up, and the 3rd hit does.
      If playing against a fast-recovery job, there is a minimal combo break between the 3rd and 4th hits, it's not impossible for them to successfully mash grab/skill during that. For a guaranteed combo must do 3 taps into Critical/skill (even Critical can have a break if the second Forward input is not timed to the 3rd hit).
        131, 131, 131, 131, 131, 131 (786 so far), knockdown forward 131 (917)

    • V2
      Same first 3 hits, then shortens the other walking hits into two stronger smaller hits forward. Has better DPS on monsters by itself (full combo + Double is ~293 DPS) or when just doing damage being ready to do ↑ attack to dodge.
      Has difficulty doing the 5th hit if the 4th misses.
      • normal 95.21 / stagger 95.21 / short stagger 95.21 / low hitstun 173.82 / knockdown forward sending down through platforms 173.82 (633.27)

        • PvP
          Better for damage, floats at the end to directly combo into Double or skills.
          Still has a break between 3rd and 4th hit against fast-recovery jobs.
          131 / 131 / 131 / 239 / float 239 (871, plus Double 1417)

    • V3
      Leaves monsters standing up, so it's easy to repeat while being ready to do ↑ dodge (full combo + Double is ~304 DPS, combo on repeat is ~226).
      Despite not knocking down, it has normal hitstun instead of staggers so it doesn't have enough to infinite combo monsters.
      • 111.24 / 111.24 / 111.24 x2 / 111.24 x2 (667.44)

        • PvP
          Fast startup. Ends by launching high.
          *The 2nd tap has very long range (longer than a spear combo starter) and moves you through that entire distance to combo afterward even from afar, or can stop after 2nd or 3rd to reset standing next to them.
          *Loop: launch then X-switch right when the last hit connects, then jump and do air↓Z X, groundZ again repeating, easier with Double V2. Autocounter will trigger at around 1600dmg.
          *The 1st tap has small range behind you (could combo into Critical backward).
          Combo is not good at reaching up.
            153 / 153 / 153 x2 / 153 and launch 153 (918, plus Double 1464)

  • Critical/Double
    Simple hit knocking down forward. Not very fast, but slightly longer than another combo hit.
    • Critical blowaway 160.62
      Double blowaway 317.47

      • PvP
        knockdown forward, Critlcal 276, Double 546

    • Critical V2
      The same move except it starst with a bonus hit extremely fast with slightly less range, comboing into the second hit to cover its startup, with the damage being split between the two. Hits faster with barely more damage if it hits from close up, has worse damage and speed than V1 if only the longer hit connects.
      • 84.55 x2 (169.1), last blows away

        • PvP
          145 x2 (290), last knocks down forward

    • Double V2
      Simple fast hit, reaches 1 floor up.
      Monsters get knocked down and sent diagonal down through platforms.
      • 317.47 knockdown forward diagonal down through platforms

        • PvP
          Usually not even possible to land anyway because Double is after the last hit which knocks down.
          From V3 combo can combo into this normally, which makes it slightly easier to do the X-switch loop.
          If missing then landing this forward or behind, on groundhit will launch high to combo into air↓Z X and ground combo.
            546, high launch on groundhit

DashZ
V1 is the same as V1 from the other mode.

  • V2
    A longer-run dash attack with multiple hits. Leaves monsters standing up.
    Has 50% chance for 2 animations with different damage.
    • 57.86 x1 (or 36.62 x2) then 117.91 (175.77/191.15)

      • PvP
        Always knocks down the opponent at the end with no time for anything, except shortcut skill or X-switch right away. The only advantage is longer range in one swing.
        99 x1 (or 63 x2) then knockdown forward 203 (302/329)

airZ
Same as other mode.

air↓ZZZ
Same as other mode.


LV1 skills

Playful mode
Shy-Shy Punch (toma toma toma)
Rapid short hits forward, last knocks down. Can walk left/right.
  • 44.67 x11, last knocks down (491.37) [MP rate 16.94]

    • PvP
      Forces standing state on airhit until the last hit knocks down (works on air combo/anti-air).
      fs 38 x10, knockdown 38 (418) [14.41]

  • V2
    Instead of knocking down monsters, only slightly pushes them.
    • 49.15 x11, last pushes (540.65) [18.64]

      • PvP
        Instead of knocking down, floats/blows away instead. Can combo into some skills (including itself on corner), or can slide them off a cliff for one juggle. But V3 is better.
        fs 42 x10, float/blowaway 42 (462) [15.93]

  • V3
    Last hit launches instead.
    • 51.70 x11, last launches (568.7) [19.61]

      • PvP
        Last hit does a spinning launch instead. Combos into air↓Z-X then groundZ.
        fs 45 x10, spinning launch 45 (495) [17.06], plus combo

Photo Shoot (flash)
Does not recharge MP anymore.
Non-piercing shot forward until screen edge. Timefreezes the monster for 3 seconds if they don't have super armor.
  • 567.00 [19.55]

    • PvP
      They stay frozen for 3 seconds even if hit again, on the ground or in the air. Can be used alone to combo into full groundZ (unless they were hit in the air), or used from combo to combo again one time.
        1

Divine Message (inspiração)
Puts a jar icon multiple steps in front, will hit a monster or instead the first player to touch it restores HP, but it's extremely weak in PvE (worse MP-to-healing rate than any other heal).
Will only stay waiting for up to 5 seconds, can heal 2 other players together when it appears. Can't heal players already inside the PvE room end portal (some heals can).
  • Healing: ATK + SpATK, x50, divided by receiver's DEF (19k ATK by 12k DEF is 79 HP, so less than 2% recovery). Cannot crit.
    Damage: 463.05, leaves standing

    • PvP
      Will heal the first player to touch it regardless of teams.
      Healing: ?

    V2
    You can press Z inside the cast animation to switch it for a poison jar which does nothing except damage an enemy.
    • Damage (without Z): 579.18 (leaves standing)
      Damage (with Z): 603.26 (launches)

      • PvP
        It's possible to use this in PvP to heal yourself then later switch one to poison to bait them into walking into it. It looks slightly different with a skull but it's not very obvious.
        525 knockdown [18.10]
5-7a: Amy 1st job (part3)
Serious mode

Spinning Counter (chute meteoro)
Rising combo.
  • launch 125.23 x4, last knocks down (500.92 [17.27], aerial 688.76) [23.75]

    • PvP
      Can anti-air.
      3rd-4th hits can reach 1 floor up but the 3rd will bounce for the 4th to miss.
        float 109 x3, knockdown 109 (436) [15.03]

  • V2
    Adds a spin hit in the air before the ender.
    • ~100.25 x6 (601.5) [20.74], aerial 852.12 [29.38]

      • PvP
        More damage (and the middle part can launch through super armor) but knocks down farther.
          float 87 x3, launch 87 x2, knockdown forward 87 (522) [18.00]

Reverse Turn (passos de dança)
Melee hit forward, then one non-piercing projectile to mid-range.
  • 284.24 x2 (568.48) [19.60]

    • PvP
      Shot knocks down.
        225, 225 float/knockdown (450) [15.51]

Triple Axel (golpe rítmico)
Multi-hit dash attack. Good at dealing most/all hits even with medium distance. Short animation/invincibility time.
  • ~125.2 x4 (500.8) [17.26]

    • PvP
      Forces standing state to work on airhit too, knocks down with the last hit.
        fs 109 rise x3, blowaway 105 (432) [14.89]

  • V2
    Same but does the first part twice, adding more damage and invincibility time. Has longer potential range (where it hits 4 times).
    • ~120.9 x5 (604.5) [20.84]

      • PvP
        fs 105 rise x4, blowaway 105 (525) [18.10]


LV2 skills
Playful mode
Dance Fever (hora da dança)
Buffs yourself and nearby teammates. Raises ATK/dmg by a somewhat small 15% (7.5% in PvP) for 20sec (30 when maxed). Amy's only proper ATK buff in all her jobs.
The buff starts applying even before the screen darkens from the skill, easy to apply when the PvE room starts, if not room host you can mash the skill hotkey to use it before the story dialogue appears.
    V2 - Sightly bigger area. V3 - Keeps the bigger area and raises the duration to 30sec.

Stigma (onda mística)
The only non-buff option for this slot.
Single radius explosion. May reach 1 floor down. Simple and good AoE skill to keep applying for damage in PvE.
  • ~1035 [16.42]

    • PvP
      Their HP Regen stops for 10sec.
        blowaway 902 [14.31]

  • V2
    Slightly more damage in PvE.
    • PvE: ~1144 [18.15]
      *2288 [36.31] or 572 [09.07]

      • PvP
        Used to have the effect last longer and stop MP but not anymore.
        blowaway 998 [15.84]

    Sacred Dance (asas da harmonia)
    Buffs yourself and nearby teammates for more DEF, and also gains a small amount of MP whenever hit (depends on damage taken, maybe 3000 damage for 1 bar), lasts 20sec.
    Might be useful in a full party in a dungeon like Harrier where damage is high. Useful in Tower of Disappearance 10F where the poison clouds will keep giving your party infinite MP to spam.
    • V2 - +25% DEF (-20%dmg), PvP +12.5% (-11%)
      V1 - +20% DEF (-16.6%dmg), PvP +10% (-9.1%), gives less MP than LV1

Serious mode

Ditzy Rush (ataque frenético)
Walking combo, last hit knocks down in place.
  • 317.62 x3, knockdown 85.85 (1038.71) [16.48]

    • PvP
      Causes hard knockdown/the same as if they countered (they don't have the option to get up with Z or a character-specific roll).
      Earlier hits can force standing state on airhit but on juggle it's easy to pass under them anyway.
        fs 276 x3, hard knockdown 74 (902) [14.31]

  • V2
    After it starts hitting you can keep pressing left/right to switch directions.

  • V3
    Keeps the V2 upgrade. Adds three more weak hits before the ender, reaching farther as it ends.
    • 317.62 x3, 45.5 x3, knockdown 85.85 (1175.21) [18.65]

      • PvP
        fs 276 x3, fs 39 x3, hard knockdown 74 (1019) [16.17]

Flash Dance (chute coreografado)
Another walking combo. AoE/multi-target potential might be smaller.
  • ~113.3 x11 (1246.3) [19.78]

    • PvP
      Ender floats, can combo into one skill or one dashatk before knockdown.
        98 x11, last blows away (1078) [17.11]

Spin Combination (pirueta)
Dashes forward in 1 kick, then does a multi-hit spin.
  • ~90.8 x12 (1089.6) [17.29]

    • PvP
      All hits force standing state on airhit to work midair.
      The end always leaves you two standing up together. Fast-recovery job enemies will recover much earlier than you (they can combo YOU if they do it right), otherwise it looks most practical to do dash grab for +370.
      • fs 79 x12 (948) [15.04]

  • V2
    Does a bigger dash at the beginning that still hits early (full damage at screen edge distance).
    • ~67.1 x17 (1140.7) [18.10]

      • PvP
        The dash hitstuns but does no damage, deals less damage total. On airhit can accidentally pass under them.
          0 x5, 58 x12 (696) [11.04]
5-7a: Amy 1st job (part4)
LV3 skills
Playful mode

Loving You (o amor está no ar)
Instantly restores HP to yourself and teammates very close to you, also leaving a buff to enable HP Regen with +100% regeneration speed for 10sec, or 15sec at V2 (around 6% HP). Teammates that enter the area after it appears only receive the regen, must start with them inside range.
The instant restoration can revive teammates before they disappear, and can heal teammates on PvE room end portal (without the regen). Instant restoration amount is scaled to ATK and can crit.
  • instant heal is 6% of your ATK (heal divided by ATK is roughly 0.0602), so 17k ATK heals for around 1020 HP and uses your CritChance for the tripled/etc CritDmg amount.

    • PvP: ?

    V2 - Regen is raised to 15sec.


Fan Service (melodia do amor)
This is a channeled buff for others, taking the same skill slot as the heal, you will stay in place with an animation forever until you tap left/right or X to leave.
Players near you will have +30% ATK and can move through monsters, and have +150%DEF/-60%dmg and super armor (resists hitstun but not knockdowns or launches), and increases HP Regen speed by +150% but in PvE doesn't enable regeneration past their item maximum health percentage, and doesn't heal from Fatal. Effects also last 1sec after leaving the area.

You have the same effects but can't act until leaving. In the first 5 seconds you are invincible and can't leave by walking, only X. Then you lose invincibility but have hyper armor infinitely until you decide to leave (even bosses can't knock you out of the animation even if you already are on Fatal) (in PvP doesn't resist knockdowns or launches).

You can plant yourself in a good position near enemies or near a boss that doesn't move much. Other players will gain +30% ATK and freely walk through bosses to dodge and never be cornered, and take 60% less damage with super armor, and regenerate HP faster.
  • V2: ATK +30%, +150%DEF/-60%dmg, HP Regen speed +150%

    • PvP: all 3 halved (+15%ATK, -42.8%dmg, Regen +75%)


Amy Dance
Buffs yourself and all teammates in the stage, but the effect is random. For 3 bars of MP and giving only 1 effect per cast this is useless, even though the buffs can be stacked by casting again.
The effect will be said on the top of the screen to all players.
  • Around 75% HP, or MP, regenerated over 3sec, or more over 20sec (regenerates less in PvP?)
  • No MP is lost when countering for 15sec (can counter every time you're hit for free)
  • ATK +20% or DEF +20% for 20sec (10% in PvP)
  • Nothing happens
  • At a smaller chance, can make a reversed negative effect to your team instead, doing an ATK/DEF debuff or taking away HP or MP for half the normal duration.

Serious mode

Grand Finale / Amy Kick (turbilhão de chutes)
An overly long melee combo forward. Enemies can walk out of this often.
  • 169.18 x11 (1860.98) [19.38], ends knocking down

    • PvP
      Forces standing on the beginning so may work on airhit too, then continues the combo.
        force-standing 147 x1, x3, x5, float 147 x2, knockdown 147 (1764) [18.37]

    V2 - Changed into a single piercing kick forward, a square AoE rolling you forward through them. Leaves monsters standing.
    • 343.61 x4 (1374.44, easy back bonus for 2199.10) [14.31/22.90]

      • PvP
        Very weak.
          float/knockdown 249 x4 (996) [10.37]

Beauty Mode (explosão de amor)
Radius explosion (reaches to mid-range in both sides and 1 floor up) first pulling in enemies then blowing them away from the center but still standing up.
  • 127.5 x13 (1657.5) [17.26]

    • PvP
      force-standing pull 111 x11 blowing away (1221) [12.71], can deal 13 hits if they don't take knockback (1443) [15.03]

Psycho Crash (ataque glamuroso)
Percing shot forward to mid-range reaching 1 floor up.
Gains more hits if the boss is wide enough and you positioned yourself in front of them, damage goes from normal to double.
  • ~70.3 xN and ~583.8 xN
    Assuming 4+3 hits 2032.6 [21.17]
    Extra-wide monster assuming 5+5 hits 3270.5 [34.06], supergiant boss max 10+6 hits 4205.8 [43.81]

    • PvP
      Forces standing state to catch airhit. Pushes but doesn't knock down.
        fs 243 xN, closest 10 hits (2430) [25.31], melee range around 8 (1944) [20.25], outside melee range around x4 (972) [10.12]

  • V2 - Goes farther. May deal 1 or 2 less hits if aiming 1 floor above.
    • ~71.6 xN and ~627.3 xN
      Assuming 4+3 hits 2168.3 [22.58]
      Extra-wide monster assuming 5+5 hits 3494.5 [36.40], supergiant boss max 10+6 hits 4479.8 [46.66]

      • PvP
        fs 261 xN, closest around 6 hits (1566) [16.31], melee range 5 hits (1305) [13.59], outside melee range 4 hits (1044) [10.87], screen edge 2 hits (522) [05.43]

LV4 skill
Let's Dance - AoE far to the sides reaching 2 floors up and 1 floor down. Hits without any hitstun to monsters.
  • 180.09 x14 (2521.26) [19.39]

Awakening - Basically a buffed version of her air↓ZZ. Jumps, shoots one projectile forward down then kicks down forward for an explosion.
  • ~1407.29 x2 (2814.59) [21.65]

H - Hits basically the entire screen.
Also gives you ATK +15% and Super Armor for 20sec after it finishes.
  • ~114.37 x16, ~61.58 x16, ~1220.02 x1, ~656.93 x1 (4692.15) [36.09 if it cost as much as MP4]
5-7b: Amy 2nd job
This Amy job is unique by having one ranged mode alongside a normal melee mode, but it's not very useful in PvE (except for the MP buff on Tower of Disappearance).

Playful mode

This mode dashes differently to everything else Amy has. It has no held run (only a far set-distance dash, and you cannot jump from it except very early).

GroundZ combo
Shoots 4 notes as wavy projectiles forward to mid-range. In PvE none of them knock down.
Since the 2nd Z can go into either Critical/Double (backdashing with one note that goes farther) or Up (a melee strike to both sides that reaches 1 floor up, sends away). Can also cancel combo into X-switch.
Full combo plus Double is ~296 DPS, without Double ~217.
  • Combo: 114.26 / 114.26 / 114.26 / stagger2 114.26 (457.04)
    Critical: longer shot of 125.73 (if Double, 285.70)
    Up: blowaway far 65.59

    • PvP
      The notes force standing state on airhit (the 4 notes fully combo even if it starts hitting them mid-jump). Doing the 4th note knocks down.
      Notes don't count as projectiles, they cannot be reflected/broken.
      Loop: if you are in the corner, hit with combo↑ (either alone or from groundZZZ↑) sending them into the wall, then repeat groundZZZ↑. Autocounter will happen after around ~1700dmg.
      • Combo: force-standing push 157 x4, last knocks down
        Critical: force-standing 216 (if Double, 492)
        Up: blowaway 47

Dash attack
Shoots a long note behind you.
  • 125.73

    • PvP
      force-standing push 216

Dash backZ
Shoots a blue note instead. In PvE it's stronger and staggers, can repeat from wall.
  • stagger 167.99 (~191 DPS)

    • PvP
      No damage. Lowers their MP.
      force-standing 0

airZ
Shoots a single note forward like in groundZ, but tapping Z again chains directly into groundZZZZ even if you're still airborne, doing 5 hits as a single combo.

Can do as air↓Z to shoot in a different angle, which cannot chain into groundZ, but if jumping for long enough you recover mid-air to be able to attack again or dash unlike normal airZ.
  • Same damage as one hit of combo

doublejump ↓Z
An airdash diagonal down until landing on the ground. Passes through enemies and has super armor until a moment after landing. In PvE easily passes to the other side of a monster for dodging, but it won't be very fast because you have to stop attacking first then doublejump.
Then when landing you can press Z again for a melee hit blowing away that turns you around, hits both sides but has longer range to behind.
  • 89.66, blowaway 246.14

    • PvP
      If passing through them, combos into charged MP1 (which combos into walk grab), but if done from so far that you don't pass through them, only combos into shortcutted MP1/MP3.
        force-standing push 131

Serious mode

GroundZ combo
3 presses for damage then the 4th launches. In PvE can keep repeating the first 3 presses (~313 DPS, full combo plus Double is ~322 DPS).
  • pull stagger 110.52 / short stagger 110.52 / normal 110.52 x3 / small launch 110.52
    Critical: launch 160.57 (if Double, blowaway 317.47)

    • PvP
      Starter has average speed and range.
      All hits except the last force standing state on airhit (works even if hitting mid-jump).
      Loop: do all 4 presses then repeat, the last will float and the first can force standing again. Timing is very hard, but easier if facing downhill.
      • fs 152 / fs 152 / fs 152 x3 / float 152
        Critical: 276, launches on ground or knocks down on air (if Double, 546)

Dash attack
Two quick consecutive hits straight forward, can have decent range with running momentum but only knocks down. The only advantage over groundZ is faster startup or the quicker knockdown.

There is a small random chance for her to trip, doing 3 hits instead of 2.
  • 68.70, knockdown forward 68.70 (137.4)

    • PvP
      Can land the first hit then X-switch to combo into walking grab, or X-switch twice to attempt melee groundZZZ.
        118, knockdown forward 118

airZZ
Normal airZ, can swing twice per jump.
Can ottoshot (~320 DPS).
  • stagger 76.42 x2

    • PvP
      Has decent active frames and can swing twice.
      Loop: jump and do the first swing, then shortly before landing do the second swing. Run-jump through the enemy, turn around and repeat. (autocounter will trigger after around 1700dmg)

Doublejump ↓Z
Same as other mode.
5-7b: Amy 2nd job (part2)
LV1 skill (playful mode)
One non-piercing slow shot to mid-range, on hit or on its max range it explodes to launch straight up.
  • launch 258.35 x2 (516.7, aerial 645.87) [17.81/22.27]

    • PvP
      The launch confuses them for 5sec (reverses left/right). Can combo into airdash grab, or if done on corner can barely combo into groundZZZ.
        launch 225 x2 (450, plus combo)

LV1 skill (serious mode)
3-4 spinning hits in a very small jump forward.
  • launch 151.18 x4 (604.72, full aerial 831.49) [20.85/28.67]

    • PvP
      Can anti-air, but horizontal range is very short and one step ahead it can already deal only 1 hit and not launch properly.
      If it fully hits can combo into groundZ in loop but timing is hard, easier if they were already airborne before the skill (right after final hit of groundZ).
        float 131 x4 (524) [18.06]


LV2 skill (playful mode)
Useless if playing solo.
Gives an MP regeneration buff for nearby teammates but not yourself. Gives them only ~1.09 MP bars over 5sec (not as strong as it used to be when it was new).
Can be used to give MP to multiple party members at once but this can take serious coordination to use in a worthwhile way. Can be good in Tower of Disappearance where you cast it at least once every floor to help your teammates kill the bosses in under 5 seconds each.


LV2 skill (serious mode)
4 AoE hits forward, last floats/knocks down.
  • 287.81 x4 (1151.24) [18.27]

    • PvP
      With hard timing, the last hit will combo directly into groundZZZ for very high damage. Or ground dash grab.
      *Has a fast hit at the beginning before freezing time (could beat out a grab).
      • 250, force-standing 250 x2, float 250 (1000) [15.87]


LV3 skill (playful mode)
Pillar AoE forward reaching more than 1 floor up but the hits are very sensitive. It has a dead zone immediately in front of you except 1 floor up where it deals 3 hits, and the enemy needs to be large to easily deal all hits.
  • ~304.9 stand, up to x8, 5 hits 1524.5 [15.88], max x8 on giant 2439.2 [25.40]

    • PvP
      Forces standing state before the last hit which knocks down, can anti-air.
        fs 252 each, lasts knocks down (5 hits, 1260)[13.12]

LV3 skill (serious mode)
Single AoE forward, reaches 1 floor down. Does 2 hits but can do only 1 if too far.
  • launch 697.92 x2 (1395.84, easy back bonus for +60% for 2233.34) [14.54/23.26], launchable monster 1744.80 or back hit 2163.552 [18.17/22.53]

    • PvP
      Weaker than normal.
        float/knockdown 607 x1/x2 (1214) [12.64]


LV4 skill
3 piercing multi-hit projectiles spread to the right in a forking pattern and 2 to the left, pushing away. After the end, those projectiles disappear and return back to the center as one column in the height of the screen.
  • First part 42.71 per hit, second part 12.04 per hit
    Normal enemy around 12 then 4 hits (560.68) [04.31]
    Average boss around 20 then 40 hits (1335.8) [10.27]
    Also has a single hit of 723?
    Raid boss: complicated but more
5-7c: Amy 3rd job
Playful mode

GroundZ combo
3 presses already launching since the 2nd, has crowd control but the other mode can continue a combo better.
  • stagger 123.75 x2 / launch 123.75 / launch 123.75 (495, aerial 556.87)
    Critical: 81.87 x2 knocking down (163.74) (if Double, 141.91 x2 (283.82))

    • PvP
      Fast startup and average range.
      All 3 presses reach 1 floor up (might anti-air but active time is very short per hit). All 3 have very small range behind you too.
      Launches on 3rd hit, comboing into dash grab (or MP1/MP2 to reset position and apply a debuff).
      • 170 x2 / 170 / groundhit launch 170 (680)
        Critical: 141 and knockdown 141 (282) (If Double, 244 x2/488)

Dash attack
One swing of 2 hits, launches monsters.
  • 74.92 and launch 74.92 (149.84)

    • PvP
      1st hit is diagonal down-back then arcing straight forward, 2nd hit starts straight forward and arcs up behind you to finish a circle.
      Can hit when airdashing directly above someone to only land the first hit which doesn't knock down, then run-grab or attempt groundZ.
      This attack doesn't reach as far up as groundZ does.
        129 and knockdown 129 (258)


Z→
Projectile shot to slightly over screen edge, on hit has a stagger.
This mode's angle is passing at around head height, can anti-air or hit 1 floor up but may pass above enemies on the ground. This is also weaker than the other, the other is strong enough to repeat as a ranged attack.
This can be reflected/broken as a projectile, but if reflected it just goes straight up.
  • stagger 167.92

    • PvP
      force-standing 115

airZ
Hits in a full circle except diagonal up-back. Has short active time.
Can ottoshot.
  • 76.39 (ottoshot ~320 DPS)

    • PvP
      157

air↓ZZ
Shoots a weak projectile diagonal down, works exactly like 1st job's version with all its tricks, with more range in the shot (and floating you farther up to boost your jump height), but the followup dive is different: it goes farther and also passes through enemies (can kind of work as a dodge in PvE by passing to the other side of a monster).
  • 42.77 + 68.54 (111.31), dive 1 or 2 hits of 85.63 (171.26)

    • PvP
      If X-switching midair you can't attack again until after landing, so can't combo shot into full combo like 1st job.
      In PvP the shot has 1 second cooldown to not loop on one platform even though 1st job can.
        force-standing 29+47 (76), dive 1 or 2 hits of launch 59 (118)

Serious mode

Z→
Uses a more straight forward angle. Can repeat as a ranged attack doing normal combo/ottoshot damage (~331 DPS), can do at melee range too if you want.
  • stagger 302.38

    • PvP
      force-standing 208

GroundZ combo
Can keep staggering monsters by repeating the first 4 presses. If there's only 1 enemy you can keep doing Z→ shot.
  • 109.52 / stagger up 109.52 / 109.52 / stagger 109.52 / launch 109.52 / knockdown forward 109.52 (657.12)
    Critical: launch 81.87, knockdown forward 80.23 (162.1) (if Double, 120.07+192.13, 312.2)

    • PvP
      Fast startup and good range, longer than the other.
      Canceling into Crit/Double has long range and reaches 1 floor up.
      • 150 / 150 / 150 / 150 / launch 150 / knockdown forward 150 (900)
        Critical: launch 141, knockdown forward 138 (if Double, 206+330, 536)

Dash attack
Works like 1st job's dashatk where it very conveniently does 2 hits leaving standing then you can optionally press again or not for a knockdown hit.
The first hits connect in a full circle (except downward), 2nd press only hits straight forward.
  • 56.76 x2 (113.52) / launch 83.91

    • PvP
      Can combo into the 2nd Z or charged/shortcutted skill, or slowly return to standing.
        97 x2 (194) / knockdown 144

airZ
Normal airZ which starts diagonal up but stays sticking out diagonal-down with medium active frames.
Can ottoshot.
  • 76.39 (ottoshot ~320 DPS)

    • PvP
      157

air↓ZZ
Same as other mode.


LV1 skill (playful mode)
3 slow non-piercing shots to screen edge, leaves them standing.
-5% DEF (+5.26%dmg) for 6sec.
  • 198.70 x3 (596.1) [20.55]

    • PvP
      Stops their HP Regen for 6sec.
      Forces standing state on airhit to work as anti-air/juggle, always leaves them standing up outside of groundZ range for a mid-range approach option (dashZ will knock down, air↓ZX will lead into ground combo or grab, Z→ covers the air and can still arc down into them if you used the skill from afar).
      The 3 shots don't actually combo into each other (it's possible for them to tap skill or do an invincible move between shots).
        fs 150 x3 (450) [15.51]

LV1 skill (serious mode)
Jumps forward with a combo.
  • launch 200.8 x3 (602.4, aerial 803.2) [20.77/27.69]

    • PvP
      The 1st hit launches, and you need this launch for the 2nd to connect into the 3rd (if done from mid-range, only the 2nd hit connects). Startup is pretty fast for a skill.
        launch 174, float/knockdown 174 x2 (522) [18.00]


LV2 skill (playful mode)
Rectangle AoE forward, leaves standing.
  • 284.17 x4 (1136.68) [18.04]

    • PvP
      Confuses for 3sec (reverses left/right input).
        force-standing 206 x4 (824) [13.07]

LV2 skill (serious mode)
Forward AoE to mid-range blowing away. Strong on wide monsters.
  • float forward 570.79 x2-4 depending on enemy (1141-2283) [18.12-36.24]

    • PvP: float/knockdown forward 276 x2-3 (556/828) [08.82/13.14]


LV3 skill (playful mode)
AoE to both sides reaching 1 floor up, starts with weak hits then ends with the big damage.
The beginning heals yourself and nearby teammates for a lower amount than usual.

Healing: set 12.5% of their MaxHP. Can hit teammates even if they enter the area late, reaches 1 floor up. Can heal teammates inside the PvE room end portal, cannot revive teammates. Also leaves a buff that enables HP Regen and sets it to +60% speed (no regen if they're in portal).
  • ~60.4 x10, launch ~544.2 x3 (2236.6 or aerial 2780.8) [23.29/28.96]
    Against raid bosses, second part can deal as many as 8 hits (4957.6) [51.64]

    • PvP
      May be able to combo into airgrab or easily do air↓ZZ. If the explosion reaches 1 floor up and they don't have super armor they will take only 1 hit then get knocked down.
      May wakeup trap if used as they stand back up and don't move away.
        52 x10, launch 473 x3 (1939)

LV3 skill (serious mode)
Forward rectangle AoE forward. Exact number of hits depends.
It can reach to screen edge or 1 floor up but only for 2 hits instead of 5.
  • launch ~559.6 x3-5 (1678.8-2798) [17.48-29.14], far/up 2 hits (1119.2)

    • PvP: force-standing 324s then launching/knocking down. Often x4 (1296) [13.50], close x5 (1620) [16.87], far/up x2 (648) [06.75]


LV4 skill
AoE reaching slightly past screen edge to both sides, and 2 floors up and down. Launches straight up.
  • ~137 x15, ~620 (2675) [20.57]
5-7d: Amy 4th job
4th job's gimmick is comboing from dashatk while keeping her fast movement and making her projectiles less directly offensive to focus more on melee. Playful dashatk directly leads into groundZ, serious dashatk is an entire combo string.

Playful mode

GroundZ combo
The 2nd press has longer range than a spear combo.
Can repeat without Double to not knock down a monster (but at only ~171 DPS).
  • 101.61 / 101.61 / stagger up 101.61 / 101.61 / standing rise 101.61 (508.05)

    • PvP
      First hit has very fast startup and average range. 2nd hit is longer than a spear and moves you forward through all of it to combo from long-range.
      If playing against a fast-recovery job, they will have a combo break moment between 2nd and 3rd hits unless the 2nd hit connected from afar.
      If playing against Arme/Mari, can loop by doing groundZZZ then X and repeating, going only 4 Zs from playful mode and 3 Zs from serious mode.
        140 / 140 / 140 / 140 / knockdown forward 140 (700)

  • Critical/Double
    Weird. Has delayed startup to possibly not even combo, has extremely short range, low active time, and still only blows forward like a typical Critical/Double.
    • blowaway 160.62 (if Double, 298.29)

      • PvP
        knockdown forward 276 (if Double, 513)

DashZZ
Only hits diagonal down, or straight forward at your waist or lower.
If it hits, can press Z again for another hit, but without doing the second hit she recovers fast enough to continue with the normal ground combo instead.
  • 81.09 / launch 81.09 (162.18)

    • PvP
      It's better to not do the second hit and instead recover and go into ground combo. Has sensitive timing against fast-recovery jobs where they may grab/skill if you don't do it with exact timing.
        139 / knockdown forward 139

Z→
A delayed bomb shot to long range, if it doesn't hit an enemy in its arc it will wait where it lands for around 1.5sec until blowing up or touching an enemy.
Has the longest range of her shots (around 25% past screen edge from center) but is weak.
  • stagger 177.86 (only ~142 DPS, ~168 if repeating faster with X-canceling)

    • PvP
      Doesn't hitstun but forces them airborne. Can use thanks to range.
      Recovery is slightly faster if pressing X after the cannon appears.
        standing rise 144

airZ
Standard airZ with only decent active frames.
Ottoshot: very hard timing, use the other mode.
  • 76.39

    • PvP
      157

air↓ZZZ
Can do up to two beams diagonal down followed by a dive.
  • shot 5 hits of 23.8 (119) x2, dive 85.65 blowaway

    • PvP
      The shot doesn't hitstun at all and is extremely weak.
      It can be possible to combo the dive into run grab.
        16 x4-5 (80) / launch 59 x2 (118)


Serious mode

GroundZ combo
Can keep repeating without Double to hit monsters without knocking down but doing only ~145 DPS.
  • 111.09 / 111.09 / stagger up 111.09 / 111.09 / standing rise 111.09 (555.45)
    Critical: blowaway 81.87 x2 (163.74) (if Double, 152.85 x2/305.7)

    • PvP
      You can do the 4th hit into Critical then run grab (1264), or Critical into skill (or do 3 presses, X-switch and attempt groundZ again).
      • 153 / 153 / 153 / 153 / knockdown forward 153 (700)
        Critical: float/knockdown 141 x2 (282) (if Double, 263 x2/526)

DashZ↑Z
Two kicks, then can press ↑ for a launcher kick, after either kick can end with another Z for potentially 4 hits.
The initial hit and the ↑ reach 1 floor up, the rest almost a full floor up.
  • 79.45 and 85.58 (165.03), ↑ small launch 94.06, 2nd Z blowaway 82.51 (all 4 341.60, 382.85 with aerial) (repeated only ~149 DPS)

    • PvP
      Doing all 4 hits causes 587dmg, but can combo the 3rd into a dash grab (815) or skill.
      You can do only the first Z then reset to standing, but then if the 1st hit doesn't connect the 2nd takes a long time to hit once.
      • 136 and 147 (283), ↑ launch 162, 2nd Z knockdown forward 142

Z→
Same as other mode.

airZ
Has short active time. Can ottoshot even against the floor above.
  • 76.39 (ottoshot ~320 DPS)

    • PvP
      157

air↓ZZZ
Same as other mode.


LV1 skill (playful mode)
Walking combo. In PvE may miss some of the last hits if the monster gets blown away by this.
  • ~220.8 x2, blowaway ~220.8 x3 (1104) [38.06]

    • PvP
      102, 102, float/knockdown 102 x3 (510) [17.58]

LV1 skill (serious mode)
3 hits rising then 3 down sending away. Hits 3-5 can hit 1 floor up.
  • 100.47 x3, 100.47 x3 (602.82) [20.78]

    • PvP
      Good at anti-airing with small damage.
        float 87 x3, knockdown 87 x3 (522) [18.00]


LV2 skill (playful mode)
Square AoE forward, reaches 1 floor up except the last hit which knocks down.

The person is a random choice from Lass/Ryan/Ronan/Jin/Sieg and it's a different one on each player's screen.
  • 81.35 x14 (1138.9) [18.07]

    • PvP
      50 x14 (700) [11.11]

LV2 skill (serious mode)
Forward beam to mid-range slightly pushing the enemy, then throws a grenade to the peak range that blows away.
  • 68.48 x15 (1027.2), blowaway 68.48 x2 (1164.16) [18.47]

    • PvP
      The grenade doesn't actually combo from the shots, for a moment they can move/attack before it explodes.
        59 x12? (708), grenade float/knockdown 59 x2 (826) [13.11]


LV3 skill (playful mode)
Similar to her 3rd job skill that heals 12.5% HP and attacks at the same time, only the attack is different: still very delayed, hits a short range to your left and right, then hits a longer range straight forward but can't hit the same enemy more than once.
  • blowaway 1813.93 [18.89]

    • PvP
      float 1579 [16.44]

LV3 skill (serious mode)
This is mainly a rectangle AoE forward, but the start will stomp for 2 earthquakes hitting all enemies in the entire stage as long as they aren't in the air, doing small damage everywhere but much more inside the rectangle.
  • earthquake launch 240.57 x2 (481.14, or aerial if launched 601.42) [05.11/06.26]
    AoE 359.79 x4 (1439.16, plus earthquake 1920.30) [20.00]

    • PvP
      Those outside AoE range can get earthquaked twice (dealing damage only each time they fall), inside the AoE they can get hit by one earthquake then the full AoE.
      • stomp launch 209 x2 (418) [04.35]
        AoE 313 x4 (1252), plus one stomp 1461 [15.21]


LV4 skill
From your spot shoots 4 non-piercing homing projectiles forward (can do from anywhere and they'll move to one enemy, even backward), they'll explode for small AoE. Each of the 4 shots apply one debuff.
The icons still show the PvP debuffs when LV4s still could be used inside PvP, the PvE effects actually are -10%DEF (monster takes +11.11%dmg), -10%ATK (monster deals -10%dmg), blind (normal monsters without super armor won't attack again), and a DoT, all for 10sec.
The DEF debuff is not as strong as it used to be for support role.
  • 9.8 + 697.9, x4 (2830.8), DoT 7.60 x34 (total 3089.2) [23.76]
5-8: Jin (general)
GCC notable changes:
-1st job skilltree roll removed, but the other job rolls are intact (except for, in PvP, every character's non-cooldown rolls having hyper armor instead of invincibility)

Story:
Silver Land used to be the southernmost segment of Xenia before becoming split off amid the Ascendant God Thanatos's descent into madness. In Silver Land they formed the Silver Knights, to protect themselves and recover the harmony of Xenia, including the high mentor Asin and the leader of the Silver Knights, Victor. But they would be decisively defeated when Victor betrayed them all and made a pact with Thanatos, being given demonic powers and an army of monsters to take over and annihilate the region with many Silver Knights being raised as undead, in a deranged plot to keep some control of what Thanatos would have done to the region himself and apparently hopeful to eventually overthrow Thanatos with this dark power, but corrupted by Victor's sheer lust for strength most of all.

Discounting Amy who was in the region but fled early from being recalled by Samsara, there was one survivor: Jin Kaien, who would have been bravely eager to uncover this event even if he hadn't intersected with the Grand Chase as both traveled Silver Land.

As they face Victor at the end of it, the losing Victor begs Thanatos for more power, who irritatedly dismisses him for his incompetence and finishes him off himself, letting loose that the purpose of commanding Victor was actually to stall the Grand Chase, either because he wanted to protect Kazeaze or to prevent them from entering Xenia as predicted; Samsara later would come to call the Grand Chase to Xenia himself.

Fun fact:
Jin's character takes many inspirations from chinese martial arts themes, and a small amount of his attacks seem to be references to fighting games.

Jin has enough skill points to max everything in his 1st job & Shared skill trees.

Notable points:
  • Melee character with unlimited rolling.
  • Jin4's 4th skill deals 17k damage in a line.
  • Can cheat jump stages by activating EX mode and repeating airX.

Burning gauge
I'll call it EX for short. Hold X when neutral to charge EX gauge: all of his jobs have 3 moves that cost EX gauge to use, and 1st/2nd/3rd skills will also spend EX gauge to do a powered-up version. While charging with X you can still input as normal (can attack/dash out of the charging animation without releasing X first).
If charging X past the maximum, instead you activate burning mode: for 10 seconds you have super armor, EX moves can be used without costing EX, and held run is faster. The activation flash is also invincible.
In PvP this means super armor at no cost or cooldown, only charge time.

Left and Right Side buffs
Needs EX burning mode activated first.
Type 1:
-Drains MP when active, locks skills during use (hitting monsters refills MP).
-Lasts as long as you can keep your MP up.
Type 2:
-Not related to MP, doesn't lock skills during use.
-Lasts 20sec and has forced cooldown.

You can also cancel it with C while standing still.
You can neither start or cancel the buff during Fatal (but using one HP potion fixes that).
  • C-right (regardless of which side Jin is facing)
    Type 1: +100% ATK and super armor, -10% DEF (+11%dmg), drains MP and locks skill use.
    Type 2: +10% ATK and super armor, -10% DEF (+11%dmg), lasts 20sec with forced cooldown.
    Type 2 technically is a free +10% ATK with no downside.
    • PvP: super armor and +25% ATK, -5% DEF, lasts 20sec whenever activated
      Type 2: +5% ATK and -5% DEF

  • C-left (regardless of which side Jin is facing)
    Type 1: recover 2% of MaxHP per hit, hyper armor, -10% ATK, drains MP and locks skill use.
    Type2: recover 1% of MaxHP per hit, hyper armor, -10% ATK, lasts 20sec with forced cooldown.
    Type 1 is exploitable for PvE because as long as active you are immortal except against MP drains (and Tower of Disappearance's 2nd Gardosen and grabs) and can solo story dungeons, but your DPS is the lowest.
    Type 2 is good because it gives HP back without limitations other than cooldown.
    • PvP: only super armor (not hyper) and +25% DEF, -5% ATK, recover 1% HP per hit, lasts 20sec whenever activated
      Type 2: ATK -5%, DEF +12.5%, recover 1% of HP per hit, super armor


Which 2 jobs to use in PvE?
(After LV45 you can buy a GP quest to let you equip 2 jobs in PvE and switch between them with Ctrl)
  • Jin4 has decent combos with easy rolling/passthrough, a good MP3 and an enemy-stacking MP2 for when it's useful, and a very very strong MP4, and even more rolling from stance backdash/counter.
    Rolls from: groundZ combo (easily), ground/air dashatk before 2nd tap

  • Jin3 attacks with ottoshot/combo and can AoE with EX Z↑.
    Rolls from: groundZ combo (only immediately after a tap), ground/air dashatk before 2nd tap

  • Jin1 has average normal attacks, and lacks rolls, but has good AoEs on MP2/MP3/MP4 even if only taken as second job.
    No rolls

  • Jin2 can easily knock down monsters. That's it.
    Rolls from: groundZ combo (only immediately after a tap), ground/air dashatk before 2nd tap
5-8a: Jin 1st job
Standard dash type (below-average)
Dash momentum: ~248 pixels, rocket ~627

GroundZ combo
Basic. On non-armored monsters can keep repeating before the end from the stagger or the rise.
The shadow step visual in the beginning doesn't have invincibility or pass-through or anything.
Critical/Double is just for emergency knockdown.
  • stagger 99.78 / stagger 99.78 x2 / stagger-up rise 99.78 x2 / stagger-down 99.78 / blowaway far 99.78 (698.46)
    Critical: blowaway 85.66 x2 (171.32) (as Double, 108.20 x2 (216.40))

    • PvP
      Lifts into the air before the final hit, swap the final hit for a Critical for more damage and less push, or swap the final hit for certain skills.
      • 104 / 137 x2 / launch 137 x2 / 137 / blowaway 137 (926. 4 Zs into Critical 1083)
        Critical: float/knockdown forward 147 x2 (244) (as Double, 186 x2, or 147 x2 if from combo V2)

  • GroundZ combo V2
    Less range.
    • stagger-up 149.68 / stagger 116.42 / standing rise 133.05 / stagger 92.39 x2 / small launch 166.31 (657.85)

      • PvP
        Has faster startup, but it doesn't have the step in the beginning to reach as far.
        This one can combo into Double which may then combo into certain skills for MP.
        206 / force-standing 160 / fs rise 183 / fs 127 x2 / float 229 (1032, +Double 1326, +DoubleV2 1509)

  • Double V2
    Replaces the Double (not Critical) with a new stronger move.
    A very short kick forward ending quickly. During this short time has super armor.
    • stagger push 277.20 (on Aerial hit, 415.80)

      • PvP
        Free damage after combo and forces back to standing state on hit. If not in the corner leaves some distance to try an EX attack or combo into certain skills, in the corner can grab (combo + DoubleV2 + run grab 1879).
        force-standing push 477

  • Up branch (unlockable)
    Launches forward, which works to set up Aerial hit for a skill.
    • launch forward 332.63

      • PvP
        Not useful in combos since autocounter, normal full combo is more damage in one combo.
        Sends up diagonally, afterwards can do airZ V2 to re-stand then with a delay attempt groundZ/grab.
        Has another combo if you're standing in a platform you can drop from: do combo Up, drop and airZ V2, jump up and airZ, groundZ again.

Dash attack
2 short hits without knocking down, another Z does a knockdown hit or can press Up for another move.
  • stagger 60.05 x2 / knockdown forward 60.05

    • PvP
      Can do ZZ, or Z-Up, or Z held into MP1.
      103 x2 (206) / 103 knockdown forward (309)

  • Dash attack V2
    Still can go into the dash attack Up moves.
    Slide attack forward sending monsters away. But V1 can be more useful.
    • push 60.05, blowaway 60.05

      • PvP
        The slide has massive range in total. From afar misses the first hit.
        If using this attack in the air against an opponent on the ground you will easily pass over them if you haven't landed on the ground by the time it hits.
        Forces standing state on 1st hit, 2nd launches, can combo into the Up followups which combo into skills.
        103 x2 (206)

  • Dash attack Up V1
    Momentarily moves up with an uppercut that reaches your height and above.
    • launch 86.48 x2 (172.96)

      • PvP
        Continues the combo or may catch from miss, this version can reach 1 floor up.
        Knocks down, has time for a single hit or skills.
        float/knockdown 148 x2 (296)

  • Dash attack Up V2
    Spinning kick forward with super armor.
    • launch 114.92 x2 (229.84)

      • PvP
        Due to super armor can start with this attack from miss to always win in a trade.
        The last hit can reach 1 floor up.
        Continues the combo or may catch from miss, knocks down or combos into skills.
        float 203 x2 (406)

  • Dash attack Up V3
    Not an attack, it's an invincible backroll. Cooldown 4sec (9sec in PvP).
    Also works to roll forward if inputting a dash attack to the other side instead, can pass through a monster this way.

airZ
Has a square hitbox so it can hit in every direction at once, and has decent active frames.
  • 96.09

    • PvP
      Great to cover both sides at once like after jumping in on the opponent, if used early in the jump still can hit someone standing on your floor. Has less range behind than forward.
      198

  • airZ V2
    Loses the middle and back part of the hit, and is active for much less time.
    Pushes monsters forward, staggers, and doesn't hitstop yourself on hit to combo after.
    • stagger push 96.09

      • PvP
        Loses the hitbox in the middle and back and the long active frames, gains smaller knockback and doesn't hitstop yourself on hit to be able to combo after easier. It also forces standing state on airhit now to combo into groundZ (especially whenever an opponent slides off a cliff).
        Can even repeat up and down the platforms as a combo (8 hits 1584, 7 hits plus grab 1756).
        force-standing 198

airZ↑
Has to be done by pressing ↑ very early from the startup of an airZ.
Momentarily locks your altitude in place while you can still move to the sides, doing multiple hits to all directions in short range. And has super armor too.
Does decent damage on floating monsters that you can hardly hit otherwise.
  • push stagger-up 59.13 x4 (236.52)

    • PvP
      If done at the start of a jump works as anti-air, if done later in a jump can be at any height you want, and it can still move to any side while attacking while it has super armor, and on any hit can attempt to lead into groundZ (even if it hits them in the air) or grab to be safer, and into groundZ is a true combo if done just before landing from a jump.
      Can hit the floor above yours, but then you recover early and have to wait for the move to finish before pressing Z again (because they're airborne when being hit by this move), can drop one floor and do this to combo into groundZ.
      force-standing very small rise 40 x4 (160), plus followup

EX Z↑
Shot to mid-range. In PvE can do as safer mid-range damage and it also doesn't knock down.
  • standing float afar 231.84 + 154.55 (386.39)

    • PvP
      Leaves them standing still, to reset back to neutral to possibly repeat or advance another way. Frame advantage might be slightly negative at close range and slightly positive at long range.
      force-standing 159 + 106 (265)

  • EX Z↑ V2
    Instead it's an extremely short range radius explosion. Has super armor.
    Launches monsters straight up and a bit to the side, can repeat on one launchable monster if holding to the side.
    • high launch 365.39

      • PvP
        Hits a short distance to every direction in case you're not sure or know they will airdash to you, and has super armor to win a trade.
        Sends diagonal up, can do one time (or two times if it first hits behind you) then combo into Z-side or skill.
        In the corner can repeat/airgrab.
        launch 251
5-8a: Jin 1st job (part2)
EX Z-side
Quickly takes a large step with one strike to mid-range. Fast recovery.
Blows away to the side and applies knockdown state as soon as it hits, repeating for damage can work but only works easily if the monster has super armor. If close may step through non-giant monsters when starting.
  • blowaway 407.52

    • PvP
      Very fast startup and good range.
      Launches away to the side too far away to even skill, but near corner can repeat as many times as you still can as a combo, then possibly end into skill (or do the last Z-side as Z↑ V1 to attempt to combo into groundZ/grab).
      launch forward 249

  • EX Z-side V2
    Launches monsters closer to be easier to repeat, can do 3 times then Z↑. Won't step past certain monsters anymore.
    Has super armor for around the starting 1/3 of it. Range/distance is shorter than V1.
    • launch forward 367.07 (as Aerial hit 550.60)

      • PvP
        Launches less forward and more up, so it can combo into itself even without the corner. Also has super armor for around the starting 1/3. But is shorter than V1 as a trade-off and apparently isn't as fast to start.
        launch 252

EX Dash backZ
Advancing hit with with super armor, floats entire groups forward.
  • blowaway 94.17, 113.00, 138.12 (345.29)

    • PvP
      Has super armor so it can win possible trades (works well midair too), 3rd hit knocks down but can cancel into charged MP1 or a shortcutted skill.
      force-standing 162, force-standing 194, small launch 237 (593)

  • EX Dash backZ V2
    Instead is a leaping shoulder bash, hits as a small forward square AoE reaching 1 floor up near the start. Has only very short super armor at the beginning.
    Hits decent AoE and blows monsters to one side, can pass through small monsters.
    • blowaway 347.75

      • PvP
        Can do in ground and air, hits a forward square (reaching 1 floor up in the inner half), temporarily has super armor before striking. Launches for jump airgrab or skill.
        launch 598

Kuan Yin Palm (passive)
Only works for 1st job.
During the entire animation of any Z↑ or Z-side, you can input another Z↑ or Z-side for that to automatically be done as soon as possible after the animation finishes (for loops to work consistently). Also can input one into groundZ.
2nd/3rd/4th job have been updated to receive the same treatment even though they don't have the skill.


LV1 skills

Dragon Uppercut (dragão celeste)
Walking combo.
  • ~178.9 x3 (536.7) [18.50]

  • EX - Adds a weak hit between the strikes.
    ~178.9 x1, ~61.7, ~178.9 x2 (598.4) [20.63]

      • PvP
        Very easily catches airhit at the end of combos.
        Worse at catching in the air if EX because the extra hit only hits near the ground and if it misses they fall before getting hit by the next part.
        • launch 155, 155 x2 (465)
          EX: launch 155, 53, 155 x2 (518)

  • V2 - Adds another hit at the end.
    • ~140.7, ~140.7 x2, ~140.7 (562.8) [19.40]

  • EX - Rising part is 3 hits, then bycicle kicks down for more damage. Bad AoE.
      ~95.5 x6 (573) [19.75]
      • PvP
        Timefreezes only between hits. If used on juggle may miss one of the 122 hits.
        EX: usually launches behind you comboing into jump dash grab behind you.
        • 155, 122 x2, knockdown 122 (521)
          EX: 83, 83 x3, 83 x2 (498) plus grab (868)

Iron Mountain Assault (palma de buda)
Single hit to both sides.
Can cast a 2nd and 3rd time with different animations attacking forward.
  • 513.43 [17.70]
    2nd: 378.98 [13.06]
    3rd: 378.98 blows away
  • EX - Instead always does the full sequence and passes through monsters like a roll.
    • ~203.2 x3 (609.6) [21.02]

      • PvP
        Worse.
        1st cast would knock down to mid-range, 2nd floats (can airZ V2 into attempted groundZ/grab), or 3rd 3rd can rise further at right timing only.
        EX: can combo into Z→ or mid-range dashbackZ V1.
        • float-knockdown-forward 223 (knockdown mid-range)
          2nd: float-knockdown 330 (can do 1 hit, especially airZ V2)
          3rd: float-knockdown 330 (hard to combo after)
          EX: 147, 147, 147 (441)

Hsing I Palm (onda psiônica)
Standing forward strike knocking down.
  • ~147.0 x3, ~142.5 (583.5) [20.12]
  • EX - Last hit AoEs farther forward. Only the last hit.
    • ~147.0 x3, ~212.9 (653.9) [22.54]

      • PvP
        On certain conditions barely has time to combo into dashZ V2 then Up.
        EX: with even more EX gauge, can combo into dashbackZ, or Z→ can repeat in corner.
        • 128 x3, float-knockdown 124 (508)
          EX: 128 x3, float-knockdown 185 (569)


LV2 skills

White Flower Technique / Pummel (espírito indomável)
Forward walking combo, ending with an explosion that launches. Explosion hits 1 floor up but that's only 3 of the 7 hits.
  • ~153.0 x4, launch x3 (1071) [17.00], last 2 hits can aerial for +153

  • EX - Now only the combo, knockdown at mid-range.
    • ~230.4 x5 (1152) [18.28]

      • PvP
        Forces standing state and will catch airhit very easily (can press S before autocounter to add more damage), unless passing under them midair because you started extremely close.
        The non-EX version can airgrab after.
        • fs 133 x4, launch 133 x3 (931, plus airgrab 1301)
          EX: 200 x5 (1000)

  • V2 - Only the combo, knockdown at mid-range.
    • ~230.8 x5 (1154) [18.31]

  • EX - Ender is different, knocks down even farther.
    • ~206.4 x4, x2 (1238.4) [19.65], last 2 can aerial for +206.4

      • PvP
        Starts without timefreeze (can be useful but also works in juggle combos less).
        Cannot grab after.
        • 201 x5 (1005)
          EX: 179 x4, 179 x2 (1074)

Dragon Squall (rugido do tigre)
Ever seen a haou sho ko ken?
Straight shot to screen edge distance from center, explodes with minor AoE.
  • ~1095.6 [17.39]
  • EX - The only difference is moving faster and reaching another halfscreen.

    • PvP
      If it connects at long range, combos into dashZ V2 Up. But it has a long animation before it actually shoots.
      launch 954

Crumbling Mountain Strike (divisor de montanhas)
Ever seen a zan retsu ken?
Forward rectangle AoE, easily catches multiple enemies and reaches 1 floor up, ender blows away.
  • ~160.6 x5, ~321.3 (1124.3) [17.84]

  • EX - Enders are replaced by one rising hit then a radius explosion.
    • ~160.6 x5, ~160.6, ~371.9 (1335.5) [21.19]

      • PvP
        Will instantly timefreeze and hit before they start moving again (good to use from hotkey) and works 1 floor up. Works mid-combo even on juggle.
        On corner can airgrab after.
        force-standing rise 139 x5, blowaway 323 (1018), plus corner airgrab 1388
        EX: 139 x5, 139, 259 (1093)
5-8a: Jin 1st job (part3)
LV3 skills
Fist of 10.000 Hells (fim dos dias)
Passes through forward leaving an AoE, last hit knocks down. Can back hit from the front, but needs back bonus for only normal damage, so it's weak.
  • ~155.4 x8 (1243.2) [12.95], easy back hits (1989.12) [20.72]
  • EX - Instead a square AoE forward reaching 1 floor up, then it shoots forward.
    • ~183.3 x7 (1283.1), explosion ~183.3 x2 and ~183.3 (total 1833) [19.09]

      • PvP
        Damage is too low.
        Can catch from airhit.
        Can airgrab after.
        • 135 x8 (1080)
          EX: AoE 159 x7, shot usually 158 x1 and 148 x2 but can miss 1 hit (1419-1567)

  • V2 - Trash if not charging X first.
    Hits to both sides then the middle, can get slightly more hits on raid bosses but is weaker either way. Faces to the right and knocks to the right.
    • ~272.4 usually x4 (1089.6) [11.35], sometimes x5 if close, max x6 (1634.4)

  • EX - More efficiently hits one AoE to the left and one to the right each with full hits. Average damage to heavy enemies, bonus damage to raid bosses, hits light enemies less times.
    • ~110.6 x16 per side, then x1
      Most targets x17 (1880.2) [19.58]
      Raid boss x33 (3649.8) [38.01]
      Light enemy around 7 hits (774.2)

      • PvP
        Damage is too low.
        Normal: can get one more hit if the opponent is to your left, and the launch can combo into one airZ or dashZUp (on left hit, can jump and do airZ V2 right before landing into groundZ).
        EX: launch is always like left hit.
        • 215 x4/x5 (860/1075)
          EX: 54 x17 (918)

Indomitable Spirit (esfera dos 10.000 infernos)
Hits to your sides and 2 floors up, good AoE but sends light monsters far away (to a practically random side).
  • pull ~5 x10/16, explosion ~426.4 (1705.6) [17.76]
  • EX - Bigger range and the explosion is slightly stronger.
    • pull ~5 each, explosion ~451.1 x4 (1804.4) [18.79]

      • PvP
        Timefreezes instantly and starts hitting before they can move again. EXCEPT if EX.
        Will hit 4 times if they are on the same floor as you, 3 times if they're above you.
        If you're near the corner and it happens to send to that side, you can airZ V2 or airgrab.
        pull 4 probably x10, explosion 371 x3-x4 (1153-1524)
        EX: pull 4 probably x10, explosion 392 x3-x4 (1216-1608)

Searing Light (nirvana)
AoE to your sides and 1 floor up, but can do less hits to light monsters: it floats them away even before it finishes, if not very close can miss half of the hits or on edge only hits once (and it misses 2 hits if the light monster is above you).
  • ~312.9 x6 (1877.4) [19.55], knocking past 3rd hit 938.7
  • EX - Slightly bigger, now just knocks down slightly to the side for easier full hits.
    • ~328.2 x6 (1969.2) [20.51], 4 hits 1312.8

      • PvP
        You recover while it's still active. Launches up in place, easily combos into airZ V2 or airgrab.
        • launch 272 x6 (1632) plus followup
          EX: launch 285 x6 (1710)

LV4 skills
Flash of Light
Long rectangle AoE to both sides also reaching 1 floor up. If bumping forward into a solid wall, will jump back a greater distance to not waste its size.
And for 15sec gives you super armor and EX moves don't cost meter (but still need some), wears off early if you switch weapon.
  • ~347 x4, ~347 & ~567 (2302) [17.70]

Awakening
Does a slam that earthquakes the entire screen.
Single hit so weak if it doesn't crit.
  • ~2610.16 x1 [20.07]

H
Hits basically the entire screen.
Also gives you ATK +15% and Super Armor for 20sec after it finishes.
  • ~148.74 x11, ~95.10 x11, ~70.53 x14, ~45.09 x14, ~246.87 x1, ~157.83 x1 (4705.62) [36.19 if it cost as much as MP4]
5-8b: Jin 2nd job
Standard dash type (below-average)
Dash momentum: ~242 pixels, rocket ~623
*Dashatk roll adds ~348 more.

GroundZ combo
Can ↓ roll (only immediately after each Z part starts).
  • ~103 x1 / x2 / x2 / x1 / x1
    UpZZ: ~77 / ~82 / ~77, ~91
    Critical: ~84 x2 (168), Double ~136 x2 (272)

    • PvP
      Normal range, average startup. Can do 4 Zs into UpZZ (into MP1, or EX MP2).
      Does not strike high to airhit but forces standing state on airhit (can work on juggle combo).
      Roll has hyper armor instead of invincibility.
      • fs 149 / fs 149 x2 / fs 149 x2 / standing float 149 / launch 149 (1043)
        UpZZ: (894 damage before this) launch 54 / launch 57 / 54 and 63 (228, 1222 from combo), then skill
        Critical/Double: 147 x2 (254)

airZ
  • ~85

    • PvP
      180

    air ↓Z
    Can be done even right after jumping. On hit will pogo you back up ready to attack/dash again, on any hit easily can repeat to stomp 5 times in a row (limited to 5, more will result in normal jump attack, also can't side-X fly after the 5). Works as this job's ottoshot, and while doing it or after doing the 5 you can fall with an airZ or do a dashatk roll, or with EX gauge one dashbackZ which will roll too.
    • ~186 (x5 = 930) (roughly 363 DPS, ~395 if adding airZ or dashbackZ as the 6th) (barely higher DPS than normal attacks; Jin1 C-right can get +100%ATK but disables skills meanwhile)

      • PvP
        135 (x5 = 675)

dashZ
One Z press then can do either Z for knockdown, or ↑ for launch which is better (can crowd control to focus on one enemy at a time).
If not doing either can ↓ roll.
  • ~79 + ~47 (126), Z knockdown ~43 (169) or ↑ launch ~165 (291)

    • PvP
      Range is slightly short. Forces standing state on airhit to connect fully.
      Z can combo into Z-held MP1 at delayed timing (less delayed if EX) or into Z↑ then possibly skill.
      ↑ has super armor at the beginning and can combo into non-EX MP1.
        144 + 86 (230), Z knockdown 79 (309) or ↑ float 286 (516)

Z↑
Can be used without X meter as a short shoulder bash that slightly pushes, with meter adds another hit that reaches farther, AoEs well.
  • ~140 and additional hit ~191 (331)

    • PvP
      With meter has some range to airhit.
        101 + 138 (239)

Z-side
EX, same as 1st job Z-side.
  • ~344

    • PvP
      249

Dash backZ
EX armored attack that knocks down, but it also does a forward roll between the 2nd and 3rd hit (very short invincibility time, easily rolls through enemies). But if you wanted to roll you could just do →→Z↓ which is faster.
  • 174.03 + 184.26 + 167.25 (525.54)


    • PvP
      Has some combos after. If you had enough meter only for one move, you can do this into Z-held non-EX MP1 for a partial hit then turn around into groundZ or dash attack.
        199, 212, 192 (603)


LV1 skill
Forward combo into knockdown.
  • ~144.2 x4 (576.8) [19.88]

  • EX
    • ~133.3 x5 (666.5) [22.98]

      • PvP
        Good at fully catching in the air but not effortlessly, timing is sensitive.
        EX: doesn't timefreeze until later so it's not as good for hitting in the air, timing is different.
        • launch 125 + normal 125 + force-standing-and-lowers 125, knockdown 125 (500)
          EX: launch 116, force-standing 116 + rise 116, knockdown 116 x2 (580)

LV2 skill
Two forward hits then a bigger launch.
  • ~290.3 x4 (1161.2) [18.43]
  • EX - Starts with the forward AoE, then walking combo.
    • ~255.5 x5 (1277.5) [20.27]

      • PvP
        Normal version combos into delayed groundZ before they land.
        EX version only combos into airgrab.
        • 252 x2, launch 252 x2 (1008), plus combo
          EX: launch 222, 222 x3, launch/knockdown 222 (1110)

LV3 skill
Forward square AoE pushing forward, then rolls forward.
  • ~272.4 x7 (1906.8) [19.86]
  • EX - 1 more hit during the middle.
    • ~248.7 x8 (1989.6) [20.72]

      • PvP
        Forces standing on airhit, can use by hotkey button inside combos even mid-juggle, or use alone to hit them even if they're jumping.
        • force-standing 237, 237 x3, launch 237, launch away 237 x2 (1659)
          EX: force-standing 216 and 216 x3 and 216 x2, launch away 216 x2 (1728)

LV4 skill
Pulls in, single square hit forward reaching 1 floor up, then moves forward dragging.
  • pull then ~145 x18 (2610) [20.07]
5-8c: Jin 3rd job
Standard dash type (average)
Dash momentum: ~278, rocket ~643
*Dashatk roll adds ~348 more.

GroundZ combo
Can ↓ roll only right after each Z part.
Can try to loop by doing until the part where it stun-floats light monsters and brings them back down then repeating from the beginning, if you can't ottoshot here.
  • ~112 each
    UpZZ: ~47 / ~47 x3 / ~63 and ~95 (+299)
    Critical: ~79 x2 (158) or Double ~131 x2 (262)

    • PvP
      Fast speed, above-average range.
      The first hit anti-airs/reaches 1 floor up.
      UpZZ: can do only one Z for a standing reset, to attempt groundZ again.
      • fs 163 / fs 163 x2 / 163 / launch 163 and knockdown 163 (978)
        UpZZ: 34 / 34 x3 re-stand / 46 + 69 knockown (+ 217)
        Critical/Double: 144 x2 (288), or as Double, 238 x2 (476)

airZ
Giant range and can ottoshot even up (but when ottoshotting you may have to stop and walk before continuing because unlike other ottoshots you stay in place). On air can ↑ for another hit that floats/knocks down.
  • ~72
    Up: ~152

    • PvP
      157
      Up: 111

air↓Z
Hits once falling down and again when hitting the ground.
  • 152.88 x2

Dash attack
Can ↑ for a rising kick, or ↓ roll.
  • ~79 + ~103 (182), Up ~152

    • PvP
      Bounces them but combos into full groundZ.
      Good range forward and slightly reaches up.
        105 x2 (210)

Z↑
Standing still long forward hit, with X meter shoots a piercing projectile that reaches farther, without meter will only deal the 1st hit, with meter deals the damage of an entire combo in one move. Leaves standing.
Can repeat for safer mid-range high damage and AoEs entire groups of monsters very easily, charges MP very fast on AoEs.
Hits raid bosses many times for high DPS, normal monsters get hit twice.
  • 108.97 + projectile 363.26 x2-4 (835.49-1562.01)

    • PvP
      55 + 92 x2 (239, meterless 55)

Z-side
  • ~372

    • PvP
      Sends slightly farther away than other jobs.
        231

Dash backZ
Not the same as other jobs: in PvE is good at crowd controlling entire groups (1st hit float-stuns, 2nd brings down, 3rd blows away).
  • 111.38 + 167.10 + 222.77 (501.25)

    • PvP
      Launches them straight up (does not combo into anything except skills).
        60 x3 (180)

XX
Throws away the staff forward for a weak hit, reverting you to 1st job, but it's 1st job with none of the skill tree, and no skills except a default LV1 with easier hitbox (and keeping Jin3's LV4 skill). After 2 seconds you can XX again to recover the staff.
It's possible to cancel this job's ground combo animation into XX before the last hit, then combo into 1st job groundZ, which is notable in PvP for damage in one combo.
If you tap Z right after throwing away the staff he will do one knockdown attack of 2 punches, this is useless.
  • staff throw ~204, quick Z ~84 + ~60

    • PvP
      staff throw 127, quick Z 23 + 39 (total 62)


LV1 skill
2 hits walking forward, reaches 1 floor up.
  • ~301.6 x2 (603.2) [20.80]
  • EX - Combo does more hits.
    • ~166.6 x4 (666.4) [22.97]

      • PvP
        Combos even on airhit, and launches. Can combo into one Z for knockdown, or dash attack (1 hit) into Down roll to attempt groundZ from the perfect distance, or dash attack with Forward then Forward+Z with Up followup so that you both recover and you can attempt groundZ or grab.
        EX: launch can combo into one hit, not dash attack anymore.
        • force-standing 250, launch 250 (500)
          EX: 138 x4 (552)

LV2 skill
Walking forward hits, can stretch 1 floor up.
  • ~387.1 x3 (1161.3) [18.43]
  • EX - More hits, doesn't reach up anymore.
    • ~255.5 x5 (1277.5) [20.27]

      • PvP
        Fully connects on airhit.
        • force-standing 337 and 337, launch 337 (1011)
          EX: 222 x5 (1110)

LV3 skill
AoE spin to both sides reaching 1 floor up, then an AoE only forward reaching 1 floor up.
  • ~206.2 x10 (2062) [21.47], only spin 1031
  • EX - The second part is slightly enhanced.
    • ~226.9 x10 (2269) [23.63], only spin 1134

      • PvP
        Cannot combo from the launch at the end.
        • force-standing 171 x5, launch 171 x5 (1710)
          EX: 188 x5, 188 x5 (1880)

LV4 skill
AoE to both sides reaching 2 floors up and 1 down, hits may not be consistent to everyone in range, max 25 hits.
  • 164.70 presumably x10, 74.41 presumably x15 (2763.15) [21.25]
5-8d: Jin 4th job
Standard dash type (below-average)
Dash momentum: ~248 pixels, rocket ~627
*Dashatk roll adds ~348 more.

With this job in PvE, you can keep doing only the first 3 ZZZs (with possible ↓ rolling at anytime) to keep repeating non-EX LV2 because it can enemy-stack, or instead fully use EX moves and MP3 and MP4 skills, with MP1 just for invincibility.
Can roll like 2nd&3rd job, can also XX→ parry.

This job recharges burning gauge faster than the other jobs.
This job has an alternate run animation if starting to run inside EX mode (no gameplay difference).

GroundZ combo
Going into Critical/Double is actually not as good as the other options.
Cancels into Down roll at almost any instant before Critical/Double (will cancel anytime since 2nd Z, or instantly after 1st press, but not between 1st and 2nd).
Exclusive to this job can cancel into XX stance anytime after inputting the 2nd Z. This will enter stance while facing forward (you can also enter stance facing backwards by doing the 3 Zs, then X, Back, X+Back).

Can loop monsters by repeating only the first three Zs, being able to cancel into Down roll anytime.
Can juggle a launchable monster by doing XX↑ (either alone or from combo) then repeating Z, ZZZ XX↑. That's one Z, three Zs then XX↑.
  • ~167 each
    Critical: ~83 + ~108 (191) or Double ~134 + ~174 (308)

    • PvP
      Slightly above-average range and fast speed. Forces standing state on airhit (fully connects even on jump/juggle) and the 1st and 3rd hit stretch up almost a full floor to anti-air.
      • fs 208 / 208 / fs 208 / 208+208 (1040)
        Critical/Double: launch 130, knockdown 169 (299), or as Double, 208+270 (478)

airZ
The first Z has no influence in your jump trajectory so it's always a free strike to do, the second momentarily stops you from rising/falling.
  • ~60 / ~60 (120)

    • PvP
      Diagonal-down very big ball hitbox, can win between pokes because it's disjointed from you.
        112 / 112 (224)

Dash attack
One dashing strike of 2 hits, then can Z for a weak knockdown hit or roll. Can cancel into XX stance anytime since the first Z, including after the second Z or after the roll (aerial dash attack into stance is the only way to use stance midair).
  • ~66 x2 (132) / knockdown ~66

    • PvP
      The first strike stretches up almost a full floor, which may interrupt as anti-air but doesn't combo into anything.
        103 x2 / knockdown 103

XX stance
Can be done standing still, or canceled from groundZ (since after the 2nd tap) or during dash attack. If done from dash attack roll will switch your facing to the other side.

Entering stance adds hyper armor (super armor in PvP) for 0.5sec.

In stance you can't walk and can immediately choose one of many followups from this stance.

stance Forward
This is a counter. It catches both physical and projectile attacks and its catch window is very long, but it might not catch something from behind. Will make you invincible to the attack and counter with a short shoulder bash, will try to reset back to standing fast and for the rest of this animation you also have super armor and only take 1 damage. Can also be used just to evade a melee or ranged attack differently to rolling.
  • 336.00

stanceZ
Similar to Z-side but without costing meter. Recovery is longer, distance is a little bit shorter.
May pass through small monsters from close, possibly back-hitting them. To avoid passing through them can do Back roll into this instead.
You can fight a heavy monster with either 3 Zs repeated (for easy rolling) or ZZZ XXZ (~384 DPS). Any XXZ may be done as XX↑ instead.
  • ~372 (~286 DPS on repeat)

    • PvP
      Has some priority in that it has super armor from the beginning until after the time it can hit.
      Can't combo after this except with skills.
        231

stance↑
An alternate of the stance kick, same recovery time. Hitbox is moved higher to catch 1 platform up and also will easily pass through all monsters like a forward roll at the same time (very useful in PvE as an attacking dodge), but is not invincible like a roll. Launches diagonal up instead of blowing away.
Your own body moves up to possibly dodge some attacks, but you still count as grounded during this move (this won't evade earthquakes, and you can use skills during it because you're not airborne).
  • Same as stanceZ

    • PvP
      231

Can also Down to shadow roll forward, or Back to backroll (both are invincible and pass through enemies) and backroll can cancel into Z kick, can backroll off a platform to kick the platform below.
If doing airdashZ↓ to roll, can XX-Side to cancel the dash roll into stance roll to teleport even farther before landing and that can instantly cancel into Z kick.

Z↑
Similar to 1st job shot except if it doesn't hit anything it will stay active in its ending place for a few seconds. Can repeat for safer long-range DPS/MP recharge.
Works even with no meter for a disjointed poke not good in PvE.
  • ~145 + ~148 (293, ~290 DPS on repeat and stopping to recharge)
    No meter: ~60

    • PvP
      37 + 92 (129)
      No meter: 37

Z-side
Same as other classes (but this job recharges X meter slightly faster).
  • ~401 (~334 DPS on repeat and stopping to recharge)

    • PvP
      249

Dash backZ
Same as other classes.
  • 131.85 + 158.22 + 193.38 (483.45)

    • PvP
      162, 194, 237 (593)
5-8d: Jin 4th job (part2)
LV1 skill
2 hits moving forward, barely hits 1 floor up.
  • ~296.2 x2 (592.4) [20.42]
  • EX
    • ~167.8 x4 (671.2) [23.14]

      • PvP
        The 2nd hit will float them, comboing into full groundZ combo (but don't start the Z too early). Can easily combo into this skill after the 4th Z of ground combo, looping as long as you have MP.
        On airhit only launches if they're high.
        • 258, high float 258 (516)
          EX: 146 x4 (584)

LV2 skill
Phasing forward dash that leaves a multi-hit on enemies hit, stacks AoE per enemy up to 4.
Damage is too low to use even with the easy back bonus.
  • ~35.5 x8 (284 [04.50], back 454 [07.21]), +7 hits per additional stacked enemy
    2-4 enemies 532-1029 [08.45-16.34], back 851-1646
  • EX - Instead changes to a forward walking combo, that you have to just-frame Z to continue each part (press Z right after the first damage number appears for each part, except the last where it's exactly when the bash connects).
    • dash1 ~198.3 x4 (793.2), dash2 ~107.7 x4 (now 1224) [19.42], strike ~114.8 x3 (now 1568.4), ender ~114.8 x3 (now 1912.8) [30.36], leaves standing

      • PvP
        Actually strong in PvP.
        123 x8 (984)
        EX: dash1 190 x4 (760), dash2 65 x4 (now 1020), strike 70 x3 (now 1230), ender _ x3 (now _)

LV3 skill
Radius explosion done twice, 2nd knocks down. Decent AoE.
Easily gets the back hit bonus if you start it during a full run, to pass through the enemy as it starts (works even on most bosses), sort of making this stronger than any MP3.
  • ~140.9 x8, x6 (1972.6) [20.54], back bonus 3156 [32.87]
  • EX - Adds pulling hits to the beginning, go to a middle to pull more enemies into the AoE. But the 2nd explosion is noticeably smaller if not counting a successful pull so the normal version can be preferred on heavy monsters.
    • 7.1 x10, ~147.8 x8, ~147.8 x6 (2140.2) [22.29], back 3424 [35.67]

      • PvP
        122 x14 (1708)
        EX: 6 x10, 128 x14 (1852)

LV4 skill
Temporary mode for 20sec. Not invincible but very powerful. Changes your groundZ and airZ into ranged shots and XXZ into a charged straight piercing beam kamehameha. During this time you have super armor to resist light attacks but still take full damage and launch/knockdown to be interrupted, doing only the shots instead of the beam is weaker but safer to do.
Switching jobs will end the mode early.
  • XX ZZZ - Piercing forward beam, extreme damage but long recovery. Mash Z for full power and range, can stop mashing after the beam appears. Range is not infinite, can reach only around 1 full screen past screen edge (1 platform less than Gorge of Oath).
    • ~593 x5 (2965 per beam), if not interrupted can do up to 6 beams (17790 damage, or 889 DPS) [136.84], can do 2 more beams if using Alt to cancel out early after the beam comes out

    GroundZ - Shoots up to 3 non-piercing shots straight forward, range is slightly longer than the beam, the combo down roll is switched into ←←/→→ to roll to any side during any of the 3 shots. 78% as strong as the beam with no piercing. Safer to use.
    • ~349 + ~10 every shot (359 per shot)
      Some enemies only take the 2nd hit, so on these you have to do only the beam
      Has time for around 39 shots (14001 damage, or 700 DPS) [107.70]

    AirZ - Same shot but slightly diagonal down, up to twice per jump.
    Same damage and almost the same rate of fire for around 40 shots.
5-9: Sieghart (general)
GCC notable changes:
-Allclass back roll has cooldown, 3rd job stance roll has cooldown
-Left rage defense is only +11%DEF

Story:
Hundreds of years ago there was a war hero knight and master gladiator, a cocky, rash, and charming knight who liked upholding justice as much as he liked upholding selfish fun. He was so famously strong that people were calling him by only his family name where no one else in the family could hold that as their nickname but him. In one battle he held his own against a hundred goblins alone, which was retold in stories and history books.

He would not accept any prizes or titles that Kanavan would give him and at one point he simply left with little explanation (presumably he may have had clues of Ashtaroth/Baldinar and the Soul Stone); he goes to Archimedia finding some ruins from Kounat, but legends have to die as eventually he is sadly unnacounted for after a whole year and they leave with only memories of him, officially writing him off as dead.

In truth, he had an encounter with monsters that left him heavily wounded, but the Highlanders brought him to their city and helped him recover. The Highlanders were the strongest faction of fighters from Kounat, some of which had avoided The Great Explosion of Kounat because they weren't in the area when it happened and they live in their secret hideout somewhere near Kounat.

In Ancient Kounat, the three goddesses temporarily lived in the kingdom along humans and elves and dwarves, assisting in strategy and magic and technology for their people to thrive in the world, and surprisingly there was a special subset of people consisting of the offspring bloodlines between humans and gods, this race called the Celestials, who had higher abilities with holy powers lower than the gods', who could be entrusted with the Geas mark to communicate with the goddesses and use their unique holy powers, who are the only non-gods who are able to fully read the klara libri/claire bible (an extremely powerful magical artifact of holy power, a book left by the Celestials recounting all earthly and cosmic information and history who writes itself in real time). The chosen elite fighters of Kounat of Celestial blood were magically granted immortality, having special training grounds and calling themselves the Highlanders. Within the Highlanders, their dreamed highest limit was called a Prime Knight, chosen by the gods themselves.

While most of the magic that the world had seen is already gone, the living Highlanders such as Graham somehow still were able to recuperate Sieghart and make him a Highlander like them, and officially allowing him into their ranks and training him, making him not only as strong as before but stronger than ever.

However, while the Highlanders were always secretive, Sieghart had left traces of a trail along his path when he entered, which were enough to point to their hideout where he was then emergently brought to, the entirety of which was deliciously discovered by Ashtaroth/Baldinar, who had accidentally caused The Great Explosion of Kounat on his attempt of merging with divine power as well as demon energy gathered from demons Kounat hunted, by abusing Kounat's most powerful artifacts and creating the Soul Stone for it for his plan of world domination after being the first person to read the claire bible for centuries, accidentally exploding the Soul Stone and Kounat with it due to his non-Celestial blood, and would not be happy from being stopped of attempting the merge a second time. Ashtaroth may not have known all of them in person, but he didn't need to, as what he did was to kill every single one of them. Ashtaroth even knew to leave a permanent barrier spell on the area after leaving to not be careless about their immortal blood.

What he didn't know was Sieghart. He didn't know Sieghart. Sieghart was not at the hideout when Astaroth entered, all he saw were trails to the hideout that he finally found, so he never realized he was missing one. Sieghart later returns only to see dead bodies, all thanks to Ashtaroth, this time leaving a markedly sour taste.

After 600 years of investigating him and trying to find the claire bible for his full story, Sieghart finally returns to Bermesiah. He actually investigated the Red Gorgos before the game timeline, correctly sensing its affected energy as Ashtaroth's instead of simply Kazeaze's, also seeing a man in this battle being sucked into a dimension door who happened to be Elesis's father Elscud. Sieghart finishes off Gorgos and leaves while apparently making little communication modernly, but does make an effort of catching up with the Grand Chase as he skips to Xenia, completely intent of stopping Ashtaroth's world domination plan from the Temple of Ascencion.

Fun fact:
His full name is Ercnard Sieghart.
5-9: Sieghart (general) (part2)
Character Traits

Sieghart's rage gauge - Fills automatically over 30sec (landing normal attacks fills it slightly). After full, can tap X when standing still to enter rage mode, lasting 16 seconds. During this time you have super armor, all your skills change, and you have +10% ATK&DEF (5% in PvP). Also raises dash distance and run speed.
Rage gauge is halted during your skills (using a skill inside rage mode will stop it from running out until you can act again, using a skill outside of rage mode will stop it from regenerating until you can act again).
Activating rage mode starts a short animation which is invincible so this also can be kept ready to avoid a big attack with X and then start attacking, or you can mash X in the middle of being attacked to combobreak with an invincible animation as soon as there is a gap between hits if possible (in PvP the most safe followup is grab or skill, or can attempt groundZ).

Calm or mad rage: in the skilltree you can only equip either the left path rage or the right path rage.
  • Right path, Mad Rage - Rage charges even faster on hit and rage mode duration is raised. And all normal attacks do an additional hit of half the damage (or around equal if combo) for more DPS.
    Makes rage be used much more often while raising damage in a bigger way.

  • Left path, Calm Rage - Can parry non-projectile attacks by tapping Left/Right at it like Ronan3 (in neutral, or while attacking, or while already being comboed) but costing some rage to do. Sieg also gains a passive +11%DEF/-10%dmg (halved in PvP).
    With full rage, can C↑ to empty rage gauge to restore 10% HP, or 5% in PvP (can heal from Fatal, in PvE can be 20% HP per minute when reserving rage gauge only for this, can help in endurance stages).

Skilltree allclass - Back roll - During any tap of Sieg's groundZ or dashatk, can tap Back to cancel into an invincible backroll. Has cooldown 5sec (PvP 10sec). Can also turn around and Z-back to roll through an enemy.

Skilltree allclass - Projectile break - Sieghart can nullify basic projectiles (not all projectiles) with the first hit of his groundZ or non-dash airZ, as any job. This includes both basic arrows and basic magic bolts, from monsters and enemy players in PvP, but these attacks are in PvE. This ability is only shared with Elesis and Edel. For Sieghart only, if set to V2, on successful nullification can cancel the attack into dash/airdash, so for example you can dashjump Z and dash again, or while standing still you can readily break the shot with Z then dash.

Skilltree allclass - Berserk - Automatically berserks if hit with too many basic arrows in a short time, launching all nearby enemies with fall damage (also then gives you super armor for 3sec if set to V2). Rarely happens if not fighting Lire in PvP. Only shared with Elesis.

Skilltree allclass - Can tap C↓ when neutral to make yourself immobile and completely invincible for 4sec to avoid a big attack, similar to activating rage mode except this has extremely long recovery that is still invincible. When you recover you have super armor for 3sec. Cooldown 35sec (PvP 40sec).


Which 2 jobs to use in PvE?
(After LV45 you can buy a GP quest to let you equip 2 jobs in PvE and switch between them with Ctrl)
  • Sieg3 has the most invincibility, can readily roll to either side when walking or whenever doing ground combo if you know the commands well. And he can use regularly spend full rage for what is essentially a LV5 skill (activate rage mode and do Z↓ mashZ).
  • Sieg4 can simply repeat the triple dashatk JF for high DPS which keeps passing through monsters, and can roll on ground after starting dashatk. His only job that cannot ottoshot but all of his ottoshots do lower damage in PvE (~354 DPS instead of 546).
  • Sieg2 has a repeatable combo and also can roll on ground after starting dashatk. His 3MP can hit in an infinite line forward but only if activating rage for it.
  • Sieg1 has only a basic moveset with no rolls other than his cooldown allclass backroll, but this is the one with Soul Extinction as his 4MP which potentially clears all normal mobs in the entire stage.
5-9a: Sieghart 1st job
Standard dash type (slightly above average dash, slightly below average rocket)
Dash momentum: ~317 pixels, rocket ~625
*Has triple-tap-dash burst.

GroundZ combo
Can infinite combo monsters by going until the 4th press (the ground stab).
  • ~127 / ~127 / ~127 / ~127 x2 / ~127
    Rage (right path): adds ~116 / ~139 / ~116 / ~93 / ~116
    Critical: _, as Double _

    • PvP
      Good range, fast speed.
      Can hold Z at one point and combo into Critical then release Z for MP1/MP2 before the second hit of Critical knocks down.
      • 178 / 177 / 177 / 177&177 (886 so far) / knockdown 177 (1063)
        Rage (right path): 187 + 187 / 186 + 186 / 186 + 186 / 186&186 + 186 / knockdown 186 + 186 (autobreaks on the 4th tap)
        Critical: 129 + 129 (258)

  • Combo Up - Braches off combo like Critical.
    • ~174 x2 (348)

      • PvP
        Hits 1 floor up/anti-airs.
        Launches and knocks down, super armor can't resist the launch.
          launch 121, knockdown forward 121 (242)

    V2 - 2 hits floating up then can dashcancel to any side. Can jump over a player-height monster as a dodge then dashcancel (still can be done from dash attack with dashZZ↑), and on corner can keep juggling a monster with ZZ↑.
    • ~199 x2 (398)

      • PvP
        Has good anti-air reach up and diagonal up, and can combo into skills.
        float 138 x2 (276)

  • Critical V2 - First hit has bigger range forward and up, and second hit recovers faster.
    • ~77 x2 (154)

      • PvP
        Better range on the first hit forward and up (doing normal hitstun instead of the mini-stun pose, and comboing midair) and better recovery.
        Sometimes it still will do the V1 supposedly tied to timing.
          force-standing 135, knockdown forward 135 (270)

  • Double V2 - Steps forward and spins the sword in the air.
    • ~74 x3-x4 (222-296)

      • PvP
        With hard timing can combo by starting the last Z but Doubling before it hits (apparently needs you to continue mashing Z).
        Does 4 hits and 2 reach 1 floor up/anti-air. If this hits on ground only the last hit knocks down, and it WILL miss that last hit if comboing in the exact corner or if standing on a slope above the enemy, comboing into groundZ again.
          130 x4 (520), last knocks down

Dash attack
As an unique feature, this is one swing of two hits, then with another Z chains into the second half of the groundZ combo for a full combo (still going into its ender/Critical/Up).
  • ~36 x2 (72), skips to groundZ ground stab

    • PvP
      The first swing hits to both sides of your feet, still hitting from behind if you airdash above an enemy while you two move which possibly combos into groundZ if you turn around.
        116 x2 (232), skips to groundZ 4th tap ground stab

    V2 - Worse in PvE.
    Becomes an attack forward reaching 1 floor up, the followup can't be done if it misses and is a weaker two hits that don't chain to anything.
    • ~75 / ~57 x2 (total 189)

      • PvP
        The only advantage is being better at anti-airing/poking 1 floor up (for still not much damage anyway).
        131 / knockdown 99 x2 (total 329)

airZ
One average swing forward, then can do a second swing hitting in a circle.
Ottoshot: no.
  • ~74 / ~74

    • PvP
      Second swing hits in a circle, hitting anywhere midair or when jumping over someone on the ground to easily combo into groundZ combo.
      But the first swing has some active frames while the second one doesn't. Doing air-to-air can be better by keeping the first swing active. Second swing instantly hits on your lower half for air-to-ground but takes a moment to hit on your upper half against aerial opponents.
        156 / 156

    V2 - Switches the second swing into just the first swing again. Also the first swing is faster and enables ↓Z ottoshot.

    • PvP
      First swing twice can be better at air-to-air (and if you jump from a cliff you can do it twice then do it again) at the cost not hitting behind you or directly below you anymore. Enables ottoshot.

    V3 - Exactly the same as V1, while adding a new air↓Z move: divekicks straight down an extremely short distance (must be very close), on successful hit will leap far forward and 3 floors up. May work for dodging purposes.
    Also, it works even when used on party members.
    • ~299

      • PvP
        Has decent range left and right and works both on enemies and teammates. Not good as a pure attack.
          208
5-9a: Sieghart 1st job (part2)
LV1 skills

Iron Crusher (lâmina esmagadora)
Walking combo.
  • ~179.5, knockdown ~179.5 x2 (538.5) [18.56]
  • Rage - One more hit at the beginning.
    • ~179.5 x1, x1, x2 (718) [24.75]

      • PvP
        Rage mode launches on second hit.
        • 156, knockdown 156 x2 (468)
          Rage: 153, launch 153, knockdown 153 x2 (612)

  • V2 -
    • ~148.8 x4 (595.2) [20.52]

    • Rage - One more hit at the beginning.
      • ~118.1 x5 (590.5) [20.36]

        • PvP
          The initial strike happens near instantly even before the time freeze.
          Instead of knocking down, last hit launches (can combo into ground dash grab).
          • 129, 129 x2, launch 129 (516), plus hit
            Rage: 108 x3, 108 x2, launch 108 (648), plus hit

Armor Crasher (destruidor de armaduras)
Single hit forward.
  • ~530.6 [18.29]
  • Rage - Two hits.
    • ~265.2 x2 (530.4) [18.28]

      • PvP
        Single blowaway hit, has some range up into the air (less than to another floor).
        Can hit them afterward but has bo good followups (except doing this twice then rocket airgrab). But in the corner can always airgrab, or if slightly near corner can do jump-airdash-fastfall-dashattack.
        Rage: first hit avoids blowing out of range even on airhit for the second to still connect, but blows worse and loses the corner combo, harder to do twice too.
        • 462, corner combo
          Rage: 242 x2 (484)

  • V2 - More hits at the beginning.
    • ~201.3 x3 (603.9) [20.82]

    • Rage -
      • ~166.1 x4 (664.4) [22.91]

        • PvP
          Won't connect on airhit anymore, won't combo into itself anymore.
          • 6 x2, 175 (187), corner combo
            Rage: 151 x2, 151 x2 (604)

Mach Strike (mega impacto)
One running hit forward, then another strike.
  • ~183.5 x3 (550.5) [18.98]
  • Rage -
    • ~148.0 x4 (592) [20.41]

      • PvP
        1st hit will force standing state on airhit, but only combos properly on air when instantly after combo Up branch, any higher and you pass through them.
        Rage: instead of knocking down will launch (combos into ground dash grab or simply hold-forward Z grab).
        • PvP: 159, 159 x2 with the 2nd knocking down (477)
          Rage: 135, 135 + 135, launch 135 (540), plus grab/hit

  • V2 - More strikes in the combo.
    • ~125.2 x5 (626) [21.58]

    • Rage -
      • ~114.1 x6 (684.6) [23.60]

        • PvP
          No longer forces standing on airhit to work on airhit.
          • 109, 109, 109, 109 x2 with the 2nd knocking down (545)
            Rage: 104, 104, 104, 104 x2, launch 104 (624), plus grab/hit

Boomerang (espada bumerangue)
Small wave to mid range, max 7 hits but potentially less depending on position and enemy.
  • ~89.3 x7 (625.1) [21.55]
  • Rage -
    • ~100.2 x7 (701.4) [24.18]

      • PvP
        Drags them along with the wave, leaves them standing up to probably get a combo after. Forces standing to work on airhit too.
        If not near corner, do dash attack combo (not an easy/reliable true combo timing if against fast recovery jobs). On corner easily combos into full groundZ combo or platform ottoshot.
        To combo into this move you may do groundZ combo into Up, holding the Z, then releasing when the 2nd hit connects.
        Rage: recovery is slower??? Less likely to combo after.
        • 64 x7 (448), plus combo
          Rage: 75 x7 (525), plus combo

  • V2 - When it would end, it stays in place to deal even more hits. 12 hits at max.
    • ~73.6 x12 (883.2) [30.45]

    • Rage - Apparently no difference.
      • Same damage (just with the rage ATK buff)

        • PvP
          Different combos after: hits for a longer time which is good, but each hit has less hitstun so on corner where it passes through it's worse.
          If not near corner can easily combo this into dash attack, but it's stronger but harder to do dash-jump non-dash airZZ, groundZ combo.
          On corner the opponent recovers before you do.
          • 43 x12 (516), plus combo
            Rage: 45 x12 (540), plus combo
5-9a: Sieghart 1st job (part3)
LV2 skills

Flame Sword (onda de chamas)
Forward wave, needs to start close then have the monster be draggable or wide for next to full hits.
  • 171.38 x9 (1542.42) [24.48]
  • Rage - One taller hit at the end.
    • 151.93 x10 (1519.3) [24.11]

      • PvP
        V1 and only V1 starts quickly hitting while time is still frozen so it's inescapable (great button to have, catches them even midair).
        Close hits 9 times, at mid-range 6 times, at the edge 1.
        • float 106 x9 (954)
          Rage: 99 x10 (990)

  • V2 - Same wave but slower then another wave for only one hit.
    • 169.51 x9, 169.51 x1 (1695.1) [26.90]

    • Rage - Both waves multihit and there's an explosion at the end, half reach 1 floor up.
      • 87.58 x9, 87.58 x6 (1313.7 in full) [20.85]

        • PvP
          This version takes a long time for the attack to come out at all.
          Rage: all the parts hardly connect together in PvP. At least it's harder to miss completely?
          • PvP: 105 x9, 105 x1 (1050)
            Rage: 57 x9, 57 x1 (570), if they slide off a long-range cliff can do 3 more hits for 741, if at an exact mid-range against corner deals 5 more hits of 72 (957)

Ultimate Storm (tempestade final)
AoE forward reaching 1 floor up. Reaches behind on only one hit.
  • ~184.5 x6 (1107) [17.57]
  • Rage - Explosion on the same spot at the end.
    • ~158.1 x7 (1106.7) [17.56]

      • PvP
        First hit is shorter to the side and launches for the second part (works on both groundhit and airhit), on hit can hold Up then dash and airgrab.
        Has a small dead zone too close in front of you. First part also hits behind but then the second part misses.
        Rage: explosion sends them farther, cannot combo after anymore. Will send either forward (if you were far) or backwards (if you were close).
        • launch 160, float 160 x5 (960), plus airgrab 1330
          Rage: 168, 144 x5, front end 144 spinning blowaway (1032)

  • V2 - Adds two melee hits during the middle. Less beneficial AoE.
    • ~150.8 x8 (1206.4) [19.14]

    • Rage - First hit and two melee hits, then a single hit wave that pushes to an explosion. Also less reliable AoE.
      • ~244.2 x5-6 (1221-1465) [19.38-23.25]

        • PvP
          The extra hits float them and make it easier for the last part to connect from the first and also make it send even higher to airgrab after.
          Nicer normally except somehow much worse damage inside rage where the last part sometimes misses because they get knocked down too early...
          • launch 131, small float 131 x2, float 131 x5 (1048), plus airgrab
            Rage: launch 223, small float 223 x2, spinning blowaway 223, spinning blowaway 223 (892 becaeuse the last hit misses)

Death Knell (sino da morte)
Short strike to both sides.
  • ~239.7 x4 (958.8) [15.21]
  • Rage - Explosion at the end.
    • ~196.3 x5 (981.5) [15.57]

      • PvP
        Hits to both sides and lasts enough to be good at catching even an enemy airdashing in. On hit leaves them standing very close to you recovering at roughly the same time as you, to attempt groundZ or grab to be safer.
        Can do a full combo then before the end combo into this to reset their auto-counter value and stand them back up so you can attempt to combo them again.
        • 208 x4 (832)
          Rage: 179 x4, float forward 179 (895)

  • V2 - Runs forward during it to be better forward instead of hitting both sides.
    • ~125.5 x8 (1004) [15.93]

    • Rage -
      • ~130.5 x9 (1174.5) [18.64]

        • PvP
          Leaves them pushed to the tip of your groundZ range instead of very close.
          Worse on airhit, ends with them too far backwards to reach with groundZ.
          • 109 x8 (872)
            Rage: 119 x8, float forward 119 (1071)

Phantom Rush (investida fantasma)
Wave attack in front of you (can do less hits depending on position/enemy) and rolls you forward through enemies.
  • ~184.9 max x9 (1664.1) [26.41]
  • Rage - More reliable hits but has lower max damage.
    • ~133.1 max x7 (931.7) [14.78]

      • PvP
        Normally 6 hits, less if not starting close.
        Has a very small step backwards before starting (small help in catching enemies advancing from ground or air, able to intentionally fall off a cliff behind you to hit 1 platform below instead).
        • float forward 102 x7 or so (714)
          Rage: all 96, normally 7 hits (672), less hits if not starting close

  • V2 - Does not step back on start.
    Goes slightly shorter.
    • ~173.0 max x9 (1557) [24.71]

    • Rage -
      • ~166.6 max x7 (1166.2) [18.51]

        • PvP
          • 108 normally x7 (756), less hits if not starting close
            Rage: 107 normally x7 (749), less hits if not starting close
5-9a: Sieghart 1st job (part4)
LV3 skills

Grinding Punisher (punição ascendente)
Melee hit stepping forward, then a short AoE in front reaching 1 floor up slightly waving forward.
  • ~166.7, ~166.7 up to x10 (1833.7) [19.10]
  • Rage - AoE is taller.
    • Same damage but with rage ATK buff

      • PvP
        Combos into ground dash grab.
        You can hold Back to move less far forward.
        Rage: sends them higher into the air.
        • 145, 145 x5, 145 x3 (1305), plus grab/hit
          Rage: 152, 152 x8 (1368), plus grab/hit

  • V2 - Instead of falling back in place will land forward with an explosion.
    • ~183.8, ~183.8 up to x10 (2021.8) [21.06]

    • Rage -
      • Same damage but with rage ATK buff

        • PvP
          Explosion blows them away far forward.
          Consistently lands 1 more hit than V1.
          • 160, 160 x5, 160 x4, 160 (1760)
            Rage: 168, 168 x10 (1848)

Triple Slash (corte triplo)
Simple square AoE forward.
  • ~619.3 x2, knockdown ~619.3 (1857.9) [19.35]
  • Rage -
    • ~619.3 x2, ~203.2 x3 (1848.2) [19.25]

      • PvP
        Almost reaches 1 full floor above, might anti-air and fully connects then.
        Rage: launches at the end to combo into airgrab.
        • force-standing 539 x2, knockdown 539 (1617)
          Rage: 566 x2, launch 185 x3 (1687), plus grab/hit

  • V2 -
    • ~678.5 x3 (2035.5) [21.20]

    • Rage -
      • ~407.1 x2, ~407.1 x3 (2035.5) [21.20]

        • PvP
          2nd launches and 3rd floats/knocks down (can only chip with 1 or 2 normal hits, except during rage).
          • 591, launch 591, knockdown 591 (1773)
            Rage: 372, launch 372, launch 372 x3 (1860), plus grab/hit

Mortal Impact (impacto mortal)
AoE far to both sides, the last 2/3 of the hits also reach 1 floor up.
  • ~194.6 x3, ~194.6 x6 (1751.4) [18.24]
  • Rage - No difference.
    • ~200.2 x3, ~200.2 x6 (1801.8) [18.76]

      • PvP
        Sends them randomly left or right, may be able to combo into ground dash grab especially if they fall off a cliff.
        • force-standing 169 x3, launch 169 x6 (1521), plus grab/hit
          Rage: 183 x3, launch 183 x6 (1647)

  • V2 - Same except you begin with a force pull to the middle that reaches slightly farther than the attack.
    • ~200.3 x3, ~200.3 x6 (1802.7) [18.77]

    • Rage -
      • ~195.8 x3, ~195.8 x6 (1762.2) [18.35]

        • PvP
          Fast-recovery jobs can get a moment to skill/invul between the pull and the hit.
          • 174 x3, 174 x6 (1566)
            Rage: 179 x3, 179 x6 (1611)

Mocking Blade (provocação fatal)
Self-buff, for 4 seconds you are invincible and can't attack (only walk and jump) while you have an aura that keeps automatically hitting nearby enemies. Reaches melee range to both sides and 1 floor up. Basically a guidable AoE leaving monsters in place.
  • ~170.0 x11 (1870) [19.47], or around 467 DPS while disabled from attacking
  • Rage - No difference.
    • Same damage but with the rage ATK buff

      • PvP
        Extremely good, almost impossible to dodge it fully even if you don't get hit by the first few seconds like this was an unavoidable damage skill, and it combos into full groundZ after for big damage, starts with skill damage so it doesn't raise autobreak and lets you full groundZ for massive damage.
        • 148 x11 (1628), plus combo
          Rage: 155 x11 (1705), plus combo

  • V2 - Lasts 7 seconds with around equal total damage. Downgrade in PvE.
    • ~107.0 x19 (2033) [21.17], or around 290 DPS while disabled from attacking (you get around 300 DPS from normal attacks)

    • Rage - No difference.
      • Same damage but with the rage ATK buff

        • PvP
          Upgrade, even harder to dodge now.
          • 93 x19 (1767), plus combo
            Rage: 97 x19 (1843), plus combo

LV4 skill
Soul Extinction
1 hit to all monsters in the entire stage. Very useful on room start and might one-shot normal monsters depending on if it crits on each target or not, lower damage if it doesn't crit.
The range is not actually infinite: it doesn't reach farther than around 2 screens away from you.
  • ~2067.1 [15.90]

Awakening
2 explosions forward on the same floor.
  • ~95.91 x10, ~2238.11 x1 (3197.21) [24.59]
    JF between the first and second hit changes second hit into ~2685.72 damage (3644.82) [28.03]

H
Hits basically the entire screen.
Also gives you ATK +15% and Super Armor for 20sec after it finishes.
  • ~1123.67 x1, ~749.11 x1, ~49.57 x17, ~33.04 x17, ~842.75 x1, ~561.83 x1 (4681.73) [36.01 if it cost as much as MP4]
5-9b: Sieghart 2nd job
Standard dash type (slightly above average dash, slightly below average rocket)
Dash momentum: ~300 pixels, rocket ~616

GroundZ combo
Can infinite combo monsters by repeating only the first Z.
  • ~150 / ~150 / ~150 / launch ~150 x2
    Rage (right path): each press gets a ~149 (but 1st and 2nd press may miss this hit)

    Critical/Double - Not useful in PvE. A few hits ending blowing away.
      ~51 x3 (153), or Double is ~99 x3 (297)

    • PvP
      Combo has long range and fast speed, and can combo until auto-counter by just repeating the first 2 Zs. If this is about to push them up a slope may need to do 1st press into Critical then airgrab.
      • 209 / 209 / 209 / launch 209 x2 (1045)
        Rage (right path): adds 220 to every press (autobreaks at 4th tap)

      • Critical/Double -
        All hits reach 1 floor down, and the 3rd also reaches 1 floor up (on anti-air combos into airgrab).
        Critical can be done even before the 1st tap hits (for the anti-air) but only Double can be aimed behind you.
          91 x2, launch 91 (273)

DashZ
2 hits, can Down to invincible roll but only if you're on the ground.
After the roll can do a ZZZ combo, or if late after roll only a weak knockdown hit.
During the first hit can Up.
  • ~75 x2 (150), Down ~63 (213), ZZZ ~63 x3 (402)
    Late Z after roll: standing ~58
    Up: back fling ~146

    • PvP
      After doing this on the ground you have the choice to roll, where if it hits you can continue with ZZZ into airgrab, or instead just ZZ to attempt to combo into groundZ/grab. Or roll with no attack to attempt a full groundZ (and if only rolling, you can do the landing attack which hits both sides knocking down to be safe).
      If playing against Arme/Mari, can do dash attack DownZZ into groundZZ infinite.

      The first hit of dash attack also hits almost 1 floor up to anti-air and you can cancel only the first hit into Up which bounces them back (can dash-jump and hit one airZ, or if they were pretty above you you can airgrab or turn and MP2).
      • 132 x2 (264), Down 111 (375), ZZZ 111 x2 157 x1 (754)
        Late Z after roll: knockdown 101
        Up: back fling 254

air ↓Z
In PvE at best is crowd control.
Divekick diagonal down (can hold forward to go slightly farther forward, but not back), explodes on landing to launch monsters.
  • ~59, launch ~81 x3 (302)

    • PvP
      Floats on hit, combos into ground dash grab.
        41, float 56 x3 (209), plus grab 579

airZ
Can ↓Z ottoshot even straight up.
  • ~75

    • PvP
      Above-average range forward, and diagonal up/diagonal down. Also reaches 1 floor straight up.
        157


LV1 skill
Forward combo, launches then hits again.
  • ~207.8, launch ~207.8, ~207.8 (623.4, 727.3 counting aerial) [21.49]
  • Rage - Air combo part does more hits.
    • ~128.1, launch ~128.1, ~128.1 x3 (640.5, 832.6 counting aerial) [22.08]

      • PvP
        Reaches around as long as groundZ (2nd hit will miss at the tip), instead of infiniting has invincibility. Needs to hit them on the ground or misses all hits after the first.
        Only combo after this is charging Z for MP2.
        Rage: can now airgrab at specific timing, or just do one Z for less damage.
          181, launch 181, knockdown 181 (543)Rage: 6, launch 6 then float 117 x2, small float 117 (363)

LV2 skill
Moving combo forward, second half reaches 1 floor up.
  • ~135.6 x4, launch ~135.6 x5 (1220.4) [19.37], or 1491.6 counting aerial [23.67]
  • Rage -
    • ~136.2 x4, ~135.6 x5 (1222.8) [19.40], or 1494 counting aerial [23.71]

      • PvP
        While this can combo even on airhit it's only in specific situations from its bad range up.
        Can wakeup trap by knocking them down with an attack then using this skill by hotkey to force their invincibility time out by the time this hits.
        If it fully connects can combo into ground run grab.
        Rage: skillfreezes instantly and hits earlier, easily works after juggle now (such as after Critical), you also recover earlier (grab timing is different).
          118 x4, float 118 x5 (1062), plus grab 1432Rage: 124 x4, 124 x5 (1116)

LV3 skill
Two hits stepping forward, then shoots a wave forward, slightly longer than the edge of the screen.
Best spaced to do the melee hits at the tip so the wave hits from its front edge first. Raid bosses can take all hits.
  • ~276.4 x2, ~276.4 max x8 depending on monster type (2764) [28.79]
  • Rage - Only the shot now traveling the entire Gorge of Oath stage, don't use it from too close for better hits.
    • 292.22 xN, non-giant with no push x4 (1168), if 6-9 then 1753-2629 [18.26-27.39]

      • PvP
        The melee hits force standing to work on airhit too, then does the throw.
        Leaves them standing, may lead into dash-jump airZ, groundZZ.
        • force-standing 152 x2, force-standing 152 up to x8 at tipped sword range (10hits) (1520)
          Rage: 164 xN, usually around x6-9 for 984-1476, close x2-3 (328-492), them touching corner x4 (656)

LV4 skill
AoE to both sides and straight up and diagonals up. Number of hits depends on distance and size.
  • ~716.6 x2-5? (1433-3583) [11.02-27.56]
    Raid boss 6 hits (4299) [33.07]
5-9c: Sieghart 3rd job
Standard dash type (slow)
Dash momentum: ~250 pixels, rocket ~560
*Slow re-dash (can repeat dash faster if holding until run starts then dashing again).

Power Stance
Enter with Z↓, or by tapping ↓ during any part of groundZ combo. Fastfalling can also enter stance upon landing.
During stance you have super armor and can slowly walk to the sides, with 1 attack and a roll forward and back. Tap Up to cancel stance.
You cannot enter stance during Fatal.

  • Z - Useless for PvE.
    Single hit blowing away, leaves stance or can chain into stance roll.
    • ~193 blowaway

      • PvP
        Single armored hit leaving them standing where it can combo into dash ZZZZ ↓Z, dashZZZZ ↓Z. But this isn't a true combo on fast-recovery jobs between 2nd and 3rd dash attack hits. To be safer on them you have to do stanceZ into dash grab, or stanceZ into skill (or do the false combo one time then do the other).
        Can cancel stanceZ into stance roll which will keep stance on.
        In stance you can't turn around but you can still do stanceZ in any direction.
          135, some knockback

    • ZZ - Costs rage to use.
      Multi-hits while running forward costing rage while continue to mash Z, while mashing can turn left/right and can X to roll. Even at full bar can only do 16 hits which is not very useful, but in rage mode it gets up to 35+35 hits in a short time which hits like a LV4 skill.
      • 60.05 xN (16 hits 960, rage mode 35 hits + 35 hits of 30.02 for 3152.45 for around 630 DPS)

        • PvP
          Weak and only serves as stanceZ with more range, press Z only two times (or more if you NEED range) then combo after it like stanceZ.
            41 xN (full rage bar 16 hits 656), combos into full dashZ

  • X - Rolls forward (easily through a monster for dodging or positioning), switches to face the other side, and reactivates stance from there but you can easily leave stance with Up. Has cooldown 2sec.
    • BackBack - Rolls backwards (invincible too and passes through enemies too) and always leaves stance. Can be used alternatively to the X roll and this version has no cooldown.
      You do leave stance from this roll, but if you press Z during the animation it will do stanceZ/ZZ so wait until you fully recover for normal groundZ.

      • PvP
        X has hyper armor instead of invincibility. After X can do stanceZ to either side then combo after that with dashZ.

GroundZ combo
Can keep hitting monsters while being able to cancel into roll anytime except during Critical/Double by pressing Down then either X-Up or BackBack. But you can't roll in Fatal because you can't enter stance in Fatal. To not even knock monsters around you can keep doing only the first 4 Zs of combo.
  • ~125 / ~125 / ~125 / ~125 / ~125 x2 with last knocking down
    Critical: launch ~75 and knockdown ~40 x2 (155), or Double is ~146, ~77 x2 (300)

    • PvP
      Pretty long range.
      The first hit forces standing state to juggle combo, but has bad range up so there are few possibilities for this.
      Can ↓ to do the stanceZ infinite, or from combo do ↓ZX↑ to attempt to combo into groundZ again.
      Critical launches on the first hit (breaks super armor) and forces standing on airhit to combo, and before the last hit of Critical can cancel into MP1.
        175 / 175 / 175 / 175 / 175 and knockdown 175 (1050)Critical: 131, knockdown 70 x2 (271)

DashZ
Similar to groundZ, allows combo from the air. On the ground it's better to manually stop running to do the non-running groundZ.
  • 103.2 / 103.2 / chains to groundZ 3rd (technically less damage than groundZ)

    • PvP
      Has slightly longer range than groundZ, and also hits faster than it to work in some combos, on 3rd press chains into groundZ combo (enabling stance too).
      First hit reaches 1 floor up to poke above/anti-air.
      2nd hit doesn't true combo into 3rd against fast-recovery jobs.
        19 / 19 / chains to groundZ 3rd
5-9c: Sieghart 3rd job (part2)
airZZ
2 presses.
Can ottoshot but this hit is too weak (~163 DPS), do combo instead.
  • ~37, ~111

    • PvP
      First press will hit straight up until diagonal down, then stays sticking forward for a decent time. With another press will hit the same range with a ground bounce.
      First hit has low hitstun to convert into groundZ combo (easier if doing dashZ instead), but doing the second airZ can combo into groundZ which will catch midair.
      Can ottoshot forward or straight up.
        78 / groundbounce 233 (311)

air↑Z
Rising spin attack.
Moves you a further half floor up when used.
Can cancel recovery into either airdash or airZ.
  • ~145 x2 (290)

    • PvP
      Hits 360 degrees, does a bonus hit slightly earlier if hitting forward or up, can cancel recovery into either airdash or airZ.
      Can also drop from platform and use it to stand back on it, covering both air and ground angles (including hitting 1 floor above and below).
      On ledgedrop use can repeat until autobreak if they don't slide away on a cliff.
        101 x2 (202)

↓↓ fastfall
Not useful in PvE.
Only works from the air while not dashing or attacking. Fastfalls to the ground and will also enter stance upon landing unless it took more than 3 floors to land. Technically a way to enter stance while airborne. It may be useful to roll after landing or leave stance with ↑.


LV1 skill
Forward combo.
It's called Rule Break because it has a trick: it has 3 different attack animations and it will cycle them when chained multiple times in a row (a 4th time will set to 1st again) but all that is weak and useless in PvE.
  • 1st cycle ~122.9 x5 (614.5) [21.18]
    2nd cycle ~125.6 x5 (628)
    3rd cycle ~76.8 x5 (384)
  • Rage - Only difference is starting at the second animation instead of the first.

    • PvP
      Combo forward needing opponent on ground for full hits, last knocks down.
      Has near-instant startup even before skillfreeze, may beat out a grab.
      Can chain multiple times before the last hit, if getting to the 3rd cycle (costing 3 bars, or 2 during rage mode) will launch and combo into groundZ.
      • 1st: 13 x4, knockdown 107 (159)
        2nd: 115 x5 with last knocking down (575)
        3rd: 67 x4 and launch 67 (335) plus full groundZ

LV2 skill
Runs forward with very weak hits, then does an AoE forward reaching 1 floor up.
Can change directions before the end.
  • dash ~8.3 x11, AoE ~225.9 x5 (91.3 + 1129.5, 1220.8) [19.37]
  • Rage - AoE goes twice.
    • dash ~8.3 x11, AoE ~114.8 x5 and ~114.8 x5 (91.3 + 1148, 1239.3) [19.67]

      • PvP
        Takes some time to start.
        Rage: floats them even higher, can wait and combo into groundZ.
        • dash hitstuns with no damage, AoE float 196 x5 (980)
          Rage: dash hitstuns with no damage, AoE float 105 x5 and float 7 x5 (560), into groundZ

LV3 skill
Long forward rectangle AoE reaching 2 floors up.
  • ~171.4 x12 (2056.8) [21.42]
  • Rage - Worse, becomes only hits straight forward. Does a dash attack into an AoE but the dash does most of the damage.
    ~307.7 x5, ~307.7 x2 (2153) [22.43]

    • PvP
      Takes some time to start.
      Pulls to center then blows them away to your side, combos into grab (different timing if they got caught high in the air).
      Rage: combos into airgrab.
        149 x12 (1788), all launch except last, into grab (2158)Rage: forces standing 255 x5, float/knockdown 255 x2 (1785), into airdash grab (2155)

LV4 skill
Invincible for 10sec, replaces groundZ/dashZ with an infinite stab, can still skill, +10% ATK during effect.
  • Normal attack/doesn't use SpATK
    ~59.0 dmg per hit (time for around 75 hits so 4425dmg, or 442 DPS during the time it takes)
5-9d: Sieghart 4th job
4th job has JFs (Just Frames) in a lot of normals and skills, where you need to tap Z in exact timing as the flash disappears to get the next part.

Standard dash type (slow)
Dash momentum: ~250 pixels, rocket ~560
*Slow re-dash (can repeat dash faster if holding until run starts then dashing again).

4th job's rage mode is different:
  • It charges slower (45sec instead of 30sec).
  • Normally rage gives you +10% ATK&DEF, this rage gives you +15% ATK but -10% DEF. In PvP +7.5% and -5%.
  • And it has a special activation animation that does a minimal-damage hit around you that blows away extremely far (if mashing X when being attacked for a reversal, will blow them away if they're not armored).
  • PvP grab animation changes (and before PvP rebalance, used to be 55% stronger aside from the ATK buff).

GroundZ combo
Against light monsters, for damage without knocking down you can repeat the first 3 presses but damage is lower.
  • ~98 / 98 x2 / 98 x2 / 98 x2
    Rage mode: ~112 / ~112 x2 / ~111 x2 / ~111 x2 / ~111 / ~111
    Rage mode (right path): also adds ~123 to the first 3 presses and ~94 to the 4th
    Critical: ~75 x2 / ~175, or as Double ~151 x2 / ~175

    • PvP
      Maybe the best groundZ in the game. It has long range like spear combos, with very fast speed, and it reaches 1 floor up, possibly comboing with them standing on the platform above you (but you need a wall in front to not pass over early) and hitting a jumping enemy for knockdown where another combo would completely miss. Also does higher damage during right path rage. In the swings that have 2 hits, only 1 hit reaches up.

      Critical launches then JF floats higher, can hold the Z from the JF to combo into MP1.

      The 2nd press will hit behind you once, but to hit behind again you need to start the 4th tap to Double backwards because Critical can't turn around. This works but is not a true combo (they can mash skill/etc).

      Can loop ZZ and repeat with very specific timing, or against Arme/Mari just repeat ZZZ which works even 1 floor up.
      • 151 / 137 x2 / 137 x2 / knockdown 137 x2 (973)
        Rage mode (right path): triggers autobreak before it ends
        Critical: 131 x2 / 254

DashZ
Does one short hit forward, then if with no other input will go again farther forward. Can JF one moment after the 1st swing hits, pressing Z up to 3 more times for up to 3 shadow step slashes left and right phasing through monsters. This is useful for rolling through monsters while dealing damage and the damage is still combo damage.
Only if on the ground, can also do Down before any 2nd strike to do an invincible rolling slide forward without having to do the JF (and can still do the JF after).
Every version of this dash attack can cancel out of recovery early into another dash.
Also has an Up followup but the JF for this is too hard.
  • First strike ~86, no input ~86, starting slide ~82
    Triple Z: launch ~175, ~218, ~262 (will apply aerials to light monsters, will probably apply a number of back hits)
    Up: ~86, ~118 x1 or more, ~158
    Up (rage): ~83, ~153, JF ~64

    • PvP
      Notable because it chains into the triple slash farther forward for 953 damage off of any hit as long as the first hit connects and can be done either on the ground or in the air.
      Up version reaches 1 floor up while walking forward (can anti-air) then you can infinitely JF to keep repeating this slash, then after not doing the JF will end with a bigger upward slash that launches into grab. Inside rage mode it changes to instantly do the final launching upper.
      • First strike 127, no input knockdown 127, starting slide 144
        Triple Z: launch 254, float 318, float/knockdown 381 (953)
        Up: 127, force-standing 173 x1 or more, launch/knockdown 231

airZ
Can ↓Z ottoshot but at very hard timing...
  • ~75

    • PvP
      Long box forward also stretching far up and down, hits directly above you and below you and slightly behind you too, good at catching people airborne and good as jump-in too.
      Not important but can cancel into air↓Z before it hits, sometimes when it hits.
      157

air↓Z
Divekick. Not really useful for PvE.
  • ~223

    • PvP
      Cannot be done if you are too close to the ground (whether moving up or down in the jump).
      Divekicks then can attempt to combo into groundZ, but better than that you can JF this move the moment you start to descend, to recover airborne after striking, to hit the divekick and do one airZ before landing to do more damage and make it guaranteed to combo into groundZ.
      If landing the divekick without a JF, it has a forced recovery animation but this can cancel early into dash (comboing into dash attack or grab).
      During rage mode, if you dive then roll back he does a backroll that can directly do the triple hit JF.
      forces-standing 155

C-Forward
Single strike forward costing 1/3 rage so can do 3 times with full bar. If done thrice is slightly more damage than MP3. Possibly not as strong as activating rage with X and doing normal attacks, though.
  • 272.15 x3 (816.45)

    • PvP
      Hits at around the same range as groundZ including reaching up, misses the knockdown 3rd hit if against 1 floor up. Not as fast as groundZ.
      Can be used to deliberately end rage mode to make it start charging again earlier and stop the DEF penalty during it.
        187 x3 (561)
5-9d: Sieghart 4th job (part2)
LV1 skill
Forward combo.
Can JF the end for another hit.
  • ~123.1 x5 (615.5), JF: ~123.1 (738.6) [21.22/25.46]
  • Rage
    • ~126.5 x5 (632.5), JF: ~47.2 x3 (774.1) [21.81/26.69]

      • PvP
        Forward combo with long range like groundZ, and the first hit will force standing on airhit to still work on juggle combos if they were a certain amount close to the floor.
        JFing can combo into another MP1 with good timing.
        One of the slashes in the combo will hit behind you once, but they still recover before you do.
        Rage: combo is faster but JF knocks down instead of launching, needs to combo into MP1 before JF instead of after JF.
        • 107, 107, 107, 107, float/knockdown 107 (535), JF: launch 107, possibly comboing into MP1
          Rage: 118, 118, 118, 118 + launch 118 (590), JF: knockdown forward 3 x1-3 possibly comboing into MP1 before JF

LV2 skill
Forward AoE.
  • ~243.0 x5 (1215) [19.28], JF: ~243.0 (1458) [23.14]
  • Rage - All hits except one reach 1 floor up.
    • ~184.2 x7 (1289.4) [20.46], JF: ~185.8 (1475.2) [23.41]

      • PvP
        Instantly skillfreezes with a forward strike (reaches around 0.8 floors up, forces standing state on airhit to fully work even on airhit/juggle unlike groundZ). Can JF to float them high enough for one hit/MP1.
        Rage blows away at the end.
        • 211 x4, launch 211 (1055), JF: float 211, plus followup
          Rage: 172 x6, launch 172 (1204), JF: spinning blowaway 174, only combos into C-Forward or dash-jump airZ

LV3 skill
Rectangle AoE forward reaching 1 floor up.
  • ~189.4 x9 (1704.6) [17.75], JF: ~189.4 (1894) [19.72]
  • Rage
    • ~209.0 x8 (1672) [17.41], JF: ~71.7 x5 (2030.5) [21.15]

      • PvP
        Forces standing state on airhit to fully combo on airhit, easy catch in PvP.
        • force-standing 164 x9 with last launching (1476), JF: spinning blowaway 164 (better to not JF then airgrab for +370)
          Rage: 195 x8 (1560), JF: 5 hits involving 67 and higher

LV4 skill
While you can still move and attack like normal, passively keeps summoning flying swords that attack in full horizontal or full vertical slashes across the screen for bonus damage. They aim close to your position every time so staying close to the enemy is better.
  • ~165.3 up to x20 (3306) [25.43]
5-10: Mari (general)
GCC notable changes:
-Mana shield has cooldown
-4th job dive attack has cooldown

Story:
A girl wakes up in Aernas with no memories of herself or her past. She does, however, realize rune casting skills unheard of for centuries and is fascinated by knowledge and technology, especially magitech. No mentions of her appear until the Grand Chase spot her in the Temple of Destruction inside Xenia, breaking apart the DK robots to analyze them. Even them in the quest dialog wonder how she got inside Xenia, alone of all things.

Mari's book might be one of the copies of the klara libri/claire bible, like Grandiel's weapon. Grandiel himself could be considered the same overall class as Mari, a Rune Caster, except Grandiel only knows magic and not machinery.

She almost disregards them until they incidentally call Sieghart an immortal, which rings a bell for her, leaving her interested. The centuries-old Sieghart starts to get a hint of her truth and they join up.
When they receive the next god's essence, the girl reacts to it and instead interprets them as "fragments" of "soul stone," confusedly rambling including a "baldinar" and "kounat" before passing out. Sieghart realizes he is exactly correct.
When they defeat the mad god of Xenia and Ashtaroth tries to take the last essence for himself and run away, Sieghart confronts him and gives himself away as the sole surviving Highlander (the strongest faction in ancient Kounat) of when Ashtaroth annihilated them centuries ago, and taunting him by saying that he knows that Ashtaroth is simply the name of the body he possessed and that his true identity is Baldinar. Ashtaroth is largely shocked but still escapes, after babbling that not only did one of the Highlanders survive but "Mari" as well, noting, "to think, Kounat has two survivors..."

As they pursue Ashtaroth in Archimedia, Mari begins to awaken more and more of her memories: in the dwarf king's throne room the battle is stopped by guards announcing that their city is being attacked by a horde of demons, making her remember only a few pieces of the original demon war of when "my kingdom" was being invaded by Extremist-clan demons and defended by humans and also Moderate-clan demons and the three goddesses of Aernas themselves, centuries before even The Great Explosion of Kounat. The goddesses would later leave into another dimension.
Mari realizes that the 6 essences, 6 objects of magical power found by humans shortly after The Great Explosion of Kounat that were then entrusted to 6 people that each became the gods of this era and had their bodies changed over time, are actually just broken fragments of the Soul Stone of Kounat, a crystal housing nearly unlimited holy power created by the prime minister of Kounat, Baldinar, by copying what remained of the goddesses' essences inside the Aernas Hammer that was created with them to be the strongest magical source and allow for power similar to theirs even if they weren't around. But he evilly plotted to use the Aernas Hammer again to magnify the holy power in the concentrated crystal and demonic energy that he gathered in order to inherit all of their powers and transform himself into not only a god but the creator god above gods, which misfired as the Soul Stone did not accept his orders as they only accepted a celestial geas from the royal family of Kounat, accidentally shattering the Soul Stone in a catastrophic event which was then called The Great Explosion of Kounat; Baldinar himself remained alive in spirit form from being so close to the Soul Stone and years later he completely possessed Xenia's Ashtaroth, and he was the only survivor of Kounat left, or so he thought.

In what is only shown in Mari's 4th job description, inside Archimedia she passes out when being called by the actual main piece of the Soul Stone that had been buried here for nearly a millenia since the explosion, awakening all of these secrets to her and permanently making her absorb the main fragment, as, unlike Baldinar before her, a legitimate royal family member of ancient Kounat, real name Mari Ming Ornette, daughter of the grand duke of Kounat, and the only Celestial bloodline person left alive.
This christened her with the title of Geas, in ancient Kounat given to those of celestial bloodline most capable of communicating directly with the gods and using holy power, like an Oracle or the most divine a person can be, directly below the gods themselves and capable of reading the real klara libri/claire bible.
But she still uses the energy largely for supplying summoned machines in her unique way: the story reason for her 4th job commands is that with the Soul Stone she can easily stabilize several wing drives permanently instead of only holding them temporarily like before, or previously having to cast certain things by having to channel from the book first.

Fun fact:
*Two quest texts in Xenia has Vanessa telling you that the DK robots in Xenia maybe are produced by Perseo but were at least invented by Ashtaroth -- Baldinar originally being a prime minister of Kounat before the great explosion, of course he would know a lot about such magic technology.

*Apparently, the reason why Mari survived the explosion of Kounat is because Duel foresaw the event and protected one Celestial to survive it, because only a deity or celestial can read the claire bible and Duel's end goal is to revive Edna even if by reversing history with it, which is why he is protective of Mari in the final Archimedia stage. Mari's late appearance after the explosion might be the time Duel entered Aernas.
5-10a: Mari 1st job
(No airdash, but if dashing off a ledge can still jump midair.
To rocketjump, dash on ground then after one second hold ↑.)

C↑
Exists for all jobs except 4th. Temporarily changes your ground combo, dash attack, and jump attack into different versions (not necessarily better). Cannot be undone except by the timer. In PvE can be renewed infinitely, in PvP has a cooldown.

GroundZ combo
At any point can cancel into XX.
To not knock down a group, can repeat ZZ-Critical.
  • ~127 / ~127 / ~127
    Critical: ~120 x2
    • During C↑ - Has no Critical/Double.
      ~65 x3, ~65, ~65 x3

      • PvP
        Short range but the starter has fast speed.
        3 presses, 3rd launches, at any point can cancel into XX. You can do ZZZ, XX Forward, BackBack Forward Z, Forward Forward Z, skill.
        176 / 176 / launch 176 (528)

        During C↑ - You lose a lot of its comboability and it knocks down at the end (if not comboing into skill earlier), but groundZ and dash attack gain more range.
        Starter is a little bit slower, and reaches 1 floor up/anti-airs knocking down.
        91 x2-3 / 91, knockdown 91 x3 (546-637)

  • GroundZ combo V2
    Alternate to the book combo.
    Has long range and easily hits all monsters inside range for MP (more reliably than C↑).
    • ~109 / ~109 / ~109 / ~109

      • PvP
        Long range but the downside is slow start (also stops true comboing from backdash shot). Almost reaches one floor above/can anti-air knocking down.
        Last hit launches and pulls, launch is not as high as V1 combo, can combo into Critical V2, still can do full combo into XX→ (but if including Critical has to link Critical into XX→ instead of from last Z, and juggling into XX← can be harder to send into the side you want.
        force-standing 152 / force-standing 152 / force-standing 152 / launch&pull 152 (608) (1025 with Critical V2)

  • Critical V2
    Critical is a single-hit tornado. Double is a slap attack.
    One shot to the side that explodes to become the dash attack that floats them.
    • float ~274

      • PvP
        Can work as a natural extention of V2 combo used as Double.
        On the corner, you can do combo V2 ZZZ-Critical, loop until autobreak.
        float 477 (as Double, 417)

XX pose
Can be done alone, or better, canceled into from any part of ground combo (except Critical/Double).
Starts with a hit a short amount to both sides but reaching one floor up which adds damage to the combo.
  • ~179

    • PvP
      124

XX Up - Mana shield. If hit, all damage goes to your MP instead, maybe around 16% of HP per MP bar. Lasts up to 10sec with cooldown 10sec (PvP 20).

XX Forward - Radius attack reaching 1 floor up and down. Cooldown 3sec.
  • ~28 x6 (168)

    • PvP
      Very strong as a defensive move from how long it lasts, and can hit on the floor above or below. Generally it only easily combos into one airZ or one groundZ for a little more damage, but if you don't have C↑ and don't need to jump above, you can walk away until it ends then hit dashZ while they're still high in the air which combos further.
      float 20 x6 (120)

XX Down - Will auto-target a delayed explosion on enemies in front of you (one floor up or down, or just straight forward almost to screen edge). Will summon multiple if with multiple enemies together. Cooldown 3sec.
  • ~67 (per monster)

    • PvP
      Possible to combo into BackBack Forward Z then dash Z (then skill).
      launch 46

XX Back - This is an invincible backdash that can pass through enemies, either avoiding a hit or rolling to the other side of a monster, while planting a 1-second mine in front (can explode instantly on touch). Cooldown 4sec.
    ~109
    • PvP
      Can be used as an attacking backdash with a cooldown, but also works as a combo tool: usually launches far forward (being able to combo afterward on corner) but can launch backwards if you are extremely close without the XX push (or by walking under them while they're airborne) to combo without needing the corner.
      With V1 combo can do ZZZ XX Forward, walk forward and XX Back, BackBack Forward Z, ZZZ X Forward, dash Z. (with combo V2, can do after Critical V2 but linking into XX Forward instead of chaining, then XX Back can be harder to send backwards, and doing groundZ after backdash shot is not a true combo with combo V2)
      Cooldown 10sec.
      far launch 76

Dash Z
(like other Mari job dashatks, tap ↑ instantly after the Z to dash attack and move diagonal up at the same time, even if you dashed off to midair)
  • ~151

    • During C↑ -
      ~207

      • PvP
        Disjointed square hitbox forward hitting at full character height (decent at anti-airing and good enough speed to repeat forward defensively), small launch on hit.
        Easily combos into skills including Z-held MP1 (or just 1 press of groundZ), if hitting high midair can combo into one more dash Z.
        launch 263

Dash, back Z
Small shot while retreating.
  • ~165

    • PvP
      Covers your backdash with one light hit but barely reaches farther than your original spot. Forces standing state on airhit. You shoot backwards but continue facing forwards (even for skills).
      If you dash off a cliff you can air control to get closer to them.
      289

airZ
No ottoshot.
  • ~32 x3 (96)

    • PvP
      Less useful than a normal airZ: it does one swipe with 3 potential hits and 1 of them will knock down so this can't start combos like most airZs, only give them some damage and a knockdown as you move around. And no ottoshot.
      Will not knock down at max range or if using as soon as you jump up against a grounded enemy.
      84 x3 with last knocking down (252)

      During C↑ - Same range, 2 hits with small knockback leaving standing, can combo into groundZ. Less hitstun than normal airZs so repeating on platforms doesn't combo.

  • airZ V2
    The second part slightly floats you up and back so you don't jump and land through platforms as fast as normal.
    • ~60 x2 (120)

      • PvP
        Two parts and only the second knocks down (sending them a distance away). Attacking shortly before you land skips the second part so you can combo after it.
        Has some active frames for air-to-air.
        107, knockdown forward 107 (214)

    Rocketjump ↓ (unlockable)
    3 piercing exploding shots diagonal down. Can use when approaching from rocketjump.
    Can also be used just to reach one platform higher than with normal rocketjump.
    • ~119 x1-3

      • PvP
        Not strong but covers an area as you approach from rocketjump. Leaves them standing as you come down, can air control to fall left or right.
        83 x1-3
5-10a: Mari 1st job (part2)
Summons
(Can place up to 1 of each different summon, in PvP each has cooldown)

C Forward (red turret)
Exploding short arcing up then down. Leaves a ground flame that can stunlock light monsters.
Lasts 7 seconds / 6 attacks.
  • ~108 per shot
    [Lasts 7 seconds, boss DPS when active 92, total for placing 648dmg]

    • PvP
      Will force standing state on airhit: can do ground combo launch then wait for them to finish falling and ground combo again. They have some time to attack while in the air.
      75 per shot, burning 1s

  • V2 - If it hits on its first half it spreadshots below the target, if not it splits midair to instantly hit the rest of the range. No longer burns.
    Lasts 10 seconds / 9 attacks.
    • ~108 x1 and ~38 below, or ~38 x3 (114)
      [Lasts 10 seconds, boss DPS when active 97/102 (boss early hit + below 199), total for placing 972/1026dmg (boss early hit + below 1998)]

      • PvP
        75, 26 x3

C Back (blue turret)
Straight shots to screen edge, doesn't pierce but explodes.
Lasts 7 seconds / 6 attacks.
  • ~108 per shot
    [Lasts 7 seconds, boss DPS when active 92, total for placing 648]

    • PvP
      75

  • V2 - Now pierces. Barely weaker but lasts more shots.
    Lasts 10 seconds / 9 attacks.
    • ~95 per shot
      [Lasts 10 seconds, boss DPS when active 85, total for placing 855]

      • PvP
        66

C Down
Makes a small shock trap in front of you.
Lasts 4 seconds / 3 attacks.
  • ~49 x2 (98) per attack
    [Lasts 4 seconds, boss DPS when active 73, total for placing 294]

    • PvP
      The range forward is very short but it does hit at full character height. Pushes forward per hit (no push if already on corner).
      Forces standing state on airhit, possibly making a launch reset in combos along with its 10sec cooldown (can do mid-combo by doing default MP1 on corner, then placing this to combo into ZZ, ZZ, ZZZ).
      force-standing 34 x2 (68)

  • V2 - Instead places a mine in front of you that can wait 6 seconds or explodes instantly if there's an enemy. On trigger, for 2 seconds it slightly pulls and slows enemies. Damage is almost zero.
    • ~1.5 x20 (30)

      • PvP
        No damage or hitstun, only slow and pull.


MP1 skills
Buster (arrasador)
Forward hit sending away, reaches 1 floor up. Can get aerial bonus on light monsters by launching with dash attack first.
  • spinning blowaway ~599.8 [20.68], aerial after manually launching 899.7 [31.02]

    • PvP
      Freezes time for a single hit forward (similar range as V2 combo but reaches 1 floor up), sends them flying and can combo after near corner (can combo into dashZ once then this skill again, or 2 dashZs into skill if you time the first dashZ to be the highest it can airhit). If very close to the corner, you can do C-Down V1 which forces them to stand (allowing ZZ, ZZ, ZZZ).
      spinning blowaway 522

  • V2 - Adds 1 more hit at the beginning for more damage.
    Apparently the range is 10% shorter and the recovery is 10% longer.
    • PvE: ~48.2 + ~599.8 (648) [22.34]

      • PvP
        42 + 522 (564)

Laser Beam (raio destruidor)
One hit reaching both sides, or up+down if you press Up/Down.
  • sideways ~416.9 [14.37], doubled on certain raid bosses (833.8) [28.75]
    up+down ~463.2 [15.97], doubled on certain raid bosses (926.4) [31.94]

    • PvP
      Floats but doesn't give time to combo before it knocks down except skill or lucky turret hit.
      float/knockdown 279

Break Down (nulificar)
Exploding shot straight reaching until screen edge, can aim up or down some 70 degrees.
You walk forward during the animation (even off a cliff into midair).
  • ~200.9 + 130.6 x3 (592.7) [20.43]

    • PvP
      Launches but only combos into dashZ (into either skill or 1 hit) or lucky machine hit.
      175 + 113 x3 (514)
5-10a: Mari 1st job (part3)
LV2 skills

Shock Field (campo eletrônico)
Big AoE forward until near screen edge.
If thrown off a cliff will fall down to the next platform.
  • ~198.1 x6 (1188.6) [18.86]

      • PvP
        Forces standing state on airhit, last hit does a small launch.
        The first hits do not naturally true combo into the last hit, needs you or a turret comboing them.
        force-standing 172 x5, small launch 172 (1032)

  • V2 - The first part now slightly pulls per hit and the first part reaches one floor up.
    • ~203.0 x5, small launch ~238.8 (1253.8) [19.90]

      • PvP
        176 x5, small launch 208 (1088)

Homing Missile (míssil teleguiado)
An interesting skill, this places an indestructible turret in your spot. It automatically will keep making straight shots at enemies to any direction at a decent travel speed, its max range is 60% past screen edge from where you cast it or almost from one tip of the screen to the other, it aims at the nearest enemy and moves on to the next once that one dies.
It is bad at splashing multiple monsters if they are steps apart but it targets any enemy at farther one one whole screen and this skill actually deals much more singletarget damage total per cast than normal skills (so it's good for bosses).
You can have 2 of this turret at once, so with 4 bars you can double cast this whenever you use it. It's good to switch to 1st job to place this and the red and blue turrets.
  • ~117.0 x22 (2574) [40.85]

    • PvP
      Reduced to only 6 shots and does little damage. This is for interrupting them.
      It functions like another turret, doing normal hitstun and forcing standing state on airhit but this one aims directly at the opponent at any angle and can't be destroyed early. A player would know to circle around it when it shoots but that doesn't stop it from interrupting them extremely easily unless they run away for the entire time.
      And like a turret, after it starts hitting you can keep restarting your combo on the enemy for the turret hit to let you start from the beginning again.
      33 x6 (198)

Core Break (quebra de núcleo)
Hits a short distance to both sides, damage is enemy-stacking which makes this generally bad.
  • ~5.4, ~155.4 x3 (471.6) [16.26]
    2-4 enemies together 937.8-1870.2 [♥♥♥♥♥-29.68]

    • PvP
      Floats them up to combo into C↓ (into groundZ) or dashZ twice. Like Buster but costing 2 bars and doesn't need the corner. May also combo into Forward Forward BackZ groundZZZ.
      4, float 135 x3 (409) plus combo


LV3 skills
Eraser (raio laser)
Wave forward reaching 1 floor up that quickly moves forward farther than screen edge. Hit count wildly varies depending on size.
  • ~310.3 xN
    Usually only around x2 (620.6) [06.46]
    Raid bosses up to x10 (3103) [32.32]

      • PvP
        In PvP actually drags the enemy along with the wave properly. Combos on airhit too and easily catches airdashers.
        175 x9 from close (1575), mid-range x8 (1400), long-range x4 (700)

  • V2 - Instead of one wave forward shoots one left and one right. Now reaches 2 floors up and 1 floor down.
    • ~170.2 xN
      Normally 12 hits total for 2042.4 [21.27], less hits if not starting close
      Raid boss max 22 hits (3744.4) [39.00]

      • PvP
        Starts with one hit a good distance sideways that pulls in, then it moves away dragging them.
        134 x1, 134 x10 (1474), same in inner mid-range, outer mid-range x8 (1072), long-range x4 (536)

Destroyer (destruidor)
Long rectangle AoE forward reaching 2 floors up. Simple and good.
  • ~157.2 x13 (2043.6) [21.28]

    • PvP
      Multi-hits knocking to its center then explodes blowing away.
      136 x13 (1768)


Nuclear Launch (canhão nuclear)
Guidable AoE where you use the arrow keys to move a cursor across the stage, then many seconds later that spot explodes. It has good distance to the sides and normally reaches 1 floor up but if you aim it slightly below the platform it will hit 1 floor up and 1 floor down.
It's good at targeting multiple monsters and can target any part of the screen. But it takes so long to trigger that it may miss.
  • launch ~336.9 x6 (2021.4 [21.05], launchable monster aerial 2863.6) [29.82]

    • PvP
      Other players can't see where you aimed it at before it explodes.
      Very hard to connect but floats up to juggle combo afterwards.
      float 293 x6 (1758) plus hit


LV4 skills
Self-buff for 20sec: boosts C cannon summon and C↓ electric pillar summon. Their damage inherits SpATK. Also makes activating C↑ last for 30sec instead of 20sec.
  • Cannon - Either C-Forward or C-Back cannon input places the new type of cannon. Spreadfires 3 piercing shots forward very far, ~42.6 x3 (127.8) attacking 10 times lasting around 10 seconds, adding 127 DPS as long as alive or doing a total of 1278dmg, but can leave 2 at once for +255 DPS/2556dmg, and has time for at least 2 rounds of summoning and you can leave a 3rd right before the timer ends.
  • C↓ - Electric pillar, lasts 6 attacks with damage ~106.6 x2, can leave 2 at once in addition to cannons, lasting around 8 seconds. (total 1279dmg or 2558 for two, DPS around +159 or +318 for two)
  • Upkeeping 2 cannons and 2 pillars is 10k damage total in 2 summoning rounds, 15k with 3 as it's about to end. (normal turrets without this would be around 2k/3k naturally in the same time)

Awakening
AoE forward to screen edge.
Single hit so weak if it doesn't crit.
  • 2603.20 [20.02]

H
Hits basically the entire screen.
Also gives you ATK +15% and Super Armor for 20sec after it finishes.
  • 128.82 x17, 76.72 x17, 729.98 x1, 434.77 x1 (4658.93) [35.83 if it cost as much as MP4]
5-10b: Mari 2nd job
This is Mari's "ranged" job.

(No airdash, but if dashing off a ledge can still jump midair.
To rocketjump, dash on ground then after one second hold ↑)

GroundZ combo
Fires a bullet up to 3 times in a row, straight or diagonal up/down, can change angle mid-combo. Reaches slightly before screen edge distance from center.
The bullets will explode if they hit on their second half of the range or if it hits point-blank. This explosion can enemy-stack for up to 2 enemies together.
  • ~61 + ~61 (122) per shot, 2+ enemies together 61 + 61x2 (183) per shot
    ~200 DPS which is below average, 300 on enemy-stack which is average; C↑ laser adds ~111 DPS

    • PvP
      Forces standing state on airhit to do full combo even on airhit. The 3 shots will leave standing but can chain into Critical/Double for another shot that does knock down.
      66 per shot, explosion 66 doesn't hit unless enemy is near the end of the shot

airZ
Shoots the gun in a slightly diagonal down pattern reaching as far forward as the straight ground shot.
Firing has some kickback that slightly sends you up and back: you can drop from a platform and press Z to come back up to keep firing down. You can also dash-jump forward then shoot back to keep moving forward faster.
  • ~4 + ~66 (70)
    C↑: ~49 x4 (196) (~374 DPS repeated up and down a platform)

    • PvP
      The shot has a small range directly below you where it will deal a hit but still shoot a bullet separately to this, won't knock down on airhit.
      C↑ hits from straight down to diagonal up.
      • bullet 116, explosion near the end 66
        C↑: knockdown 86 usually x1-2 (86-172), may do more hits on airhit or super armor (x4 = 344)

Backdash forward Z
Single straight shot while turning around.
  • ~47 + ~82 (129)

    • PvP
      Doesn't knock down.
      144

DashZ
Her only attack that won't try to trigger a gunshot.
Launches.
  • launch ~151
    C↑: ~49 x4 (~196)

    • PvP
      Startup is a tiny bit on the slow side, but has good range. Range up has potential to juggle/anti-air and launches on every hit. Barely has enough time to combo into itself a number of times then combos into groundZZZ.
      (like other Mari job dashatks, tap ↑ instantly after the Z to dash attack and move diagonal up at the same time, even if you dashed off to midair)
      • launch 263
        C↑: float 86 normally x2-3 (172-258)

XX pose
Has only 2 functions: ↑ for MP shield, or X again to prepare an ice bullet at no cost (only charge time). Can also dashcancel during.
Ice shot can be fired only on ground straight forward with X. It freezes monsters without super armor for 3 seconds.
  • ~207

    • PvP
      Does no damage and freezes (they recover from mashing left/right), can combo into groundZ or dashZ.

Summons
C→
A long-range turret firing a shot that arcs down. Cannot deal damage until it explodes on the ground.
Lasts 8 seconds / 3 attacks.
~139 x1-3 (139-417), done 3 times
[Lasts 8 seconds, boss DPS when active 156, total for placing 1251dmg]

  • PvP
    97


C←
A fun bumper mine to go with your gunplay. Can place 2 and each waits up to 5 seconds, launches on hit.
  • launch ~132

    • PvP
      Can only place 1 at cooldown 10sec.
      It has a long push and forces standing state, so you can always combo after it with groundZ/dashZ, even if it was you who blew them into the mine.
      long push 92


LV1 skill
Single melee hit forward.
  • ~610.4 x1 [21.04]

    • PvP
      Has long startup for a skill.
      May hit in the air (barely does not hit 1 floor up).
      Used to hit twice where hitting with both parts sent them so far up you could combo after it into dashZ. Now it only hits once and you can't combo after it anymore.
      launch 531

LV2 skill
Does a line of 3 spaced explosions forward, usually only hits with 2 (and only 1 if too far left or right) but on certain bosses can hit with 3.
  • ~604.5 x2 (1209) [19.19]
    Boss x3: 1813.5 [28.78]

    • PvP
      Does not knockdown on airhit, and leaves them standing while you have almost no recovery, easily comboing into not just groundZ but dashZ. Also has good wakeup trap potential and will combo afterwards if it hits.
      Can be used mid-combo before auto-counter triggers to lower the auto-counter gauge and re-combo.
      526 x1-2 (526-1052) plus combo

LV3 skill
Beam forward reaching noticeably farther than the screen edge from center.
  • ~202.3 x10 (2023) [21.07]

    • PvP
      Has some knockback and leaves standing. You two recover at around the same time so it's not a guaranteed combo after, it can even be dangerous for you if not done from a distance.
      176 x10 (1760)

LV4 skill
For 15 seconds, gun has infinite range, you have +10% ATK and can still skill.
  • Normal attack/doesn't use SpATK
    Ground combo: each ~153.0 + ~102.0 (255) (time for 24 shots, 6120dmg/408 DPS)
    Air shot: ~242.8 + ~102.0 (344.8) (time for 26 ledge-drop shots, 8964.8dmg/597 DPS)
5-10c: Mari 3rd job
This is Mari's "direct melee" job.

(No airdash, but if dashing off a ledge can still jump midair.
To rocketjump, dash on ground then after one second hold ↑)

GroundZ combo
Critical is a direct hit, Double is a hit that can stay in place for up to 3 seconds before it hits.
  • ~189 / ~189 / ~94 x2
    Critical/Double: ~302

    • PvP
      Fast startup and above-average range.
      The first 2 presses reach 1 floor up.
      Critical leaves standing with enough hitstun to combo back into groundZ (and if you hit midair with only the Critical it forces standing to fully combo into groundZ). Can repeat ZZ-Critical until auto-counter.
      Double is a completely different attack: it can stay for 3 seconds before it hits (to do combo-Double even on miss), and it knocks down instead of comboing after, and in PvP Double costs 0.2 bars of MP.
      • 264 / 264 / knockdown 132 x2 (492, 1018 with Double)
        Critical/Double: 526

  • During C↑ - Does high DPS and equally hits in a large part of its range, gets MP extremely fast on groups.
    • ~87 / ~116 / ~146 x3 (~365 DPS repeated)
      Crit/Double: ~332 (combo+Double is ~467 DPS repeated)

      • PvP
        The starter has same range forward but doesn't reach as far up, and the other parts actually reach less far forward than that.
        The first two presses force standing state on airhit.
        Can do ZZZ-Double, then combo into dashZZ. But ZZZ-Double can miss if the opponent is standing higher or lower than you, instead can do "ZZZ, dashZZ" but the timing of that is harder.
        To do the Crit/Double it needs to be doubled-tapped very early after the 1st/2nd/3rd swing starts.
        • force-standing 122 / force-standing 162 / float 203 x3 (893), plus combo
          Critical: launch 578

DashZ
(like other Mari job dashatks, tap ↑ instantly after the Z to dashatk and move diagonal up at the same time, even if you dashed off to midair)
  • ~151

    During C↑ -
    • ~38 + ~77 / ~96

      • PvP
        Simple hit floating up/knocking down. Barely does not reach 1 floor up (can anti-air). Can combo into grab, or Z-held MP1 or hotkey MP2, whether done on ground or DashZ↑.
        float 263

        During C↑ - Very fast poke with decent disjointed range forward, also almost reaches 1 floor up. 2 hits, floats then launches. Then has a 2nd Z that launches even higher.
        Can combo after groundZ combo (or hit with this alone), then can infinite by comboing into itself more times, but when it hits very close to them it bounces them to your side so before then you combo into groundZ instead.
        float 67 + launch 135 / launch away from explosion 169 (371)

Dash, back Z
Slow wave shot, weak in PvE.
*Counts as a skill/special attack.
  • ~11 xN, less hits depending on knockback resistance and width

    • PvP
      In PvP costs around 0.3 bars of MP.
      Big slow piercing shot, drags enemies along and forces standing state on airhit, very good defensive move to catch an attacker even in the air then easily combos into dash then groundZ.
      21 up to x11 if close (231)

airZ
  • ~85
    C↑: ~49 x4 (196) / ~116 (repeating the first swing up and down a platform is ~374 DPS)

    • PvP
      Hits on your entire spot and straight forward, might hit a short distance straight/diagonal up. Has decent range diagonal down. Easily combos from the air into ground combo (Mari's only job that can do this), but has very short active frames for using as air-to-air or falling down on them.
      150

      During C↑ - Hits as a box from straight up and down to a good range forward, weak hit that knocks down instantly. Can do a second swing also knocking down.
      knockdown 86 x1-4 (3 on groundhit, 1 on groundhit far, 4 on airhit/super armor) / knockdown forward 86

air ↓Z
Weak shot diagonal down, to the side reaches until around screen edge from center.
  • ~96

    • PvP
      In PvP costs 0.2 MP bars.
      Forces standing state on airhit to work on air too, hitstun is slightly long and can combo into ground combo.
      71

XX pose
Can ↑ for MP shield, or can X again to begin charging a self-buff (can dashcancel during). You get ~0.55 MP bars over 10sec (disappears early if you get hit), has cooldown 20sec.

Summons
C→
Turret that spreadfires 3 projectile forward in an arcing pattern, good potential area but short duration. Leaves a flame carpet that can hitstunlock light monsters.
Lasts 5 seconds / 2 attacks.
  • ~116 x3 (348), 2 times
    [Lasts 5 seconds, boss DPS when active 139, total for placing 696dmg]

    • PvP
      81 x1-3, burning 1s

C←
Places an object in front, it acts as a breakable solid wall to enemies and basic enemy projectiles, but as long as it's still alive it gives MP regeneration to you and your team nearby, lives up to 10 seconds.
Costs around 0.2 MP bars to place and gives ~0.54 bars across its 10 seconds.
Has 20sec cooldown.

C↓
Costs 1 MP bar to place a teleporter below yourself, place another to connect them. Permanent and can be used by other players (including enemies in PvP).


LV1 skill
Melee hit, plants a bomb on them that explodes after. Enemy-stacking damage so generally weak.
  • 96.77 and splashing 232.25 (329.02) [11.34], 2-4 enemies 561-1025 [19.35-35.37]

    • PvP
      Skillfreezes and does a single melee hit forward, reaches 1 floor up/anti-airs, combos on juggle.
      It explodes when they land on the ground, if near corner can combo into air↓Z then groundZZ-Critical. If very close to the wall could also do backdash shot into groundZZ-Critical.
      blowaway 67, on landing small float 161 (228), plus combo if near corner

LV2 skill
Forward rectangle AoE reaching 1 floor up.
  • ~123.4 x10 (1234) [19.58]

    • PvP
      It catches even on airhit (inside combos, or alone), and can combo after with jump air↓Z shortly before landing then groundZZ (or if C↑ is active, just wait and groundZ). Can be used before auto-counter triggers to set it back down and re-combo.
      107 x10 (1070), plus combo

LV3 skill
Dragging wave forward, average damage at max and much less on most targets.
  • 164.54 max x12 with knockback or wide boss (1974.48 at most) [20.56]

    • PvP
      Slow dragging shot, at the end explodes and freezes to combo after (airZ groundZZ). The end explosion reaches 1 floor up and down too.
      119 x11? (1309)

LV4 skill
Forward rectangle reaching 2 floors up, teleports the enemies to its center then attacks, final hit blows away. More for grouping up enemies than just dealing damage.
  • ~79.9 x28 (2237.2) [17.20]
5-10d: Mari 4th job
After dash after a small delay, can tap and hold Forward a 3rd time to do a continuous run. Jumping during the run will instantly rocketjump.
Rocketjump is faster to do as 4th job, simple tap ↑ a second after dash started, and specifically after a rocketjump she can airdash once (to any side).
4th job can air jump from dash for a much longer available time than other jobs (after dashing off a cliff or dropping with ↓).

GroundZ combo
Has good AoE on each hit, getting MP fast if hitting multiple monsters.
Can infinite combo light monsters with the first 3 Zs.
  • ~60 x3 / ~60 x3 / ~185 / launch ~185
    Critical/Double: ~54 x3 knockdown (162)
    (repeating ZZZ-Crit is ~360 DPS, ZZZ without knocking down is ~318)

    • PvP
      Decent range and normal speed. If continuing on miss can do 3rd/4th which have longer range, 4th launches.
      The 4th hit never combos from the 3rd (they can't grab you at that distance but can still break out of the combo with skills or an invincible move), so the normal combo is ZZZ-Critical every time.
      Critical/Double has long range like 3rd/4th, floats/knocks down. Will reach 1 floor up but counting float only lands 1 hit. If Critical/Double switches sides the physical hit from the combo will instantly switch sides too before the new hit strikes.

      With MP you can do ZZ-Critical, holding Z after starting Critical to cast MP1 after the 3 hits of Critical, then recover from the skill and do dashZ (then may MP1 again for another dashZ).

      You have non-guaranteed versions of the combo by doing the full 4 hits: ZZZZ-Double, hold forward and ZZ for knockdown (can MP1>dashZ). In the corner you can do ZZZZ-Double then C block, to attempt groundZ again.
      • 85 x3 / 85 x3 / 257 push / launch 257 (1024, 1540 with Double)
        Critical/Double: float/knockdown 95 x3 (285), as Double, 172 x3 (516)

DashZ
(like other Mari job dashatks, tap ↑ instantly after the Z to dash attack and move diagonal up at the same time, even if you dashed off to midair)
  • ~75 x2 (150)

    • PvP
      Disjointed hit forward like 1st job, doesn't reach up very high, launches by a very small height, if both hits connect can combo into Z-held MP1 then dashZ again.
      launch 131 x2 (262)

Dash, back Z
Less useful for PvE.
There has to be a small delay before the Z.
Reverses the dash direction passing through enemies (can possibly pass through a monster but can be hard if not doing it from a wall) also dealing a small hit on touch.
After starting the backdash, can hold Forward to run, or tap Up for rocketjump.
  • ~57 x2 (114)

    • PvP
      Deals a hit in a line and can move away from either held run or rocketjump, from the rocketjump can do an interrupting hit forward to cover your advance anytime you want.
      float/knockdown 101 x1-2

airZ
Single hit.
  • ~75

    • PvP
      One hit with instant knockdown. Great range, hits as a box from you a good range forward but stretched up and down almost 1 floor (can slightly hit straight up and down). Minimal active frames.
      knockdown 157

air↓Z
Instantly falls straight down with a radius hit. Can be done from normal jumps, and from rocketjump/rocketjump airdash to just fall faster.
  • ~168

    • PvP
      Floats/knocks down a medium distance to the side, can combo into held MP1 (or only hotkey MP1 depending on timing) into dashZ.
      If done early after jumping will pass down through one platform if you can drop from that platform.
      5sec cooldown.
      Despite how it looks, the hit is not made after you land, it starts a set time after the Z starts and continues until after recovering from landing.
      float/knockdown forward 117

C block
A split-second block. With hard timing will parry a single hit for no damage but may still be affected by launch/knockdown despite damage being nulled. Has 5sec cooldown.
Also deals a very weak physical hit in small radius.

  • PvP
    The physical hit forces standing state on airhit, to attempt to combo into groundZ or grab.

XX pose
No dashcancels from this job.
  • XX Z - Makes orbs orbiting around you, gives 0.55 bars of MP over 10sec but as long as this buff is active you can spend it on one of two moves. Buff disappears early if you get launched/knocked down.
    Starting orbs has 20sec cooldown.
    • X↑ - Makes a barrier reaching to the sides and 1 floor up, anyone of your team inside it is invincible to enemy attacks. Lasts 2 seconds. Can be done on its own or cancelled into from groundZ combo (except Critical/Double) as a dodge that affects even party members.
    • X→ - Non-piercing shots straight forward, too weak to be useful. (~74 x3, 222dmg)

      • PvP
        Can be done on its own or during groundZ combo. Can do ZZZ X→ then start Z again or dashZ, not a true combo but barely.
        For story reasons, this demon-energy-sealing shot affects AP characters, halting their AP regeneration and disabling their skill/technique use for 5 seconds.
        rise and force-standing 52 x3 (156)

  • XX ↑ - MP shield.

  • XX C - Locks yourself in a stance where you can shoot with Z and aim up and down, leave with Left/Right. Doesn't work while orbs are active.
    Too weak in PvE.
    • ~266 (only ~159 DPS repeated)

      • PvP
        The shot goes perfectly straight (reaching 1 screen past screen edge, half of Gorge of Oath) and can angle up or down up to 45 degrees. On hit launches away, long recovery between shots timed to pass by them again after they stand back up from the previous shot.
        Has great potential range but is more for safely hassling an enemy who wants to stay away than actually doing big damage. It might be easier for them to dodge the closer they are.
        launch 185


LV1 skill
Single hit forward, reaches 1 floor up, launches (aerial bonus if done twice).
  • launch ~620.1 [21.38]

    • PvP
      Instantly freezes time and does a single hit forward, floats them high up. Reaches so far up it can hit 1 floor up, anti-airs/juggles easily.
      If this hits them on the ground, you barely have time to combo into dashZ, but they stay in the air for longer if this hits them in the air.
      float 540

LV2 skill
Radius explosion reaching 1 floor up. Easy AoE damage.
  • ~159.3 x8 (1274.4) [20.22]

    • PvP
      The startup time before it freezes time makes it less possible to use inside combos. On hit floats to only combo into MP1.
      float 132 x8 (1056)

LV3 skill
Rains a row of meteors, reaches around 1 whole screen away to both sides. Can do much lower damage to small enemies, average damage to normal bosses, and above-average damage to bigger bosses.
  • ~152.6 per hit
  • Most normal monsters: 3 or 6 hits (457/915) [04.76/09.53]
  • Tall monsters: 6 hits (915) [09.53]
  • Normal bosses: 6 or 12 hits depending on position or always 12 (915/1831) [09.53/19.07], can double or triple hits if boss is moving sideways
  • About 4k on raid bosses

    • PvP
      Can hit the entire stage but may still be avoided from a skill or an invincible move and does little damage. Could be used after you know they have no MP left.
      float 124 x3-4 (372-496)

LV4 skill
Does a straight-up beam from your spot at melee range to both sides stretching all floors up and freezing for 3 seconds, and also hits the entire stage with hail.
  • Hail 81.44 x14 not inheriting SpATK (1140.16) [08.77]
    Close beam 67.17 x28 (1880.76), total 3020.92 [23.23]
5-11: Dio (general)
GCC notable changes:
  • Onrush nerfed damage and cannot hold infinitely
  • Removed 4th job's Devil 1/2/3 and Weapon 1/2/3 passives
  • Blink teleport raised to 12+ second cooldown, and Grip raised to 9

Story:
The creator had the universe with two groups: creation gods meant to nourish new worlds, called deities, harmonically with destruction gods meant to wipe and erase decrepit or threatening worlds as necessary, called demons. Demons were given their own world called Elyos to reside in and would split themselves into different clans (such as Burning Canyon and Crimson River) and different races; the "pure" demon race are the asmodians, and one race called the ancient demon race had a separated advanced civilization that was deemed by the creator to be too self-indulgent and was ordered completely killed. The ancient demon war raged but the ancient demons held their ground against both asmodians and deities with their very strong army as their most powerful member, Duel, could keep the situation in check with their extremely strong magical living sword Eclipse, alongside his lover Edna who held the other legendary demon weapon, Transcendence. Duel was responsible for the death of the allied asmodian forces leader, Werner Burning Canyon.

Until in one battle Edna sacrifices herself in order to save Duel's life in a tragic moment; Duel immediately went mad and slayed virtually everyone involved of both sides in the war including the majority of his own race, making shorter work of the war.
As the asmodians rebuilt Elyos, the then leader of the asmodians, Heitaros Cratsus, preventing another war, scapegoats that civilizations from other worlds would pose a danger to ALL demons inside Elyos just as this, and that their goal first should be to make one singular empire that could fight and conquer even other worlds for their own kind's survival.
Heitaros quickly moves to expand their territory by conquering other innocent worlds for his own gain, and even the rest of Elyos itself in the name of his clan the Hardliners. All demons after this point can be classed under only two factions: the Moderates who did not want to support him and wanted to keep their original purpose, and the Extremists who supported him and only wanted demon supremacy in the universe.

Millenia before the game begins, Heitaros had already taken many worlds and enacted an assault on Aernas after opening a dimension door to it in its most blessed and advanced city Kounat, fighting against the three goddesses who were previously in charge of Aernas and left but returned purely to defend it once more, as well as many Moderates willingly defending it after a formal order. Dio Burning Canyon, Werner's own son, was one of them. After Heitaros was repelled with the goddesses nearly exhausting their powers he fled back into the dimension door that was then sealed by the goddesses, before they left too. The remaining demons spread throughout Aernas and started to transform the world's creatures into monsters with their demonic energy; thus the human world no longer had their divine beings and danger existed even from monsters from their own world, in addition to the threat of further demonic invasions around Archimedia.

The Moderates returned home shortly afterward, but recently, Dio has a premonition, and after observing is alarmed that many dimension doors have been loosening in Aernas again (after Ashtaroth stole Thanatos's Orb of Ascendancy and returned to Archimedia with it) and he brashly goes to shut them down, apparently suspicious that Duel himself will also be found in Aernas, not even knowing this was Baldinar's doing or who Baldinar is; purely human issues are out of his interest.

Fun fact:
Dio had to cut his own power to recently enter the portal he took to Aernas; when you see him in Relics of an Ancient Kingdom, he at his lowered level is still LV80. To create Dio you need a mid-level character and he already starts at LV30.

Also he is an edgelord showoff in-story. Ley is constantly saying that he tries to look tough and unbothered to a detriment but can be sensible and a total scaredy cat. When they were younger she clearly took the lead. But he can still show his age and experience.

Dio's gimmick is that he is a warrior-type character with the standard good dash and relatively bland normal attacks, but he has the fastest base MP regeneration in the game and techniques and big skills to instantly use with the skill shortcut buttons. Originally only AP characters could use A/S/D/F/G for skills or techniques and he was the first.

Standard dash type (slightly below-average)
Dash momentum: ~254 pixels (~257 with dash passive), rocket ~563 (~622 with dash passive)

Skill Tree Style
Dio's skill tree is divided in two separate straight lines, one called Devil Force (DF) and one called Weapon Force (WF). To learn the next job's table of DF/WF you need to master the ending of the previous job's DF/WF. It's possible to put points towards both lines but reaching the end of one barely leaves any points for the other, so you choose between going 99% DF or 99% WF (or hybrid medium on both).
  • Demon Force could be called the "power" or "balanced" side, keeping the same normal attacks while adding many instant-use AoE skills and some mid-range or utility techniques including one HP leech skill. It has stronger combos in PvP.

  • Weapon Force could be called the speed/chain attack side, but its techniques have been made mostly useless since technique cancel nerfs (and raised cost in GCC) and even Onrush's use in PvE is nerfed. It has many new normal attacks but all are pretty useless in PvE except for the combo with a teleport/dive/ledgedrop cancel because of the teleport invincibility time, which in PvP add to his range and agility but don't combo well and in PvP WF's combos actually are much stronger.

  • Hybrid is mainly using DF but taking points in WF too, because of 2nd job skills (Onrush, Chaotic Spark), or until 3rd job (different marble).
5-11: Dio - Normal attacks
Dio's groundZ combos can be altered with a Devil Force 3rd job passive, which makes his V1/V2/V3 combo faster as said in its description but can also lower the PvE damage to equalize the DPS and can change hit properties (can be equipped on and off).

GroundZ combo V1
Will get barely 300 DPS. Can infinite combo non-armored monsters by repeating the first 3 Zs with low range (~222 DPS).
  • ~129 / stagger ~129 / stagger and pull ~129 / rise-stun ~129 / diagonal up knockdown ~64 x2
    DF Speed: 2nd and 4th lower 129>65, 5th raises by 1 (DPS is only equal or lower)

    • PvP
      The starter has fast startup and average range.
      This is his only groundZ where 1st press forces standing state on airhit to continue comboing on air (or V3 does too if with DF Speed).
      5 presses, 4th sends to the air, can chain to ↑ branch before 5th to juggle even higher.
      On corner can loop with 4 Zs into ↑ZZ, repeat. And if you have DF Speed you can don't need the corner for that. (with neither corner or DF Speed, can do 4 Zs into ↑ZZ, hold forward to walk, ZZ↑ZZ)
      2nd press will reach from behind you to forward while reaching 1 floor up from both sides.
      • force-standing 181 / 181 / pull and force-standing 181 / launch 181 / knockdown forward 91 x2 (906, 1227 with Double)
        DF Speed: 2nd has no knockback and lowers 181>91, 3rd press lowers 181>91 (545, 866 with Double)

  • V2 combo
    Will get just under 300 DPS. Can infinite combo non-armored monsters by repeating the first 3 Zs and can add the first hit of ↑ (~165 DPS).
    Cannot start from too close or they get pulled through you. Last press launches for aerial bonus on certain skills.
    • pull ~100 / stagger ~100 / rise-stun ~100 / launch ~100 x2
      DF Speed: 2nd hit lowers 100>68

      • PvP
        The starter has fast startup and long range, and pulls on hit for the rest to connect.
        2nd does not combo into 3rd against fast-recovery jobs (they can mash grab or skill or invincible move).
        3rd press sends to the air, 3 and 4 actually have more range than the first.
        2nd press reaches 1 floor up (diagonal up-back up-forward).
        • pull 139 / 139 / float 139 / knockdown 139 x2 (695)
          DF Speed: 2nd hit pulls and lowers 139>95

  • V3 combo
    Will do ~287 DPS (~317 with DF Speed), can easily repeat the first 3 Zs to hit without knocking down with wide AoE to hit multiple monsters (~270 DPS, or ~321 with DF Speed).
    • push ~112 / push ~112 / push ~112 x3 / no hit + ~112 leaving standing
      DF Speed: 1st hit raises 112>145

      • PvP
        The starter has fast startup and good range.
        2nd press has slightly longer range and 3rd is actually multiple shots pushing forward, 4th is a summoned claw hitting at long-range that even misses if at closest range.

        Tight timing per press makes it easy to not true-combo from 1st to 2nd or 2nd to 3rd unless doing with exactly timed presses instead of mashing (tap Z twice for each of the 2nd and 3rd presses to make it easier), the only guaranteed true-combo route is Z↑ZZ.
        Can corner loop like V1 if with DF Speed (combo ↑ZZ, repeat).
        Can try to loop the first 3 presses but they can mash out.
        The last claw hit has a bonus hit that forces standing, but to hit needs to miss the normal hit midair, or if you do all 4 presses but tap ↑ before the claw hits (going into dash grab or attempting groundZ).
        • small pull 157 / forces-standing small pull 157 / forces-standing 157 x3 / knockdown forward 15 (800) (rare: + forces-standing 157)
          DF Speed: 1st hit now forces-standing like V1 combo first hit

  • V4 combo
    This is a combo that can press ↑ to disappear with invincibility as a dodge then teleport into a nearby enemy with a launching hit (can work to pass through a monster), ending in a float that can sideZ for a divekick or Z then divekick. Normal combo can also ↓ instead to cancel combo and drop from the platform. Cannot do Up/Down from Critical/Double. Has these uses but damage is not high.

    The 4th Z groundbounces light monsters and also monsters with temporary animation super armor.
    Can launch light monsters with ZZZ ↑Z, then repeat 1 or 2 Zs into ↑Z again.
    • ~100 x2 / ~100 / launch ~100 / ~100 groundbounce through armor
      ↑Z: launch ~60 x3 (180) / ~145

      • PvP
        Does not have the juggle combos of V1/SpeedV3.
        Fast startup and above-average range, from 2nd on has long range.
        Has some range walking forward and can cancel into platform drop or invincible teleport attack which can work like a counter. Teleport can be done alone as Z↑ anytime as long as on the ground and not running.
        Easily combos all 4 Zs then after the groundbounce ↑Z, then barely can combo into dashZ V1 or airgrab.
        pull 139 x2 / force-standing 139 / launch 139 / groundbounce 139 (695, with Double 1016)
        ↑Z: float 42 x3 (126) / float 100 (226)


Critical/Double
Single forward hit.
Also, all Dio Doubles reduce skill cooldown by 1sec.
  • Critical: ~115 (Double: ~184)

    • PvP
      Easy to use very fast single hit, can hit 1 floor up exactly above you/anti-air close.
      knockdown forward 200 (as Double, 321)

  • V2 Critical
    Does a very small backstep away from that side while doing a mid-range beam. Still fast recovery.
    Intended for Combo V3 because of the long range it sets and this reaches it while Critical V1 doesn't reach it. More PvE damage than V1.
    • ~54 x2 and ~67 x1 (175) (Double: ~97 x2 and ~119 x1 (313))

      • PvP
        First 2 hits force standing, 3rd hit knocks down (can cancel into tec/skill before the 3rd).
        force-standing 96 x2, knockdown 117 x1 (309)

  • V3 Critical
    Single hit with some damage after/during combo, blows away light monsters.
    Can only be done forward; will not override dashZ V1/V2 backward (divekick stance will).

    Equipping this replaces forward dashcancel from the techniques PhaseEdge / FlashSword / FarAway with this kick. Also can be done out of dashZ V2.
    • 208.51 (Double: 312.78)

      • PvP
        Wallbounces on corner but not very useful.
        Able to hit juggles but range is not tall.
        Could combo after the WF groundZZZZ but going into teleport already works.
        This Critical replaces forward dashcancel from PhaseEdge / FlashSword / FarAway which also can kill their PvP combo potential, can be done after dashZ V2.
        359 small blowaway, will wallbounce a set distance on corner


Combo ↑Z Z
2nd press blows away, but stopping at 1st can be useful by pushing monsters without having to knock down.
  • rise-stun ~100 / blowaway ~271

    • PvP
      They have long-ish range, can use this where the next normal swing would be too short.
      Each hit floats, then can always combo into dashZ (or tec/skill), but if you do ↑Z Z on V1/V2 combo after 3rd Z launch you have much more time before they fall, comboing into airgrab or more tec/skills.
      float 139 / float 189 (328)
5-11: Dio - Normal attacks (part2)
DashZ V1
First swing pushes and rise-stuns, second swing blows away.
Very weak but can group up light monsters (including with only the first swing) before going to another attack.
  • rise-stun ~51 x2 (102) / blowaway ~64

    • PvP
      Fast startup. The first swing forces standing state on airhit to combo, then can press Z for the knockdown hit or cancel the first swing into tec/skill (or do first swing into grab or attempted groundZ) (or do first swing into X if on the ground). 2nd swing hits forward 1 floor up/anti-airs.
      This attack has a land-cancel: if pressing Z right before air run ends, will auto-cancel on landing, to directly combo the first swing into full groundZ instead. Can duel with backdash-jump, airdash in, late Z autocancel, groundZZ.
      You're forced to do the 2nd swing if it was during a held run/held air run, stop holding forward first.
      force-standing 90 x2 (180) / knockdown forward 112 (292)

  • DashZ V2
    A single swing, launches monsters up.
    • ~70 x3 (210, aerial 280)

      • PvP
        A single swing, has some active time and reaches 1 floor up/anti-airs, but has longer recovery and is short sideways. May combo into grab or tec/skill, cancels into X which re-stands them then combos into delayed combo V2 or Speed combo V3, or V1 combo still works since the 2nd swing missing the 1st.
        If WF, can also cancel into Double V3.
        float 124 x3 (372)

  • DashZ V3
    A very long moving dash attack placing you close to them with both of you still standing up, or can Z again to launch/knockdown or cancel into X if on ground.
    Can cancel backward into divekick flight stance (before the 2nd Z) allowing it to be started midair.
    • ~72 up to x3 if close enough (216) / small launch 56.99 x3 (total 386.97)

      • PvP
        The bigger distance allows you to rush more when starting with this (and can cancel backwards into divekick stance) but doesn't fit in all the same dashZ combos anymore (slower to start, doesn't hit as high, moves too much).
        Forces standing state on airhit so it won't knockdown if it scrapes them in the air, possibly setting you up for a hit.
        Equipping this passive makes Dio unable to grab on dash except after holding dash for a moment (so that you can't do only the first Z then grab immediately). Can do only the first Z for a standing reset (or combo into tec/skill, or other Z which may go into tec/skill too). If exactly in the corner, can do only the first Z into held walking grab.
        force-standing 126 up to x3 if close enough (378) / float 45 x3 (513)

←← Divekick stance
This can be started in two ways. This is first a doable backdash from groundZ, or dashZ V2/V3 in ground or air, moving you up and back into a flight stance where you can sideZ for a divekick. You can also do the kick directly if you jump forward, ↑↑, and do down-forwardZ.

You have invincibility on the backdash but for only an extremely short time (lost by the time you're 1 floor up). From flight you can divekick with sideZ (which then can cancel landing animation into dashcancel, or tec/skill), or ↓↓ to fastfall straight down, or ↑ which will let you glide sideways before inputting kick or fall.

Equipping this replaces backward Critical/Double from groundZ, and backward dashcancel from the techniques PhaseEdge / FlashSword / FarAway.
  • small launch/knockdown ~122

    • PvP
      Divekick can work as an easy long-range approach by diving right in, and a mindgame by switching between diving forward or down or back or holding flight with ↑, or dive and dashcancel landing, with this stance ready again at anytime and with dashZ V3 catching at straight lines.
      On hit floats/knocks down and you can dashcancel away or only combo into tec/skill, but if hitting either with near minimum distance or near maximum distance can combo into dashZ V1 (much easier if diving to below your own platform).
      float/knockdown 85


airZZ
It's possible to ottoshot with this but the timing is too hard.
  • ~75 / push ~107

    • PvP
      Basic airZ, short active time. Starts diagonal up then reaches directly below you or a tiny distance behind your back or foot (second swing only diagonal down to straight down). Hitstun is not high for both first and second swings (landing with an airZ/airZZ into groundZ may not combo against fast-recovery jobs).
      But this can be a repeated poke attack as air-to-ground, the opponent may not know what to do against this. You slightly float on the 2nd swing, can choose to go left/right. The easiest things to try to combo from this are dashgrab and skill.
      2nd hit forces standing state on airhit, so if the first misses and the second hits midair it sets up groundZ/dashgrab.
      157 / forces-standing 225 (382)

  • airZ V2
    Strangely bad in PvE. None of the hits have proper hitstun except for the last hit knocking down. Using this on monsters can get you hit for no apparent reason and it also does less damage. It has no good side.
    • ~75 rise no hitstun / ~27 x3 rise no hitstun with last knocking down

      • PvP
        One quick swing of course hitting diagonal down and straight forward, but also hits diagonal up or straight up even 2 floors above where you stand.
        On successful hit only, has another Z that hits 360 degrees knocking down.
        Changes from dueling with the optional moving float of airZZ, to just rushing forward and hitting, has big range especially up and on any hit can do the second swing for damage and knockdown which will hit from any direction.
        The first swing has better hitstun to combo airZ into groundZ than V1, but to combo this into groundZ, you cannot do airZ too close to landing or the attack animation will stay and won't automatically cancel back into standing fast enough.
        157 / 59 x3 with the last knocking down (total 334)


↑↑Z glide
Can only be done midair while not airdashing. Must be airborne for around half a second first (but not so long that his jumping animation stops: running extends the timer).
Dio flaps his wings and hovers still in the air for one second, can press Z to do a swooping attack forward, can also do just the glide to barely reach 1 platform higher in your jump.

The attack is pretty useless in PvE, hits at the second half of the screen and blows away.
  • launch to the side ~253

    • PvP
      Can use below your platform if you drop while finishing a dash.
      Hits only in mid-to-long range forward, only starting hitting way post normal melee range, but can reach slightly past screen edge from center. Easily hits the floor you are on and the one above. Has super armor after the Z.
      On hit sends straight up, may grab or tec/skill afterward but how much time you have depends on how high they were.
      After the attack, you are in recovery until landing but can cancel into airZZ without turning around.
      Moves farthest if you do ↑↑Z after a rocket.
      float 176

Marble
Marbles can be charged with X button attacks and activated with C once full. You can choose 1 marble.

Power marble: +20% ATK, lasts 15sec.
Spell marble: -28% AP cost (14% in PvP) for 15 seconds. In PvE can cast two MP3s with 4 bars.
Time marble: tecs/skills start with cooldown reduced by 4sec, for 15 seconds.
5-11: Dio X attacks
X→ (choose one)
Dominate (dominação)
Cooldown 7sec
Hits at only mid range forward.
  • small launch ~110.35, ~55.17 up to x4 (331.03)

    • PvP
      Will try to float them in place pulling to you, comboing into Speed Combo V1/V3 for full combo, impossible if they're slightly lower than you.
      float pull _, float _ up to x4 (_)

Flash Sword (saque rápido)
Useless in PvE except for charging marble. Does a dash attack forward.
  • 105.14 x4 (420.56)

    • PvP
      A very quick long dash attack, one swing of 4 hits, knocks down on last hit or can cancel into a skill (not technique).
      If you hit exactly at the maximum distance it misses the last hit and doesn't knock down, letting you attempt groundZ V2 or dash attack or grab.
      Can dashcancel from the ending, only slightly earlier than it ends.
      _ x4, last knocks down

Charging Death Star 2 (carga horizontal)
A very fast long dash attack of 1 hit passing through enemies. Can be used as a non-invincible dodge button that also builds marble. Blows away light monsters to behind you.
Charging (maxed when he starts shaking) slightly raises damage and distance.
  • high launch backwards 174.51 (or half-charged 296.69, fully charged 362.37)

    • PvP
      Dash attack, knocks down forward, at best can be used alone or in combos to tumble them off a cliff so you get another attack (groundZ V1, or dashZ, or airZZ V1 into attempted grab/groundZ).
      If charged to max and hitting on groundhit (impossible to combo into that) stops them before they fall then can combo into something that floats/launches (Z↑ZZ, dashZ V2, certain skills) or they do fall down.
      knockdown forward _-_


X↓
Shatter Fist (garra estilhaçante)
Cooldown 7sec
Pounds the floor dealing one hit to all enemies within a circle, reaches 1 floor up and down hitting farther forward than back. Charges marble for every enemy hit.
Launches light monsters in place to set up aerial hit skills.
  • high launch ~250.09

    • PvP
      Launches from a large area to easily combo into combo V1 or Speed V3. If they're from the floor below must dash-drop-grab, if they're from the floor above can't really combo (possible to jump-dashZ V1 but timing is very hard).
      _dmg only if they fall without being hit midair


XX (choose 1)
Phase Edge (lâmina afiada)
Does a short melee hit forward that also hits a set distance far ahead.
Useless in PvE, except for charging marble.
  • 172.92 x1 + 194.63 x1 (367.55)

    • PvP
      Hits at very close melee range and a space forward at mid-range, both leave standing. Can dashcancel the ending early.
      Forces standing on airhit so can do on juggle too. The close hit will combo into dashZ or grab, afar can attempt dashZ which barely doesn't combo from it, or from any range may combo into another tec/skill.
      Steps forward during animation, if using by a cliff will fall and hit your floor and the one below.
      If you hit the close part late in the animation it can combo into groundZ (by falling off a cliff, or by comboing into ↑ZZ in the corner then using this technique so it hits late) although combo V1 into ↑ already loops naturally.
      close _, far _

Charging Death Star 1 (carga vertical)
Useless slow hit forward, can charge but doesn't change much.
  • 171.55 x1 or x3 (171.55/514.65)

    • PvP
      A single small swing forward, forces standing state on airhit and can chain further into a skill (otherwise it has long recovery).
      Can charge the swing for more hits but it's never good to.
      force-standing 211 x1-3

Evil Shock (choque maligno)
Cooldown 7sec
Useless in PvE, at best can stun certain monsters with upgrade A which disables Evil Eddy's spreadshot.

Places an orb in front of where you are, nothing collides with it. It can stay for up to 9sec and you can have up to 1, then press XX to detonate it.

4th job upgrade A: gains an extra hit that binds for 3sec.
4th job upgrade B:
  • ~396.12, upgrade A bind _

    • PvP
      You can leave it around and manually detonate when needed. Dashcancel from detonation to combo into dash attack, hardly any time to combo into anything else.
      With the bind they get frozen for a lot more time (but only on groundhit, not airhit), more hits on them will not break the bind and they will release on their own when mashing where they can combobreak before you hit them again after they release. To be safer you could detonate then grab, or a few Zs into grab.
      The orb explosion almost reaches a floor up and down so it can spread up or down if placed in enough of an incline.
      float/knockdown _, bind +0

Far Away (distância)
Very quickly will do one hit with good range left and right then immediately can dashcancel out of the animation, could be used to stop an attack animation and start running. Will charge more marble if hitting one monster with each side or hitting inside a giant monster with both sides.
Launches monsters high slightly to the side setting up aerial bonus (for certain skills to try to juggle one enemy).
  • launch 312.49

    • PvP
      Can be used to instantly hit a large area to your sides especially after movement (or WF divekick) then is free to dash out. Also easy to add inside combos, always combos into grab or maybe dashZ.
      blowaway _, plus combo


X↑ (choose one)
Deathstar Uppercut (corte aéreo com foice)
Cooldown 7sec
Single swing, blows light monsters to behind you.
  • _ and launch back _ (_)

    • PvP
      Sends them behind you. If in the middle of a combo, and you have combo V1 or Speed V3, you can chain into this then turn around and do full groundZ again. If you have your back to the corner you can do that even if this hits alone even as anti-air.
      The first hit is to both sides and reaches 1 floor up, but the moving hit is only straight forward.
      _and float back _ straight forward (_) plus combo

Grip (pegada)
Cooldown 9sec
Does a short hit diagonal up then flings you up and forward into the air.

4th job upgrade A: weak bleed (70).
4th job upgrade B: saps MP in PvP.
  • _, bleed +70 ()

    • PvP
      Works like a semi airdash (putting you into the air where you can still freely dash and attack) and also has a, interrupting hit in it.
      On hit forces standing state on airhit, can anti-air since it hits extremely fast (or use inside combos after any launch) then turn around and airZ after they land to combo into grab or attempt groundZ.
      Can be used from 1 floor below to hit then combo into airZ groundZ._


X←
Rebound (ricochetear)
Cooldown 7sec
Creates a small AoE a set distance forward (distance is farther with the skippable passive in skill tree, not unequippable after learned) with a hit that tries to pull them back closer to you.
  • pull ~362.20

    • PvP
      Can be used to hit by surprise but does have some startup time.
      Blows them into the air closer to you, directly comboing into groundZ V1 or Speed V3. Range +1 easily catches from outer 1/3 screen for combo. Range +2 can be a shock from how far it is. Range +0 can be possible from ground combo (especially after one hit of ↑) .
      spinning blowaway pull _
5-11a: Dio Devil Force
Techniques

Blink / Vertical Blink (lampejo / lampejo vertical)
Cost 13 AP/0.4 bars, cooldown 12/13 seconds, 15/16 if not maxed
After a NOT invincible moment of startup, teleports to mid-range forward with basically no recovery time (Vertical: straight up). They significantly nerfed the cooldown so it hardly can be taken as a dodge anymore and also raised the minimum AP cost of techniques.

Devil Force upgrade A: blinks can be used midair.
Devil Force upgrade B: reappearing will make a weak explosion for an interrupting hit.

  • PvP
    Can be used to teleport closer to them by surprise or sometimes as a dodge.
    4th job upgrade B will float the enemy, barely comboing into groundZ claw airhit, or dashZ or rocket airgrab.

Life Keep (existência dimensional)
63 AP/1.9 bars, cooldown 1 minute 39 seconds
Self-buff, costs the 2 bars and also 50% of your max HP. The effect is if you die within 1 minute 40 seconds, you will revive with 36% HP.
Since it costs a skill slot to even equip, it's generally not useful (given that you can get more HP potions/bonus lives than you need) except in no-revive stages.

Devil Force upgrade A: while it still lasts, basic projectiles (rare outside of PvP) do -20%dmg to you.
Devil Force upgrade B: cost lowers to only 30% of your current HP, but still needs at least 30% to start.

  • PvP
    Revives with 18% HP (761).
5-11a: Dio Devil Force (part2)
LV1 skills

Death Scythe (foice mortal)
Simple forward combo, moderate duration/invincibility time. Good to have as the MP1 to use for invincibility, won't walk past a solid monster.
  • ~197.1, ~197.1, 206.5 (600.7) [20.71]

    • PvP
      Needs groundhit to fully combo the 3 hits together.
      After this can combo into the technique Death Star Uppercut.
      171, 171, small float 179 (521)

Cool Spiral (carga com lança)
While flying does a dash attack forward.

4th job upgrade A: after casting this, for 10sec your jumps cover 2.5 floors and your walking speed is boosted (dashing speed is barely affected).
4th job upgrade B: when starting, can also choose to aim backwards, or straight up recovering midair.
  • ~143.7 x4 (574.8) [19.82]
    Upgrade B up: ~113.0 x4 (452) [15.58]

    • PvP
      Knocks down forward. 1 hit of the 4 will scrape 1 floor up.
      Upgrade B up version combos into airgrab and can hit 1 floor up if from exactly below them.
      • float 125 x4 (500)
        Upgrade B up: 98 x4 (392) plus airgrab (762)


LV2 skills

Death Star (estrela da morte)
A long AoE forward but hits are spread smaller along the total range, even at best the damage is not good.
  • max ~115.1 x7 and ~0.3 x3 and ~68.1 x3 (1010.9) [16.04]

    • PvP
      Instantly shoots forward pushing to mid-range on button press, hitting again from long range floating them to you. If you have DF Speed combos into groundZ V1/V3 (if not, airgrab) so you can also combo into this before auto-counter triggers to re-combo.
      Can even do more hits at very long range, but casting will not timefreeze opponents at very long range.
      push 64 x7, close/mid is 64 x3-4 float pull (640-704), far is 123 x1 and 64 x5 (443), plus combo

Rake Hand (garra demoníaca)
Long rectangle AoE forward that reaches 1 floor up.
Easy AoE and can launch with a normal attack first for +50% aerial bonus.
  • launch 980.28 [15.56], aerial 1470.42 [23.34]

    • PvP
      Directly combos into walk groundZ V1 or Speed V3 (if not, airgrab) so can do before auto-counter.
      Hits 1 floor up so it's good at anti-airing.
      launch 687, plus combo

Evil Eddy (fenda profunda)
Needs to mash Z during animation.
Slow wave attack straight forward and reaching 1 floor up, but will miss many hits if they can't take knockback properly or aren't as wide as the full AoE or if started from afar.
  • ~49 xN
    Maximum x21 (1029) [16.33]
    (unmashed version: around 520)

4th job upgrade A: inflicts bind for 3sec.
4th job upgrade B: more lenient on dealing hits, shoots one piercing ball AoE straight forward which hits this floor (and the one above if mashed), with also another ball above it (hitting your floor and the one above) and another below it (hitting your floor and the one below).
  • ~19.3 x21 thrice
    Your floor: average boss ~50 hits, max x63 (965-1215) [15.31-19.3]
    Floor above: max 42 hits (810.6)
    Floor below: max 21 hits (405.3)
    Unmashed around 370dmg with all 3

    • PvP
      Also combos into groundZ V1/SpeedV3, with even enough time for an airZZ first.
      Unmashed it's a single bullet reaching 50% over screen edge.
      Upgrade A: mashed version will bind on final hit, unmashed version on every hit, with these binds not breaking when you hit them again without launching/throwing but is instantly broken when they mash out with them possibly then doing skill. Can try a few hits and a safe way to end it is grab.
      • 38 x20 and 38 float (798), plus combo
        Unmashed: 38 x6 with last floating (228)

        Upgrade B: 16 xN and final float 16, same floor ~63 hits (1008), above ~42 (672), below ~21 (336)
        Unmashed: each 16 x5 and float 24, same floor 15+3 hits (312), above or below 5+1 hits (104)
5-11a: Dio Devil Force (part3)
LV3 skills

Necrotic (esquife de ossos)
Rectangle AoE forward to screen edge.
The first hit is slightly less wide on both sides (enemies don't take the full timefreeze unless they're in range of the first hit when casting).
Shortly after beginning this skill you can cancel into another skill and this will still hit.

4th job upgrade A: if it hits, restores 20% HP per enemy hit (10% in PvP).
4th job upgrade B: if it hits, restores 0.8 AP bars (lowering cost from 2.7/90 to 1.9/63).
  • ~369.8, ~369.8 x4 (1849) [20.54, if counting MP cost as reduced from upgrade B then 29.34]
    (needs 2nd job upgrade to change hit count from 1+2 to 1+4)

    • PvP
      Floats to combo into groundZ V1/SpeedV3 (or else dashZ).
      322, float 322 x4 (1610, 1288 without first hit), plus combo

Black Space (esfera das trevas)
AoE hitting to mid-range left and right and 2 floors up and 1 floor down. Takes 2 seconds to start where in this time it will keep doing very weak hits to try to keep them in.

4th job upgrade A: for 5sec after casting, damage taken is reduced to 1 and you have hyper armor.
4th job upgrade B: for 5sec after casting, a small amount of damage you take is reflected at the attacker.
  • Very weak hits, then ~103.7 x20 (2074.8) [23.05]

    • PvP
      The initial hits pull but don't hitstun, so opponents may run away or skill in time. But if you're on a different platform than them, when pulled they may be sent airborne up/down to you where they cannot skill anymore.
      On hit combos into groundZ V1/SpeedV3 (if they're on the floor above you, must airgrab or Grip), without V1/V3 can airgrab or dashZ.
      pull 1s, float 66 x20 (1320), plus combo

Kill Zone (zona mortal)
Without freezing time, hits from slightly behind you to mid-range forward, stretching 1 floor up. It will keep dealing damage at every half-second for 12.5sec.

4th job upgrade A: slows enemies, including bosses. Duration lowers to 6sec.
4th job upgrade B: will keep knockbacking monsters towards the center (only to monsters that don't resist knockback). Duration lowers to 6sec.
  • Start ~1689.1 x1, DoT ~52.7 x26 (1741-3059) [19.34-33.99]
    Shortened version max 2374.2 [26.38]

    • PvP
      Will keep doing hits to them inside the area without knockback, each hit has hitstun but not enough to combo between its hits.
      If not against a fast-recovery job, can infinite with it by repeating ZZ/ZZZ on the opponent while they are already in it. Slowing version works better and works as an infinite combo even by itself but lasts less time.
      If they aren't inside it, can juggle them into the AoE (with combo V1 or combo ↑) for the AoE to hit them midair and force standing again so you can groundZ again.
      Can be easier to set up when knocking down the opponent.
      Knockback version will keep pulling them left and right from the center over and over, not good.
      force-standing 75, 35 xN

Chaos Hit (corte caótico)
Does multiple big AoEs in a wave forward to screen edge in total.
Cannot cancel this skill into another skill.
  • ~510.9 up to x5 (normal 4 hits 2043.6 [22.70], 5 hits 2554.5 [28.38])
    Very wide bosses as much as x7 (3576.3) [39.73]

    • PvP
      Enemies are timefrozen from when you start casting to when it finishes, working on instant button press even on airborne enemies.
      close: float 404 x3 and float/knockdown 404 (1616)
      mid: 404 x2 and 404 (1212)
      far: 404 x1 and 404 (808)


LV4 skills
(LV4 skills need over LV70 to get and cannot be used in PvP)

Innocent Fear (império sombrio)
AoE to both sides reaching to screen edge from center reaching 3 floors up and 2 down.
  • ~169.1 x14 with no hitstun, launch ~724.0 x1 (3091.4) [23.78]

Awakening
Slams once and hits basically the entire screen.
Single hit so weak if it doesn't crit.
  • 2607.49 x1

H
Hits basically the entire screen.
Also gives you ATK +15% and Super Armor for 20sec after it finishes.
  • 144.95 x11, 289.90 x2, 88.84 x11, 177.67 x2, 724.85 x1, 444.20 x1 (4675.88) [35.96 if it cost as much as MP4]
5-11b: Dio Weapon Force
Techniques

Blink / Vertical Blink (lampejo / lampejo vertical)
Same as from Devil Force page.

Life Keep (existência dimensional)
Same as from Devil Force page.


LV1 skills

Even as WF Dio it can be recommendable to get the first skill from DF as it's a reliable MP1 for invincibility with no issues, and the leveling quests will ask for that skill regardless of build.

Infernal Spear (lança diabólica)
Dash attack AoE forward hitting actually very far until screen edge from center.
But at the beginning you become non-solid and can often pass through monsters and miss if not cast with a minimum distance in mind, and monsters walking forward will go through you before it does anything.
  • all with small launch, ~312.8 + ~208.5 + ~208.5 (729.8, with aerial 938.3) [25.16/32.35]

    • PvP
      You won't dash through them in PvP, but if they're running at you from too close they may pass before it starts hitting/freezing time because of the startup time.
      float/knockdown 285+181+181 (647)

Blocker (aparar)
Places a mark a long range forward (it is NOT a solid wall), it keeps hitting enemies very close to it every second with knockback. Becomes stronger if placed in the corner or inside a monster that doesn't take knockback (essentially stunlocking non-armored monsters for a longer time than the skill cooldown). If it hits for its entire duration it's actually as much damage as an MP3.
Lasts 13sec but it can be ended early by taking many enemy attacks, also stopping enemy basic projectiles.
  • ~139.1 xN (max x14, 1947.4) [67.15]

    • PvP
      Hitstuns enemies at least.
      In PvP the knockback always sends them to the direction you were facing when you first cast it.
      Stronger on corner but even then it doesn't combo into itself but you can try to loop a few hits of groundZ.
      36 xN

Proud Swing (giro audaz)
Spins the scythe forward up into the air, will do a total of 14 hits in small parts across its total range from your feet to forward 1 floor above only.
For monsters has a minimum distance to not miss most hits and usually does only very low damage anyway, and for an invincibility MP1 has pretty low invincibility time too. Launches light monsters.

If you cast MP2 Haunting Shock within 3 seconds of this, it is aimed diagonal up slightly closer than normal so that it connects after this (meaningless in PvE).
  • 50.6 xN
    Only 2 hits if too close
    Normally x7 for 354.2, x9 if tall or giant 455.4 [15.70]
    Supergiant 14 hits 708.4 [24.42]

    • PvP
      Better in PvP. Timefreezes instantly and hits before they're unfrozen, so can even anti-air/hit 1 floor up well. Deals full hits on closest range, loses hits over distance, on any hit can easily combo into groundZ V1/SpeedV3, or V4 hitting since 2nd hit (or else airgrab, or dashZ).
      float 24 xN, very close x14 (336), close ~10 (240), plus combo
5-11b: Dio Weapon Force (part2)
LV2 skills

Vengeful Sword (espada vingadora)
Bad for PvE.
Does 3 pillars forward launching, hit count is very sensitive on exact mid-range distance started and enemy type (often missing 1 or 2 pillars) and even on perfect hit the damage isn't worth it.
  • launch ~401.5 x3 (401/803/1204 damage [06/12/19], with aerial 401/1003/1606 [06/15/25]

    • PvP
      Has no minimum range and always lands all 3 hits unless starting far outside melee range to only hit with 2. Can hit with only 1 if hitting in the air.
      float forward 349 x3 (349/698/1047)

Haunting Shock (choque fantasmagórico)
Very big AoE hitting from in front of you to screen edge, stretching 2 floors up except near you.
Doesn't timefreeze.
Sends light monsters far forward.
  • launch to the side ~1155.9 [18.34]

    • PvP
      Hits a very large area, but still has startup time with no timefreeze so it's not impossible to miss.
      Due to the forward step at the beginning, if used by a cliff will drop aim 1.5 floors down.
      blowaway extremely far 887

Tenacious Hold (empalar)
Auto-targets an attack at the one closest enemy in a circle from you (reaching up to one and a half floors up or down), has convenient aiming but has average damage and very small AoE potential.

On light monsters the first hit launches, then the rest hits only after they get knocked down, but you can hit them once between parts to make the rest aerial which still only adds around 400dmg.
Casting Far Away within 3sec of this will make Far Away dash forward (no meaningful use?).
  • launch ~370.3 , pause, ~370.3 x2 (1110.9) [17.63]

    • PvP
      Launches to combo into combo V1/SpeedV3, or airgrab or dash attack.
      Can be cast immediately after knocking down the opponent, it will scan by the time they're hittable again, usually missing only if they manage to run outside of range (harder near corner) or use invincibility.
      trap midair 0 with no hitstun, launch 295 x2 (590), plus combo

Stick Lance (lança perfurante)
Fires a fast piercing shot straight forward, any monster hit is dragged with it regardless of knockback resistance, going until the wall or max range, but it deals damage over time so it needs to be alive for a long time for decent damage at all (max hits is around the width of the first screen of Forest of Life), instead is only useful for forcing all monsters of one lane into the same place for AoE purposes.
  • ~90.5 xN
    Basically 270-1900 depending on distance to wall

    • PvP
      No damage until wall explosion which is always the same damage. Starts hitting before time unfreezes, may catch midair at shoulder height. On corner can grab after.
      0 while dragging, wall 39


LV3 skills

Onrush (estocada)
Long rectangle AoE forward but does a phashing dash at the beginning to require mid-range to start, and you can hold Forward to make it keep costing all AP left to keep doing more hits while still invincible.
After the nerf, basically Onrush without spending extra AP deals the same damage as any MP3, and it can only spend up to double the AP for up to double the damage (cannot be held infinitely with potions anymore), so at most it just does the damage of two MP3s for the slot of one at still twice the AP cost.
(if taking this skill on a hybrid build, also needs 2nd job passive for upgraded AP cost)
  • Normal (2.7 bars), 12 hits: ~171.4 x12 (2056.8) [22.85]
    Held x1 (2.95 bars), 15 hits: ~171.4 x12, ~154.3 x3 (2519.7)
    Held x2 (3.11 bars), 18 hits: ~171.4 x12, ~154.3 x3, ~120.0 x3 (2879.7)
    Held x3 (?.?? bars), 21 hits: ~171.4 x12, ~154.3 x3, ~120.0 x6 (3239.7)
    Held x4 (?.?? bars), 24 hits: ~171.4 x12, ~154.3 x3, ~120.0 x9 (3599.7)
    Held x5 (4.60 bars), 27 hits: ~171.4 x12, ~154.3 x3, ~120.0 x12 (3959.7)
    Held x6 (5.41 bars), 30 hits: ~171.4 x12, ~154.3 x3, ~120.0 x15 (4319.7), maximum
    If you have a full 4 bars, you can do 24 hits without an MP potion. 27 if you have Chase MP reduction too.

    • PvP
      135 xN, x12 (1620)

Chaotic Spark (brilho caótico)
Very big AoE, a rectangle AoE far forward stretching 1 floor up and down. Can jump 1 floor up from the ground floor before casting to make it hit 3 floors instead of 2. Last hit is much smaller from center and sends away if it hits.
When you cast this skill you can instantly cancel into another skill and this will still come out.
  • push ~75.6 x24, launch to the side ~75.6 (1890) [21.00]

    • PvP
      Can airhit well, forces standing state on airhit.
      Traps them for enough time to run in then wait for the last hit to airgrab, you can try to see if they will be blown to the left or right (it sends them away from the center) to do groundZ V1/SpeedV3 as they fall on you.
      small push 61 x24, small blowaway 61 (1525)

Destruction (destruição)
Hits to melee range to both sides for 4 hits, with a 5th that reaches farther to the sides and 1 floor up and down and knocks down.
This skill cannot cancel into another skill. Hitstops enemies in range when started.
  • ~421.5 x4, knockdown ~412.5 (2107.5) [23.41]

    • PvP
      Doesn't reach up well enough to airhit.
      323 x4, knockdown 323 (1615)


LV4 skills

Innocent Fear (império sombrio)
AoE to both sides reaching to screen edge from center reaching 3 floors up and 2 down.
  • ~169.1 x14 with no hitstun, launch ~724.0 x1 (3091.4) [23.78]

Awakening
Slams once and hits basically the entire screen.
Single hit so weak if it doesn't crit.
  • 2607.49 x1

H
Hits basically the entire screen.
Also gives you ATK +15% and Super Armor for 20sec after it finishes.
  • 144.95 x11, 289.90 x2, 88.84 x11, 177.67 x2, 724.85 x1, 444.20 x1 (4675.88) [35.96 if it cost as much as MP4]
5-12: Zero (general)
GCC notable changes:
-4th job weaponless roll has cooldown
-Transformation mode lowered to 20sec, does not lower during skill time, now activated manually with CC when full instead of automatically when the bar is filled
-PvP: hyper armor reduced to super armor and XX draw animation has no armor (old Season 5 change), Unique's bind nerfed

Story:
During the ancient demon war where all other demons gathered to fight against the Ancient Demon Race, where the one Ancient Demon named Duel was the linchpin in the war, the Asmodian demon great wizard Oz Pone Max Reinhardt had the plan to forge his own magic living sword that would not only rival Duel's Eclipse but surpass it. Oz was the one who had the very Core of the demon world Elyos and it was used in making this sword to give it immense power. He named the sword Grandark.

Grandark's own essence was not only sapient but highly self-important and disrespectful. It wanted to personally take down Duel and Eclipse, but was rebellious and actively refused any wielder it did not itself choose from deeming too weak, including Oz himself.
Failing to tame Grandark and indeed wanting the sword to be realized to its maximum potential, Oz gave up on ever using the sword himself and instead wanted to develop the absolute best possible wielder for Grandark specifically.

Oz's test was to take an Ancient Demon core from their own territory and the body of a dead hero demon, and implement that on him and revive him and engineer his body for Grandark. Prototype Zero seemingly has no memories of his past life and maybe doesn't even know he had one before this. Grandark's overbearing powers stretch behind its overbearing personality, and made Zero's personality underdeveloped and shy: he fully intends on taking the mission of defeating Eclipse (at this point apparently degenerated from Oz's goal of defeating Duel once and for all, to Grandark's goal of destroying Eclipse in a display of superiority), but he knows nothing of life besides his mission and has no interests beyond Grandark's. Although Grandark is constantly the one talking and also because of that, Zero himself would have trouble communicating and prefers any quiet place or person to any noisy one (except for Grandark, who he sees like part of himself and is overly dependent on).

The demon faction that leads/would lead the Extremists, the Hardliners, attack Oz's lab in search of the Ancient Demon core he had used. Oz successfully defends Zero and Grandark, but apparently, after this point he had been separated from them.

Due to the rush and Grandark's overtaking power, Zero mistakenly developed the notion that his only purpose in life is to become very strong and defeat Duel by serving Grandark; his entire self depends on those 3 things, he is aloof and indifferent to anyone else.

Fun fact:
Oz officially named Zero as Zero Zephyrum, which is not Oz's family name or of any other known character. Some characters in the game had a special palette-swap version of one of their job outfits, and Zero's is called Zero the Hero or Prototype Zero, with blood-red hair, and black and orange clothes: this is only a guess but this may be Zero before being revived.

Skill Tree Style
Zero's skill tree has many loose ends and you cannot learn everything.

Standard dash type (below-average)
Dash momentum: ~250 pixels, rocket ~564
5-12: Zero (normal attacks)
Zero can be played weaponless keeping Grandark on his back, and pressing C↑ will enter Sword Stance or return to weaponless if already in stance. He can also equip Offensive stance at 2nd job (C→) and Defensive Stance at 1st job (C↓). Zero has hyper armor inside any stance (super armor in PvP) but cannot enter a stance and automatically leaves any stance while in Fatal.

Weaponless

Only weaponless can fully dash and airdash. In stance you would wish he had better movement somehow, but leaving stance to move a distance then simply entering stance again can be faster than moving in stance.

GroundZ combo
3 hits walking forward, Critical/Double knocks down.
ZZZ-Double can actually be slightly better DPS than sword combos (with ~360 DPS), and after 4th job has a Down roll during combo except Critical/Double. Repeating only ZZZ is ~259 DPS.
Double also lowers your skill cooldowns by 1.
Also, you can cancel ZZZ into stance, to start dealing damage earlier then continue the combo with the sword.

4th job upgrade: adds 1 extra swing at the beginning, not useful in PvE, just makes it longer to get into the strong Double again and makes you take longer to walk forward. Can be unequipped after learning.
  • 144.4 / 144.4 / 144.4
    4th job added hit: 98.3
    Critical: 163.8, Double 303.0

    • PvP
      The main point of this combo is that you can do ZZZ then XX to cancel into stance and keep the combo going. It even works on airhit.
      4th job added hit is great, it's a disjointed hit forward without walking forward to be more likely to win trades, also doesn't knock down midair, doesn't walk forward so if they were airdashing is less likely to pass under them by the time they fall down, has more range than the other hits and pulls for the rest to connect.
      • 153 / 153 / 153
        4th job added hit: 135
        Critical/Double: 282

Dash attack
3 hits knocking down.
After 4th job has the same Down roll as combo, repeating this attack without the 4th job upgrade is ~278 DPS (weaker than combo if adding Double).
Can C↑ to cancel into Sword Stance during the part it hits (even midair).

4th job upgrade: adds another swing at the beginning which hits once without knocking down, cancelling into stance better. Lowers DPS on repeated use.
Cannot do the second swing if in Fatal?
  • 68.7 x3 (206.1)
    4th job added hit: 68.7

    • PvP
      Default version will combo into nothing except skills, but 4th job upgrade lets you do only the first swing so you can combo into XX Z (even on airhit).
      Can cancel into XX Sword Stance so can be done on ground dash or air dash to just cover your advance while entering stance.
      float/knockdown 118 x3 (354)
      4th job added hit: 118

airZ
Single hit, repeating this up and down a platform will stunlock and push back non-armored monsters into another position until you switch to a sword combo or AoE skill.
  • 84.1

    • PvP
      Might look simple but has more uses than usual.
      This is a physical hit that stays in place still able to hit for one second. Can be used to attack forward like normal, but also works defensively, can make a wall when repeating it up and down a platform or when using it while retreating (←←↑→Z) to make it hard for someone to rush you.

      On hit it floats, will knock down in time but can repeat into itself up and down a platform and/or combo into groundZZZ XXZ. You can do this from any instance of airZ hitting, assuming you commited to the next hit early enough (you don't always have the time to confirm the hit before you have to do the next hit).
      The angle will hit down-forward, basically only reaching as far up as the bottom 1/3 of your body, so being next to an opponent then dropping down the platform and doing this may miss.
      float 173

C↑/C→/C↓ midair activation
You can enter stance midair, and doing this midair will make you count as drawing when grounded, to cancel draw directly into any stance ground attack from the air.
5-12: Zero (stances)
Sword Stance (C↑)

swordZZ
Does up to 2 swings, then after the 2nd swing can press Down to cancel into Z↓ (which can press Forward to cancel to Z-Forward which cancels back into ZZ).
The strongest combo is repeating ZZ↓→ (~344 DPS), but against non-armored monsters you should repeat ZZ↓ which is an infinite combo on monsters that take hitstun (~320 DPS). After 4th job you get a Z+X teleport which sends you forward through a monster for dodging or just to start getting back bonus.
On bosses that you can hit with both back and forward angles, you can repeat only ZDown alone as DownZ, for ~453 DPS, or DefensiveZ for ~497 DPS.

3rd job passive: enables 3rd-4th-5th swings where the 5th pushes. Completely unnecessary (as you already can chain as early as the 2nd and spending time on these swings won't increase DPS because they're not strong enough to matter). You can actually already do those extra swings without equipping this passive sometimes and I don't know what the situation is.
  • 2 swing version: 132.2 x2 / 132.2 x2
    5 swing version: 132.2 x2 / 132.2 x2 / 126.0 x2 / 126.0 x2 / 126.0 x2
    Critical: 255.36

    • PvP
      Can start a combo on Sword Stance on its own, or do weaponless ZZZ C↑ ZZ.
      ZZ↓→ will loop until you do enough damage and auto-counter triggers, and you can extend this combo with technique Rude Pressure or MP1 Classic Force (ice/poison) which will both lower the opponent's auto-counter gauge to delay auto-counter and combo back into ZZ↓→.
      After a combo finishes it may be a good idea to immediately C↑ to return to weaponless and get away, rather than stay in stance next to where they will stand back up. You may also try to keep stance to fight with its super armor (you will still be affected by hits that launch or knock down and be taken off of stance).

      All swings of ZZ force standing state to combo even if it hits midair and they reach at full character height, and you can also jump C↑ ZZ to do it midair (can also twist the first Z into Z↑/Z→/Z↓) .
      • 2 swing version: 182 x2 / 182 x2
        5 swing version: 182 x2 / 182 x2 / 86 x2 / 86 x2 / 86 x2

Z↓
Can be chained from swordZZ as only a Down input. Chains into Z-Forward as only a Forward input (but on light monsters can stop here because Z↓ staggers monsters for a long time to true combo ZZ↓ into ZZ↓ again).
This actually deals 2 hits behind you and 2 hits forward, and on certain bosses you can hit with both angles which makes this a top DPS contender.

3rd job passive: adds another swing after this move but it's useless and weak. Can be unequipped after learning so you don't get this by accident.
  • 124.4 x2-4
    124.4 x2-4 / 79.3 x1

    • PvP
      Z↓ is how you can hit both sides at once to hit an opponent that may try to pass to your other side (and this can combo into certain skills).
      The 3rd job swing does not combo from the previous hit so it's not to be used inside combos. If it hits alone at least it can combo into C↑ to remove stance then ZZZ C↑ ZZ.
      • 65 x2 (130)
        65 x2 (130) / 54

Z→
Forward poke that's slower to start but can be chained from Z↓, after this will cancel into any Sword Stance attack so it can go into swordZZ again.
It helps charge transformation quicker on hit.

3rd job passive: adds the ability to mash Z during this hit to do many very weak hits, having low DPS but charging transformation extremely quickly. It also adds another weak hit when pulling back whether or not you did the extra hits.
Equipping this passive changes the cancel window timings after Z→.
  • 78.0 x3
    78.0 x3, 36.95 x1-6

    • PvP
      Adding the extra hits in combos makes transformation easier to get into.
      You can combo into the extra hits, then combo into them again, to give time for RudePressure/ClassicForce to finish cooldown to do ZZ↓→ [1 of Rude or Classic] in loop, doing one infinite combo without auto-counter until they counter manually (and technique Increase can cut MP per hit).
      You can keep canceling the upgraded version into itself as a wall.
      41 x3 (123)
      41 x3 (123), pull 12 x1-6

Z↑
Hops forward while doing one hit at the same time, not useful from blowing away light monsters.
But it has a secret superjump: if you press Z then press Up as fast as possible, Zero apparently does this simultaneously to a jump, which makes the move jump a full platform up for movement and lets you aerial control it left and right. Superjump doesn't work inside transformation and doesn't work if 4th job airZ is equipped.
  • 266.4 knockdown + diagonal up knockback

    • PvP
      Versatile if doing the superjump version, can combo into skills or Viper.
      Hits your floor and the one above.
      float/knockdown 141

airZ
Small forward hit. It actually has high DPS on monsters if you keep using it jumping up and down two platforms on an enemy (~430 DPS) which is stronger than your sword on enemies that you can't hit from both sides at once (and it also hitstunlocks monsters without super armor), and attacking this way may have easier dodging. Won't charge transformation though.
  • 218.4

    • PvP
      300

DashZ
Small ground hit forward while going forward. Not strong enough.
  • 105.84 x2 (211.68)

(4th job) Z+X teleport
Teleports a set short distance forward (and with the stance-enter hit passive it also does a light hit to your sides) while keeping in stance. Can only be done from standing still (not even walking). 5 second cooldown.
Easily passes through a monster to their other side for positioning or for evasion, also can ZZ↓ a non-armored monster then teleport and continue comboing from with back bonus now, especially after pushing monsters together with swordZ-Critical.
If this is inside cooldown you also may X↓ to enter Defensive Stance and teleport from there which has no cooldown.

(3rd job) air ↓Z
Very slightly repositions you faster, hits to interrupt monsters and leaves them standing for your combo. Usually done after jumping from a higher platform.
  • 126.0 x1-2

    • PvP
      Floats on hit to only combo into skills, otherwise just knocking them down.
      hit 86, landing forward 86 (172)
5-12: Zero (stances2)
(2nd job) Offensive Stance (C→)
Like Sword Stance but faster with bigger attacks and better DPS. The drawback is that techniques/skills cost 40% more AP inside this stance (but still can be cast from the normal cost with the new cost being more than you have).

offensiveZ
4 Z presses freely doing Critical/Double, and also has an emergency ↑ during combo which instantly multi-hits to all directions except down.
The second strongest combo is repeating ZZZZ-Double which gets ~498 DPS, the strongest is dashZZ-Up which gets ~515 DPS.
Double also reduces skill cooldowns by 1.
The first swing is much faster if you do it while running, which also replaces combo Up with a jump cancel on the first swing.
  • 248.9 + 86.4 (335.3) / 248.9 + 86.4 (335.3) / 207.4 / 259.3 + 86.4 (345.7)
    Critical: 141.0 + 58.7 (199.7), Double: 235.0 + 97.9 (332.9)
    Up: 82.3 x3 (249.9)

    • PvP
      The swings start faster in Offensive Stance and hit a large area with some active time. You can keep comboing even on airhit. You may also dashjump-Z or platform-drop Z.
      The 4th Z press does not combo from the 3rd so they may skill. Once you connect with offensiveZZZ you do the first 3 presses into C→ and continue with swordZZ↓→ combo, or you can do offensiveZZ-Critical looped into itself but it's very finicky.

      Combo ↑ hits both sides stretching 1 floor up easily intercepting advancing enemies. It may combo into skills or certain techniques. In PvP it has 5sec cooldown.

      Also, the technique Unique is very good in PvP inside Offensive Stance.
      137 + 47 / 137 + 47 / 114 / uncomboing pause, 142 + 47 (all force standing state on airhit, except the 4th press blows away)
      Critical/Double: float 202 + knockdown 84
      Up: float 56 x3 (168)

(4th job) Z+X teleport
Same as Sword Stance.

(3rd job) air ↓Z
Same as Sword Stance.

Defensive Stance
Repeating defensiveZ against big monsters you can hit with both back and forward angles is Zero's strongest normal attack.
That is the only thing Defensive Stance is useful for in PvE, you may skip the rest now.

Since 2nd job passives, simply being in Defensive Stance will reflect basic projectiles while it's glowing, which are too rare in PvE. Since 3rd job passives the glow isn't temporary and any damage you take is reflected at the attacker (it's instant and they can't dodge it). You have a DEF bonus inside Defensive Stance (counting LV5 from 4th job tree, +50% DEF which is -33.33% damage taken).

  • PvP
    DEF boost lowered to +25% (-20% damage taken).
    You can freely enter and leave Defensive Stance for the projectile reflection. Or because being hit in Defensive Stance at least will hurt them back roughly equally and you do have attacks from this.

defensiveZ
Single swing, hits both forward and behind, and switches which side you're facing (since you can't do that normally in this stance).
~497 DPS on big monsters you can hit with both sides.
  • 109.2 x2/4 (218.4/436.8)

    • PvP
      Instantly knocks down and sends them far. Used to lead into combos but not anymore.
      75 x2 (150)

defensive ↑Z/↓Z
Too weak and useless in PvE.
  • Up: 74.9
    Down: 86.4

    • PvP
      UpZ is a fast attack that sends them up, and DownZ is a slower longer attack that also sends them up. They can cancel into each other in their recoveries (but you can't stay holding Up/Down for them from before you need to for the move to come out), from the second one you can combo into run, then release Forward and instantly press Z+X, then combo into walk forward and back ZZZ XXZZ↓→.
      Up: 51
      Down: 59

defensiveRun
In PvE is just for movement.

  • PvP
    Will cause hitstun, then stop holding Forward and immediately press Z+X to combo into defensive teleport which can combo into ZZZ for full combo.

defensiveZ+X
Different from the other stance teleport. It has no cooldown and will home in on a nearby enemy (even one floor up or down), dealing one light hit to them and you recovering weaponless ready to attack.
5-12: Zero (X button attacks)
Can be done both weaponless and on stance, returning to whichever you were on.

(1st job) Loss (derrotar)
Cooldown 7sec
One of the commands for X→.
Single hit that can be made to steal HP or AP on hit.
On max-level 2nd job passive, restores either 20% HP or 0.35 bars of AP. Not a DPS increase but can be a free restore often.
  • Normal: 393.12
    HP or AP version: 349.44

    • PvP
      Halved HP/AP in PvP (10% HP/423 HP).
      Can be taken for the healing, but the problem is hitting with it: you can chain normal sword attacks into this, but they recover faster than you and can always grab you first or skill, unless you only use this when comboing into skill afterward.
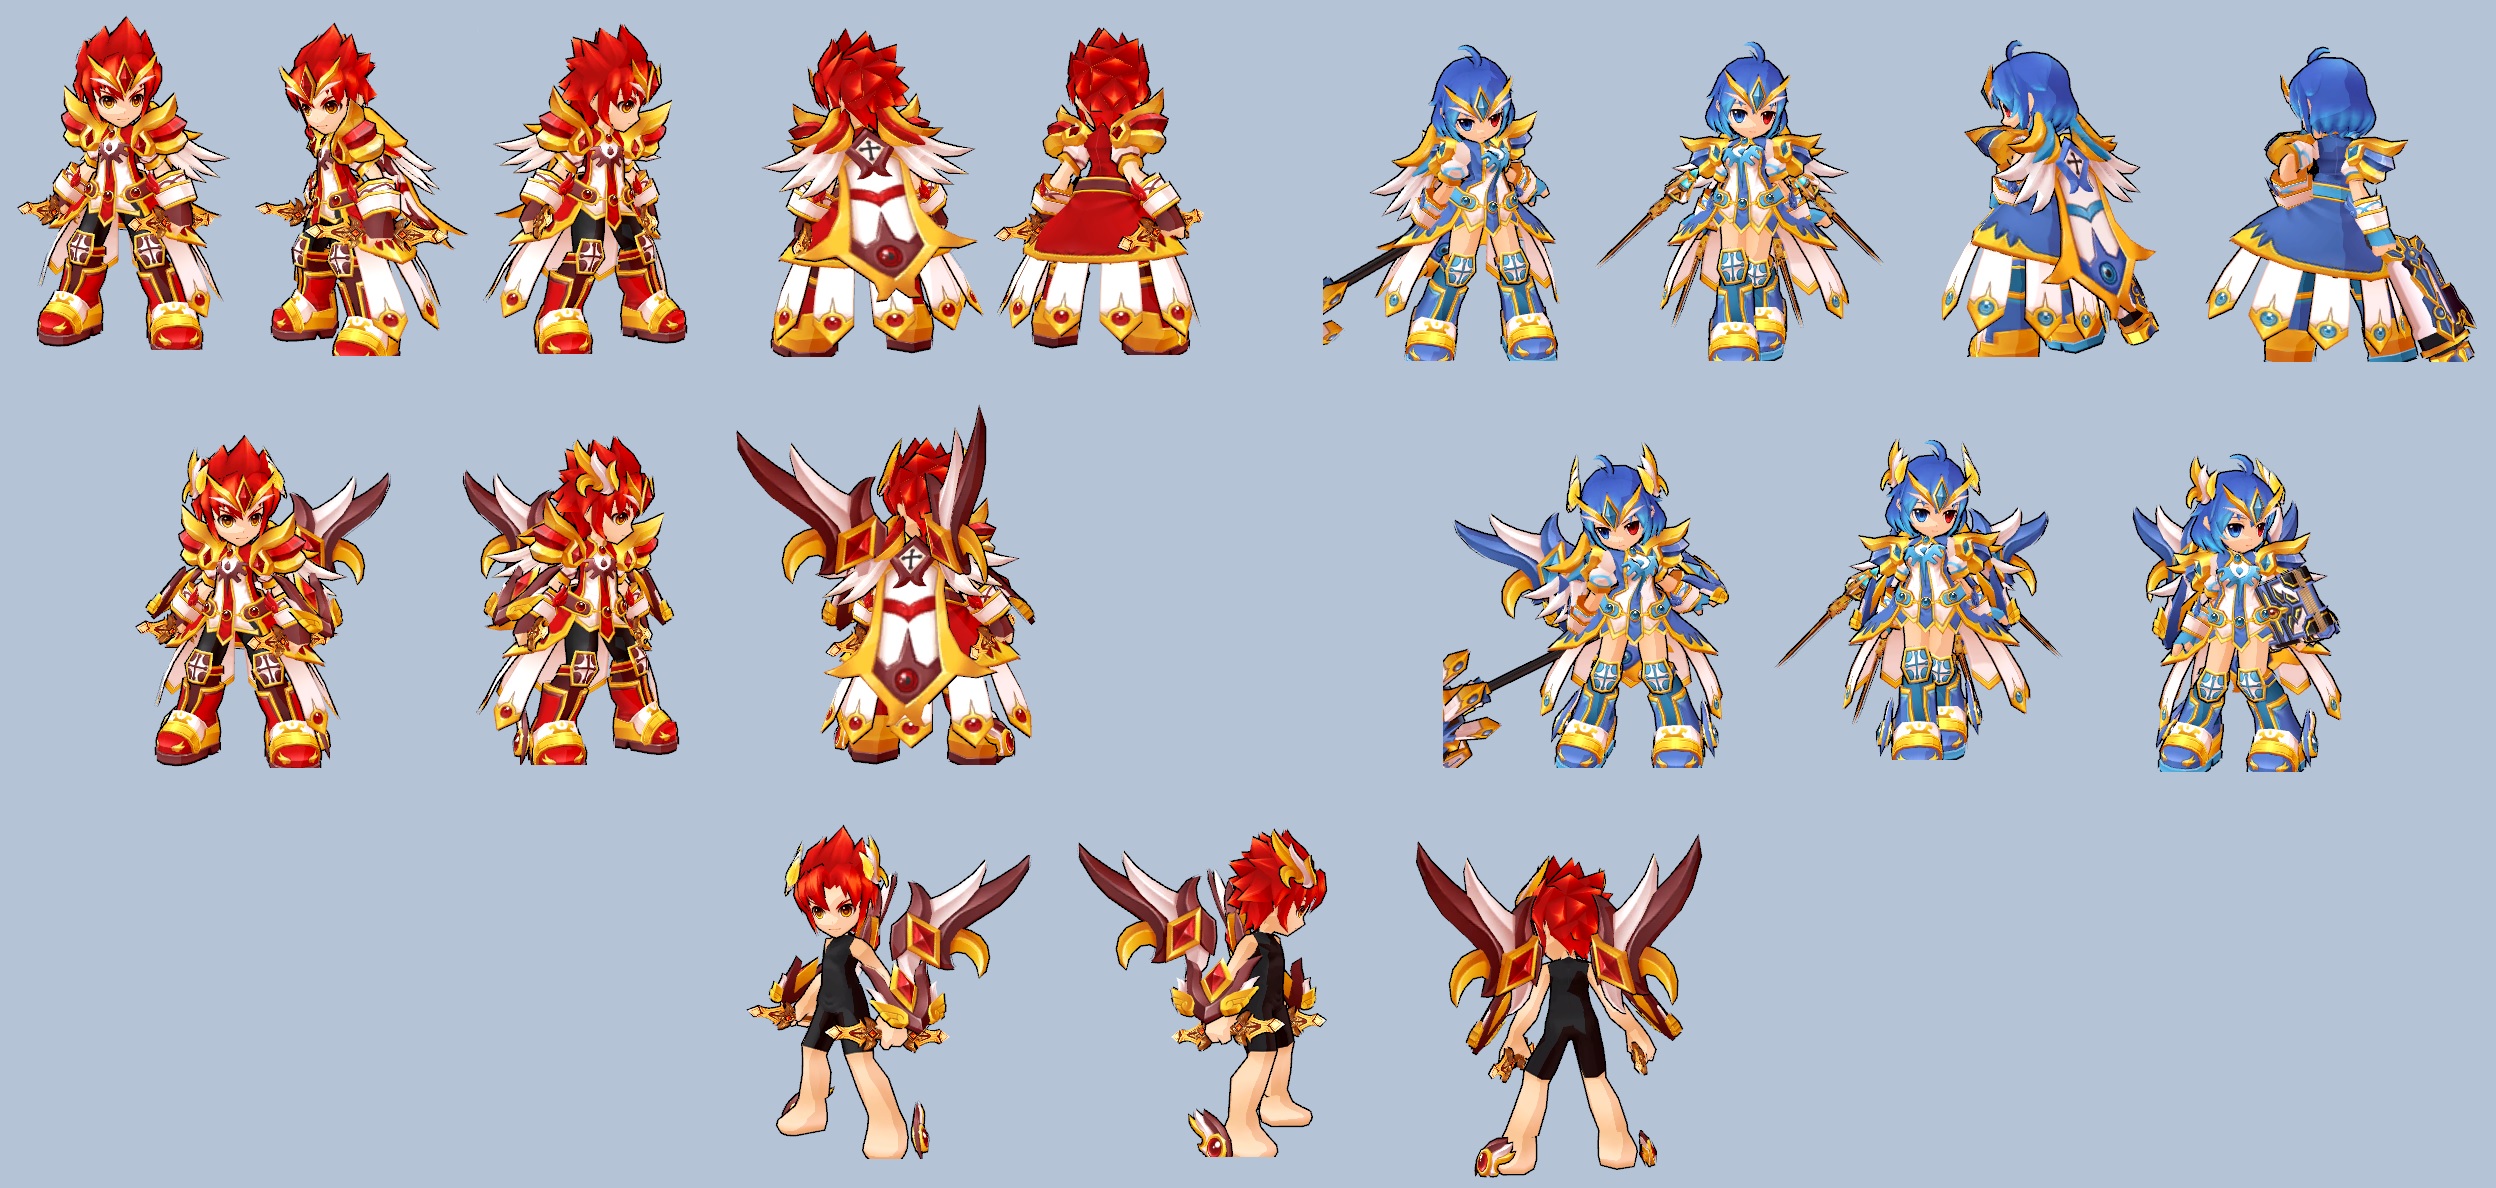
(1st job) Rude Pressure (pressão brutal)
Cooldown 7sec
One of the commands for X→.
Useless in PvE.
  • ~141.00 x3 (423)

    • PvP
      Useful because it hits to the side fairly fast (and leaves them standing even on airhit), instantly has super armor during the animation, and if weaponless can combo from it.

(2nd job) Windmill (rodamoinho)
Cooldown 2sec
One of the commands for X→.
Will do a strike with hyper armor that also has +50% DEF (-33%dmg) during animation, not bad to eat a hit to remain armored and not react to it.
Will do one strike forward, one back, then another forward but it misses on light monsters because the first sends up.
  • ~201.30 x1-3

    • PvP
      This can be an emergency attack that checks both forward and behind to cover approaches, sadly it knocks down and only combos if you chain into certain skills.
      DEF buff lowered to +25%DEF/-20%dmg.
      float 228 x1-3


(2nd job) Orchid (ferrão caçador)
Cooldown 7sec
One of the commands for X↑.
Targets up to the 4 closest enemies within a circle from you. It can miss if they don't stop moving sideways. Restores either HP or AP.
On max-level 2nd job passive, each autotarget that hits at least one enemy restores 8% HP so 8%/16%/24%/32% or 0.3 AP bars so 0.3/0.6/0.9/1.2 if you could hit as much as 4 enemies. Useless in boss fights where there's only 1 enemy.
Also, outside of boss fights, using this launches launchable monsters, setting up aerial hits for either a skill do deal +50% or to airZ up and down a platform.
  • Normal: 303.27
    HP or AP version: 242.61 (2-4 enemies together 485.22-970.44 on each)

    • PvP
      Has the longest reach out of your attacks as a poke and can even target all 3 enemies at once. Can even be used after knocking them down so it hits after they invincibility ends with limited-time tracking.
      Even a teammate can combo from it with an attack that forces standing state on hit.
      Halved HP/AP recovery.
      Normal: float 499
      HP or AP: float 399

(4th job) Shock Wave (ataque sísmico)
No cooldown
One of the commands for X↑.
Useless in PvE.

  • PvP
    Checks and bounces them if they're around, actually good in weaponless because it combos into ZZZ C↑ ZZ (or barely doesn't combo into dashZ V2 into C↑), in sword stance they still have some time after they land before you can hit again but not much.


(4th job) Viper (víbora)
Cooldown 7sec
One of the commands for X←.
Basically useless aside from being kinda strong to do.
  • Weaponless: 66.12 x6 (396.72)
    Stance: 113.87 x4 (455.48)

    • PvP
      Does a basically instant startup long spike forward that pulls, forces standing state on airhit too.
      If cast weaponless, it's a lot like the 4th job Z (barely longer and not as tall). Will lead into groundZ for full combo.
      In stance has longer range, but does not hitstun enough to combo into swordZZ, only certain skills.
      Weaponless: 74 x6 (444), plus combo
      Stance: 124 x4 (496)

(4th job) Bone Crusher (índole esmagadora)
Cooldown 7sec
One of the commands for X←.
Will instantly jump forward high into the air, evading some attacks and jumping over some monsters, and deal a hit smashing to both sides.
  • Weaponless: 97.33 x3 (291.99)
    Stance: 113.87 x4 (455.48)

    • PvP
      The jump at the beginning is a real jump forcing you airborne and significantly pulling your hurtbox up, you can instantly jump over projectiles and dodge even some physical attacks that don't reach above the shoulder, then easily hit with the smash from either side.
      If cast weaponless, will always combo into ZZZ C↑ ZZ. If cast in stance, pushes them away and will not true combo into swordZZ, only certain skills.
      Weaponless: 110 x3 (330), plus combo
      Stance: 129 x4 (516)


(2nd job) Amid (dominação zero)
Cooldown 22sec
One of the commands for X↓.
Gives you invincibility for 5 seconds (which is good since you get it every once in a while at no cost) and you are forced to stay in Sword Stance and cannot use skills/techniques while it lasts. Not advantageous in terms of DPS on a vaccuum, only to deal normal damage while invincible.
Also has the problem of having some startup time that is NOT invincible...

  • PvP
    Lasts 3 seconds and has cooldown raised by 5sec.


(2nd job) Increase (aumentar)
One of the commands for X↓.
Useless except one of its effects in PvP.

  • PvP
    This is a buff that lasts 10sec, the effect depends on your current stance and leaving stance will cancel the effect early.

    Sword Stance: blue aura, normal attacks will sap enemy MP/AP per hit. Can be very strong and also can be cast mid-combo after using ice/poison shot.
    Can be kept for when you know the opponent might have spent all MP left so they start with not enough MP to counter then can't regenerate more. Can make a real infinite combo if you hit them and chain into sword Z→ with its multi-hit upgrade for as much as possible while ClassicForce cools down so they don't autocounter.

    Offensive Stance: red aura, all attacks taken will hurt the attacker as well. Very weak, around 1/3 the strength of Defense Stance's natural reflection.

    Defensive Stance: green aura, your max HP is raised by 20% (10% in PvP) but won't raise your current HP to match. I have no idea what this is even supposed to help, it's useless.
5-12: Zero (skills)
Techniques
Unique (impacto zero)
13 AP/0.4 bars, cooldown 7s
Useless in PvE.
  • Sword: ~66 x3 (198)
    Offensive: ~98
    Defensive: ~19

    • PvP
      Does one different action for Sword/Offensive/Defensive Stance.

      Sword Stance: quick mid-range shot, low damage and floats/knocks down only comboing into certain skills.
      111 x3 (333)

      Offensive Stance: will hit up to 3 enemies in a circle from you similar to Orchid but instantly, binding them. Very strong. They don't receive hitstun while binded and may mash out at any moment to be able to skill, grab will end it to be safe.

      Defensive Stance: a very fast small hit forward of minimal damage and short hitstun. Cannot actually block any attacks. Could combo into Defensive ↑Z but then why not just start at that...


MP1 skills
Triple Bash (corte triplo)
Forward combo. Inconveniently slow to start moving.
Has an extremely long animation/invincibility time, most of the cooldown will be gone by the time you recover.

(during transformation: last hit makes a weak piercing wave forward)
  • ~144.7 x4 (578.8) [19.95]
    Transformation: ~34.3 usually x2, max x5 depending on size

    • PvP
      Forces standing on airhit to combo midair too.
      120, 120, 120, float 120 (480)

Classic Force (onda perfeita)
Straight shot, with range upgrade almost reaches screen edge. You can select only 1 of 4 versions.
Invincibility time is very short if already in stance.

(during transformation: max range doubled)
  • Normal: ~448.0 + ~113.9 (561.9) [19.37]
    Fire: ~467.5 + ~10.9 x17 (652.8) [22.51]
    Poison: ~448.0 + ~21.8 x8 (622.4) [21.46], hitstuns monsters without super armor during DoT time
    Ice: ~467.5 [16.12], if the monster doesn't currently have super armor it will be stunned for 3sec, many monsters are permanently armored especially bosses

    • PvP
      If you're playing Zero in PvP you probably should have this skill equipped.
      In PvP you should only use either ice or poison because they set up a full combo after.
      Ice stuns with mashable recovery, so it combos after but there's the possibility they break and skill before you can get to them.
      Poison will pause them in time for around 2 seconds then extremely slow their animations (including recovering from being hit) so you can combo them, but this does not apply hitstun by itself, so if they get hit by this outside of being comboed they will not stop doing their current attack and maybe can start an invincible move or skill.
      You can do long combos then chain into this move before auto-counter triggers to lower the auto-counter gauge then combo back into full combo.
      Normal: 325 + 82 (407)
      Fire: 339 + 4 x17 (407)
      Poison:282 + 14 x8 (394), plus combo
      Ice:339, plus combo

Bite Off (mordida)
Single short hit forward, blows away light monsters.

(transformation effect is PvP only)
  • ~547.6 [18.88]

    • PvP
      Almost instant timefreeze and startup time, may catch midair in combo or alone. If very close to the corner, can immediately combo into ZZZ C↑ ZZ.
      During transformation it wallbounces instead, stops comboing if too close to the wall, has to be mid-range then it only combos into techniques/skills, or if far will actually combo into swordZZ.
      433 blowaway far

Huge Impact (impacto grandioso)
Weaponless skill (will revert to weaponless and stay weaponless).
Slightly short line AoE forward.
  • launch ~139.0 x4 (556) [19.17], on launchable monster misses 4th hit but makes 2 aerials for same damage

    • PvP
      Leads into ZZZ XX ZZ for full combo, worse range than Classic Force but always guaranteed combo.
      float forward 121 x4 (484), plus combo

Stark (oblívio)
Cannot be equipped with Huge Impact above: if cast weaponless becomes Huge Impact, in stance becomes Stark.
Hits a very short range to all directions except below you.

(during transformation: makes 2 bigger trace hits at the end)
  • ~179.4 x3 (538.2) [18.55]
    Transformation: ~31.5 x2 (total 601.2) [20.73]

    • PvP
      Doesn't reach far from you but does hit in every direction except below you (possibly catching even someone who was airdashing past your head), and ahead of you launches to combo into ZZ.
      During transformation will groundbounce to give more time to combo.
      launch 148 x3 (444), plus combo
5-12: Zero (skills part2)
MP2 skills

Gran X
Does a mid-range unreliable wave forward with 4 total hits, will miss 1 or 2 if not close, reaches 1 floor up but if they can take knockback then only partially.

(during transformation: final hit swapped from one hit to piercing fireballs through all of the range)
  • ~290.0 x3, ~324.8 x1 (1194.8) [18.96]
    Transformation: last hit switches for ~48.4 x7 (total 1208.8) [19.18]

    • PvP
      Will hitstop enemies when started so it's instant and can catch midair, not bad as a button in PvP.
      252 x3, 282 (1038)

Breakthrough (esmagador de ossos)
5-hit dash attack.

(during transformation: passes through all enemies, badly can deal less hits to all)
  • ~230.3 x5 (1151.5) [18.27]

    • PvP
      Usually misses airborne enemies, except on combos in corner.
      float 182 x5 (910)

Mega Slash (dança da perdição)
Hits to both sides at once, farther forward than back.
Has MP3 damage on monsters you can hit with both forward and back angles.
  • ~154.4 x8 (1235.2) [19.60], raid boss 16 hits 2470 [39.21]

    • PvP
      pull 96 x5, float 96 x3 (768)

Slash Chaser (perdição brilhante)
Weaponless skill (will revert to weaponless and stay weaponless).
Forward square AoE.
  • ~40.5 x27 (1093.5) [17.35]

    • PvP
      Stays active for a second hitstunning and pulling to its center, easily can combo into ZZZ.
      35 x27 (945), plus combo

Shining Gran (onda de choque)
Cannot be equipped with Slash Chaser above: if cast weaponless becomes Slash Chaser, in stance becomes Shining Gran.
Single projectile straight that explodes on touch, explosion can reach 1 floor up and down.

(during transformation: slowing poison after last hit)
  • contact 5.46, explosion 1139.85 [18.17]

    • PvP
      Does too little damage.
      During transformation can continue to walk forward then combo into swordZZ.
      float 136
5-12: Zero (skills part3)
MP3 skills

Bleeding Gash (erupção de ferroadas)
Hits a moderate range to both sides and barely reaches 1 floor up.
If hitting on the floor above you, they must not be launchable or else it misses most hits.

(during transformation: slightly wider and taller)
  • ~1, launch ~648.7 x3 (1946.1) [21.62], launchable monster aerial 2594.8 [28.83]

    • PvP
      1, 507 x3 (1522)

Abyss (abismo)
Does a dash attack forward (being stopped by a living monster), then jumps straight up and shoots only diagonal down. Damage is split 50/50. Has damage badly split over AoE and sometimes shoots over small enemies, but at least reliably deals normal damage to a single large monster, and the reason to equip this is its transformation version.

(during transformation: becomes Ronan's Kanavan Strike instead. Causes an AoE to mid-range left and right reaching 1 floor up, bonus damage to larger monsters or launchable monsters)
  • full hits ~239.9 x5, ~239.9 x5 (2399) [26.65]
    Transformation: ~137.1 per hit, max 33
    Normal: x15 (2056.5) [22.85]
    Mediums take 15 with 14 aerials (3016.2) [33.51]
    Lights take 8 with 7 aerials (1576.6) [17.51]
    Average bosses take wildly around 20 hits (2742) [30.46]
    Raid bosses take all 33 hits (4524.3) [50.27]

    • PvP
      During transformation, can combo into swordZZ at right timing.
      172 x5, 172 x5 (1720)
      Transformation: 98 x ~7 (686), plus combo

Two-Hand Smash (giga corte)
Rectangle AoE forward. Simple and quick AoE, good.

(during transformation: 3 more hits at the end)
  • ~267.5 x7 (1872.5) [20.80]
    Transformation bonus: ~85.1 x3 (+255)

    • PvP
      Reaches only around 0.8 floors up, where it can AoE the floor up too but it needs a shorter distance than average.
      During transformation, can combo into swordZZ.
      212 x7 (1484)
      Transformation bonus: 70 x3, plus combo

Zero Domination (domínio zero)
Weaponless skill (will revert to weaponless and stay weaponless).
A conveniently bigger version of Bleeding Gash, good range left and right and 1 floor up. Doesn't launch/aerial monsters.
  • ~150.0 x13 (1950) [21.66]

    • PvP
      Not only is it bigger, it floats enough to combo into ZZZXX for full combo.
      float 103 x13 (1339), plus combo

Dimensional Fissure (fissura dimensional)
Cannot be equipped with Zero Domination above: if cast weaponless becomes Zero Domination, in stance becomes Dimensional Fissure.
Rectangle AoE forward reaching 1 floor up, takes a few seconds to finish.
Equipping this lets you have both the radius version and the forward version to pick and choose which you want to use right now by pressing XX to switch stances.

(during transformation: more hits at the end)
  • ~73.7 x20, ~130.5 x3 (1865.5) [20.72]
    Transformation: added ~73.7 x5 (2234) [24.82]

    • PvP
      It keeps hitting them but ends by doing a throw on them where you can't hit them anymore. You have time to add a few groundZs before they get thrown.
      During transformation, instead of throwing deals more hits, comboing into delayed swordZZ.
      58 x23 (1334), throw 45
      Transformation: float 61 x5, plus combo


MP4 skills

Zero Domain (olho maligno)
Does an auto-aimed AoE attack on up to 4 different enemies with max range being more or less your own screen. Will do multiplied damage for stacking the enemies together but is weak against only one enemy.
Will restore 6% HP for each enemy hit from each auto-aim (only one enemy is 6% HP, four separated enemies is 24% HP, 3 in the same place is 54% HP).
The final 5th hit is delayed and bigger than the rest.
  • PvE: ~399 x5 (1995) [15.34], 2-4 enemies together 3990-7980 [30.69-61.38]

Awakening
Temporary mode that switches your normal attacks for 20sec.
Has time for 8 combo+Double swings totalling 15293dmg in 20sec (764 DPS), but has time for around 40 nonstop swings which is stronger (21718dmg, 1085 DPS)
For the whole duration you have hyper armor and all damage taken is 1.
  • They apply SpATK/count as special attacks
    Combo: ~271.48 x2 (542.96), ~271.48 x2 (542.96)
    Double: ~275.24 x3 (825.72)
    Dash: ~271.48 x2 (542.96)
    Jump: ~214.83 x3 (644.49)
    Air dive: ~557.94

H
Hits basically the entire screen, but doesn't do as much damage as other characters' H.
Also gives you ATK +15% and Super Armor for 20sec after it finishes.
  • ~88.72 x13, ~54.38 x13, ~874.61 x1, ~536.05 x1 (3270.96) [25.16 if it cost as much as MP4]
5-13: Ley (general)
GCC notable changes:
  • Teleport distance minorly reduced but can angle up/down better than before
  • DashZ changed from a complete circle to one hit left and one right, and its following shot is smaller
  • Alternate jump attack only hits forward instead of both sides (can turn around right before it finishes)

Story
While many of the demon tribes of Elyos unified in their revolt of demonic supremacy to conquer the cosmos, some clans proudly stood true to their original meaning and fought against the other demons themselves.
The princess of the Crimson River family, Ley von Crimson River, was not one of them. She's an impatient brat who loves mischief and couldn't care less, despite being the only heir of her prestigious family.

Her family had had difficulties in conceiving children and she was the only one in a long time, but very quickly they discovered that she was born with an incurable illness that was going to kill her in years. She grew up as a normal child but her illness gave trouble to her relationships. What would be called her biggest friend was another child of her age, Dio, at this age a pushover crybaby kid who she loved to bully and endlessly tease. She legitimately thinks he is weak but for some reason won't let anyone else lay a finger on him.

The Crimson Rivers naturally have unusually strong arcane powers, which Ley did possess, but seemingly this was her disease: her body could not contain it and it was sapping her life away. As Ley inevitably became weaker and weaker, her father Peter ordered Great Wizard Oz to attempt an experimental cure with a forbidden ritual: even earlier, when all of the demon tribes were together as one to fight against the stronger Ancient Demon race, the war where Dio's father died, one ploy was a trap meant to kill and secure their strongest member, Duel, but Duel's lover Edna saved him by sacrificing herself in his place. The plan was to spend and fuse Edna's soul into Ley so that she wouldn't have to die.

Ley gradually became healthier and completely cured of her disease, and could rise in status in ways they never thought her able to and now thrive - but those close to her could notice that she also possibly became different in certain ways. Her likes and dislikes slightly shifted over time. She became much more interested in magic training and had almost a kink for fighting, but less so fighting herself and more so watching others bicker even if she had to give them a little push first.

After a long time, Peter becomes suspicious of trouble on the horizon: Duel has been trying to contact demon clans including the Extremists who had invaded Aernas before, with dimension doors opening in Aernas again, and even Dio, now the current leader of allied Moderate clan Burning Canyon, has gone missing and gone to Aernas. She is ordered to immediately seek him out and make sure all of the ties stay together.

Fun fact
This concept art exists.

Ley is "the mage" of the AP characters. She has melee and projectile attacks for close-to-mid range and her dashes are invincible teleports and all her Criticals/Doubles are just her invincible teleport, with special attacks out of the teleport whether forwards or backwards, and she can have 2 constant NPC minions with her.

Skill Tree Style
Ley's skill tree has many loose ends and you cannot learn everything.

Dash type: invincible teleport
Dash momentum: ~386 pixels, rocket actually lowers to ~360.
If angling →→↑ or →→↓, can keep holding forward for ~590.
5-13: Ley (normal attacks)
Shot combo
Does non-piercing shots to long range. Actually good at CCing one target between stagger and knockdown over and over (or you can just repeat the first two shots to not knock down), but it's bad at hitting more than one enemy per shot and it has very low DPS (~150 DPS).
Will continue walking backwards per shot, but you can hold left/right to slightly move while attacking.
Can cancel into ↑ attack anytime, or after starting the 2nd shot can cancel into dash-teleport left/right or 4th job Z↓.
3rd job passive has no effect on shot combo in PvE at LV1 and adds a very weak shock on LV2.
Critical will hit the same total area but with a piercing shot. If Double will reduce skill cooldowns by 1sec.
  • stagger ~115 / stagger ~115 / knockdown ~115
    Critical: 57.64 x2 (Double: 115.29 x2) (extra-giant x8)

    • PvP
      The shots don't hitstun at all so this relies on using dash-teleporting or ↑ at the right time. 3rd job passive will make the last shot cause Curse for 2sec (loses HP every time they press Z) and 1 Shock hit (after 3 seconds, they take hitstun again).
      • PvP: none have hitstun: 147 / 147 / 147 (441)

  • (4th job) Melee combo
    Substitutes the ground combo for a slash-slash-shoot combo, can be equipped on and off.
    Same cancels into teleport/Up, except Z↓ can be done even before the 1st strike.
    The melee swings can hit multiple monsters much easier and it also has better DPS. After any launch can repeat ZZ↓ to keep juggling (may need to delay the ↓).
    • float-stun pull ~136 / float-stun push ~136 / blowaway ~136 (around 231 DPS).

      • PvP
        force-standing pull 189 / force-standing 189 / blowaway 189 (567, counting dashZZ 937)

  • ↑ branch
    Can only be done branched from ground combo, easier if repeatedly tapping ↑. Sets up aerial hits.
    • launch ~118

      • PvP
        float 82

  • (4th job) ↓ branch
    Can only be done branched from ground combo (from shot combo needs to start after the 2nd hit, from melee combo can be whenever).
    • launch ~46 x3 (138)

      • PvP
        float 32 x3 (96)

Dashatk
Does one small hit left and one small hit right, on certain bosses can hit with both at once.
At 2nd job gains a Z followup, a straight shot that can be done to any side regardless of which side you teleported to.
  • launch ~130 x1-2 / launch ~81

    • PvP
      float 227 / float 143 (370)

airZ shot
Single projectile diagonal down. Backward movement on use makes it easier to use behind you while retreating and harder to do it while advancing.
  • knockdown ~75

    • force-standing 157

  • (2nd job) airZ melee
    Substitutes the jump attack for a melee attack, can be equipped on and off.
    Creates a lasting hitbox at your full height hitting both sides at once.
    • knockdown ~37 x3 (111)

      • 79 x3 (237) with last knocking down

(4th job) air ↓Z
Dive attack. From contact will deal 1 hit, then 2 more where she lands.
Has a sharp angle that aggressively travels a large distance especially if you hold Forward.
  • launch ~95 x3 (285)

    • PvP
      force-standing 67, launch 67 x2 (201)

(1st job) X ↑
Charged homing shot, too slow and weak in PvE.
  • Uncharged 178.79, semi-charged 249.23, fully charged 357.59

    • PvP
      To do this move, hold X then input a jump, then you can release X but continue holding Up.
      Can cancel the animation into dash anytime.
      3rd job passive makes it confuse in PvP (reverse left/right) for 3 seconds.
      force-standing _
5-13: Ley (summons)
Summons

Ley can have 2 summons active at once: Garouille or Haunt (which fly, automatically chasing and attacking enemies on their own), plus, Mary Bastion or Jeeves (which will try to walk closely to you and attack automatically but can be given commands with X to immediately do certain attacks). Summons have their own HP bars and need to be summoned again if defeated.

Learning most with all of the 4 summons leave too few points for the optional skills elsewhere, so you may choose 2 summons to simply not invest in past learning their summon skill which is a requirement for some other summons.

At the beginning, summons are started with 2-bar skills that take up a skill slot, but since 3rd job can be summoned with C commands without needing skill slots and only costing 1.5 bars (then only 1 bar with a 4th job passive).

Most summon attacks include SpATK. Summons will apparently at random do +30% damage compared to normal. Summons never get back hit bonus. Summons don't outlevel monsters in PvE for bonus damage.

Garouille (gárgula)
20sec buff: +10%DEF/-9.09%dmg (halved in PvP).
Lasts 20/30/40sec.

Test in 60sec: normal attack x4, Break Through x6, Breath x3 (5721dmg, 95 DPS)
  • Normal attack:
      ~72 (does not apply SpATK)
      • PvP
        force-standing 24
    Breath: 3rd job upgrade raises damage, and makes a smoke zone with no effect
      ~552 (with 3rd job upgrade: ~1235)
      • PvP
        force-standing 283, 633 with 3rd job upgrade
    Ice Breath: freezes monsters without armor for 3 seconds, 3rd job upgrade makes a hit zone farther diagonal down than the actual target
      191.4 x3 (574.2) (zone: 9.35 x36? for +336.6)
      • PvP
        0 mashable freeze
    Fire Breath: DoTs, 3rd job upgrade makes a hit zone farther diagonal down than the actual target
      ~107, DoT 22.97 x28 (total 750.16) (zone: 13.78 x36? for 496.08)
      • PvP
        55, 1 x28, zone 6s
    Break Through (ataque sombrio)
      wave ~72 xN, up to x4 (288)
      • PvP
        force-standing 37 x4 (148)
      Statue
        While close to an enemy, Garouille enters a statue pose on the ground with an aura. PvE: forces nearby enemies to attack it.
        • PvP
          Makes a zone that slows down enemies, can repeat attacks in it.


Haunt
20sec buff: CritChance +3% (halved in PvP)
Lasts 40/60sec.

All curses are instant 360 degrees attacks.
Test in 60sec: flame carpet x3, curse x7 (3542.8dmg, 59 DPS)
  • Flame
      flame carpet 26.2 xN (6 hits for each of the 3 flames, 471.6)
      • PvP
        flame carpet 8s
    Red Curse
      ~304, DEF -7% for 10sec
      • PvP
        145, no debuff
    Green Curse
      ~303, ATK -10% for 10sec
      • PvP
        155, no debuff
    Violet Curse
      ~303, 17.67 x27 (total 780)
      • PvP
        155, temporarily reverses their left/right inputs
    Curse: Sudden Death
    PvP only effect.
    When you summon Haunt, it enchants every enemy within one screen to curse them, unless Haunt is killed within 12sec or so, they take 1269 damage and hitstun.


Mary Bastion
20sec buff: +10% ATK (halved in PvP).
No time limit.
Test in 60sec: normal attack x8, rabies x3, bark x2 (4741dmg, 79 DPS, plus X commands)
  • Normal attack
      ~146 (does not apply SpATK)
      • PvP
        force-standing 48
    (3rd job) Rabies (raivoso)
      ~199, bleed 17.67 x27 (total 676)
      • PvP
        force-standing 102, no debuff
    (3rd job) Bark (latido)
      ~309 x5 (1545), less hits for light monsters who get pushed early
      • PvP
        Causes no damage or hitstun or push at all

  • Commands can be given when standing still, or during ground combo but this can be harder if not playing as room leader.

    X→: Spin Dash (investida)
    Quick attack right in front of you, smaller than it looks
      ~243 x2 (486)
      • PvP
        float 124 x2 (248)
    X↓: Spin Drop (queda livre)
    Appears diagonal up falling straight down, if an enemy is close will start above them
      knockdown ~199
      • PvP
        float 157
    X←: Howling (uivo)
    Delayed hit a set distance ahead of you, reaches 1 floor up
      ~374
      • PvP
        192, temporarily reverses their left/right inputs


Jeeves (james)
20sec buff: HP regeneration speed +50% but won't regenerate HP after your normal limit (regen +25% in PvP).
Lasts 40/50/60sec.

Test in 60sec: normal attack x15, destructor x3 (10080dmg, 168 DPS, plus X commands)
  • Normal attack
      ~210 x3 (630) (does not apply SpATK)
      • PvP
        70 x3 (210)
    Destructor (destruir)
      ~210
      • PvP
        258, locks their tec/skill use for a few seconds

  • Commands can be given when standing still, or during ground combo but this can be harder if not playing as room leader.

    X→: Eradication (erradicar)
    Wave attack forward, commonly up to x5 depending on target, raid boss x9
      wave ~54 xN, x5-9 (270-486)
      • PvP
        force-standing 6 x9 (54)
    X↓: Nightfall (cair da noite)
    Mid-range diagonal up from you
      launch ~243 + ~69 (312)
      • PvP
        float 134
    X←: Raze (arrasar)
    Attacks around Jeeves wherever he is
      launch ~487
      • PvP
        249
5-13: Ley (skills)
X commands

Inspire (inspiração)
Cooldown 16sec
XX↓.
Self-buff, regenerates 1.16 bars of AP over 7sec.

  • PvP
    Cooldown 20sec.

Barrage (barreira)
Cooldown 13sec
XX↑.
Summons a turret that fires 8 homing projectiles in total, reaching better forward than backward. Can be summoned regularly.
Left passive makes it explosive with more damage, right passive makes it blind (in PvE making monsters without super armor not start another attack).
  • 169.20 x8 (1353.6)
    Left passive: apparently 198.38 + 48.34 x2 (295.06, total 2360.48)

    • PvP
      In PvP can be broken with enough attacks.
      Blind makes them unable to see halfway through the screen.

Blockade (barricada)
Cooldown 13sec
XX←.
Makes a solid wall object that also has hands coming out of it from the front which pushes as an attack. Breaks on the 3rd hit it takes. May do damage on a monster that can't be pushed.
  • 21.66 x33 (714.78)

Dark Flame (fogo negro)
Cooldown 13sec
Piercing fireball.
  • 108.77 x3 (326.31)

    • PvP
      rise-float-standing _ x3 ()


Techniques

Gray Zone (zona negra)
16 AP/0.5 bars
  • 12.57 x52, 167.40 (821.04) [51.31]

    • PvP
      hitstuns and bounces any enemy hit straight up repeatedly, end hits for 291


LV1 skills

Jeeves Etiquette (lição de etiqueta)
Forward hit, reaches 1 floor up. Blows light monsters far away.
  • 578.2 [19.93], on light enemies can get aerial bonus after combo↑ for 867

    • PvP
      launch extremely far 211

Gravity Ball (esfera gravitacional)
Non-piercing shots to mid-range.
  • With extra hits passive: ~137.5 x5 (687.5) [23.70]
    Without extra hits passive: ~254.4 x2 (508.8) [17.54]

    • PvP
      With: float 43 probably hitting 3 times (129)
      Without: float 43 x2

Shove (empurrão)
Forward hit only to mid range, knocks down far forward.
  • ~183.9 x3 (551.7) [19.02], on light enemies can get aerial bonus after combo↑ for 827

    • PvP
      float/knockdown forward 74 x3 (222)

Uncertain Air (ventos da incerteza)
Will place a small AoE on one close target to any direction. The additional passive makes you place up to 2, doubling the damage if there are two enemies in the same place.
Light monsters on the last hit will get blown diagonal down through platforms.
  • ~95.0 x5 (475) [16.37], enemy stack 950 [32.75]

    • PvP
      force-standing 51 x4, float 51 (255)

Tick Tock (tic-tac)
Places a mine a set distance forward, it explodes instantly on contact or can wait up to 7 seconds for contact.
Has two hits and the second enemy-stacks.
  • ~404.8 + ~93.1 (497.9) [17.16], 2-4 enemies in the same place 591-777 [20.37-26.79]

      PvP: float 74 x2 (148)

Dark Luminous (luz negra)
Very small AoE hitting slightly to your left and right.
  • 63.3 x10 (633) [21.82]

    • PvP
      float to center 17 x10 (170)

Netherwind (vento dos mortos)
Moves forward through enemies, doing a wave of 6 hits total if starting close.
Light monsters will be pushed forward along, getting some back hits.
  • ~107.6 x6 (645.6) [22.26], may deal less hits on super armor non-giants

    • PvP
      force-standing 26 up to x6 (156), doesn't stun them long enough to combo


LV2 skills

Flame Roll (esfera flamejante)
Wave forward to mid-range, leaves a flame carpet for around 2 seconds.
  • ~72.1 up to x26 depending on width, flame carpet ~3.1 up to x260 depending on width
    Medium: around 12+100 hits (1175.2) [18.65]
    Raid boss: 26+260 hits (2680.6) [42.54]

      PvP: force-standing 49 xN dragging along (1274) (loses hits over distance), flame carpet 2 a few times

Tear Drop (lágrima da noite)
AoEs to your left and right.
Can hit with both sides on very large bosses.
  • ~189.8 x6 (1138.8) [18.07], or x12 (2277.6) [36.15]

    • PvP
      float/knockdown 111 x6 (666)

Heavy (gravidade)
Long-term AoE in place, monsters without super armor are pulled in and locked in hitstun.
  • ~25.4 x46 (1168.4) [18.54]

    • PvP
      No damage or hitstun, pulls to center and slows animations.

Flawless Attack (ataque perfeito)
AoE forward to screen edge reaching 1 floor up. Actually a very big area.
Last hit launches straight up.
  • From each side, pulling to center: ~75.6 x10, launch ~108.0 x1
    Average monster around 18 hits (1425.26) [22.62]
    Boss max 1728 [27.42]

    • PvP
      force-standing 65 x10 pulling to one side only, launch very high 94 x1 (744)

Half Moon (lua crescente)
Moves forward a long distance passing through enemies doing 1 hit to them.
Has a small minimum range, and back hits monsters if used close.
  • ~1199 [19.03], back hits when close (1918) [30.44]

    • PvP
      launch 949, time to do 1 hit
5-13: Ley (skills part2)
LV3 skills

Jeeves Power Bomb (poder do mordomo)
Short AoE forward reaching 1 floor up.
  • ~128.2 x15 (1923) [21.36]

    • PvP
      float 111 x10 (1110)

Secret Passage (passagem secreta)
Useless.
Fires one ball straight in each of the 8 directions away from you, each explodes for 12 hits. Needs to be cast from inside certain bosses for max 96 hits in the same target where it still only does average damage, so in any other scenario it is too weak.
It also deals knockback to light monsters so they might not even be hit for most of the 12 hits.
  • ~24.6 per hit (295.2 per ball), very little to small enemies (1-2 balls), steps away from average boss 36 hits (885)[09.84], very close on boss either 60 hits (1476)[16.40] or max 96 hits (2361)[26.24]

    • PvP
      force-standing hit, doesn't explode and passes through and debuffs them for 107 x12 (1284)

Grim Hand (palma da invocação)
AoE forward stretching 2 floors up.
  • ~626.5 x1, ~399.4 x4 (2224.1) [24.71]

      PvP: 472, blowaway 301 x2 (1074)

Center of Gravity (centro gravitacional)
Not good in PvE.
Hits all enemies at around screen size except below your floor, staggering them and raising them into the air to above you, doing almost no damage meanwhile, then places an AoE above you.
Most of the damage comes from the last AoE doing 21 hits, but monsters without super armor getting hit by it once get instantly blown diagonal down and only take around 5 hits from it, 20 total (or around 12/total27 if they bump into a platform) instead of the full hits, so it only deals its full damage (average skill damage) on heavy monsters who willingly stay close to you from start to finish and deals half or less otherwise.
  • ~5.1 x15, then ~88.8 x21 (1941.3) [21.57]

    • PvP
      Completely different attack in PvP.
      Darkens the screen while trying to hit every enemy from below 5 different times. Anyone who is caught is teleported into the AoE above you moments after it appears.
        77 x15? (1155)

Firebird Splash (incômodo demoníaco)
Temporary aura that automatically keeps shooting short-range homing projectiles while you continue fighting like normal. Does above-average damage at the cost of low AoE and having to take some time to fully finish.
Damage doesn't stack per enemy anymore.
  • ~132.3 x23 (3042.9)

    • PvP
      The hits cause hitstun without comboing together, but can help link normal attacks alongside it.
        force-standing 115 x23 (2645)

Real Dark (escuridão completa)
Hits at not much wider than your character's width, stretching 3 floors up and down.
  • ~332.8, ~114.1 x16 (2158.4) [23.98]

    • PvP
      force-standing 251, force-standing 86 x16 (1627), may lead into combo

Havoc (aniquilação)
AoE to both sides reaching less than screen edge and hitting up to 2 floors up, cannot hit below your floor.
Each hit float-stuns pulling in to above you, then last hit above you blows away left and right.
Large AoE but does slightly less damage and sending monsters away may be a bad thing.
  • ~94.8 x15, blowaway 276.4 (1698.4) [18.87]

    • PvP
      force-standing rise-pull 82 x15, blowaway wallbounce 240 (1470)


LV4 skills

On Target (essência da morte)
Summons a turret above your spot shooting straight at enemies.
Each time shoots two projectiles, spreading to two different enemies or focusing all on a single enemy, fired 12 times. On hit it leaves an AoE on that spot that will hit them more times depending if the target stays in that area or not, doing less hits to launchable monsters but keeping them midair.
Has extremely high boss damage.
  • ~10.7 x22 (235.4) shot twice 12 times (singletarget 5649.6 [43.45], will split between two enemies doing 2824.8 to each [21.72])

Awakening
AoE that can hit multiple enemies but can be weaker than the other one. AoE forward to screen edge reaching 1 floor up.
Single hit so weak if it doesn't crit.
  • 2467.84 x1 [18.98]

H
Hits basically the entire screen.
Also gives you ATK +15% and Super Armor for 20sec after it finishes.
  • 105.45 x4, 70.30 x4, 562.44 x1, 374.96 x1, 58.58 x12, 39.05 x12, 93.73 x6, 62.49 x6, 562.44 x1, 374.96 x1 (4686.68) [36.05 if it cost as much as MP4]
5-14: Rufus (general)
GCC notable changes:
  • Minigun techniques greatly raised cooldown to 17sec
  • Bleeding changed to not affect enemy behavior/juggle, only do minor DoT
  • Rufus no longer takes x1.2 damage compared to other characters separately to defense calculation (was the only character with any effect like this)

Story:
The Underworld is a parallel dimension where all deceased souls are sent to. Evil creatures will be kept imprisoned, and good creatures will live in it until they reincarnate as told by their fate (usually without keeping their memories). But the Underworld is also a thriving civilization with native inhabitants, mostly composed of the Haros tribe -- a particular race of demon who have had the purpose of ruling and watching over the order of the Underworld, separate to the demons of Elyos.

But the Haros are split into the upper class, who happily live in the castle-city, and the lower class, who are outcast into the wilderness to make do; if they die, no big deal.
Among the lower class exist the Bounty Hunters, well-honed agents who will readily chase after any outlaw of the Underworld for a bounty, especially the evil souls who managed to defy their prison. (this results in many of the hero dungeons in the game, with the Circus/Crucible/Sanctum bosses having spontaneously escaped from the Underworld at some point. Also Berkas, although Berkas isn't a dead soul, iron dragons naturally live in the depths of the Underworld, but Berkas was among the weakest of them and couldn't contest territory and so decided to conquer Aernas for himself instead)
The most famous Bounty Hunter was Legis, who also worked his way up to become the general of the Haros Justice Army with his legendary skill and his blue flame power. He had a son who inspired to become like him, but eventually Legis left to Aernas never to come back, leaving Rufus completely alone to fend for himself as a low-class Haros.
Rufus would grow to resent Legis but continued to become a proud Bounty Hunter, though now partially in revenge to not live in his father's shadow but to surpass it with his own name alone.

Fun fact:
His left arm is a prosthetic, he lost the original in a fight. You can see glowing blue writing all over his arm including a bar code, but because of his clothes you usually only see a line across his forearm.

He often complains about targets who end up being worth less than the price of his bullets but thankfully ammo is not a mechanic for him in the game.

Rufus (also called Lupus or Luxus, among others) is an agile gunslinger with mostly short-range moves, including some cheaper techniques to use like special moves involving his various guns. Rufus is made to be very easy to do well with and even his skill tree is simply a straight line where the only choice is which 5 skills you currently want to equip.

Skill Tree Style
Rufus's skill tree is a forced straight line. You have to learn everything, the only choice is which 5 skills you have equipped right now.

Standard dash type (slightly below average)
Dash momentum: ~276 pixels, rocket ~591
*Has slower re-dash (can re-dash faster if holding until run starts then re-dashing).

Has a passive to jump higher and floatier, but the difference is so small it's almost impossible to see: in terms of platforms, there is an extremely small difference of platforms he can reach that others can't, only a few that you would definitely reach if you raised the jump by 10%.
5-14: Rufus (normal attacks)
GroundZ combo
Will shoot forward to mid-range up to 4 times, but since the 2nd shot it will instead automatically switch for a melee combo if there is an enemy right in front of you.
Doing the melee combo has ~358 DPS and launches (or do only the first 2 Zs to push monsters together and never knock down which can be good). Shooting the 4 shots over and over at mid-range is an option too (~304 DPS).
And at any point since the 2nd Z press, has 4 dodges available (you can also do damage from some of them but they do less damage than a single Z press from the combo and at slower rate):
-ForwardForward dodge will do a small melee hit forward, but if there is an enemy right in front of you it will teleport behind them first. Has some startup before it teleports so it's not perfect as a dodge. If used as Double will reduce current cooldowns by 1.
-Up dodge will teleport forward up into the air, as a faster dodge, still possibly passing through enemies.
-BackBack dodge will do a backroll into a kick standing up. During the backroll your hurtbox is shrunk, and while spinning up you are invincible (it's possible to time the spin up as a dodge). Pressing Z during this makes him shoot in-between.
-And Down will cancel the attack and drop through your platform if it is a platform you can drop from, as another possible dodge.
  • 4 shots: ~138 x4
    Shot + combo: ~138 / ~93 x2 / launch ~93 x3
    Forward dodge: ~158
    Up dodge shot: ~18 x6 (108)
    Back dodge shot: ~23 x6 (138), kick: launch ~16 x2 (32)

    • PvP
      The groundZ pistol shots don't cause any hitstun in PvP, needs to land the first melee hit or do a dodge attack to hitstun them from it (even jumpZ won't true combo into groundZZ because of this). Some techniques can compensate with this.
      The groundZ pistol shots reach 1 floor up.
      You can attept to repeat ZZ in PvP but they can grab/skill between hits.
      Melee combo will not trigger if the opponent is in Fatal (must do dodge attack).
      • 4 shots: 193 x4 (772)
        Shot + combo: 193 / force-standing push 130 x2 / launch 130 x3 (843, with Double, 1042)
        Forward dodge: float 110, as Double, 199
        Up dodge shot: float 16 x6 (96)
        Back dodge shot: launch 16 x3-4 (48-64), kick: float 11 x2 (22)

DashZ
This does one melee hit with the muzzleflash, and then one ranged hit with the bullet reaching farther.
Launches monsters diagonal up for crowd control or to set up aerial bonus for skills or teammates.
  • launch forward 147.55, 73.82 (110.73 if aerial)

    • PvP
      Hits melee with the muzzleflash and ranged with the bullet, which alone doesn't hitstun or push but the muzzleflash knocks down. If the muzzleflash hits, the bullet will too as they fall.
      knockdown 216 + bullet 108 (324)

airZ
Just for a bit more damage during a jump.
  • ~109 (~214 DPS repeated up and down a platform)

    • PvP
      Actually hitstuns unlike groundZ bullets.
      Strikes in a very low angle, often missing air-to-air if you weren't above them, but it does reach pretty far forward, and the hitbox is separate from your body so you're more likely to win trades while moving around, doing the attack with less recovery than dashZ.
      force-standing 228

airX
Same as the up dodge hits without the dodge. Pretty useless.
  • 47.04 x6 (282.24)

    • PvP
      Useless as it's not even as strong as one hit of airZ (which already hitstuns).
      force-standing 16 x6 (96)

XXXX
Fires the shotgun up to 4 times at around the same range as combo at slightly lower damage per shot with added knockback, but can then chain into Double which does Impale which does total more damage and launches so another XXXX can aerial.
  • knockback 121.79 x4

    • PvP
      Around the same area as a groundZ shot, alternate gun that actually has hitstun. Chains into Double which is Impale.
      You can stop shooting, recover, dash-jump airX, then you have time to combo into X again, but they have time to skill/inv when you stop the shot and do airX.
      153 x4 (612, 1062 with Double)

X→→
Impale. Must be done from X animation. Works as Critical/Double from XXXX.
  • 132.71 x2 (265.42), or as Double, 265.10 x2 (530.2)

    • PvP
      After hitting, will combo into 2 groundZ shots as they stand back up, or one X to re-stand and miss any other hits.
      In the corner, combos back into XXXX>Impale as an infinite until autobreak.
      147 x2 (194), as Double, 225 x2 (450)

C
Soul Arbiter, the minigun. Fires piercing shots straight. Can aim behind after starting.
Takes around 4 seconds but has cooldown 5.
The ending animation where he puts the gun back can cancel into dash.
  • Exact hit count of each may be slightly wrong: 43.10 x20, 47.42 x8, 51.70 x4 (280 DPS repeated, weaker then combo, DPS is worth it if hitting at least 2 enemies)

    • PvP
      Has no hitstun or push at all, just hits the zone for damage, so you better be ready to cancel into a technique to register hitstun and not get hit. It's also weaker than a grab in full.
      _ x32 ()


Techniques
(1st job) Rake (Investigar)
Does a very short melee hit then a wave forward. Does this for both left and right at the same time.
Too weak on average targets, more hits on very wide bosses.
  • launch ~70.4 x1, ~77.2 around x3 on average targets (302) [23.23]
    x8 on wide bosses (688) [52.92]
    Maximum from inside raid boss: melee x2, wave x16 (1376) [105.84]

    • PvP
      Works as an emergency melee attack to both sides (which actually hitstuns unlike your ground shot) that can be used alone or canceled from any normal attack on the ground. Can combo after ZZZ combo. Normally will knock them down at mid-range but can combo into skills.
        force-standing 122, float 134 x2-3 (390-524)

(1st job) Trample (caminho pesado)
Forward jump with a hit.
Not needed in PvE as you already have all the dodges from combo.
  • ~86.1 x3 (258.3) [19.86]

    • PvP
      Quick evasive forward jump, can jump over enemies. Hits on your current floor and 1 above.
      Can work as an outright melee attack forward offensively or defensively, and combo after ZZZ-forward. After hitting will leave them standing in front of you (or behind if you used this from very close up) to combo into grab or skill, or attempt to reset into ZZZ.
      Hits well as an anti-air but then depending on the distance they can stay at either your left or right so pay attention.
        force-standing 149 x3 (447) plus continuation

(2nd job) Nether Blade (espada espiritual)
Up to two melee hits forward with a sword.
Useless in PvE.
  • ~279.8 and bleed ~46 (325) [25.06]

    • PvP
      Fast single melee strike forward. Can cast a second time costing AP again for another strike that reaches farther up.
      Can use directly in a very short range scenario, or combo ZZZ into this cast twice into another full ZZZ. If not casting twice, will combo into grab or can attempt ZZZ (perfect range to attempt ZZZ if doing ZZZ-Forward into this).
      Can cancel into platform drop just like groundZ.
      • 487 and bleed 4 x13 (539)
        Two casts plus ZZZ-Forward: 1823
5-14: Rufus (skills)
LV1 skills

Pulverize
Will do multiple shots forward to long range (but non-piercing). If there is an enemy close in front of you, you will teleport in front of them before the second half. Not good at damaging more than one enemy and the teleport may be bad sometimes.
Has very long invincibility/recovery time.
  • ~142.1 x2, ~56.8 x5 (568.2) [19.59]

    • PvP
      Will hit then knock them down mid-range.
        force-standing 123 x2, force-standing 49 x5 where last hit floats/knocks down (491)

Empower (delegar)
A short animation with a single shot forward. Non-piercing but does have small splash. Can launch with ZZZ or dashZ first for aerial +50%.
OK for invincibility time with easy-to-connect damage.
  • ~613.6 [21.15], aerial 920.4

    • PvP
      While it doesn't reach 1 floor up it is good at hitting jumping/airdashing or juggled enemies.
        blowaway 534

Soul Shackles (grilhões da alma)
Forward step and small radius explosion. Certain light enemies can take aerial bonus on the second hit.
Medium invincibility time/recovery time.
  • ~289.4 x2, first launch then blowaway (578.8 [19.95], or with 1 aerial 723.5 [24.94])

    • PvP
      float 252, high float 252 (504)

Shatter (estilhaçar)
AoE reaching a short distance forward stretching 1 floor up. On light enemies can get aerial bonus after ZZZ or a delay after dash attack.
Very short invincibility/recovery.
Monsters float-stun in place.
  • ~119.3 x5 (596.5) [20.56]

    • PvP
      Can hit as an anti-air.
        float 103 x5 (515)


LV2 skills

Twin Tooth (caninos gêmeos)
Relatively weak.
AoE forward to mid-range. Last part won't pierce through the first targets.
  • ~111.3 x3, again x3, again launch x1 + knockdown ~120.3 x1 (899.4) [14.27]

    • PvP
      force-standing 96 x3, again x3, float/knockdown 104 + 96 (776)

Crescent Sweep (varredura crescente)
Forward combo.
Second hit can launch for the third to aerial for +200.8.
  • ~401.6 x3 (1204.8) [19.12], bleed ~46

    • PvP
      Starts hitting even before the timefreeze. Last hit floats on hit and reaches 1 floor up.
        force-standing 333, float 333, very high float 333 (999), plus combo

Howling Gale (tempestade uivante)
AoE forward doing 6 hits sending away per hit.
Also does 2 other hits behind you.
  • ~205.0 x6 (1230) [19.52], 410 behind you
    Inside large boss x8 (1640) [26.03]

    • PvP
      float straight up 130 x6 (780), combos into techniques or 1 attack


LV3 skills

Make It Rain (tormenta de tiros)
Good AoE reaching a short amount to both sides and 2 and a half floors up and almost a full floor down. Timefreezes all enemies inside range when started until the skill finishes (if they don't have super armor), on light enemies can launch them first with ZZZ or dash attack for +50% damage.
After using will always face to the right.
  • ~154.1 x14 (2157.4) [23.97], aerial 3236.1

      PvP: 116 x14 (1624), plus combo

Bullet Time (tempo de bala)
AoE reaching a better distance to both sides and a full floor up and down. Light monsters will be knocked to the side, so light monsters at the max distance left/right don't take around half of the damage.
Has some startup time before attacking so they may accidentally move away.
On a normal enemy will do 7 weak hits and 1 or 2 strong hits, from inside raid bosses does 7+4 hits.
  • knockdown aside ~204.3 x7, ~408.6 x1-2 (1838-2247) [20.42/24.96]
    Raid boss x7 + x4: 3064.5 [34.05]

    • PvP
      Doesn't blow away and leaves them standing slightly closer to you, you recover at around the same time.
        force-standing 242 x8 (1936)

Bloody Gust (tornado sangrento)
Forward combo, last knocks down.
  • ~243.7 x2, x2, x4 (1949.6) [21.66], bleed ~46

    TYPE2 version can be equipped on and off. Does the quick first part then only does one more hit straight forward, to be a faster and more effective AoE.
  • ~243.7 x2, 1535.7 x1 (2023.1) [22.47]

    • PvP
      Starts hitting even before timefreezing.
        force-standing 212 x2, 212 x2, float/knockdown 212 x4, bleed 4 x13 (1748)Type 2: 212 x2, 212 (636)

Expunge (eliminar)
Square AoE forward stretching 1 floor up.
    ~157.7 x11, weak x10, ~157.7 x1 blowaway (1892.4) [21.02], bleed ~46
    • PvP
      This can combo on airhit but they must be low in the air or else it accidentally pushes them behind you and misses unless your back is to the wall.
        137 x4, 137 x6, blowaway 137, bleed 4 x13 (1559)


LV4 skills
(LV4 skills need over LV70 to get and cannot be used in PvP)

Explosive Shot (disparo final)
Does 4 hits to both sides from up close moving to mid-range reaching multiple floors up and one down, then does 1 AoE for each enemy's spot (anywhere on stage only up to 4 enemies?), then after you recover, 5 more AoEs will appear aimed almost in a circle around your starting spot depending on altitude and facing when started.
From inside raid bosses will start with 8 hits instead of 4 so can do more damage singletarget.
  • ~329.2 xN
    Against close enemy usually 7 hits or sometimes 8 (2304/2633) [17.72/20.25], less if farther away
    At least 4 more hits from inside raid bosses (3620+) [27.84]
    Enemy-stacking +329 per enemy together after the first

Awakening
Hits basically the entire screen.
  • ~98.99 x9, ~197.79 x9 (2671.02) [20.54]

H
Hits basically the entire screen.
Also gives you ATK +15% and Super Armor for 20sec after it finishes.
  • ~122.19 x15, ~76.89 x15, ~1123.42 x1, ~197.79 x1 (4307.41) [33.13 if it cost as much as MP4]
5-15: Rin (general)
GCC notable changes:
  • Added/extended cooldown to many dodge-like abitilies (only exception is combo-SideSide roll)
  • Removed MP Regeneration passive (same speed as normal MP character now), MP on start passive, and crit chance passive
  • 4th skill nerfed to not keep making new orbs, no longer timefreezes teammates on activation
  • Light: glyph debuff nerfed to nothing but -5% DEF for 5sec
  • Dark: X buff gives much less ATK and costs less, HP steal buff reduced to 5sec
  • Transformation: parry reflected damage option is much weaker

Story:
Millenia ago, a total eclipse was made; this was done as the awakening of an infinite cosmic being, the living embodiment of the concept of evil, called only the Malevolent Horde. It seeked to destroy the world with its black flame and physically grew stronger as darkness became darker. Gods arrived to combat it but not even deities were strong enough to protect the lands in the face of it.

Until the goddess Agnesia, the goddess of life and purity, alone, came in contact with it: she realized that due to its nature, it cannot simply be destroyed like a physical being, but lest she be consumed she used a forbidden spell and successfully sealed the creature into something that could contain it; herself.
The spell itself almost exhausted all her divine power and left her weakened, and it was sealed but the weaker her body is, the weaker the seal is: the moment Agnesia died, it would be free again just the same. The second part of her plan was to use her last powers to force eternal reincarnation onto herself; an immortal being such as a deity has no fate and does not ever reincarnate, but a mortal one does.

An eclipse would happen, but if she survives until the eclipse passes so the Malevolent Horde's powers are weakened, another girl would start life as her incarnation, with the seal continuing.

In present times Rin is born in a distant village. They easily recognize the child as Agnesia herself with her unnatural magic abilities and treat her very well.
However there are also people who remember the other part best: one group worships not Agnesia but the Malevolent Horde. Together with the Malevolent Horde, they schemed to raze the village specifically when the next natural eclipse incidentally happened.
The attack came unprecedently and was devastating. One by one Rin's friends gave their lives to protect hers from demons. For the first time in her life she felt absolute despair, anger, and hatred in her heart; all things that allow the Malevolent Horde to grow itself and come closer to the surface, for the first time directly talking with her.

Rin travels to seek help on how to mantain the strength of the seal, as the evil inside her tricks her into completely giving in to negative emotions and deliberately lends her its power for the sake of it.

Fun fact:
A lot of her themes were chosen from a poll that Kog gave to the brazilian GC team to put on their forums about deciding what this future character should be. It included things such as: from a choice of male and female it was chosen female, from a choice of colors it was chosen white because no character had white yet, and it was chosen for her to add some special gameplay systems instead of choosing a simple basic character, which was made as her glyph system.

Hybrid character explanation:
  • Like AP characters, has only one weapon style, and job upgrades add more skills and techniques and passives to it, choosing any 5 skills/techniques to equip.
  • Still has all of the benefits of an MP character: can charge MP to use skills, and in PvE recharges MP when hitting monsters.

Skill Tree Style
When learning 2nd job has to choose between Dawn (Light) path, or Twilight (Dark) path. This will change what she gets in 2nd/3rd/4th jobs and you will learn all skills of that path, but it's impossible to put points in the other path. Using an all SP reset card lets you choose again.
They each have their own playstyles and stuff but if you're asking which is better for PvE it's Dark.
  • Dawn (Light) will continue her 1st job style: she is an agile trickster character where her groundZ combo keeps shooting forward with at any point being able to cancel it into jump or roll, with a double jump and a straight-down stomp. Can press X from any normal attack to spend glyphs to do a hitstunning followup shot, or spend a glyph when using a skill to enhance the skill (glyphs recharge over time, much faster if standing still). Has a minor skill to buff other players in the team for a very short barrier or speed+jump height.

  • Twilight (Dark) instead completely changes her into a fun hyperactive melee character with close range attacks and a divekick diagonal up/down, with some movement abilities and rolling (still can roll sideways from any point of ground combo, or an Up branch that jumps up and strikes to both sides). She loses the glyph system for a temporary mode that gives small HP leech, and can press X during any normal attack to instantly cancel the attack animation back to standing still at the cost of own HP.

Standard dash type (average)
Dash momentum: ~286 pixels, rocket ~667
*On midair dash, has extremely slow re-dash (can re-dash faster if holding until starting to run, then re-dashing).
5-15a: Rin, Light (normal attacks)
Doublejump (2nd job)
Can be done after an airdash only if you held run then stopped holding it.

GroundZ
Single shot forward at near full character height, can be done 3 times and each time it goes farther forward. Can infinitely combo monsters by doing ZZ-dash or repeating ZZ if already near the wall (but the combo has a low ~132 DPS either way, but easily pulls many monsters at once for higher MP gain).
Between hits can cancel into X to shoot a glyph straight to mid-range then go back to the Z shots, can repeat this X shot as many times as you can spend.

From 100% of the animation can SideSide to cancel and roll to that side as an evasion. Since 2nd job upgrade, after 1st strike can instantly cancel into jump too, ready to attack or airdash.
  • float-stun 91.71 / float-stun 91.71 / float-knockdown 91.71
    X: 21.19 x4 and 78.04 x1 (162.8), applies -10% ATK and -5% DEF for 5sec

    • PvP
      SideSide evasion has hyper armor instead of invincibility.
      The tornados have no hitstun in PvP, only push. Canceling into X still has hitstun, or can shoot and jumpcancel into airZ or grab, or shoot and be ready to dodge to the side.
      • push 126 / 126 / 126 (378)
        X: launch 31, no debuff

Dashatk
Melee hit forward that sends into the air, with 3rd job learns the second Z input after this which hits again and groundbounces.
With 4th job upgrade, can ↓ roll right after the first strike (cooldown 5sec, PvP 12).
  • launch 160.64 (repeating on giant has ~168 DPS)
    ZZ: knockdown 90.72 then groundbounces with 2.84 (repeating on giant has ~186 DPS)

    • PvP
      Can keep looping dashZZ, if hills aren't in the way. Or can combo into X instead.
      • float 276
        ZZ: 156 groundbounce on airhit, knockdown forward on groundhit

  • Dashatk X (2nd job)
    Replaces the normal X followup only when this is off cooldown.
    Places a stationary glyph in that place and jumps forward over them as a dodge, easily getting back bonus. Cooldown 2sec.
    • PvP
      Cooldown 4sec.

hold X (2nd job)
Spends one glyph to start. Must hold for slightly over 2 seconds before it's ready. It will home in on enemies for 1 hit, can go up and down and reaches farther forward than backward. Can charge for an extra stage to increase its maximum range.
  • LV1: no hit
    LV2: 286.48
    LV3: 466.86

    • PvP
      LV2: 97 without hitstun, slows for 1 second
      LV3: 194 without hitstun, slows for 1 second

airZ, ↓Z
Short melee hit, doesn't put you in aerial recovery after one use.
Alone or after hitting or missing airZ can input ↓Z to dive straight down with a spinning hit.
  • stagger 38.29 x2 (76.58) [repeating up and down a platform is only ~141 DPS]
    ↓Z: launch 73.91 up to x3 (221.73, aerial from launch 295.64)

    • PvP
      The normal attack forces standing state on airhit (so it can undo a knockdown by hitting any enemy in the air, trying to combo into grab or another attack like dashatk).
      • force-standing 79 x2 (158)
        ↓Z: launch 50 x3 (+150)

airX
Same damage as X from combo. Stays in place for a second instead of moving forward.

Z+X getup (4th job)
Only works when knocked down at the moment you land on the floor (a flash of light will happen). Backdashes and recovers faster (doesn't work if already on Fatal) then pressing Z will lose the invincibility to do a dash attack forward.
  • float-stun 302.40


C↑
Talisman Buff 1, or Enhanced Talisman Buff 1
The 2nd job version boosts jump height to almost 2 floors for you and an ally in front of you for 15sec, the 3rd job version applies to yourself and all nearby teammates. Cooldown 20sec.

  • PvP
    Cooldown raised to 25sec.

C↓
Talisman Buff 2, or Enhanced Talisman Buff 2
The 2nd job version gives hyper armor and damage taken is reduced to 1 for 3 seconds for you and an ally in front of you, the 3rd job version applies to yourself and all nearby teammates. Cooldown 20sec.

  • PvP
    Cooldown raised to 25sec.

C←
Infinite Use of Talisman (poder ilimitado)
Cooldown 20sec
For 10 seconds your X button attacks don't consume glyphs so you can spam them (skill commands still spend them).

  • PvP
    More useful in PvP, but lasts 5sec with cooldown 25sec which is a lot.

C→
Sweet Relaxation (distração)
Melee hit, only works on normal monsters without super armor and makes them unable to start any attack for 4 seconds even if being hit. But not good as cooldown is 25 seconds, and you can already stun non-armored monsters with repeating the first two Zs of ground combo.

  • PvP
    Makes the opponent invincible and stunned for 5 seconds, and slightly lowers their MP.
    Cooldown 30sec.
5-15a: Rin, Light (skills)
LV1 skills

Flash of Light (raio de luz)
Small melee strike forward, launches.
EX: doesn't launch, pushes.
  • launch ~232.5 x2 (465) [16.03], light monster 1 aerial 697.5
    EX: ~244.1 x2, ~23.6 x6, ~0.7 x12 (638.2) [22.00], main hit only 488.2

    • PvP
      float 202 x2 (404)
      EX: 212 x2, float 20 x6 with last launching (544)

Raging Wind (vento sagrado)
2 mid-range projectiles straight forward, EX is the same but 3.
When using a MP1 for invincibility time this has better range to deal damage than the other one.

Has two versions. Normal version projectiles hit the first enemy then disappear. 3rd job has an upgrade (can equip on and off) that makes them pierce, but number of hits now depends on width/knockback.
  • ~217.8 x2/x3 (435.6)[15.02] / (653.4)[22.53]
    Piercing: ~56.8 max x10/x15 (568)[19.58] / (852)[29.37]

    • PvP
      First two shots force standing state, 3rd blows away.
      164 x2/x3 (328/492)
      Piercing: 33 around x8/x12 (264/396)


LV2 skills

Eye of the Storm (ventos da divindade)
Long-duration AoE forward.
EX: has additional hits for slightly pulling in.
  • ~0.7 x1, ~119.8 x9 with last hit knocking down (1078.9) [17.12]
    EX: ~125.8 x9, ~1 x22 with last hit knocking down (1154.2) [18.32]

    • PvP
      Last hit floats for possibly comboing after like with dash attack, EX version even slows them down on last hit.
      force-standing 94 x9, last floats/knocks down (846)
      EX: 99 x9 (891), slows

Soul Shield (escudo das almas)
Barrier around where you cast it, you and teammates staying inside the barrier cannot be hit by enemies. It lasts 3 seconds or 5 with glyph. (in PvP, 4 with glyph)

Strong Wind (tufão)
Sends a multi-hit tornado to both sides (reaches your height and 3 floors up), doing hits starting close to you but ending a set distance away from you. Against a heavy monster you need to start at the right distance away, light monsters may be pushed.
Does bonus damage to raid bosses that get hit by both tornadoes.
EX version moves farther away from you so it may need to be angled from farther away.
  • ~60.1 up to x20 (1202)[19.07], raid boss x40 (2404)[38.15]
    EX: ~66.6 up to x20 (1332)[21.14], raid boss x40 (2664)[42.28]

    • PvP
      The tornado will keep pulling enemies along with them perfectly so it always does full hits, only losing a few hits if not starting close to them.
      float 24 x20 (480)
      EX: 26 x20 (520)

Shard of Spirit (fragmento da chama/algema de luz)
Too nerfed.
Places a splashing AoE on up to 2 nearby enemies within a short circle from you.
  • weak x11, ~194.3 x4 (777.2) [12.33], launchable aerial 1068.6
    2+ enemies together: 1554 [24.66]

    EX: ~173.4 x5 (867) [13.76], launchable aerial 1213.8, plus 11 weak hits
    2+ enemies together: 1734 [27.52]

    • PvP
      bind, launch 169 x4 (676)
      EX: bind, launch 151 x5 (755), disables techniques/skills for 2 seconds after they recover
5-15a: Rin, Light (skills part2)
LV3 skills

Final Flash of Light (explosão final)
Giant piercing shot diagonal down with big AoE, it explodes when reaching the floor but can pierce 1 platform before exploding if not used from the bottom floor, on certain giant monsters can do double hits this way. EX version often is weaker and cannot pierce platforms.

If used in Fatal after spending all glyphs, becomes a different skill: AoEs a medium distance to both sides reaching 1 floor up, final hit blows away.
  • 223.82 per hit, normal enemy 6 hits (1342.92) [13.98], boss 9 hits or possibly double going down (2014.38/4028.76) [20.98/41.96]
    EX: 78.30 per hit, normal enemy 9 hits (704.70) [07.34], boss 26 hits or possibly double going down on hole (2035.80/4071.60) [21.20/42.41]

    Fatal: ~191.4 x9, blowaway ~313.8 (2036.4) [21.21]

    • PvP
      force-standing push _ xN (from close around 20 hits, _), explosion launches away and may juggle
      EX: 194 xN (around 21 hits, 4074), combos into dashZup if you wait a moment first
      Fatal: ?

Light Restraint (grilhões de luz)
Piercing slow projectile forward with infinite range (equippable 3rd job upgrade also shoots two more diagonal up/down), enemies touched by it get an AoE on them that pauses enemies including bosses, but when the projectile hits another enemy the AoE disappears early and restarts at that other enemy in full. Cannot appear again after the 4th enemy hit by the projectiles.

EX can do more damage in total, but over a longer time (if it's going to hit multiple enemies, non-EX can deal more damage).
  • launch ~232.5 x1, ~102.2 x16? (1867.7 [19.45], aerial 2685.3 [27.97])
    EX: launch ~232.5 x1, ~58.1 x32? (2091.7 [21.78], aerial 3021.3 [31.47])

    • PvP
      force-standing 89 x14?, last floats/knocks down (1246), quickly combos into dashZup
      EX: 50 x26? (1300), while trapped combos into dashZ, dashZ, dashZup

Heaven's Light (luz celestial/julgamento divino)
Jumps up and shoots multi-hit projectiles diagonal down. Needs to be used on extra-large targets for any decent damage.
EX is the exact same but with 60% more projectiles.
  • 52.49 per hit, normal enemy 9 hits with or without glyph (472.41), average boss 16 hits or 20 with glyph (839-1049) [08.74-10.93]

    • PvP
      Too weak.
      float 45 around x5 (225), EX around x7 (315)


LV4 skills

Makes piercing orbs around you that spiral away then spiral back to the middle. Doesn't create more orbs on hit anymore.
Number of hits depends on size. Does low damage to small enemies, average damage to average bosses, higher damage to extra-large bosses.
  • ~53.7 per hit, average boss ~55 hits (2953.5) [22.71]

Awakening
Single hit AoE reaching forward and 2 floors up.
Single hit so weak if it doesn't crit.
  • 2604.70 [20.03]

H
Hits basically the entire screen.
Also gives you ATK +15% and Super Armor for 20sec after it finishes.
  • 105.48 x8, 156.27 x9, 562.59 x1, 70.31 x9, 104.18 x9, 375.05 x1 (4758.32) [36.60 if it cost as much as MP4]

Transformation
Technique that costs 2 bars of MP. After leaving transformation cannot transform again for 15sec (cooldown ends early when switching screens).

While transformed, has hyper armor (super armor in PvP) and around +92% DEF, reducing damage taken by around 48%.

  • Transformation explosion
    PvE: float/knockdown ~191.3
    PvP: blowaway 333

Z
3 mid-range beams with a single hit, 1 reaches 1 floor up too.
Has a Critical/Double, hitting again similarly but only at the tip. Can aim the Critical to the other side.
  • float-stun 131.03 x3 (393.09) (repeating Z is ~471 DPS)
    Critical: float-stun 366.91 (repeating Z with Critical is ~608 DPS)

    • PvP
      Pushes per hit without knocking down, Critical does knock down.
      In corner, can do Z-Critical-X and repeat, if the stunning block is equipped.
      force-standing 92 x3 (276)
      Critical: float/knockdown 303

Dashatk
Teleports far to the side, can slightly angle Up or Down. Can still be hit and interrupted for some time before teleporting. Can press Z after teleporting for a short melee hit to all directions, reaching 1 floor up too.
If repeating combo against monsters, may be able to teleport away from an attack in time.
  • float-knockdown 231.84

    • PvP
      float/knockdown 332

airZ
Hits easily but knocks down on hit.
Jumping up and down a platform with this attack is her strongest normal attack against monsters (~724 DPS).
  • 135.23 x3 (405.69)

    • PvP
      float/knockdown 399


XX block
Doesn't actually block any attacks. It's an extremely fast physical hit forward, which microstuns non-armored enemies.
  • Left passive: stun lasts slightly longer.
    Right passive: taking damage during this moment reflects a small amount of damage (without showing damage numbers).

Transformation passives
Buff:
  • Left passive: HP Regen Speed +5% (too weak)
    Right passive: heal 5% HP on kill
Absorption:
  • Left passive: groundZ (not Critical) heals 0.6% per hit/1.8% per attack
    Right passive: supposed to make groundZ recover more MP but tested and saw no difference
Transform:
  • Left passive: transformation time increased from 30sec to 35sec
    Right passive: while transformed, gains +5% ATK, +5% DEF, +10% MaxHP, +5% HP Regen Speed
In PvP all these passives are halved.


All these techniques/skills can be used during normal attacks on the ground.
They can only be used with the A/S/D/F/G buttons, not by holding Z.

X↑
Cooldown 15sec
Melee hit left and right and up. Has invincibility like a short skill.
Weak but can be used as an emergency defensive attack to drive foes away, can be used just to evade an attack if timed well.
  • PvE:
    • Left version: blows away. 360.93
      Right version: small push. 288.75 and 1.90 x12 (311.55)

    • PvP
      • Left version: blowaway 628
        Right version: force-standing 503, very long hitstun and may combo afterward

A button
0.5 bars, cooldown 10sec
Square AoE in front staying for multiple hits. Technique but has invincibility like a short skill.
  • PvE:
    • Left version: keeps floating in place until ending with knockdown. 65.49 x12 (785.88) [49.11]
      Right version: launches straight up until ending with knockdown, attack lasts less time. 65.49 x7 (458.43, launchable monster aerial 664.9) [28.65/41.55]

    • PvP
      • Left version: launch 33 x12 (396), combos into groundZ Critical
        Right version: launch 33 x7 (231)

S button
1.4 bars, cooldown 15sec
Lasting AoE around your own spot, keeps hitting and doesn't knock down even in the end.
  • PvE:
    • Left version: small float-stun slightly pulling back, ~109.6 x11 (1205.6) [26.20]
      Right version: small float-stun, monsters without super armor get pulled to center, 87.6 x11 (963.6) [20.94], says it slows but apparently doesn't work on monsters

    • PvP
      • Left version: pulls to center per hit. Force-standing 68 x11 (748)
        Right version: slows opponent and leaves in place midair. Force-standing 54 x11 (594), combos into groundZ Critical twice

D button
2.9 bars bars, cooldown 30sec
Hits a short distance to both sides, for many hits then sends it as a wave to both sides.
  • PvE: 119.49 x7, then up to x6 (1553.37)
    If hitting the beam both left and right on a giant, can get x7 then x12 (2270.31) [23.64]

    • PvP
      launch 104 xN, float push 104 xN (~1350)
5-15b: Rin, Dark (normal attacks)
X cancel
Learned at 2nd job.

Can instantly cancel any normal attack animation with X at the cost of HP to continue a combo or run away. Costs 10% HP (5% since 4th job upgrade).
The glyph points are also replaced with a darkness gauge: hitting normal attacks exclusive to the Dark path will fill the gauge, once full it is active for 5 seconds and normal attacks will refill 2% HP on hit (1% in PvP).

GroundZ combo (dark)
Dark version is learned at 2nd job. Unequipping this lets you use Light's wind combo (without 2nd-4th job upgrades) but that's not recommended.

4-hit melee combo. At any point can roll to any side.
  • PvE: ~98 / ~98 / ~98 / ~98 (~204 DPS repeated)

    • PvP
      Can fully combo even on anti-air/juggle combo. Can loop back into combo by doing ZZZZ>Up or ZZZZ>Critical.
      1st swing almost reaches a full floor up and 4th swing does.
      force-standing rise 151 / force-standing 151 / force-standing 151 / float 151 (604)

  • Combo Critical/Double
    Learned at 2nd job.
    This is very good for PvP but replaces the forward roll, can be unequipped to keep roll forward especially for PvE.
    • 0 x4, 151.1 x1

      • PvP
        Do full melee combo into Double, once Double hits after the float of the last combo hit it will send even higher so that you can do combo>Double again. In the corner you have to slightly delay the next start or you will walk past them.
        float/knockdown 260

  • Combo BackBack
    Learned at 2nd job.

    Modifies the back roll to place a shadow image in your old spot with lasts up to half a second to explode if near an enemy, dealing very short hitstun.
    • 47.0

      • PvP
        May attempt to combo after, but it pushes forward from where you are facing.
        force-standing 32

  • Combo Up
    Learned at 2nd job.

    Cancels into a small jump attacking with full melee distance to both sides and easily jumping one full floor up reaching high with the attack, can freely move left or right before landing and can cancel into airZ.
    • 108.7 x2 (217.4)

      • PvP
        If this hits there is a hard timing to combo afterward with ground combo. But this becomes very easy if the opponent already was in the air by using this after full ground combo.
        Can easily catch an opponent in the platform above you, where you will land faster to combo into groundZ.
        force-standing rise 74, float/knockdown 74

Dash attack (dark)
Dark version is learned at 2nd job.

This energy ball can do up to 3 hits, then explodes for one more hit.
At 3rd job can continue with Z for another hit of similar range and lasting time.
  • 42.5 x4 (170),
    ZZ: 36.7 x3 (110.1)

    • PvP
      May combo after the energy ball if you X-cancel and hit groundZ with specific timing, or if started at minimum distance will naturally combo into the ↑ attack then groundZ combo.
      force-standing 73 x1-3, blowaway 73
      Up: float 63 x1-3

airZ
Dark version is learned at 2nd job.

Hits as a short box forward reaching only a decent amount diagonal up and diagonal down, almost your full character height.

Since 3rd job, after doing the attack once can chain into ↓Z or ↑Z for a dive.
  • PvE: 76.4 (~191 DPS repeated)
    Dive: 37.2 x3 (111.6)

    • PvP
      Even on airhit forces standing state to possibly undo a knockdown and combo into groundZ.
      force-standing 157
      Dive: force-standing 25 x3, third hit floats/knocks down

Hold X
Can be charged in up to 3 stages, once released will cost some HP to give yourself an ATK buff for 10 seconds. ATK buff is halved in PvP.
  • Stage 1: costs 3% HP, +3% ATK for 15sec
  • Stage 2: costs 6% HP, +6% ATK for 15sec
  • Stage 3: costs 10% HP, +10% ATK for 15sec
While still charging/while her hand is still up, can dash to either side to instantly teleport a short distance to that direction (long cooldown).

Z+X getup (4th job)
Only works when knocked down at the moment you land on the floor (a flash of light will happen). Backdashes and recovers faster (doesn't work if already on Fatal) then pressing Z will lose the invincibility to do a dash attack forward.
  • float-stun 302.40


C↑
Soul Gap (esquiva dimensional)
Cooldown 20sec
Invincible pose for 2 seconds, can be used to avoid an attack.
Regenerates some HP including recovering from Fatal.

  • PvP
    Cooldown 25sec.

C↓
Weapon Enhancement (fortificar arma)
Cooldown 15sec
Self-buff. For 10sec, normal attacks hit for an additional 21.85 that applies a renewable bleed of total +40.5 (4.5 x9). When repeating combo, adds around 50 DPS.

  • PvP
    Buff only lasts 5sec with cooldown 20. The bonus hit deals 1dmg and the debuff is Curse for only 2sec (they lose HP for every Z press while cursed).

C→
Bloody Wall (barreira de sangue)
Cooldown 5sec
Creates a solid wall object in front for 3 seconds. It can bodyblock enemies (including minibosses but not bosses) and stop certain basic projectiles.

  • PvP
    Cooldown 7sec.
5-15b: Rin, Dark (skills)
LV1 skills

Flash of Light (raio de luz)
Short hit in front.
  • 232.5 x2 (465), plus the bleeding (total 505.5) [17.43]

    • PvP
      Can send up far enough to juggle but only into this or other skills. Stops their HP Regen for 3sec.
      float 202 x2 (404)

Endless Strength (ferocidade)
4-hit combo.
  • 160.9 x4 (643.6) [22.19]

    • PvP
      In corner will combo into groundZ.
      force-standing 140 x2, launch 140, knockdown groundbounce 140 (560), plus combo

Wind Wings (tempestuosa)
Small explosion from you.
  • 212.4 x3 (637.2) [21.97]

    • PvP
      float 185 x3 (555)


LV2 skills

Eye of the Storm (ventos da divindade)
Lasting AoE in front.
  • ~119.8 x10 (1198) [19.01]

    • PvP
      Has time to do ZZ then combo into full ZZZZ. Can combo into this skill then combo into groundZ to deal much more damage in 1 combo.
      Stops their HP Regen for 5sec.
      force-standing 94 x9, float/knockdown 94 x1 (940), plus combo

Desperate Force (força sobre-humana)
Dash attack forward quickly pulling enemies along and leaving them standing up in front of you.
3rd job upgrade can be equipped on and off: does a second dash back, light monsters often get pushed out of the way then the second part misses but raid bosses take good damage.
  • ~256.3 x6 (1537.8) [24.40]
    Upgrade: ~157.0 x6 twice (942/1884)[14.95/29.90]

    • PvP
      Leaves the enemy standing close to you, can attempt groundZ but only dash grab can combo.
      Comboing after this is not as beneficial as the other MP2s but starting with this can be very hard to dodge.
      force-standing 130 x6 (780)
      Upgrade: force-standing 80 x12 (960)

Internal Flame (chama interior/flecha final)
Non-armored monsters hit by this can't attack for 6 seconds.
  • 191.75 x6 (1150.5) [18.26]

    • PvP
      Can combo into groundZ especially if you set them in the air first.
      float/knockdown 167 x6 (1002), plus combo
5-15b: Rin, Dark (skills part2)
LV3 skills

Final Flash of Light (explosão final)
Exploding projectile as a square AoE forward reaching 1 floor up and knocking down.
  • ~2093.0 x1 [21.80], if launching a light monster for aerial hit first, 3139.5 [32.70]

    • PvP
      launch 1823

Wailing Gust (olho da tempestade)
Explosion from you.

3rd job upgrade can be equipped on and off: for 3sec after finishing, instead of being able to attack you have a damaging aura where you take only 11% damage.
  • ~188.4 x11 (2072.4) [21.58]
    Upgrade: adds ~71.6 x6 (429.6) instead of being able to attack for 3 seconds

    • PvP
      float 136 x11 (1496), barely combos into groundZ, easily with upgrade. Can do one combo until before autocounter happens, combo into this, then do groundZ combo again.

Internal Passion (fúria interior/fragmento espiritual)
Slow homing shot with a big explosion. Lower damage.
  • ~1116.3 [11.62]

    • PvP
      Hits basically every enemy within one screen.
      does no damage


LV4 skills

Makes piercing orbs around you that spiral away then spiral back to the middle. Doesn't create more orbs on hit anymore.
Number of hits depends on size. Does low damage to small enemies, average damage to average bosses, higher damage to extra-large bosses.
  • ~53.7 per hit, average boss ~55 hits (2953.5) [22.71]

Awakening
Single hit AoE reaching forward and 2 floors up.
Single hit so weak if it doesn't crit.
  • 2604.70 [20.03]

H
Hits basically the entire screen.
Also gives you ATK +15% and Super Armor for 20sec after it finishes.
  • 105.48 x8, 156.27 x9, 562.59 x1, 70.31 x9, 104.18 x9, 375.05 x1 (4758.32) [36.60 if it cost as much as MP4]

Transformation
Technique that costs 2 bars of MP. After leaving transformation cannot transform again for 15sec (cooldown ends early when switching screens).

While transformed, has hyper armor (super armor in PvP) and around +92% DEF, reducing damage taken by around 48%.

  • Transformation explosion
    PvE: ~191.3
    PvP: float/knockdown 333

Ground Z
3-button melee combo.
Critical/Double isn't invincible or anything but might help dodge from the movement to the side.
  • 73.85 x3 / 73.85 x3 / 73.85 x3 (664.65) (~392 DPS repeated, her strongest normal attack)
    Critical/Double: 193.1

    • PvP
      Easily combos into itself one more time (unless enemy is uphill) before autocounter triggers. Can instead combo ZZZ into one technique/skill, then groundZZZ again, possibly with more techniques/skills.
      If doing Critical/Double behind you, the attack will turn around too before Critical/Double hits.
      force-standing 101 x3 / force-standing 101 x3 / launch 101 x3
      Critical/Double: blowaway 332 wallbounce

Dash attack
  • 77.2 x3 (231.6)

    • PvP
      knockdown 133 x3 (399)

airZ
Very long range diagonal down with good active frames.
  • 43.7 x3 (131.1) (only ~230 DPS repeated up and down a platform)

    • PvP
      90 x3 (270), first two force standing and last knocks down

XX block
Doesn't actually block any attacks. It's an extremely fast physical hit forward, which microstuns non-armored enemies.
  • Left passive: stun lasts slightly longer.
    Right passive: taking damage during this moment reflects a small amount of damage (without showing damage numbers).

Transformation passives
Buff:
  • Left passive: HP Regen Speed +5% (too weak)
    Right passive: heal 5% HP on kill
Absorption:
  • Left passive: groundZ (not Critical) heals 0.6% per hit/1.8% per attack
    Right passive: supposed to make groundZ recover more MP but I tested and saw no difference
Transform:
  • Left passive: transformation time increased from 30sec to 35sec
    Right passive: while transformed, gains +5% ATK, +5% DEF, +10% MaxHP, +5% HP Regen Speed
In PvP all these passives are halved.


All these techniques/skills can be used during normal attacks on the ground.
They can only be used with the A/S/D/F/G buttons, not by holding Z.

X↑
Cooldown 15sec
Melee hit left and right and up driving foes away. Has invincibility like a short skill.
  • PvE:
    • Left passive: blows away very far, 360.9
      Right passive: 288.75, for 10sec you have faster movement and higher jumps

    • PvP
      • Left passive: blowaway 628 wallbounce
        Right passive: blowaway 503, for 10sec you have faster movement and higher jumps

A button
0.5 bars, cooldown 10sec
Not a skill but has invincibility like a short skill.
  • PvE:
    • Left passive: 240.6 [18.50], floats straight up
      Right passive: 168.4 plus bleed for 15 hits over 5sec (+67.5, total 235.9) [18.14]

    • PvP
      Has short debuffs, but they can be useless because this combos into groundZZZ.
      • Left passive: launch 419, reverses left/right inputs for 5sec
        Right passive: launch 293, curses for 3sec

S button
1.4 bars, cooldown 15sec
  • PvE:
    • Left passive: ~109.6 x11 (1205.6) [26.20]
      Right passive: ~87.6 x11 (963.6) [20.94]

    • PvP
      • Left passive: force-standing 68 x11 (748), pulls to center
        Right passive: no hitstun but slows without knockback, hitting again starts hitstun which doesn't end quick. 54 x11 (594)

D button
2.9 bars, cooldown 30sec
  • PvE: ~123 x15 (1845) [19.21]

    • PvP
      pull airborne to center 107 xN, launch away 107 xN (1605?)
5-16: Asin (general)
GCC notable changes:
  • Pressure Point and Water Puddle debuffs extremely nerfed in PvE
  • Added/raised cooldown of many dodge-like abilities
  • X stances have easier timing into their commands

Story:
As Silver Land was being attacked by Thanatos's forces after Victor's betrayal, Jin's older mentor Asin Tairin (the man with brown hair) had to separate himself from him as they escaped. Both had presumed the other to be dead.

Tairin nearly had been killed, but his mortally wounded gasping body laying in the bamboo forest was seen by a shadow. A boy, seemingly an outcast orphan, carefully watched with cold eyes.

Tairin wakes up in a bed with his wounds bandaged. Feeling grateful of his life being saved, over the many days of his recovery and their travels, Tairin tells the boy everything about the Silver Knights and their physical and spiritual teachings, their martial arts, stories of how great Jin was, and the boy learns their martial arts quickly -- very quickly. This was the birth of the Disciple. He was eagerly interested in pursuing martial arts but had not expressed why.
The boy felt the need to help Tairin during that day, but he saw something more. In truth, he was alone and had always coveted power. Real power. Power that he could use as revenge to things from where he had come from. The boy had developed a sly personality where to others he easily showed a kind and compassionate face coupled with polite sayings which nothing but concealed ulterior meanings behind his words and a sadistic cold killer's face hiding in plain sight.
But Tairin had been more than a teacher of an art, more than someone's tool. To this lone person he had been a true father figure instead of a means to an end. Allegedly.

But even this relationship was cut short.
Suddenly there is another monster attack, and Tairin rushes to help defend the boy. While they win the fight, they could not win the war; after this battle, Tairin's new wounds could not be treated by anyone. He was simply on his way to death in two weeks.
The boy only grew in grief in dealing with it as it came. As it comes to a close he breaks and realizes that, even again, even now, there still is nothing he can do as who he is; in rage he declares, "master, I'll put your name as reciprocation for all this and I swear I'll be stronger than anyone, including Jin."

Remembering Asin Tairin's words, the boy, now calling himself Asin, eventually tried to get the vajras hidden in Victor's Fortress, weapons originally used by gods who could be used by a human with extremely advanced spiritual power, to ascend and become a Rama himself, but they had already been collected and surpassed -- by none other than Jin. Asin confronts the Grand Chase purely in rivalry to Jin, and tells Jin that he'll become stronger than anyone and ascend as well. Jin agrees to lend him the vajras and help him on the path, but Asin only fails; as Jin puts it, Asin's problem is the same as Victor's had always been: they are too corrupt of heart to spiritually ascend as they only seek more raw power for selfish impulses, without reason or balance.
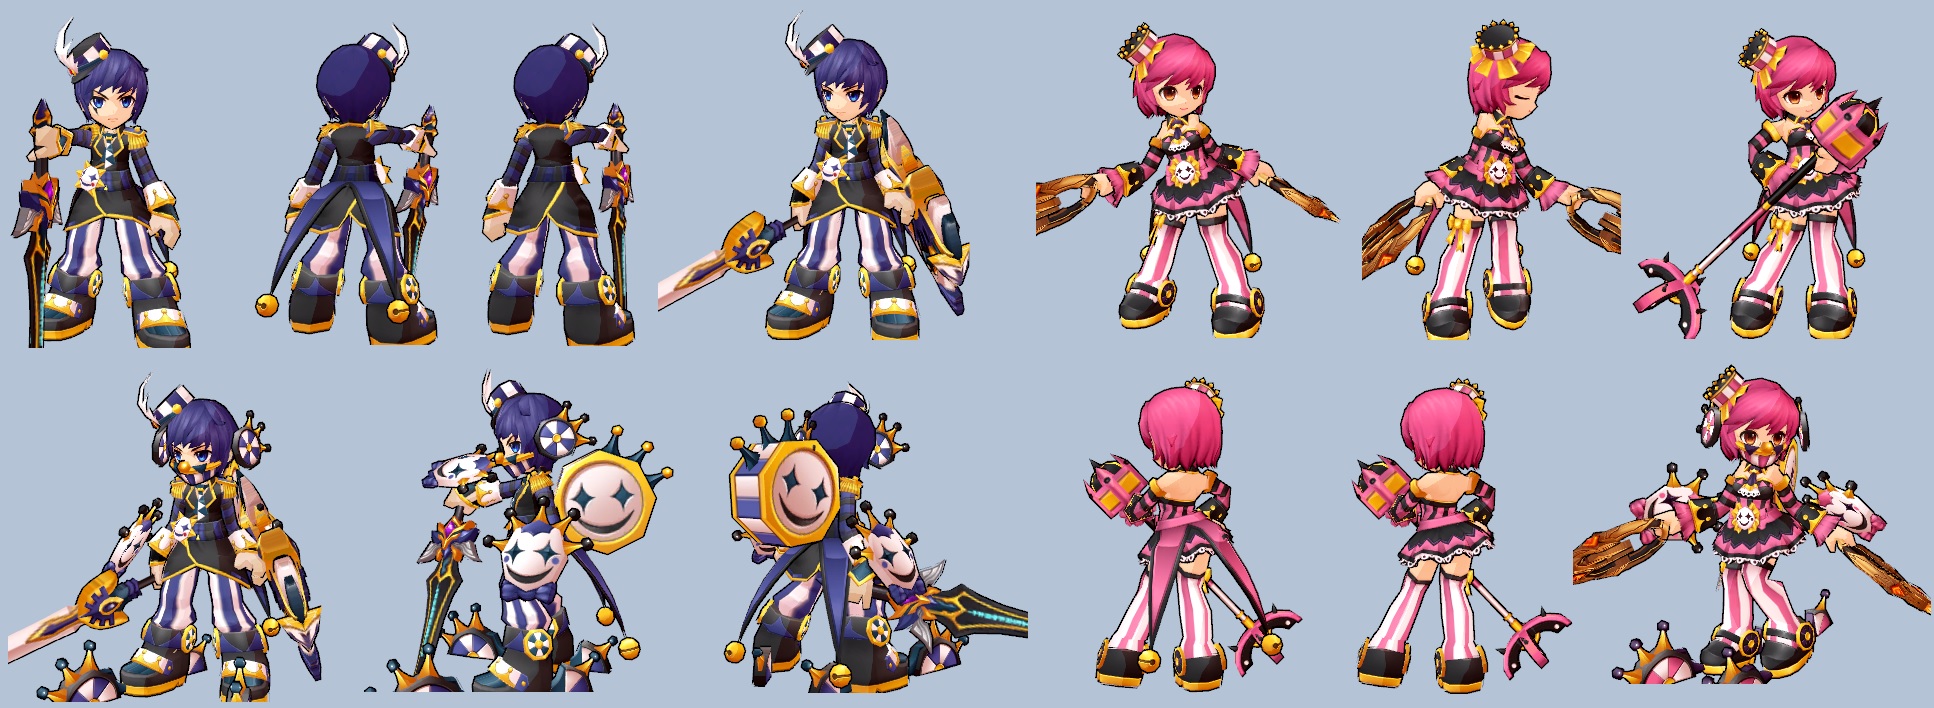
Asin, likely tired of such an inane reason in his eyes, chooses to give up on the vajras and the Silver Knights' traditional teachings as a whole, and instead simply combines all of Tairin's skills with everything he learned from Jin to create completely new fine yet destructive techniques and foundations by his own mind, unrestricted by their traditional teachings, on his way to ultimate power -- thus is the birth of Mugen.

Fun fact:
There used to be an intro when playing Asin in the first stage. This is art of when he first met Tairin. Note who has the magic armguard.

Asin is a fun agile melee character who never stops pressing the attack buttons, with constant possible branches into attacks as well as dodges, with possibly more than 1 counter. Asin does not miss, he only gets closer. He is easy to do flowing combos with and has a high skill ceiling with how many different attacks and offensive/evasive branches he has.

Skill Tree Style
Asin has exactly enough skill points to learn everything from both 1st job and 2nd job now.

Standard dash type (average)
Dash momentum: ~276 pixels, rocket ~656
5-16: Asin (normal attacks)
GroundZ
Has 3 Z presses, or 5 with the shared tree upgrade which switches the knockdown to the 5th press. Use the 5 version so you can repeat the first 4 Zs to combo monsters infinitely (even being able to combo Up to move behind them for back bonus).
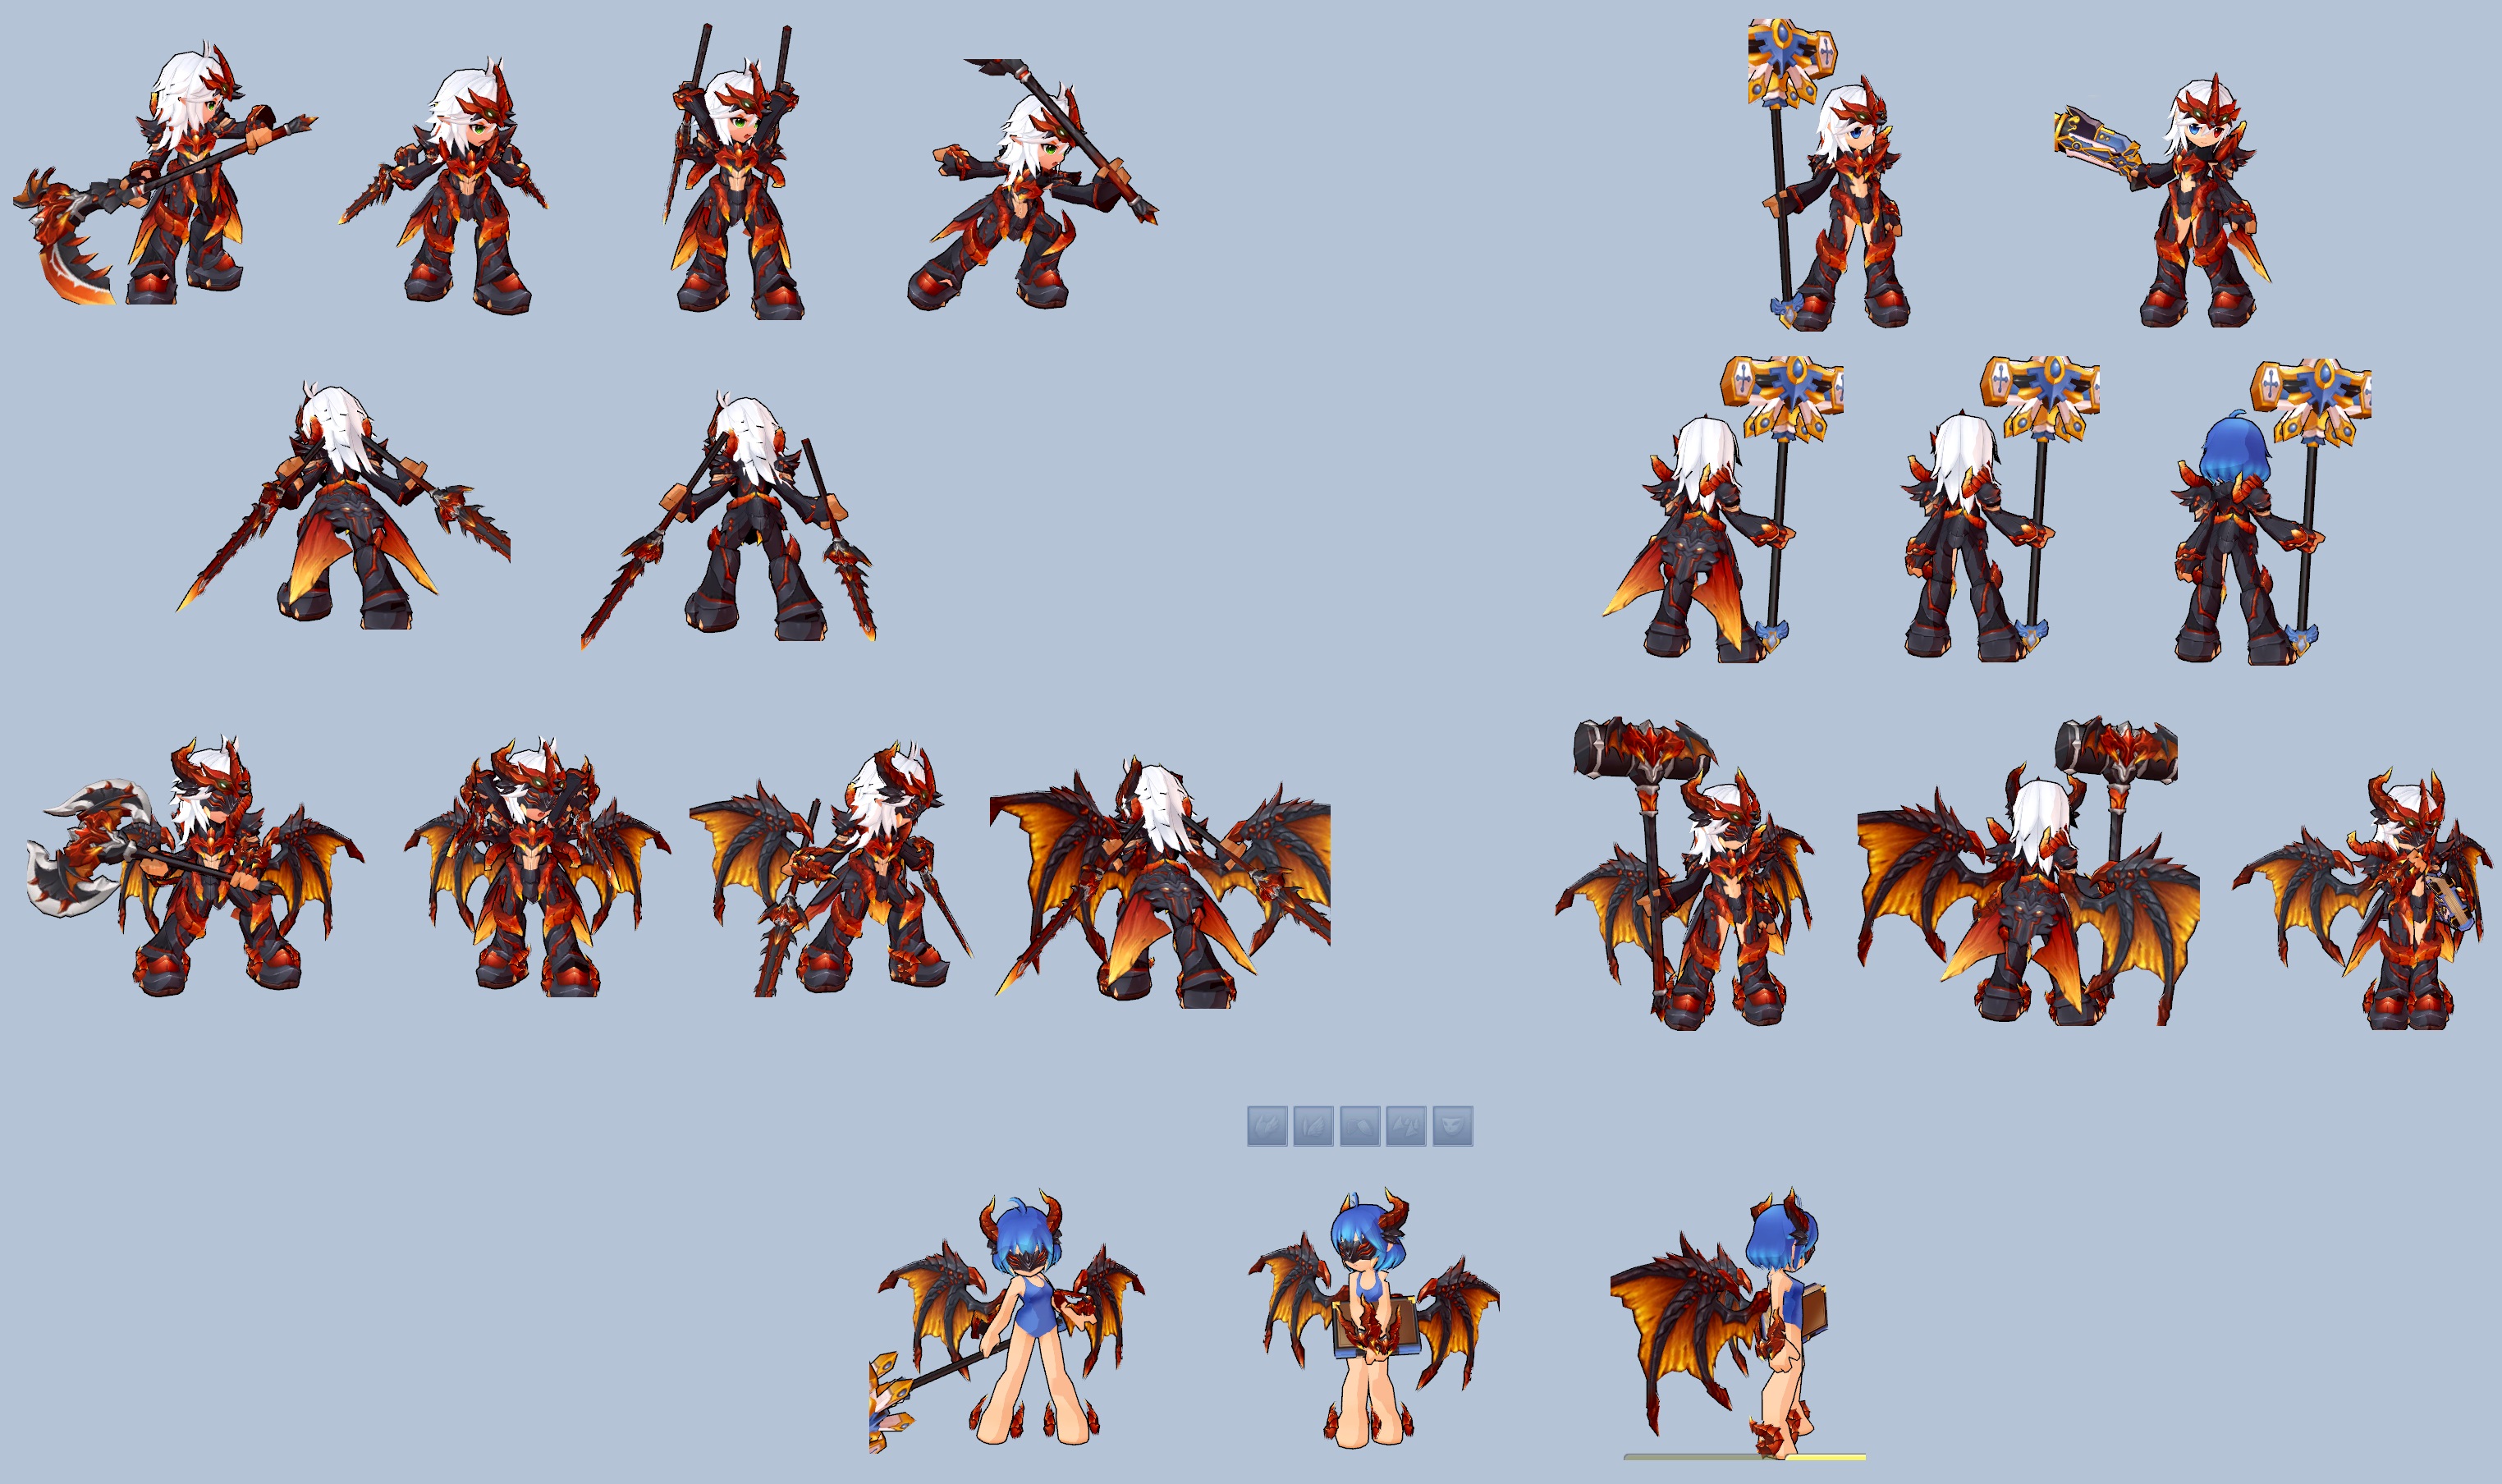
Can cancel combo into platform drop. With 2nd job can cancel combo into X stance.
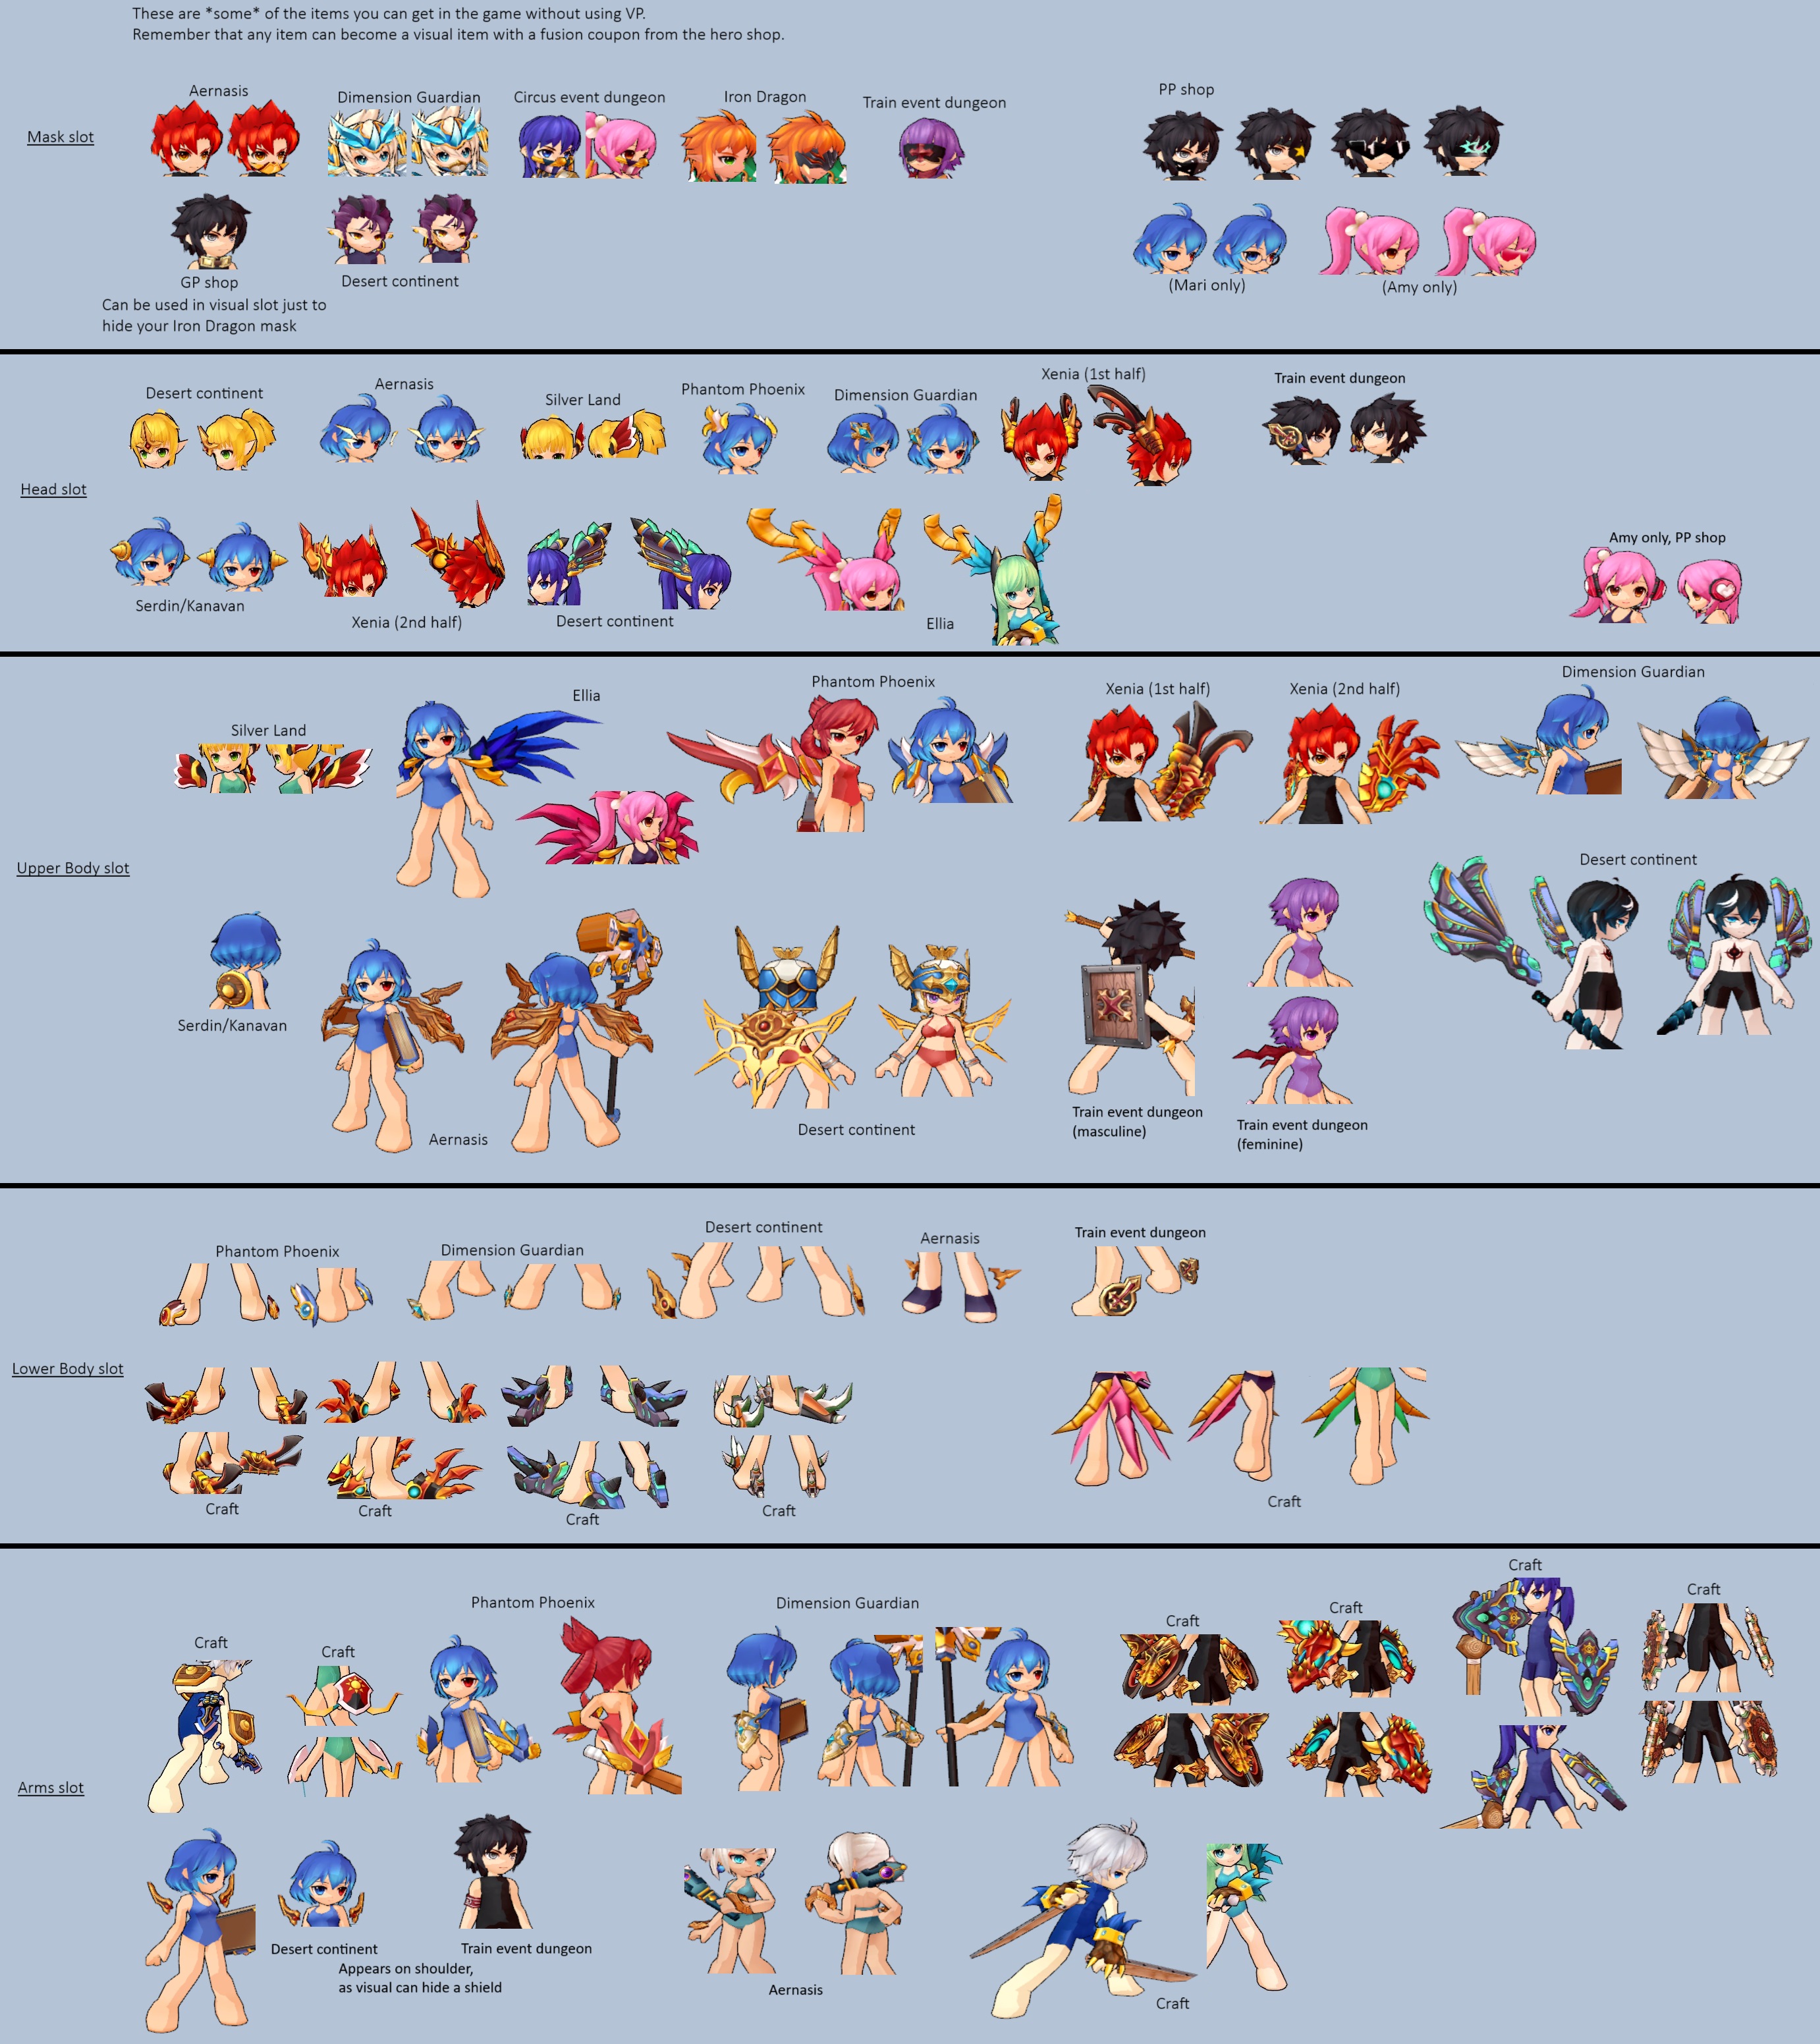
Can press Up for either a dodge or shuju water bomb, can press Down for Water Puddle which DoTs and gives -5% DEF.

*Up dodge can only be done since the 2nd Z. Teleports a few steps forward through the enemy turning around.
*With the 3rd skill in the 2nd job tree, you can also teleport through an enemy with dashZX.
*BackBack dodge rolls backward with actual invincibility frames and for a bigger distance (cooldown 4sec, PvP 9).
  • 110.07 / 110.07 x2 / 110.07 / 110.07 / knockdown 110.07
    Critical: 196.5 (Double 324.22)
    2nd job ZXZ: 161.2

    Up dodge Z: 151.2 x2 (302.4)
    Water bomb: 37.89 x3, 114.85
    Water puddle: 42.23 x15 (636.45)

    • PvP
      The attacks can fully combo even on anti-air/juggle combo, and the first hit reaches almost a full floor up to anti-air well.
      Equipping the 5-button version actually has a problem so you may turn it off for PvP: it takes longer to do the 3rd press so that it no longer true combos from the 2nd, and the 5th doesn't combo either.

      Critical will naturally combo into dashZ, or wallbounces in corner into turn around groundZ. But with 2nd job you can loop ZZXZ ZZCriticalXZ until auto-counter anyway.
      • 3-presses version: force-standing rise 151 / force-standing 151 x2 / float/knockdown 277
        5-presses version: force-standing rise 151 / force-standing 151 x2 / force-standing 151 (barely does not true-combo) / force-standing 151 / float-knockdown 151 (does not true-combo)
        Critical: high float 135, wallbounces
        2nd job ZXZ: 111

        Up dodge Z: float 104 x2 (208)

DashZ
Naturally has only one hit that launches.
1st job upgrade adds 3 more Z presses (can only be done if each part hits), which teleport into the air to continue hitting from there (missing monsters that can't be launched and aren't taller than you).
2nd job upgrade adds X stance which switches to their other side and can Up/Side/Down or do two hits.
  • 1st job: 117.9 launch / 76.4 / 76.4 / 76.4
    2nd job ZXZ: 117.9 launch / launch 117.6 / knockdown 117.6

    • PvP
      The first hit has decent range and may anti-air.
      1st job version will groundbounce on final hit to combo into itself but that's weak and better is groundZCritical which combos back and forth into dashZZZZ, but it may take a while for the kill and Critical wallbounces near the wall which can make it unnecessarily hard to pick them up again.
      2nd job will groundbounce in place to combo into full groundZ, and with 2nd job you have an infinite from it (ZZXZ ZZCriticalXZ).
      • 1st job: launch 203 / 131 / 131 / groundbounce 131
        2nd job ZXZ: launch 203 / launch 202 / groundbounce 202

airZ
1st job air combo is not useful as you would better just continue as a ground combo.
  • 1st job: 65.5 x2 (131) / launch 57.9 / 57.9
    2nd job ZXZ: 65.5 x2 (131) / blowaway 201.6

    • PvP
      The first press already launches on hit to directly combo into groundZ, and only the first hit can go into X stance.
      1st job: 135 x2 (270) / 39 / 39
      2nd job ZXZ: 135 x2 (270) / float 138


X-button stances
Each has a hit upon entering (110.07).

Stance Up
Rising kick. Has super armor. Recovers midair to attack/dash again.
  • ~112 x2 (224)

    • PvP
      float 86 x2 (172)

Stance SideSide
Does a diagonal dash recovering midair to attack/dash again. You can even do dashZX dashZX dashZX to fly too fast to see.

Stance DownZ
Does an invincible backroll up into the air (can pass through enemies), can continue with a divekick.
  • 201.6 blowaway

    • PvP
      float 138

2nd job Nimble choices
Has the same 4 choices for each of the 4 stances, can choose the same effect for all or different ones for each.
  • Choice A: if stance attack hits, restores 2% HP (doesn't stack with hitting multiple monsters), halved in PvP (42 HP).
  • Choice B: if stance attack hits, it's supposed to fill MP but was tested and doesn't even give a noticeable difference.
  • Choice C: if getting hit in stance before input, erases that hit from the stage and does one counter left and right with invincibility time (essentially being another dodge). Will not trigger against launching hits or basic projectiles, but will erase special projectiles even for teammates.
    Choice D: same as C, except instead of a counter you teleport slightly forward with no recovery (and no invincibility).

C attacks
Increased Attack (C→), Increased Defense (C↑), Increased Speed (C←)
Gives +5% ATK/DEF/Speed for 10sec (one passive from the 1st job tree increases to either 10% or 15sec). Cooldown is 30sec counting from start.
Also, this has an invincible animation so it can dodge attacks if timed right.
The third choice is to not boost the enhancement and get +5% Crit Chance when multiple are on at once (it used to be 50%).

  • PvP
    Stat/Crit buffs are halved in PvP.

Flow (desvio)
C↓. Counterattack catch. Has 20sec cooldown. Just equipping the C version of the X buffs can be so much easier.

CC
This is either Quiet Repose or Cloud Walk depending on which you have equipped.

Quiet Repose (meditação) - Sits invincible for 2 seconds, has 30sec cooldown. Regenerates around 0.2 bars of MP?

Cloud Walk (desejo de ferro) - Self-buff, for 10sec you will move through enemies. With 2nd job end upgrade also gets super armor (resists hitstun but not launch/knockdown, for you mostly just prevents getting blown away by some attacks while still taking full damage).
5-16: Asin (skills)
Techniques

(shared tree) Strengthened Body (aprimoramento corporal)
6 MP/0.2 bars, cooldown 30sec (PvP 35sec)
Self-buff. Hyper armor for 10sec (takes no hitstun, and cannot die while it lasts except to grab).
Activation pose is invincible.
You lose more MP for the duration but it's only around 0.17 bars/5 MP.


1st job second tree

Pressure Point (punho da agulha)
23 MP/0.7 bars, cooldown 10sec
Does 1/2/3 punches forward depending if it's level 1/2/3, each applies a different debuff.
Too nerfed in PvE now.
  • ~51/102/153 damage
    DEF -7% for 5sec, ATK -3% for 5sec, ~370 DoT

    • PvP
      Temporarily negates their MP gain and disables skill/tec use. Can combo into groundZ if on corner otherwise it pushes too far.
      DEF -1.5%, halted MP regen, and disabled skill/tec use, for 10 seconds. Cooldown 15sec
      all force standing: 88, 90, far push 90

Choice for Shared active skills (MP1 Razor Air Kick & Infinite Hand, MP2 Hanuman & Fire Drop, MP3 Bamboo Swallows)
  • Choice A: was about MP and was removed from the skill tree, only the next 2 can be seen
  • Choice B: their skill damage raised by only roughly 5%
  • Choice C: using one of them gives a buff icon in the corner of the screen, use any of them to spend the buff and make that skill do a bonus hit at the end (damage can raise 13%-30%)

2nd job tree techniques

XX heal
Doesn't take a skill slot to equip.
When standing still can press XX to spend 2 MP bars to restore 10% of your own HP. Can only be done if currently below half HP.


LV1 skills

Razor Air Kick (chute martelo)
Single forward hit.
  • ~505.3 blowaway [17.42]

    • PvP
      float 440 (can combo into groundZ if this connected with them higher in the air)

Infinite Hand (investida do infinito)
Forward combo, good for the continuous movement while still solid and invincibility time.
  • ~102.7 x5 (513.5) [17.70]

    • PvP
      89 x5 (445)

Chaotic Storm (tempestade caótica)
A very small explosion from you, deals no damage while leaving an effect on them that explodes after 3 seconds. Effect will be applied to each enemy for multiplied damage per enemy together, too weak for most of the time.
  • ~291.9 [10.06]
    2-4 enemies together: 583-1167 [20.10-40.24]

    • PvP
      Initial hit knocks down forward with no damage, later 195 with no hitstun


LV2 skills

Hanuman (inversor de correntezas)
Forward combo.
Will end by passing through forward and turning around.
  • ~152.6 x7 (1068.2) [16.95]

    • PvP
      126 x7 (882)

Fire Drop (golpe fatal)
One hit forward launching ahead, then an AoE a set distance forward.
  • launch forward ~185.2 x1, teleports forward, launch ~185.2 x4 (926) [14.69]
    Light monsters will take aerials (1296) [20.57]
    Heavy monsters can take back hits from the second part (1370) [21.74]

    • PvP
      153, 153 x4 (765)

Awakened Shooting Star (chute meteoro)
AoE hitting to melee range to both sides stretching 1 floor up.
Will do 1 hit then try to teleport behind the enemy for the remaining 5 for back hit.
  • ~231.5 x6 (1389) [22.04], light monster aerial 1967 [31.22]

    • PvP: 141 x1, 141 x5 (846)


LV3 skills

Bamboo Swallows (dança das andorinhas)
Good AoE to both sides reaching 1 floor up.
  • ~309.2 x6 (1855.2) [19.32]

    • PvP: 256 x6 (1536)

King's Wrath (divisor de rios)
An AoE stretching very far to both sides and 3 floors up. Hits are in 3 separate areas, bosses can be hurt with 2 parts at once, 3 if supergiant.
  • This might not be exactly right but it's 25 hits max:
    Forward edge 218.47 x5 (1092.35) [11.37]
    Center 145.65 x10 (1456.50) [15.17]
    Back edge 109.23 x10 (1092.30) [11.37]

    2 parts 2548.85 [26.55]
    Raid boss full hit 3641.15 [37.92]

    • PvP
      Has only 1 area for its entire place, hitting the total area equally.
      275 x5 (1375)


LV4 skills
(LV4 skills need over LV70 to get and cannot be used in PvP. They cannot be cast by charging MP, only by shortcut at 45sec cooldown shared between all LV4s)

Eastern Rain Liquid Jade (técnica secreta do gelo)
130 MP, cooldown 45sec
Hits enemies very near you, and does damage to all enemies in the stage.
  • full stage rain 155.64 x15 (2334.6) [17.95], near 397.73 x5 (1988.65, total 4323.25) [33.25]

Awakening
Single explosion forward. Bad compared to the other one and less damage except the melee hit has more AoE, lengthy and reaches 1 floor up.
  • ~2619.18 x1 [20.14]

H
Hits basically the entire screen.
Also gives you ATK +15% and Super Armor for 20sec after it finishes.
  • ~103.96 x9, ~69.31 x9, ~70.17 x10, ~46.78 x10, ~1169.64 x1, ~779.76 x1 (4678.33) [35.98 if it cost as much as MP4]
5-17: Lime (general)
GCC notable changes:
  • No negative stats to having one aura activated at all times, Berserk can be activated as a down aura and stacks with aura, nerfed auras and Berserk
  • Self-auras have been made into normal attacks you can equip
  • Combo backdash has cooldown

Story:
In an island away from Bermesiah, there is the Great Roose country, of highly religious people who worship the creator god and the other deities, ruled by a pope. They are aware of the first demon war that happened in ancient Kounat from the initial demon invasion, and competently realized that their dimension doors have been opening again recently in Aernas (as Ashtaroth became more active), and sent their Holy Knights in an expedition to break them all down.

Remember the portal you break with Dio? They broke several.

But after a certain battle, one of them becomes separated, and lost, alone somewhere apparently in a desert near Serdin or Kanavan.

With no aim and no food left after 3 days she wanders, until eventually she does find people to save her -- Elesis and Lire and Arme, who coincidentally were passing by and rescue her while being confused that someone was just walking here alone, but to her she first thought she was seeing an angel ready to take her away.

While Lime would never forget her mission or her great convictions of upholding justice and destroying all evil just because it's the right thing to do (in fact it's very hard to stop her once she gets riled up in any of it), she has another thought: after seeing Elesis and Lire and Arme, the Great Roose citizen is reminded of the image of the three goddesses Ernasis and Lisnar and Amenias, and settles that her being sent here and meeting them was no coincidence after all. Despite not immediately reuniting with her Holy Knights she is happy to follow the Grand Chase meanwhile.

Fun fact:
Lime explicitly was made to be able to play a support role, not just anywhere but also specifically in raids. Though most of her support abilities now got nerfed hard in the re-release.

Lime (also named Holy in portuguese) is a cutesy short-ranged melee character with a huge sledgehammer and relatively heavy movement (although auras can cancel her normal attack animations instantly), who can choose auras to passively buff herself or herself and all nearby teammates, and has a 2MP healing skill and a skill to draw all monster attention to only herself. Her 4MP skill does damage while also giving one auto-revive buff to herself and all teammates.

Skill Tree Style
Lime has more than enough points to max out the 2 jobs completely.

Standard dash type (long distance on ground but limited advanced steps)
Dash momentum: ground ~408 pixels, air ~317, rocket ~615
*No fastfall to do advanced steps other than rocket.
*Slow held run.
5-17: Lime (normal attacks)
Auras
Auras are infinite duration modes she can switch between with C-direction inputs.

  • Support Aura (C→)
    • You and nearby allies have a small MP Regen buff.
      • Upgrade - Only one choice because the others were removed from the game. In PvP only, enemies that were inside the area when it activated have techniques/skills disabled for 3sec, effect will not trigger again for 20sec.

  • Attack Aura (C↑)
    • You and nearby allies have +5% ATK.
      • Choice A: +7% ATK
        Choice B: in PvP, reduces enemy MP per hit
        Choice C: also gives Crit Chance +5%

  • Defense Aura (C←)
    • You and nearby allies have +10% DEF (-10.1% dmg).
      • Choice A: +15% DEF (-14.1% dmg).
        Choice B: HP regen speed +20% but does not activate HP regen past the limit.
        Choice C: another +30% DEF barrier temporarily (-29.6% dmg).

  • Berserk (C↓)
    • Self-buff. For 10sec you cannot use skills and have +15% ATK and +9% CritChance (not as strong as it used to be so not as useful). Cooldown 30sec.
      Will stack with auras. Can be canceled early by doing the command again so you can cast skills.
      • Choice A: you also have super armor for the duration (more useful in PvP than PvE)
        Choice B: duration 10sec raised to 15sec
        Choice C: ATK buff raised to +20%

        • PvP
          Halved stat buffs, cooldown 35sec.


GroundZ combo
Sets yourself in place for a slow-hitting combo, but can BackBack roll which has long invincibility at a cooldown, and can also instantly cancel the combo into Down to platform drop if you are in a platform you can drop from.
Can also cancel into Up which defensively hits to both sides and reaching 1 floor up, and cancels into dash after the time it hits which is faster than finishing the combo.
Repeating ZZZ-Double is ~492 DPS.
  • 292.1 / 292.1 / 110.3 x3
    Up: launch 181.4 x1-2
    Critical: 169.7 + 113.4 xN (283.1), Double 339.5 + 113.4 xN (452.9)

    • PvP
      Starter has slightly long range, but very slow speed.
      • force-standing 335 / float 335 / knockdown 126 x3 (1048, Double is not reliable)
        Up: launch 83 x1
        Critical: float/knockdown 224 / float/knockdown 52 xN

  • Combo V2
    Not slow to start like the other combo.
    Last hit of combo makes a wave of 3 hits, with average-width monsters you only reliably hit 1 but large monsters take all 3.
    ZZZZ-Double is around 556-717 DPS depending if the last swing hits 1-3 times.
    To infinite combo non-armored monsters you can repeat ZZZ (~312 DPS).

    You cannot platform drop from this version. Up attack still works.
    • 211.5 / 211.5 / 211.5 x2 / 211.5 x1-3

      • PvP
        The first swing's range lowers to average, and its startup is still slightly slower than average.
        124 / 124 / 124 x2 / 124 x3 (868, with Double 1136)
        Critical/Double: forces-standing 67, float/knockdown 67 x3 (268)

  • Critical/Double V2
    Less useful than the spin but does do more damage.
    Critical: 78.6 x4 (314.4), Double 157.2 x4 (628.8)

  • BackBack roll
    Cooldown 4sec. Can Z for a simple attack that's not strong enough.
    Can be used from ground combo or the spin or combo ↑.
    • 289.7

      • PvP
        Might be able to attack as a bait then backroll and hit them back. Cooldown 9sec in PvP.
        launch 79

DashZ
Same attack as Critical V1 (except the first hit is stronger if Double in PvE only).
Hits both sides, can keep pressing Z to keep spinning and repeating the attack while being able to walk left and right and drop through platforms and jump, does not cost MP anymore.
In PvE the damage of the extra spin is low, but the extra spins have hyper armor. It can endure hits while staying in position dealing damage and hyper armor also makes you immune to stone/freeze and earthquake if timed right (but you only have hyper armor since the second hit so you might need to start the DashZ/Critical early).

  • PvP
    If you start the dash attack midair right before your dash momentum runs out, you will instantly cancel the attack animation when landing, comboing into grab. You don't get hyper armor from this.

DashZ V2
Quick single forward strike. Every monster hit by this takes an additional hit that also hits any other monster they touch (whether standing still together or being blown back into one).
Can still chain into the spin so technically only the first hit is changed, into an attack that is more useful but less strong singletarget.
  • launch 102.2 x1 and blowaway 102.2 x1+
    Singletarget 204.4 (heavy monsters stay in place, light monsters take 1 aerial for 255.5 and get blown away possibly striking more monsters for 102.2)
    2-4 monsters together 306-511 per swing or 408-715 on light aerial

    • PvP
      Can loop into itself on corner but timing it is not easy and may miss.
      blowaway very far 135 x2 (270)

airZ
Can be used as a bonus when moving from one platform to another but it has some startup so it may not finish early enough. Not useful otherwise.
Hits up to 3 times.
  • 58.9 x3 (176.7)

    • PvP
      Does not hitstun at all in PvP, so even if you can make them jump into it you have to bet on other attacks.
      push 67 x2-3 (134-201) without hitstun

  • airZ V2
    Average sword wielder airZ, hits diagonal up then diagonal down, faster and easier to register hits with. Stronger too.
    After it glows blue at the tip you can cancel into air↓Z.
    • 248.4

      • PvP
        Aside from hitting the common offensive angle, this is a rare jump attack that forces standing state on airhit and it cancels into air↓Z.
        forces-standing 157

air↓Z
Dive attack straight down.
  • 88.2 x2 (176.4)

    • PvP
      Combos into dash grab, or skill (can even hold the Z to cast MP1), doesn't true-combo into groundZ but may attempt.
      Cooldown 3sec.
      forces-standing 40 x2 (80)


Counter
Press forward or back at the attack with perfect timing to block it and deal a weak hit. In PvP has cooldown 2sec.
Does not work on projectiles.
5-17: Lime (skills)
X-↑
Tornado
Cooldown 10sec
Multi-hit reaching both sides, pulls monsters and leaves them standing up but leaves them randomly in the left or right.
*Entire animation has hyper armor (immune to earthquake and stone/freeze, resists certain knockbacks or a killing blow if timed correctly)
*If cancelling the start into Alt roll, will still do the full hits afterward
  • 48.0 x8 (384)

    • PvP
      Super Armor in PvP instead of Hyper Armor.
      Cooldown 15sec.
      pull force-standing 60 x8 (480)

Xside
Can equip either Crush or Block.

Crush (esmagar)
Cooldown 10sec
Does 4 hits forward and 3 behind you. On bosses that you can hit with both angles you do 7 hits.
*Entire animation has hyper armor (immune to earthquake and stone/freeze, resists certain knockbacks or a killing blow if timed correctly)
  • 127.4 x4 (509.6)
    Large monster you can hit with both forward and back angle: x7 (891.8)

    • PvP
      Super Armor in PvP instead of Hyper Armor.
      Cooldown 15sec.
      Last hit forward knocks down, last hit back sends far.
      force-standing 150 x4/3 with 4th knocking down (600/450)

Block
When not attacking, can do a block pose on ground and air (hyper armor and +42%DEF/-29.6%dmg, hyper armor resists earthquake and stone/freeze). If done on ground can cancel anytime into dash.

X-down
Can equip either Momentary Enhancement, or Mana Shield, or Aggressive.

Momentary Enhancement (fortalecimento instantãneo)
Self-buff, hyper armor for 10sec, cooldown 30sec.
With hyper armor you still take full damage but will not be stopped by any attacks, except throws, so you can continue attacking. You also become immune to stone/freeze and earthquake.
While it still lasts you will stay alive even at 0 HP, except to throws.

  • PvP
    Cooldown raised to 35sec.

Mana Shield
For 10sec all damage goes to your MP before your HP (maybe 1 bar for 16% of HP), cooldown 20sec.

  • PvP
    Cooldown 30sec.

Aggressive (provocação)
Cooldown 20sec
Makes all monsters inside a radius circle from you constantly try to attack you and chase you, especially over other players. Aside from taking aggro away from longer-ranged players, this lets you pull all monsters from the stage to the same place so everyone can AoE.
  • Choice A: duration 10sec raised to 15sec
    Choice B: longer range
    Choice C: DoTs all enemies inside range (78.9 x11 (867.9))

    • PvP
      No effect does anything except Choice C which hits with no hitstun.
      Cooldown 25sec.


LV1 skills
Power Strike (golpe poderoso)
Single hit low to the ground left and right.
  • launch ~658.3 [22.7]

    • PvP
      float 442

Justice (punição)
Forward combo. Good for the long invincibility time.
  • ~93.5 x6 (561) [19.3]

    • PvP
      force-standing 75 x6 (450)

Oracle (oráculo)
One square hit forward, then 3 short shots going forward and diagonal up and diagonal down. Deals 4 hits close or less at range, with 4 hits it's her strongest MP1.
  • ~169.2 x4 (676.8) [23.33], plus DoT ~37.7 (714.5) [24.63]

    • PvP
      Instead of DoT it debuffs jump height.
      force-standing 105, blowaway 105 x1-3 (close 4 hits 420, 3 hits 315)


LV2 skills
Blast Hammer (martelo explosivo)
Does a multi-hit run forward passing through enemies, knocking light monsters along with you then knocks them down together in front of you. Can keep changing left/right.
The end has a hit only behind you so it only works inside giants not sent by the last hit.
  • 279.99 x6 (1679.94) [26.66], and only against giants 195.99 x1 (1875.93) [29.77]

    • PvP
      169 x6 (1014)

Nemesis
Hits up to 3 enemies at around screen range targeting the closest ones.
With only 1 monster alive like in boss fights will do very low damage and be useless. On stages will hit 3 lone enemies for some damage on each, but stacks the damage if you put the monsters together first.
  • ~114.6 x6 (687.6) [10.9]
    2-3 enemies together: 1375-2062 [21.80-32.74]

    • PvP
      Massive range and auto-targets up to 3 enemies. May be dodged by continuing to move to the side.
      force-standing 99 x6 (594), can combo if close enough

Glory
A healing skill. For yourself and nearby teammates, restores 30% HP then enables HP Regen also with +60% rate for 10sec (in practice less than 3% more). From a full 4 bars of MP, can cast twice in a row for 60% recovery plus one round of regen buff.
Very helpful in endurance stages instantly making Lime a healer (and reviver thanks to MP4), stronger than other healing skills too.
Unlike some other healing skills, can't revive KO'd teammates on the ground before they disappear.

  • PvP
    Heals 15% HP (634).


LV3 skills
Demolish Hammer (martelo demolidor)
Forward rectangle AoE reaching 1 floor up.
Launches and aerials light monsters for bonus damage.
  • launch forward ~612.3 x1, launch ~612.3 x3 (2449.2 [25.5], or light monster 3 aerials 3367[35.0])

    • PvP
      launch 441, blowaway 441 x3 (1764)

Holy Smash (carga brutal)
One hit as a forward rectangle AoE reaching 1 floor up (not as crazy long forward as it may look) and also one earthquake hit to all enemies within multiple screens that still hits airborne enemies.

The earthquake connects first and launches so against light monsters you can get one aerial hit with the forward AoE.
  • earthquake: launch ~688.4, forward hit: ~1668.0 (total 2356.4) [24.5], with aerial 3190.4 [33.2]

    • PvP
      AoE 270 x5 (1350), earthquake fall deals no damage


LV4 skills
Redemption (redenção)
Hits far to both sides reaching 1 floor up, and gives a buff to everyone in your team. For 100 seconds if the player is killed they will be revived with 20% HP and halved MP.
This skill uniquely has a longer base cooldown of 80 seconds and does slightly less damage than a LV3 skill so it's bad for boss DPS reasons, just the revive.
  • 341.88 x5 (1709.4) [13.1]

Awakening
AoE forward stretching 1 floor up.
In the area it hits, leaves an effect. Monsters who stay in it take a DoT, and you and allies who stay in it get +15% ATK, for 1sec renewing the area for 10sec. Better for raw boss DPS than the revive.
  • 2473.37 x1, DoT 62.66 x16 (3475.93) [26.73]

H
Hits basically the entire screen.
Also gives you and every ally close to you temporary super armor and a regen to full.
Also gives you ATK +15% and Super Armor for 20sec after it finishes.
  • 860.46 x1, 542.54 x1, 167.31 x13, 105.48 x13 (4949.27) [38.07 if it cost as much as MP4]
5-18: Edel (general)
GCC notable changes:
  • Added cooldown to evasions: combo BackBack, combo Up, dashatk roll

Story:
Edel was born with a twin in the noble Frost family in Serdin. Normally they would have expected her brother, the technical firstborn, to continue their line of prestigious swordsmen, but he went to develop a strange illness.

House Frost was proud in their fame of valiant swordsmen, but since the kingdom wars Serdin clearly was making much better use of their magic casters, and non-magical swordsmen started being seen as too old-fashioned and pointless by the others around them, and so the entirety of the Frost family name was being put into question.

The young Edel, known for being very kind and gentle and even thought of as too delicate to use a sword, willingly enlists into the Knights of Serdin in order to uphold her family's honor. Knowing of what people would think of her, she deliberately starts to change her outward personality to act harsher and ice-cold on the outside, without ever showing the smallest sign of weakness, even when it hurts her the most of anyone, all for the sake of her family name. With her striking attitude, immense dexterity in combat, and unbreakable will, she quickly impressed her peers and earned the rank of captain -- which meant that she had to keep this on even harder from then on, as she could only truly be herself with her family at Île de Frost.

On one break to visit her brother at home, a curse affected everyone; this is where her dungeons start at.
After defeating the perpetrator and going back to the headquarters in Serdin she is promoted to Major, but she still has to discover more about the curse and the dimensional portals. She sets out to speak with the Violet Mages of Serdin, where the archmage surprisingly knows that the Great Explosion of Ancient Kounat done by a "Baldinar" also had the effect of weakening limitations between dimensions that now allow Elyos to more easily open portals into Aernas, saying that now his daughter Arme was with the Grand Chase on their way to re-seal dimensional portals from Elyos. Edel is to meet up with them in order to uncover more about these portals and find her brother in Elyos.

Fun fact:
Edel apparently is more or less the second-in-command of the Knights of Serdin out of any established characters, the closest one below Knight Master Lothos Isolet. She had a scrapped 3rd job meant to be called Colonel, so what would her 4th be?


Edel is a fast swordsman melee character who can keep pressing many buttons, with normal attacks as well as multiple 1-bar skills that allow her to endlessly re-take her offense once locked to one target and never drop her pressuring attacks, and some branching dodges to keep her flow, with double jump and a dash that repeats into itself.

Skill Tree Style
She can learn everything.

Character traits:
  • Magic Slash - The first groundZ or jump attack will break basic arrow/magic bolt projectiles (not all projectiles).
  • Berserk - If hit with enough arrow attacks in a short time (usually only in PvP against Lire), Edel triggers super armor.
5-18: Edel (normal attacks)
Standard dash type (average, and has a special triple dash)
Dash momentum: ~268 pixels, rocket ~643
*Has a triple-tap-dash which can repeat itself infinitely for extreme speed, easier to just mash → from the air, another 2nd job passive lets you press ↑ after it to enable that, so if not starting from the air, press →→→↑ then mash →.

Doublejump
Only works at peak jump height, and since 2nd job has another separate doublejump from her repeat-dash.

GroundZ
Can keep comboing while cycling many rolls on cooldown: BackBack dodge (can attack to move back, with 2nd job can also dash back in then attack), Up dodge forward through the monster, Alt roll, and also skill.
Repeating ZZZZZ-Double is ~355 DPS. You can also keep using pistol cooldown on comboXZ which are two strong hits.
On non-armored monsters can keep repeating full combo without Double since the last hit staggers with little knockback (~266 DPS).
  • 105.8 / 105.8 / 105.8 / 105.8 x2 / 105.8
    Critical↑Z: launch 162.7 / 157.2, Double: 325.4 / 157.2
    ...XZ: launch 342.7 / 342.7
    BackBackZ↑Z dodge: 302.4 knockdown diagonal down through the platform / 241.9

    • PvP
      First hit has slightly long range and average speed.
      Critical/Double↑Z will launch even higher if the opponent already was airborne which happens from the last hit of combo, so do full combo into Double↑Z, then only if it was on a decline, you can combo into dash attack.
      • 145 / 145 / 145 / 145 x2 / 145 (870, 1150 with Double)
        Critical↑Z: launch 280, knockback, brings down on airhit / launch 108
        ...XZ: force-standing rise 236 / groundbounce 236
        BackBackZ↑Z dodge: float 208 / launch 166

DashZ↑Z
Can ↓ roll (with another cooldown), with 2nd job can do twice in a row with ↑.
On hit will launch a monster which is often not what you want but it can set up aerial hit skills.
Can also dashZbackZ which isn't invincible but can move backwards through an enemy.
  • launch 81.9 x2 / 120.9
    dashZbackZ: 133.0

    • PvP
      Forces standing state on airhit to combo on air/juggle combo.
      Chains into ↑Z for another hit which combos into grab, if not comboing into a technique/skill.
      • force-standing 141 x2 (282) / ↑Z launch 208
        dashZbackZ: float 229

X shot
Not really useful in PvE. Would be a way to do some ranged damage but it has a cooldown.
  • 342.7

    • PvP
      Can combo from this by canceling the ending into groundZ (if you're close) or dash (into dashZ if you're far).
      force-standing 236

airZ
You can launch a monster with dashZ then juggle with airZ going up and down a platform, but every so often you have to delay one hit or you send them too high up.
  • 76.4

    • PvP
      Forces standing state on airhit even on the melee hit, do as air-to-air or juggle combo to combo into groundZ.
      force-standing 157
5-18: Edel (skills)
Techniques
There are 3 and they are not good for PvE, only PvP.

Weapon Break (desarmar)
13 MP/0.4 bars, cooldown 8sec
Two light hits forward. Lowers the monster's ATK by 7% for 3sec.
  • ~39.9 x2 (79.8) [03.4]

    • PvP
      23 MP/0.7 bars, cooldown 15sec
      Can combo into this even on juggle after a combo, and after this the opponent will be standing up unable to attack or use skills for 3 seconds, essentially comboing into groundZ for high damage.
      Recharges pistol cooldown and can cancel into pistol shot but for this you can go directly into groundZ instead.
      force-standing 69 x2 (138) and combo


Mind Break (pressão psicológica)
13 MP/0.4 bars, cooldown 8sec
Forward hit, leaves a DoT, too weak.
  • ~26.7 x2, bleed 20.9 x10 (total 262.4) [16.4]

    • PvP
      16 MP/0.5 bars, cooldown 12sec
      Reaches a decent range up into the air. Can be used from combo if using in place of Double.
      Recharges pistol cooldown and can cancel into pistol shot, will combo into pistol shot into combo, otherwise against non-fast recovery jobs can combo into dash attack or can attempt groundZ.
      Reduces some of their MP on hit.
      force-standing 46 x3 (138) and combo


Leg Break (tiro incapacitante)
13 MP/0.4 bars, cooldown 8sec
Single forward hit. Debuffs -7% DEF for only 3sec.
  • ~79.8 [04.9]

    • PvP
      16 MP/0.5 bars, cooldown 12sec
      Forces standing state on airhit and easily combos after Double.
      Recharges pistol cooldown and can cancel into pistol shot, combos into pistol shot into combo.
      Also they have reduced movement speed for 3sec as they come out of it.
      short stagger 139 and combo


LV1 skills

Swift Hit (ataque veloz)
Walking combo. Good invincibility time.
  • 108.1 x5 (540.5) [18.6]

    • Choice 1: last hit restores 10% HP if it hits.
      Choice 2: last hit freezes a monster without super armor for 3sec.
      Choice 3: recharges pistol cooldown.

      • PvP
        Hits quick before timefreezing too.
        Leaves them standing up a pushed distance from you. Safest option after is run grab (if not comboing into skill) but some versions of this skill get full combo after.
        94 x4 and 175 (551) and standing reset

        Choice 1: heals 211 HP if it hits.
        Choice 2: freezes to combo after. Good.
        Choice 3: recharges pistol cooldown, and stuns for slightly longer to always combo into dash attack or run grab.


Frenzied Sprint (impacto estelar)
Multi-hit dash attack forward.
  • ~215.4 x3 (646.2) [22.28]

    • Choice 1: hotkey cooldown lowers by 5sec. Damage lowers to 174.1 x3 (522.3) [18.0]
      Choice 2: becomes a 2-bar skill, adds a rising slash at the end. Added ~327.7 x2 (total 1301.6) [20.6]
      Choice 3: does the normal version with the bonus of being able to press Z to spend MP again for more hits (exact same MP and damage) being able to change left/right.

      • PvP
        float/knockdown 170 x3 (510)

        Choice 1: no change
        Choice 2: becomes a 2-bar skill, adds a rising slash at the end. Added 285 x2 (total 1080)
        Choice 3: aside from being able to repeat, hits will now force standing state on airhit, leaving you two standing a small distance apart just like Swift Hit.


Circular (espiral)
Single short hit to both sides, very low to the ground so can miss aerial enemies.
  • ~604.5 [20.8]

    • Choice 1: does not timefreeze as a skill and damage lowered to 577.4, so, bad.
      Choice 2: becomes a 2-bar skill, swings twice.
        ~294.0 x1 then x3 (1176)[18.66], launchable monster aerial 1617
      Choice 3: becomes a 3-bar skill, does the base swing then shoots a dragging wave AoE forward reaching 1 floor up. 1/4 reduced damage against small targets, average damage on most, and would be getting bonus damage on big targets but Despair3 does that much stronger for the same MP cost.
        489.3 x1, then again x2-x5 (1467-2935) [15.2-30.5]

        • PvP
          Single short hit to both sides, very low to the ground so can miss aerial enemies.
          501 blowaway

          Choice 1: hits quick without timefreezing.
          Choice 2: becomes a 2-bar skill. Also hits with no timefreeze but pulling on hit, then timefreezes and hits the same area again blowing away a shorter distance, combos into dash attack.
            force-standing 256, float 256 x3 (1024), plus dashZ
          Choice 3: becomes a 3-bar skill. Timefreezes, then does the normal hit that leaves them standing, and sends a wave forward to screen edge from center reaching 1 floor up.
            387 x1, 387 x5 (2322)


Despair (legado)
Walking combo.
  • 316.2 x2 (632.4) [21.8]

    • Choice 1: freezes monsters without super armor. Damage lowers to 524.3 [18.0]
      Choice 2: becomes a 2-bar skill. Does Choice 1 but timefreezes only after this, then melees and shoots again ending steps behind where you were. Not worth it.
        Adds ~325.3 x2 (total 1283) [20.36]
      Choice 3: becomes a 3-bar skill, rains many meteors in front of you reaching 1 floor up and down, commonly does 14 hits for average 3-bar damage but can do 28 hits for very high damage on bosses apparently if it starts hitting them from the floor above yours.
        ~153.7 x14 (2151.8)[22.4] or x28 (4303.6)[44.8]

        • PvP
          Walking hit then one shot.
          force-standing 255 x2 (510)

          Choice 1: freezes to easily combo after.
          Choice 2: becomes a 2-bar skill. Does Choice 1 but quickly with no timefreeze until after this, then hits and shoots again freezing again ending behind where you were, still comboing after but unhelpfully costing more MP to do.
          Choice 3: becomes a different 3-bar skill, will hit for force-standing 121 around 9-14 times (1089-1694), can combo after.
5-18: Edel (skills part2)
Sword of Glory (lâmina espectral)
Does a small radius explosion reaching 1 floor up. Whether or not it hits, buffs your normal attacks for 10 seconds so that they deal a bonus hit with an effect.

Base: extra normal hit ~8.2, applies Shock DoT (total ~49) (too weak)
Choice 1: no extra hit, leaves a flame on the floor for 3 seconds, roughly +50 DPS on continued combo and they hitstun non-armored monsters continuously
Choice 2: extra normal hit is weaker than base, has no effect in PvE
Choice 3: extra normal hit ~5.7, monsters without super armor get darkness for 2 seconds (they cannot start an attack again) which can be upkept if continuing to hit them, although repeating full Z combo without Double would already do this

  • PvP
    Does a small radius explosion reaching 1 floor up, knocks down. Also buffs your normal attacks for 8 seconds.
    float/knockdown 300

    Base: applies Shock (deals hitstun every 3 seconds for 3 times) which is useful. Also every extra normal hit will force standing state on airhit even after sending them into the air, so Critical or final groundZ will always re-stand them, setting up an attempt for groundZ (in loop) or an attempt for dash grab.
    Choice 1: ground flames, 1
    Choice 2: curse for 3 seconds (they lose 84 HP for every Z press)
    Choice 3: darkness for 2 seconds so they can only see halfway across the screen. Also the extra normal hit has more hitstun than the others.


Phase (alma celeste)
Self-buff, looks like a stab but has no hit. Gives Edel a shield that triggers an effect when you're hit.

Base: if you would get hit, instead you teleport behind the opponent. Lasts 1 time or 15sec. Can keep re-casting to avoid a possible hit at the cost of MP.
Choice 1: if you get hit you gain MP. Lasts 7 seconds or 7 triggers.
Choice 2: if you get hit your A/S/D/F/G cooldowns are partially recharged. Lasts 7 seconds or 7 triggers.
Choice 3: if you get hit you reflect a small amount of the damage, not worth it. Lasts 1 time or 7 seconds.

  • PvP
    Base: only lasts up to 1 hit or 3 seconds.
    Choice 1: max 5 triggers.
    Choice 2: max 5 triggers.


LV2 skills
Cost 63 MP with cooldown 18sec.

Assault Pierce (golpe perfurante)
Long dash attack forward where you pass through enemies to your new spot, leaves monsters standing in place. Good AoE skill in general for multiple enemies, 2 bars so can cast twice.
  • ~315.7 x3 (947.1)[15.0] or back/aerial possibly around 1420 [22.5]

Choice 1: more hits for higher damage. ~183.2 x6 (1099.2) [17.44] or aerial/back around 1648 [26.1]
Choice 2: farther distance but base damage lowers to 261.8 x3 (785.4).
Choice 3: raises cost to 3 bars. Strikes the area (longer than before) without moving from your spot. Pushes monsters. Its singletarget damage is not worth as much as other 3-bar skills and you can't cast it twice from 4 bars anymore, and it won't back hit from the front anymore without raising the damage to compensate for that.
    ~530.5 x3 (1591.5) [16.57], launchable monster aerial 2122 [22.10]

    • PvP
      float/knockdown 275 x3 (825)

      Choice 1: stuns for longer due to dealing more hits, can combo into dashattack combo, or rocket-dashattack for one hit to turn around and attempt groundZ.
      Choice 2: longer but weaker, 152 x3 (456)
      Choice 3: sends farther forward (in corner combos into dash attack)


LV3 skills

Lunatic Blade (lâmina lunar)
Dragging wave forward reaching 1 floor up. Overall good, only 1/4 weaker on small armored enemies and 1/4 stronger on very big bosses too, good mobbing AoE too.
  • ~370.8 x4/x7 (1483.2[15.45] / 2595.6[27.0])

Choice 1: low area but high damage. Jumps up and shoots a wave straight down reaching slightly to both sides. Average boss 8 hits, raid boss up to 12 hits
    ~275.1 x8/x12 (2200.8/3301.2) [22.9/34.3]
Choice 2: a single attack hitting to both sides reaching 2 floors up.
    ~451.2 x5 (2256) [23.5], launchable monster aerial 3158.4 [32.9]
Choice 3: hits like Choice 1.
    ~233.3 x10 (2333) [24.3], loses 2 hits if enemy is 1 floor below, loses 4 hits if more

    • PvP
      Wave forward reaching 1 floor up.
      285 xN, x4-x7 (1140-1995) depending on how early it connected

      Choice 1: does not timefreeze. Shoots a wave hitting to your level and below.
        141 x6? (846)
      Choice 2: single attack reaching to your sides and reaching 2 floors up.
        255 x5 (1275)
      Choice 3: another wave down. Leaves standing a bit away from them.
        175 x10 (1750), 1 floor below x9 (1575), farther below x6 (1050)


LV4 skills
(LV4 skills need over LV70 to get and cannot be used in PvP. They cannot be cast by charging MP, only by shortcut at 45sec cooldown shared between all LV4s)

Moon Slash (impacto lunar)
Does one melee hit, then places an AoE on up to 4 monsters in the stage targeting the closest ones. When mobbing, targets various enemies across the stage for more total damage and deals some more damage if the monsters are stacked together, but deals low damage singletarget (lower DPS in raids with the higher cooldown too).
  • ~3.2 x3, melee ~1396.3 x1, targets ~930.8 (total 2336.7) [17.9]
    2-4 enemies together: 3267-5129 [25.1-39.4]

Awakening
AoE forward to screen edge. Better than Moon Slash on raids/singletarget damage.
  • 690.85 x3, 1046.51 x1 (3119.06) [23.99]

H
Hits basically the entire screen.
Also gives you ATK +15% and Super Armor for 20sec after it finishes.
  • 236.00 x9, 139.12 x9, 826.00 x1, 486.95 x1 (4689.03) [36.06 if it cost as much as MP4]
5-19: Veigas (general)
GCC notable changes:
  • DEF debuff skill extremely nerfed, passives nerfed
  • Backroll has cooldown, wakeup roll has cooldown

Fun fact:
Veigas was the only playable character who is a villain, and was the only playable character who does not become a party member of the Grand Chase (aside from Uno). Veigas is more or less a playable boss character. He exudes so much power that he has completely unique levitating animations even for being hurt. Ley has levitating animations too, but he doesn't copy any of hers, he uses his own. He even has a giant cape that only he can use, with his chase coordi visual set.

Story:
Veigas is a Hardliner Asmodian, of the Extremists, and the leader of the Terre clan. He has no reason to side with Aernas, only the destruction of it as other Hardliners tried in the demon war thousands of years ago. Veigas himself might have gone if he was available for that time frame, but all he got was the result: Kounat somehow repelled the attack and dealt a major blow to the Extremists' forces, with the help of the other faction of Asmodians, the Moderates, who defended Aernas and sealed back the dimension portals that the Extremists had opened to attack through, including with the help of one rival Asmodian whose name he was always at odds with, Dio.

With the voice of the Creator suddenly officially ordering him to carry his duty as an Asmodian to destroy an unecessary world and with the gift of his tesseract, the last thing he would do is doubt the reason behind it.

Veigas does not under-deliver his evil in his unique initial story scenario (the story happens much after the last Archimedia stage and before Tower of Disappearance).


Veigas is a mixed character that has offensive and zoning abilities and short teleporting, with a naturally broad melee range and potent skills of very large AoE, toying with his enemies at close or mid range as he feels like with no lack of angles to strike from.

Dash type: hybrid between standard dash and teleport

Uses standard dash mechanics but freely dashes through enemies and with a shorter moment of invincibility (only around 1/4 of a second only at the start, then another moment near its end; usually you dodge from passing through rather than invincibility frames), but as a dash, it's slower and shorter, with a forced cooldown time on starting a dash again, though it does have a held run.
To be faster you have to always start dashes from the air which will let you have more momentum. So jump and →→↓, jump and →→↓, repeat. He can shadowstep with a delay but this is even faster than that.

Hitstun recovery speed: very fast
*Due to his invincible teleport and fast recovery, you can attempt combobreaks from non-true combos by spamming dash when being hit: due to the double tap input it's not always reliable to happen early, but you may escape the hits by teleporting away. (spamming one or multiple skill buttons instead would work reliably)

Floating pose
Veigas's normal poses apparently extend his hurtbox slightly taller than normal with a few cases of Veigas being hit from something that should only hit the floor above him, including in PvP.
-Seth's Pyramid, red laser deals few hits 1 floor below
-Dwarf king hammer strike hits 1 floor below
-Zeruel guard elf melee hits 1 floor below
He also interacts differently with jump pads in jump stages.
-Xenia 1, 2nd jump pad does not activate instantly


Skill Tree Style
He can learn everything.
Maybe he couldn't learn everything if he actually had 3 more jobs...

Passives

Choice 1
  • 1-A, Arref: CritDmg +30%, but CritChance -3% (this is actually around a 0.5% loss in DPS, it used to be CritDmg +100%)
  • 1-B, Byet: buffs for temporary +3%Dmg (PvP +1.5%) for 3sec if an attack hits 3 different enemies at once (free bonus but too small and needs 3 enemies close)
  • 1-C, Gymel: when you score a critical hit, gains +10% MP Regen for 3sec, cannot stack multiple times

Choice 2
  • 2-A, Darlet: whenever you use a technique except the portal's melee attack, your skills that are currently on cooldown will shorten by 20% of current remaining amount. (mentions that other technique cooldowns will raise but this doesn't happen?)
    Sounds nice but it's hard to have this actually matter unless you equipped multiple techniques, and simply using two techniques will cost around 1 bar so it's not to trigger every time.
  • 2-B, Hy: skills get +3%Dmg (PvP +1.5%) but have 20% longer cooldowns. (not worth it)
  • 2-C, Barb: as long as below 30% HP, gains +10% MP Regen (not reliable but it's a free bonus)

Choice 3
  • 3-A, Jain: skills have -30% cooldown, but their AP cost raises by 15%. (two-sided but good. The reduction is useful including for making MP1s recharge faster to use for invincibility, and the cost change is manageable)
  • 3-B, Het: skills do +3%Dmg (PvP +1.5%), but their AP cost raises by 15%. (not worth it)
  • 3-C, Tet: skills will cost 15% less AP, but on use you lose HP equal to 5% of current HP rounded down. In most stages this is very little and a single potion heals a dozen uses of it, in potion-less stages or PvP, the cost is effectively slowing down your HP regeneration.
  • Unequipping all 3 is possible too.
5-19: Veigas (normal attacks)
GroundZ combo
Without moving does 3 thrusts forward each reaching farther every time. Critical/Double was changed to hit the same total area as the 3rd Z.
On non-armored monsters can keep repeating just the 3 Zs.
Can backroll from combo which is invincible (but not for long, cannot be timed early) and passes through enemies and attacks, with 4sec cooldown.
Can chain the combo into ↑ which does an emergency melee hit to both sides which launches.
The Double, every time it is done, reduces skill cooldowns by 1sec.
  • ~132 x2 / ~99 x2 / ~78 x2
    Critical: 80.31 x1-x3 (80/160/240), Double 160.64 x1-x3 (160/320/480)
    Combo↑: launch ~59 x3 (177)
    Backroll Z: launch ~128 x2 (256)

    • PvP
      All 3 swings force standing state on airhit to combo on air/juggle, combos into Critical/Double.
      2nd swing does not true combo into 3rd (they may skill or use an invincible ability) but ZZ-Crit always works (or ZZ↑ or ZZbackrollZ).
      After Critical/Double only combos into skills, or maybe grab in the corner.
      Z↑ can be added after many combos even where the opponent is still to be knocked down guaranteed, and after Z↑ hits can combo into almost any skill if available or the melee technique.
      • 184 x2 / 138 x2 / 110 x2
        Critical: 138 x1-3, Double 276 x1-3
        Combo↑: 41 x3 (123)
        Backroll Z: 90 x2 (180)

DashZ↓
  • launch ~44 x3 (132) / knockdown ~136

    • PvP
      Disjointed attack, angled up to possibly hit airborne opponents. Second swing will groundbounce to combo into juggle groundZ, or you can skip the second swing to groundZ from closer.
      79 x3 (237) / groundbounce 237

DashBackZ
Shot to mid-range while turning around. Free damage when passing through a monster, may be repeated as a mid-range attack if needed (~196 DPS).
  • ~209

    • PvP
      Very useful light hit for many scenarios, forces standing state on airhit. On juggle combo, or after hitting an advancing enemy on ground or air, combos into many skills or leaves them at the right distance for your long groundZ.
      364

airZ
  • ~77

    • PvP
      One swing that starts slightly diagonal up then curves down, but will curve until diagonal down-back. It hits forward even air-to-air and is very good at hitting grounded enemies even if jumping past them.
      Forces standing state if it hits someone in the air.
      force-standing 162

air↓Z
Float-stuns per hit so it can stall monsters while pushing them together.
It hits in 3 separate zones 2 times each for 2-6 hits per enemy, can get full hits on monsters that are 2 floors tall. If you can get 6 hits then repeating this move is ~315 DPS which is average for ground combo and may have easier dodging from it than comboing.
  • float-stun ~56 x2-6 (112-336)

    • PvP
      Reaches only diagonal down but reaches far sideways.
      Unlike some jumping attacks this will not cancel when landing, cannot be done faster by repeating up and down a platform.
      39 x4 (156)

Wakeup roll (skilltree)
To explain, must input as ←← or →→ immediately before you land from an attack that knocked you down (if you're on the ground, must input a dash instantly after being hit by the final hit).
This will do his normal wakeup attack (hitting a very short distance to all directions, with the enemy still standing up next to you) but teleporting to the side first and auto-aiming the teleport directly into an enemy if there is one close enough.
Cooldown 5sec (PvP 12).
  • float-stun ~57 x3 (171)
5-19: Veigas (skills)
Techniques

Dimension Crevice (fenda dimensional)
(16 AP/0.5 bars, cooldown 15sec)
Leaves a portal in your current spot, then as long as it still is in cooldown, pressing the button again will do a single melee strike forward which will instantly teleport enemies hit to the portal's spot (can teleport minibosses but not bosses).
Can place it in a corner where you want to move all monsters to, then hit all the monsters away from that place, grouping them up for you and your team to be able to AoE them all at once. Harder to use solo because they will all scatter away when you move away from the target spot to hit another monster, better to bring just 1 monster for an AoE.
If using this in random rooms, people can get angry at you if you pull a monster they already wanted to hit.
  • ~183.7

    • PvP
      Place the portal to enable the melee attack. Enhances melee combo and dash attack to be able to cancel into this strike (including after Critical), either placing enemies away from you again for more zoning if the portal was elsewhere, or teleporting them right next to you where you can try to reset afterward with groundZ which can loop back into this. (or grabbing would be safer to try)
      Cooldown 20sec (after placing, can melee for 20sec).
      320


Black Shield (barreira prismática)
(13 AP/0.4 bars, cooldown 8sec)
Makes a solid wall object a short distance to your left and right and below your feet. Your team can move through them and enemies are bodyblocked (except bosses), the wall may absorb melee hits and basic projectiles from enemies. They last 7 seconds or each one breaks after 4 hits.

  • PvP
    The walls can save you from hits either by pushing them out of range or by absorbing the hit, and your melee range is longer than the distance to the walls to counter.
    Lasts 5sec. Cooldown 12sec.


Bury (enterrar)
(13 AP/0.4 bars, cooldown 8sec)
Useless for PvE.
  • ~246.0 [15.3]

    • PvP
      Places a mine in front of you (if standing next to a cliff it will fall straight down until reaching ground), it can wait for 7 seconds until an enemy touches it. On hit it has no hitstun but applies a slow inside the area for a very short time where you can try to combo after it.
      In the corner, you can juggle an enemy onto the wall (for example after Critical/Double) and put this below them to combo into Z combo again (the slow effect gives enough time to connect the 2nd Z which will force standing state again so they take the full combo).

      Cooldown 12sec.
      428


LV1 skills

Blast (destruidor)
Places a hit on the closest enemy within a circle from you reaching 1 floor up or down and even behind you.
  • ~585.6 [20.1], can launch a light monster first for aerial 878.4

    • PvP
      Excellent range only missing if they're too far away from you, even hits 1 floor up or down.
      Will do a small launch, better if you hit them while they already were high in the air.
      launch 510

Ravage (tormento)
AoE forward, short but reaches 1 floor up.
Will pull and leave standing. Connects badly if they were in the air.
  • ~71.2 x9 (640.8) [22.0]

    • PvP
      Great regardless if the opponent is on the ground or in the air, reaches up well so can anti-air. Good but forward range is short.
      Pulls to you and leaves them standing to continue to try attacking, only barely not true comboing into groundZ on fast recovery jobs.
      62 x9 (558)

Dark Frenzy (frenesi das trevas)
Rectangle AoE forward, hitstuns monsters in place with weak hits then explodes and blows away.
Can be timed after a launch for aerial bonus on light monsters but needs to be used while they're low in the air.
  • ~0.87 x100, ~541.8 (628.8) [21.6], after launch 943.2

    • PvP
      The initial hits do not hitstun and it pulls opponents to the center even forcing them into the air so they can't skill anymore. Easily catches midair/in combos.
      On hit floats them straight up (can dash attack, or re-stand with jumpZ. If in corner can do this into backshot then attempt mid-range groundZZZ).
      1 x100, 471 (571)

Dark Binding (solo atormentado)
Useless in PvE.

Almost zero damage. Hits to melee range left and right, if it works it stuns them for 3 seconds but never works on monsters with super armor or bosses.
  • Less than 1.0 damage

    • PvP
      Hits to melee range left and right, does nothing unless they are standing on the ground or falling so close to it. On hit, binds them in place until they mash out, attacking them won't release them early except by grab. You can try multiple groundZ combos (especially if you avoid staying too close), or one into grab to be safe.
      Also, the hit has long active frames, it's possible to hit them after they stand back up form knockdown as the invincibility runs out during the skill time freeze.

Black Hole (buraco negro)
Shoots forward a ball that will home in on any one enemy close enough, hits one monster and teleports them above you standing up so they fall beside you (or if there is a platform above you they will be there), can teleport even minibosses but not bosses.
Not very useful because you can't freely choose the enemy it targets.
  • 530.9 [18.3]

    • PvP
      Great homing projectile that hits almost anywhere by surprise, lives enough to last almost to the side of the screen from center and can reach one and a half floors up and two floors down, and after it appears you can mash Z to spend additional AP to make it last even longer. The only problem is that it has a noticeably long casting time.
      After teleporting them, the safest option is to combo into any skill, or to walk away then back and grab. Can jumpZ then attempt either groundZ or grab.
      420
5-19: Veigas (skills part2)
LV2 skills

Explosive (devastar)
AoE forward until screen edge from center, but has a dead zone immediately in front of you.
  • ~177.9 x7 (1245.3) [19.7]

    • PvP
      154 x7 (1078)

Death's Caress (tufão da morte)
Quick AoE to both sides, launches enemies into the air but knocking them down closer to you.
  • 177.3 x7 (1241.1) [19.7], on launchable monsters lands 4 hits with 3 being aerial (975.1) [15.4]

    • PvP
      154 x7 (1078)

Burning Agony (agonia ardente)
Hits to both sides slightly longer, and can reach 1 floor up.
Against light monsters will launch then blow them away.
  • ~0.76 x120, ~376.8 x3 (1221.6) [19.3]
    Launchable monster normally 2 aerials (1598.4)[25.3], launch with normal attack then this 1832.4 [29.0], launchable monster on floor above has explosion do 2 hits with 1 aerial (942.7)[14.9]

    • PvP
      Initial pull hits do not hitstun but strongly pulls to the center forcing them airborne where they can't cast skills anymore.
      Explosion floats forward comboing into air dash attack, or if in the corner can instead jumpZ into attempt groundZ/grab, or back-forward shot then attempt groundZ.
      1 x120, 328 x3 (1104)

Dark Barrier (escudo negro)
Enchants the area around you for 3 seconds (reaches 1 floor up). You and teammates inside are invincible, and also regenerate 11.22% HP and around 1/3 of an MP bar in total. Also can walk through enemies. Restoration still works on PvE room end portal.
Could block an attack even for a teammate along with you, but costs 2 bars and it takes a moment to start applying invincibility for teammates so it would need to be started early.
Does give you some HP regen for Tower of Disappearance/Harkion/Void4F.

  • PvP
    Can be more useful in PvP where blocking any attack once then getting one combo is decent by itself. Heals only 5.61% HP (237).

Dark Cannon (canhão negro)
Many shots straight forward, infinite range but non-piercing so can only hit 1 enemy with small splash. Can aim up and down around 60 degrees only after it starts firing.
Lower AoE potential but standard damage and strong against launchable monsters, can keep pressing Z to spend 0.45 bars for +4 shots, as many times as you want to pay so this also becomes a 3-bar/4-bar skill for high DPS if you want.
  • launch ~123.9 x9 and ~75.2 x3 (1340.7) [21.2], launchable monster aerial 1949.1 [30.9]
    Extention is 0.45 bars for ~75.2 x4 (300.8) [20.7], launchable monster aerial 451.2 [31.1]

    • PvP
      float 98 x9 and 59 x3 (961)
      Extention is 0.45 bars for 59 x4 (236)


LV3 skills

Distortion (distorção)
Great AoE.
Aim the crosshair with the arrows keys for a second, it causes a big explosion reaching 1 floor up and down from it. Max range is one full screen away and has great splash (high range to the sides and hits 3 floors at once).
  • launch ~338.0 x6 (2028) [22.5], launchable monster aerial 2873 [31.9]

    • PvP
      294 x6 (1764)

Overdrive (esfera maligna)
Piercing straight ball with infinite range, will hit an entire lane straight forward and can also angle up or down almost as much as completely straight up or down, can shoot slightly angled to hit one lane forward across 2 floors.
Deals a set 1 hit to each enemy and blows away.
  • 2132.7 [23.6], light monster launch with normal attack into this 3199 [35.5]

    • PvP
      Great size and can even angle up or down. Can be easy to dodge if trying to hit from too far away instead of close.
      1206

Overload (golpe devastador)
One shot straight forward (can barely hit 1 floor above) that causes an explosion that hits 1 floor up and down, if missing it explodes when reaching screen edge from center.
Since the explosion takes a second to come out, if used close you have enough time to dash to their other side to force back bonus on heavy monsters, or light monsters get launched by the explosion for aerial bonus instead.
  • ~0.77 x1 and x100, explosion launch 491.8 x4 (2044.9) [22.7]
    Launchable monster 3 aerials 2782.6 [30.9]
    Back bonus ~3271 [36.3]

    • PvP
      1 x1 and x100, explosion 428 x4 (1813)

Absolute Dark (zona nula)
Makes a field around your current spot reaching 2 floors up, it lasts 10 seconds and monsters inside have -8% DEF (everyone's damage raises by 8.6%). Deals less damage for a 3-bar but can be technically more damage in a full party.
Dealing as much as 8000 damage during this time means only +688 damage, which is not enough to even out this damage to having used a different MP3. You would need over 12k to make it worthwhile.
  • 38.05 x28 (1065.5)

    • PvP
      Bad.
      No damage or hitstun, enemies inside stop regenerating HP/MP and have -3.5% DEF (+3.6% damage).

Dark Spear (lâminas do tormento)
Essentially hits almost to the side edges of the screen stretching 1 floor up and down, damage depends on size. Needed in raids.
  • Falling ~42.8 xN & bottom explosions ~51.1 xN
    Normal enemy around 1350
    Average boss around 1750, or if cast from their middle to hit on floor above and below around 2100
    Raid boss around 4000

    • PvP
      Low damage by itself but floats enough to, with sensitive timing, combo into airZ then groundZZZ, or just a dash attack-Down.
      32 and 38 (around 1000)


LV4 skill

Explosion hitting to both sides, reaches 1 floor down and 2 floors up. Sends far forward.
Simple large AoE to hit multiple enemies and can launch one enemy first for aerial bonus, but isn't special on boss fights.

Not affected by his passives that change skill damage/cost/cooldown.
  • ~381.4 x8 (3051.2) [23.4], light monster launch with normal attack first 4576 [35.2]

Awakening
Explosion forward to screen edge reaching 1 floor up.
Teleports enemies hit into the center on the bottom.
  • ~51.34 x11, 2259.25 x1 (2823.99) [21.72]

H
Hits basically the entire screen.
Also gives you ATK +15% and Super Armor for 20sec after it finishes.
  • ~127.64 x16, ~62.55 x16, ~1146.87 x1, ~491.02 x1 (4680.93) [36.00 if it cost as much as MP4]
5-20: Decanee (general)
Story:
As a defeated Baldinar laid still, someone watched: a certain great demon named Heitaros. Someone who took Baldinar's shortly-enjoyed creator powers from him.
Decanee was created by Heitaros and ordered to do his bidding. One time she is made to absorb the essence of Kazeaze, inheriting all of her memories. She is almost overcome with Kazeaze's will but mantains herself, now being both herself and the living Kazeaze while going to the Tower of Disappearance.
As she continues to follow Heitaros, something starts to resonate stronger than ever: what if she... Decides not to?

What will the Grand Chase do when the real Kazeaze stands among them?

Fun fact:
She has so many similarities to Veigas you would think KOG is shipping them. She also has some of her animations taken from Ley or Veigas.

Skill Tree Style
Decanee has exactly enough points to unlock everything.

Overview
Decanee usefully has Veigas's movement style/teleport and her skills give her more or less the best AoE in the game. On bosses she can do high combo damage/fast MP recharge with ZZZ↑ (or repeat dash attack which has quicker dodging) and Cursed Flame Copy deals more damage to very big bosses.
5-20: Decanee (normal attacks)
GroundZ
Has 3 swings plus a Double or Up, combo Up is very strong and just as fast as any one swing of combo, so repeating ZZZ-Up on an enemy that can't take knockback is the strongest DPS she can do (497 DPS). On other enemies you can do ZZZ-Double, walk, ZZZ-Double again. Double has a special property: enemies are not allowed to counterattack it, so they will just idle through it when hit by it, so you can walk and combo again.
There is also a combo BackBack dodge, which normally has a cooldown of 4sec, but during X has no cooldown and places an orb in case they advance.
  • ~127.08, ~100.45 x2, ~197.95
    Up: ~316.28
    Critical: ~147.08, Double ~223.57 + ~11.17 x10 (335.27)
    X mode BackBack: ~43.43

DashZZ
Can do some damage at range before doing combo, not special.
  • ~138.01, ~104.89

DashBackZ
Single shot behind you, doesn't go very far. Damage isn't notably high.
During X mode it shoots two additional orbs.
  • ~137.16
    X mode: also ~30.25 x2

airZ
Simple airZ hit. Cannot ottoshot.
  • ~71.02

air↓Z
Dive straight down.
  • ~159.69

X mode
Needs the full charge bar to activate.
Gives 10% ATK (15% at full passives) and super armor for 15sec.
One choosable passive makes it last 5sec less but fill 33% faster, another makes it last 5sec more but fill 33% slower.
During X mode, your DashBackZ does more hits, and your comboBackBack has no cooldown and leaves a very weak hit in its place.
5-20: Decanee (skills)


Cursed Arrow (flecha maldita)
1 bar

Deals full hits inside its full area, reaches forward and a shorter distance behind you too to not miss easily.

  • Choice A
    Bleed.
    • 162.70 x1 167.34 x2 (497.38), bleed 4.52 x12? (+54.24, 551.62) [19.02]
      Both sides on giant boss: 162.70 x2, 167.34 x4 (994.76), bleed (+54.24, 1049) [36.17]

      • PvP
        Stops HP regen temporarily instead of bleeding.
        150 x3 (450)

  • Choice B
    Loses the DoT, instead blinds enemies for 5 seconds (stops monsters from starting another attack but doesn't work on super armor monsters).

    • PvP
      Blinds preventing them from seeing halfway across the screen for 3 seconds.
      150 x3 (450)

  • Choice C
    Hits a bigger area. Pushable enemies may take slightly less hits at the tip.
    • 100.67 x6 (604.02) [20.82]

      • PvP
        94 x6 (564), can combo into 1 Z for +222


Cursed Flame (chama amaldiçoada)
2 bars

  • Choice A
    Square AoE forward.
    • float straight up/knockdown ~241.7 x5 (1208.5) [19.1]

      • PvP
        200 x5 (1000) (if comboing into ZZZ as they fall, misses the first and does 1357)

  • Choice B
    Changes to only one hit. On light monsters can launch with dash attack first for aerial bonus.
    • float straight up/knockdown ~1094.4 [17.3], after launch 1641.6 [26.0]

      • PvP
        953 (can combo into ZZ as they fall for 1276)

    • Choice C
      Hits at both sides for better AoE, raid bosses take both hits at once for bonus damage.
      • float straight up/knockdown ~227.6 x5 (1138) [18.0]
        Raid boss x10 (2276) [36.1]

        • PvP
          126 x5 (630)


Dark Astraphe
3 bars

  • Choice A
    Targets up to 5 monsters inside your screen.
    Too weak with only one enemy in the screen (boss fights), otherwise targets many across the screen for partial damage on each and multiplies damage if they're together.
    • hitstun ~86.3 x11, DoT hitstun 13.12 x4 (1001.7) [10.4]
      2-5 enemies together: from 2003.4 [20.8] to 5008.5 [52.1]

      • PvP
        61 x11, DoT 5 x4 (691)
        2-3 together 1362-2033

  • Choice B
    Becomes a 2-bar skill and sets damage accordingly. The advantage is that it can be cast twice in a row now for when enemies are stacked together, and the button cooldown is reduced too.
    • stand ~58.6 x11, DoT hitstun 13.12 x4 (697.0) [11.0]
      2-5 enemies together: from 1394 [22.1] to 3485 [55.3]

      • PvP
        38 x11, DoT 5 x4 (438)
        2-3 together 856-1274

  • Choice C
    Long rectangle AoE forward. Simple quick damage and leaves them in place.
    It also deals additional hits in the two floors above depending on enemy position/height but they are very weak.
    • float-stun-rise per hit
      Very small monster: 12 hits of 147.01 (1764.12) [18.37]
      Normal boss: 33 hits but involving 11.92 and 10.37 (roughly 1998.94) [20.82]
      Taller boss: 46 hits but involving 11.50 (roughly 2148.44) [22.37]

      • PvP
        137 x12 (1644)


Domination
1 bar

  • Choice A
    Buffs you and nearby party members: +5% ATK for 15sec.

    • PvP
      +2.5% ATK for 15sec so nothing.

  • Choice B
    One weak hit to nearby enemies, has a small knockback push and debuffs them for only -3% ATK for 3sec.
    • ~380.3 [13.1]

      • PvP
        Forces-standing on airhit 261dmg and can combo into groundZ for big damage.
        -1.5% ATK for 3sec.

  • Choice C
    One of her two pull skills. Pulls enemies from both sides and also 1 floor above yours. Has normal skill damage.
    • 83.12 x7 (581.84) [20.06]

      • PvP
        Pulls and combos into full groundZ.
        61 x7 (427) plus combo


Protection
2 bars

  • Choice A
    Self-buff, for 5 seconds you have hyper armor and all damage you take is 1, and you have an aura that keeps hitting nearby enemies while still being able to move and attack.
    Decanee is not an AP character so this may be recast before it runs out one or two times by holding Z.
    • *Doesn't use SpATK
      hitstun 25.24 x25 (631) [10.01]

      • PvP
        no hitstun 28 x25 (700)

  • Choice B
    Slightly lowers the aura damage, during the buff all normal attack hits restore 1% HP. Upgrade.
    The aura hits themselves can restore HP but only sometimes?
    • *Doesn't use SpATK
      hitstun 20.11 x25 (502.75) [07.98]

      • PvP
        no hitstun 21 x25 (525)

    • Choice C
      Purely worse except for party play.
      Changes into a buff for yourself and nearby party members. Hyper armor and all damage taken is reduced to 1. Lasts 3 seconds.

      • PvP
        Lasts 2 seconds.


Limited Liberation
3 bars

  • Choice A
    Large AoE far forward reaching 2 floors up.
    Single hit so on light monsters it's easy to use after dash attack to aerial.
    • float straight up/knockdown 1799.61 [18.7], aerial after launch 2699 [28.1]

      • PvP
        1608

  • Choice B
    Changes to multi-hit and places a DoT in the area.
    • stand ~405.1 x4 (1620.4), ground burn 39.19 x6 (total 1855.5) [16.8/19.3]

      • PvP
        Leaves standing and barely does not true-combo into groundZ.
        force-standing 363 x4, force-standing 36 x6 (1668)

  • Choice C
    Hits a much shorter range to the side, and takes a longer time in place to finish all hits. Damage is slightly higher.
    • ~97.9 x18 then launch straight up ~131.1 x3 (2155.5) [22.45]

      • PvP
        While it's still happening can combo into groundZZZ-Double, groundZZZ and then they fall.
        Forces standing state on airhit so can even combo after ZZZ-Double to still combo after.
        force-standing 81 x18 then launch straight up 135 x3 (1863) plus combo


5-20: Decanee (skills part2)


Void
2 bars

Her other pull skill forward, Domination also has one for 1 bar.

  • Choice A

    • float-stun 22.77 x46 (1047.42) [16.62]

      • PvP
        18 x46 (828)

  • Choice B
    Last hit also debuffs -5% DEF for 7sec.
    • doesn't raise to air, 23.09 x22, then float straight up/knockdown 467.5 (975.4) [15.48]

      • PvP
        -2.5% DEF for 7sec.
        19 x11 and 20 x11, launch 370 (799), can add dashZ (1125)

  • Choice C
    With very low duration just pulls them to the same place and explodes sending them straight up/down.
    • pulls up midair 13.79 x10, then float straight up/knockdown 924.31 (1062.21)

      • PvP
        5 x10, launch 783 (833)


Cruel Slash
3 bars

  • Choice A
    Exploding shot forward.
    • ~18.1 x1 then 62.34 x5 and 59.74 x7, float straight up/knockdown ~503.9 x2 (1664.2) [17.3], plus DoT 4.52 12? (+54.24)

      • PvP
        Temporarily negates HP regen instead of DoTing.
        82 x5 and 69 x7, float 313 x2 (1505)

    • Choice B
      Projectile instantly explodes centered on yourself to hit as an AoE to both sides.
      Instead of DoT, blinds for 10 seconds (stops attacks from starting but doesn't work on super armor).

      • PvP
        Blinds for 10sec (they can't see halfway through the screen).
        74 x5 and 73 x7, float 341 x2 (1222)

    • Choice C
      Becomes an AoE that hits slightly bigger than your own screen. Perfect AoE but has the damage of a MP2.
      If started next to an enemy, has time to teleport one time to get back bonus, where it would give the same damage as an MP3.
      • 98.44 x1, 196.89 x1 and launch 959.86 (1255.19) [13.07], back ~2008

        • PvP
          stun 58, launch 156 and 894 (1408)


LV4 skill
Apocalipse
AoE hit around the size of your own screen that also pulls them to where you started it.
Lower singletarget damage for its cost so not good for bosses especially with the cooldown.
  • ~4.82 x20 and ~4.01 x27, then ~10.85 x16 and ~10.04 x22, and launch ~489.5 x3 (1981.2) [15.24], launchable monster 2 aerials for 2470.7

Awakening
Hits both left and right to screen edge reaching 1 floor up.
Single hit so weak if it doesn't crit.
  • 2465.68 x1

H
Hits basically the entire screen.
Also gives you ATK +15% and Super Armor for 20sec after it finishes.
  • 122.28 x7, 102.24 x12, 770.40 x1, 78.18 x7, 65.36 x12, 492.55 x1 (4677.37) [35.97 if it cost as much as MP4]
5-21: Ai (normal attacks)
GroundZ
4 presses then Double, also has a combo Up hit. Can enter stance if pressing Z (or X with a passive) during Double or Up or DashZ, so you can always do combo-Double-stance or enter it quick with dashZ-stance.
Going into Up launches monsters so you can aerial hit +50%.
Also has a comboBackBack dodge that goes into a hit.
  • 159.60 / 147.83 / 137.75 / 201.60
    Up: launch 189.84
    Critical: 155.90, Double 94.58 x3 (283.74)
    BackBackZ: 78.96 x2 (157.92)

Stance
Can do stanceZ which is a fairly strong single hit, but stance Up does more damage. Stance Side works as a dodge through an enemy but does the least damage.
  • Stance Z: 283.05
    Stance Up: launch 95.96 x4 (383.84, launchable monster 527.78)
    Stance Side: 54.42 x4, 58.06 x1 (275.74)

DashZ
Hits left and right, on certain bosses will do 4 hits hitting with both sides at once, quickly prepares stance.
  • 60.47 + 62.99 (123.46)
    4 hits on certain bosses (246.92)

airZ
Single airZ melee that can't ottoshot. Can chain into ↓Z which is a dive straight down.
  • 86.51 / 45.35
5-21: Ai (skills)
LV1 skills

Stylish Attack (ataque elegante)
Forward combo. Good for invincibility and will keep you close to the enemy.

Knocks down forward.
  • 128.5 x3, 234.0 (619.5) [21.3]

    • PvP
      force-standing 113 x3 with 3rd launching, blowaway 207 (546)

Brandish (ataque elegante)
Forward combo lasting less time, launches but not in a way you can combo without skills.

Launches/knocks down in place.
  • 101.1, 104.4, launch 135.0 x3 (610.5) [21.0], launchable monster aerial 745.5

    • PvP
      88, 91, float 118 x3 (533)

Type 2
Single swing, short forward AoE reaching 1 floor up.

Launches/knocks down in place.
  • launch 190.3 x3 (570.9) [19.6], launchable monster aerial 761.2

    • PvP
      launch 166 x3 (498)

Flare (irromper)
AoE to mid range left and right. Can hit with both sides close enough to certain monsters.

Knocks down in place.
  • 94.7 x4 and 120.5 x1 (499.3) [17.2]
    Both sides: x8 and x2 (998.6) [34.4]

    • PvP
      force-standing 80 x4, knockdown 104 (424)

Type 2
One forward dash passing through monsters.

Knocks down monsters forward with you.
  • 139.1 xN
    Usually x3, large bosses x4 (417.3/556.4) [14.3/19.1]

    • PvP
      force-standing 112 x3 (336) with last knocking down

Force Crash (queda forçada)
Short AoE forward, has 2 hits and only the first reaches 1 floor up.
Launches but not in a way you can combo from without skills. Second hit launches/knocks down in place.
  • 217.1 + 377.9 (595) [20.5]

    • PvP
      force-standing 191 + launch 333 (524)

Type 2
Does not timefreeze nearby enemies at the beginning and damage is slightly lower. (why even)
  • 202.3 + 372.4 (574.7) [19.8]

    • PvP
      Would make an advancing enemy continue advancing without stopping them.
      178 + 328 (506)


LV2 skills

Divine Impact (impacto divino)
Short AoE forward, may be able to reach 1 floor up or not depending on platform distance.
Needs to mash Z for full power but the difference isn't big.
  • 1171.4 [18.5]

    • PvP
      float/knockdown 1039

Brilliant Dash (investida brilhante)
3 short melee hits, then 2 long AoEs forward.
Blinds for only 3sec (monsters without super armor won't start an attack for 3sec).

Last hit knocks down far forward.
  • 119.2 x3, 233.7, 564.3 (1155.6) [18.3]

    • PvP
      Instead of blinding causes confusion (reverses their left/right inputs for 3sec).
      force-standing 95 x3, force-standing 186, blowaway 450 (921)

Type 2
Removes the debuff for slightly more damage.
  • 124.1 x3, 243.3, 587.3 (1202.9) [19.0]

    • PvP
      110 x3, 216, 521 (1067)

Electronic Pulse (pulso eletrônico)
Line of 3 shock traps forward to screen edge from center. Has high damage.

Leaves monsters standing, pulls to center.
  • 248.7 x1, 97.4 xN
    Normal enemy around 14 hits (1514.9) [24.0]
    Average boss 18-27 hits, raid boss 27 (1904.5 - 2781.1) [30.2 - 44.1]
    *Cannot get back bonus

    • PvP
      Pulls to center, can insert after combo. Can combo into dashZXZ once.
      146 x1, 38 and 53 xN (around 630) plus 1 hit

Type 2
Hits a different area, but max damage is now lower than previous normal damage.
Alternate version that's shorter forward but reaches 1 floor up. Knockback will try to pull down monsters from the floor above. The next skill can be used for an AoE that reaches 1 floor up.
  • 246.2 x1, 39.2 xN
    Normal enemy around 20 hits (991) [15.7]
    Average boss 29 hits, raid boss 29 (1343.8) [21.3]
    *Cannot get back bonus

    • PvP
      Can insert after combo. Can combo into dashZXZ once.
      118 x1, 31 xN and 43 xN (around 850) plus 1 hit

Chain Blast (cadeia explosiva)
AoE forward to screen edge from center reaching 1 floor up.
Commonly does 2 hits on any hit, average boss very sensitive 3 hits instead of 2 if cast from mid-range, raid boss 4 hits.

Will slightly push forward, or knock down in place.
  • 617.9 x2/3/4 (1235.8 [19.6] / 1853.7 [29.4] / 2471.6 [39.23])

    • PvP
      333 x2 (666)

Type 2
Does less damage but lowers DEF by 10% (raising every player's damage by 11.11%) for 5 seconds. Less worth it solo, more worth it with full room.
  • 540.0 x2/3/4 (1080 [17.1] / 1620 [25.7] / 2160 [34.28])

    • PvP
      DEF -5% for 7sec.
      305 + 322 (627)
5-21: Ai (skills part2)
LV3 skills

Divine Tempest (tormenta divina)
Does many small melee hits forward while being able to slightly walk left or right, then ends knocking down slightly forward. Very small affected area and needs them to not move away from it during the animation.
Near the end can press Z to spend more bars to deal more hits but the base cost already is so high, can only do once.
  • 133.4 x10, launch 321.8 x2 (1977.6) [20.6], launchable monster 1 aerial +160.9
    Z: each 0.9 MP bars for ~333.6 x3 (1000.8) [34.51]
    Full hits counting 1 Z: 3.8 MP bars, 2978.4 [23.51]

    • PvP
      119 x10, float/knockdown 287 x2 (1764)
      Z: each 0.9 MP bars for 119 x3 (357)
      Full hits counting 1 Z: 3.8 MP bars, 2121

Shock Detonation (detonação concussiva)
Great AoE. Instant AoE forward to screen edge from center reaching 2 floors up. On launchable monsters can aerial by launching with comboUp first.

Launches away from center.
  • 2037.7 [21.2], aerial after launch 3056.55 [31.8]

    • PvP
      float/knockdown 1486

Type 2
Weaker big hit, but does more hits in the area over time for more total damage.
Against launchable monsters, this version launches straight up and will juggle up for a few seconds (losing a few hits but getting aerial bonus).
  • 1323.4, 114.8 x11 (2586.2) [26.9], aerial after launch 3534.9 [36.8]

    • PvP
      DoT part has no hitstun at all, so getting more hits relies on them staying inside.
      float/knockdown 1120, 122 x11 (max 2340)

Orbital Strike (disparo orbital)
Guidable AoE, keep aiming with the arrow keys while it explodes 5 separate times.

Later hits knock down in place.
  • 480.1 x5 (2400.5) [25.00]

    • PvP
      378 x5, 1st and 2rd do not true-combo into 2nd and 3rd, 3rd and on launches (1890)

Type 2
Same but instantly releases all hits on the first explosion. AoE is not as big as the other type.
  • 423.2 x5 (2116) [22.04]

    • PvP
      launch 365 x5 (1825)


LV4 skills
Hits forward to screen edge from center reaching 3 floors up, doing weak hits and moving them sideways to the center (regardless of knockback resistance) where it gets blasted.
  • 19.6 x11, launch 105.2 x18, 123.6 x4 (2603.6) [20.0], launchable monster aerial 3745 [28.8]

Awakening
Does one beam straight up hitting left and right close, then hits farther to the sides than the entire screen but not hitting below your own floor.
  • close beam ~993.90 x1, screen ~115.36 x14 doing 1615.04 alone (total 2608.94) [20.06]

H
Hits basically the entire screen. Damage is partially split across the area so max damage is above what it does on an actual enemy.
Also gives you ATK +15% and Super Armor for 20sec after it finishes.
  • ~65.07 x10, ~36.60 x10, ~72.31 x9, ~40.67 x9, ~780.93 x1, ~439.27 x1, ~175.71 x6, ~16.27 x4, ~58.57 x1, ~98.83 x6, ~12.51 x4, ~32.94 x1 (max 5107.59) [39.28 if it cost as much as MP4]
5-22: Kallia (normal attacks)
Skill Tree Style
Kallia has exactly enough points to get everything.


GroundZ
Does a few hits and there's an upgrade to deal more hits in it, it actually deals high DPS/has high MP recharge (~538 DPS), since 2nd job you can also X while comboing to pass to their other side.
  • Combo: ~147.59 / ~177.34 / ~187.93
    Upgraded combo: ~124.39 x4, ~129.26 x3, ~263.58 x1, 129.26 x3, 124.39 x1, 263.58 x1
    Combo Up: ~159.86 / ~149.94 / ~80.85, ~98.33
    Critical: ~92.28 + ~46.14 x2 (185.56), Double ~127.58 + ~144.76 (272.34)

Z→
Hit that places a short DoT on hit.
  • ~274.17, ~17.65 x7 (397.72)

DashZ
Unnotable.
  • ~101.86 / ~133.97

X
Does a booster jump forward and up, can be followed up with Up or Forward or Down.
Can be done from groundZ, which passes straight forward through enemies to their backside.

airZ
Simple melee hit that can't ottoshot.
Can chain into air↓Z.
  • ~68.92

air↓Z
Dive straight down.
  • ~49.25, ~105.73 (154.98)
5-22: Kallia (skills)
MP1 skills

Consecutive Smash (esmagamento consecutivo)
Type 1: forward combo where you are.

Position: last hit knocks down a distance forward.
  • ~97.3 x4 and ~122.2 x1 (511.4) [17.63]

    • PvP
      102 x4 and 129 (537)

Type 2: the only difference is that you can press Z to spend more MP to continue dealing hits up to twice for 3 bars, dealing standard damage for the MP cost like a bonus MP3 in your set, but it still has short range.
  • ~97.3 x4 and ~122.2 x1 (511.4) [17.6]
    Twice: ~97.3 x4, ~118.0 x4 and ~256.6 x1 (1117.8) [19.2]
    Thrice: ~97.3 x4, ~118.0 x4, ~128.5 x4 and ~415.5 x1 (1790.7) [20.5]

    • PvP
      force-standing 102 x4 and blowaway 129 (537)
      Twice: 102 x4, 102 x4 and 129 (945)
      Thrice: 102 x4, 102 x4, 102 x4 and 129 (1353)

Flame Fist (punho flamejante)
Type 1: conveniently long dash attack forward that still does full hits at around 70% of the distance and most of the damage is in the last hit anyway.

Position: knocks down a distance forward.
  • ~26.6 x4 and ~381.4 x1 (487.8) [16.8]

    • PvP
      38 x4 and 360 (512)

Type 2: single strike forward standing still. Does a small launch that can set up aerial for 1-hit MP3s (the next skill also does this).
  • ~461.4 [15.9]

    • PvP
      launch 485

Scorching Fist (punho ardente)
Type 1: hits a decent distance to both sides. Launches high and can set up for aerialing 1-hit MP3s.
Does double hits inside raid bosses.

Position: launches high/knocks down in place.
  • ~68.7 x4 and ~147.8 x1 (422.6) [14.5]
    Hitting with both sides: 845.2 [29.1]

    • PvP
      launch 70 x4 and 130 (410)

Type 2: the only difference is that its direct damage is slightly lowered and it puts a short DoT that's stronger the loss. Generally a stronger upgrade but could be slightly weaker if you were repeating this skill inside a raid boss.
  • ~61.1 x4 and ~144.7 x1 (389.1), DoT ~11.5 x17 (total 584.6) [20.1]
    Hitting with both sides: 778.2 [26.8], DoT + 195.5

    • PvP
      launch 64 x4 and 114, 18 x17 (676)


MP2 skills

Mass Explosion (explosão em massa)
Type 1: AoE that hits a long distance to both sides.
Double hits inside raid bosses.

Position: small launch at the end, knocks down in place.
  • ~124.6 x5, ~127.8 x2, ~195.7 x1 (1074.3) [17.0]
    Hitting with both sides: x10, x4, x1 (1952.9) [30.9]

    • PvP
      84 x5, 90 x2, 121 x1 (721)

Type 2: the only difference is that its direct damage is slightly lowered but from the beginning it applies -5% DEF for 7sec (a monster with 95% DEF takes a multiplicative +5.26% damage from every player). In solo play can be roughly equal in the end but is an upgrade in party play.
  • ~114.6 x5, ~117.6 x2, ~180.1 x1 (988.3) [15.6]
    But counting DEF debuff from the first hit would be 1034.2 [16.4]
    Hitting with both sides (counting DEF debuff): 1878.9 [29.8]

    • PvP
      -2.5%DEF.
      Counting DEF debuff: 79 x1, 82 x4, 85 x2, 137 x1 (714)

Blasting Sprint (investida explosiva)
Type 1: bad. Runs forward or to any side you press, will deal a total of 5 hits while passing through monsters then ends with a bigger hit. Even if you keep running back and forth in place to put all hits on the same enemy it only deals average skill damage to that place with tiny AoE, and splitting to a larger area will do much less damage per target.

Position: keeps in place, last hit launches/knocks down in place.
  • ~112.0 x5 (560), ~223.7 x3 (671.1) (total 1231.1) [19.5]

    • PvP
      Passes through enemies, so you must keep tracing them.
      84 x5, 209 x3 (1047)

Type 2: less direct damage, leaves a flame carpet. Even placing all flames in the same spot barely gets a damage boost over type 1, but the flames hitstunlock non-armored monsters for around 2 seconds after it finishes and re-stands after the launch to make it easier to groundZZ them.
  • ~100.8 x5 (504), ~223.7 x3 (671.1), all flames in the same place max ~3.55 x26 (total 1267.4)

    • PvP
      75 x5, 190 x3 (945), flame carpet 3s but can barely hit because you launch them off it

Point Buster (impacto preciso)
Without freezing time will do a slow punch a distance forward. If it hits, does another hit.

Position: knocks down forward.
  • ~75.1, ~1033.6 (1108.7) [17.5]

    • PvP
      108, 974 (1082)

Charge Buster (carga explosiva)
Simply does multiple AoEs forward on the area of the successful hit.
Can press Z to spend one more bar (0.9 each) to repeat the first part, up to 3 times, being a skill that can spend up to 5 bars for average skill damage like a having bonus high-cost skill.

Position: knocks down forward.
  • ~272.7 x3, ~350.6 x1 (1168.7) [18.5]
    2.8 bars: 272.7 x6, 350.6 (1986.8) [22.0]
    3.7 bars: 272.7 x9, 350.6 (2804.9) [22.7]
    4.6 bars: 272.7 x12, 350.6 (3623) [23.6]

    • PvP
      219 x3, 331 (988)
      2.8 bars: 219 x6, 331 (1645)
      3.7 bars: 219 x9, 331 (2302)
5-22: Kallia (skills part2)
MP3 skills

Ultimate Smite (golpe absoluto)
Type 1: rectangle AoE far forward reaching 1 floor up. Good AoE.
On light monsters can do aerial for +50% damage if you launch with an MP1 first.

Position: knocks down slightly to the side.
  • 1774.9 x1 [18.4]
    Aerial 2662.3 [27.7]

    • PvP
      launch 1550

Type 2: becomes a wave reaching overall the same area but over 4 hits going forward.
Slightly stronger than average if with 4 hits (but not as strong as the last 3-bar skill here). Must start close for full hits, light monsters will be knocked back for full hits but super armor enemies will take less, average bosses take 3 hits and some can take 4.

Position: knockdown far.
  • 609.4 x4 (2437.6) [25.3]
    If only x3 1828.2 [19.0]

    • PvP
      455 x4 (1820)

Meteor Strike (impulso meteoro)
Type 1: the only purpose of this skill is to use when there are 3 monsters in the same place.
Puts a splashing AoE on up to 3 enemies inside your screen targeting the closest ones.

Position: knocks down in place.
  • Singletarget ~208.6 x3, ~329.7 x1 (955.5) [09.9] on up to 3 separate enemies
    2-3 enemies together: 1911-2866 [19.9-29.8]

    • PvP
      134 x3, 207 x1 (609) on up to 3 separate enemies
      2-3 enemies together: 1218-1827

Type 2: does a melee hit an extremely short distance from you, which results in a weak earthquake hitting all enemies within 3 screens away.
If used as a melee skill against a boss is nearly average damage for an MP3.

Position: launches/knocks down in place.
  • melee ~1227.2 x1, earthquake ~525.9 x1 (total on same target 1753.1) [18.2]

    • PvP
      earthquake 1560, no melee hit

Extreme Blast (estouro extremo)
Type 1: summons projectiles from far below you quickly advancing all the way up. May splash some damage from 3 platforms up or down.
Damage depends on size, can do some less on small enemies but more on bosses.

Rise-stuns monsters pulling them closer to center, will leave them standing up.
  • ~61.2 xN
    Normal enemy ~24 hits (1468) [15.3]
    Tall monster ~32 (1958) [20.4]
    Average boss ~40 (2448) [25.5]
    Berkas ~80 (4896) [51.0]

    • PvP
      49 xN (around 1600)

Type 2: the projectiles are weaker but explode at the end. Always better damage (unless they leave the area before it explodes).

Position: the end launches/knocks down in place.
  • ~18.8 xN and ~41.4 xN, ~248.2 xN
    Normal enemy around 16-25 hits then explosion 3-4 hits (1226-1734) [12.7-18.0]
    Average boss around 47 hits then explosion 7 hits (3140.8) [32.7]
    Berkas around 104 hits then explosion 14 hits (6605.2) [68.8]

    • PvP
      72 xN and 25 xN, 200 xN (around 1500, less)


MP4 skills

Volcanic Eruption (erupção volcânica)
Hits a short distance left and right with infinite range up and down. Also does some damage to all enemies in the stage within 5 screens from you. Does not do high damage.
The close hit launches light monsters for aerial bonus.
  • close 109.1 x14 (1527.4), stage ~85.3 x7 (597.1), both close 2124.5 [16.3]
    Aerial 3132.2 [24.0]

Awakening
Will do a far dash straight forward hitting your floor and up to 2 above.
Can be cast midair.
  • ~578.94 x2, ~110.27 up to x18 but probably x13 even on big boss (3142.74/2591.39) [24.17/19.93]

H
Hits basically the entire screen.
Also gives you ATK +15% and Super Armor for 20sec after it finishes.
  • ~207.80 x7, ~93.35 x7, ~969.73 x1, ~435.68 x1, 101.01 x8, 45.38 x8 (4684.58) [36.03 if it cost as much as MP4]
5-23: Uno
In PvE Uno is the combo king. You can combo between Z and X attacks. If they're normal enemies without super armor then you've already won, just repeat XZZZ over and over (from 328 to 428 DPS depending on bleeding). Or on monsters immune to knockback you can get more damage/MP by doing XXZZZDouble, XXX, repeat (around 650 DPS which is very high).
ZZZ: ~159.6 / ~109.2 + ~122.7 / ~186.5
Critical: ~121.0 + ~89.0 (210), or Double: ~85.7 x2 + ~154.6 x1 (326)

XXX: ~164.7 / ~201.7
XXX 3rd hit (V1): ~126.0 + ~152.9 (278.9)
XXX 3rd hit (V2): ~403.4
XXX Double: almost no damage, but gives around 3.8% HP per enemy hit (max 3 enemies), reaches 1 floor up and down

XX↓: ~36.14 x20 (722.8)


Uno's X attacks will start a Wound on the enemy. An applied Wound causes a DoT, and the Wound can level up by hitting them further with any attacks (but skills apparently raise it slower than normal attacks), and Uno's XXX command will end the Wound to cause instant damage relative to the level of the Wound (or 2nd job's XX↑ hit will heal you from them).
From what I can see Wounds last around 6.5 seconds with around 19 hits. You hitting them with any attack renews the timer but if a Wound wears off it is removed regardless of level and has to be started from LV1 again.
  • Start Wound: LV1 Wound, 11.75dmg per tick or +35 DPS or total 223.25 (XXX: removes for instant 167.99)
  • Start Wound + 2 normal attacks: LV2 Wound, 16.79dmg per tick or +50 DPS or total 319.01 (XXX: removes for instant 335.99)
  • Start Wound + 5 normal attacks: LV3 Wound, 23.51dmg per tick or +70 DPS or total 446.69 (XXX: removes for instant 503.99)
  • Start Wound + 7 normal attacks: LV4 Wound, 33.59dmg per tick or +100 DPS or total 638.21 (XXX: removes for instant 671.99)

    • PvP
      In PvP you can infinite combo ZZZXZZZ until autobreak.
      LV1 Wound: 8 x18 (144) (XXX: removes for 99)
      LV2 Wound: 11 x18 (198) (XXX: removes for 150)
      LV3 Wound: 16 x18 (288) (XXX: removes for 199)
      LV4 Wound: 22 x18 (396) (XXX: removes for 298)

Skill Tree Style
Uno has exactly enough points to learn everything.


MP1 skills

All of Uno's skills will show an icon above your head near the end of the animation, press Z at roughly this time to do the Just Frame correctly and execute the second part of the skill.

Mysterious Wind (ventania furiosa)
Forward combo. If you do JF you roll forward.
Monsters may walk through you at the very beginning.

Position: last hit knocks down close. JF slightly bounces them closer to where they were (may aerial from this).
  • ~115.94, ~123.05, ~126.87 x2, ~128.51 (621.24) [21.4]
    JF: ~133.98 (total 755.22) [26.0]

    • PvP
      Makes a standing reset in front of you if you don't JF.
      force-standing 101, 101, 106 x2, 121 (535)
      JF: launch/knockdown 110 (645)

Decapitate Soul (decapitar alma)
Single forward hit, JF does another that also reaches 1 floor up.
Invincibility time is very short. And will make the noise and effect for a skill but won't timefreeze nearby enemies at all.

Position: float-stuns a bit back. JF: knocks down forward.
  • ~410.16 [14.1]
    JF: ~273.44 (total 683.6) [23.5]

    • PvP
      Without the JF that knocks down, makes a standing reset that's plus, if not doing the JF can combo into groundZ except against fast-recovery jobs.
      force-standing 432
      JF: float/knockdown 136 (568)

Crimson Blood (sangue escarlate)
Long AoE forward and starts hitting from behind you in case the monster walks through you. Always rolls you forward. Will either debuff DEF or heal you depending on type.

Position: stagger (sets up into back combo easily). JF: knocks down in place (turns them around to you).

Type 1
Targets take -5%DEF for 5sec (-10% if JF).
  • ~503.14 [17.34]
    JF: ~82.03 (total 585.17) [20.1]

    • PvP
      force-standing 432
      JF: launch 128 (560)

Type 2
On JF only, heals 7.5% HP for each enemy hit.
  • ~481.26 [16.59]
    JF: ~82.03 (total 563.29) [19.4]

    • PvP
      force-standing 432
      JF: launch 125 (557)

Bloody Scent (odor sangrento)

Type 1
Pretty long AoE forward.
Reliable MP1 option with no weaknesses.
Can start a Wound like an X attack.

Position: float-stun. JF: knocks down forward.
  • ~244.46 x2 (488.92) [16.8]
    JF: ~56.32 x4 (total 674.2) [23.2]

    • PvP
      160 x2 (320)
      JF: 46 x4 (504)

Type 2
Decent-range AoE forward reaching 1 floor up.
May move you forward and jump over a close enemy during the animation.
Can start a Wound like an X attack.

Position: float-stun. JF: knocks down forward.
  • ~250.96 x2 (501.92) [17.3]
    JF: ~66.93 x2 and 79.02 x1 (total 714.8) [24.6]

    • PvP
      force-standing 161 x2 (322)
      JF: knockdown 64 x3 (514)


MP2 skills
Wind Lightning (tormenta relâmpago)
Short AoE forward reaching 1 floor up. JF steps forward and hits left and right on your own floor blowing away.

Position: float-stun. JF: blows away to the side.
  • ~590.64 x2 (1181.28) [18.7]
    JF: ~273.44 (total 1454.72) [23.0]

    • PvP
      492, 595 (1087)
      JF: 204 (1291)

Scales of Light (escamas brilhantes)
Long AoE forward. Will roll forward except if you JF which comes back.

Position: float-stun. JF: knocks down in place.
  • ~357.12, 383.91, 411.80 (1152.83) [18.2]
    JF: ~355.47 (total 1508.3) [23.9]

    • PvP
      force-standing 328 x3 (984)
      JF: float/knockdown 206 (1190)

Demonic Blood (sangue demoníaco)

Type 1
Single hit to your sides reaching 1 floor up. Never knocks away.

Position: leaves standing. JF: knocks down in place.
  • ~1066.43 [16.9]
    JF: ~169.53 x2 (total 1405.49) [22.3]

    • PvP
      force-standing 817
      JF: float/knockdown 173 x2 (1163)

Type 2
Makes the same initial hit, but also with a small AoE on your spot and 2 left and 2 right, usually hitting all normal enemies in range with 2 at once, or more against very large enemies. JF is just the AoEs hitting again.
  • ~1066.43, 41.01 x2-5 (1148-1271) [18.2-20.1]
    JF: ~202.89 x2-5 (total 1554-2285) [24.6-36.2]

    • PvP
      671, 54 x2 (779)
      JF: float/knockdown 198 x2 (1175)

Half Moon (meia-lua)

Type 1
Shoots a slow wave forward but damage is high and reliable. Less hits if used at the end of the range.
Must be cast from a minimum distance, at the beginning you step forward and it will pass through enemies next to you.

Position: pushes them along the range then last hit knocks down farther.
  • ~123.05 x9, 216.02 (1323.47) [21.0]
    JF: ~86,40 x5, 151.48 (total 1906.95) [30.26]
    • Normal enemies: drags along well for max hits
    • Raid boss: max hits
    • Average boss: around 3 less hits or -300ish
    • Super armor small enemy: around 8 hits/half

      • PvP
        Always drags them perfectly with it for full hits.
        force-standing 65 x9, launch 195 (780)
        JF: another similar wave, damage total is around 1400

Type 2
Alternate version where JF teleports you some space ahead exploding the projectile early, ready to combo.
Wave is faster but hits are less reliable.

Position: pushes along far. JF: moves in and stops them in their tracks.
  • ~109.37 x10, 546.89 (1640.59) [26.0]
    JF: ~82.03 and ~109.37 (total 1831.99) [29.07]
    • Normal enemies: wave misses 2-4 hits (total 1394-1613)
    • Average boss: wave misses 2 hits (1613)
    • Raid boss: full hits

      • PvP
        Does not push them enough for full hits anymore.
        force-standing 75 xN, launch 241 (991-)
        JF: nothing extra
5-23: Uno (part2)
MP3 skills
Wrathful Wind (ventania furiosa)
Wave forward reaching 1 floor up. As a wave attack hit count would be sensitive but deals average damage to normal enemies and bonus damage to most bosses (but for raids specifically, Bloody Rain 1 is even stronger).

Position: pushes a lot. JF: knocks down in their place.
  • ~210.55 xN
    JF: ~372.98 x1
    • Normal enemy: 6-8 wave hits (JF total 1636.28-2057.38) [17.0-21.4]
    • Average/raid boss: 12 wave hits (JF total 2899.58) [30.2]

      • PvP
        182 x7? (1274)
        JF: launch 329

Spark of Light (faísca brilhante)
Beam forward. Almost infinite range, around 3 or 4 screens away.

Position: stagger. JF: knocks down forward.
  • ~1368.81 [14.2]
    JF: ~882.13 (total 2250.94) [23.4]

    • PvP
      Without the JF, makes a standing reset but you can't combo after.
      force-standing 1487
      JF: launch 431 (1918)

Bloody Sky (céu sangrento)

Type 1
AoE hitting to both sides reaching 2 floors up.
Can be used midair (reaching 1 floor up and 1 floor down).

Position: float-stun, slight pull. JF: knocks down to the side.
  • ~411.26 x5 (2056.3) [21.4]
    JF: ~246.10 (total 2302.4) [23.9]

    • PvP
      Makes a standing reset possibly close enough to grab after.
      317 x5 (1585)

Type 2
Hits all enemies in the stage (reaches around 3 or 4 screens away from you to every direction), will do halved damage if you miss the JF.
The initial hits will start a Wound on enemies, and do enough hits by itself to raise the Wound to LV3. If you do the JF it will end the Wound like XXX, also making this an easier and safer way of ending Wounds.

Position: no hitstun at all. JF: knocks down in place.
  • ~68.90 x10, 122.23 x1 (811.23) [08.4]
    JF: ~218.75, plus LV3 Wound end 503.99 (total 1533.97) [15.9]

    • PvP
      63 x10 without hitstun, 23 x1 without hitstun (653)
      JF: 247, plus LV3 Wound end 199 (1099)

Bloody Rain (chuva sangrenta)

Clearly above average.

Type 1
AoE hitting to both sides almost to the edge of the screen, reaching 2 floors up. Never knocks away.
The big AoE hits 19 times reliably but there's a secondary part that may or may not hit which deals more hits the bigger the monster is.

Position: stays standing. JF: knocks down in place.
  • ~107.73 x19, ~46.48 xN
    JF: ~175.00 (2221.87 [23.1] plus secondary hits)
    • Normal enemies: + around 6 secondary hits (2500.75) [26.0]
    • Average boss: + around 19 secondary hits (3104.99) [32.3]
    • Raid boss: + around 41 secondary hits (4127.55) [42.9]

      • PvP
        56 x19, 39 xN (damage is around 1700)

Type 2
Changes AoE to only farther forward reaching 3 floors up and damage is generally lower too...

Position: stays standing. JF: knocks down in place.
  • ~109.37 x12, ~55.78 xN
    JF: ~317.19
    • Normal enemy: + around 12 secondary hits (1981.8) [20.6]
    • Average boss: + around 29 secondary hits (2930.06) [30.5]
    • Raid boss: + around 36 secondary hits (3320.52) [34.5]

      • PvP
        66 x12, 35 xN (damage is around 1800)


MP4 skill

Eradication
Hits all enemies at around screen size.
  • ~164.72 x10, ~132.07 x8, ~59.06 x3, ~270.71 x1 (3151.65) [24.2]

Awakening
AoE forward stretching 2 floors up. Has a part that deals up to 6 hits depending on enemy size.
  • 2188.45 x1, 98.19 x1, 98.19 x6 (2875.78)
    JF: replaces second and third part with 245.49 (3906.88) [30.05]

H
Hits basically the entire screen, but does less damage than average for an H.
Also gives you ATK +15% and Super Armor for 20sec after it finishes.
  • 200.02 x3, 112.89 x3, 150.01 x10, 84.66 x10, 127.51 x1, 71.96 x1 (3484.9) [26.80 if it cost as much as MP4]
GCC Major New Updates History
16/11/2022
Story dungeon Another World 1-1 Siege of Teroka. The story in this world is based on events from the mobile game which only released after the shutdown of the old servers.

18/01/2023
Character Decanee.

22/03/2023
Story dungeon Another World 1-2 Temple of Time. (4 months after previous story dungeon)

05/07/2023
Character Ai. (6 months after previous character)

16/08/2023
Raid hero dungeon Void Invasion.

29/11/2023
Raid hero dungeon Void Taint.

31/01/2024
Character Kallia. (6 months after previous character)

08/05/2024
Story dungeon Another World 1-3 Great Explosion of Kounat. (14 months after previous story dungeon)

24/07/2024
Added minor hero dungeon Infinity Cloister. (due to story had to release after Great Explosion of Kounat, also after Kallia and also features Ai as an enemy in one room)

14/08/2024
Character Uno which is from the old server but also added a new class for Uno. This is the first new class for an old character since GCC. (character added 7 months after previous character)

07/01/2025
Added hero dungeon Abyssal Path and added some new awakenings every update from here on out.
GCC Update History
Grand Chase Classic has a main update every 3 weeks, commonly cycling minor temporary events such as login incentives and limited-time drops/crafts which will not be listed here (there always is at least one temporary event active at any moment).

Old Grand Chase
  • Servers originally closed around 2015, with the korean servers shutting down last in January 1 2016. The mobile sequel Grand Chase Dimensional Chaser (GCDC or GC mobile) was officially announced in February 2016 and had been in development for a long time.
  • At the time of closing, the game had 20 characters and was on Season 5.
  • Allegedly, there were plans for Lime's 3rd job and Edel's 3rd job and Veigas's 2nd job which were cancelled. Obviously without counting Asin, them and Uno are the only characters to not have had 4 jobs.

14-21/07/2021
  • Re-releasing rebranded as "Grand Chase Classic" from now on.
  • Closed Beta test. Had only the first 3 characters available with 3 character slots total and only 5 worlds out of 7, 3 hero dungeons out of 6, certain smaller features missing.
  • Has UI changes compared to the old game (updated corner menu features and removed shop/crafting inside world maps to better place in the corner menu instead, reworked inventory screen and shop screens) but no other visual changes to the game.
  • Balance changes (all found by play without any official mention):
    • For present and future characters, skill damage is largely refitted to one standard of MP cost to singletarget damage ratio (more extremely nerfing 4-bar skills and certain boss killer skills). Pet damage and pet MP recovery are also severely nerfed. Certain MP-related skill tree abilities also nerfed or removed from the game. Alongside monster HP changes, this makes the game harder, but also more balanced in a way as enemies and bosses now are forced to last an expectable amount of time instead of cheaping them out with single button presses.
    • Certain roll abilities from characters outright removed from the game alongside the universal Alt roll no longer being obtainable.
    • Many monsters across all old worlds were also nerfed by removing some of their attacks, commonly removing many attacks that had too short of a tell before the strike or certain bigger special attacks, making the leveling dungeons simpler to finish (some of these removed attacks were added into Harrier dungeon enemies later). But monster damage was changed and often increased. Potion cooldown was reduced from 10 seconds to 5 seconds.
    • Normal attack damage and other abillities apparently unchanged (so far).
    • Other changes to pets: pets no longer need a special effect to recover AP compared to MP, pet attacks are infinite uses (eventually had the in-match uses icon removed) and are automatically obtained when equipping the pet.
  • Items available in hero shop are a smaller list than before. Also, initially it was selling the hero potions but they were silently removed at some point in the upcoming months as an unlisted change, sometime before Dio.

28/07/2021
  • Full release that did not keep beta account progress.
  • Returned character #4 Lass (4th character slot automatically unlocked to every account. In the original Season 5 system, character slots past the default amount had to be unlocked with an item but in this release they were being automatically added along with every returned character)

18/08/2021
  • Returned world #6 of 7, and character #5 Ryan.
  • Visually updated monster textures on worlds 1, 2, and 4.

08/09/2021
  • Returned world #7 of 7, and character #6 Ronan.
  • Visually updated monster textures on worlds 3 and 5.

29/09/2021
  • Returned Harkion hero dungeon, and character #7 Amy.
  • Visually updated monster textures for world 5, hero dungeon Crucible&Sanctum, and hero dungeon King Slime.

20/10/2021
  • Returned Berkas's Lair hero dungeon, and character #8 Jin.
  • Returned GP shop and certain guild functions.
  • Berkas's Lair had been changed to be available daily instead of weekly, reducing the time needed to get the full max-level set.

10/11/2021
  • Returned Tower of Disappearance hero dungeon (last old stage missing), and character #9 Sieghart.

01/12/2021
  • Returned character #10 Mari.
  • Visually updated certain gear sets especially job sets hair? (unlisted)

22/12/2021
  • Returned character #11 Dio.
  • Big roster-wide PvE damage rebalance patch mostly affecting non-skill damage.
    This was mostly a minor or moderate nerf to many many things (especially to Jin or Nephilim normal attack damage), but also buffed almost every groundZ combo in the game and their Critical/Double (with some Doubles now being stronger than the Critical) and significantly buffed a few others like Elesis3 air↑Z.
    Re-implemented Elesis's allclass roll which had been silently cut in GCC with much criticism.

Unlisted patch, 07/01/2022: updated letter font visuals, fixed some old dialog text formatting errors at least on PT translation.

12/01/2022
  • Returned character #12 Zero.
  • Updated the 3 basic hero dungeons to stop costing entries on loss/leave, at the downside of not giving awards on loss. A bigger rework to hero dungeons comes later.
  • Added a red alert function to private message system.
  • There were unlisted monster graphics changes.

26/01/2022
  • Returned character #13 Ley.
  • Added brand-new temporary event dungeon Gorgos Queen, available for 3 weeks.
  • By an error, until next patch the Crucible and Sanctum of Destruction had a selectable hard mode difficulty. Attempting to use that would not make the match begin.

16/02/2022
  • Returned character #14 Rufus.
  • Updated item tooltips to include buy and sell prices.

10/03/2022
  • Returned character #15 Rin.
  • Added new Chase Level system along with raising EXP/GP rewards from hero dungeons to be suitable for that.
  • Smaller PvE rebalance, mostly making some 4th skills less weak than currently (had been so much weaker than oldly but still not comparable).

30/03/2022
  • Returned character #16 Asin.

20/04/2022
  • Returned character #17 Lime.
  • Added a Daily/Weekly Quest system along with the ability to buy the job costumes with these rewards. Also visually updated some of them, particularly hair models.
  • Reworked hero dungeons, allowing Wizard's Labyrinth to change floors without leaving the room and allowing entries of hero dungeons past daily limit with nulled gain (mostly to help a friend win when your character already hit the daily maximum), also adding an exclusive drop to them and the daily quests for a new type of chest. This new drop is a new type of drop which can be picked up by all players in the room individually, rather than be split between the party. The noise it makes upon appearing is unique.
  • Reworked Tower of Disappearance to share drops to all players with this new system.

11/05/2022
  • Returned character #18 Edel.
  • Rebalanced many leveling dungeons to make them easier, especially Thanatos stage and Barakhufu boss fight.
  • Added option to separately choose game text language and voice language.
  • Gorgos Queen temporarily available again (stage is slightly longer, dialog is different).

2 weeks before next main update: news post teaser showing a completely new world. Another teaser in the next week with outlines of new enemies, with the tagline "are you ready to fight against plunder?"
GCC Update History (2)
02/06/2022
  • Instead of returning the next character, added World Harrier, initially with only 4 stages available out of 12, and introducing the Taint Resistance mechanic (at this point called Harrier Resistance until adding Siege of Teroka as another stage that has it). Reception to Harrier stages continued to be pretty negative as every Harrier enemy save for only certain bosses is a reskin of an old enemy with attacks slightly modified to be more powerful, with reused BGs, with the stages being too hard to do before endgame stats.
  • Also introduced the new rune system, primarily gotten from worlds after Archimedia.
  • Big PvE balance patch #2. The previous balance patch primarily affected attack damage and this one primarily affected status-related abilities and cooldowns of abilities (this was mostly nerfs, but buffed the PvE dodge cooldowns that had been extended to higher than 5sec for GCC). Also nerfed attack damage for abilities that deal multiplied damage per enemy stacked in the same place, which had evaded the initial damage rebalance as they did do normal damage if compared to only one target.
  • Added an inventory search by name function.
  • Changed font for EXP bar (6 weeks after Chase Level was added).

22/06/2022
  • Returned character #19 Veigas.

1 week before next main update: teased for another section of Harrier.
The only old character missing now is Uno, but Uno would not come. Every official news post from then on would be questioned about Uno as KOG had never released any roadmap and keeps completely silent outside of their maintenance update news.

13/07/2022
  • Added the next 4 Harrier dungeons, now with 2/3 of the area.
  • 1-year anniversary, included event to craft Princeon/Frixion pet and visual set (originally this was another paid gacha set).

2 weeks before next main update: teaser said to be a PvP update.

03/08/2022
  • Only PvP changes.
    • Complete damage rebalance for PvP. Many moves were moved up or down, in great part toning down long-range jobs.
    • Many traditional rolls given or extended cooldowns, others having only hyper armor instead of invincibility.
    • All skill damage severely lowered in PvP.
    • Added the "combo Down gauge" system, where normal attack damage raises an invisible stun gauge that if filled to maximum (by doing around 40% HP worth of damage) will cause a Combo Down, forcibly knocking down the person mid-combo as if they did an instant Counter manabreak without costing MP. Gauge instantly resets to 0 from any knockdown dealt, and lowers if hit by skills instead of raising.
    • Automatic stat scaling was reworked to different values (now using nearly doubled HP from before, silently nerfing the value of HP Regeneration as regeneration is a set value instead of a percentage). Practice mode directly uses these same stats.

24/08/2022
  • Added the last dungeons of Harrier, revealing Kazeaze's relation to it.

14/09/2022
  • Balance/behavior changes to many leveling dungeon enemies, including certain changes for their boss counterparts in Wizard's Labyrinth and Angry Bosses.
  • Further reworked hero dungeons. Broadened opening hours (Crucible/Sanctum/Labyrinth are permanently open, Berkas's Lair is 00-30 and Tower of Disappearance is 30-59), and greatly nerfed the monster stats in Crucible&Sanctum to make them more appropriate for their lower level entry range and made their bosses not use player-transformation debuffs when only one player is alive (I presumed this means that they futurely will re-add this difficulty as an optional higher difficulty; during Ley patch these two dungeons already mistakenly had a hard difficulty selectable that did nothing if opened).
  • Had a temporary event giving bonus rewards for leveling up characters, with step-by-step rewards for reaching a certain amount of TotalATK up to 100k, separate by character to be received per high-level character. This leveling event already being done may be taken as a hint that the missing character Uno was decided to not appear.
  • Updated UI for dungeon end screen. Updated sizes for quest list and world map quest icon.

04/10/2022
  • Completely new gacha seal breaker visual set, being advertised as Season 6, being the first ever mention of a Season 6 for the game.
  • Gorgos Queen temporary event now with hard mode having Taint Debuff plus dropping a monster card that includes Taint Resistance (this monster card drop came as shared to all players, like the hero dungeon change).

25/10/2022
  • Halloween seasonal event, no new content except another completely new Season 6 gacha, these continued to appear often.
  • Around October 27 in a maintenance patch, added a heavily-critized chat sensor. This censors many words into asterisks even if separated by a space, making english alphabet speech commonly break half of the time. It supposedly uses a full list of bad words from every old GC server to censor bad words from several languages at once and even the number "18" is considered a bad word. This censor was done shortly before officially connecting the servers to a new access demographic from korean Nexon (this included a promotion to have a temporary level-scaled item set and a pet when playing on internet cafes).

1 week before next main update: teased a "new dungeon" apparently of an entire new world.

16/11/2022
  • Added new worlds accessible after Archimedia separate to Harrier, now with only their first world and dungeon, Siege of Teroka (which already was a story point in Dimensional Chaser), with other to-be-added locations visible. This is commonly seen as the first truly new content since the game closed. Uno is still missing as the comments in the news posts will clarify.
  • Added a new weekly event quest system resetting every wednesday, this time tied to this new dungeon but then got used regularly for other things.
  • Updated the dismantling function, minor UI update to certain confirm/etc buttons and mail buttons.
  • For some reason, broke the texture for the "F4 for Controls" button in the corner of the screen until the next main patch.

1 week after this had unlisted changes in Siege of Teroka's drops: both monster cards and equipment drops were made to be shared between players instead of split (presumably this is where they also changed Harrier cards to be shared too).
But this also came with a nerf to farming Siege of Teroka past the 3 daily runs: earring fragments now drop exactly 1 per run before the limit (instead of being a normal random drop across the stage regardless of limit), and random equipment drops although shared are dropped for completely random characters with only the in-limit clear reward being for your character.

07/12/2022
  • No new content.
  • Added new gacha Star Guardian set which is a set brought from Dimensional Chaser.
  • Updated mail functionality and mail UI again.
  • Made pet attacks not take up inventory slots anymore.
GCC Update History (3)
28/12/2022
  • New temporary event dungeon, Illusions of Memory, plays like a much smaller and easier Tower of Disappearance, rewards similar to the older temporary event dungeon Queen Gorgos.
    The story is from Decanee's point of view, who has a character model and portrait stylized in proportion more like a playable character than a boss character, which was noted by some players.
  • Added a code coupon system. This much was mentioned in the patch notes but no codes apparently were given yet.

Just 2 days after the patch, had a news post celebrating a new year in service, but at the same time had another post suddenly teasing what apparently is Decane's blackened outline for a new playable character as used to be done years ago for teasing a new character release, while GCDC simultaneously did an outline teaser for Decanee as a new character as well.
Later would announce an event, players could register an email to receive a code that could be redeemed after the release to get the Princeon set and pet for Decanee. A trailer was also made shortly after (featuring voice clips but still no gameplay footage yet).

18/01/2023
  • Added new character Decanee with a free 20th character slot (first new character or class since the game originally closed). Did make a gameplay trailer for the character after the patch went live. The character temporarily has the event growth missions that were shortly available for other characters earlier.
  • Updated the character select screen to be able to change their order freely.
  • Daily login rewards for these next few weeks include a new item, the event seal breaker scroll, which is the same as the normal buyable gacha set coupon scroll except it is deleted between updates if not spent yet.
  • Added a new gacha set Royal Order which is based on one of the costumes of Kanavan from GCDC.
  • Unlisted:
    • Enemies and bosses have lowered HP from Xenia to Archimedia to level up faster. Some of their damage may have been increased to compensate.
    • After killing a boss, the player speeds up during the slow-mo and isn't stopped from dropping from platforms during that time to pick up loot easier.
    • Items you're too underleveled to equip now have the required level in the corner of their icon.
    • Either here or earlier, made event dungeons be all open on Saturday+Sunday instead of only Saturday.
    • Re-wrote certain item text descriptions. Refine-related scrolls specify details more consistently and the VP item prop reset scroll now says CASH items in its name and description.
      • Portuguese translation: improved localized name of equipment "set" (from pacote _ to conjunto _), changed the portuguese version name of Iron Dragon/True Iron Dragon items to the direct translation (previously always was a different localization that took less characters to spell).

08/02/2023
  • No new content.
  • Added item lock function to inventory.
  • Improved text font, some UI button graphics, re-did the options menu layout.
  • Skipping the starting dialogue with X will now skip the character's intro animation too to control faster.
  • Fixed some visual bugs related to Decanee.

28/02/2023
  • Returned the saving Alt dodge.
  • Buffed AP character base MP recovery (Zero and Veigas were lower, but all 5 were raised even higher to the same amount).


One week before the next update, showed a preview of the update and two announcements: opening an official discord server for the game, and opening a survey for one week about character balance adjustments feedback to be made later.
22/03/2023
  • New stage Temple of Time.
  • Reworked seal breaker gacha system.
  • Made fused coordis able to be defused.
  • Added a button in-game to send to the official discord server.

(list discontinued)
Outro
Special thanks:
-Zerfirum/Duque and Binary, of the spreadsheet (technical information help)
-Nestor (move-by-move damage checking, in-depth testing, MP/effect counting)
61 Comments
Tiomasta  [author] 13 May @ 6:29am 
I haven't considered making a website for it, I think I can handle it on my own. And I know of the google spreadsheet which has the damage for skills and such (an H is impossible to figure out without that)
法大法大法大法大 12 May @ 8:52pm 
had you ever consider to transfer it to a wiki website? maybe I can help?
Tiomasta  [author] 17 Apr @ 8:52am 
I just updated that part to include some of the extended post-first-item numbers.
I already re-posted on your thread to address it, too.
eev 17 Apr @ 8:51am 
Yeah, too bad my money went to the drain already
eev 17 Apr @ 8:46am 
Used this guide to go on my Seal Breaker and got tricked.
its FALSE that every 14 tries (28 scrolls) you get to 100% chance.
Spent over 70 scrolls to get into the 100% chance, which means above 35 tries until granted chance.
greatest diver 5 Mar @ 9:43pm 
holy, this is impressive
Tiomasta  [author] 30 Dec, 2024 @ 6:23am 
Max scrolls per pity cycle total count, it's 2 scrolls per try and and it takes 15 tries/30 scrolls for pity to get one piece in case you haven't randomly gotten it yet
Rahnark 27 Dec, 2024 @ 10:14am 
Regarding the gacha pet table. Does the second column means total max scroll or max scrolls per pity cycle? I was under the impression that it only took 15 rolls to pity max, but I just watched my friend roll 60+ scrolls with minuscule pity count.
Fallen Angel 18 Oct, 2024 @ 1:52pm 
I am surprised you still update this guide. Can't thank you enough.
Tong Apat. 13 Oct, 2024 @ 9:30am 
bery cool.