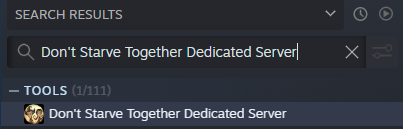
Don't Starve Together

Don't Starve Together

72 ratings
The Complete Guide to DST Dedicated Server
By Shepard󰀀
[Relevant in 2024] [For Windows OS] Guide to creating a dedicated server for DST with or without caves, mods. Preconfigured or manually created server(s), download a ready-made server, 64 bit servers, running one or more servers at the same time, changing server world settings, beta server, and other useful information.
This guide was created on OS Windows 10 (64 bit).
2
2
   
Award
Favorite
Favorited
Unfavorite
Introduction
Greetings! I am aware that there are quite a few similar guides in Steam, but this one contains all the information I know about creating a dedicated server for DST, namely:
  • Dedicated server creation: preconfigured or manually created server.
  • Adding caves to the server.
  • Installing mods on the server and their configuration.
  • Changing server world settings.
  • Running one or more servers at the same time.
  • New! Server start in 64 bit version.
  • And other useful information.
Also you can download a ready-made server and configure it according to your interest.

Advantages of a dedicated server compared to a regular server:
  • The ability to run the server without the need for the user to be on this server.
  • The ability to enter some commands through the server console without having to log into the server.
  • The ability to run more than one server at the same time on one machine.
  • A more optimized version of the server than a regular server.
Disadvantages of a dedicated server compared to a regular server:
  • A more complicated procedure for creating the world than through the Host Game.
  • A more complicated procedure for installing, enabling and configuring server mods.
  • A more complicated procedure for changing world generation settings.
Additionally:
If you have any questions, write about it in the comments to the guide, and I will try to answer them.
If you want to thank the author, then you can reward my guide or donate the skin of any item from the DST, which can be exchanged. In order for me to add you as a friend, and you have the opportunity to do so, you must let me know that you want to add you as a friend by posting a comment below this guide. Otherwise I won't know who you are and why you decided to submit the request, so the request may be rejected or ignored.
In case I took certain text from other sources, I added a link to the source from where I took this information.

Note: this guide may be updated frequently as new information is discovered or existing information is edited.

Also, if you like this guide, don't forget to rate and add to favorites so you can easily find it later!
I've tried to make it a useful and working guide.
The first steps

Downloading the Steam tool to start the server
In order for you to start running dedicated DST servers, you certainly need a tool that will do this.
  • First go to your Steam library and enable the checkbox in the Tools section.


  • Next, search for Don't Starve Together Dedicated Server and select this tool:


  • Downloading the tool.

To change file extensions
Note: I showed this on the example of Windows 10. If you have a different version of Windows, the way to enable file name extensions may be different. You can find these ways on the Internet.
  • Open the explorer and click on the View tab.


  • Check the box next to File Name Extensions.

After that you can start working with servers.

Additionally
For the convenience of editing .lua files, you can download the Notepad++ program from the official website. It contains syntax highlighting for the .lua language.
  • Syntax highlighting example:

Ready-made servers

Preconfigured DST server
  • Download the archive with ready-made server from this link: https://drive.google.com/file/d/132PkuxLE95Q0BzI_6azBOkc30cFuBKGh/view
  • Unpack the archive to the \Documents\Klei
  • Open DoNotStarveTogether_EasyConfigOverworld\Cluster_1
  • Create a token for cluster_token.txt following the instructions in the section below and open that file. Open cluster_token.txt file and paste your token instead of "Paste your cluster token instead of this text" and save the file.
  • Open the cluster.ini file. Configure it as you need and replace the lines "Paste your server name" and "Paste your server description" with your own. Save the file.
    * server.ini and worldgenoverride.lua in the Master folder are already configured and do not need to be changed. You can install mods and change world settings following the instructions in the sections below.
  • Copy cluster.ini and cluster_token.txt and go to \Documents\Klei\DoNotStarveTogether_EasyConfigCaves\Cluster_1
  • Paste the copied files.
  • Start the server by opening the launch_preconfigured_servers.bat file, located in \Don't Starve Together Dedicated Server\bin\scripts
  • Go to the Connecting to the server step.

A manually created server (surface and caves)
  • Download the archive with ready-made server from this link: https://drive.google.com/file/d/14KNwKh3wGHsvjxs1oixvfrx1d0FF_OUU/view
  • Unpack the Example_Server folder from the archive to \Documents\Klei\DoNotStarveTogether
  • Rename the Example_Server folder by replacing the name of this folder with the name of the server. For example My_Server.
  • Create a token for cluster_token.txt following the instructions in the section below and open that file. Open cluster_token.txt file and paste your token instead of "Paste your cluster token instead of this text" and save the file.
  • Open the cluster.ini file. Configure it as you need and replace the lines "Paste your server name" and "Paste your server description" with your own. Save the file.
    * server.ini and worldgenoverride.lua files in Master and Caves folders are already configured and do not need to be changed. You can install mods and change world settings following the instructions in the sections below.
  • Unpack the two .bat files from the archive to \Don't Starve Together Dedicated Server\bin
  • Select the .bat files > Right click > Edit

  • In files that will open:
    After the word title, specify the text that will be displayed in the name of the console of this shard. In my case, this is: Server name: Shard (Master or Caves)
    Replace the Example_Server line with the name of the folder you renamed in the \Documents\Klei\DoNotStarveTogether directory. This is the name of the main server folder. This line must be the same for both .bat files.
  • Save both files.
  • Rename both .bat files to your liking.
    Example:
    YourServerName_Master.bat - for surface.
    YourServerName_Caves.bat - for caves.
  • Start the server by opening these two .bat files.
  • Go to the Connecting to the server step.

A manually created server (only surface, without caves)
  • Download the archive with ready-made server from this link: https://drive.google.com/file/d/1JBtouWZ5nabRlL32TOp6GEPu-pOZBXHK/view
  • Unpack the Example_Server folder from the archive to \Documents\Klei\DoNotStarveTogether
  • Rename the Example_Server folder by replacing the name of this folder with the name of the server. For example My_Server.
  • Create a token for cluster_token.txt following the instructions in the section below and open that file. Open cluster_token.txt file and paste your token instead of "Paste your cluster token instead of this text" and save the file.
  • Open the cluster.ini file. Configure it as you need and replace the lines "Paste your server name" and "Paste your server description" with your own. Save the file.
    * server.ini and worldgenoverride.lua files in the Master folder are already configured and do not need to be changed. You can install mods and change world settings following the instructions in the sections below.
  • Unpack the .bat file from the archive to \Don't Starve Together Dedicated Server\bin
  • Select the .bat file > Right click > Edit

  • In file that will open:
    After the word title, specify the text that will be displayed in the name of the console of this shard. In my case, this is: Server name: Shard (Master)
    Replace the Example_Server line with the name of the folder you renamed in the \Documents\Klei\DoNotStarveTogether directory. This is the name of the main server folder.
  • Save the file.
  • Rename the .bat file to your liking.
    Example:
    YourServerName_Master.bat - for surface.
  • Start the server by opening this .bat file.
  • Go to the Connecting to the server step.

Connecting to the server
  • Start the game and click on Browse Games.


  • If you run the server on the same machine with the game, then on the right there is a Filters tab and immediately below it there is a Connection filter. Click on the arrow to the right opposite Online to change the filter to LAN.


  • When you click on your server, information about it will be shown including its description, world settings, etc.


  • Join your server and make sure everything is working properly and the caves too (for a server with caves).
Your server will be visible in the server list.
In order for others to find your server, they can write the name of your server in the filter by name, but without the LAN filter.
How to create server token for cluster_token.txt

  • Go to the Klei official website: https://accounts.klei.com
  • Sign in with your Steam.


  • Next click on the Games tab.


  • Find Don't Starve Together and click on Game Servers.


  • You will see a list with the created servers and their tokens. Since you haven't created a token for the server yet, you need to create a new server.
    At the bottom there is a line with the creation of the server. Enter the server name and click on Add New Server.


  • After that, you instantly create a new server in this list and below under the server name there will be a new token that you can copy and paste into your cluster_token.txt

Preconfigured DST servers
Note: the preconfigured servers are configured with caves by default.

So. You have installed the DSTDS tool and you can now proceed to the next steps:

Starting the server for the first time to create folders
  • Go to your Steam library and right-click on the tool > Manage > Browse local files


  • You will open an explorer with the main folder of the tool and you will need to go to the directory: bins\scripts
    The scripts folder contains a launch_preconfigured_servers.bat file that you have to open.


  • After opening the file, you will have two consoles - this is the server console.
    Wait until the console is fully loaded and you have created server folders in \Documents\Klei. The console will display: Your Server Will Not Start


  • Shut down both servers by writing c_shutdown() in both consoles. Then press Enter.


    Creating files for the surface
  • Now go to the directory \Documents\Klei there are two server folders (Surface and Caves)


  • First, open \DoNotStarveTogether_EasyConfigOverworld\Cluster_1
    Create a text document .txt and rename it to cluster_token.txt


  • Open cluster_token.txt and paste your token. Save the file. (token creation guide in section below)


  • Now you need to create a cluster.ini file in the same folder.
  • Create a new text document and rename it to cluster.ini

  • You will get a confirmation window. Click Yes.


  • Open cluster.ini and paste the following text:
    [GAMEPLAY] game_mode = survival max_players = 8 pvp = false pause_when_empty = true [NETWORK] cluster_name = [Test] My new server cluster_description = Put your server description here. cluster_password = cluster_intention = cooperative autosaver_enabled = true enable_vote_kick = true [MISC] console_enabled = true [SHARD] shard_enabled = true bind_ip = 127.0.0.1 master_ip = 127.0.0.1 master_port = 11001 cluster_key = keyiguess
    Some settings you can change or add by looking in the list of settings for cluster.ini

  • Save the file and open the Master folder.


  • Open server.ini and paste the following text:
    [NETWORK] server_port = 10999 [SHARD] is_master = true [STEAM] master_server_port = 00002 authentication_port = 00001 [ACCOUNT] encode_user_path = true
  • Save this file and create a file worldgenoverride.lua and open it with a regular notepad or to make it easier to edit with Notepad++ (I will use it).
  • Paste the following text into worldgenoverride.lua:
    return { override_enabled = true, overrides = { -- insert overrides here }, }
  • Save the file and go back to the folder with cluster.ini and cluster_token.txt

    Creating files for caves
  • Copy the cluster.ini and cluster_token.txt files you recently created and go to \Documents\rKlei\\DoNotStarveTogether_EasyConfigCaves\Cluster_1
  • Paste these two files into this Cluster_1 folder.
    An important point: both of the Cluster_1 folders must have the same cluster.ini and cluster_token.txt files.
  • Open the Master folder, create a server.ini file there and paste the following text into it:
    [NETWORK] server_port = 11000 [SHARD] is_master = false name = Caves [STEAM] master_server_port = 00004 authentication_port = 00003 [ACCOUNT] encode_user_path = true
  • Save the file and create worldgenoverride.lua in the same folder.
  • Open it and paste the following text:
    return { preset = "DST_CAVE", override_enabled = true, overrides = { -- insert overrides here }, }
  • Save the file and go to the next step.

    First normal start of the server
  • Go to the main folder of the tool again. (Go to your Steam library and right-click on the tool > Manage > Browse local files)
  • Open \bin\scripts and run launch_preconfigured_servers.bat again
  • Two server consoles will open. Considering that you have started the server normally for the first time and you do not have a created world yet, both shards will create it.


  • This is how the consoles look when they are fully loaded and the caves with the surface are connected to each other:


    Connecting to the server
  • Start the game and click on Browse Games.


  • If you run the server on the same machine with the game, then on the right there is a Filters tab and immediately below it there is a Connection filter. Click on the arrow to the right opposite Online to change the filter to LAN.


  • When you click on your server, information about it will be shown including its description, world settings, etc.


  • The View World tab will show that there are caves on your server.


  • Join your server and make sure everything is working properly and the caves too.
    In order for others to find your server, they must write the name of your server in the filter by name, but without the LAN filter.
Your server will be visible in the server list.
In order for others to find your server, they can write the name of your server in the filter by name, but without the LAN filter.
Servers created manually (a bit of information)
When creating a server manually without using the preconfigured ones, you will have the choice to run it with or without caves. It is also possible to run more than one server at the same time.
These servers use .bat files that are created manually.

For example, my first server will be called Example Server. You can use any other server name.
Servers created manually (surface and caves)

    First step
  • Go to the main folder of the tool.
    (Go to your Steam library and right-click on the tool > Manage > Browse local files)


  • Open the bin folder and create two text documents there.


  • Open the first document that will be responsible for the surface. Paste the following text into it:
    title Example Server: Master dontstarve_dedicated_server_nullrenderer -console -cluster Example_Server -shard Master
  • After the word title, specify the text that will be displayed in the name of the console of this surface shard. In my case, this is: Server name: Master
  • Replace the Example_Server line with the name of your server without spaces, replace spaces with "_". This will be the name of the main server folder.
  • Save the file.
  • Open the second text document and paste the following text into it:
    title Example Server: Caves dontstarve_dedicated_server_nullrenderer -console -cluster Example_Server -shard Caves
  • After the word title, specify the text that will be displayed in the name of the console of this caves shard. In my case, this is: Server name: Caves
  • Replace the Example_Server line with the name of your server without spaces, replace spaces with "_". This will be the name of the main server folder.
  • Save the file.

    Note: The server main folder name must be the same in both documents. In my case, this is Example_Server.

  • Now you need to change the extensions of both files from .txt to .bat
    To do this, you need to rename them.
    Example:
    YourServerName_Master.bat - for surface.
    YourServerName_Caves.bat - for caves.


  • If you see such a confirmation window, click Yes.


  • Run both .bat files.
  • Wait until the server consoles are fully loaded so that the necessary folders are created and you will see the inscription Your Server Will Not Start.


  • Shut down the server with the c_shutdown() command in both consoles.
    Note: The main folders of these servers, unlike the preconfigured ones, are located in \Klei\DoNotStarveTogether
  • Go to \Documents\Klei\DoNotStarveTogether
  • Open the main folder of your server. In my case, this is the Example_Server folder.


  • This folder will contain folders of two shards - surface and caves.


  • In this folder, you need to create a cluster_token.txt and paste your newly created token into it. (token creation guide in section below)
  • Also create a file cluster.ini and paste the following text into it:
    [GAMEPLAY] game_mode = survival max_players = 8 pvp = false pause_when_empty = true [NETWORK] cluster_name = Paste your server name cluster_description = Paste your server description cluster_password = cluster_intention = cooperative autosaver_enabled = true enable_vote_kick = true [MISC] console_enabled = true [SHARD] shard_enabled = true bind_ip = 127.0.0.1 master_ip = 127.0.0.1 master_port = 11001 cluster_key = exampleserver
  • Configure it as you need and replace the lines "Paste your server name" and "Paste your server description" with your own. Also in the line cluster_key = write the unique key for your server. For example, I have this server name, exampleserver. Save the file.

    Creating files for the surface
  • Open the Master folder and create the worldgenoverride.lua file there. If you do not have a server.ini file there, then create it manually.
  • Open worldgenoverride.lua and paste the following text into it:
    return { override_enabled = true, overrides = { -- insert overrides here }, }
  • Save it. Now open server.ini and paste the following text into it:
    [NETWORK] server_port = 10999 [SHARD] is_master = true [STEAM] master_server_port = 00002 authentication_port = 00001 [ACCOUNT] encode_user_path = true
  • Save the file and go back to the main server folder again.

    Creating files for caves
    Open the Caves folder and create the worldgenoverride.lua file there. If you do not have a server.ini file there, then create it manually.
  • Open worldgenoverride.lua and paste the following text into it:
    return { preset = "DST_CAVE", override_enabled = true, overrides = { -- insert overrides here }, }
  • Save it. Now open server.ini and paste the following text into it:
    [NETWORK] server_port = 11000 [SHARD] is_master = false name = Caves [STEAM] master_server_port = 00004 authentication_port = 00003 [ACCOUNT] encode_user_path = true

    First normal start of the server
  • Perfect, now you can run both .bat files that you created in the bin folder of the tool.
    (Go to your Steam library and right-click on the tool > Manage > Browse local files)
  • Two server consoles will open. Considering that you have started the server normally for the first time and you do not have a created world yet, both shards will create it.


  • This is how the consoles look when they are fully loaded and the caves with the surface are connected to each other:


    Connecting to the server
  • Start the game and click on Browse Games.


  • If you run the server on the same machine with the game, then on the right there is a Filters tab and immediately below it there is a Connection filter. Click on the arrow to the right opposite Online to change the filter to LAN.


  • When you click on your server, information about it will be shown including its description, world settings, etc.


  • The View World tab will show that there are caves on your server.


  • Join your server and make sure everything is working properly and the caves too.
    In order for others to find your server, they must write the name of your server in the filter by name, but without the LAN filter.
Your server will be visible in the server list.
In order for others to find your server, they can write the name of your server in the filter by name, but without the LAN filter.
Servers created manually (only surface, without caves)

    First step
  • Go to the main folder of the tool.
    (Go to your Steam library and right-click on the tool > Manage > Browse local files)


  • Open the bin folder and create only one text document there.


  • Open this document that will be responsible for the surface. Paste the following text into it:
    title Example Server: Master dontstarve_dedicated_server_nullrenderer -console -cluster Example_Server -shard Master
  • After the word title, specify the text that will be displayed in the name of the console of this surface shard. In my case, this is: Server name: Master
  • Replace the Example_Server line with the name of your server without spaces, replace spaces with "_". This will be the name of the main server folder.
  • Save the file.
  • Now you need to change the file extension from .txt to .bat
    To do this, you need to rename it.
    Example:
    YourServerName_Master.bat


  • If you see such a confirmation window, click Yes.


  • Run the .bat file.
  • Wait until the server console is fully loaded so that the necessary folders are created and you will see the inscription Your Server Will Not Start.


  • Shut down the server with the c_shutdown() command in the console.
    Note: The main folders of these servers, unlike the preconfigured ones, are located in \Klei\DoNotStarveTogether
  • Go to \Documents\Klei\DoNotStarveTogether
  • Open the main folder of your server. In my case, this is the Example_Server folder.


  • This folder will contain a folder of the surface.


  • In the main folder of your server, you need to create a cluster_token.txt and paste your newly created token into it. (token creation guide in section below)
  • Also create a file cluster.ini and paste the following text into it:
    [GAMEPLAY] game_mode = survival max_players = 8 pvp = false pause_when_empty = true [NETWORK] cluster_name = Paste your server name cluster_description = Paste your server description cluster_password = cluster_intention = cooperative autosaver_enabled = true enable_vote_kick = true [MISC] console_enabled = true
  • Configure it as you need and replace the lines "Paste your server name" and "Paste your server description" with your own. Save the file.

    Creating files for the surface
  • Open the Master folder and create the worldgenoverride.lua file there. If you do not have a server.ini file there, then create it manually.
  • Open worldgenoverride.lua and paste the following text into it:
    return { override_enabled = true, overrides = { -- insert overrides here }, }
  • Save it. Now open server.ini and paste the following text into it:
    [ACCOUNT] encode_user_path = true

    First normal start of the server
  • Perfect, now you can run a .bat file that you created in the bin folder of the tool.
    (Go to your Steam library and right-click on the tool > Manage > Browse local files)
  • The server console will open. Considering that you have started the server normally for the first time and you do not have a created world yet, the server will create it.


  • Since you created a server without caves, it will be written here that enter/exit the caves is inactive.


    Connecting to the server
  • Start the game and click on Browse Games.


  • If you run the server on the same machine with the game, then on the right there is a Filters tab and immediately below it there is a Connection filter. Click on the arrow to the right opposite Online to change the filter to LAN.


  • When you click on your server, information about it will be shown including its description, world settings, etc.


  • The View World tab will show that there are only the surface on your server.


  • Join your server and make sure everything is working properly.
    In order for others to find your server, they must write the name of your server in the filter by name, but without the LAN filter.

  • Also, if you find a sinkhole, it will look like this and you will not be able to interact with it except to examine it.

Your server will be visible in the server list.
In order for others to find your server, they can write the name of your server in the filter by name, but without the LAN filter.
Running more than one server at the same time (manually created servers)

This section is for running two or more servers at the same time with caves enabled.
  • First thing you need to do is create the first server by following the instructions in the Servers created manually (surface and caves) section.
    If you have the first working server, then you can move on to creating the second using the same instruction, but without reaching the step with creating cluster.ini, because it is from this moment that the difference between starting one server and more than one server begins.

  • For example, my first server is called Example Server, and the second will be called Example Server 2.
  • Go to the main folder of your second server. In my case, this is the Example_Server_2 folder.
    (located in \Documents\Klei\DoNotStarveTogether)


  • Create cluster.ini there.

  • If you run both servers on ONE machine. Considering that ports such as 10999 (server.ini in the Master folder), 11000 (server.ini in the Caves folder), 11001 (cluster.ini in the main folder) are occupied by the first server, you will need to pick up the unoccupied ones on the second server to there were no occupied port errors (SOCKET_PORT_ALREADY_IN_USE error).

  • Just start counting from the last port 3 times. These will be your ports that you will use for another server. In this case, the following ports will be used for the second server:
    11002 - server.ini in the Master folder. 11003 - server.ini in the Caves folder. 11004 - cluster.ini in the main folder.

  • If you are planning a third, then use these:
    11005 - server.ini in the Master folder. 11006 - server.ini in the Caves folder. 11007 - cluster.ini in the main folder.
  • And so on.

  • Same with master_server_port and authentication_port.
    Used master_server_port = 00002, authentication_port = 00001 in Master > server.ini, master_server_port = 00004, authentication_port = 00003 in Caves > server.ini so for the second server:
    In Master's server.ini: master_server_port = 00006 authentication_port = 00005
    In Caves's server.ini: master_server_port = 00008 authentication_port = 00007

  • If you are planning a third, then use these:
    In Master's server.ini: master_server_port = 00010 authentication_port = 00009
    In Caves's server.ini: master_server_port = 000012 authentication_port = 000011

    In addition, each server must have its own unique cluster_key. I will use the name of the second server, which is exampleserver2.
    Note: You can follow the rest of the steps in the Servers created manually (surface and caves) section, but remember to change the ports, master_server_port, authentication_port and cluster_key correctly.

  • Open the cluster.ini file you just created and paste the following text:
    [GAMEPLAY] game_mode = survival max_players = 8 pvp = false pause_when_empty = true [NETWORK] cluster_name = Paste your the second server name cluster_description = Paste your the second server description cluster_password = cluster_intention = cooperative autosaver_enabled = true enable_vote_kick = true [MISC] console_enabled = true [SHARD] shard_enabled = true bind_ip = 127.0.0.1 master_ip = 127.0.0.1 master_port = 11004 cluster_key = exampleserver2
  • Configure it as you need and replace the lines "Paste your server name" and "Paste your server description" with your own. Also in the line cluster_key = write the unique key for your server. For example, I have this server name, exampleserver2. Save the file.

    Creating files for the surface
  • Open the Master folder and create the worldgenoverride.lua file there. If you do not have a server.ini file there, then create it manually.
  • Open worldgenoverride.lua and paste the following text into it:
    return { override_enabled = true, overrides = { -- insert overrides here }, }
  • Save it. Now open server.ini and paste the following text into it:
    [NETWORK] server_port = 11002 [SHARD] is_master = true [STEAM] master_server_port = 00006 authentication_port = 00005 [ACCOUNT] encode_user_path = true
  • Save the file and go back to the main server folder again.

    Creating files for caves
    Open the Caves folder and create the worldgenoverride.lua file there. If you do not have a server.ini file there, then create it manually.
  • Open worldgenoverride.lua and paste the following text into it:
    return { preset = "DST_CAVE", override_enabled = true, overrides = { -- insert overrides here }, }
  • Save it. Now open server.ini and paste the following text into it:
    [NETWORK] server_port = 11003 [SHARD] is_master = false name = Caves [STEAM] master_server_port = 00008 authentication_port = 00007 [ACCOUNT] encode_user_path = true

    First normal start of the server
  • Awesome, now you can run all the .bat files you need. In my case, there are two servers, so I will run 4 .bat files. (two caves, two surfaces)
    (Go to your Steam library and right-click on the tool > Manage > Browse local files)
    (\Don't Starve Together Dedicated Server\bin)
  • This is what the four consoles look like, and the arrows show which ones are connected.


    Connecting to the servers
  • Start the game and click on Browse Games.


  • If you run the server on the same machine with the game, then on the right there is a Filters tab and immediately below it there is a Connection filter. Click on the arrow to the right opposite Online to change the filter to LAN.
  • Unfortunately, if you put a LAN filter, then only one server will be shown. Therefore, you will have to manually find your two or more servers by name. Just remember to remove the LAN filter.


List of options for cluster.ini and server.ini

Most of the information was taken from here[forums.kleientertainment.com]

List of options for cluster.ini:
  • [GAMEPLAY]
game_mode
  • Default: survival
  • The cluster’s game mode. This field is the equivalent of the “Game Mode” field on the “Host Game” screen. Valid values are survival, endless or wilderness.
max_players
  • Default: 16
  • The maximum number of players that may be connected to the cluster at one time.
pvp
  • Default: false
  • Enable PVP on the server.
pause_when_empty
  • Default: false
  • Pause the server when there are no players connected.

  • [NETWORK]
offline_server
  • Default: false
  • Create an offline server. The server will not be listed publicly, and only players on the local network will be able to join, and any steam-related functionality will not work.
tick_rate
  • Default: 15
  • This is the number of times per-second that the server sends updates to clients. Increasing this may improve precision, but will result in more network traffic.
whitelist_slots
  • Default: 0
  • The number of reserved slots for whitelisted players. To whitelist a player, add their Klei UserId to the whitelist.txt file. (Place this file in the same directory as cluster.ini)
cluster_name
  • The name for your server cluster. This is the name that will show up in server browser.
cluster_description
  • Default: empty
  • Cluster description. This will show up in the server details area on the “Browse Games” screen.
cluster_password
  • Default: none
  • This is the password that players must enter to join your server. Leave this blank or omit it for no password.
autosaver_enabled
  • Default: true
  • Saving the server after every day.
enable_vote_kick
  • Default: false
  • Set to true to enable the “Vote to Kick” feature.
lan_only_cluster
  • Default: false
  • When set to true, the server will only accept connections from machines on the same LAN.

  • [MISC]
max_snapshots
  • Default: 6
  • Maximum number of snapshots to retain. These snapshots are created every time a save occurs, and are available in the “Rollback” tab on the “Host Game” screen or when you complete a c_rollback() command for a certain number of days.
console_enabled
  • Default: true
  • Enabling the console.

  • [SHARD]
shard_enabled
  • Default: false
  • Enable server sharding. This must be set to true for multi-level servers. For single-level servers, it can be omitted.
bind_ip
  • Overridable in server.ini
  • Default: 127.0.0.1
  • Required: If shard_enabled = true and is_master = true
  • This is the network address the master server will listen on for other shard servers to connect to. Set this to 127.0.0.1 if all of your servers in your cluster are on the same machine, or 0.0.0.0 if the servers in your cluster are on different machines. This only needs to be set for the master server, either in cluster.ini, or the master server's server.ini
master_ip
  • Overridable in server.ini
  • Default: none
  • Required: If shard_enabled = true and is_master = false
  • This is the I.P. address that a non-master shard will use when trying to connect to the master shard. If all servers in a cluster are on the same machine, set this to 127.0.0.1
master_port
  • Overridable in server.ini
  • Default: 10888
  • This is UDP port that the master server will listen on, and that a non-master shard will use when trying to connect to the master shard. This should be set to the same value for all shards by having a single entry in cluster.ini, or omitted completely to use the default.
cluster_key
  • Overridable in server.ini
  • Default: none
  • Required if shard_enabled = true
  • This is a password used to authenticate a slave server to the master. If you are running servers on different machines that need to connect to each other, this value must be the same on each machine. For servers running on the same machine, you can just set this once in cluster.ini.

  • [STEAM]
steam_group_id
  • Default: 0
  • Steam group id for steam_group_only / steam_group_admins settings.
steam_group_admins
  • Default: false
  • When this is set to true, admins of the steam group specified in steam_group_id will also have admin status on the server.
steam_group_only
  • Default: false
  • When set to true, the server will only allow connections from players belonging to the steam group listed in the steam_group_id setting.

List of options for server.ini:
server.ini have settings for each server. (server ports, steam port, activated master or slave)
  • [NETWORK]
server_port
  • Default: 10999
  • The UDP port that this server will listen for connections on. If you are running a multi-level cluster, this port must be different for each server. This port must be between 10998 and 11018 inclusive in order for players on the same LAN to see it in their server listing. Ports below 1024 are restricted to privileged users on some operating systems.

  • [SHARD]
is_master
  • Default: none
  • Required: If shard_enabled = true
  • Sets a shard to be the master shard for a cluster. There must be exactly one master server per cluster. Set this to true in your master server’s server.ini, and false in every other server.ini
name
  • Default: none
  • Required: if shard_enabled = true and is_master = false
  • This is the name of the shard that will show up in log files. It is ignored for the master server, which always has the name [SHDMASTER].
id
  • Default: Randomly generated number.
  • This is field is automatically generated for non-master servers, and is used internally to uniquely identify a server. Altering this or removing it may cause problems on your server if anybody’s character currently resides in the world that this server manages.

  • [STEAM]
authentication_port
  • Default: 8766
  • Internal port used by steam. Make sure that this is different for each server you run on the same machine.
master_server_port
  • Default: 27016
  • Internal port used by steam. Make sure that this is different for each server you run on the same machine.

  • [ACCOUNT]
encode_user_path
  • Default: true
  • Inside the server's session folder exists the world state and folders for each KleiID user (client). Encoded paths take the KleiID and transform them into a two-way encoding that's all uppercase characters. When you switch it to the non-encoded then the server "loses" the characters as the game is no longer looking for encoded folder names but rather the KleiIDs individually. It's best to leave it encoded.
Change server world settings using worldgenoverride.lua, mods or command

worldgenoverride.lua
Useful information here[forums.kleientertainment.com] by Electroely.
It also contains a list of settings that you can apply to the worldgenoverride.lua file.
Note: you will be able to change the parameters for World Generation with worldgenoverride.lua, but they only apply if you are creating a new world (although they change even in an already created world in the View World window). They are only used if you create a new world and enter the required parameters there.
  • Open worldgenoverride.lua in the Master folder (surface configuration) or in the Caves folder (caves configuration) which is located inside the main folder of your server or create if there is no such file and enter the settings you want in the specified place:
    • If surface:
      return { override_enabled = true, overrides = { -- insert overrides here }, }
    • If caves:
      return { preset = "DST_CAVE", override_enabled = true, overrides = { -- insert overrides here }, }
    Note: if you have a preconfigured server, the worldgenoverride.lua file is located in:
    For surface - \Klei\DoNotStarveTogether_EasyConfigOverworld\Cluster_1\Master
    For caves - \Klei\DoNotStarveTogether_EasyConfigCaves\Cluster_1\Master

  • Save the file[s] and restart the server.

  • An example where you need to enter parameters:
    return { override_enabled = true, overrides = { desired overwrite = "valid value", }, }
  • Replace "desired overwrite" with the setting you want to change. Instead of "valid value" paste a parameter - "never" (None), "rare" (Little), "default" (Default), "often" (More) or "always" (Tons). Or separate parameters for such settings as day.
    (list of parameters you can find here[forums.kleientertainment.com])

  • Sample worldgenoverride.lua file for surface:
    return { override_enabled = true, overrides = { -- wildfires = "always", wildfires = "never", lightning = "rare", regrowth = "fast", beequeen = "often", liefs = "always", }, }
  • Wildfires are disabled, lightning is rare, fast regrowth rate, Queen Bee respawns faster, Treeguards appear very often. Overwriting wildfires = "always" will not work because there is a -- in front of it.

  • Sample worldgenoverride.lua file for caves:
    return { preset = "DST_CAVE", override_enabled = true, overrides = { -- insert overrides here wormattacks = "never", earthquakes = "always", }, }
  • Cave worms waves are disabled, earthquakes happen very often.

Сlient mods for editing the settings of the existing world
Note: both mods are not compatible with each other, use only one of them. To use these mods on a server, you must be the administrator of that server.
    In order to quickly change the settings of the world (including special events), use the World Settings Picker mod:https://cs2bus.com/sharedfiles/filedetails/?id=2421565258
  • Connect to the server.
  • While holding down the scoreboard button (Tab by default), click on the new button, which is indicated by the arrow in the screenshot below:


  • In the window that opens, change the settings as you wish and click the Accept button and confirm the server restart.


  • The server will then accept the settings, save and restart the server. After restarting, the desired world settings will change.

  • This also works for caves. To do this, you need to go down into the caves and repeat the same steps.


    Note: it will take some time before restarting the Cave shard. The Master shard (surface) restarts first, and then the caves.

    If you only need to change a specific special event on the server, use the Special Events mod:
    https://cs2bus.com/sharedfiles/filedetails/?id=1299647282
  • Connect to the server.
  • While holding down the scoreboard button (Tab by default), click on the new button, which is indicated by the arrow in the screenshot below:


  • In the window that opens, select the event you want to activate, and then confirm the server restart.


  • After that the server will accept the settings, save and restart the server. After restarting, the desired event will change.
    Note: it will take some time before restarting the Cave shard. The Master shard (surface) restarts first, and then the caves.

Command for changing world settings
Note: any other method other than editing the worldgenoverride.lua file is not recommended because it may break, become irrelevant and stop working. It is advisable to use the worldgenoverride.lua file instead of the command.

Note: you won't be able to change the parameters for World Generation with the command, as you can change them in worldgenoverride.lua and start creating a new world (although they change even in the already created world in the View World window). They are only used if you create a new world and enter the required parameters there.

    Method if you are the host and you have access to the server console
  • Enter the following commands in the Master console one by one:
    TheWorld.topology.overrides.desired overwrite = "valid value" c_save() c_reset()
  • Replace "desired overwrite" with the setting you want to change. Instead of "valid value" paste a parameter - "never" (None), "rare" (Little), "default" (Default), "often" (More) or "always" (Tons). Or separate parameters for such settings as day.
    (list of parameters you can find here[forums.kleientertainment.com])

  • Example: I want to remove wildfires altogether and make only a day time.
    TheWorld.topology.overrides.wildfires = "never" TheWorld.topology.overrides.day = "onlyday" c_save() c_reset()

    Method if you are a server admin and you do not have access to the server console
  • Join the required server where are you admin (star next to your nickname). Go to the surface and enter one by one the commands you need by opening the console by pressing ~ and making sure that it says Remote (press Ctrl to change the console mode).
Installing server mods

How to get the mod id
  • Go to Steam library > Don't Starve Together > Click on the Workshop tab


  • Select and open the mod you need. It shouldn't be tagged client_only_mod because you are downloading the mod to the server. For example, I will choose Health Info mod.
  • Click on the Share tab.


  • A window will open in which there will be a link to this mod. You need the id of this mod. Copy or remember this identifier, it starts after the = sign (the identifier is marked in red in the picture)


Installing the mod on the server
  • Go to the main folder of the tool (Go to your Steam library and right-click on the tool > Manage > Browse local files) and open the mods folder in it:


  • In this folder you need to open dedicated_server_mods_setup.lua file.


  • In this file you will need to create the necessary lines for downloading and installing, as well as automatic updating of mods for the server(s).
  • Paste the line ServerModSetup("") and between the quotes paste the identifier of the desired mod which you copied by following the guide at the top of this section. In my case, this is the ServerModSetup("375859599") line.


    Note: you can add more than one mod there. To do this, just make a paragraph and add another line with the desired mod id. You can also add your own or someone else's mod collections there to immediately install all the mods included in this collection. More information can be found in the same file.
  • Go to the section Enabling and configuring mods.
Enabling and configuring server mods

How to enable and configure the mod (3 ways)

  • The first way (manually with mod configuration)
      Creating modoverrides.lua file
    • If you have a preconfigured server:
      1. Go to the surface folder \DoNotStarveTogether_EasyConfigOverworld\Cluster_1\Master
      2. Create modoverrides.lua and open it.
      3. Configure the mod(s) using the configuration sample. Save the file.
      4. Copy the saved file to \DoNotStarveTogether_EasyConfigCaves\Cluster_1\Master

    • If the server was created manually:
      1. Go to the main folder of your server. In my case, this is Example_Server.
      2. Open the Master folder. Create modoverrides.lua and open it.
      3. Configure the mod(s) using the configuration sample. Save the file.
      4. If you have caves enabled, then copy the saved file to the Caves folder of your main server folder.

    • Sample configuration:
      return { ["workshop-000000001"]={ configuration_options={ }, enabled=true }, ["workshop-000000002"]={ configuration_options={ name="anyname", display=2, range=true, ["Parameter name"] = "number", }, enabled=true } }
      Explanation:
      The mod with id 000000001 only needs to be enabled without its configuration.
      The mod with id 000000002 needs to be configured. Options for configuration (which are in the curly brace configuration options) can be found in in the mod folder in the modinfo.lua file.
      Also remember to consider the .lua syntax.

  • The second way (manually)
    (easy way without careful configuration of the mod)
      Creating modoverrides.lua file
    • If you have a preconfigured server:
      1. Go to the surface folder \DoNotStarveTogether_EasyConfigOverworld\Cluster_1\Master
      2. Create modoverrides.lua and open it.
      3. Paste ForceEnableMod("workshop-1234567890")
      4. Replace 1234567890 with your mod id. Save the file.
      5. Copy the saved file to \DoNotStarveTogether_EasyConfigCaves\Cluster_1\Master

    • If the server was created manually:
      1. Go to the main folder of your server. In my case, this is Example_Server.
      2. Open the Master folder. Create modoverrides.lua and open it.
      3. Paste ForceEnableMod("workshop-1234567890")
      4. Replace 1234567890 with your mod id. Save the file.
      5. If you have caves enabled, then copy the saved file to the Caves folder of your main server folder.

  • The third way (using the server to configure mods)
    (the most convenient way)
    1. Subscribe on the mod that you will enable on the server.
    Wait until the mod is fully downloaded.
    2. Start the game and click on Host Game.
    3. Click on Create New World.
    4. In the world name field, paste Mod settings world.
    5. Select Local Only and reduce the number of players to 1.
    6. Click on Generate World.
    Note: it's better to add caves to this world in order to then have time to click on the Cancel button while starting the server.


  • The process of generating the world will begin.


    7. When the world is generated and you enter the server, immediately click on Disconnect or select a character and exit the server.


    8. From the main menu of the game, click Host Game again and select your new world for mod settings.


    9. Go to the Mods tab.


    10. Select the Server Mods tab. Find and enable the desired mod(s).


    Note: if you want to manually change the mod settings:
  • Click on the desired mod and then click on Configure Mod.

  • Change the mod settings as needed and click on Apply.


    11. Click on the Resume World.


    12. Wait 3-4 seconds and click on Cancel.


    Note: if you did not have time to press the button and entered the world, then simply leave it.

    13. Click on the Back and Save Changes button.


    14. Click on the button with the folder icon. The main folder of this world will open. In my case, this is the Cluster_1 folder.


    15. In the folder that opened, open the Master folder (instead of it, you can open the Caves folder, because in both folders the required file is the same).


    16. Copy the modoverrides.lua file:


  • If you have a preconfigured server:
    1. Go to the surface folder \DoNotStarveTogether_EasyConfigOverworld\Cluster_1\Master and paste modoverrides.lua there.
    2. Go to the caves folder \DoNotStarveTogether_EasyConfigCaves\Cluster_1\Master and paste modoverrides.lua there.

  • If the server was created manually:
    1. Go to the main folder of your world. In my case, this is Example_Server.
    2. Open the Master folder and paste modoverrides.lua into it.
    3. If you have caves enabled, then paste the modoverrides.lua file into the Caves folder of your main server folder.

    Note: for caves and surface, modoverrides.lua must be the same file.
Note: in the future, you can turn off, turn on and configure any server mods in the same world, and then copy modoverrides.lua from this server. In fact, the server itself configures this file for you, and you simply configure the mod's settings through it. For me personally, this is the most convenient and fastest way.

Launching a server with mods
  • Start the server. Certain lines will appear in the console (for example the DownloadPublishedFile line), which means that the mods are being installed in the mods folder of the main tool folder. Mods are enabled and configured using modoverrides.lua

    Note: lines may appear again if there is an update for an already installed mod or if you are installing another mod. Each time the server started, it checks for updates for the mods specified in the dedicated_server_mods_setup.lua file and downloads the missing mods, which are specified in the same file.

  • In the server browser, your server will be tagged with Modded.

Beta server launch

Changing the version of the tool to the beta version
  • Go to your Steam library and right-click on the tool > Properties...


  • Betas tab > Instead of None, select a specific beta


  • The update begins and the tool will switch to the beta version.
  • To return from beta to the regular version, you need to change the name of the beta in the Betas tab to None. The tool will be updated again.

  • You can run the servers and they will only be available in the beta version of the game, so your game should be in beta version too.

Changing the version of the game to the beta version
  • Go to your Steam library and right-click on the game > Properties...


  • Betas tab > Instead of None, select a specific beta


  • The update begins and the game will switch to the beta version.
  • To return from beta to the regular version, you need to change the name of the beta in the Betas tab to None. The game will be updated again.
Starting a 64 bit server

Q: What is the difference between 64 bit and 32 bit server?
A: In 32 bit there is a limitation on the use of no more than 4 GB of RAM. The 64 bit version can use a much wider amount of RAM usage, namely 16 exabytes (16 EB) or 17179869184 GB (yes, it's hard to imagine). But this does not mean that if you have 16 GB of RAM, then the server will use all 16 GB of RAM that is on your PC. Mostly useful if an Out of Memory error appears.

If you have a preconfigured server:
  • Go to the main folder of the tool.
    (Go to your Steam library and right-click on the tool > Manage > Browse local files)
  • As you can see, there are two folders in the main folder of the tool - bin and bin64.

  • Open the bin folder and select the scripts folder.

  • Copy this folder to bin64 folder. Open it.
  • Select the launch_preconfigured_servers.bat file > Right click > Edit

  • In the file that will open, replace the lines dontstarve_dedicated_server_nullrenderer.exe with dontstarve_dedicated_server_nullrenderer_x64.exe Example:
    @ECHO OFF set SteamAppId=322330 set SteamGameId=322330 cd .. start "Don't Starve Together Overworld" /D "%~dp0.." "%~dp0..\dontstarve_dedicated_server_nullrenderer_x64.exe" -conf_dir DoNotStarveTogether_EasyConfigOverworld -console start "Don't Starve Together Caves" /D "%~dp0.." "%~dp0..\dontstarve_dedicated_server_nullrenderer_x64.exe" -conf_dir DoNotStarveTogether_EasyConfigCaves -console
  • Save the file.

If the server was created manually:
  • Go to the main folder of the tool.
    (Go to your Steam library and right-click on the tool > Manage > Browse local files)
  • As you can see, there are two folders in the main folder of the tool - bin and bin64. Open the bin folder.

  • Copy .bat file[s] of your server from bin folder to bin64 folder.
  • Select .bat file[s] > Right click > Edit

  • In the file[s] that will open, replace the dontstarve_dedicated_server_nullrenderer line with dontstarve_dedicated_server_nullrenderer_x64 Examples:
    title Example Server: Master dontstarve_dedicated_server_nullrenderer_x64 -console -cluster Example_Server -shard Master
    title Example Server: Caves dontstarve_dedicated_server_nullrenderer_x64 -console -cluster Example_Server -shard Caves
  • Save the file[s].

Thus, by launching .bat files in this folder with this parameter, your server should start in 64 bit mode.
Useful commands for the server console
Most of the information was taken from here[dontstarve.fandom.com]

  • c_shutdown(value)
Possible values: false, true or leave blank.
Description: shuts down the shard (Master, Caves, ect.). true will save the game, false will exit without saving. c_shutdown() is the same as c_shutdown(true).
  • c_save()
Description: forces the server to save immediately (servers normally autosave whenever night finishes).
  • c_reset()
Description: reloads the server without saving. This command may crash your game if you are a client (unless you send it as a remote command).
  • c_regenerateworld()
Description: deletes the current world on the server and starts the process of generating a new one.
  • c_regenerateshard()
Description: deletes the current world on a specific shard (Caves or Surface) and starts the process of generating a new one. In order to do this for a surface, you need to enter this command in the surface shard console (for example, the Master console). For caves, respectively, in the cave shard console.
  • c_rollback(value)
Possible values: number or leave blank.
Description: rolls back a server by the given number of saves. c_rollback() will roll it back by one, while c_rollback(3) will roll it back three.
  • TheNet:SetAllowIncomingConnections(value)
Possible values: true or false.
Description: setting it to true is the default behavior (people can join). Setting it to false prevents anyone from joining.
  • c_announce("announcement")
Description: when you enter this command, the players on the server at the top of their screen will receive the announcement that you indicated in quotation marks "".
Additionally: you can make the announcement periodic, for this you need to enter a comma and a numeric value after the quotes. This value means the frequency of sending the announcement in seconds. Example: c_announce("Hello!", 1800) - will send an announcement "Hello!" every half hour.
  • TheSim:SetTimeScale(value)
Possible values: number.
Description: set the time scale of the simulation to a specific value. The normal time scale corresponds to the value 1. The value 0 pauses the game.
Manually cleaning the server using the command
Sourse of information[forums.kleientertainment.com]

This command is used to manually clean up garbage on the server map. It will help clear any item.
Note: this command does not delete items in the player's chests and inventory, only what is on the floor.

First thing you need to do is add your own command to the server. To do this, copy and enter the following line in your console or in the server console:

c_cleanup = function(prefab) for k, v in pairs(Ents) do if v.prefab == prefab and v.components.inventoryitem and v.components.inventoryitem.owner == nil then v:Remove() end end end

Once you've entered this, you can use the c_cleanup("prefab") command to clean up the garbage on the server.
Note: after restarting the server, you will need to add your own command again because the server does not save it.
  • Usage example:
    c_cleanup("spoiled_food") - will clear the entire map from the rot that is on the floor.
How to associate your server with a Steam Group

Getting Steam Group ID
Note: you must have access to edit the profile of your group.
  • Open your group profile. Click on the Edit Group Profile tab.


  • What is highlighted in a red square in the picture is the ID of your Steam group.


Configuring the cluster.ini file
  • Open the main folder of your server
    (or for a preconfigured server \DoNotStarveTogether_EasyConfigOverworld\Cluster_1)
  • Open the cluster.ini file and add the following lines to the end:
    [STEAM] steam_group_id = GroupID steam_group_admins = false steam_group_only = false
  • Replace GroupID with your Steam group ID.
    Note: if you replace the line steam_group_admins = false with steam_group_admins = true, then the administrators of this group will automatically become the administrators of your server.
    If you replace the line steam_group_only = false with steam_group_only = true, then only members of this group can see your server in the server browser list. The flag icon changes from yellow to red.
  • Save the file and start the server again.
    (if you have a preconfigured server, then copy the saved cluster.ini to \DoNotStarveTogether_EasyConfigCaves\Cluster_1)

As you can see in the server browser list, your server now has a flag icon:

How to make a player an administrator of your server

Creating the adminlist.txt file
  • Go to the main folder of your server and create the adminlist.txt file there.
    (or for a preconfigured server \DoNotStarveTogether_EasyConfigOverworld\Cluster_1)
  • Now you need to find out the identifier of the required player (KU_xxxxxxxx).

Getting player ID (two ways)
    The first way (quickly)
  • Join the server where the required player is located.
  • While holding down the scoreboard button (Tab by default), hover the mouse cursor over the player's nickname.


  • What starts with KU_ is the identifier of this player. Remember it or take a screenshot.
    The second way
  • The required player must join your server. For simplicity, let the player be on the surface, not in caves.
  • Now open the Master folder and there is a server_log.txt file there. Open it.
  • In this file, find a message that this player has joined the server (Client authenticated:) or simply by his nickname. The text in round brackets starting with KU_ is the player's identifier. Copy it.


Editing the adminlist.txt file
  • Open the adminlist.txt file you created and paste there the player ID that you want to make the administrator of this server. If you need to add more than one player there, then add the identifier through the line:
    KU_abcd0001 KU_abcd0002
  • Save the file.
    (If you have a preconfigured server, then copy the saved adminlist.txt to \DoNotStarveTogether_EasyConfigCaves\Cluster_1)
  • Restart the server.
Reserved slots for server players

Creating the whitelist.txt file
  • Go to the main folder of your server and create the whitelist.txt file there.
    (or for a preconfigured server \DoNotStarveTogether_EasyConfigOverworld\Cluster_1)
  • Now you need to find out the identifier of the required player (KU_xxxxxxxx).

Getting player ID (two ways)
    The first way (quickly)
  • Join the server where the required player is located.
  • While holding down the scoreboard button (Tab by default), hover the mouse cursor over the player's nickname.


  • What starts with KU_ is the identifier of this player. Remember it or take a screenshot.
    The second way
  • The required player must join your server. For simplicity, let the player be on the surface, not in caves.
  • Now open the Master folder and there is a server_log.txt file there. Open it.
  • In this file, find a message that this player has joined the server (Client authenticated:) or simply by his nickname. The text in round brackets starting with KU_ is the player's identifier. Copy it.


Editing whitelist.txt and cluster.ini files
  • Open the whitelist.txt file you created and paste the ID of the player you want to reserve the slot for. If you need to add more than one player there, then add the identifier through the line:
    KU_abcd0001 KU_abcd0002
  • Save the file.
  • Open cluster.ini and at the end of the [NETWORK] section, paste whitelist_slots = slot
  • Replace slot with the number of reserved slots for the required players. Save the file.
    (If you have a preconfigured server, then copy the saved whitelist.txt and cluster.ini to \DoNotStarveTogether_EasyConfigCaves\Cluster_1)
  • Restart the server.

      Examples:
    • [GAMEPLAY] max_players = 10 ... [NETWORK] ... whitelist_slots = 2
      The server supports 10 players and you add 2 players to the whitelist. Whether those 2 players are currently connected to the server or not, there will only be 8 public slots on your server. Only 8 random people can join at the same time, and these 2 players can join at any time.

    • [GAMEPLAY] max_players = 3 ... [NETWORK] ... whitelist_slots = 3
      Your server supports 3 players and you have added 3 players to the whitelist. No one who is not whitelisted will be able to join.
How to ban the player (WIP)
Work In Progress
Launch shortcuts for manually created servers

The so-called "shortcut" to launch the server will allow you to launch the caves and the surface at the same time when you open it. It can be used to run any number of shards at the same time. This is how the launch_preconfigured_servers.bat file in the scripts folder works, which launches two shards at the same time.

Creating a shortcut
  • Go to the main folder of the tool.
    (Go to your Steam library and right-click on the tool > Manage > Browse local files)


  • Open the bin > scripts folder and create one text document there.


  • Open this document and paste the following text into it:
    @ECHO OFF set SteamAppId=322330 set SteamGameId=322330 cd ..
  • After the cd .. line you write which server and which shards (Surface or Caves) will run. For example, I have a server called Example Server and I need to run its caves and surface. This is what my file looks like:
    @ECHO OFF set SteamAppId=322330 set SteamGameId=322330 cd .. start "Example Server: Master" /D "%~dp0.." "%~dp0..\dontstarve_dedicated_server_nullrenderer.exe" -console -cluster Example_Server -shard Master start "Example Server: Caves" /D "%~dp0.." "%~dp0..\dontstarve_dedicated_server_nullrenderer.exe" -console -cluster Example_Server -shard Caves
  • What is in the quotes "" is the name of the console that will open. For convenience, I have indicated the name of the server and the corresponding shard. The main folder of my server is called Example_Server, its name should not contain spaces, so you can use the "_" sign in the name. After the word -shard, it is indicated which shard will be launched, caves or surface (Master).

    Note: if you want to run shards of the server(s) in 64 bit mode, then your file should be located in the \Don't Starve Together Dedicated Server\ bin64\scripts directory, if there is no scripts folder, then create it. Instead of the dontstarve_dedicated_server_nullrenderer.exe line in the file, specify dontstarve_dedicated_server_nullrenderer_x64.exe

  • After you have edited and saved a text document, you must change its extension from .txt to .bat If you need to edit the .bat file, then right-click on it > Edit. After you open the file, it will launch as many shards as you specified in it.
25 Comments
Shepard󰀀  [author] 2 Jan @ 4:41am 
[NOTE] the problem was with preconfigured servers by dst tool, for some reason via this method doesn't normally installing mods specified in dedicated_server_mods_setup.lua
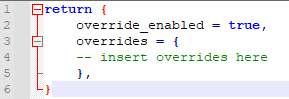
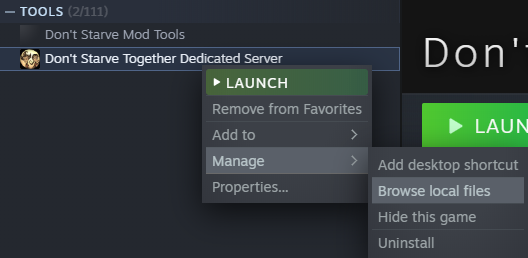
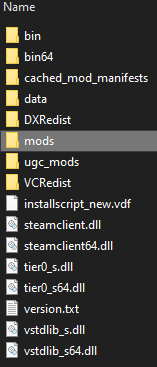
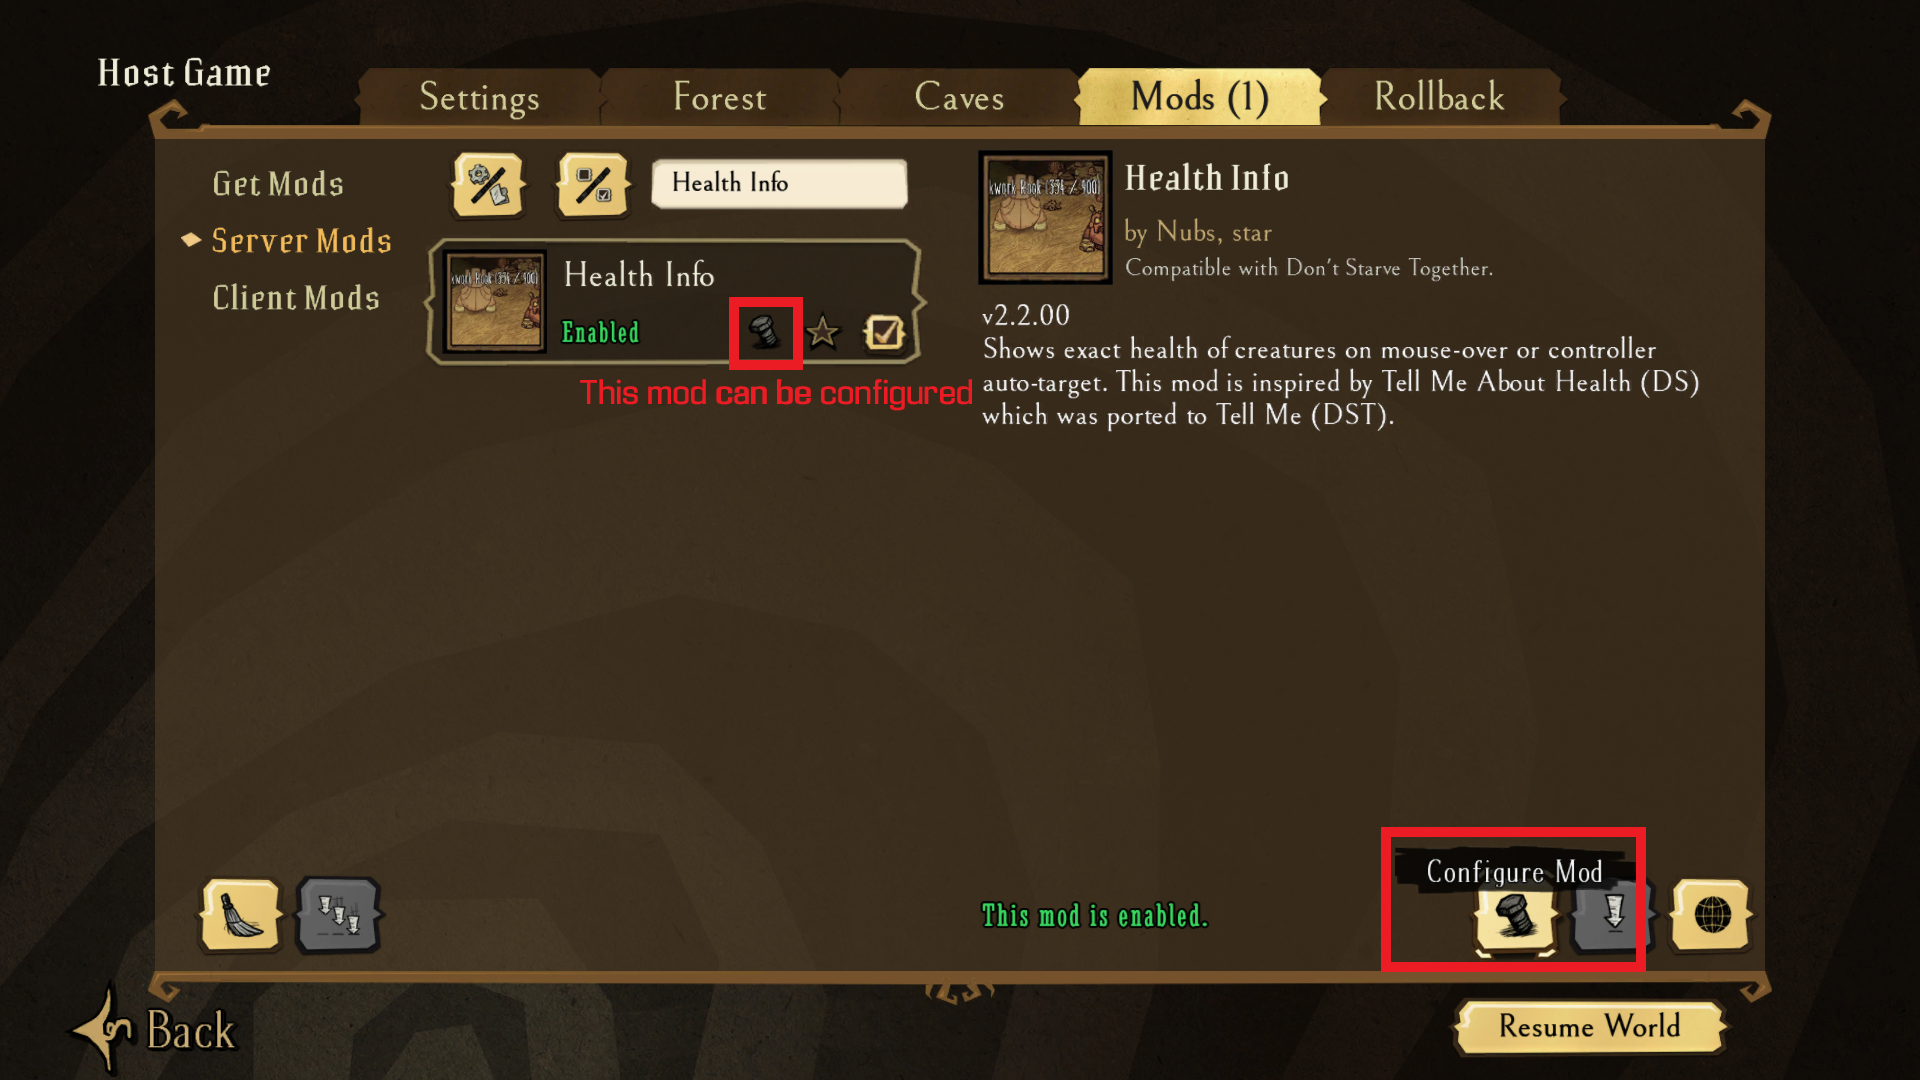
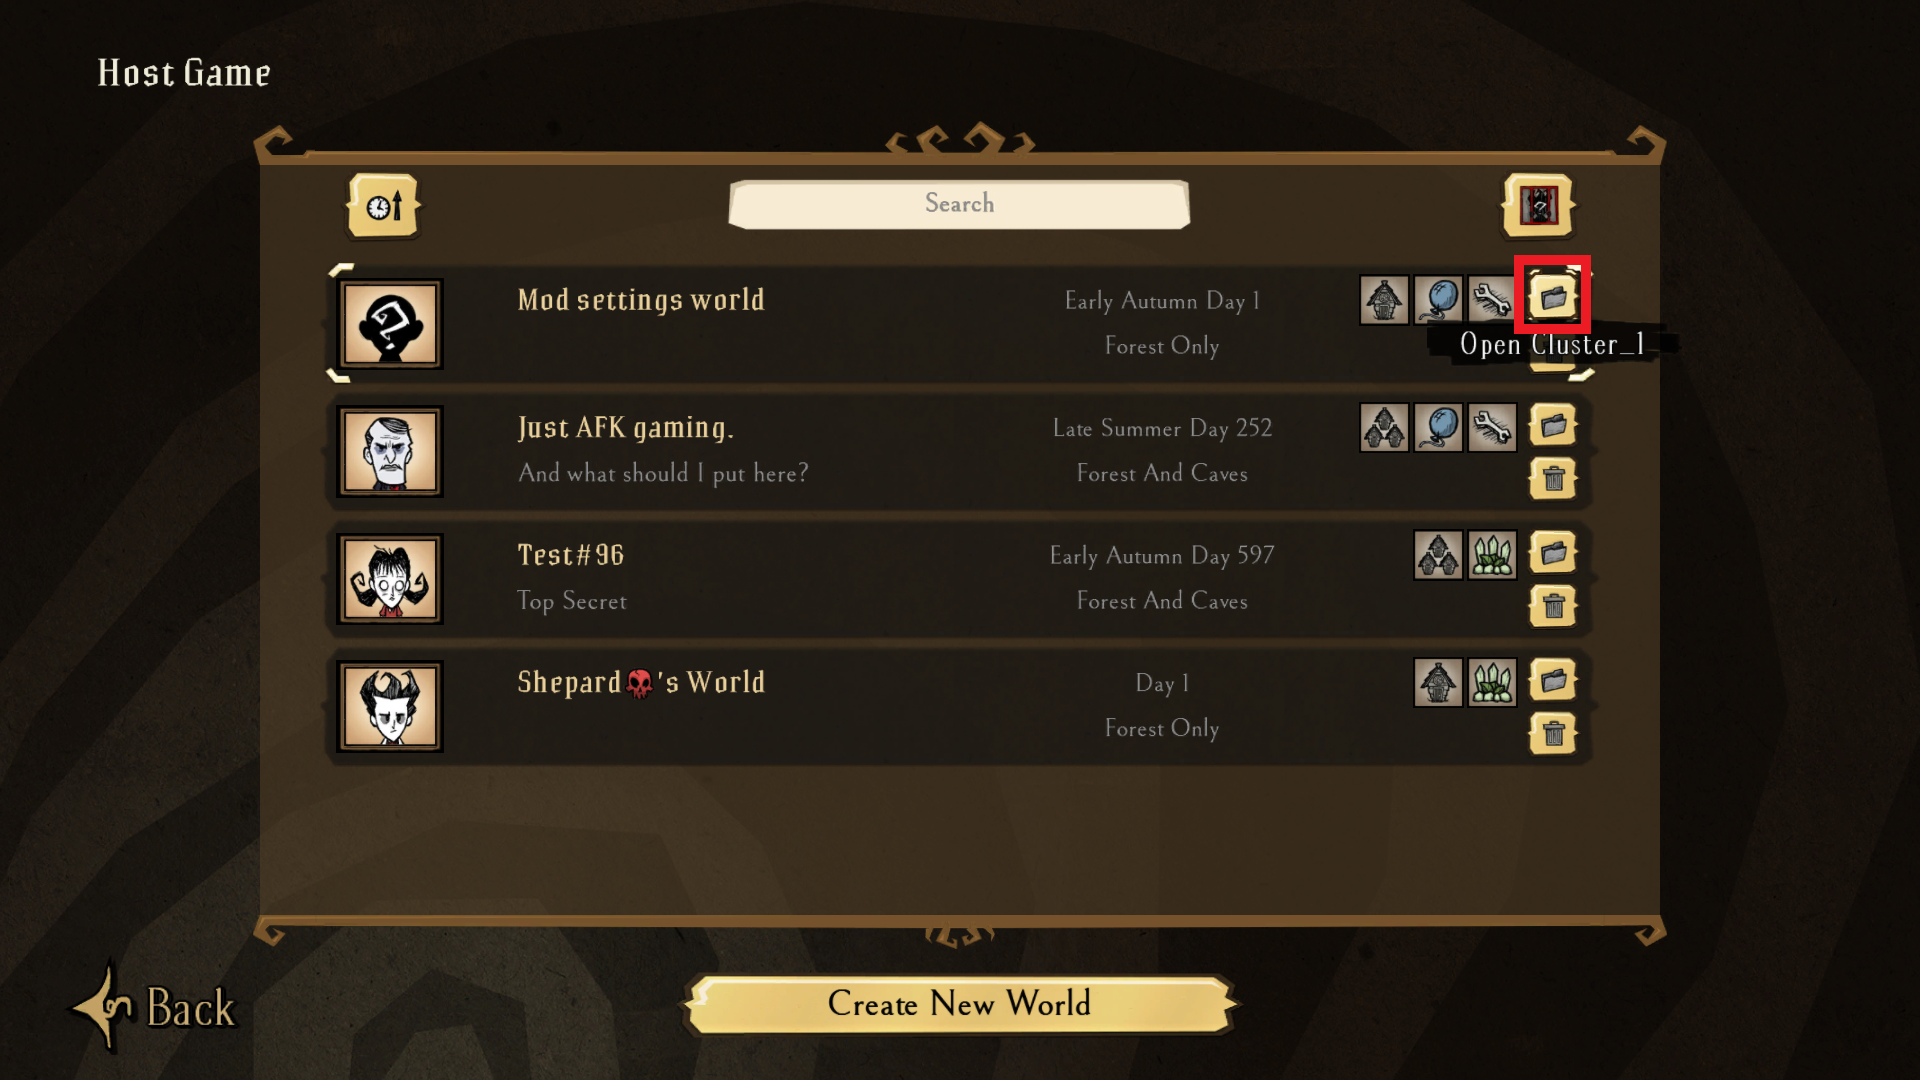
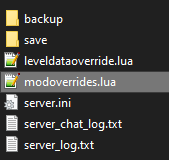
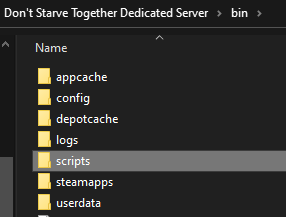
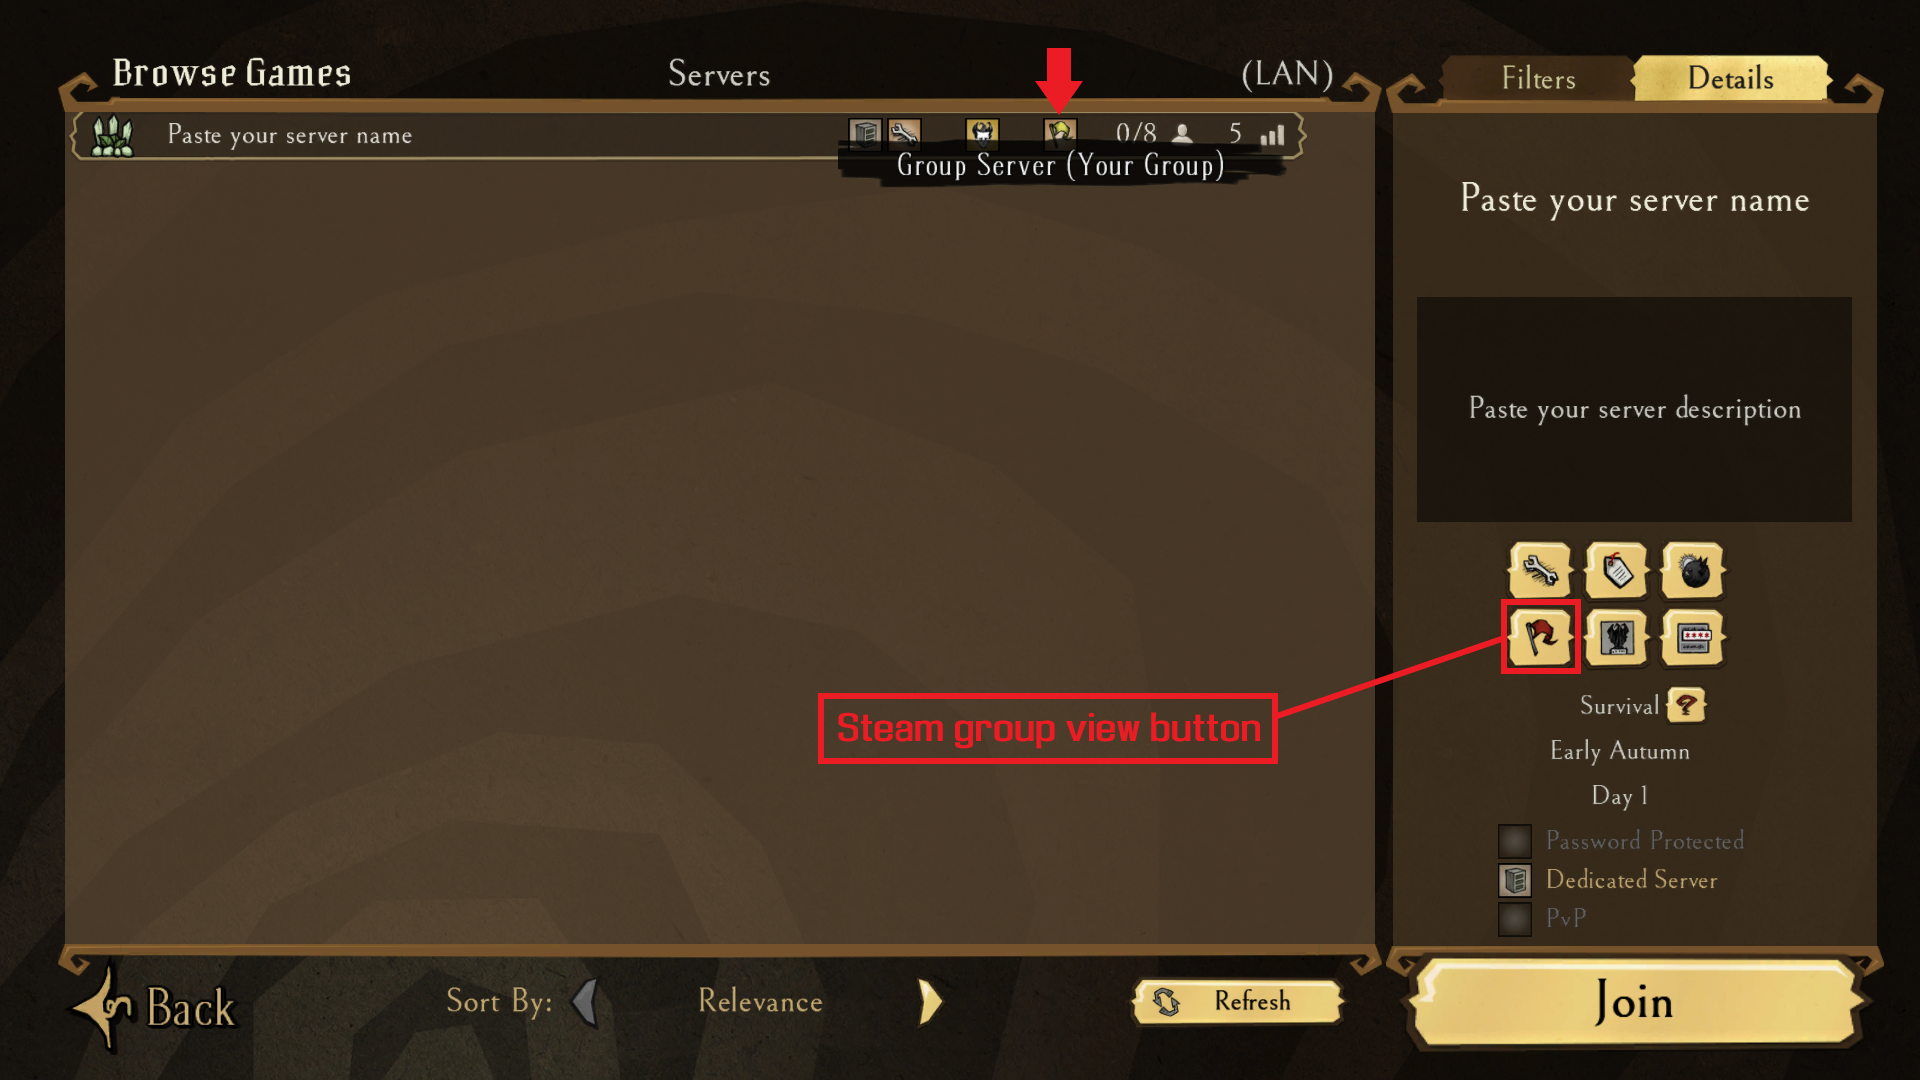
to fix that, go to "...\Don't Starve Together Dedicated Server\ugc_mods\Cluster_1\Master\content\322330" and check if there're all your mods. If no, use method with manually created servers or go then to "...\SteamLibrary\steamapps\workshop\content\322330" and copy all mods that you need for your server (identifying by the identifier) and paste them in "...\Don't Starve Together Dedicated Server\ugc_mods\Cluster_1\Master\content\322330"

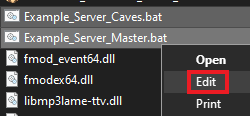
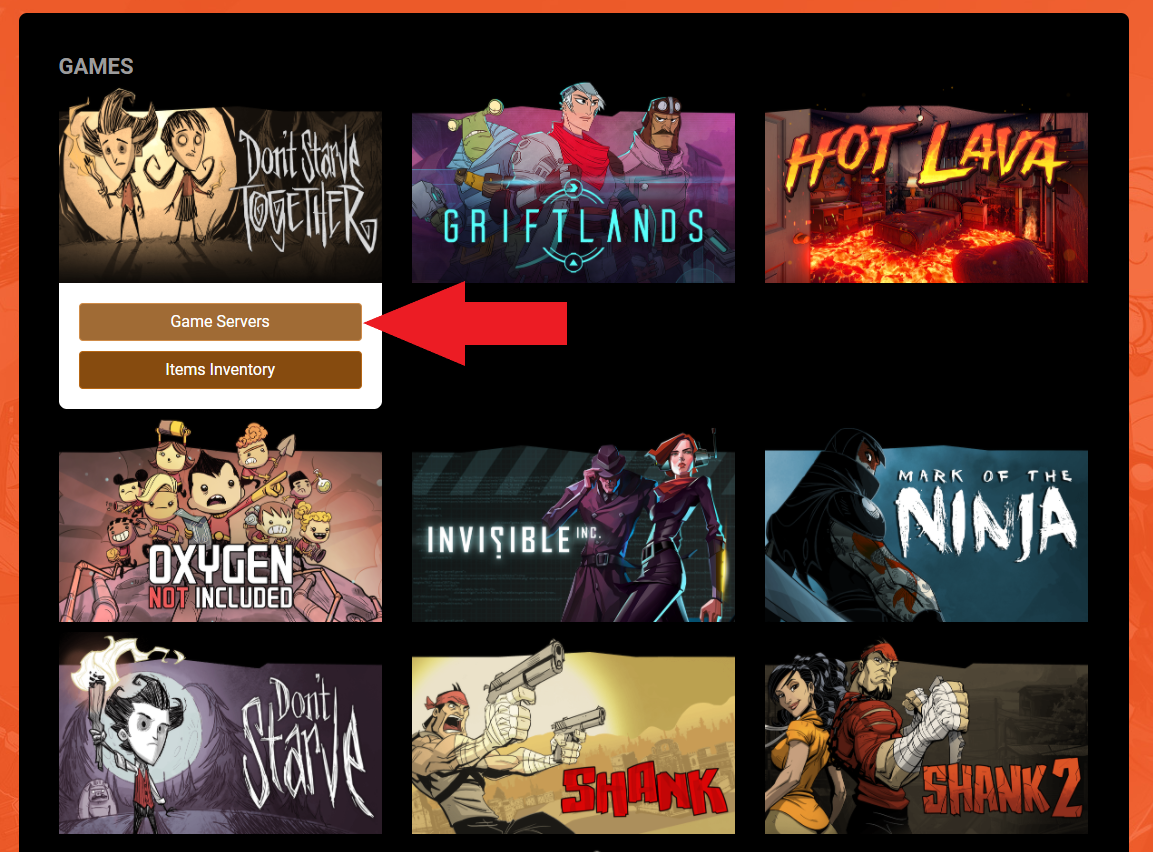
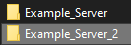
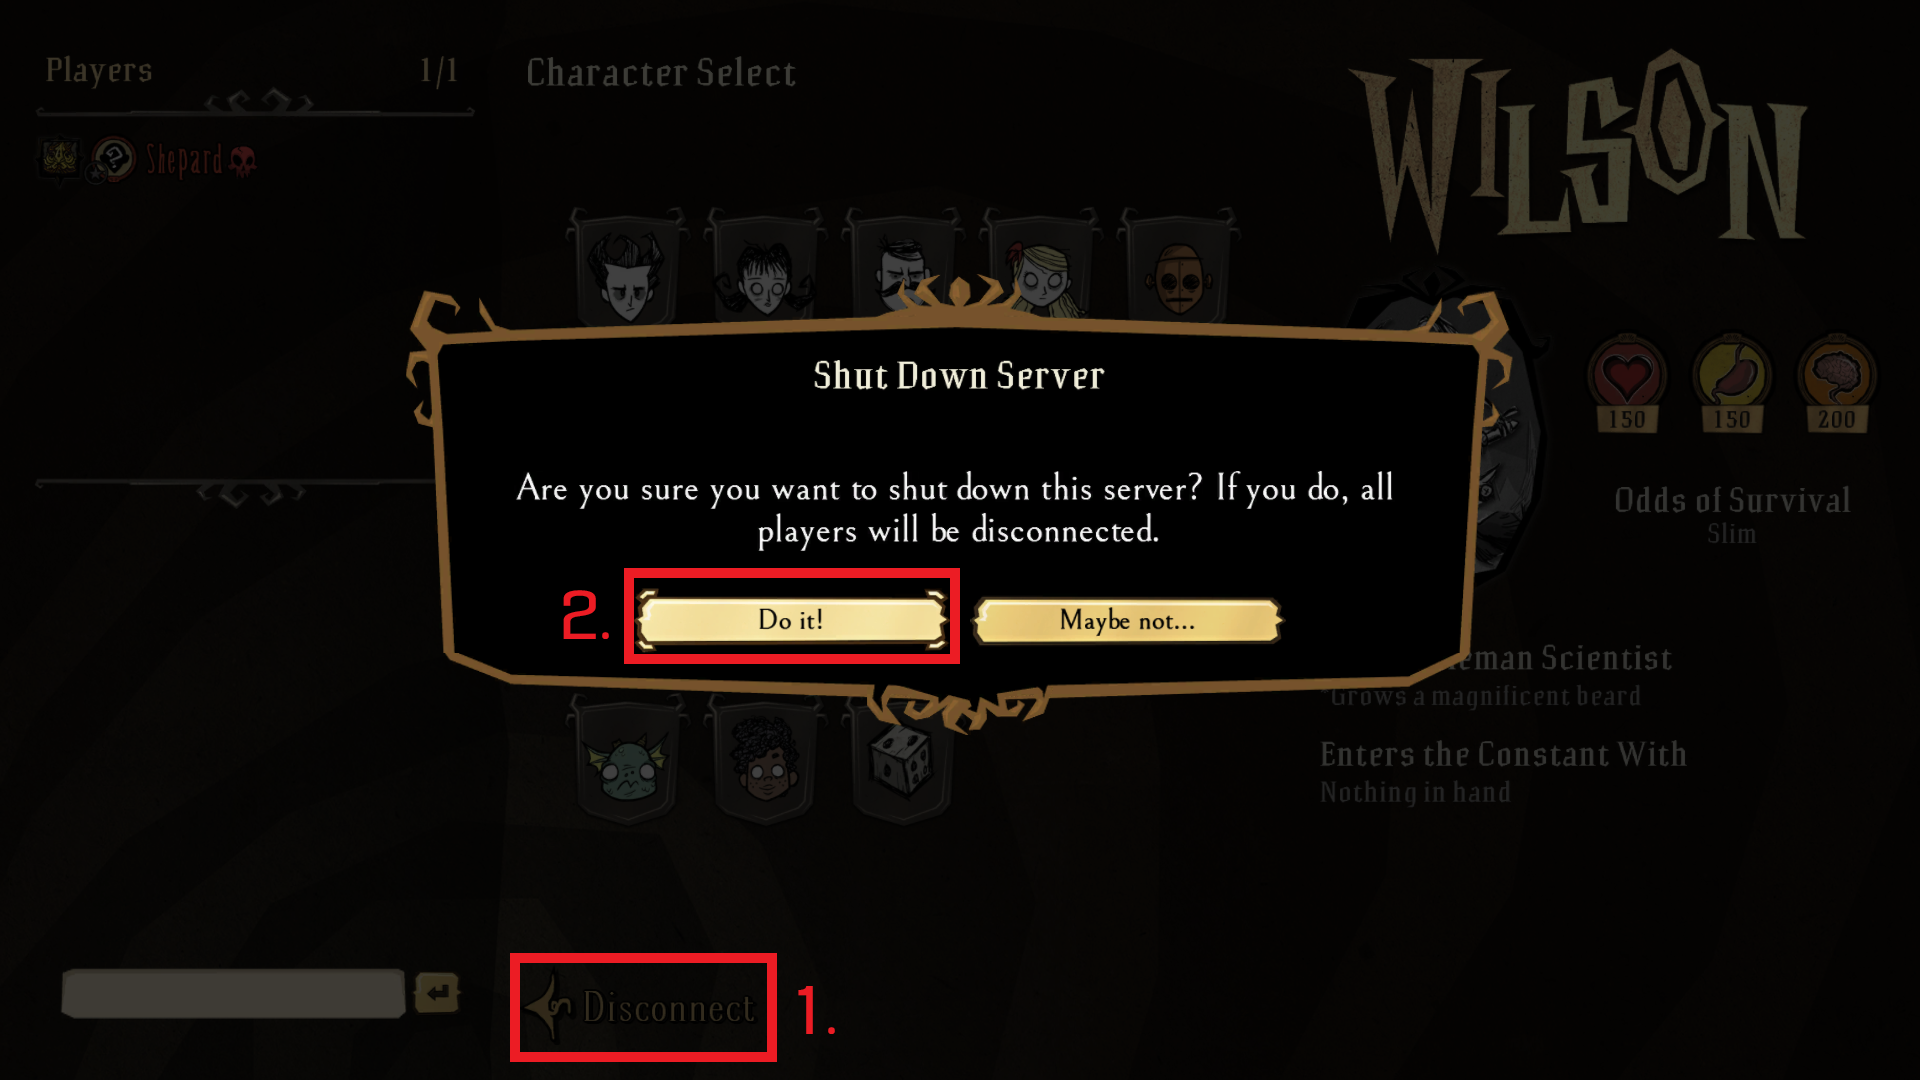
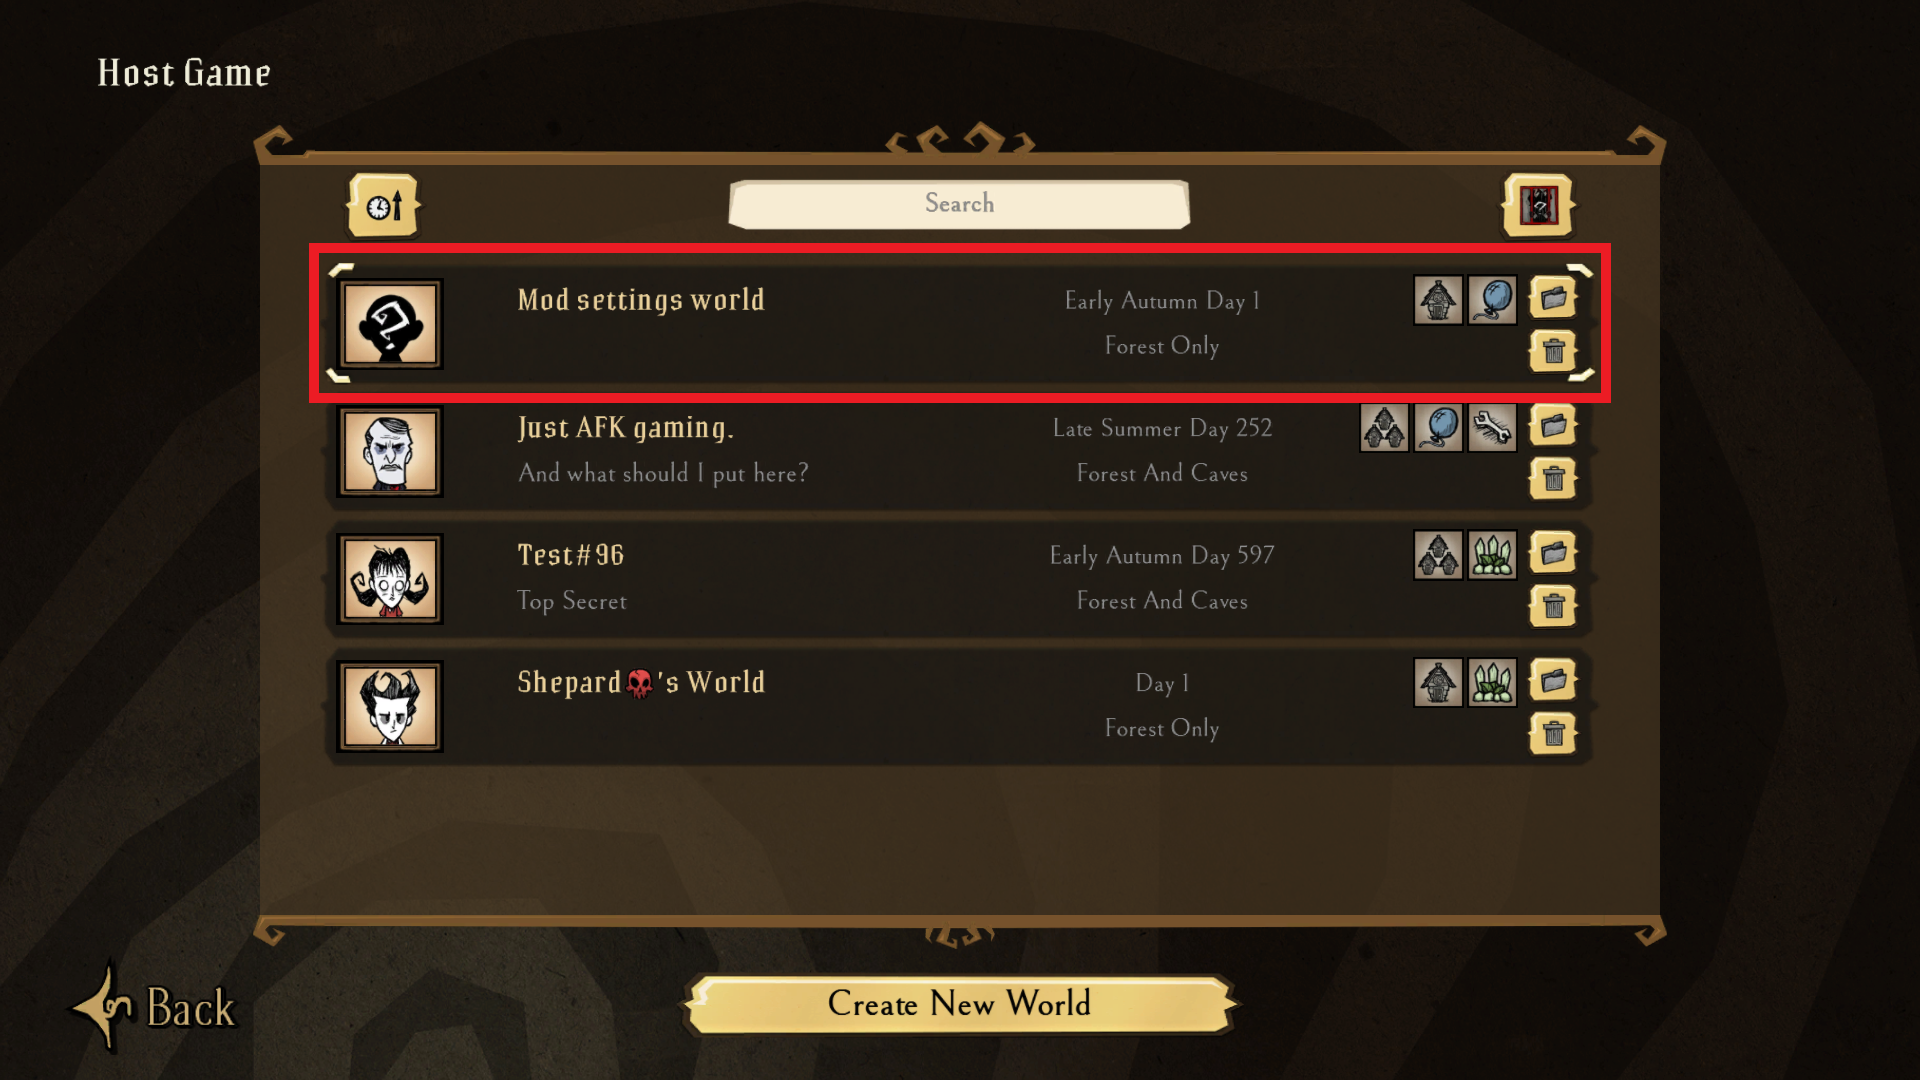
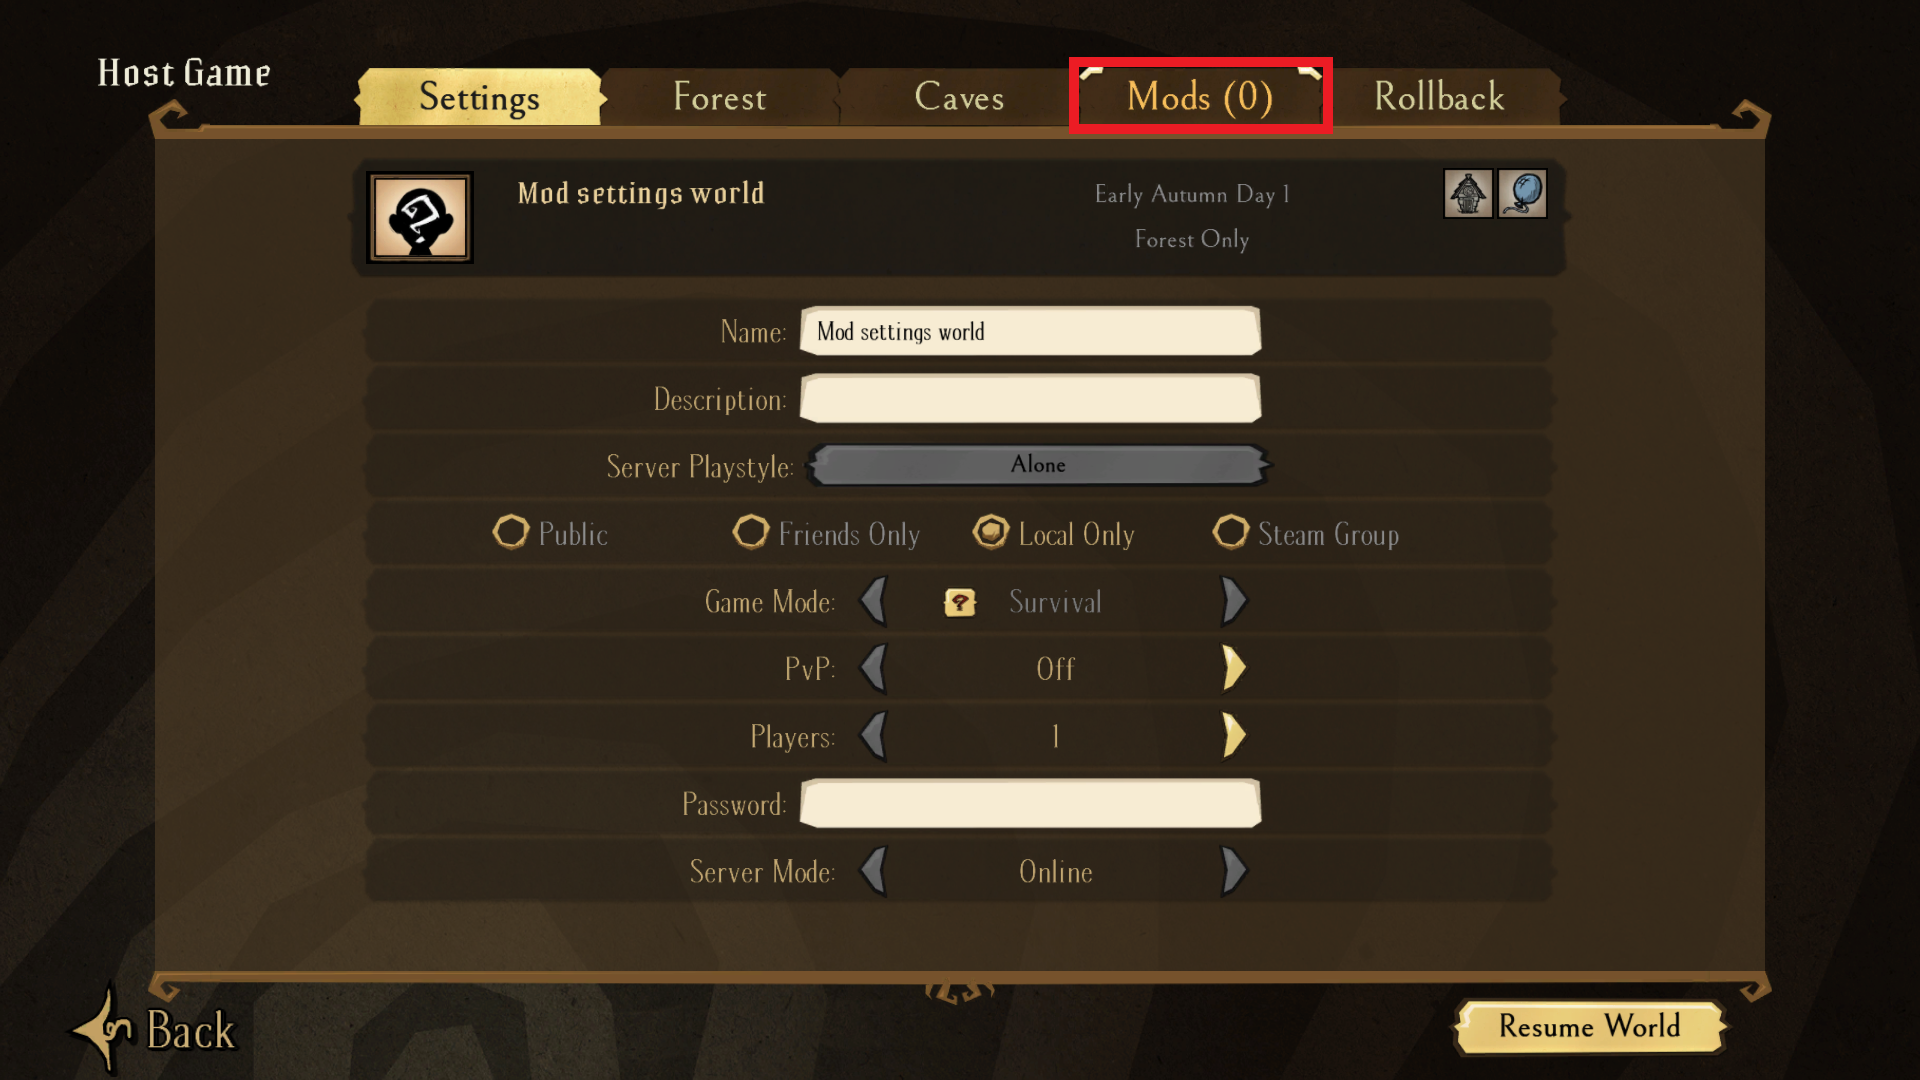
manually created servers are more convinient at this moment, and are recommended :ranger:
Shepard󰀀  [author] 1 Jan @ 3:32am 
@qircore , make sure you have configured the dedicated_server_mods_setup.lua file from the “Installing server mods” section and installed server mods with it. You may have configured the mods, but not installed the mods specifically for the dedicated server.

If you have reviewed the steps of the guide and the problem is not solved, you can add me as a friend, I'll try to help you in DM, at least there it is possible to upload screenshots
Shepard󰀀  [author] 1 Jan @ 3:21am 
No, if a mod has been added, the Mods tab should appear immediately on server startup. Otherwise it will be grayed out and there will be no Modded tag either.

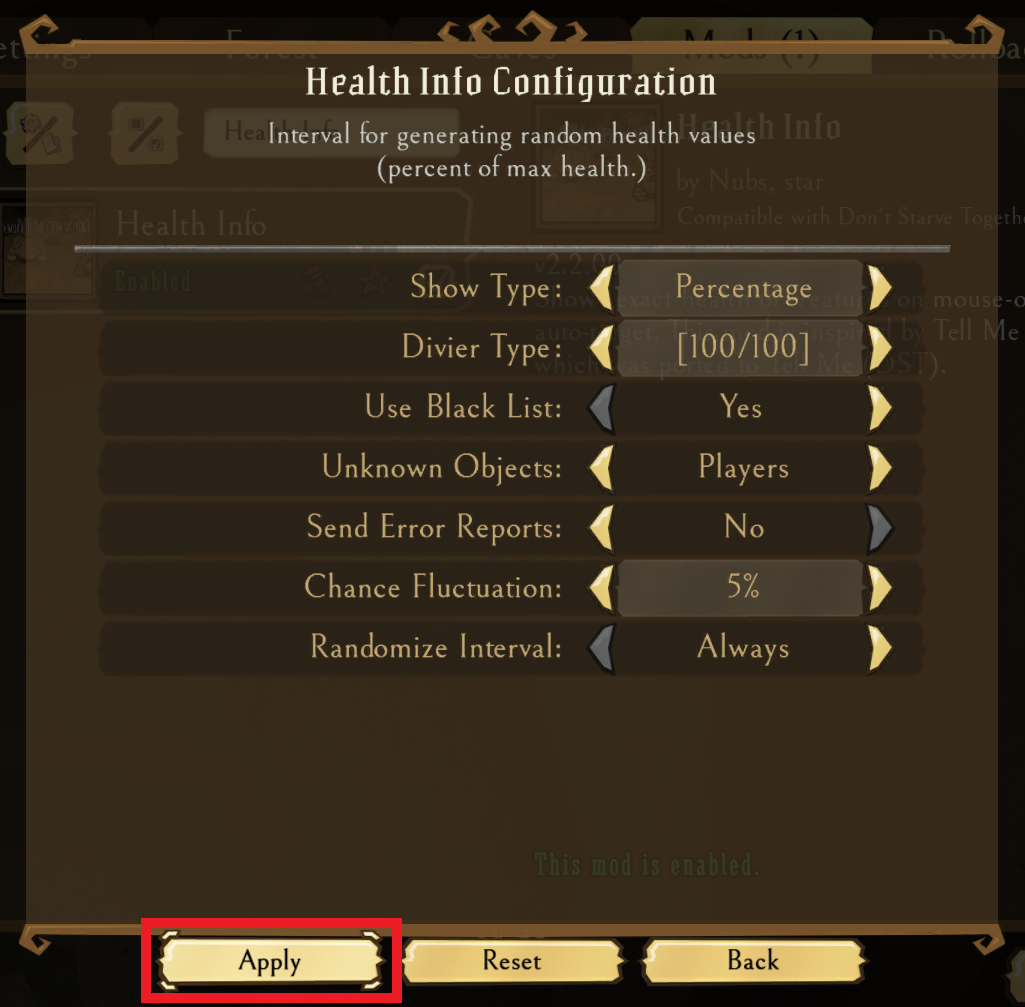
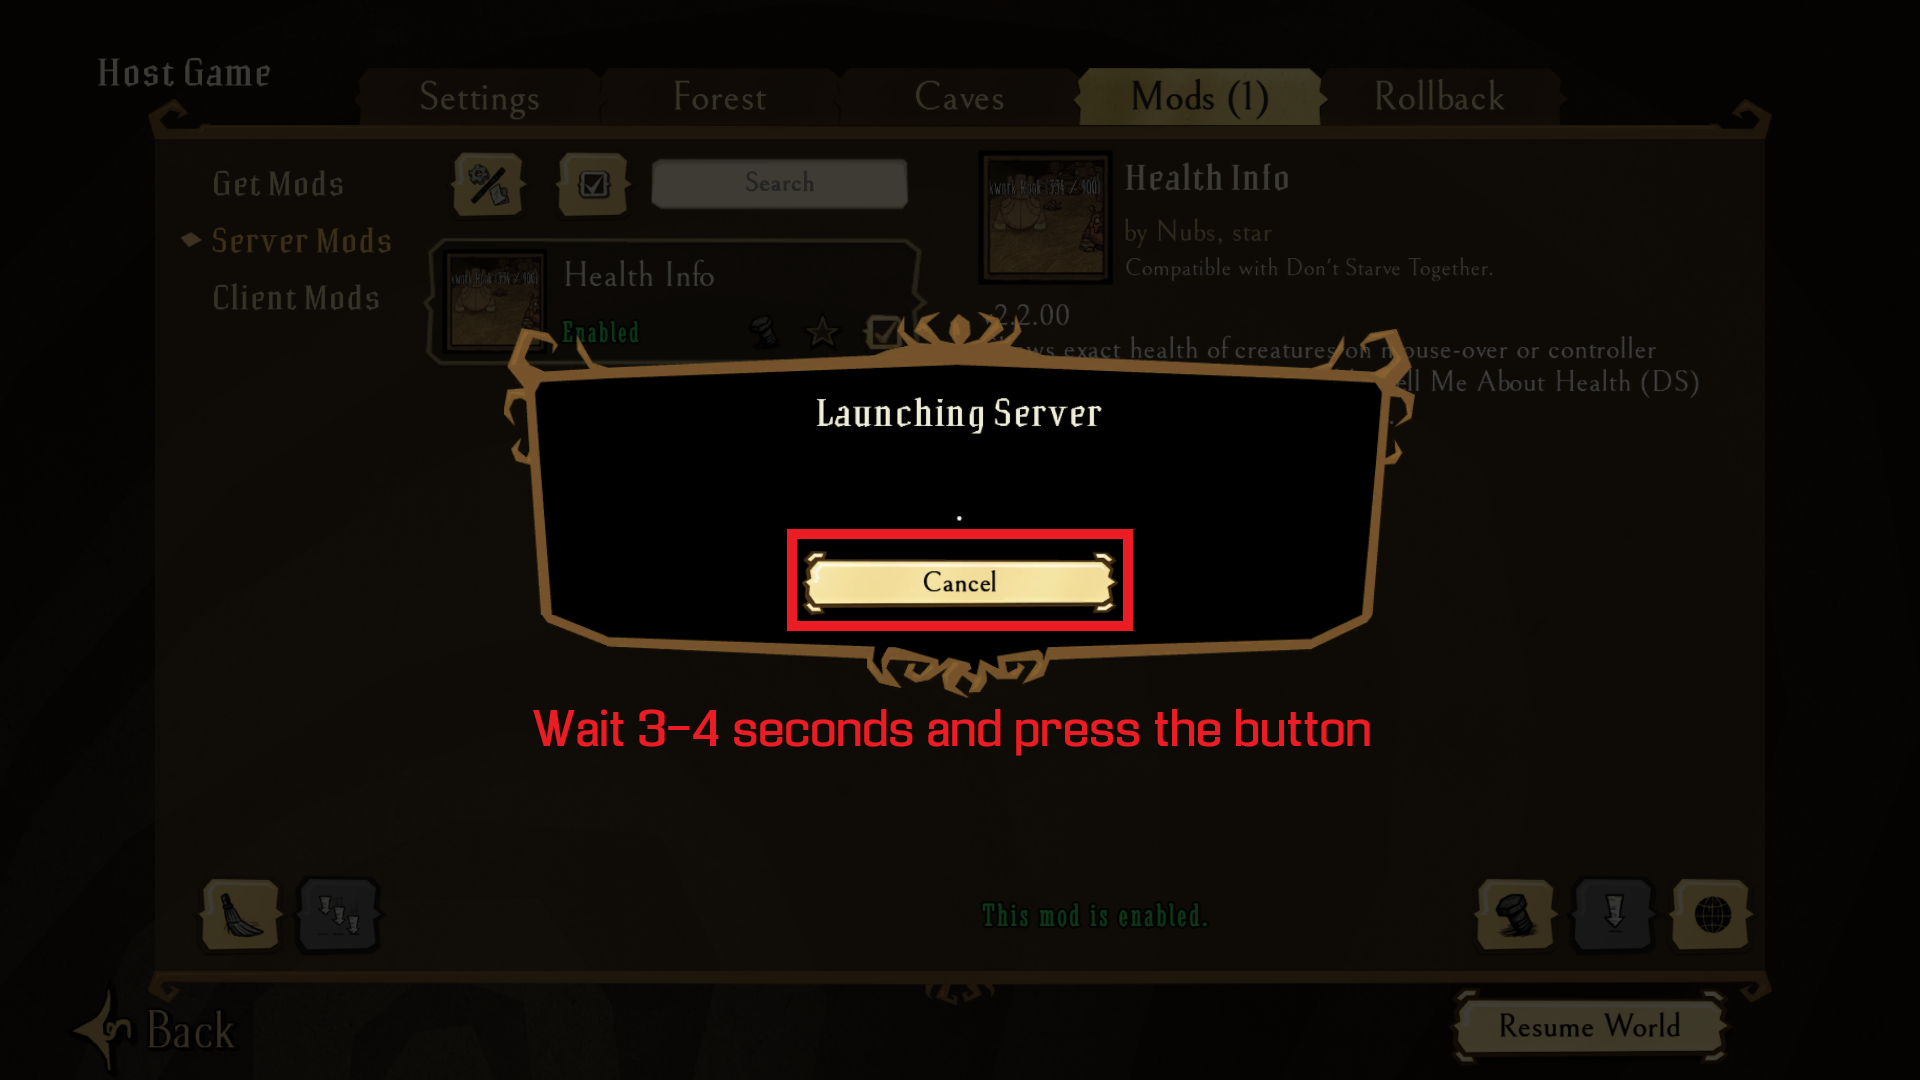
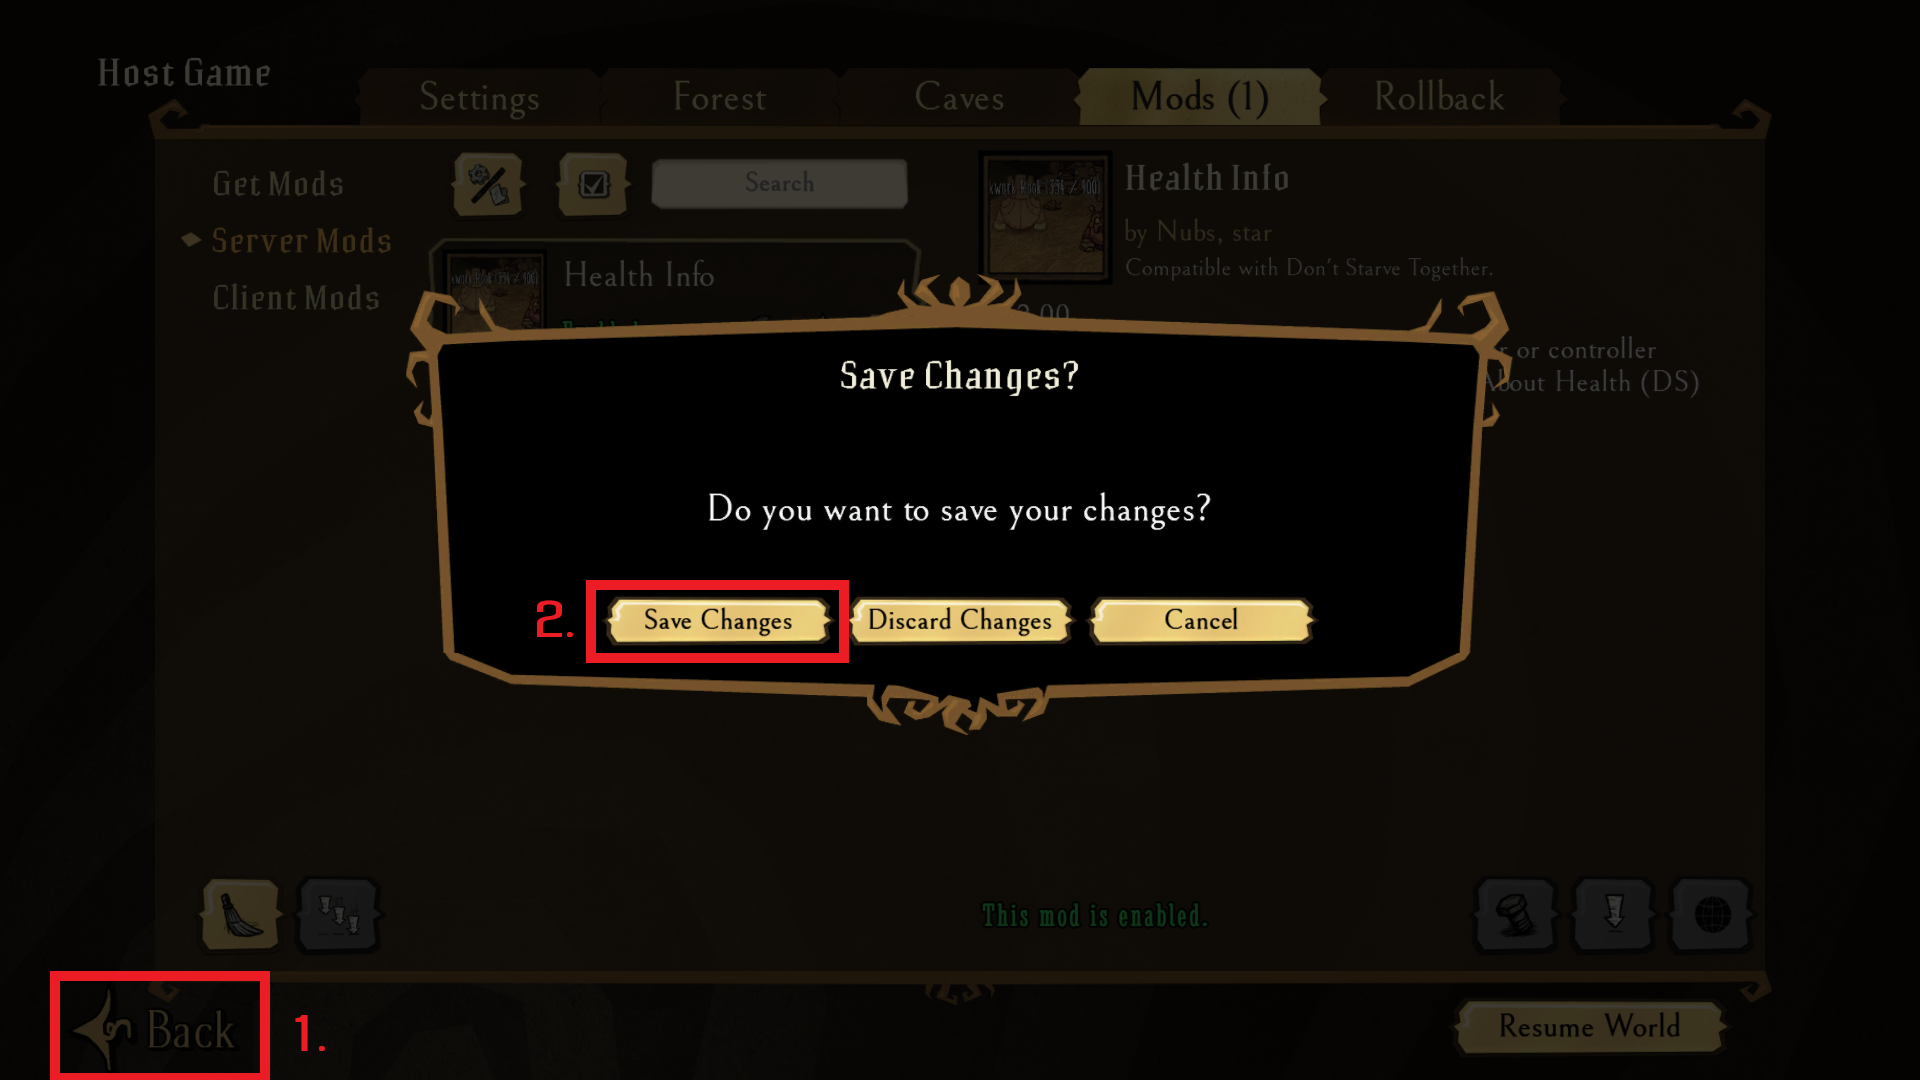
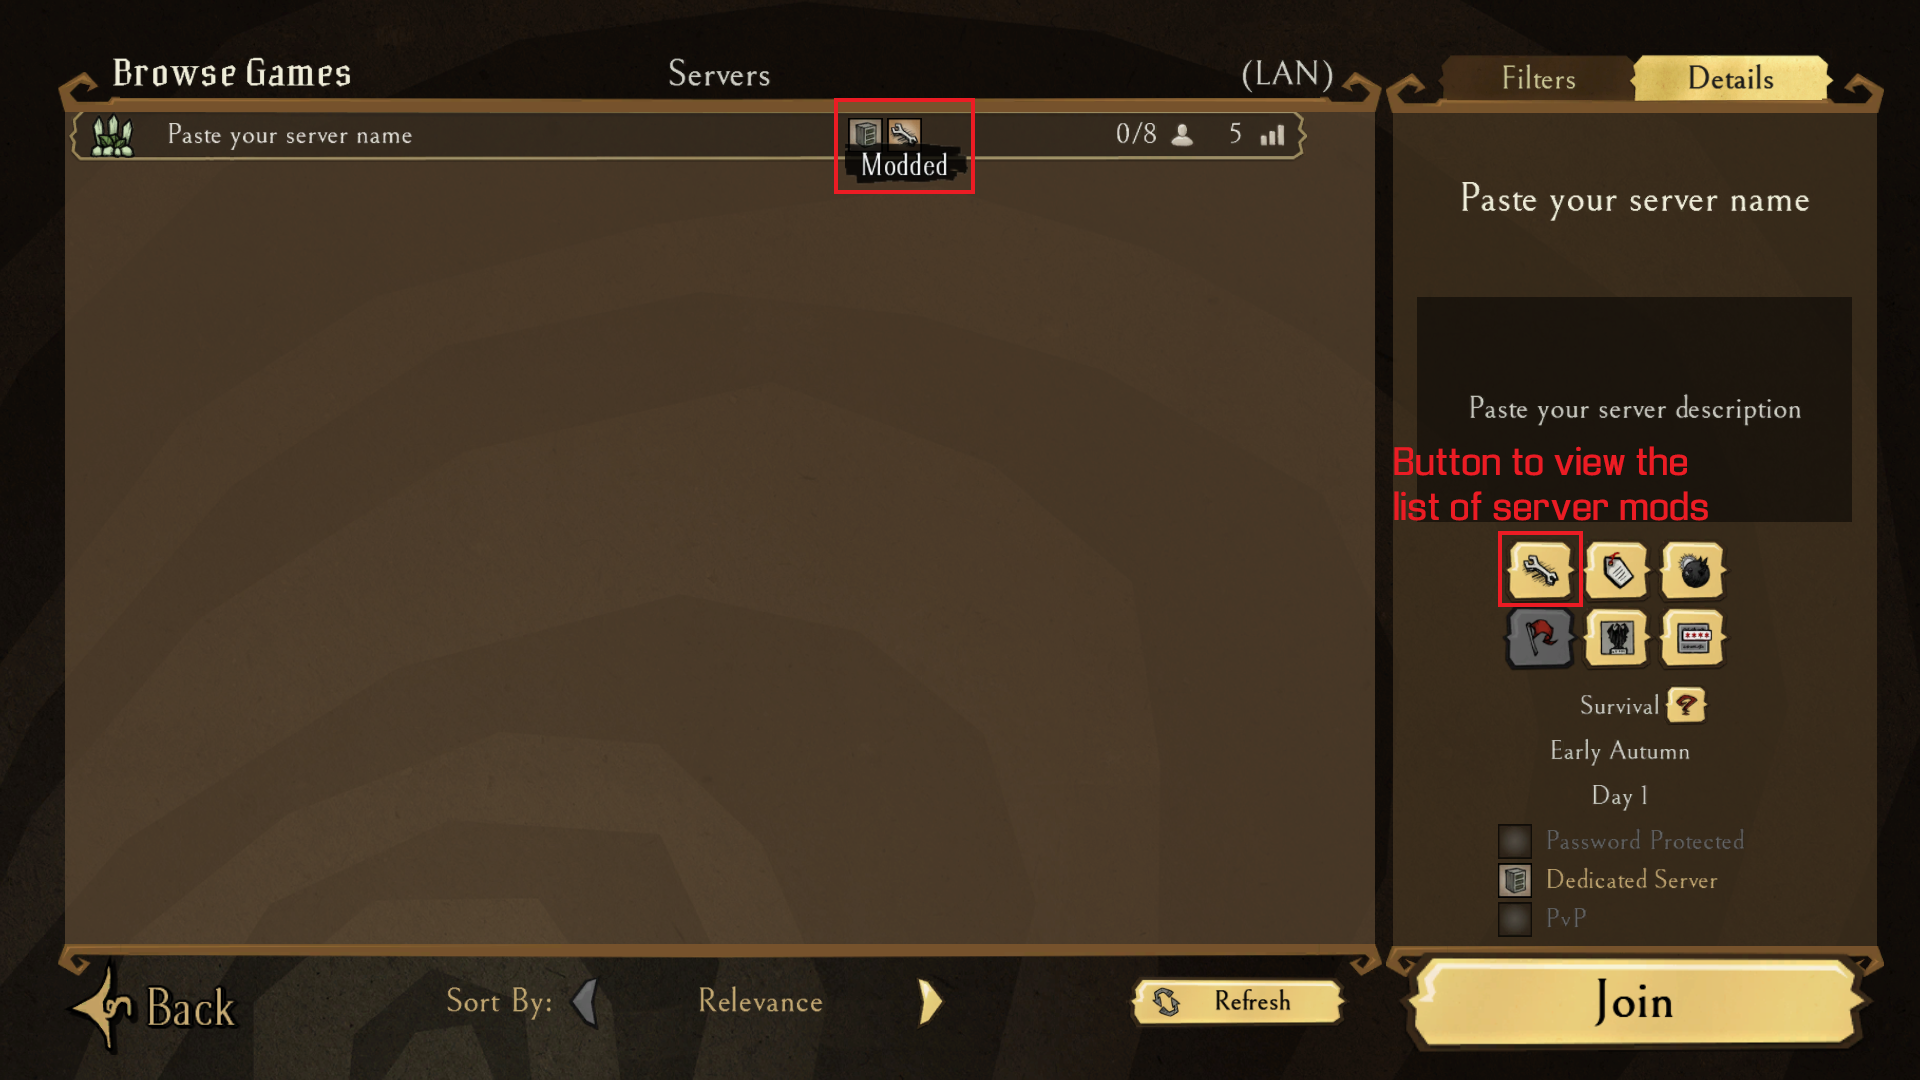
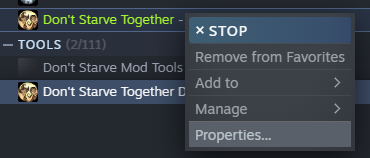
Which way of setting up and enabling mods out of the three suggested in the guide did you use? I recommend the third way
Qircore 31 Dec, 2024 @ 12:11pm 
trying to mod the server, put the lua file with mods in both masters for cave and over world but when launched the server doesn't say it has mods, do i need to join it for it to register?
Shepard󰀀  [author] 26 Apr, 2024 @ 11:40am 
Personally, I've never heard if it's possible to make it so that the server pause is only for a specific player. What exactly do you mean by that? Server pause usually happens when no one is on the server, or it is set manually through the menu or possibly the console.
SMC 6 Apr, 2024 @ 1:21pm 
Any way to pause the server just for admin or something like that ?
Shepard󰀀  [author] 26 Jan, 2024 @ 4:35am 
@Misloagi628 http://cs2bus.com/profiles/76561199082145340 Double-check several factors
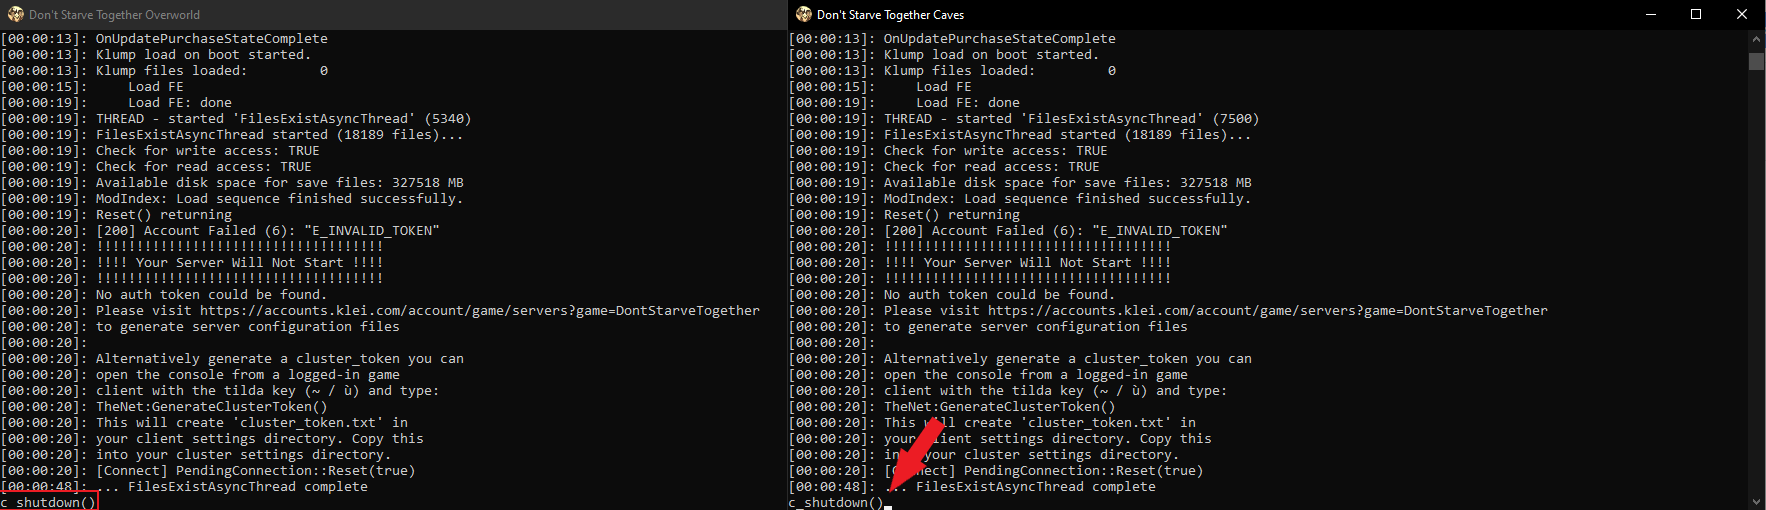
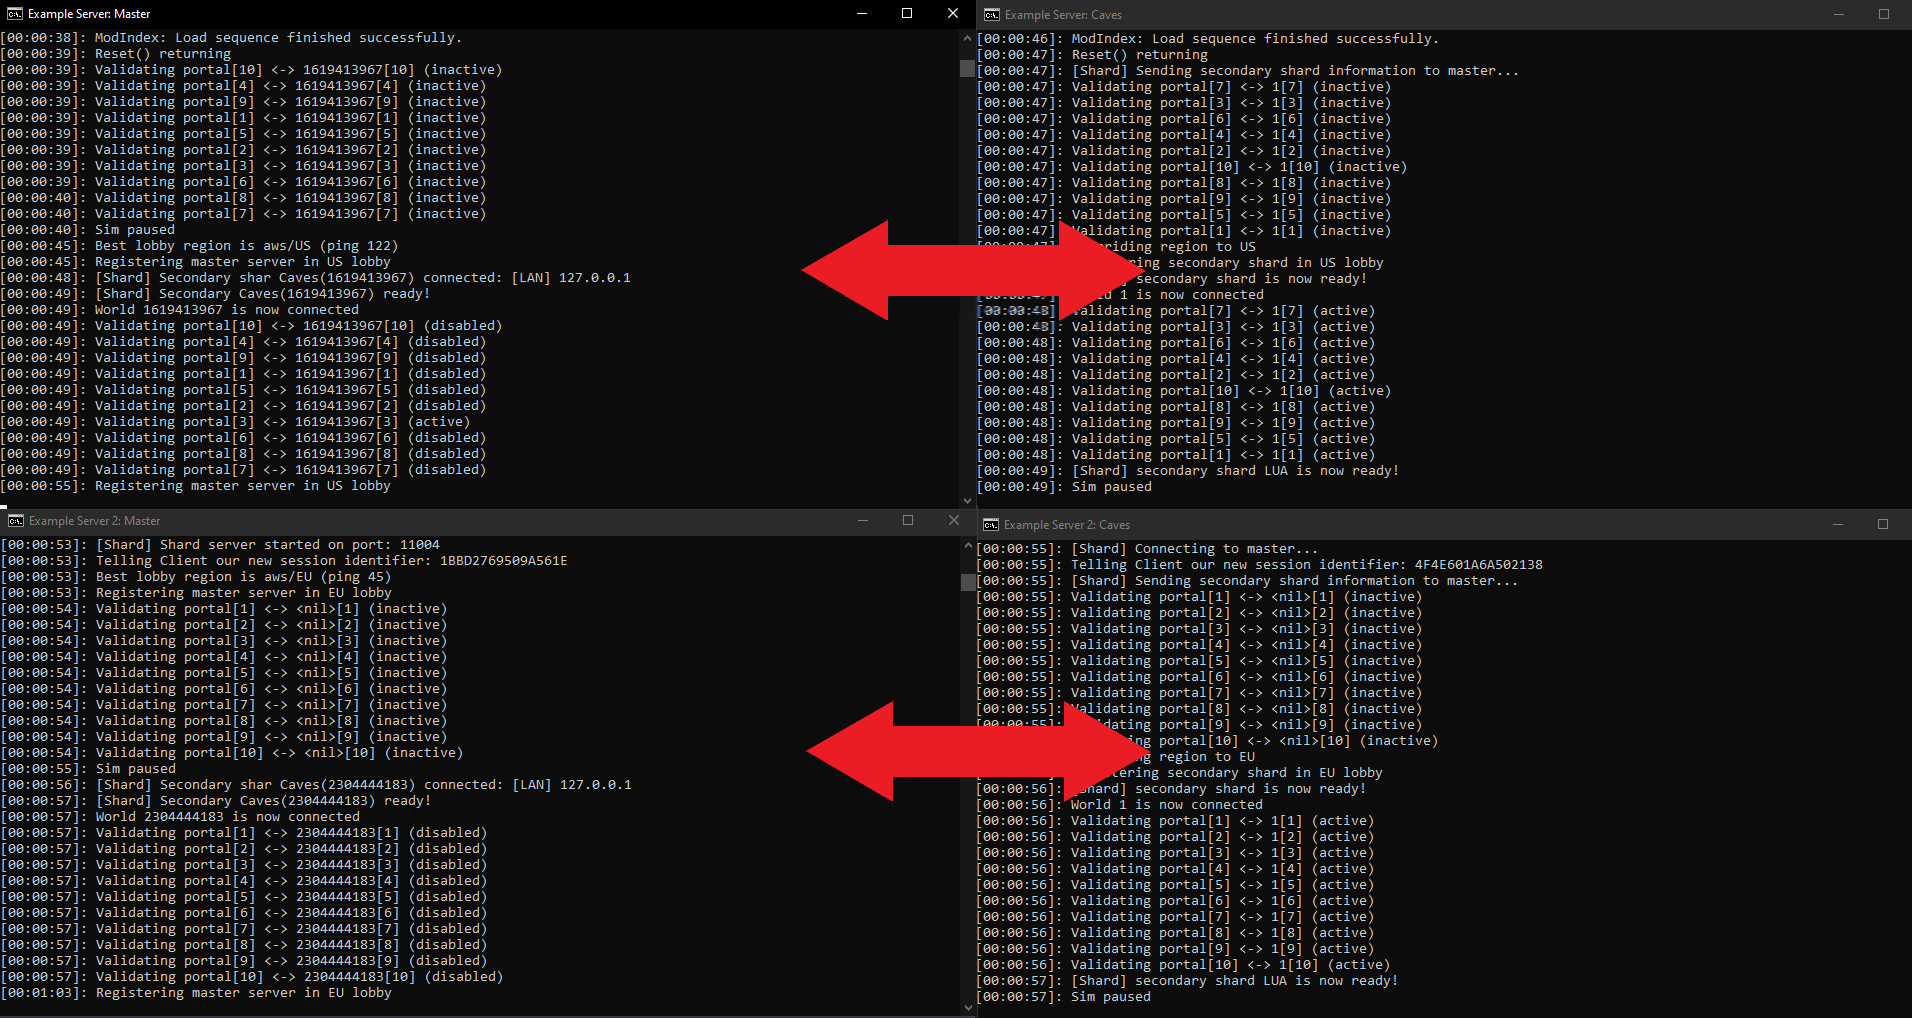
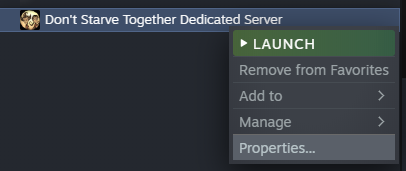
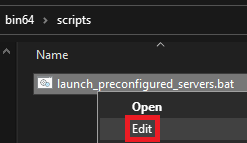
> that the .bat files you run have the correct server folder names and that you are not accidentally running another server
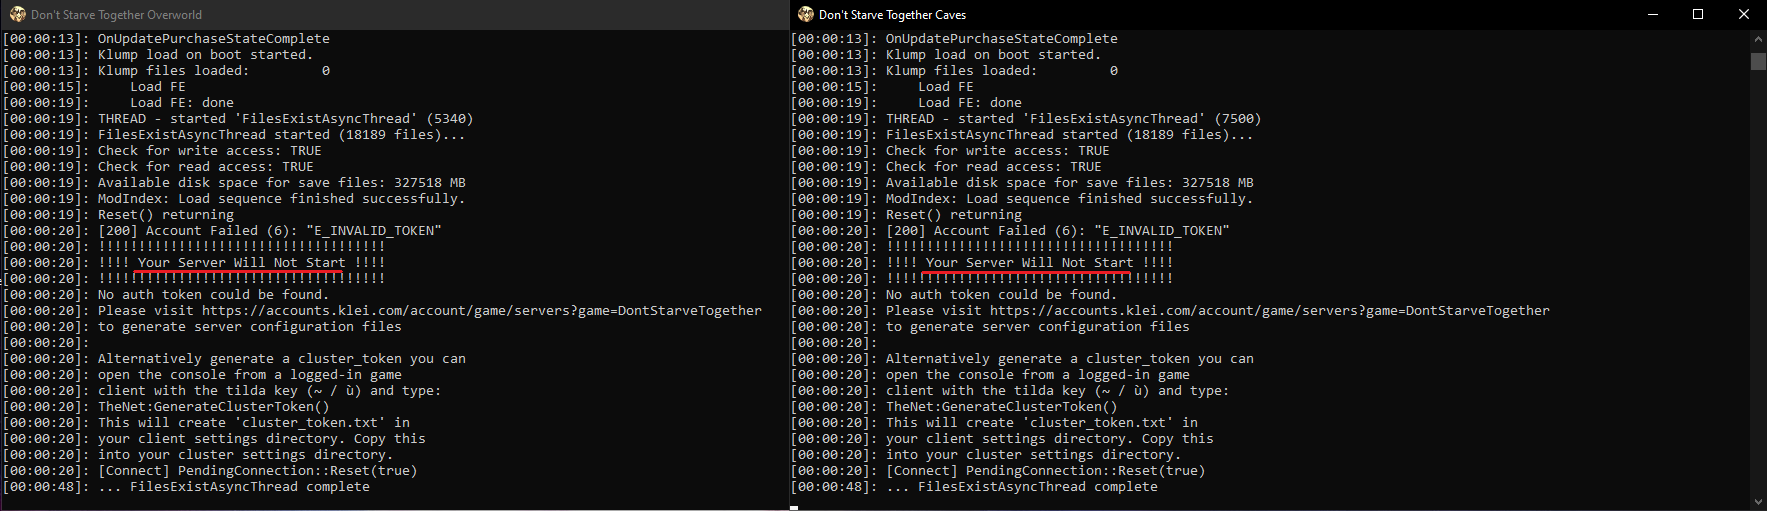
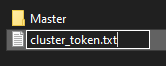
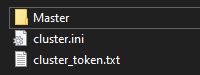
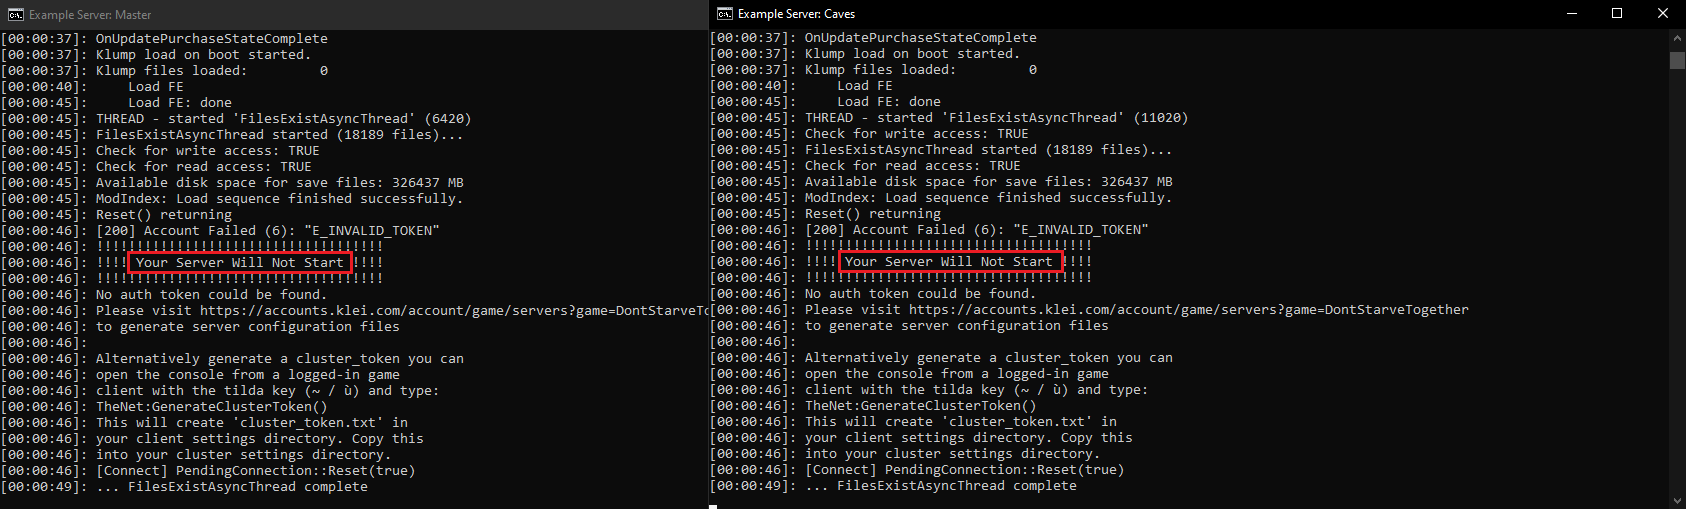
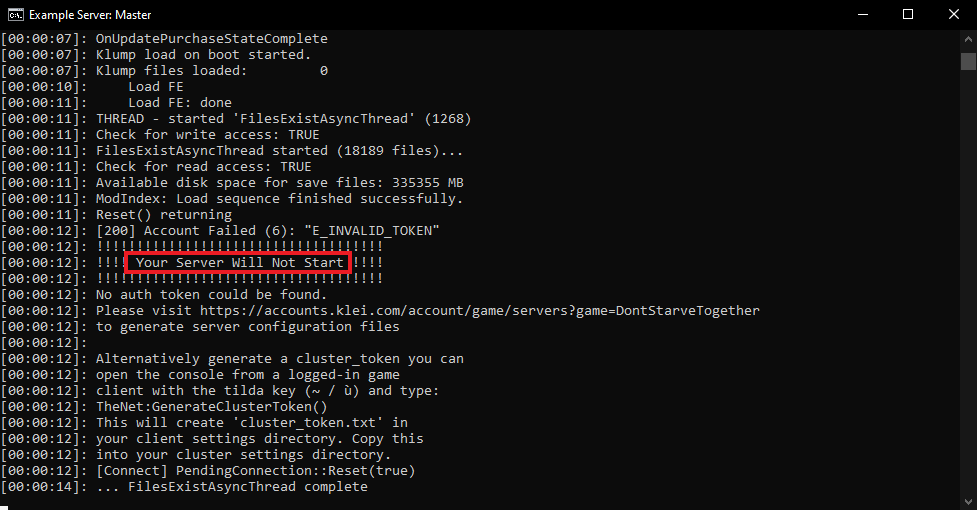
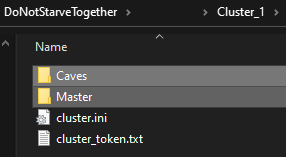
>The token in the cluster_token.txt file from your server folder matches the token you created on the site (alternatively, you can create it via console [`] directly from the game, a guide on how to do this can be found by googling "how to create token dst via console").
Shepard󰀀  [author] 26 Jan, 2024 @ 4:35am 
@fr0zert http://cs2bus.com/profiles/76561198298062843 we discussed this a long time ago in DM, hope it helped you:yay:
Shepard󰀀  [author] 26 Jan, 2024 @ 4:34am 
@asdfasf http://cs2bus.com/profiles/76561198010209754 thank you for your review! I'm sure you've done well and I'm glad I tried to make this guide useful to someone:ranger:
Shepard󰀀  [author] 26 Jan, 2024 @ 4:34am 
@Qavemann http://cs2bus.com/profiles/76561198386104818 sure! The actual "shards" (Surface & Caves) are actually separate two dedicated servers that are connected to each other. Using mods that create more links you can make more than 2 shards linked together, I call it multisharding. If you just need to run for example two separate servers (in the first 2 shards and the second too (caves + surface)), then you need to make sure that the two servers have separate two folders with their files, you also need to take into consideration the ports of the servers, because there may be conflicts.