Umineko When They Cry - Question Arcs

Umineko When They Cry - Question Arcs

184 ratings
How to download and install Umineko Project on PC or on Steam Deck
By SHADOW HAWKZ
If you are planning on reading Umineko: When They Cry, you absolutely must download and install Umineko Project.

Umineko Project is a fan port of the PS3 version of Umineko. If you do not play Umineko Project, you are missing out on a lot of enhancements that really make the game way more enjoyable.

You may think that downloading the 07th Mod patch is sufficient, but it isn't. Due to the way the engine is coded, with only 7th Mod, you are missing out on a lot of features. These features include lip sync (character's mouths moving when they talk), rain effects, animated effects (such as animated golden butterflies, eyes, sword slashes, etc.).

Also, readers in the past were unable to use the Witch Hunt translation on Umineko Project (the witch hunt translation is the official translation that is on Steam). Users used to have to choose between Steam + 7th Mod for the "best" translation or Umineko Project for best visuals with a fan translation. This is NO LONGER the case and you can easily add the Witch Hunt translation to your installation of Umineko Project.
40
5
4
20
3
2
3
3
2
2
   
Award
Favorite
Favorited
Unfavorite
IMPORTANT COPYRIGHT DISCLAIMER
Below, I have copied the copyright disclaimer straight from Umineko Project's website. Please choose to install at your own discretion. While it is technically free to download and install Umineko Project, to cover all of your bases and ensure that you legally own the assets to be able to play Umineko Project, you must own the Steam release of Umineko: When They Cry as well as the PS3 release of Umineko no Naku Koro ni Rondo.

"Copyright message
This game may violate various copyrights of Ryukishi07, Alchemist, artists, musicians, voice actors, translators, and more.

It is not our intent to financially (or otherwise) harm any of these people or companies. It is simply not financially possible for us to obtain permission to legally distribute this game with all its features, and we opted for English and Russian versions of Umineko PS3 to exist in this state instead of not at all.

We ask all our users to support these people by buying the products that made this game possible: the PC release of Umineko no Naku Koro ni EP4, and the PS3 release of Umineko no Naku Koro ni Rondo — even if you do not own a PS3.

Usage of this game is prohibited if you do not own either one of these two games.

You are forbidden to redistribute the intact game without this copyright message and a link to Umineko Project website. You are forbidden to redistribute the game with any modifications unless officially allowed by Umineko Project.

Disclaimer:
This software is provided “as is”, without warranty of any kind, expressed or implied. In no event shall the authors be liable for any damages or other issues caused by the software, their website or anything related. The software is provided for private, non-commercial use only. For use outside Japan only.

The password to extract the game archive can be constructed if you own the PC and PS3 games, as follows:

1. Find the large bold numbers on the back cover of the PS3 game manual, and write them down without hyphens.
2. Look up the number before “KB” at the bottom of page 4 of the PS3 game manual, and append it to the end of what you already wrote.
3. Find the “うみねこのなく頃に.exe” file of the PC game, and append its size in bytes (not “size on disk”) to the end.
4. Finally, find the “nscript.dat” file of the PC game, and append its size in bytes (not “size on disk”) to the end.

At this point you will have a 27-digit passphrase you can use to unpack the archives.

If you agree with this statement, please, proceed to “Downloads”."

A link to the web page can be found here: https://umineko-project.org/en/copyright-message/
Note for People Wanting to Install on Steam Deck
If you want to install Umineko Project on the Steam Deck, you will still follow Steps 1-5 first. After Steps 1-5 you will perform Step 5.5 which is an exclusive step just for the Steam Deck. I placed it after Step 6 to not confuse people trying to install Umineko Project on a normal PC.
Step 1: Downloading the Resources
Step 1 is usually the hardest step for people. Some do not understand or struggle with this step. Please follow my directions to make sure you do not mess anything up.

Here is a link to the Umineko Project download web page: https://umineko-project.org/en/downloads/

First: I recommend simply creating a new folder anywhere on your computer. Name it whatever you want. I simply name it Umineko. You will want to use this folder to install your files into. This will be the folder where you will launch the game from.

Second: You will see a tab titled "Resources". Under Resources, there are a total of twelve (12) files that you need to download. There are three different mirrors that you can choose from per file, I always use "mirror 3" as it is a direct download and is the fastest in my experience.


As you download the files, I recommend NOT sticking them in the New Folder you created because you are going to be extracting from the files you download. Simply keep them in your download folder on your computer until you are ready to extract the data. When we get to the next step, you will want to extract the data to your blank New Folder that you created.

Now here is a VERY IMPORTANT NOTE. All twelve of the files you see may be .zip files. Sometimes it looks like just the first file, "umiproj_31.12.19.7z.001" is a .zip, sometimes all twelve look like a .zip file. Regardless, DO NOT TRY TO UNZIP ANY FILE UNTIL ALL TWELVE FILES ARE DOWNLOADED. I cannot emphasize this enough. If you try to unzip file #1, it will not work and you will get an error. Same is true for any of the twelve files. ONLY when you have all twelve files downloaded in the same location, will you be able to extract the first file titled "umiproj_31.12.19.7z.001". The reason for this is because extracting the first file actually is programmed to extract the data from all twelve of the files, not just the first one.

Third: Once, and only once, all twelve files are downloaded, what you need to do is use your unzip program such as Winrar to unzip the first file. The password to unzip the file is: 035646750436634546568555050

When you unzip the data, extract it to the New Folder you created. This step is going to extract almost all of the game's data and may take awhile depending on how fast your computer is. Let it do its thing, if it seems stuck, it likely isn't.
Step 2: Downloading Resource Updates
This next step is much easier. Simply download the single file under the "Resource Updates" tab.


The file is a .zip. After the file is downloaded, you will need to extract the file. Place the extracted data into your recently created folder that you extracted all of the data from the twelve files in Step 1. Your computer will warn you that there are already files in the folder that share a name with the files that you are extracting into the folder. You need to choose the Replace option. Do not skip. These files are updates to pre-existing files so they need to replace what is already present.


WARNING

Do not download and extract this file under Resource Updates until all of the data from Step 1 that you obtained under the Resources tab have been fully extracted to your New Folder. If you do this one first, data from Resources will see the data from Resource Updates and ask if you need to overwrite or skip the files. This will mess with your installation and will likely result in you needing to start from scratch. This is easily avoided by only starting Step 2 after you are fully completed with Step 1.
Step 3: Downloading Scripts
Step 3 is really easy. Simply download the single file titled "Base Scripts under the "Scripts" tab.

Take this file and stick it in the folder that you created that you extracted the data from Step 1 and Step 2 into.

Step 4: Downloading Your Game Engine
Step 4 is also really easy. There are multiple game engines for you to choose from. You only need to download one of the five that are available. Specifically, you need to download the one that corresponds to your computer's operating system.

Likely, you are on a Windows PC like myself. In which case you need to download the file titled "Windoes XP SP3+32-bit". If you are on a Mac, then download the file titled "macOS 10.6+" (I have never tested the Mac version so I cannot provide any troubleshooting if you have issues).

Take the single file that you have downloaded and stick it in your folder that contains the data and files from Step 1, Step 2, and Step 3.

Step 5: Downloading Witch Hunt Language Pack
Step 5 is also really easy. Simply download the single file under the "Witch Hunt Language pack by @ooa and 07th-mod".

Take this file and stick it in the folder you created that you installed all of the data and files from Step 1, Step 2, Step 3, and Step 4 into.

This file adds the official translation to the game. To access it, simply choose "Witch Hunt" as your language in the options menu from the main menu when you have the game open.

Starting the Game the First Time
If you successfully completed Steps 1-5, your folder will look like this:


To launch the game, you will use the .exe file titled "onscripter-ru" with the character head as an icon.

Whenever you launch the game, run the game as Administrator. I run into issues where the game will crash when I try to save or quit if I forgot to run the .exe as an Administrator.


The first time you launch the game, the program will do a file verification to ensure that everything is installed correctly. If you installed everything correctly, it will let you know and it will never do the file verification ever again whenever you launch the game.

However, if you messed up at some point and the verification detects that a file is incorrect or missing, it will let you know. Even if the game starts, it will always do the file verification. Unless you successfully complete the file verification once without any issues detected, you will have to wait through a lengthy file verification every time.

Please ensure you complete the file verification at least once, especially if you want to complete the optional Step 6.
Step 6: Optional But Recommended
Step 6 is entirely optional. Please note that you must do one successful file verification before you do this step. By default, while reading Umineko through Umineko Project, the textboxes have, in my opinion, a distracting logo plastered onto the textboxes. This is what it looks like:


If you are like me, you may want this replaced with something cleaner and nicer looking. Here is a link to where you can download a much nicer textbox: https://www.reddit.com/r/umineko/comments/1athh3k/umineko_project_logoless_text_boxes_link/

I used to have a different link but it is dead now.

Download the textbox file and install it in the following directory where you placed all of the Umineko Project files: graphics\system\wnd

Simply overwrite the prior textboxes and your game will look much nicer!

Step 5.5: Steam Deck Only Step. Do Not Perform if Installing on PC
As of the writing of this guide, I have not been able to get the default Steam Play comparability tools to run the game.

Also, despite the Steam Deck running Linux, I was not able to get the Linux launcher on the Umineko Project site to work. I am not good with Linux at all so it is very possible someone more proficient at Linux might be able to get it working if they know what they are doing.

For the purposes of the Steam Deck step, you will still install the "Windoes XP SP3+32-bit" file from Step 4.

First: You need to do is install "ProtonUp-Qt" while in Desktop mode on the Steam Deck.


Second: Right click your "onscripter-ru.exe" file and click "add to Steam". The shortcut has the Steam logo for easy identification. If this does not work, open your Steam application and on the bottom left click "Add a Game" and then "Add a Non-Steam Game...". Find your "onscripter-ru.exe" and add it to Steam.


Once it is added to Steam, you can rename it in your Steam application and add custom artwork if you would like so it is not generic gray. You can find plenty of artwork on https://www.steamgriddb.com/. This is all optional of course but makes Umineko look nicer on your Steam Deck menus.

Third: Switch your Steam Deck back to Game Mode. While in Game Mode, click the gear icon for the non-Steam game you created by adding "onscripter-ru.exe" to Steam (I renamed it to Umineko: When They Cry in the Steam client while in Desktop Mode).


Fourth: Click "Properties" then go to "Compatibility".


Fifth: This is the most important step for getting Umineko Project to work on the Steam Deck. If it is not already checked, check the box that says, "Force the use of a specific Steam Play Compatibility tool".


Sixth: You are going to switch it to the "ProtonUp-Qt" compatibility tool. As of the writing of this guide, the current version is "GE-Proton7-43" but it may be a different number for you if you are following this guide at a later date. As of the writing of this guide, the latest Steam version is "Proton 7.0-5". Regardless of what versions are out when you happen to follow this guide, simply click the "ProtonUp-Qt" one which should hopefully indicated a much larger number than the Steam version. It should still have "GE" in the name unless it is changed in the future.


After these steps are completed, Umineko Project should launch and run properly on your Steam Deck! At this point, after you have successfully started the game and launched it once, you can complete the Optional Step 6 to clean up the text boxes in the game to get rid of the logo.

If you are having issues getting the game to start due to it needing to do the File Verification, a simple fix is assigning the ESC key to a button. Once the file verification is complete, hit your button that ESC is assigned to and it should close out properly for you to restart the game without it needing to do another file verification.
Step 5.6: Steam Deck Controls
Once the game is running properly, you will need to configure the controls for the game to be playable. As a Steam Deck owner, I hope you know how to configure game keybindings. Here is a list of the common usable buttons:

Left Click / Enter: Advance Text / Select menu option.

Right Click: Pause the game and pull up the menu.

A: Auto read or auto advance text (however you want to call it).

Mouse wheel up / H: Opens the Message Browser (Backlog).

Arrow keys: Navigate menus and Message Browser (Backlog).

ESC: Hide text box.

CTRL: Fast skip text.
Conclusion
Thank you for taking the time and following my guide to install Umineko Project. I hope that this guide was helpful and you were able to complete the installation successfully. I struggled installing it myself and had to learn what to do through trial and error. Several people I have helped also struggled, even with my guidance. Learning exactly what I need to do as well as helping other inspired me to write this so that I could hopefully help as many people as possible be able to experience the definitive way of playing Umineko.

Umineko is a masterpiece that deserves to be experienced in the best possible way. Please remember to support the release by purchasing Umineko on Steam before installing Umineko Project. Good luck embarking on your great journey, and never stop thinking as you try to reach the truth in this elaborate story! If you ever need help or troubleshooting, I am always available to assist in helping you install Umineko Project if you encounter any issues.

186 Comments
Pho 2 Jul @ 3:39pm 
@SHADOW HAWKZ Yes, I have been
SHADOW HAWKZ  [author] 2 Jul @ 3:06pm 
@Pho
Have you also been running the game as administrator?
Pho 2 Jul @ 8:14am 
@SHADOW HAWKZ On Windows, and yea Ive got a very good PC. For some reason it would crash seemingly the first time a new scene/scenario would begin.
SHADOW HAWKZ  [author] 1 Jul @ 8:04am 
@Pho
On Windows? I have not heard of that issue before, if it keeps persisting, it could be good to do a fresh install. I am also guessing your PC is decent? We aren't talking about a really old one right?
Pho 30 Jun @ 12:16pm 
I've been having crashes, once when I went to the config menu, and another after Kinzo's outburst at the beginning. All files verified fine so Im not sure if theres a way to fix this?
SHADOW HAWKZ  [author] 30 Jun @ 8:09am 
@GioHiTech
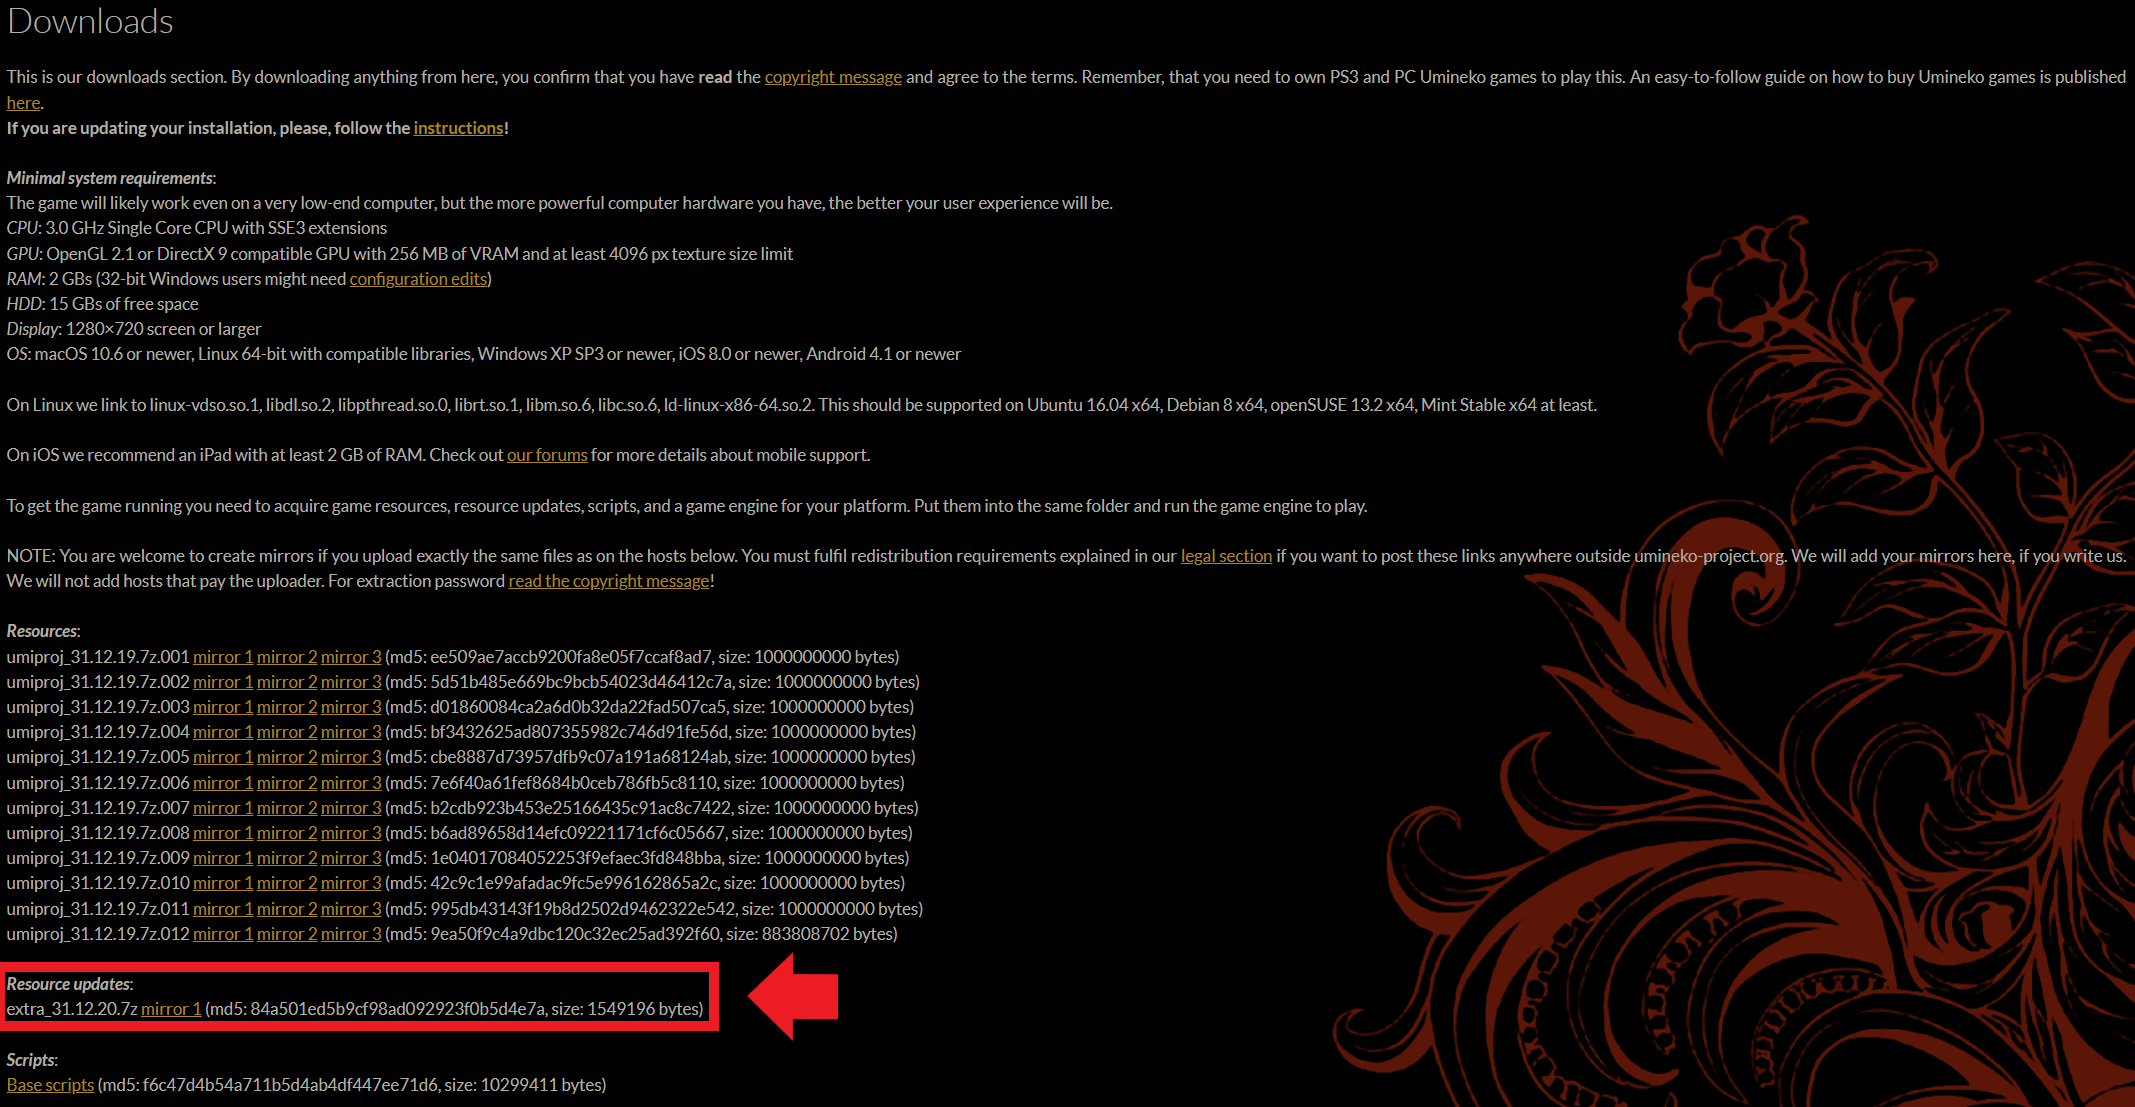
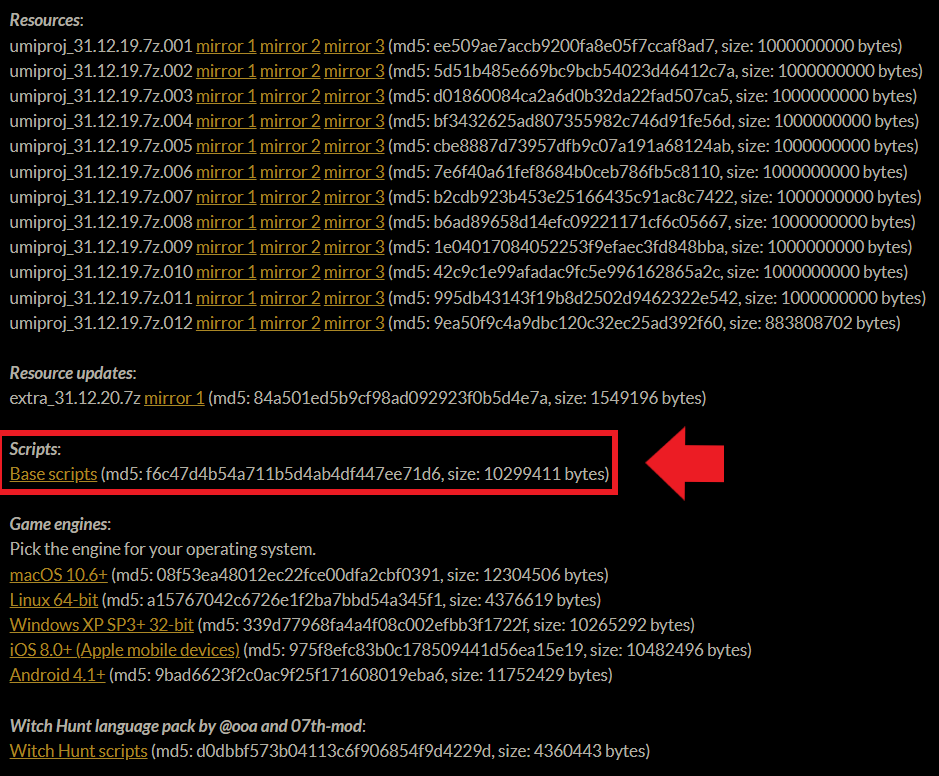
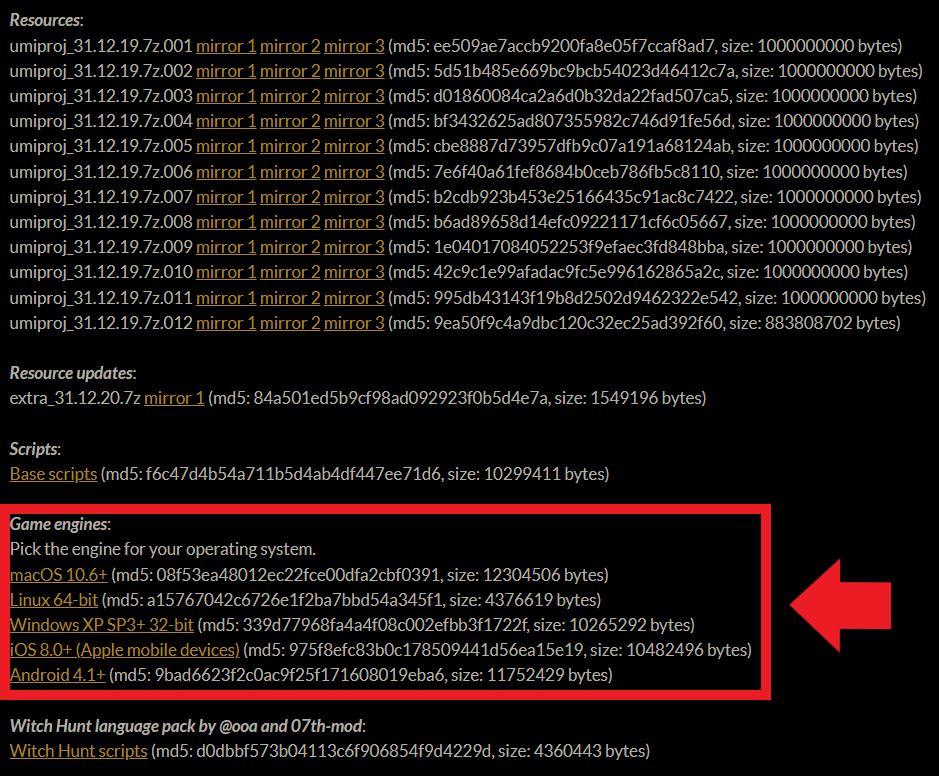
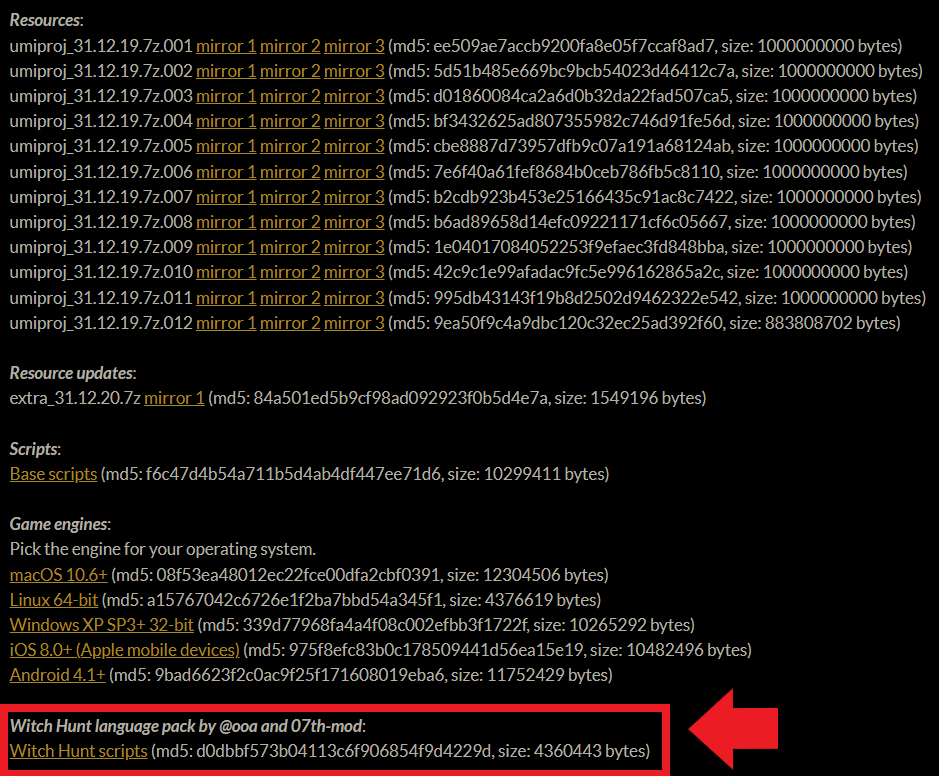
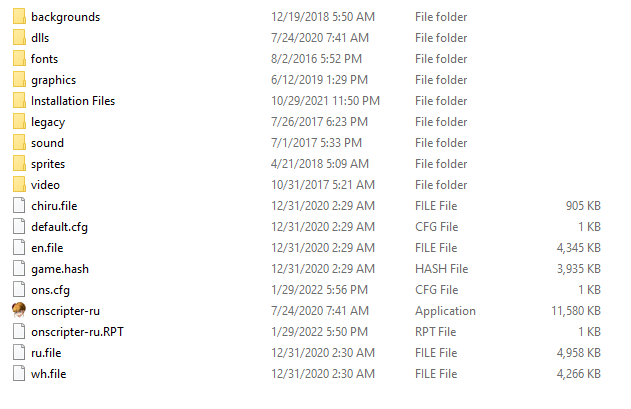
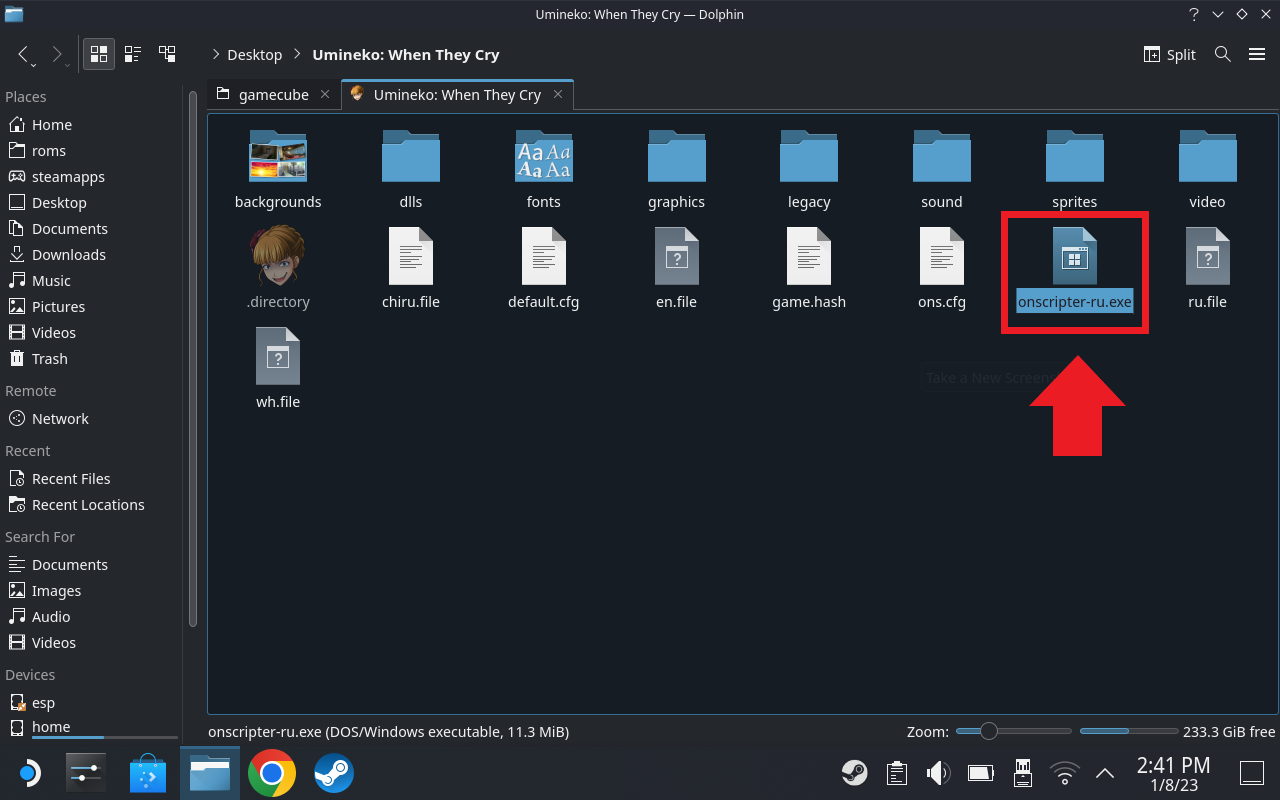
You say you extracted the files but did you also install 1) the resource updates; 2) the scripts and; 3) the game engine?

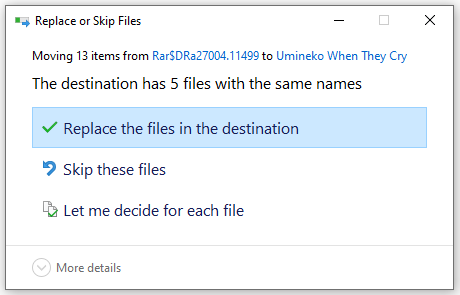
If you have and it is still not working, my only advice would be to do a fresh install, something might not have extracted properly or try a different extracting program.
GioHiTech 29 Jun @ 8:09am 
I need help, I downloaded and extracted all the files correctly, however when I open onscripter-ru (even in administrator mode), it does nothing. I checked in task manager and the program opens for a split second then crashes. I'm running windows 10 64-bit, what do I do to fix this?
blue iverson 13 Jun @ 8:59am 
Okey brochacho, thank u
SHADOW HAWKZ  [author] 13 Jun @ 8:18am 
@blue iverson
No. Umineko Project is a separate application on your computer. I recommend reading Umineko Project then using CRTL to skip through the Steam version if you want to unlock the achievements.
blue iverson 11 Jun @ 8:52pm 
U can still get the achievements?