The Witcher: Enhanced Edition

The Witcher: Enhanced Edition

665 ratings
The Witcher: Enhanced Edition - Walkthrough
By Blue Warden
Full walkthrough for The Witcher.
2
2
8
   
Award
Favorite
Favorited
Unfavorite
Walkthrough - Prologue part 1
1. After the opening cutscene, grab the Rusty Sword infront of you and use it to dispatch the invaders. It's a pretty easy fight considering you have your fellow witchers at your side.

2. Follow your companions up to the gate for some dialogue. You learn that the invaders you just fought are not your run-of-the-mill bandits but are a group going by the name of Salamandra. Deeper into the conversation you'll see a mage named Savolla with a beast called a Freightener. Once the conversation ends you'll be instructed to go alone to the upper courtyard to secure passage for your friends while they hold off the bandits.

3. Once in the courtyard, the game will instruct on how the combo system works. Once you attack an enemy the sword icon will change into a "flaming sword". Click the enemy again and Geralt will follow his first combo with a second, do it again for a third and so forth. The game will then instruct you on how to kill stunned enemies with a single attack. Dispatch the bandits and keep moving.

4. Further on, the game will begin showing you combat styles. Use the Strong Style to kill the heavily armored enemies and use the Fast Style to kill swift enemies. (Note: Changing styles while comboing will cancel the combo). After the bandits are dead you'll see some enemies with ranged weapons. Ignore them and head towards the stairs which lead to a cutscene. Keep moving forward while dispatching any enemy that gets in your way. Theres also a lone barrel along the walls of the citadel which you can loot. Head towards the gate opposite to the citadel, kill the bandits, then interact with the 'Winch'.

5. After the cutscene you'll be instructed to head into the citadel to prevent Salamandra from obtaining any of the witchers mutagens. You'll be accompanied by a young witcher called Leo while the others hold off any other bandits. Before going you'll be giving two potions a Thunderbolt and Swallow (Thunderbolt raises your strength but prevents you from parrying or dodging while Swallow gives you a slight Vitality regenaration boost). Drink your potions then head inside the citadel.

6. Once inside Leo will remark on his witcher training. Continue and kill the Salamandra in your way. The game will instruct you on how to dodge enemy attacks (something you wont be able to do for a while if you drank the Thunderbolt potion). A little more inside, you'll get another tutorial. This one instructing you on how to use the Group Style which is useful when you want to deal some crowd control. Loot the enemies and the barrel near the kitchen door then follow Leo up the stairs.

7. In this new area you'll get a cutscene. After the cutscene, Leo will tell you to learn the Aard sign. Follow Leo to the Circle of Whispering Stones (while heading there loot the crate along the way and the one in the room with the Circle). Click on the circle to learn Aard. Head back and use Aard on the debris next to the barrier.

8. You'll be back outside on the courtyard. You'll need Triss to take down the barrier you saw earlier. Savolla will waltz in alongside his Freightener which leads to your first big choice in the game. Fight the Freightener or go with Triss. The Freightener gives a nice ammount of experience but going with Triss nets you 2000 points of experience which you wont get for fighting the beast. Whichever your choice you'll recieve a Towny Owl potion.

-If you decided to fight the Freightener

9. You'll be accompanied by all your witcher comrades this time. Eliminate all of the Salamandra goons first since they'll just get in your way but dont engage the Freightener just yet as your attacks will not affect him much. Once the bandits are dead, go towards the two 'Siege Cauldrons' and use the Aard sign to get them to reverberate. Once done, go ring the 'Bell'. All the noise will then leave the Freightener vulnerable to your attacks, so head towards the beast and use the strong style to deal as much damage as possible. Repeat the process again if necessary then slay the beast. After the beast is killed, Triss will teleport to the courtyard, injured, and say that she underestimated the sorcerer that was inside the citadel.

-If you decided to go with Triss

9. After Triss finishes talking head into the larger room to trigger a cutscene. Savolla will appear and scoff at you but then Triss calls his bluff. Triss will then depart to deal with the barrier leaving you to deal with Savolla. The mage will then conjure up a magic circle around everyone. After the boss fight begins, dispatch the four goons that accompany Savolla as they make the mage invincible while they are alive. After they're dead, use the strong style to hack away at Savolla's health which will cause the mage to teleport. Repeat the process again until the mage becomes worm food. Once dead, loot his corpse and then head towards the laboratory to meet an injured Triss and the two men ransacking it. You'll get 2000 EXP for your troubles.

10. Whichever choice you picked will lead to the same outcome. Once the ensuing cutscene is done the game will give an explanation on meditation in which you can allocate points for skills, brew potions, oils, and create bombs or to make the game transition from day to night or vice versa. Since you're most likely level 1 by now you'll recieve 3 bronze talens which you can use to unlock skills. After using your talents just meditate.

11. After your meditation go talk to Vesemir, who will tell you what needs to be done. After the cutscene, you'll be instructed to make a potion for Triss. Talk to Lamber who will tell you that you can find some Calcium Equum and White Gull which are need to brew the potion for Triss. Go through the door in the kitchen. You will see some Salamandra stragglers from the invasion but they're nothing you cant handle. Head up the stairs until you find a door that leads to the upper floor.

12. Kill the Salamandra then head into the evening hall where you'll find a crate that holds some Calcium Equum and a book called the The Freightener. Reading books in this game is important because they enable you to gain knowledge which allows Geralt to pick herbs or skin and other things from beasts that you wouldnt normally get if you didnt read a book. Leave then head to the armory to find a chest that contains the White Gull you need. You'll also find an axe and a dagger which you can use. Once you've found the components head back downstairs and speak with Lambert, which explains you'll need a claw of a 'mighty beast' and some Celandine, he will then send you to talk to Vesemir. Vesemir, in turn, will give you the Celandine and will teach the 'Flaying' ability which will net you your claw. Vesemir will then give you some proper equipment more fitting for a witcher and a red meteorite (which can be used to upgrade weaponry) and a Freightener's Vision scroll.

13. Head outside and skin the Freightener to get your much needed Freightener's Claw and a Freightener's Eye. Head back inside, and meditate in front of the fire. Click the Alchemy menu on the top right (which is indicated by a flask) to make the potion for our red headed sorceress. Move the White Gull into the big circle in the middle and put your Celandine, Calcium Equum, and Freightener's Claw in three of the smaller circles then brew them to get your potion.

14. Go up to Triss' Room and talk to her. The game will then explain how give gifts to people. Click on the icon to the left and give Triss the potion you made for her. This, in turn, leads to Triss and Geralt to get some sexy time which gives you your first Sex Card. After they've finished getting it on, talk to her to gain some insight. There's still some things to do around Kaer Morhen, but if you want to skip over to Chapter 1 tell Triss that you'll go meet Vesemir.
Walkthrough - Prologue part 2
You'll then get 1000 EXP for brewing the potion and getting some in-out.

15. Now if you decided to stay before leaving, theres another quest which you can do. Head to the upper floor of the citadel and speak with Eskel and Lambert. One of them will explain combat styles and the other will offer you a boxing match which will net you another 1000 EXP even if you win or lose.

16. If you're ready to leave talk to Vesemir or talk to Triss to get Leo's funeral underway. Once thats done you'll get 4000 EXP and will head towards Chapter 1.
Walkthrough - Chapter 1 part 1
1. After watching the cutscenes you'll be welcomed by a pack of Barghest. You will recieve some help but dont expect it to last long. Use the Group Style to kill the troublesome beasts and get 500 EXP.

2. Once the dogs are dead, you'll be approached by a girl named Shani. She will redirect you to the Reverend whom should know a thing or two about Salamandra and the Beast that plagues the outskirts. Talk to Shani if you want to learn more about her.

3. Approach the notice board infront of the inn to pick up some work then head inside the country inn itself. Talk to Innkeeper Olaf who will act like total douche but will open up to you. He will then let you store any crap you dont want for now. Talk to the waitress, Vesna Hood, and flirt with her if you want and buy 5 Vizimian Champion's from her. Afterwards, approach the men in the corner of the inn. Here you can bet some of your money to brawl against opponents however theres only two fist fighter and one wimpy fist fighter but more will come up soon. Once you're done beating down some people talk to the drunkard in the other side of the inn and challenge him to a drinking contest. Remember the 5 Vizimian Champion's I told you to buy? Yea, use them now. After downing all 5 you'll recieve a book called 'The Tome of Fear and Loathing, Volume I'. Read it to get some insight on some beasts you'll have to hunt later on.

4. Now that thats done talk to the inn keeper and pay 5 Orens to spend the night or go outside and rest infront of the fireplace. If the fireplace is out you can use a flint to start a fire.

5. Once the sun is up open the gate and head outside. Head west and talk to the Royal Huntsman if you so wish. Along the way you should see a man called 'Traveler' he's overweight and is wearing black clothing. When you talk to him he'll recognize you as the legendary witcher Geralt and will reward you with 100 Orens for a job Geralt did for him in the past. Now keep going and before reaching the village where you'll meet the Reverend you'll find yet another small village. In it, you will meet an old woman wants a White Gull so she can help her dying grandson die less painfully. If you have one give it to her and she will give you an 'Eternal Fire Signet Ring' which she stole from the Reverend. Keep going and in the same village you might see a 'Peasent Woman' with blonde hair and a green and yellow top. Give her some Tulips (which you can buy from a man called Declan Leuvaarden staying at the inn during the day) and you'll get the 'People of the Outskirts' Sex Card.

6. Once you reach the village where the Reverend is, you'll be harrased by the local militia. After these useless sobs stop pestering you head towards the Chapel in the center of the village and talk to the Reverend whom should be standing outside. By your first conversation you'll understand that the man is a zealot, and to gain his trust you will need to light 5 'Eternal Fire Shrines'...during nightime. Talk to the Reverend concerning information about Salamandra and he will send you to help 3 members of the community which are Mikul, Haren, and Odo. He will also give you an 'Eternal Fire Signet Ring' (yes, the same ring you got from the old lady who asked for the White Gull) which you should equip right away. Head inside the 2-story house infront of the Chapel and go upstairs then loot one of the drawers to find a torch.

7. Talk to the stall keeper to the north of the village and you she will tell you about another witcher that spoke to the Reverend. Head northeast past the stall keeper, while heading down you will see a dwarf being picked on by a couple of racists. Help the dwarf by killing the racists and you'll get yourself 2000 EXP. The dwarf reveals himself to be Zoltan Chivay an old friend of Geralt. The dwarf will then stay at the inn for the rest of the chapter. Afterwards loot the body of the racists to find a dice box which will be valuable for a quest later. Keep going down the riverside and you'll reach a point where theres a bridge to you're left and some houses to your right. Go left and get on the bridge to find Mikul at the end.

8. Speak to Mikul and he'll tell you theres a quarantine and that only people with passes can go in. Show him the ring you got from the Reverend (which you should have equiped) then pick option 1. He'll tell you he was supposed to deal with some ghouls in a crypt nearby but is to much of a ♥♥♥♥♥ to do it himself. You'll get the quest to deal with these ghouls. Open the map with the 'm' key and look for the crypt then click on it then head towards it. Once infront of the crypt be sure to save before going in.

9. Once inside a cutscene will ensue. Use the torch you found earlier or if you dont have it go to the options menu and raise the gamma. Pick up the Glass Vial on the floor before heading deeper. In front of the corpse of the girl you will find your first ghoul so use the Strong Style to deal as most damage as possible. Head deeper inside and you'll be attacked by 3 ghouls at the same time. If you're playing on easy then just use the Group Style to fight all 3 but if you're playing on a higher difficulty it might be best to take them one at a time. You will then recieve 1000 EXP for ridding the crypt of the ghouls. Once dead, skin the ghouls (be sure you read the book you got from the Drunkard beforehand) and take 'Ghoul Blood' from them (you need three vials for a quest). Loot the corpse in the same room where the 3 ghouls spawned and interact with the 'Circle of Inner Fire' to learn the Igni sign.
Walkthrough - Chapter 1 part 2
10. Leave the crypt and go back to the Inn. In the Inn buy a bottle of wine from Vesna Hood (you'll need it later), next you should find Zoltan Chivay inside if you helped him with the racists earlier. Talk to him about the dice you looted from the racists and he'll offer to play with you (this in turn will let you challenge Mikul, Haren, and Odo to a game later on). The rules are simple: once the game begins both players bet a certain ammount of Orens. Afterwards they both roll their dice. Once the dice are done rolling both players can reroll any dice if they want or they can 'Stand' if they want to keep the 'hand' they currently have. The following are the 'hands' you can get going down from worst to best:

-Nothing: A hand where nothing matches (1, 2, 3, 5, 6)
-Pair: A hand where two dice are the same (1, 2, 3, 3, 5)
-Two Pair: A hand where two sets of dice are the same (1, 1, 3, 3, 4)
-Three of a Kind: A hand where three dice are the same (1, 1, 1, 3, 4)
-Five-High Straight: A hand that has (1, 2, 3, 4, 5)
-Six-High Straight: A hand that has (2, 3, 4, 5, 6)
-Full House: A hand with combination of three of a kind and a pair (2, 2, 2, 3, 3)
-Four of a Kind: A hand with four dice with the same amount and a fifth with a different ammount (1, 1, 1, 1, 2)
-Five of a Kind: A hand where all dice have the same ammount (6, 6, 6, 6, 6)

Beating Zoltan Chivay gets you 100 EXP and starts the quest 'Dice Poker: The Novice'

11. After beating Zoltan, look for Declan Leuvaarden (he's a the fat man wearing white cloathing) inside the Inn. He'll ask you to find his friend who was lost in a cave next to the city walls. Accept and you'll receive the quest 'Dead Hand of the Past'.

12. Now look for a man called Kalkstein who should be sitting (or standing next to) a table next to the entrance of the Inn. He's the one that put up the notice for the ghoul blood. So give him the 3 'Ghoul Blood' you got from the crypt and you'll get 3000 EXP and 100 Orens in return.

13. Go to the corner of the Inn and look for a man called Fat Fred. He'll offer to fight for 25 Orens. Beat his ass and he'll give you a choice of prizes which include money (100 Orens), a Diamond Ring (which sells for 120 Orens) or 'Vodka and Chaser' (this being two bottles of Zerrikanian Spirit, a loaf of bread, a mutton leg, and cheese). Take the ring then sell it. You'll then have to wait till Chapter 2 to continue this quest.

14. You can also find Shani in front of the fireplace. Talk to her and she'll say she let Alvin (the boy from the beginning) in the care of Abigail, the local witch.

15. If you havent bought wine from Vesna Hood do so now.

16. Go to the Innkeeper and pay 5 orens to rest until midnight or go outside and light the fireplace with the Igni sign.

17. Once its nighttime, take the road to the west and you'll see a couple of thugs harassing Vesna Hood, the waitress of the Inn. She'll ask you to deal with the numbnuts that are pestering her. After they've been taken care of she will ask you to escort her house in the same village where you met the Reverend. You will receive 500 EXP for helping the damsel in distress.

18. Take her to her home. If you happen to encounter any Barghest along the way (the green dogs) be sure to loot their corpses as you'll need 10 'Barghest Skull's for a quest later on. Also be sure to light any 'Eternal Fire Shrine's you come across (they're not necessary for this quest but it'll save you time later). Once you reach her house, she'll ask you how to repay you. Pick the first option to ask for a date, she will then tell you to meet her at the Mill at dusk and to bring some wine (hence why I said buy some Wine earlier). You get 1000 EXP for escorting her...and a date.

19. Now go past the same stall you passed earlier to the road that led to your meeting with Zoltan Chivay. Open your map to find Haren Brogg's house then go inside. Speak to him and show him the ring the Reverend gave you. Ask him about dice and beat him to update the dice quest. Afterwards ask for witcher work and he'll mention some drowners that have been coming out of the river at night. This then gives you the 'Strangers in the Night' quest. Leave his house then go as if you were going to the bridge where you met Mikul. Along the way you might see some crates and barrels infront of the river. Stay around them and some drowners will rise from the river to attack you. Kill them and loot 3 'Drowner Brain Tissue' from them (you'll need them for yet another quest). Once you kill about 8 of them an elf belonging to a group called the Scoia'tael will appear to take the goods left by the riverside. He will tell you that these goods are for the other members but you get the say in the matter. Your choice here leads to the death of a character in Chapter 2. If you refuse to give away the goods, said character will not die but you will have to fight the elf, a dwarf, and two elven archers. However if you accept, you recieve 200 Orens and the reassurance that a character in Chapter 2 will die. Once you've dealt with the matter go talk to Haren Brogg again to recieve 3500 EXP plus 200 Orens, he will also send good words to the Reverend about you.

20. Head towards the bridge where you talked to Mikul and you will find Kalkstein trying to gain entry into the city. Talk to him and a cutscene will play where you get attacked by members of Salamandra. Now, this fight can go two ways depending on your choice during the prologue. If you fought the Freightener you will fight a group accompanied by a mutated hound. But if you went with Triss you will just fight a group of normal Salamandra members. Either way once you've killed them give the 3 vials of 'Ghoul Blood' to Kalkstein if you havent already done so. Then talk to Mikul to turn in the quest you offered to do in the crypt then ask Mikul if he wants to play a game of dice. Beat him to update the dice quest.

21. Now open the map and look for Abigail's Hut and make your way there. Once inside give her the ten 'Barghest Skull's she asked for in her notice. You get 2000 EXP, 100 Orens and 2 Mandrake Roots. If it's still night, rest in Abigail's hut until dusk.

22. Now go back to the village where you met the Reverend and cross the bridge to the north of the village. At the end of the bridge, you'll find some stairs in both sides. Go down the stairs to the right and head towards the mill and meet Vesna Hood in front of the entrance then give her the wine (the one I mentioned you needed) and humorous cutscene will play which gives you Vesna Hood's Sex Card.

23. After your get some, go to Haren Brogg's house and rest until morning then head to the Chapel and give 3 'Drowner Brain Tissue's to the Reverend who in turn gives 2000 EXP and 100 Orens.

24. Go towards the bridge again and go down the left stairs which lead to a cave...it's time to find Declan's friend. It's darker than hell inside so use your torch or raise the gamma in the options. Inside you'll find enemies called Echinops, giant plants that spit needles at you. Use the Strong Style and Igni to dispatch them and run to the cave exit if you need to recover some health. At the far western end of the cave you'll find a Sated Echinops, kill it then then search the ground around it to find the remains of Declan's friend. You'll get 500 EXP for finding what's left of the guy.

25. Now head to Odo's House close to the Inn. Go inside and speak to Odo and present him the ring you got from the Reverend. You can ask him to play dice with you of you havent completed the novice dice quest yet. Afterwards talk to the man and get plastered on booze and he will negotiate prices with you in order to deal with the plants in his garden. He'll offer 100 Orens for the job so head outside and deal with the creature, an Echinops...while drunk.
Walkthrough - Chapter 1 part 3
Since you probably found Declan's friend in the cave by the city walls then you've already dealt with Echinops so this one wont be much of a challenge. Kill it then head back inside to Odo's and he'll give you the 100 Orens he promised alongside 4000 EXP plus he'll send word to the Reverend that you helped him.

26. Since you're probably still drunk you'll have to walk towards the Inn to rest. Interact with Odo's dog if you want but it won't lead to anything. Once you pass the gate of Odo's house you will start to hallucinate a vision of the Beast accompanied with some Barghest...the Beast was just a vision but the Barghest are not. Kill them and while Geralt is still holding his sword (for some reason he runs faster then usual even when drunk while holding it) run towards the Inn before he puts away again or if he already did just hold 'a' or 'd' to move slightly faster.

27. If its night take a rest till morning and talk to Declan Leuvaarden to report that you found his friend...or whats left of him and he will ask you to provide his friend a 'decent' burial underneath the crypt in the Chapel. Leave the Inn and go back to the Chapel and talk to the Reverend.

28. Speak to the old coot and tell him you've lit all the shrines (if you havent already done so) and you'll get 500 EXP. The old man will then babble on how the Beast is probably the work of the local witch, Abigail. Geralt will then say that its best to speak to the witch before assuming otherwise. The old man will then agree to pay you 200 Orens if you find the origins of the Beast. Also speak to him about your success with Mikul, Haren, and Odo.

29. Now speak to him again about Declan's friend and he'll offer you a crumbling sarcophagus since you were nice to lit the shrines. Head inside the Chapel and go down the stairs to the right to go down into the crypt. Interact with the sarcophagus and put the remains inside and you will be visited by a wraith going by the name of 'King of the Wild Hunt'. Whichever the response you give to the specter it will conjure up the spirit of Leo, the young witcher that was killed by Salamandra. Use your Strong Style to dispatch the young witcher and loot him to get a 'Red Meteorite'. You will then get 500 EXP for giving Declan's friend a 'proper' burial.

30. Head back to the Inn and talk to Declan about his friend and he will reward you with 200 Orens and 1000 EXP.

---Chapter 1 Climax

1. It's time to do the final quests for this chapter so head to Abigail's hut. Once there, ask her about the Beast and she will say that the Beast is beyond her and that Alvin, the kid from the beginning, might be able to divine the Beast's origin. But before you can get that information out of the little twerp you need to bring five 'White Myrtle Petal's to Abigail so she can prepare a potion for the kid. Buy the book 'Field Plants' from Abigail for 200 Orens which will let you pick the petals you need. The petals are usually found outside of Abigail's hut and infront of the walls that lead to the Inn (they look like bushes with distinctive white petals on them). Once you gathered the petals go back to the hut and give the petals to Abigail and she will say that it'll take a while to make the potion. So head outside and come back again and she'll have it ready for the boy to drink. Once Alvin takes the potion and discernes the Beast's origin you will get 'Berengar's notes on the Beast'.

(Note: Before talking to the Reverend be sure to do any activity around the Inn as they will be unavailable for the rest of the game.)

2. Head back to the Reverend and explain what you've learned. He will then tell you everything he knows about Salamandra including the fact that they've taken over the Inn. You'll get 500 EXP for telling the Reverend about the Beast's origin.

3. Head over to the Inn and once inside you'll see that the innkeeper has been murdered and Shani is being harassed by a couple of Salamandra goons. Kill them and talk to Shani then loot the body of innkeeper for a key. You get 500 EXP for rescuing Shani.

4. Leave the Inn and head north past the Royal Huntsman to see two Salamanders standing in front of a house. The two goons will ask for a tribute in the form of a child but Geralt not having any will instead give them the edge of his sword. Head inside and you'll be attacked by 4 Salamanders which can be killed easily with the Group Style. If you fought the Freightener in Kaer Morhen the cave will be filled with things stolen from there but if you didnt it will just be filled with normal Salamandra goons and children, including Alvin. Head forward and you will engage in a conversation with a Salamandra Boss who spills the beans on Odo's missdeads. Kill them then talk to Alvin and he'll say that he was sent by the Reverend into the clutches of Salamandra. You get 500 EXP for saving the kid. Alvin will then tell you to break down a wall using the Aard sign but before doing that be sure to loot any body and crate you can see. After you're done, go find Alvin and use the Aard sign to break down the wall then follow the path to find Abigail brewing something. She will tell you the truth about the things Mikul, Haren, Odo and the Reverend have done. Afterwards she will try to seduce Geralt which can lead to you getting Abigail's Sex Card...or you can refuse her if you want. Once you're done chatting, head outside to meet an angry mob led by the Reverend. They've come for Abigail and they wont take no for an answer. This then leads to another choice in the game. Protect Abigail from the mob or hand her over. The Reverend, Odo, and Haren will spin their tales in a way to blame Abigail for the things they've done. Frankly, I can't bear to side with these liars, rapists, and murderes but you can leave Abigail to her fate if you wish. Depending on your choice will determine if Abigail appears again in Chapter 4 and will determine the help you get during the following battle.

5. Whichever your choice, the Beast will once again appear. If you sided with the villagers they will help you in the battle so just use the Strong Style to deal with the Beast while the others distract the Barghest's. If you sided with Abigail, then she's the only help you'll get but she can heal you during the fight. If you're with Abigail, use the Group Style to kill the Barghest then use the Strong Style to kill the Beast. You will get 2500 EXP for killing the Beast.

6. Now, if you sided with Abigail the villagers will come to attack you (ungrateful bastards). Once they're dead, loot their bodies for Orens then loot the Reverend for a 'Letter of Safe Conduct'. If you sided with the villagers, the Reverend will thank you and will reward you with 300 Orens and a 'Letter of Safe Conduct'.

7. Now loot the corpse of the beast to obtain a 'Trace of the Beyond' then head back to the Inn to get Shani. It's time to leave the outskirts of Vizima for good. On the way, Shani and Geralt will talk about the outskirts. Head to the same village where you met the Reverend and cross the bridge to the north then go down the right flight of stairs then follow the road to find Miller's Gate and Mikul. It seems the little sh*t set Geralt up. The chapter ends with you getting a free pass to jail and 3000 EXP.

Walkthrough - Chapter 2 part 1
The chapter opens up with Geralt getting put in the pen and the Proffesor being released. Talk to the elven convict on the corner and play some dice porker with him. Even if you win, lose, or back out the captain of the guards Vincent will offer one of the prisoners a pardon if they exterminate a Cockatrice thats lurking in the sewers.

1. After Vincent ends his proposal a fat prisoner, with delusions that he can beat the beast with his bare hands, decides to step up. Walk to the Muscleman and challenge him to a fist fight. If you win you'll be sent instead of the fat man to dispose of the beast but if you somehow managed to lose you'll be sent to investigate since so much time has passed. If you win you'll get 500 EXP and, even if you win or lose, you'll recieve the Silver Sword and some potions.

2. Once in the sewers, Geralt will skewer a Drowner to show that he doesnt f*ck around. You'll be approached by a Knight of the Flaming Rose going by the name of Siegfried who will offer you knowledge about the Cockatrice and will even offer you some assistance in dealing with the monster. You can also refuse his help if you want but having his help can make the fight with the Cockatrice all the more easier.

3. Use your map to find the location of the Cockatrice's lair. Along the way you will also find the corpse of the Muscleman if you lost the fistfight with him earlier and looting him gives you a Rusty Sword. Once you're at the Cockatrice's Lair, engage the beast using the Fast Style and follow up with some combos and you'll get 1000 EXP. After the beast has been slain loot it's corpse to take its head plus the Maal'kad Sephirah (which is necessary for another quest much later in the chapter). Siegfried, if he came with you, will compliment you and will show you a way out of the sewers. Follow him to the exit and you'll both be ambushed by a pair of Salamndra assassins which give you 500 EXP for killing them. After they're dead, Siegfried will remark on the unexpected assassination attempt and will direct you to talk to a detective. He will the give you the key to leave the sewers and will then depart.

4. After leaving the sewers, it's time to get your stuff back. So open your map and look for the 'Dungeon'. Once you're in talk to the guard called Jethro who will in turn give you your pardon and permission to take your gear. Open the bars next to Jethro and loot the 'Depository' to get your equipment plus 1500 EXP then talk to Vincent Meis and give him the Cockatrice's head for 400 Orens and 3000 EXP then ask him about the Salamandra investigation to update the 'Suspect: Vincent Meis' quest. Now talk to Jethro again about the Professor's release which starts the quest 'Suspect: Vivaldi'. Ask him about his sneezing and he'll redirect you to Coleman in the Hairy Bear Inn. Also metion the bounty on the Professor's head which updates the 'Wanted' quest. Finally, ask him about the missing package you got from Haren Brogg and the quest 'Hot Potato' will update.

5. Now go back to the sewers and rest in the fireplace inside until 7:00 AM. After resting, leave the sewers to find a character called 'Con Man' near the entrance to the sewers. He will ask you to get a heirloom ring from a nearby crypt. Agree and he will give you a key. Now, go back to the sewers and look to your left and you should see some bars which can now be opened with the key you got from the 'Con Man'. Inside you'll find 3 Graviers which are a stronger variation of Ghouls. Try not to fight all 3 of them at the same time as they can deal considerable damage to Geralt at this point. As you kill them be sure to loot them and get a 'Gravier Bone' from each them as you'll need 5 of them for a contract in Chapter 3. This is also a good place to rack up EXP for levels. Now, loot the crate in the room in the eastern corner to find the ring and you'll get 500 EXP for your troubles.

6. Now exit then crypt and rest in the fireplace until 7:00 AM again and exit the sewers to find the 'Con Man' outside again. Talk to him and give him his ring and you'll be rewarded with 4000 EXP.

7. Around town there's a woman called 'Gossip'. Exhaust her dialogue and she will ask for a gift which can only be 'Red Women's Gloves' which you can buy from a man called 'Peddler' for 100 Orens to the north of the Temple Quarter or you can find a pair inside the Hospital but you can't get inside yet. After giving her the gloves you will get the 'Poor Townfolks' Sex Card.

8. Head to the Slums and talk to a woman called Carmen standing in front of the brothel if it's morning or inside of the brothel if it's night and she will give you the quest 'Working Girls'. You can also play Dice against her if you still need to beat 3 more Novice players. After talking to Carmen open the map to find the 'Warehouse' but don't go inside it instead head into the unmarked house in front of it. Inside you'll find a 'Thug' who will offer to share the loot found inside a hunted house thus giving you the 'A Ghost Story' quest.

9. Now head to the Hairy Bear Inn which is close to the Warehouse and interact with the notice board in front of the entrance to get the contracts on it. Head inside to the Inn itself and talk to the Innkeeper to store anything you have on you that you don't need right now. Now look for a man called Conrad who can be found drinking booze inside the Inn during the day. He will complain about the quality of the booze and will give you the quest 'A Most Uncommon Wine' then ask for the location of his house to mark it on the map. Don't bother drinking with him as he gives no reward. After talking to Conrad look for Zoltan Chivay who should be standing close to the tables. Ask him for work and he will give you the quest 'Save Heaven'. Then ask him about your success of beating 3 novice players and he will remark that you have to beat 3 professional players to become a professional yourself. Afterwards look for another dwarf called Munro Bruys who should be sitting on a table close to Zoltan whom is the first professional dice poker player you can play against but only if you beat 3 novice dice poker players before. While youre in this corner, head in to the boxers ring and talk to and challenge a man called 'Butter Bean'. This time for winning you get 150 Orens, two Bottles of Mandrake Cordial, or a Golden Necklace. Whatever you chose, you will get 4000 for beating 'Butter Bean'. After you've done all that it's time to deal with 'Coleman' who can be found in a room at the back of the Inn. Buy a unit of Fisstech from him as you'll need one for later. Talk to him about work and he'll give you the 'The Rat' quest then tell him about the missing package from Haren Brogg and mention that it was Jethro's fault that the package was lost which in turn gets you 2500 EXP. However, if you come on a bit agressive, Coleman will send thugs to attack you which gets you 2000 EXP for killing them. After you're done with Coleman, look for a man called 'Messenger' near the bar. Challenge him to a drinking contest and after 5 cheap bottles of booze he'll slip that he's working for Leuvaarden, then man from the outskirts that asked you to bury his friend.

10. Now that you've done all that, leave the Inn and open your map and find the 'Abandoned House' then head inside. Once inside, it's revealed that the haunted house the 'Thug' mentioned was nothing more than a ruse to lure people to rob them. After the Thug is done talking, dispatch the enemies with the Group Style for 500 EXP. Once dead, loot the leader Thug for a key and talk to another one of their victims, a 'Half-Elf'. She'll thank you and invite you to her home to give you a proper reward. You'll get 2000 EXP for saving her.

11. Exit the house and open the map to find a house called 'Well Stocked Cellar'. Inside you'll find some Wraith's which you can dispose using the Fast Silver Style. Once dead, the quest 'The Rat' will update and you'll get 500 EXP.


Walkthrough - Chapter 2 part 2
Switch to the Group Silver Style and head down the stairs to the cellar to find 4 Gravier's. Loot them incase you need 'Gravier Bone's then grab the 3 bottles of 'Very Old Wine' to get 500 EXP.

12. Return to the Hairy Bear Inn, and find Conrad if it's after 17:00 to give him his wine. Apperantly he drank all his money away and thinks he's entitled to at least one bottle. Give him the bottles or better yet keep all three since each bottle sells for 80 Orens for a total of 240 Orens. After reporting to Conrad about the wine you'll get 1500 EXP.

13. If it's not night yet, head over to the Half-Elf's house which should be marked on your map. Find the Half-Elf inside and talk to her. She'll try to teach you the Elven language. Go with it and you'll end up getting the 'Half-Elves' Sex Card.

14. If there's still time until night then rest somewhere until nightfall. Now that it's night, go find and kill 6 dogs around town as you need to loot them for 'Dog Tallow's which are needed for a contract. Afterwards, you'll get 500 EXP for getting all 6 'Dog Tallow's.

15. Now open your map and look for Carmen's girls which should be marked on your map. Once you approach one, Geralt will trade mean words with Assassins that are harassing the prostitutes. Kill them with your Steel Sword then loot them for any 'Salamander Pins' they might be carrying then do the same for the other 3 prostitutes. After saving all 3 girls you'll get 500 EXP.

16. Head to the Warehouse now if it's still nighttime. Inside you'll find Vincent conversing with a group of Salamandra. Play along with his ruse or not but either way you'll be attacked by the Salamanders. Kill them using the Group Steel Style and loot them for any valuables they might have. Don't bother speaking with Vincent just yet so head back to Carmen.

17. If it's still nighttime you'll find Carmen inside. Talk to her about helping her girls and she'll reward you with 200 Orens or with the gratitude of the prostitutes (the gratitude allows you to hire a prostitute with a bundle of flowers). Whatever your choice you'll get 1500 EXP.
Go outside and pay one of the prostitutes with some flowers (if you chose the gratitude) or pay one of them between 150 to 350 Orens and you'll get the 'Prostitutes' Sex Card.

18. Go back to the Hairy Bear Inn and ask the Innkeeper where Coleman is. He'll tell you that you can find him by the Dike. The Innkeeper will also ask you to find out what he's up to.

19. Check your map and find the gate that leads to the Dike then head over there. Once you're in front of the Dike you'll be greeted by Siegfried (if you let him come and hunt the Cockatrice with you during the beginning of the chapter) who will let you pass freely to the Dike. However, if you didn't let Siegfried come with you you'll have to bribe the guards for them to let you pass.

20. Once you're in the Dike you will see Coleman talking to a guard and will then talk to you after he sees that he's been caught. You'll get 500 EXP and 100 Orens for finding him. Coleman will tell you that he's actually helping Vincent Meis with dismantling the Salamandra organization and will beg you not to turn him in. Return to the Hairy Bear Inn and either turn Coleman in to the Innkeeper which gets you 1500 EXP and 500 Orens or lie about Coleman which only gets you 1500 EXP.

(NOTE: If you gave the supplies from Haren Brogg to the Scoia'tael in Chapter 1 then be sure to turn this quest in before you talk to Detective Raymond as Coleman will get a serious case of death later on which will give the Innkeeper a reason not to pay you anymore. Or if you didnt give away the supplies then you have nothing to worry about).

21. Return to the Dike and talk to Declan Leuvaarden, our friend from Chapter 1. If you buried his friend during Chapter 1 but forgot to turn in the quest then this is a good time to do it. Ask him about the creatures around the dock and he'll offer 400 Orens for you to kill them. Then, ask him about Salamandra and he will ask for 3 'Salamander Pins'. If you have any on you give them to him and he'll give you 200 Orens for each of them for a grand total of 600 Orens.

22. It's time to talk to Detective Raymond so leave the Dike the way you came. Once in the Temple Quarter open your map. You'll see that Raymon's house is pretty close so head over there. Once inside, head up the stairs and speak to the man himself. Talk to him about Salamandra. When he asks, mention the name Azar Javed and he'll offer to help you in the investigation for free or if your elusive he will charge you 100 Orens. By speaking to him you'll start the quests 'The Crown Witness' and 'Vizima Confidential'. After the conversation is over, Raymond will mention and he thinks you're being followed. Afterwards, you'll see the Professor talking to Azar Javed. Once they're done, the henchmen will be left behind to fight Geralt. Dispose of them with the Group Steel Style then go find Vincent Meis.

22. Go talk to Vincent Meis and prove to him that he's not connected to Salamandra. You'll get the 'City Guard Signet Ring' plus 4500 EXP for proving him innocent.

23. Head over to the dungeon and talk to Jethro. If you bought the unit of Fisstech from 'Coleman' like I said then (if you didnt and he's dead then you can get one from Salamandra Assassins) bribe him with it to get information on your Silver Sword thus starting the 'Suspect: Thaler' quest. Ask him about a Salamandra prisoner and he'll direct you to the Hospital. You get 500 EXP for bribing Jethro with Fisstech.

24. Leave the dungeon and open your map to find Thaler's house then head over there. Talk to Thaler once inside his home (if he's not in his home then he's walking around town) and exhaust his dialogue to gain some insight about some things. Asking him about your Silver Sword will make him tell you that he won it off a gambler hanging out at the Hairy Bear Inn. Asking him about Salamandra will update the 'Suspect: Thaler' quest. Finally, challenge him to a game of poker dice. If you win then you've beaten your second professional dice poker player.

25. Leave Thaler's house and head to the Hairy Bear Inn to talk to this gambler that Thaler mentiones. He's sitting right on a table infront of the bar and will flat out tell you that he won it off the Gardener at the Hospital. You get 250 EXP for getting this information. Before you leave the Inn, head to the back and talk to the man called Ramsmeat and ask him about what he knows about Berengar. He'll tell you that his items were found by Brickmakers at the swamp. You then get 3500 for asking about Berengar.

26. If its daytime, head over to the Hospital and talk to the Gardener who should be tending to some crops outside the Hospital. Ask him about his mercenary days and you'll have to bribe him with food. You can also bribe him food for some Red Roses which you'll need later. Ask him about the Silver Sword and he'll mention he got it from a Witcher and will tell you to talk to Shani if you want to know more. Finally, you can play dice poker but he's only a novice so only play him if you still need to beat a novice.

26. Go inside the Hospital and talk to Shani. Ask her if she need help and she will ask for 5 units of 'Celadine' which you can find in the swamp. Upon giving her the plants you'll get 500 EXP and will be able to spend the night here. Rest until the night and go over to the 'Prisoner'. You'll be stopped by a pair of guards who will force you to bribe them with 10 Orens. One bribe later, the 'Prisoner' will mention Kalkstein before a group of thugs barge into the Hospital to attack you. Kill them then leave the Hospital.

27. Open your map and look for Shani's House then head over there. Go inside and you'll be greeted by a character called 'Grandma'. This NPC will approach you every time you go inside Shani's House and will sometimes kick you out for the f*ck of it but will sometimes let you stay inside.
Walkthrough - Chapter 2 part 3
If she happens to trow a tantrum and kick you out just re-enter the house and try again. If she lets you come inside be sure to look around the cabinets to find 'Grandma's Cordial' and 'Grandma's Pickle's and Lard' as you'll need them later. Now go upstairs and talk to Shani to learn more about the Silver Sword that belonged to Witcher Coen. You will get 250 EXP and Shani will re-direct you to Zoltan Chivay.

28. Since it's probably still nightime head over to Raymond's House and talk to him about Kalkstein and Ramsmeat. You then get 3000 for sharing this information with Raymond.

29. Make your way over to Kalkstein's House and speak to him. Talk to him and he'll offer you a job which gets you a whopping 1000 Orens but first you'll need to get two books called "Ain Soph Aur" and "The Secret Gates". Talk to him about the Salamander at the Hospital and he'll mention that he didnt know he belonged to a secret organization.

30. Leave Kalkstein's House and head over to Vivaldi's House. Go inside and talk to the dwarf and ask him about "The Secret Gates" and he will refuse to sell them at first but will sell you both "The Secret Gates" for 100 Orens and "Ain Soph Aur" for 300 Orens. However, if your patient, theres a way to get both these books later for free. If you opt to buy them now, read both books to get 500 EXP. Speak to Vivaldi again about the evidence you've collected so far and he will tell you a bit about Azar Javed. Prove him innocent with the evidence you have to get 3000 EXP.

31. Talk to Zoltan Chivay if he's inside Vivaldi's House and ask him about the Silver Sword to get 1000 EXP and an 'Earth Rune'. If he's not inside the house you'll be able to find him at the Hairy Bear Inn but you can also find him wandering around town if he's not at the Inn.

32. Head over to the Hairy Bear Inn after talking to Zoltan Chivay (unless you werent already there) and head to the back room to talk to Ramsmeat. If he isnt there then you can find him at the house with the two thugs standing outside. Talk to Ramsmeat and pick option 2 to ask him about Salamandra then pick option 2 again. After your conversation with him is over you'll get 2500 EXP for proving him innocent.

33. Exit the house then open the map to find the Graveyard. Go over there and talk to the 'Gravedigger' hanging around the entrance and give him the 6 units of 'Dog Tallow' you should already have to receive 2000 EXP and 100 Orens.

34. After giving the 'Gravedigger' his things, talk to a woman called 'Hildergard Zollstock' who should be hanging around in front of the gate leading to the 'Graveyard'. She mentions that her husband is hunting her at night and asks you to take care of him. Convince her to pay you 200 Orens for your services then rest at the Inn or at the Hospital. At night, head back to the gates of the 'Graveyard' to find Hildergard's husband as a 'Wraith'. Use the Silver Sword along with the Fast Style and he should die easily. Go back to the Inn or the Hospital and rest until noon. Go back to the gates of the 'Graveyard' and talk to her about the job to recieve the 200 Orens she promised you along with 2000 EXP.

35. Now head over to Kalkstein's house and speak to him about the 'The Secret Gates' and 'Ain Soph Aur' you should already have in your inventory (unless you plan to get these for free later) and he'll tell you that you need ten Sephirah Stones that need to be placed in ten Obelisks scattered throught the 'Swamp'. You should already have the 'Maal'Kad Sephirah' in your inventory but you'll recieve the 'Chocc'Mah Sephirah' which updates 'Mysterious Tower' and 'Vizima Confidential'.

36. Return to Raymond's House with news only to discover that he's under attack by some Salamandra assassins. Kill them using the Steel Sword with the Group Style and then Raymond will mention that he was just one step away from solving the case. He will give you a list of suspects (some which you should have already proven innocent) which updates 'Vizima Confidential' and starts the quest 'Suspect: Leuvaarden'. You get 1500 EXP for saving Raymond.

37. Exit Raymond's house and you'll be approached by a kid that'll tell you that Raymond wants to see you if you proved everyone of the suspects innocent (if you havent then check your journal for anyone you've missed then prove them innocent). Head back into Raymond's house and talk to him to hear that the 'Prisoner' from the Hospital was moved recently but didnt survive. You'll have to recover the body from the 'Gravedigger' and perform an autopsy. Speaking to Raymond updates 'Anatomy of a Crime' and 'Vizima Confidential'.

38. Head over to the Inn and buy one 'Mahakaman Mead' as you'll need it soon. Now go over to the 'Antiquary' who runs a book shop close to Shani's house. Buy 'Forensic Medicine' for 150 Orens and 'Zerrikarian Insects and other Vermin' for 110 Orens then read both.

39. Head over to the 'Graveyard' and ask the Gravedigger about getting into the 'Cemetery' and you'll start the 'A Gravedigger's Gratitude'. Now ask him about the Salamander's body and he'll demand some Dwarven alcohol. Give him the bottle of Mahakaman Mead you should already have in your inventory and he'll promise to drop off the corpse at the Hospital. You get 500 EXP for giving the man his alcohol.

40. Go over to either Vincent Meis or Thaler and ask either of them about the Gravedigger's request. Go back to the Gravedigger and speak to him about fulfilling his request to recieve the 'Key to the Cemetery' and a 'Petri's Philter Formula'.

41. Find or buy a piece of fruit before heading over to the Hospital because you'll be needing it in a few. Find somewhere to rest until night then head over to the Hospital. Read the two books you got from the 'Antiquary' if you havent already then talk to Shani, who should be inside, to start the autopsy. There are a lot of options to pick in this autopsy with most of them giving you the wrong answer. Pick option #3 first, then #3 again, and finally #1 to update 'What Lies Beneath', 'Vizima Confidential', 'Suspect: Kalkstein', 'Old Friend of Mine' and to complete 'Anatomy of Crime'. You then get 3500 EXP for completing the autopsy.

42. Before you leave the Hospital, approach the Melitele statue and put a piece of fruit inside to get three Sephirah (Oth Sephirah, Ghe'Vrath Sephirah, Veen'Ah Sephirah).'

43. Leave the hospital and head back to Raymond's house and tell him about the autopsy. Exit the house then go back in then talk to Raymond. Raymond we'll figure that Kalkstein and Ramsmeat were working together. Play along with his conversation and finger Kalkstein as the perfect person for Azar to impersonate. You get 600 EXP for your little chat with "Raymond".

44. Go talk to Ramsmeat, either at the Inn or at the house with the two thugs outside, and tell him about Azar's plan to get you to kill him. Mention that he should lay low for a while. Afterwards, head over to Kalkstein's house and prove him innocent, if you haven't already, to complete 'Suspect: Kalkstein'. Speak to him about Azar and he'll mention that luring him someplace magically unstable would be your best bet. This completes 'What Lies Beneath' while also netting you 3000 EXP for proving Kalkstein innocent and 2500 EXP for finding and appropriate place to fight Azar.

45. Return to Raymond's house and lie that Ramsmeat is dead. Tell him about leading Azar and Kalkstein to the Swamp Tower and he'll hand over the 'Keth'Aar Sephirah' to help you get into the tower.

46. As it's probably night, head over to the Cemetery. Kill everything in your path and head inside the Crypt at the northern edge of the Cemetery. Inside, use a Cat Potion, use a torch or go to the options menu and raise the gamma so you can see easier in the dark. Kill everything and you'll find a wall that you can take down using your Aard Sign. Enter the tunnel and to find enemies and, most importantly, Raymond's body.
Walkthrough - Chapter 2 part 4
Interact with his corpse and you'll update every available quest plus you'll get 500 EXP for finding the real Raymond.

47. Leave the Crypt and Cemetery then head over to Shani's House. Talk to Shani and she'll tell you that she wants you and Dandelion together to reminisce. She asks you to get Cherry Spirit Cordial, Mettina Rose and Temerian Rye which you can get at the Hairy Bear Inn. Go to the Inn, buy the booze, then head back and give Shani the alcohol. She then tells you to bring a friend. You then get 500 EXP for getting the beverages for Shani.

48. Now, there's 3 available characters that can come with you to the party. First, there's Siegfried. Second, there's Zoltan Chivay. And lastly, there's Carmen. Zoltan is by far the best choice since he gets along well with everyone there...but it's your game so bring whoever you want. Be sure to bring Red Roses with you (they're not necessary for moving the plot forward but you'll need them if you want some sexy time with Shani).

49. Return to Shani's house and talk to Dandelion upstairs. Talk to everyone after Dandelion and you'll eventully end up having to go downstairs to get something to eat. If you didn't loot everything downstairs before then do so now then head back upstairs. After the party is over, give Shani some Red Roses to get her Sex Card plus 2000 EXP for partying with old friends.

50. Talk to Shani and rest until morning. Not too far from her home, you should find a dwarf that sells books. Buy and read any books that have information on Wyverns, Echinops, swamp plants and whatever else inhabits the Swamp Forest. Go over to the Gravedigger in front of the Cemetery after reading up on some critters and tell him about your discovery to get 1000 EXP.

51. Go to the Dike and talk to Leuvaarden. Prove Lauvaarden innocent to get 2500 EXP and 500 Orens. Ask him about the Sephirot and he'll mention that he has one, which, he'll fork over for 500 Orens. Pay the man his money to get the 'Tipperath Sephirah'. You should now have 7 out of 10 Sephirah.

52. Talk to the Ferryman and pay him 5 Orens so he can take you to the Swamp Forest.


Walkthrough - Chapter 2 part 5
1. Talk to the Ferryman after getting off the boat and he'll mention someone named Yaren Bolt has a job for you. Close to the Ferryman is a bounty hunter named Jean-Pierre who'll take 10 wolf pelts from you as part of the Wolf Contract. If it's not already late, use a flint or use your Igni at the nearby fireplace. At nighttime, walk around the boat to spawn some Drowners. Kill all of them to get 500 EXP plus another 2000 EXP and 400 Orens after reporting to Leuvaarden about your deed.

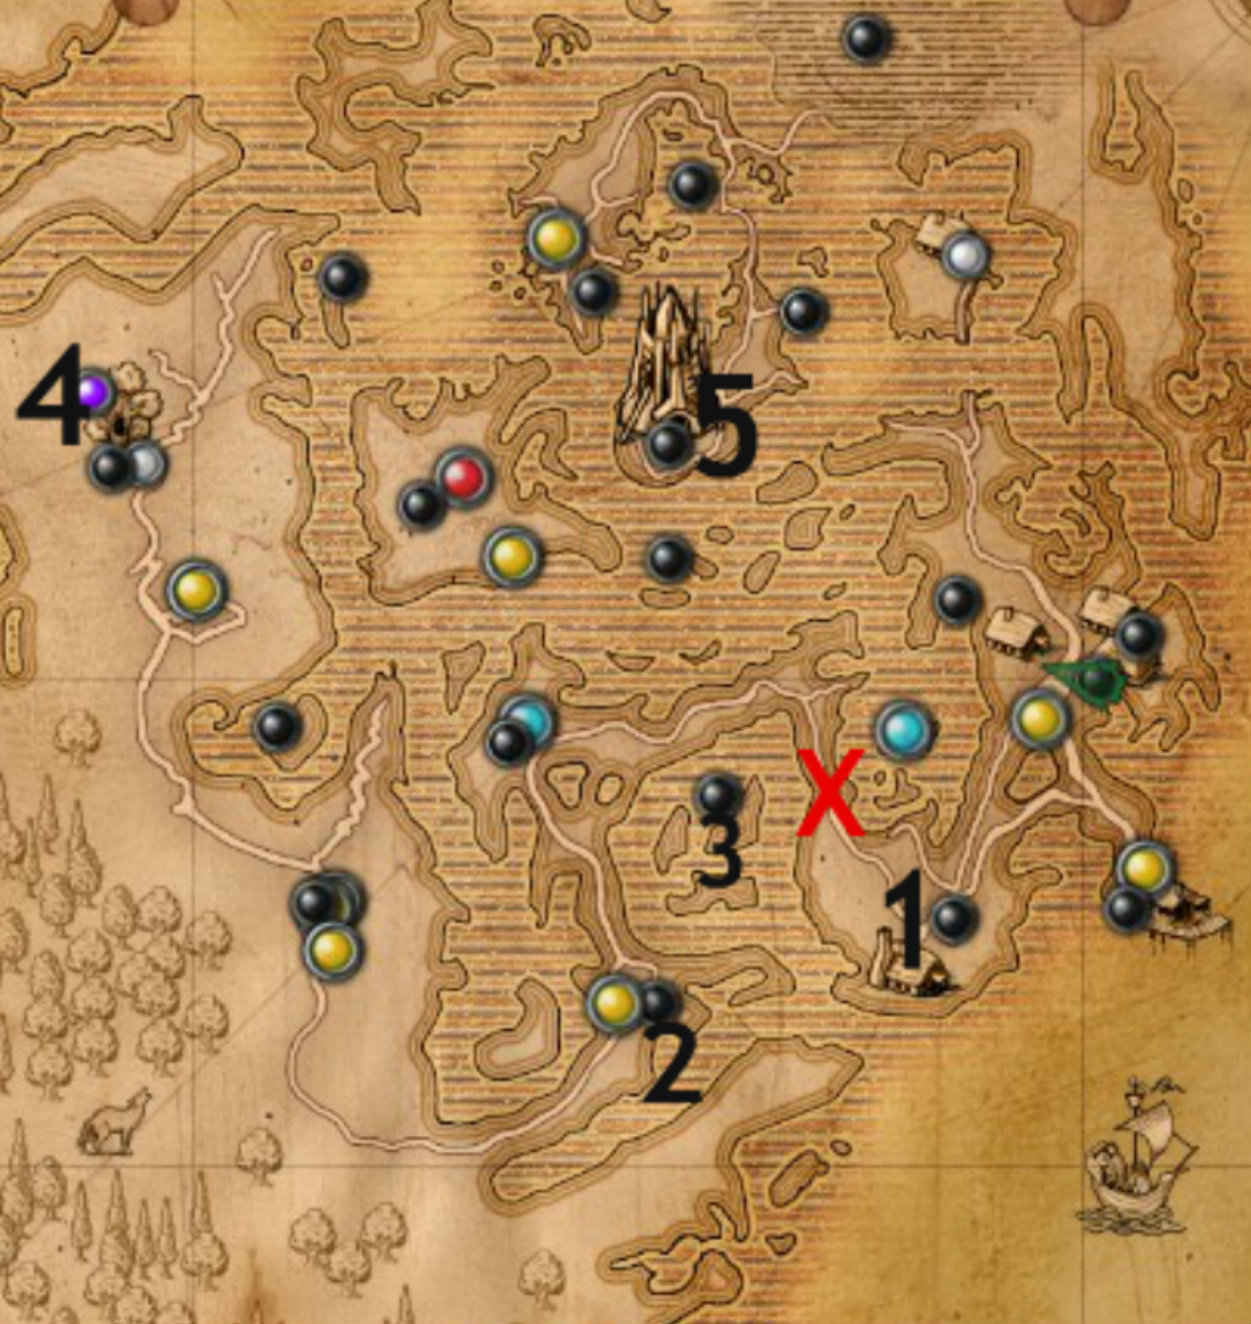
2. Go northwest to find a unique Archespore named Coccacidium (apparently it can sometimes spawn almost anywhere in the swamp but for me it always spawned around the red X on the map below) . Use your Strong Silver style to take it down to get 2000 EXP. Loot it afterwards to take it's head which you can take to Vincent Meis for 3000 EXP and 400 Orens.

3. Go back to the Docks to find an old man called Gramps. Ask him about work and he'll ask you to escort him to a shrine. Normally you can get 1500 EXP for escorting him straight to the shrine but you can get another 1000 EXP for taking him to specific spots around the Swamp. The places where you can take him are marked with numbers below:


1. Clay Pits
2. Cave
3. Three Islands
4. Druid Grove
5. Mage's Tower

4. While you're escorting the old man look out for Drowned Dead's and Echinops. You need the tongues of 10 Drowned Dead's to take to Siegfried for the Drowned Dead contract and 3 Echinops' Rootstocks for the Gardener.

5. Head to the Brickmaker's Village to the east of the Swamp after escorting the old man. Enter Vaska's house (if she isn't already outside) and ask her if she has work. Accept the quest and the ask her about Berengar. Ask her the about the Mage's Tower to get the Tower Tarot Card which starts the 'The Sentry' quest.

6. Leave her house and head over to the Clay Pits. Clear the Clay Pits of drowners to get 500 EXP then return to Vaskas to get another 2000 EXP and the Kezath Sephirah.

7. Return to Kalkstein's home in Vizima on the boat or teleport there through the Place of Power close to the shrine. Talk to him about the Golem and he'll tell you that you'll need a lightning rod which a smith can forge for you. Talk to the smith dwarves next to Vivaldi's home or to the Order blacksmith and ask them to forge the rod for you. Agree to pay the Orens they ask for, leave the area, come back, and the rod will be complete. You get 500 for having the rod forged.

8. Before heading back to the Swamp be sure to give the 10 Drowner Dead tongues to Siegfried, the Echinops' Rootstocks to the Gardener and the Coccacidium head to Vincent Meis.

9. Back at the Swamp, head to the Brickmaker's Village and talk to Vaska about work and she'll give you the 'A Lost Lamb' quest.

10. Head to the south towards the Cave and go inside. Inside you'll find plenty of wolves to skin for the Wolf Contract. Deeper inside theres a wraith guarding Vran's Sarcophagus. Kill it and then loot the sarcophagus to find the Y'Esath Sephira among other things. At the back you can find the Circle of Hanging Stones which gives you the Quen sign.

11. Leave the cave and head to the west to an area marked on your map as 'Clearing'.

12. Once at the clearing, talk to one of the lumberjacks who will tell you that his kids are sick. He'll ask for a donation of 200 Orens (you can lower this to 150 Orens if you want) and in return he'll give you a piece of Red Meteorite, one unit of Sodden Mead, a Silver Ring and a recipe for Wive's Tear. Talk to the dwarf named Yaren Bolt hanging around the camp and ask him for work. He'll send you to find 5 Beggartick flowers, which you can find to the north-east, near the Nonhuman Camp.

13. Rest until morning if its already night then head to the north towards the Druid Grove. Talk to one of the druids about a few things like the Beggartick flowers (which gets you 100 EXP) and the missing boy. Talk to the dryad named Morenn about the missing boy to get 500 EXP. While she begins talking about procreation, pick option #2 then option option #2 again which prompts her to ask for a Wolf Pelt. You should already have more than enough after exploring the Cave (if you dont you can find plenty of wolves to the north of the Grove). Give her one to get the Dryad Sex Card.

14. Hanging around the Grove is an elf named Yaevinn. Speak to him and you'll get the 'Worth its Weight in Gold' which tasks you to deliver a letter to Vivaldi at Vizima. Interact with Circle of Unwanted Power to get the Yrden sign.

15. Head north towards an island, shaped like an upside down question mark, called Wyvern Island. Dispatch the wyverns located around and in the island one at a time using the Fast Silver Style. Once they're all dead, head to the center of the island to find a corpse containing a Blood-Stained Letter and the, much more powerful Steel Sword, Harvall.

40 Comments
Mister Magician 22 Dec, 2024 @ 1:19am 
what nonsense. your curses are Consummately Returned.
nunocardosoferreira 24 Aug, 2024 @ 1:14pm 
Chapter 3, Beauty and the Beast: you have the option to kill or spare the werewolf when you first meet him, but the dialogue seems to have a bug, because if you let him go he will still turn against you. There's a right sequence of answers to make sure you let the werewof live:

1. "Nothing special" or tell him what you saw
2. "Witchers kill monsters"
3. "Go on"
4. "You're right, appearances don't matter"
CastleKingSide 10 Oct, 2023 @ 10:04am 
anyone else having trouble picking up the glass vial?
Sime 20 Jun, 2019 @ 11:54am 
?Correct me if I'm wrong but this is unfinished right?
Also, this needs some editing quite a few things aren't mentioned/correct thanks tho.
Korrupt 10 Apr, 2019 @ 3:38am 
I am disappointed. I wanted to complete this game 100% and your guide seemed good until i got to chapter 2 where in the beginning you mention talking to the guy in the dungeon about the hot potato quest that you get from Haron Brogg... which you did not even mention in your chapter one walkthrough... there goes my 100% completion. Ive already progressed too far to revert to an old save to pick that quest up. Not only that, you make no mention in chapter 1 about killing the monsters near the mill or in the crypt to get the trophies.. luckily i remembered the trophies before i progressed so far that it was too late.
b255ea006 29 Sep, 2018 @ 3:32am 
:steamhappy: There is an official Witcher Wiki (Multilingual) [witcher.wikia.com] @Selamat Pagi :LCTOO_Revolver:
Tomocha 21 Sep, 2018 @ 8:20am 
but im stuck at chapter 3 :(
tenryu12 2 Apr, 2018 @ 5:11pm 
ME has dejado a medio camino!!!, mucho menos q eso :'v
BigFatJuicyMonkeys 23 Mar, 2018 @ 2:40pm 
Guess the guide isn't going to be finished huh?
D3agl3-Cross- I'm not 18 Jun, 2017 @ 6:12pm 
when fighting leo in chapter 1 part 3, you said to use the strong stance. its the fast stance you need to hit him though.