Yakuza Kiwami

Yakuza Kiwami

32 ratings
Like A Dragon EXTREME 100%
By No More Justice
   
Award
Favorite
Favorited
Unfavorite
PROLOGUE - AFTER THE BUBBLE
So you wanna get 100% in Yakuza Kiwami? It's not as bad as Yakuza 0, but it's still bad. I would think twice if I were you. Mind you, some things can be a dealbreaker for most people and if you really want to pull this through, you've got to stay determined to do it, no matter how frustrating it may get. And it WILL get frustrating.

Just a quick reminder: This game has NO MISSABLE ACHIEVEMENTS! So no anxiety about having to play the entire game again if you forgot something!

Before getting into the grind, I highly suggest playing this game casually and experience the entire story. After that, you will unlock a couple things like Climax Battles, LEGEND difficulty, Premium Adventure and New Game Plus, where you should be set to start 100%-ing this game.

Unlike in Yakuza 0, you're going to have to play the Premium Adventure mode too. But you can also carry over your progress in items, skills and cash to your New Game Plus save. I am not sure about everything else. Things like Substories all get reset though! But don't worry about that because...

REAL YAKUZA PLAY ON LEGEND DIFFICULTY!

This game is actually the first one of the series and starts off 7 years after the events of Yakuza 0. If you haven't played that, you should be fine, but you won't understand most of the Yakuza 0 references, unfortunately.

One more thing of note is that you have to save often! Getting defeated/killed in this game on LEGEND difficulty makes you reload a prior save instead of a checkpoint! But since you will get a phone, you can save anytime from the pause menu, making save-scumming your way through unfair minigames a breeze.

Other than that, this game features way less unwanted unfair minigames and is generally easier to get completed 100%. But since this is a guide for completion on LEGEND difficulty, it doesn't really matter, what you unlock or do in your first playthrough. I'll help you get everything done in one fell swoop on your second playthrough!

But before you start playing on LEGEND difficulty, let's do the Climax Battles first to get them out of the way early. Consider this as training to being prepared for whatever may come your way in this game's campaign.

I will be using videos by devilleon7 to help you understand the tactics visually in case you have trouble beating a particular climax battle.

There's also something to note on the battle criterias. Sometimes, you only get a certain fighting style, sometimes you have all four. And sometimes you only have a particular set of skills rather than all of them or nothing.

Weakest Dragon means no skills, Idolized Dragon gives you all Soul skills, Technical Dragon gives you all Tech skills, Dragon Embodied gives you all Body skills, Dragon Reborn gives you all Dragon skills and Strongest Dragon means all skills unlocked.

There are also some miscellaneous main game achievements that may require some explanation:

Half the Battle is earned for completing 50% of the Completion List while Perfectionist is the reward for getting everything done on the Completion List.

Also, What a Player requires you to play every single minigame. While most of the activities have to be done anyway, the game never tells you that visiting Club Asia and watching a show is also considered a minigame, even though you just sit there and watch. Remember to visit Club Asia on your free time once too.
CLIMAX BATTLES SUNRISE - SOMETHING TO PROVE AGAIN
CLIMAX BATTLES - PROVING GROUNDS
These are certain challenges, where you usually have to beat enemies under special conditions. Sometimes it's not even your goal to defeat everyone and some of these even have limited time. But they should be pretty straightforward to understand.


PROVING GROUNDS ONE
Strongest Dragon vs. Circlesaw, Shotgunner, Grenade Thrower & 10+ Enemies
DON'T FALL TO THE GROUND! It is highly recommended to take down the Shotgunner first. He is in the line of sight of the Grenade Thrower, so you might have to dodge. The Shotgunner is right behind you in the dock. Use his shotgun!

PROVING GROUNDS TWO
Dragon Embodied vs. 7 Enemies & Tough Enemy
EARN 5 XP POINTS! Switch to Beast Style and tackle the group with a Motorcycle. Then prioritize beating up the tough guy.

PROVING GROUNDS THREE
Technical Dragon vs. Shotgunner, Swordfighter, Dagger Enemy & 5 Enemies
USE WEAPONS ONLY! Switch to Beast Style and take down the Shotgunner, take his shotgun and just defeat the others.

PROVING GROUNDS FOUR
Idolized Dragon vs. 10+ Armed Enemies
USE HEAT ACTIONS ONLY! Use your Brawler and Beast Styles to build up Heat and then try using various unique Heat Actions on the toughest guys to save time.

PROVING GROUNDS FIVE
Weakest Dragon (Brawler Style) vs. Tough Enemy
USE RESOLUTE COUNTER ONLY! Whenever the enemy attacks and hits you, you can press an attack button to do a Resolute Counter. It barely does any damage, but this is basically an endurance fight.

PROVING GROUNDS SIX
Strongest Dragon (Rush Style, No Damage) vs. 9 Handgun Enemies & Swordfighter
DODGE AND STRIKE! Heat Actions will drain your Heat and make you fail the challenge immediately! Taking down the armed guys is easy. The Swordfighter is the challenge here. Just keep dodging his attacks and punching him from behind.

PROVING GROUNDS SEVEN
Strongest Dragon (Beast Style w/ Gun, No Damage) vs. 10+ Handgun Enemies, 2 Tough Enemies
SPAM THE FIRE BUTTON! Pressing the Aim and Fire Buttons while moving slightly will heavily increase your firing speed. Luckily, you don't need to aim that well. Hurry up, though! You have a harsh time limit!

PROVING GROUNDS EIGHT
Strongest Dragon (Dragon Style) vs. 3 Tough Enemies & 2 Handgun Enemies
USE THE ITEMS! Your health drops over time and you're stuck in Dragon Style. There are a Tauriner++ and a Staminan Royale in the back of the pool. Take down the pistol guys and use your Tiger Drop on the tough guys otherwise.

PROVING GROUNDS NINE
Strongest Dragon (No Damage?) vs. 4 Enemies, 3 Tough Enemies every 30 seconds
USE HEAT ACTIONS! You start with 1 HP, but one of your skills heals you whenever you use a Heat Action. Just protect the Beetle as well as you can. Having enough HP allows some mishaps.

PROVING GROUNDS TEN
Regular Ol' Date vs. Handgun Enemy, Bat Enemy & Regular Enemy
CAREFUL! Date's moveset is a bit strange. He has 3 attacks than he can chain up. After doing his combo, don't press anything (not even a movement direction), or he will duck to the ground for a short moment. Just wait about one second for Date to finish his last attack animation and repeat. Prioritize the armed guys first, especially the guy with the gun! And be quick about it, there's a timer!

Rewarded Magnetic Necklace for beating the Proving Grounds
Well done. That's a quarter of the way, keep it up!
CLIMAX BATTLES DAYLIGHT - FIGHT LIKE A DRAGON
CLIMAX BATTLES - MELEE BATTLES
The Melee Battles are pretty straightforward fights where your goal is just to defeat the enemies using your skills in fighting. It's basically a harder street fight than usual because of the time pressure.


MELEE BATTLES ONE
Idolized Dragon vs. 3 Waves of Armed Enemies
IMPROVISE! Use your surroundings and Heat Actions to take the mob down! It can't get simpler!

MELEE BATTLES TWO
Technical Dragon vs. Inmate 1356 & 4 Enemies
UNLEASH THE BEAST! Keep prioritizing Inmate 1356 and try hitting him with different combos for the most damage output. It seems to work fine to just spam Beast Style combos, but you have to take care of the other 4 enemies too.

MELEE BATTLES THREE
Dragon Embodied vs. 10+ Armed Enemies
GROUP FIGHT! Take out the enemies around you first, then quickly towards the Coliseum area to find the remaining 2 enemies and take them out as well!

MELEE BATTLES FOUR
Dragon Reborn vs. 3 Waves of Armed Enemies
DROP THEM! Just use the Dragon Style's Tiger Drop like there's no tomorrow and you should be good on the time.

MELEE BATTLES FIVE
Idolized Dragon (Brawler Style) vs. 10+ Armed Enemies
FREE WEAPONS! Take the first couple enemies down and don't be shy about using their weapons against them. It's also recommended to use Heat Actions whenever an enemy just won't go down.

MELEE BATTLES SIX
Technical Dragon (Rush Style) vs. 10+ Tough Enemies
LEAD THE GANG WAR! Try taking down most of the enemies using your elaborate Rush Style combos or spam short swings. It should be easily doable either way.

MELEE BATTLES SEVEN
Dragon Embodied (Beast Style) vs. 3 Waves of Armed Enemies
GUNS! Try forcing your attacks through most of the enemies and pick up guns whenever you can. There should be plenty of pistols.

MELEE BATTLES EIGHT
Dragon Reborn (Dragon Style) vs. Arase & 20+ Armed Enemies
GET TO THE ROOF! You can actually ignore most enemies and just run past them towards the roof. On the roof, you will have to defeat all the enemies including Arase. 30 minutes and several Healing Items should make this easy.

MELEE BATTLES NINE
Strongest Dragon vs. Majima & 20+ Armed Enemies
GET TO THE GROUND FLOOR! Same as before, you can skip most enemies and you will just have to defeat Majima at the end.

MELEE BATTLES TEN
Weakest Dragon vs. Kashiwagi, Ogino, Sera & 20+ Armed Enemies
HARDCORE BATTLE! This is a straight up long endurance fight. You get 15 minutes to fight your way through every enemy including the 3 minibosses you will encounter. You get no Health Items. You have no skills. Use your Rush Style for fastest movement and useful stun-lock combos! Good luck!

Rewarded Calming Towel for beating the Melee Battles
That's the melee battles done and you're halfway there. Good work!
CLIMAX BATTLES SUNDOWN - MAD DOG ON THE LOOSE
CLIMAX BATTLES - MAD DOG BATTLES
These battles all center around you fighting Majima under various circumstances. The challenges are pretty straightforward to understand, but usually involve a trick for beating them easily.


MAD DOG BATTLE ONE
Strongest Dragon (Rush Style) vs. Majima (Breaker Style)
MAINTAIN PRESSURE! You can pin Majima down with your Rush Style combos, so this should be easy, even under 90 seconds.

MAD DOG BATTLE TWO
Strongest Dragon (Beast Style) vs. Majima & 2 Police Officers (Slugger Style)
SHOW RESPECT! Hitting a police officer will fail the challenge. You have to keep your eyes on Majima, as the police officers look exactly like him, since they also use the Slugger Style.

MAD DOG BATTLE THREE
Strongest Dragon (Brawler Style) vs. Majima (Thug Style) & 10+ Enemies
COMEBACK AFTER COMEBACK! Majima will be very persistent in fighting you multiple times. You will also have to fight several enemies along the way. Unleash your entire Heat on Majima in his final battle!

MAD DOG BATTLE FOUR
Weakest Dragon vs. 3 Hannya-Men
FOCUS ON THE FLAMES! You will have to fight a single Hannya-Man at the start using something like Brawler or Beast Style. Taking his health down halfway will put him in Heat and usually spawn the next Hannya-Man. Make sure to keep your focus on the one with the lowest health so you don't juggled by all 3 Hannya-Men and be unable to retaliate in time!

MAD DOG BATTLE FIVE
Strongest Dragon vs. 4 Majimas (Thug Style, Slugger Style, Breaker Style, Mad Dog Style)
DROP THEM! Just spam your Dragon Style's Tiger Drop on all four and you should be good. It's really not much of a challenge if you can do that.

Rewarded Dojima Family Amulet for beating all Mad Dog Battles & Ultimate Climax Battles for beating all other Climax Battles
That's Majima out of the way. You should've unlocked the Ultimate Battles now. Good luck!
CLIMAX BATTLES MIDNIGHT - WORTH OF A TITLE
CLIMAX BATTLES - ULTIMATE BATTLES
These battles are pretty much story and boss battle rushes. You need to win several fights in a row, regenerating a bit between fights. The best part is, all of these let you fight with all abilities and all styles. Good luck!

ULTIMATE BATTLE ONE
Vs. Takashi, B-King, Blue Z, White Edge, Bloody Eye & Yuya
B-King is a bit tougher than usual. Otherwise, this one is easy.

ULTIMATE BATTLE TWO
Vs. Ali Brothers, G.B. Holmes & Lau Ka Long
The Dragon Style's Tiger Drop should make this a breeze.

ULTIMATE BATTLE THREE
Vs. Inmate 1356, Club Asia Assassin & Arase
Arase should be manageable by now. Also an easy boss rush.

ULTIMATE BATTLE FOUR
Vs. Atobe Family, Shindo, Hayashi, Arase, Majima & Shimano
There are actual Healing Items during the Atobe Family & Majima fights.

ULTIMATE BATTLE FIVE
Vs. Inmate 1356, Yuya, Shimano, Hayashi, G.B. Holmes, Shota, Shindo, Bloody Eye, Lau Ka Long, Arase, Majima, Shimano again & Nishikiyama
This one takes long, but it should be very easy by now. You're skilled enough, you should be able to get this on your first try without breaking a sweat.

Rewarded War God Talisman for beating the Ultimate Battles & Death By Climax for beating all Climax Battles
There you go! Now we can get to playing this game on Legend difficulty...
CHAPTER 1 - KAZUMA KIRYU, THE DRAGON
The story starts off in 1995, 7 years after the events of Yakuza 0. Here, you are heavily confined to learning the basics of navigating Kamurocho and who you can talk to for what. You can't do much here.

You will have to fight Hirata twice during the course of this chapter. Defeating him for the first time and collecting the money will reward you with When You Don't Pay Your Debts....

Unlike in Yakuza 0, all your Fighting Styles are available from the start. During this chapter, you are highly skilled in your Dragon Style.

You'll also have to fight Inmate 1356 at the end of this chapter.

Completing Chapter 1 will get you Things Will Never Be the Same.
CHAPTER 2 - FALLEN LEGEND
This chapter still doesn't really let you explore much of Kamurocho. You may be able to interact with more people and establishments than before, but apart from Substories, you should wait.

You will have to fight Majima here for the first time for the Majima Everywhere System. Be wary of how all your skills are gone and your Dragon Style is pretty much useless! You don't have to win this fight, but if you manage to defeat Majima with a bit of strategy, you'll get a buttload of XP!

You'll have to fight a guy named Punk-ass Abe. He's a bit stronger than your usual thug, don't underestimate him.

You will also have to fight Yuya in front of Stardust and some Shimano Family yakuza in this chapter.

In this chapter, you'll get the chance to:
  • Get introduced to the Majima Everywhere System
  • Substory 8: Molestation Accusation

That's the only Substory you can do in this chapter. Completing the chapter gives you Turmoil in the Tojo Clan.
CHAPTER 3 - HATEFUL INTERVENTION
This chapter will entirely play out at Tojo Clan HQ, still not letting you roam free through Kamurocho.

You will have to sneak into the funeral. During that, you'll have to fight Yasuda in the Tojo Clan HQ backyard.

After speaking with Kazama, you'll have to fight your way through the Tojo Clan HQ. Near the main gates, you will have to fight Shimano.

Other than fighting a lot and finding healing items, you won't be able to do anything else here.

Completing this chapter will give you Funeral For the Old Ways.
CHAPTER 4 - TOO MUCH TO DO
This is the chapter, where the game decides you can now do whatever you like if you don't wanna follow the story without doing some side-activities. You can now play minigames and visit eatiers at your leisure.

You'll meet Haruka in this chapter. You will also have to fight Hayashi toward the end of this chapter.

In this chapter, you'll get the chance to:
  • Substory 1: The Price of an F-Cup
  • Substory 10: Dine and Dash
  • Substory 11: The Price of a Palm-reading
  • Substory 12: The Toll Collector
  • Substory 14: The Yakuza Hater
  • Substory 15: The Bouncer
  • Substory 16: Collection Call
  • Substory 17: Bump and Scam
  • Substory 18: Bump and Scam: Revenge
  • Substory 19: Bump and Scam: Three Strikes
  • Substory 20: Bump and Scam: Epilogue
  • Substory 21: Con-tacts
  • Substory 22: The Little Match Girl
  • Substory 23: The Crane Game
  • Substory 24: Prodigal Son
  • Substory 25: Bowling Battle
  • Substory 26: The Drunkard
  • Substory 27: Handbag Hunt
  • Substory 28: Under Suspicion
  • Substory 30: The Yakuza's Apprentice
  • Substory 31: The Yakuza's Apprentice II
  • Substory 32: The Yakuza's Apprentice III
  • Substory 33: The Yakuza's Apprentice IV
  • Substory 34: Man Scout
  • Substory 35: The Truth About Beauty
  • Substory 36: Professional Brawler
  • Substory 38: Pick Pocket Pursuit
  • Substory 45: Of Luck and Debt
  • Substory 47: Crisis on a Crapper
  • Substory 53: MesuKing: The Queen of Beetles
  • Substory 54: A Goodbye Promise
  • Substory 55: Freedom to Romance
  • Substory 70: Practice Match with Professor
  • Substory 71: First Rival
  • Substory 72: Private Lesson
  • Substory 73: As Long as There's Love
  • Substory 74: Time for a Raid!
  • Substory 75: The Professor's Past
  • Substory 76: The Professor's Past
  • Substory 77: Enjoying It With Everyone
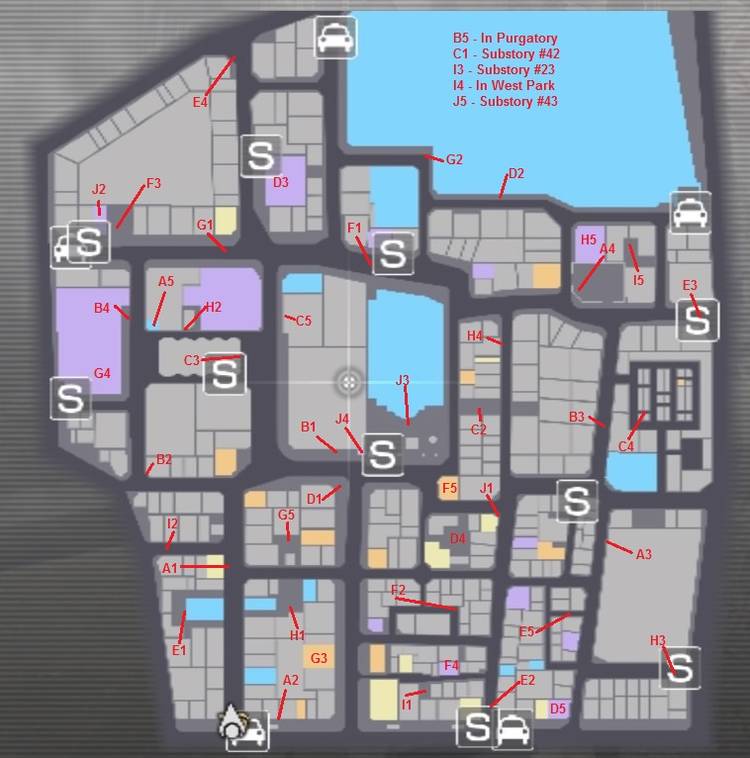
  • Find and collect Locker Keys
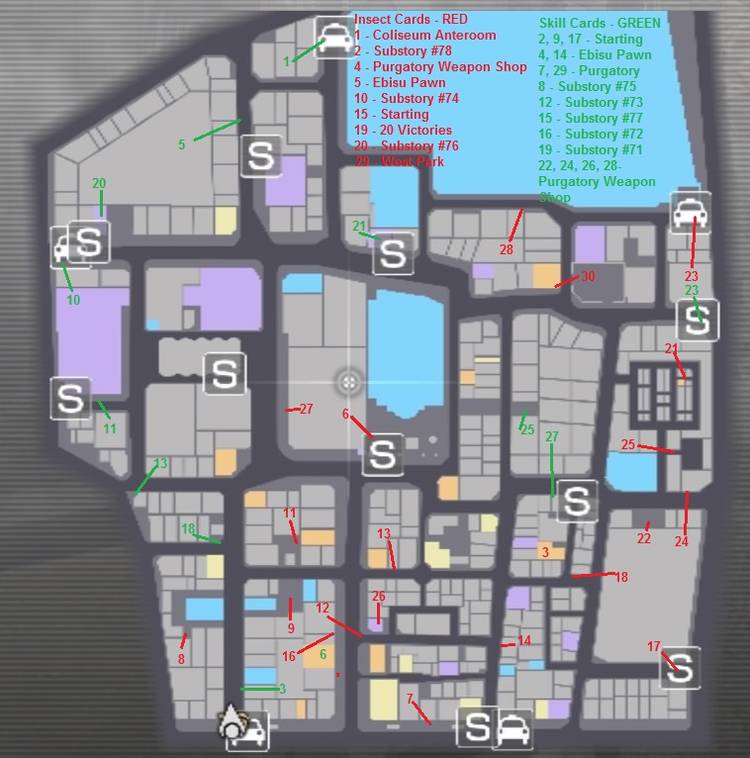
  • Find and collect MesuKing Cards
  • Get to Rank C in Majima Everywhere
  • Complete Batting, Bowling, Pool & Darts Minigames
  • Complete Shogi
  • Complete the two Cabaret Clubs

Don't worry if you don't wanna do everything here at once in a single chapter. Doing half of the games side missions here and playing some tough minigames on top can be pretty exhausting. Then again, you wanted to 100% this... Just keep some stuff for later. You always have the chance to get everything done just before the final battle in the Finale, if you wish. This right here is just the fastest way. It's gonna get less from here on out!

You will get Tell Me a Story for completing 10 Substories and Hero of the Story for completing 30 Substories!

Completing this chapter will reward you with Mother and Child.
CHAPTER 5 - INFORMANTS ARE KEY
This is the chapter, where you officially get access to West Park and the Underground Purgatory, basically unlocking everything for you to explore.

You will have to fight Daniel Feldman, Gaowayan Pramuk and Gary Buster Holmes in the Coliseum as part of the story.

You will meet Sotaro Komaki in Purgatory as well.

After all this, you will have to fight Majima with some Shimano Family goons as part of the story as well.

In this chapter, you'll get the chance to:
  • Initiate Komaki's Training
  • Substory 2: My Baby's a Showgirl
  • Substory 13: Pay it Forward
  • Substory 42: The Cell Phone Plan
  • Substory 48: Memories of the Bubble
  • Substory 52: The Value of 2.000 Yen
  • Substory 78: Battle for the MesuKing Throne
  • Complete the MesuKing Minigame
  • Complete the UFO Catcher and Photo Booth Minigames

Completing this chapter will earn you The Price of Life.
CHAPTER 6 - TOUGH LOVE
This is a good chapter to complete every other tedious activity. The story drifts off into some other side affairs here anyway. You might as well spend take the time and get over with some of the more brutal and slow challenges of this game.

It's possible to complete Komaki's training in this chapter. However, should he say something like he's making preparations, you need to wait until Majima is active again, and that means you need to get until Chapter 8 to continue with Komaki's training.

You will have to fight Tamura, B-King and some Yakuza in this chapter.

In this chapter, you'll get the chance to:
  • Substory 29: The Heart of Vandalism
  • Substory 43: Yakuza on the Run
  • Substory 44: Bad Boy in Blue
  • Substory 56: The Fighter's Successor
  • Substory 58: In Pursuit of Pleasure
  • Substory 59: Komaki Style: Shot Stopper
  • Substory 60: Komaki Style: Swordsmanship
  • Substory 61: Komaki Style: Roundhouse Attack
  • Substory 62: Komaki Style: Cat-Like Reflexes
  • Substory 63: Komaki Style: Clear-Minded Mastery
  • Substory 64: Komaki Style: Evade and Strike
  • Substory 65: Komaki Style: Dharma Tumbler
  • Substory 66: Komaki Style: Fist Reversal
  • Substory 67: Komaki Style: Knock Back
  • Substory 68: Komaki Style: Tiger Drop
  • Substory 69: Komaki Style: Parry
  • Complete Mahjong
  • Complete Pocket Circuit
  • Complete the Coliseum
  • Complete Karaoke
  • Complete Komaki's Training
  • Collect all MesuKing Cards

Completing this chapter rewards you with Sins of the Father.
CHAPTER 7 - FROM THE SHADOWS
This chapter is nothing special, really. You will have to track down Haruka, as she ran off. During your search for her you will encounter some drunk guy that requests you to bring him booze instead of telling you whether or not he saw Haruka run by. Just threaten him twice and he'll answer.

You'll have to fight a group of Mysterious Men with silenced handguns as well as all the Con Artist and Gambling Hall Staff in the gambling hall later on.

Also, make sure you have Haruka with you when going to do the Substories here! Some of them require Haruka to be with you!

In this chapter, you'll get the chance to:
  • Substory 3: Bet On a Champ
  • Substory 5: A Doctor's Duty
  • Substory 39: Kyoka and Takashi
  • Substory 40: The Medicine Goes Down
  • Substory 41: The B-King's Misfortune
  • Substory 50: Searching for the Present
  • Substory 51: Bad Ass Dads
  • Complete Cho-han, Koi-Koi, Cee-lo & Oicho-kabu in the Gambling Hall
  • Complete Blackjack, Poker, Roulette & Baccarat in either Casino
  • Visit Club Asia once casually
  • Collect all Locker Keys

This should cover all the minigames. If you were doing them in this order up to now, you should be awarded What a Player for playing all minigames.

Completing this chapter will earn you The Dragon and the Koi.
CHAPTER 8 - CITY UNDER SIEGE
West Park is being attacked and Haruka is nowhere to be found once again. In this chapter, you'll have to run around town and smash the new gangs that have started roaming the streets. Since there's no mission marker, I'll make your life easy:

Go to Children's Park to fight some Blue Z guys, then go to the square lot in the Champion District to fight White Edge and their leader and then go to Club Debolah to fight Bloody Eye and the Akai Brothers.

In this chapter, you'll get the chance to:
  • Substory 49: The Rumored Party
  • Get Rank B at Majima Everywhere
CHAPTER 9 - NO CHECKPOINTS?
This chapter can be absolutely infuriating on Legend difficulty because there are NO CHECKPOINTS at all! You need to fight your way through the chinese restaurant, through its kitchen, through Lau Ka Long himself and then survive a highway gunfight against half of the Snake Triad! I hope you have a mouse and keyboard ready...

Good luck.

After completing this chapter, you will be rewarded with A Man's Conviction.
CHAPTER 10 - OF BLOOD AND REGRETS
Love is a strange thing, isn't it? You'll mostly be following a blood trail to find where Shinji is hiding from the Nishikiyama Family, only to run into a massive, empty building near the Hotel District which is full of Yakuza looking for Shinji.

It's another long battle through the floors up to the roof and then culminating into a boss fight. You don't actually need to fight every Yakuza on your way; just running past most of them and getting to the stairs or right doors is enough to proceed, but you can also grind some XP here by fighting everyone.

On top of the building, you'll have to fight Arase, who is very skilled with pistols.

In this chapter, you'll get the chance to:
  • Substory 6: The Fake Mizuki's Truth
  • Substory 9: The Stalker
  • Substory 37: Gangbusters

Completing this chapter earns you The Dragon Roars.
CHAPTER 11 - LUCRATIVE SCAVENGER HUNT
This chapter will also feature a lot of action. You're gonna have to be running around a lot at first and chatting specific people, but after getting the fake passport, you can get the Shangri-La Membership Card off a man working at the MEB for at least 300.000 Yen.

You're gonna have to fight some Chinese Men during this little scavenger hunt for info, but it should be no problem. What will be a problem, is that Majima will invite you in a taxi and take you to the pier.

Once you're there, you and Majima will fight some Ex-Dojima Family Yakuza who still want revenge for Kiryu murdering their boss Dojima (which didn't exactly happen).

After this, you will be running around with Haruka again and can complete a Substory which can only be triggered if she's with you. Otherwise, just proceed to Shangri-La and expect a long fight against the Shimano Family back out of the building.

You will have to fight Majima just before exiting Shangri-La.

In this chapter, you'll get the chance to:
  • Substory 7: Man on a Ledge

Completing this chapter will get you Ashes to Ashes.
CHAPTER 12 - "EXPOSITORY" ON A NEW LEVEL
This is the chapter where you will have your biggest clash yet with several Kazama Family Yakuza at your side against Shimano and the Shimano Family. Somehow, Majima isn't there with him. Basically, it's a big group fight and that would be it.

Should be easy.

Completing this chapter will earn you Legends Never Die.
FINALE - WHEN ALL IS LOST
This chapter is where you will be at the point of no return. To start the Finale, you will have to tell Kazuki that you're ready to go. Before this, make sure you do anything you still wish to get done before finishing the story, like the final substories, minigames you may have neglected to do before or settling the score with Majima.

Regardless, this entire Finale is basically a massive final battle. First, you will have to fight your way through Kamurocho against the Mob, in multiple waves of random thugs. Once you're inside the Millenium Tower, you'll have to fight MIA.

Shortly after Jingu's introduction, you will have to fight more MIA men again until you reach the helipad platform, where Jingu and two MIA Colonels will attack you. This is considered the hardest bossfight in this game as the two Colonels are seasoned fighters keeping you in check and Jingu keeps his distance using grenades and a handgun.

Once they are taken care of, you finally get to fight Nishiki and beat the game with him falling to the ground.

In this chapter, you'll get the chance to:
  • Substory 4: The Yakuza's Wife
  • Substory 46: The Last Assassin
  • Substory 57: Behind the Assassin

Completing the last Substories to a total of 78 will reward you with Story of My Life.

Finishing the Finale for the first time will earn you Thank You! Remember to go into Premium Adventure after this first, before starting a New Game Plus run! There's something you need to do that you can only do there!

Finishing the Finale on Legend difficulty will give you Dragon of Legend.

And if you completed every other achievement before finishing the story on Legend difficulty, you should be rewarded with KIWAMI as your final achievement!
PREMIUM ADVENTURE - LIKE FATHER AND DAUGHTER
This is Premium Adventure mode, where you can roam freely through Kamurocho, use your DLC outfits and fight Majima and regular Street Thugs if you want. This is also the time where you can try and get everything you may have missed up until the Finale, like Substories, Minigames, Weapons or Gear, Locker Keys and so on.

Unfortunately, going into this mode is essential here. There are two specific achievements tied specifically to Premium Adventure and they can be quite tedious.

You can choose to take Haruka outside of Serena and walk with her. When you're slow enough, you'll walk hand in hand with her. Walking 1km of distance while holding her hand is just as annoying as it sounds, but you can do it while grinding for the other achievement. Anyway, doing this will reward you with Hand In Hand.

The other achievement is the real slouch here. There's a special mechanic called Haruka's Requests and it is basically a way to make you do more unnecessary ♥♥♥♥♥♥♥♥ a real kid would never ask for. While some things may seem simple like getting her some amulet, some food or going to play Bowling with her, later on, she is going to expect you to buy expensive crap or play like a gambling god.

I'm not kidding, I don't know who thought this game wasn't long enough already, but apparently they wanted to make sure you wouldn't forget this game's atrocious minigames. Anyway, Haruka's Rank Rewards can be broken down into a simple table. You start at Rank F.

Rank
Reward
E
Haruka's Candy
D
Haruka's Chocolate
C
Haruka's Amulet
B
Red Jewel
A
Haruka's First Aid Kit
S
Haruka's Lunch Box
SS
Zero Jewel
SSS
Haruka's Necklace
EX
Morning Glory Scarf

And here's basically, what you need to do, in order:
  • Buy a Protective Amulet at Don Quijote
  • Buy Staminan Royale at Kotobuki Drugs
  • Order a Beef Bowl at Akaushimaru
  • Buy Natchan Orange at Poppo Tenkaichi St.
  • Buy Dog Food at Poppo Nakamichi St.
  • Win 300 Wooden Pieces in Oicho-kabu
  • Order Ramen at Tengokuken
  • Win 1.000 Chips in Roulette at Rune Casino
  • Buy a Wallet at Le Marche
  • Win 500 Wooden Pieces in Cee-lo
  • Win 2.000 Chips in Poker at Fukuma Casino
  • Get 200 in Count Up Darts at Vincent
  • Order Stone-cooked Bibimbap at Kanrai
  • Order a Shake at Smile Burger
  • Win 800 Wooden Pieces in Cho-han
  • Win 3.000 Chips in Blackjack
  • Get 800 Points on the Normal Course in the Batting Center
  • Order Carbonara at Pronto
  • Make a Photo in the Photo Booth at Club SEGA Theater Square
  • Buy Yakisoba at Poppo Showa St.
  • Get 800+ Points in Haruka's song at Karaokekan
  • Order a Sherbet at Yoronotaki
  • Order Onion Takoyaki at Gindaco
  • Buy a Yakisoba Bun at M Store
  • Win 1.000 Wooden Pieces in Koi-koi
  • Beat Haruka at MesuKing in Club SEGA Nakamichi St.
  • Order Abalone at Sushi Gin
  • Win a Baby Plushie at Club SEGA Theater Square's UFO Catcher
  • Get a Turkey (3 consecutive strikes) at Mach Bowl
  • Beat an Opponent at Four-Ball Pool in Vincent
  • Order Coffee at Cafe Alps
  • Buy a Gold Plate at Ebisu Pawn
  • Win 4.000 Chips in Baccarat at Fukuma Casino
  • Beat an Opponent at Rotation Pool in Vincent
  • Get 950+ at Otometal MY LIFE in Karaokekan
  • Clear 3 Splits in a Split Game at Mach Bowl
  • Get 1200 Points on the Hard Course at the Batting Center

And once you got all this done, you've arrived at Haruka's EX Rank, giving you Mister Master. Now you can start a Legend difficulty playthrough for the climactic finale!
PEOPLE OF 2005 - ORIGINS [1 - 20]
There are a total of 78 Substories in this game! This page includes Substories 1 - 20.

Substory 1: The Price of an F-Cup
Located south of Beam
  • Accept Mai's offer
  • Answer anything
  • Refuse to drink 3 times
  • Defeat the Con Artists
  • Choose "Not a chance."
Rewarded 100.000 Yen, Password for Rune Casino hidden in Kyushu No.1 Star for being persistent & You'll Only Get Burned for completing this Substory

Substory 2: My Baby's a Showgirl
Located at Club Asia
  • Agree to see the show with Yuya
  • Defeat the Mysterious Assassin
  • Defeat the Kidnappers
Rewarded Free Pass for Asia & That's a Man! for completing this Substory

Substory 3: Bet On a Champ
Requires Haruka and is located inside Bantam
  • Defeat the Boxer
  • Choose "I've come to take shelter from the rain."
  • Defeat the Blackmailer
Rewarded Sonic Right Hook for completing this Substory

Substory 4: The Yakuza's Wife
Located at the Florist of Sai's mansion
  • Defeat the Ex-Dojima Family Yakuza
Rewarded An Answer Owed

Substory 5: A Doctor's Duty
Located west of the West Park entrance
  • Give the boy some food
  • Let Haruka talk to the boy
  • Give the boy some more food
  • Head to the clinic west of the Akaushimaru near Theater Square
  • Defeat the Ali Brothers
Rewarded Kidney Stones for completing this chapter

Substory 6: The Fake Mizuki's Truth
Located at the Florist of Sai's mansion
  • Defeat the Pares Staff
Rewarded A Bad Business for completing this Substory

Substory 7: Man on a Ledge
Requires Haruka and is located west of Park Blvd.
  • Choose "Tell me what happened"
  • Ask "Who is Mizuki?"
  • Ask "Have you contacted her?"
  • Ask "How much have you spent on her?"
Rewarded She's Worth It? for completing this Substory

Substory 8: Molestation Accusation
Located at the southeast of Theater Square
  • Refuse to pay
  • Defeat the Menacing Man
Rewarded 20.000 Yen

Substory 9: The Stalker
Requires Substory 37 and is located at Orchid Palace Mahjong
  • Agree to help the woman with her stalker
  • Try convincing the stalker to stop
  • Don't fall for his bluff twice
  • Defeat the Stalker and the Yakuza
Rewarded 30.000 Yen

Substory 10: Dine and Dash
Located near western Akaushimaru
  • Defeat the Dine-and-Dasher
Rewarded Toughness Infinity

Substory 11: The Price of a Palm-reading
Located north of Karaokekan
  • Agree to listen
  • Refuse his offer 3 times
  • Defeat the Con Artists
  • Defeat the Palm Reader
Rewarded 35.000 Yen & Lifestone

Substory 12: The Toll Collector
Located on Park Alley
  • Choose to fight
  • Defeat the Toll Collector
Rewarded Leech Gloves

Substory 13: Pay it Forward
Located in the Park Alley alcove
  • Bring Sake to a drunk in Public Park 3
  • Bring a Worn-out Coat to homeless guy near Beam
  • Bring a Pair of Glasses to a man in front of Club Asia
  • Bring a Super Strength Adhesive Tape to a homeless guy in West Park
  • Bring the Silver Briefcase to the man in the Park Alley alcove
Rewarded Swiss Watch

Substory 14: The Yakuza Hater
Located next to Children's Park
  • Defeat the Yakuza Hater
  • Defeat the Street Ruffians
Rewarded Red Jewel

Substory 15: The Bouncer
Located east of Don Quijote
  • Agree to guard the club
  • Defeat the Street Thugs
  • Answer anything
Rewarded Italian Scarf

Substory 16: Collection Call
Located near Vincent
  • Answer anything
  • Defeat the Con Artist
Rewarded Sakura Storm

Substory 17: Bump and Scam
Located east of M Store
  • Bump into the 3 Thugs
  • Refuse to pay
  • Defeat the Street Thugs

Substory 18: Bump and Scam: Revenge
Requires Substory 17 and is located east of M Store
  • Bump into the 3 Thugs
  • Defeat the Street Thugs

Substory 19: Bump and Scam: Three Strikes
Requires Substory 18 and is located east of M Store
  • Bump into the 5 Thugs
  • Defeat the Street Thugs
Rewarded Colorful Parasol

Substory 20: Bump and Scam: Epilogue
Requires Substory 19 and is located east of M Store
  • Agree to walk with the 5 Thugs
  • Defeat the Street Thugs
PEOPLE OF 2005 - BUSTING SCAMS [21 - 40]
This page includes Substories 21 - 40.

Substory 21: Con-tacts
Located east of Ebisu Pawn
  • Refuse to pay
  • Defeat the Con Artist
  • Leave the area, return...
  • Defeat the Con Artist again
Rewarded 20.000 Yen

Substory 22: The Little Match Girl
Located near Pink Street entrance
  • Choose anything
Rewarded Celebrity Perfume

Substory 23: The Crane Game
Located at Club SEGA Nakamichi St.
  • Bring the businessman a white Bunchan
  • Bring the businessman a Woo Papa, a Woo Mama & a Woo-kun
  • Bring the businessman a Jumbo Chestnut
  • Defeat the Yakuza
Rewarded 90.000 Yen & Locker Key I3

Substory 24: Prodigal Son
Located north of the Millenium Tower
  • Answer "D.. Dad?"
  • Choose "Seems that way."
  • Defeat the Homeless Hunters
  • Return the Stolen Wallet
Rewarded Sacrifice Stone

Substory 25: Bowling Battle
Requires having played some Bowling and is located at Mach Bowl
  • Beat the challenger at Bowling
Rewarded 30.000 Yen

Substory 26: The Drunkard
Located at the corner between Tenkaichi St. & Tenkaichi Alley
  • Bring the drunk any alcohol
  • Bring the drunk a bottle of Scotch Whiskey
  • Bring the drunk a healing item (like a Tauriner)
Rewarded 510 Yen & Alertness Hood

Substory 27: Handbag Hunt
Located in front of Millenium Tower
  • Agree to help the woman find her bag
  • Defeat the Street Thugs
  • Bring the woman her Stolen Bag
Rewarded 10.000 Yen

Substory 28: Under Suspicion
Located south of Mach Bowl
  • Talk to the woman on the left in a long green coat
  • Don't peek inside the bag (You'll find out anyway)
Rewarded 80.000 Yen for not peeking into the bag

Substory 29: The Heart of Vandalism
Located west of Mach Bowl
  • Agree to watch the cafe owner's sign
  • Leave for a bit
  • Defeat the Street Ruffians
Rewarded 50.000 Yen

Substory 30: The Yakuza's Apprentice
Located in front of Karaokekan
  • Defeat Kano
  • Answer anything
  • Defeat the Yakuza
Rewarded Gold Champagne

Substory 31: The Yakuza's Apprentice II
Requires Substory 30 and is located at the south end of Senryo Ave.
  • Agree to go with Kano
  • Defeat the Yakuza
Rewarded Tauriner Maximum & Password to Rune Casino hidden in Kyushu No.1 Star

Substory 32: The Yakuza's Apprentice III
Requires Substory 31 and is located at Beam
  • Defeat Godspeed Yoko
  • Defeat Godspeed Yoko again
  • Defeat the Yakuza Loan Sharks
Rewarded 100.000 Yen

Substory 33: The Yakuza's Apprentice IV
Requires Substory 32 and is located at the southern entrance to the Champion District
  • Agree to bail Kano out
  • Defeat the Yakuza
  • Answer anything
Rewarded Masterwork Dagger

Substory 34: Man Scout
Located at the corner of Showa St. & Senryo Ave.
  • Pay 10.000 Yen
  • Answer "Physique"
  • Answer "I don't look back at the past"
  • Answer "Tachibana"
Rewarded Staminan Spark

Substory 35: The Truth About Beauty
Located in the empty alley behind north of Poppo Nakamichi
  • Agree to hang out with Ruby
  • Refuse to go with her twice
  • Defeat "her" "brother"
  • Defeat Ruby
Rewarded Black Belt

Substory 36: Professional Brawler
Located in the Shichifuku Parking Lot
  • Agree to fight
  • Defeat the Pro-Fighter
  • Offer to fight him again
  • Defeat the Street Thugs
Rewarded 30.000 Yen

Substory 37: Gangbusters
Located west of Park Blvd.
  • Defeat the Gangbusters
  • Defeat the Gangbusters again
  • Defeat Asano
Rewarded 30.000 Yen

Substory 38: Pick Pocket Pursuit
Located at the west end of Park Blvd.
  • Find the Pickpocket (glasses & gray vest)
  • Defeat the Pickpocket
Rewarded 70.000 Yen (50 back plus 20 as reward)

Substory 39: Kyoka and Takashi
Requires Substory 41 and is located northwest of Vincent
  • Bring the B-King a Sandwich from M Store
Rewarded Gambler's Binding

Substory 40: The Medicine Goes Down
Requires Substory 41 and is located in the southeastern Senryo Ave. side street
  • Defeat the Punks in Red
  • Bring the man his bag
Rewarded 150.000 Yen
PEOPLE OF 2005 - WARRIOR'S GLARE [41 - 60]
This page includes Substories 41 - 60.

Substory 41: The B-King's Misfortune
Located on Theater Square
  • Decide to step in
  • Defeat the Yakuza
Rewarded Brawler Amulet

Substory 42: The Cell Phone Plan
Located in the backlot of Tenkaichi Alley
  • Defeat the Assassin
Rewarded Locker Key C1 & Goddess of Children Amulet

Substory 43: Yakuza on the Run
Located in the area north of Ebisu Pawn
  • Defeat the Running Yakuza
  • Defeat the Yakuza
Rewarded Locker Key J5

Substory 44: Bad Boy in Blue
Located south of Kyushu No.1 Star
  • Refuse to pay
  • Defeat the Police Officer Con Artist
Rewarded 70.000 Yen

Substory 45: Of Luck and Debt
Requires having drunk at Shellac, access to Rune Casino and is located inside Shellac
  • Agree to help collecting a tab
  • Bring the Gambler a Goddess of Children Amulet
Rewarded 50.000 Yen

Substory 46: The Last Assassin
Requires all other 77 Substories completed, all Skills maxed out and is located at Theater Square
  • Agree to fight him
  • Defeat Jo Amon
Rewarded Amon Sunglasses & Amon Defeated for defeating Jo Amon

Substory 47: Crisis on the Crapper
Requires a few completed Substories and is located in Children's Park
  • Give the man 6 packs of Pocket Tissues
Rewarded Stone of Enduring

Substory 48: Memories of the Bubble
Located at the dance floor inside Club Debolah
  • Agree to help the lady
  • Answer "We waved 10.000 Yen bills"
  • Answer "Leg lads"
  • Answer "A bodycon dress and a fan"
  • Buy a Bodycon Dress and Isobe Fan at Don Quijote and bring them to the lady
Rewarded Double Feathered Fans

Substory 49: The Rumored Party
Located inside Club Stardust
  • Agree to help with the rumored party
  • Speak with everyone in Club Debolah
  • Defeat Munan Yazawa
Rewarded Tourmaline Bracelet

Substory 50: Searching for the Present
Requires Haruka and is located in Children's Park
  • Buy a Crossword Puzzle Book from Poppa Showa St.
  • Get a Shrink-Wrapped Book from the back alley at Tenkaichi Alley
  • Get a Limited Edition Golem Tiger from Pocket Circuit Fighter
  • - Ultra Spiked Tires
  • - Ultra Metal Frame
  • - Ultra High Torque Motor
  • - Ultra Boost Gears
  • - High Capacity Battery
  • - Side Stabilizer
  • - Light Suspension
  • Give the girl the Crossword Puzzle Book

Substory 51: Bad Ass Dads
Located in West Park
  • Answer "My clothes"
  • Answer "I beat up punks every day"
  • Answer "Having less common sense than normal men"
Rewarded Italian Shoulder Bag

Substory 52: The Value of 2.000 Yen
Located inside Vincent
  • Collect one from the drunk at the crossing of Taihei Blvd. & Pink Street
  • Collect one from the guy at a vending machine across the Kazama Family Office for 2.000 Yen
  • Collect one from the clerk at Poppo Tenkaichi St. for 2.000 Yen
  • Collect one from the guy in Club SEGA Theater Square for 5.000 Yen
  • Collect one from the guy in the Batting Center for 2.000 Yen
Rewarded 100.000 Yen

Substory 53: MesuKing: The Queen of Beetles
Located outside Club SEGA Nakamichi St.
  • Return the MesuKing card to the kid

Substory 54: A Goodbye Promise
Requires Rank S with Yui and is located at Theater Square
  • Meet with Yui
Rewarded Steamy Moment with Yui

Substory 55: Freedom to Romance
Requires Rank S with Rina and is located at Cafe Alps
  • Defeat the Drunkard
Rewarded Steamy Moment with Rina

Substory 56: The Fighter's Successor
Located inside Pocket Circuit Stadium
  • Agree to help find a successor to Fighter
  • Beat Hideki at Pocket Circuit
  • - Slim Tires
  • - Speed Frame
  • - Speed Motor
  • - Balanced Gears
  • - High Speed Battery
  • Beat Pocket Circuit Fighter at Pocket Circuit
  • - Ultra Slick Tires
  • - Ultra Metal Frame
  • - Ultra Godspeed Gears
  • - Ultra Boost Gears
  • - High Capacity Battery
  • - Heavy Suspension
  • - Bumper Plate
  • Beat Takuma at Pocket Circuit
  • - Ultra Spiked Tires
  • - Side Stabilizer
  • - Rest's the same as above...
Rewarded Godspeed Motor Mark II & Track Editor

Substory 57: Behind the Assassin
Located west of Taihei Blvd.
  • Defeat Former Inmate 1356
  • Defeat Kunieda and his Nikkyo Consortium Goons

Substory 58: In Pursuit of Pleasure
Located south of the western Champion District entrance
  • Take Shinohara to Kanrai
  • Take Shinohara to Jewel
  • Take Shinohara to the Coliseum
Rewarded Shinichi Shinohara as Coliseum Opponent

Substory 59: Komaki Style: Shot Stopper
Located in West Park
  • Agree to become Komaki's student
  • Complete the training session
Rewarded Komaki Shot Stopper Skill

Substory 60: Komaki Style: Swordsmanship
Requires Substory 59, a Wooden Katana and is located in West Park
  • Complete the training session
Rewarded Komaki Swordsmanship Skill
PEOPLE OF 2005 - A DIFFERENT YAKUZA [61 - 78]
This page includes Substories 61 - 78.

Substory 61: Komaki Style: Roundhouse Attack
Requires Substory 60, the Image of an Asura and is located in West Park
  • Complete the training session
Rewarded Komaki Roundhouse Attack Skill

Substory 62: Komaki Style: Cat-Like Reflexes
Requires Substory 61, the Image of a Cat and is located in West Park
  • Complete the training session
Rewarded Komaki Cat Feet Skill

Substory 63: Komaki Style: Clear-Minded Mastery
Requires Substory 62, the Image of a Snake and is located in West Park
  • Complete the training session (winning not required)
Rewarded Komaki Clear Mind Skill & Hannya-Man as Coliseum Opponent

Substory 64: Komaki Style: Evade and Strike
Requires Substory 63, the Image of a Kamaitachi and is located in West Park
  • Complete the training session
Rewarded Komaki Evade and Strike Skill

Substory 65: Komaki Style: Dharma Tumbler
Requires Substory 64, the Image of Dharma and is located in West Park
  • Complete the training session
Rewarded Komaki Dodge Roll Skill & Isamu Kumada as Coliseum Opponent

Substory 66: Komaki Style: Fist Reversal
Requires Substory 65, the Image of Four Gods and is located in West Park
  • Complete the training session
Rewarded Essence of Fist Reversal Skill

Substory 67: Komaki Style: Knock Back
Requires Substory 66, the Image of an Elephant and is located in West Park
  • Complete the training session
Rewarded Komaki Knock Back Skill

Substory 68: Komaki Style: Tiger Drop
Requires Substory 67, the Image of a Tiger and is located in West Park
  • Complete the training session
Rewarded Komaki Tiger Drop Skill & Raizo Shiba as Coliseum Opponent

Substory 69: Komaki Style: Parry
Requires Substory 68, the Image of a Dragon and is located in West Park
  • Complete the training session
Rewarded Komaki Parry Skill & Sotaro Komaki as Coliseum Opponent

Substory 70: Practice Match with Professor
Requires Substory 53 and is located inside Club SEGA Nakamichi St.
  • Play a Practice Match against the Professor in MesuKing

Substory 71: First Rival
Requires Substory 70 and is located inside Club SEGA Nakamichi St.
  • Beat Tomohiro at MesuKing
Rewarded Giant Swing Card

Substory 72: Private Lesson
Requires Substory 71 and is located inside Club SEGA Nakamichi St.
  • Beat Sach at MesuKing
Rewarded Finish Time Card

Substory 73: As Long as There's Love
Requires Substory 72 and is located inside Club SEGA Nakamichi St.
  • Beat Masaru at MesuKing
Rewarded Super Romero Special Card

Substory 74: Time for a Raid!
Requires Substory 73, 30 Cards and is located inside Club SEGA Nakamichi St.
  • Beat Nobuo at MesuKing
Rewarded Giant Japanese Mantis Card

Substory 75: The Professor's Past
Requires Substory 74 and is located inside Club SEGA Nakamichi St.
  • Beat Takeru at MesuKing
Rewarded Last Resort Card

Substory 76: The Professor's Past 2
Requires Substory 75 and is located inside Club SEGA Nakamichi St.
  • Beat Hime at MesuKing
Rewarded Wasp King Card

Substory 77: Enjoying It With Everyone
Requires Substory 76 and is located inside Club SEGA Nakamichi St.
  • Beat Masashi at MesuKing
Rewarded Tie Breaker Card

Substory 78: Battle for the MesuKing Throne
Requires Substory 77, 50 cards and is located inside Club SEGA Nakamichi St.
  • Beat the Professor in a serious challenge at MesuKing
Rewarded Hercules Beetle Card & Throne of the MesuKing! for defeating every opponent at MesuKing
FEAR OF 2005 - HE'S EVERYWHERE
Just after the beginning of Chapter 2, you will encounter Majima for the second time during the story, except this time, he will challenge you to a fight. He will be almost unstoppable and dish out a lot of damage while you have no skills unlocked yet. However, with the right tactics, you can actually defeat Majima in this first battle and instantly get experience worth 1000 Skill Points.

After this battle, Majima will declare to hunt for you all across Kamurocho and suddenly attack you when you're near. Fighting and defeating Majima will increase the Majima Everywhere Rank, making him stronger and initiating several new Majima Events, all to better upgrade your Dragon Style. This rank starts at G and ends with SSS. Ranking up to B gives you It's Not Over Yet!

It can also happen that you haven't progressed far enough through the story to fight Majima again and rank up further. Some ranks are locked behind story progression, but that shouldn't be much of an issue. The only known annoyance it creates is that your Dragon Style only gets powerful enough to be useful toward the endgame. Unfortunately.

There are five ways to encounter Majima in Kamurocho:

On the Streets - Majima will be walking around town with a certain costume and Style Aura looking for Kiryu. Once he sees you, he will yell "Kiryu-chan!" and chase you. This will earn you Kiryu-chan! for making Majima chase you.

Suddenly Majima - If you are in a certain area and have the Majima Sensor skill, you will be alerted to Majima's presence. However, just walking past a certain spot will trigger Majima to come out of his hiding spot and attack you. You can get Majima From Above by making him ambush you from a hiding place above you and Majima From Below by making him appear out of a manhole.

From Above - Outside Beam / On Pink Street
From Below - Champion District / Near Kazama Family Office / Hotel District

Don't Forget Majima - After getting to Rank A, there will be 8 different spots where you can trigger a sort of scripted fight against some thugs, where Majima will jump in to fight you too, 2 spots always being dedicated to one of his four fighting styles. You will get Let's Fight! for Thug Majima, Swing for the Fences! for Slugger Majima, Break it Down! for Breaker Majima and Are Ya Havin' Fun Yet? for Mad Dog Majima.

Thug Style - In front of Tenkaichi Poppo & North of Todo Building on Shichifuku St.
Slugger Style - Southwest to southern Champion District entrance & near Children's Park
Breaker Style - East of Shichifuku St. & southeast of Theater Square
Mad Dog Style - Outside Millenium Tower & east of Mach Bowl entrance

Hidden Majima - Find Majima hiding in car trunks, giant traffic cones or in manholes. Sometimes you just get an item instead of a fight. Nothing more to it.

There are plenty more ways to trigger Majima to appear, but they are not all necessary to do:
  • Darts at Vincent
  • Pool at Vincent
  • Shogi Challenge at Shoten
  • Get the Beam Password from some guys southeast of Theater Square
  • Photo Booth
  • SHINE (Rank F E-Mail)
  • Bowling at Mach Bowl (Rank E E-Mail)
  • Pocket Circuit (Rank D E-Mail, Guard Dog Race)
  • Pocket Circuit Again (Vicious Dog Race)
  • MesuKing (Rank C E-Mail)
  • Baseball at the Batting Center (Rank B)
  • Pocket Circuit (Rank B E-Mail, Mad Dog Race)
  • MesuKing (Rank S E-Mail)
  • Coliseum (Rank SS)

Guard Dog Race
  • Slim Tires Plus
  • Speed Frame Plus
  • Speed Motor Plus
  • Balanced Gears Plus
  • Regular Battery

Vicious Dog Race
  • Ultra Spiked Tires
  • Ultra Metal Frame
  • Ultra Godspeed Motor
  • Ultra Boost Gears
  • High Capacity Battery
  • Heavy Suspension

Mad Dog Race
  • Ultra Spiked Tires
  • Ultra Metal Frame
  • Ultra Godspeed Motor
  • Ultra Boost Gears
  • Regular Battery
  • Heavy Suspension
  • Bumper Plate

Fighting Goromi (Majima at SHINE) rewards you with Goromi the Hostess, fighting Officer Majima gives you Majima On the Beat and fighting Zombie Majima gives you Majima of the End.

That should cover everything special with Majima.
DINING & DRINKING IN 2005 - FINE ESTABLISHMENTS
There are a lot of places to eat and drink at in Kamurocho. To get all the Completion Points in this regard, you have to have ordered every food and drink of the menu in a restaurant, club and bar. And you have to do that for every single place where you can eat and drink, which means that convenience stores don't count. Things you already tried once, are marked as checked in the menus.

Getting this can sound hard at first because you can only eat when you're not at full health, but you can also work around that limit. You can exchange Completion Points to get Bottomless Stomach that basically enables you to eat even when you're completely full. That is the point where it makes sense to consider grinding eateries in the first place. But you're always free to stop by a restaurant instead of using healing items when you're roaming the streets!

There is of course an alternative to the skill that is an item called AppStim RX. You can buy it at Kotobuki Drugstore, the place where you can get the strongest healing items as well. It chips some of your health away so you're able to eat again. But maybe getting the skill might turn out to be easier.

Also good to know might be that you can actually order multiple things sometimes, so that you can just order every food in a restaurant in one go when you're able to eat infinitely.

Bars, places where you only get to choose one serving of alcohol at time, can be time-consuming. Unfortunately, Legendary Drinker of Ryukyu is no longer obtainable in this game, so feel free to stand around in a bar and watch YouTube or something until Kiryu feels like drinking again.

  • Gindaco
  • Yoronotaki
  • Akaushimaru
  • Kyushu No.1 Star
  • Sushi Gin
  • Pronto
  • Cafe Alps
  • Smile Burger
  • Shellac
  • Vincent
  • Bantam
  • Kanrai

Consuming food items is an Adventure Point as well, but it means eating actual food items and not restaurant orders, like Bentos, Onigiris or Sandwiches, basically anything you can get and eat from a convenience store.
ENTERTAINMENT 2005 - MAHJONG AGAIN!?
This is what it boils down to. This is the challenge that most people give up on because it's so frustrating to do. It wasn't fun in Yakuza 0 and it's back, just as frustrating as 17 years ago! They should've cut this minigame as well...

Let's break it down. Playing Mahjong is kind of like playing a round of Poker. It's all about hands. The better your hand, the higher the worth of your tile combination, the higher the payout if you manage to "go out" (this means winning a round in Mahjong). But what are the conditions to going out?

When you want to start a game, there are three tables you can join: Beginner, Intermediate and Advanced. Honestly, just pick Advanced as it doesn't make a difference in difficulty. You will lose a lot at the Beginner Table as well. Make sure you saved your progress before attempting to win here and always go straight to the Advanced Table for the fastest progress.

In this game, there's also the Lucky Tile cheat item that you can get from Locker I2, but it's basically useless as you can only use it once for it to be consumed and all it does is give you a single useful tile.

Once you picked a table, there are a couple of things you should consider in Mahjong Basics and Change Rules. The basics are explained well enough. You always have a hand of 14 tiles and each round, you pick a tile from your own deck, giving you a random tile that could be completing a part of your hand or be completely useless. Each time you draw a tile, you need to discard one in return. It could be one that you don't need in your hand or it could be the one you drew.

To win, you need 4 combinations of 3 tiles which could be Sequences (same-suit 1-2-3, 2-3-4, 3-4-5 and so on) or Triplets (3 of the exact same tile) and a pair (2 of the exact same tiles). SOMETIMES it can happen that your hand does not meet the winning criteria even though you have all the needed tiles. Unfortunately, I have no clue why that happens, but as far as I can tell you, it is connected to stealing tiles from other players and having combinations of special tiles (the 4 wind tiles and dragon tiles). Just make sure you don't steal, as tempting as it may be, because your hand's worth will drop a lot from that.

There are 3 different suits of tiles, sorted by number going higher to the right:

BAMBOO

DOTS

JAPANESE NUMBERS


Next, have a look at the Change Rules tab. Always put the game style on Quarter Game for a shorter round and a higher chance of winning. Use Red Dora for these red bonus point tiles to rapidly increase the worth of your hand! Two Han Minimum is up to you to decide, it just regulates a minimum of worth for a player's hand to be able to win. Kuitan is another special rule, where it becomes easier to win with stealing, so if you want higher worth and chances, you should not use it.

Once you're set and you've played 10 rounds, you will have most likely noticed that I wasn't kidding about the unfair RNG here. It's hardly possible to win and you will have a lot of moments where you're one tile away from winning, just so some opponent wins and rubs it in your face by taking your money. Well, you have 6 Minigame Points to complete here. Let's get to work!

Go out 10 times/Earn 100.000 Wooden Pieces
Earning 100.000 Wooden Pieces in Mahjong is pretty tiresome, considering how often you usually lose. Basically, you have to start the game with your current amount of pieces and make a profit by the time you finish the rounds and exit the minigame for payout. If you are lucky and get high worth hands, you can get a lot of grind in this out of the way much quicker. But you have to get lucky first.
"Going out" is just the term for winning a round with your hand. Win 10 rounds, basically.

Go out with Mangan 5 times/ Haneman 1 time
Han, Mangan and Haneman represent the worth of a hand in Mahjong. Usually, a scoring element (also referred to as Yaku) in a hand has a number of Han and you can get that through miscellaneous hand combinations, special round conditions or Red Dora tiles. 5 Han can produce Mangan, 6 - 7 Han can produce a Haneman and there's also Baiman which you can get with 8 - 10 Han.
The easiest strategy here is to just go for Full Straight and Riichi Ippatsu at the same time while using Red Dora tiles. If you win under these conditions, it's a guaranteed Haneman. Getting Haneman also scores for getting Mangan in the Completion List. However, you will most likely just get Mangan and Haneman eventually with a lot of luck.

Go out with Full Straight
Full Straight is a Yaku that requires you to have tiles from 1 to 9 of the same suit in your hand. If you manage to complete your hand and go out while having this Yaku, you will get this Minigame Point.

Go out with Riichi Ippatsu
Your hand can have two different states, concealed and exposed. You start your round with a concealed hand and what it means is that you never stole tiles from an opponent and an exposed hand is when you stole at least one tile during the round. Going out with a concealed hand is also a Yaku. Moreover, there's a special condition called Riichi that you can ONLY activate if you NEVER stole a tile from opponents the entire round and are just ONE tile away from completing your hand!
Once you activate Riichi, the game starts playing automatically until you get the tile you need. Riichi Ippatsu means that you have to win during the first round after activating Riichi. That means, you draw first, then opponent 1 draws, then opponent 2 draws, opponent 3 draws and it's back to you and then back to opponent 1, Riichi Ippatsu is failed. If you start Riichi and the next opponent draws a tile you can steal, steal it to get Riichi Ippatsu out of the way.
Don't worry, Riichi Ippatsu might be a higher worth Yaku than Riichi, but we're trying to make progress here and Riichi is a nice and easy Yaku itself.
ENTERTAINMENT 2005 - GAMBLING IN THE SHADOWS
There are a couple Gambling Minigames located in the casino and the gambling hall. The available games are Poker, Roulette, Blackjack and Baccarat in the casino and Koi-koi, Cho-han, Cee-lo and Oicho-kabu in the gambling hall. There are also Minigame Points tied these: You need to win 50.000 Chips in two of them and 20.000 Chips in the other two, where you only need to win 10.000 Wooden Pieces for each one in the gambling hall.

Sadly, there is ZERO strategy here. It's all completely luck-based and the minigames work here just like in real life. In this case, you could get extremely lucky in Roulette and get about 6 million Yen by betting just once and you could also lose 20 bets in a row in Cee-lo. The only thing that can be considered a strategy is to always bet the highest amount, so you can to get the most out of your lucky moments.

POKER, I'LL HOLD 'EM - 20.000 Chips
Just keep betting the highest amount. Frankly, it's up to you whether or not you would like to play typical Texas Hold 'em or any other variation. It comes down to the same luck. There are no cheat items for this one.

ROULETTE, RED 'N' BLACK, YET WINNIN' JACK - 50.000 Chips
The easiest way would be to keep betting on one of the two colors. But if you want to take your chances, you can try betting on the green zeros or just three numbers. There are also three different cheat items for this one: the Black Jewel (from Locker H2), the Red Jewel (from Substory 14 or Haruka at Rank B) and the Zero Jewel (from Locker I1 or Haruka at Rank SS). Using them consumes them for a very high chance of getting the desired color, but using them can heavily boost your progress, as the Zero Payouts are very high and you can bet a lot of chips.

1 WIN + 20 LOSSES = BLACKJACK - 50.000 Chips
Draw cards until you are close to 21. If you are lucky, you can randomly draw 21 at the start and that's an instant guaranteed win. Try not to bust (go over 21), that's an instant failure. Sometimes, even the dealer can draw a blackjack, but you can get out of that situation if you guess correctly or lose less money if you take insurance. There are two cheat items for this one: the Blackjack Amulet (from Locker G3) and the Bust Amulet (from Locker G4). Using either will consume them and their aren't all that useful early in the game. It is only recommend to use these Amulets once you are in winning streak of at least 3 wins as you can heavily boost the winnings at this point.

STILL NEVER HEARD OF BACCARAT - 20.000 Chips
You draw cards and the banker does. The one with the higher first digit wins. The thing is that you have to bet on who wins. If you bet on the banker and you lose, you get paid out. There is also a rare case where you and the banker both have the same number. It pays off a lot more than just betting on one side and happens more rarely, but you could try betting on a Draw to boost your winning amount. There are two cheat items for this one: the PLAYER's Piece (from Locker G2) and the BANKER's Piece (from Locker F4). As far as I'm concerned though, they aren't very useful and get consumed after one use as usual.

KOI-KOI, FOUR LIGHTS GONE OUT - 10.000 Wooden Pieces
This game hasn't nearly enough explanation. This is a card game where you play against one opponent and if you manage to get certain card combinations, you upgrade the worth of your hand. And there are 4 decks of cards (junk cards, 20-point cards, 10-point cards and another deck). Basically, the best hands need you to have Poetry Ribbons, Seasonal Cards (watch the card representing the month) and 20-point cards. Looking at the combinations, you should be able to make out what's what, but generally only keep throwing out junk cards. Try to avoid placing high-worth cards on the table make it as hard as possible for your opponent to get a good hand. There is the Lucky Hanafuda Card from Locker H4, but it's not useful since it gets consumed after one round and you can't pick it where you might need it.

CHO-HAN, FASTEST DICE IN THE EAST - 10.000 Wooden Pieces
There's not much strategy here, you just have to get lucky. Keep betting on either even or odd numbers. Risking it for 1 predicted number or even 2 predicted numbers probably won't get you far. Don't be afraid to raise the stakes each time you get it right. But also don't overdo it, you want to make progress here. In case you want to make a bit more progress with a single good bet streak, you could use Trips Yokan (from Locker C4), Even Goro's Beads (from Locker E4) or the Lopsided Cigarette (from Locker F3 or Weapon Shops). But using it up here is usually less advised than sparing the cheat items for Cee-lo.

CEE-LO, COUNT TO THREE - 10.000 Wooden Pieces
You can throw dice in three tries or in one, doubling your stakes. Don't double down, this game is riddled with bad luck moments. Sometimes, an opponent manages to roll 3 dice in a very bad combo, sometimes they get Musashi or whatever and you lose cash before you had a chance to roll your dice. Luckily, this minigame is a little more fast-paced, so you should be done relatively quickly. You can also use Trips Yokan (from Locker C4), the All Ones Charm (from Locker B4), 1-2-3 Gum (from Locker C3) or the Piss Mountain Stone (from Locker E3). In this case, using a cheat item can be slightly beneficial for one or two wins, but it's a fast-paced game, so using cheat items only gives you a slight boost.

OICHO-KABU, NINE TO NOTHING - 10.000 Wooden Pieces
Another strange card game. Here you and 3 opponents draw 2 cards. The cards are added up and the first digit is the number that counts. It can go from 0 - 9, 0 being the worst case and 9 being the best. Then a banker gets chosen and when you play, you have to press "Showdown" when you're confident in your number. It works a bit like Blackjack, but it's everyone against the banker, who is being rotated every round. This game is pretty much unpredictable and just like Blackjack, having a bad number and then drawing another card can always give you an even worse number, making this game frustrating as well. You can actually use Trips Yokan (from Locker C4) or the 10-10-1 Charm (from Locker I5) to win a single round. Yet, consuming the items for a single win is maybe kind of a waste. The 10-10-1 Charm should give you a decent boost by betting the highest amount though.

Good luck! You'll need it!
ENTERTAINMENT 2005 - SHOGI MASTERPLAY
Shogi is a minigame that feels a lot like a Japanese variant of Chess. In Chess you have a board with two sides being occupied by chess pieces with different movesets and a king that needs protecting. In Shogi, there are a couple more interesting rules and the pieces look all the same. Luckily, the minigame lets you look up all the information about shogi pieces that you might need!

Other than that, shogi only has 3 Minigame Points, namely that you have to win 5 games of Shogi without a take back. Take backs are a special rule in Shogi that allows the player to reverse their last move. Normally, you can do that 3 times per game, but you can also turn it off for the Minigame Points.

If you're struggling with this minigame or you want to battle your way through the Shogi Championship at a Shogi Parlor, you could also just make life easy on yourself by installing a Shogi app on your phone, set the AI to the highest difficulty and just copy the movements the AI would make against your opponent. You could also trying to play legitimately and maybe out-wit the AI yourself.

Or you could also use the Give Up Piece from Locker J3 to increase your chances of your opponent becoming afraid of your Shogi skills.

This is one of the more relaxing minigames, but the AI is still rigged since RGG basically copied this game from Yakuza 0.
ENTERTAINMENT 2005 - DUMB-FIRE DARTS
Darts is a very weird minigame. You can feel sure that you're going to hit the target where you want, but then you're gonna find out that wherever the dart is actually going is still decided by pure RNG. It's a total wreck if you're expecting to have fun here.

There is one Minigame point here: you need to get 10 hat tricks in total. Before challenging anything like that, let's get you properly equipped for the job first. There are 5 different darts that you can get in the game, having better precision stats presumably or less RNG on where your dart is going to go. "Presumably" because the game doesn't explicitly say that in stats but rather in names. You can guess that Sniper Darts will land better than Standard Darts.

  • Darts (the ones you start with)
  • Standard Darts are darts which are given to you by an employee after having played your first game of Darts.
  • Custom Darts are given to you after your 10th (or so) game of Darts.
  • Sniper Darts unlock at Ebisu Pawn after playing a number of Darts games for 1 million Yen.
  • Battle-Tested Darts unlock at Ebisu Pawn after your first Darts game for 10 million Yen.

It's probably easiest to just try and get it with the Standard Darts. A hat trick is when you land all three bulls-eyes in a single round. Every round you can throw three darts. Make sure they all land in the middle of the target. Do this 10 times and you get a Minigame point.

As far as it's known, there's no real strategy on how to properly aim the darts at the bulls-eye mark. There are several theories about pulling back the right stick slowly, waiting until Kiryu's hand is still or pressing C, V, B or N for better precision, but generally it all comes down to luck. Fortunately, you don't have to do anything else here.
ENTERTAINMENT 2005 - POOL TRICKS
Pool returns and is as fun as it is supposed to be! Basically, you don't need to bother challenging anyone here or playing for cash. All you really need to do is do 3 combination shots and 3 carom shots to complete the Minigame Points. The most efficient way to do that is by playing Solo Nine-Ball, so you don't have to sit there and watch the AI mess up your setup or outplay you while you're planning. The explanations are somewhat simple, really:

A combination shot is when you manage to sink a ball using another ball inbetween. For example:
  • White Ball hits 4
  • 4 rolls and hits 7
  • 7 sinks
That's a combination shot.

A carom shot is when the white ball uses another ball to bounce off and sink a different ball. For example:
  • White Ball hits 2
  • White Ball keeps rolling in a different direction now and hits 4
  • 4 sinks
That's a carom shot.

Like I said, just do 3 of each of these tricks and you're good.
ENTERTAINMENT 2005 - BATTING IS MY PASSION
The Batting Minigame is not very complicated once you find out how to play. You get 20 Balls that can fly at you from different directions and angles, plus, you need to be aiming at the special panels to get any points at all.

Here's a little trick though: Don't focus on the ball, focus on Kiryu! Focusing on the ball makes it hard to predict when you're supposed to press the Hit button. Instead of trying to learn that, just watch Kiryu's movements. When Kiryu stands there, he will wiggle the bat a bit. Once the ball is close enough to be hit, Kiryu will start shifting into a ready-to-hit position. That's your call to hit!

I have also found that it's much easier aligning the crosshair with the mouse rather than with a controller, as you need to hold the stick on the target with high precision and you can just instead move the mouse there.

All you need to do is get 1600 Points in every course (Easy, Normal, Hard & Extra Hard) as well as get 10 so-called Two-Panel Knockouts.

1600 POINTS TO WIN
The easy course only has one big panel. Just hit 16 balls. Funny as it is, this course is actually the hardest one to get 1600 points in, since you can only miss 4 balls.

The normal course has 3 panels for 150 points each and a 400 points bonus target. Make sure you don't hit the same panel twice before they reset! It won't give any points that way!

The hard course features 9 panels with the middle one being surrounded by wooden beams. This is so you can't hit it with any other panels at the same time. Each panel gives you only 20 points. However, every completed diagonal, horizontal or vertical combination of panels will give you 100 points extra. If you have hit 1, 3, 5, 6, 7, 8 and you hit 9, you will get 320 points. There will also be a bonus target for 300 points.
This course is also the only course to get Two-Panel Knockouts! Just try to hit right in the white seams between the panels to hit both at the same time! Get 10 of these to complete the challenge!

The final extra hard course has 9 panels, yet this time, the panels are much smaller and seperated. You still get combination points for hitting certain panels like in the hard course and a bonus target, but you can't hit two panels at once anymore, essentially.
ENTERTAINMENT 2005 - BOWLING PUZZLES
The Bowling minigame is pretty straightforward in this game. You can play normal Bowling or so-called Split Games. Normal Bowling is just you accumulating points by hitting pins and getting spares or strikes, like casual bowling. Split Games are the other interesting mode.

First of all, you can choose a ball before rolling it and it goes from 6 to 14 pounds. The heavier the ball, the harder it is to aim it, adjust strength and so on. However, the lighter the ball is, the less the chance of hitting a good and reliable strike. I found myself using the 10, 12 and 14-pound bowling balls the most when getting strikes and playing Split Games.

After having chosen your bowling ball, you get to aim it's rolling direction, then adjust the force between 0 and 100 and then you get a quick chance to adjust in which direction and how hard you want to roll the bowling ball (making it roll in a curve on the track). All these micro-adjustments may seem like nothing, but once you get a feeling for the bowling ball, you will be able to reliably hit strikes by adjusting everything just right.

So getting 10 strikes should be no problem. But what are Split Games?

Split Games are basically a gamemode where you get 3 tries and have to complete certain splits. There are 10 splits you can choose from, ranging from 1 to 10 in difficulty. A split is basically an arrangement of pins that you have to manage to completely knock over by using a single bowling ball. This mode can be pretty fun as it plays somewhat like Puzzle Pool, but with Bowling. You only have to complete 5 Splits in one game for Bowling to be complete, but you get another prize if you manage to complete 7 Splits.
ENTERTAINMENT 2005 - SEGA ARCADE
The SEGA Arcades are back! Yet, the only things you can and have to do there is play the UFO Catcher and take some photos in the Photo Booth!

UFO CATCHER PRIZES
All you need to do is get 15 prizes. You'll notice that these machines have gotten a different layout of where the toys are placed. The design is supposed to represent on how these machines became scam machines over time and how it got harder to get the toys out for a reasonably cheap price. However, due to the new design, it can actually be possible to get some toys just by making them topple over into the opening.

Here's a list of all the possible prizes:
  • Bunchan (White), the white round bird
  • Bunchan (Pink), the pink round bird
  • Jumbo Bunchan, the slightly bigger white round bird
  • Chestnut the Squirrel (Blue), the blue cowboy squirrel
  • Chestnut the Squirrel (Red), the red cowboy squirrel
  • Jumbo Chestnut, the slightly bigger blue cowboy squirrel
  • AiAi, the classic monkey
  • GonGon, the strong monkey
  • MeeMee, the female monkey
  • Baby, the infant monkey
  • Woo Papa, the purple axolotl
  • Woo Mama, the pink axolotl
  • Woo-kun, the blue axolotl
  • Kyon-bo, the boy doll
  • Kyon-chan, the girl doll
  • Kara Kappa, the former Karaoke mascot bird

PHOTO BOOTH
There isn't much to this. You need 10 so-called Best Shots, which are just photos where you hit the QTE during the pose. You can just spam a single pose you can reliably hit and get those Best Shots in no time, but there's no loss or gain from trying out different poses or backgrounds.
ENTERTAINMENT 2005 - MESUKING, THE ADULT CARDS GAME
MesuKing is a minigame with way too much focus put on it. Basically, this is a minigame where you get to choose an insect and give it different attack skills and play a round of Rock, Paper, Scissors to win against your opponent. Except when I said "insects" I meant half-naked girls fighting just like in the Japan Catfight Club from Yakuza 0. The only change-up here is that every opponent you face during this minigame has their own tactic of playing the game and it's all about reading the bets of your enemy to win.

Quite frankly, either I was pretty lucky or the game is pretty easy in itself. Apart from guessing correctly, you should be able to make out step-by-step how to defeat each opponent and foresee their choices.

A lot of skills of the girls from the JCC return here as Skill Cards as well, which you can equip for your insect. Basically, you get to choose a character and choose the skills they have in the battle. The big differences between insects are health and damage. Your first insect card will be heavily outclassed by the final insect card you will find.

You truly complete this minigame by finding and earning 50 MesuKing cards as well as defeating the Professor in a serious challenge, which is only possible after defeating every other opponent before, which is why this completion is basically tied to the MesuKing Substories.

Other than that, you can try getting all the other cards at your own leisure, if you want to.
ENTERTAINMENT 2005 - RACING DRAGON
The Pocket Circuit Racing minigame returns! Fortunately, while it may be more difficult to get all the parts for the Minigame Points, it is about just as easy as it used to be in Yakuza 0. There are more races this time around but they are less reliant on RNG. You don't actually need all the Cars and Decals, but they are pretty cheap, so if you want to switch up the look of your tiny speed machine, the option shouldn't set you back in progress at all, really.

Getting most items related to Pocket Circuit is pretty straightforward. About 90% are gotten from the Parts Shop after you win official races. Some are gotten at Ebisu Pawn, Beam, the Purgatory Weapons Shop and three items are exclusively obtained as prizes from Mach Bowl's Split Games.

Playing Pocket Circuit here is mechanically the same as in Yakuza 0. You use different parts to modify your car to be optimized for every race track. Moreover, you have the ability to Fast-Forward, Boost and use your Energy gauge in case your car is about to fly off the track or tumble over.

Fast-forwarding is a strange thing. It does make the race go twice as fast, but it also made the impression on me that it increases bad luck, as in fast-forwarding around curves or ramps on the more difficult tracks is making it more likely for you to fail compared to you just watching those races normally. Maybe I've been imagining it, but you have been warned.

The Boost is as useless as ever. It makes your car go faster, sure, but it also makes your car more prone to flying off the track because it's going too fast. There is only one occasion where it makes sense to use a Boost, and it's at about 35 seconds into the Champion's Cup race. Otherwise, don't use the Boost at all.

The Energy gauge is essential here. Whenever your car is about to tumble over, stop or fly off the track, you can press a button and use Energy to balance your car and get it back in the race. Sometimes, it's enough to just tap the button a couple times for your car to keep driving and not use all your Energy on one close call.

Here's a list on what you can use to win each official race:

Introductory Race
  • Slim Tires
  • Speed Frame
  • Speed Motor
  • Balanced Gears
  • High Speed Battery

Little Racer's Cup
  • Slim Tires Plus
  • Speed Frame Plus
  • Speed Motor Plus
  • Balanced Gears Plus
  • Regular Battery

Rookie's Race
  • Same as above

Beginner Cup
  • Spiked Tires Plus
  • Speed Frame Plus
  • Speed Motor Plus
  • Balanced Gears Plus
  • High Capacity Battery

Amateur Cup
  • Extra Slick Tires
  • Extra Balanced Frame
  • Extra Speed Motor
  • Extra Balanced Gears
  • Regular Battery

Standard Cup
  • Extra Slick Tires
  • Extra Metal Frame
  • Extra Speed Motor
  • Extra Balanced Gears
  • High Capacity Battery
  • Side Stabilizer

Intermediate Cup
  • Super Slick Tires
  • Super Speed Frame
  • Super Speed Motor
  • Boost Gears Plus
  • High Capacity Battery
  • Medium Suspension

Advanced Cup
  • Same as above

Pro-Am Race
  • Ultra Slick Tires
  • Ultra Speed Frame
  • Godspeed Motor
  • Super Boost Gears
  • High Capacity Battery
  • Medium Suspension

Elite Cup
  • Ultra Slick Tires
  • Ultra Speed Frame
  • Godspeed Motor
  • Ultra Balanced Gears
  • Regular Battery
  • Heavy Suspension

Expert Race
  • Ultra Slick Tires
  • Ultra Speed Frame
  • Godspeed Motor
  • Ultra Balanced Gears
  • High Capacity Battery
  • Heavy Suspension

Master Cup
  • Ultra Spiked Tires
  • Ultra Speed Frame
  • Godspeed Motor
  • Ultra Boost Gears
  • High Capacity Battery
  • Heavy Suspension

Champion Cup
  • Ultra Spiked Tires
  • Ultra Metal Frame
  • Godspeed Motor
  • Ultra Balanced Gears
  • Regular Battery
  • Heavy Suspension
  • Bumper Plate
  • (Hit Boost about 35 sec into the race!)

2005 King of Speed Cup
  • Ultra Slim Tires
  • Ultra Metal Frame
  • Ultra Godspeed Motor
  • Ultra Baoost Gears
  • High Capacity Battery
  • Heavy Suspension
  • Bumper Plate

Completing all the official races gives you The Dragon of Pocket Circuit Reborn!
ENTERTAINMENT 2005 - THE SHINE OF A JEWEL
There are two different hostesses you need to go and see: Yui and Rina. You have to chat with them, go on dates and do fun stuff as well as some miscellaneous stuff to get the most out of their love for you. But before doing any of that, you should prepare a little.

First off, have about at least about 20.000 Yen ready. You don't need to buy gifts, but you should at least buy some 1.000 Yen drink each time you visit Yui or Rina. Moreover, make sure to equip a shirt item. The Dragon Shirt is said to be the best item, but any shirt does the job.

Now to get to the girls. You will chat with about a Rank Topic and then about a General Topic. Depending on your responses, you may or may not fill the Love Gauge in a single session. You will also have events on Rank D and Rank B, as well as two Substories for their Rank S. After each session, you may will have the chance to ask her out on a date. If you do that and she accepts, you will get Can I Call You?. When you manage to ask her out, decide to go play Mahjong with her. Regardless of you winning or losing, you will get Sexy Ron.

YUI - JEWEL
Rank Topics
  • Rank F - "I was in prison." - "At least you're honest."
  • Rank E - "Men need to consider a girl's feelings." - "Honesty is the best policy."
  • Rank D - "They're jerks." - "How about 'I love you'?"
  • Rank C - "What a weird guy..." - (any)
  • Rank B - "That's certainly possible." - "Bet you're in love already."
  • Rank A - "You won't fall in love, right?" - "Looking forward to it."

General Topics
  • Taking classes - "Cooking class"
  • Plastic surgery - "It's your sister's choice."
  • Class reunions - "Maybe they don't like fun."
  • Buying presents - "That's an old trick."
  • Toy poodle - "The sooner you get him, the better."
  • Online reviews - "You're not cute."
  • Picture taken - "Just don't even smile."
  • Eighteen years old - "Do you do that too?" - "Challenge accepted."
  • Emotional movie - "Age really matters."
  • Running late - "I'm sorry to hear that."

Rank D - Go east near Kanrai
Rank B - Go to Theater Square
Rank S - Go to Theater Square
You and Yui will go to a hotel and spend a "steamy moment" together, earning Yui the Hostess.


RINA - SHINE
Rank Topics
  • Rank F - "Are you new here?" - "You look happy."
  • Rank E - "That's not really cheating." - "They're so progressive overseas."
  • Rank D - "Go out with a guy." - "You don't like yourself."
  • Rank C - (any) - "Am I cute?"
  • Rank B - "Don't be ridiculous." - "What about adoption?"
  • Rank A - "Of course." - "Is there someone in particular?"

General Topics
  • Buying a camera - "You gotta spend it to make it."
  • Trying out different restaurants - "Somewhere with tasty ramen."
  • Karaoke - "He ought to sing current songs."
  • Idol Fan - "It's nice that you can get so close."
  • Christmas Crowds - "I don't like crowds either."
  • Forgetfulness - "It's the thought that counts."
  • Saying Dirty Things - "Respond with pervy jokes."
  • Maid - "Do you want me to help?"
  • Host Clubs - "How about at okama bars?"
  • Gaining Weight - "It's better to be fat."

Rank D - Go near Club SEGA Nakamichi St.
Rank B - Go near Don Quijote
Rank S - Go to Cafe Alps, then to Millenium Tower, defeat the Drunkard
You and Rina will go to a hotel and spend a "steamy moment" together, earning Rina the Hostess.
ENTERTAINMENT 2005 - A KARAOKE VOICE
Dame Da Ne Guy returns for his grand debut of singing in a gritty mafia-style brutal fighting game! The Karaoke minigame is pretty much the most entertaining one of all the minigames, making it a blast to play for rhythm game fans.

It plays like your average console rhythm game: use four different buttons, sometimes just a perfectly timed tap, sometimes hold, sometimes mash...

You can sing 5 out of 6 sings by yourself or let someone else sing in case you brought Haruka, Yui or Rina with you. Basically, you need at least 900 points, which is pretty much hitting 90% of each song perfectly. It might take some practice for people who aren't exactly fluid in rhythm gaming.

Moreover, Kiryu can only sing TONIGHT, Iji Sakura 2000 and Bakamitai -Sorrow-. The other three songs EURO de x3 SHINE, Moment de la Petite Sirene and Otometal MY LIFE can only be interjected in. Here, make sure to select Lively Interjections, because Simple Interjections won't let you score enough to get 900 points.

Plus, the last song Otometal MY LIFE can ONLY be selected when Haruka is with you. So until you get to spend time with her late into the story, you're not gonna be able to play this particular song.
ARSENAL 2005 - THE FOUR-SIDED SKILL TREE
Since this game is technically the sequel to Yakuza 0, Kiryu still has all his four Fighting Styles. But skilling up is quite different nowadays.

Unlike in Yakuza 0, where you spent Cash on new unlocks in each of the four Fighting Styles, you now have Experience Points like in the original Yakuza 1, except the Skill Trees are called Soul, Tech, Body and Dragon.

Soul contains mostly upgrades that have to do with Heat, meaning you get skills like faster Heat build-up, Heat Retention against damage and several other things.

Tech contains upgrades concerning moves in all your 3 fighting styles except Dragon Style, where you unlock the Bear Hug for Beast Style, Better Quickstep for the Rush Style and Heat Actions.

Body contains mostly upgrades that have to do with Health or Defense, where you can skill things like not toppling over after being hit with blades or guns.

Getting 10 skills in each of the three skill trees will reward you with Take Back Those Ten Years! Unlocking every skill from each of the three skill trees will reward you with Master of Body and Soul.

Dragon is the only skill tree that can only be advanced by fighting Majima in general or under special circumstances. Here, you unlock moves and very basic things for the Dragon Style like being able to use Heat Actions with that style or regaining your Rush Combos and Double Finishing Blows. The only downside here is that you only get to upgrade the best moves and skills toward the endgame, making the Dragon Style essentially useless until very late into the game. Getting all skills in the Dragon tree earns you The Dragon of Dojima Returns!

However, I will only detail how to get the special Dragon Style skills, as everything else either requires Experience Points which you get from basically anything and general Dragon Skills get unlocked by fighting Majima and ranking up in Majima Everywhere as you go.

To get these "Skills under special circumstances", you will receive E-Mails from Nishida, one of the soldiers of the Majima Family that has your number and texts you once Majima is up to something again. Following the hints and instructions in there, you will have a special fight with Majima each time, getting to unlock that skill.

  • Rank F - "Please Help": Visit Goromi at the SHINE Hostess Club
  • Rank E - "I think it's a riddle?": Visit Mach Bowl to play against Majima
  • Rank D - "Looking for the boss": Beat Majima in two races at Pocket Circuit Racing
  • Rank C - "Did you know, sir?": Win a MesuKing battle against Majima at Club SEGA Nakamichi
  • Rank B - "A photo from the boss": Beat Majima in a race at Pocket Circuit Racing
  • Rank A - "Please be careful!": Fight Majima under "Don't Forget Majima" circumstances (make Majima interfere in a battle on the street)
  • Rank S - "Watch out, Kiryu-san!": Win a MesuKing battle against Majima at Club SEGA Nakamichi
  • Rank SS - "Check this out": Defeat Hannya-Man at the Coliseum (appears in Breakout GP & Maximum GP)

Aside from that, you will meet Sotaro Komaki at about Chapter 5 of the game, where he will want to teach you new skills. There will be 11 training sessions with Komaki, 9 of which you'll have to unlock by bringing him the Paintings that are only found in the Coliseum Shop.
ARSENAL 2005 - WEAPONS VIRTUOSO
There are 108 weapons total in this game. You can buy all of them over the course of the chapters in the story at all the different Weapon Shops and you even earn some unique ones during Substories or through other means. You will be able to have all the weapons once you reach the Finale, as some stuff only unlocks this late in the story. You need 100 Weapons to get the Battle Point. Here's a table of all the weapons you can get:

Pipes & Batons
Umbrellas
Blackjacks
Daggers
Knives
Broadswords
Stun Guns
Bats
Golf Clubs
Lumber
Gentleman's Umbrella
Blackjack
Dagger
Sturdy Knife
Chinese Broadsword
Old Stun Gun
Sturdy Bat
Wooden Driver
Sturdy Iron Pipe
Colorful Parasol
Ballbuster
Masterwork Dagger
Butterfly Knife
Lotus Clan Broadsword
Stun Gun
Extremely Sturdy Bat
Metal Iron
Extremely Sturdy Iron Pipe
Antique Oilpaper Umbrella
Golden Blackjack
Legendary Shintogo
Extremely Sturdy Knife
General Guan's Broadsword
Hyper Stun Gun
Metal Bat
Patriarch's Driver
Iron Pipe
Goemon
Super Spicy Knife
Spiked Bat
Dragon Driver
Superalloy Pipe
Dragon God Short Sword
Patriarch's Bat
Police Baton
Superalloy Bat
Modified Police Baton
Legendary Kinryu Bat

Swords
Hammers
Longswords
Staffs
Spears
Shotguns
Knuckles
Bagh Naka
Unorthodox
Sturdy Wooden Katana
Sturdy Iron Hammer
Yagyu Greatsword
Long Lumber
Assassin's Spear
Slime Gun
Brass Knuckles
Bagh Naka
Modified Lighter
Extremely Sturdy Wooden Katana
Extremely Sturdy Iron Hammer
Exorcism Greatsword
Sturdy Pole
Photon Blade Prototype
Zap Gun
Sturdy Brass Knuckles
Assassin's Bagh Naka
Bottomless Lighter
Wooden Katana
Big Festival Fan
Extremely Sturdy Pole
Cleaving Pole
Smoke Gun
Extremely Sturdy Brass Knuckles
Tiger Bagh Naka
Modified Bottomless Lighter
Nameless Katana
Iron Hammer
Six-Fluted Pole
Great Marlin
Golden Shotgun
Steel Knuckles
Modified Deluxe Lighter
Yoshiyuki
Warning Sign
Collapsible Steel Staff
Mighty Dragon Spear
Broken M1985
Konpeito
Slime Spray
Photon Blade Prototype
Fortune Mallet
Sacred Wooden Staff
Expulsion S-12
Dragon Grudge Fists
Venom Spray
Sakura Storm
Frozen Tuna
Thunder God Stuff
MJM-56 Exorcist
Table Salt
Sacred Wooden Katana
Raging Dragon Hammer
Golden Rifle
Master Ball
Sunburst
Firecracker
Morning Tempest
Steel Business Card
Dragon Slayer
Celestial Steed
Ama no Murakumo

Launchers
Tonfa
Nunchaku
Kali Sticks
Dual Swords
Handguns
Marlin Cannon
Sturdy Tonfa
Sturdy Nunchaku
Sturdy Kali Sticks
Double Chinese Broadswords
Modified Model Gun
Cannon
Wooden Tonfa
Wooden Nunchaku
Double Slats
Guan & Lotus Broadswords
Drow-Z 55
Destroyer of Lands
Extremely Sturdy Tonfa
Extremely Sturdy Nunchaku
Extremely Sturdy Kali Sticks
9mm Automatic Pistol
Carbon Tonfa
Carbon Nunchaku
Wooden Kali Sticks
Antique Gun
Steel Tonfa
Frozen Sardines
Spiked Taiko Sticks
Double Action Revolver
Slashing Tonfa
SPARK 15000V
Double Feathered Fans
Mr. Random
Steel Crowbar
Sickle Nunchaku
Twin Dragon Sticks
Tiger's Bane
Yinglong Tonfa
Daikon Nunchaku
Musashi's Wooden Katana
Golden Pistol
Dragon Horn
Dynamite Nunchaku
Dragon Nunchaku
Baiken
ARSENAL 2005 - CLOTHES & ACCESSORIES
There are also plenty of gear items in this game, of which you will have to find and buy every single one. However, just like the weapons, you will mostly only be able to get the final gear items during the endgame in the Finale. You need all 70 Gear Items to get the Battle Point. Here's a list of gear items:

Binding
Mail
Shirts
Jackets
Manga Magazine
Chain Mail
Fireproof Shirt
Metal Jacket
Binding
Battle Mail
Insulated Shirt
Jet Black Jacket
Sarong
Steel Mail
Baseball Shirt
Military Jacket
Bloody Binding
Antique Chain Mail
Tour T-Shirt
Training Gear
Fighter's Binding
Chain Shirt
Wild Shirt
Makoto Surcoat
Elder's Belly Warmer
Dragon Mail
Celestial Garb
Yakuza Training Gear
Hawker's Belly Warmer
Dragon Shirt
Fur Belly Warmer
Gambler's Binding
Fearless Binding
Lucky Binding
Dragon's Binding
COLLECTION 2005 - LOCKERS UNSAFE
There are a lot of Coin Locker Keys spread across Kamurocho and just lying on the ground. You can pick them up and open their respective locker next to the Millenium Tower entrance. All these lockers can have different things like weapons, gear, cheat items or just boosters. But they are all necessary to be opened Adventure Points, so... here's a table with locations and a map made by CyricZ[gamefaqs.gamespot.com]:

Nr.
Location
Item
A1
In front of Poppo Tenkaichi St.
Medieval Silver Coin
A2
West of Sushi Gin
Buddhist Statue
A3
South of the Senryo Ave. & Taihei Blvd. Crossing
Dinosaur Fossil
A4
In the Shichifuku Parking Lot
Clay Figurine
A5
On the dance floor of Club Debolah
Meteor Fragment
B1
At the Coin Lockers
Sacrifice Stone
B2
At the corner of Taihei and Theater Alley
Brass Knuckles
B3
Middle of the street next to the Champion District
Scotch Whiskey
B4
Behind a pillar west of Club Debolah entrance
All Ones Charm
B5
In Underground Purgatory
Medieval Painting
C1
Substory 42
Dagger
C2
In the alley east of Millenium Tower entrance
Dagger
C3
Between two lamp posts at Theater Square
1-2-3 Gum
C4
Southwestern alley inside Champion District
Trips Yokan
C5
Down the stairs east of Club SEGA Theater Square
Staminan Spark
D1
Western corner of Nakamichi & Taihei Crossing
Binding
D2
North of the Kanrai building block
Bloody Binding
D3
In the Batting Center
Fighter's Binding
D4
In the lot at the Kotobuki Drugstore building block
Metal Jacket
D5
In Shoten
Springy Arm Guards
E1
At the back entrance to Serena
Gentleman's Umbrella
E2
Near southern Pink Street entrance
Tauriner Maximum
E3
Near the save point south of the northeastern taxi stand
Piss Mountain Stone
E4
Northwestern end of the Hotel District
Even Goro's Beads
E5
In the alley north of Karaokekan
Cool Striker
F1
In front of the MEB
Golden Blackjack
F2
Eastern end of the T-Junction south of Poppo Nakamichi St.
Repair Kit
F3
In Children's Park
Lopsided Cigarette
F4
Inside Orchid Palace Mahjong
BANKER's Piece
F5
Inside eastern Akaushimaru
Toughness Infinity
G1
South of M Store
Blackjack
G2
Corner northeast of the MEB building block
PLAYER's Piece
G3
In Cafe Alps
Blackjack Amulet
G4
In Mach Bowl
Bust Amulet
G5
In the lot opposite of Public Park 3
Stone of Enduring
H1
In Public Park 3
Stun Gun
H2
East of Club Debolah
Black Jewel
H3
Near southeastern save point
Royal Joker Card
H4
North of Beam
Lucky Hanafuda Card
H5
Inside Vincent
Ruby Plate
I1
Southeast of Ebisu Pawn
Zero Jewel
I2
In the street north of Serena
Lucky Tile
I3
Substory 23
Modified Model Gun
I4
In West Park
Marble Sphere
I5
In Park Alley of the Vincent building block
10-10-1 Charm
J1
East of Kotobuki Drugstore
Metal Bat
J2
Inside Pocket Circuit Stadium
Metal Frame
J3
At the Millenium Tower entrance
Give Up Piece
J4
In the Gambling Hall
Diamond Plate
J5
Substory 43
Charismatic Photo
COLLECTION 2005 - LOOKING FOR "INSECTS"
You're going to have to collect each MesuKing card either from the streets of Kamurocho or by winning against your opponents. It's highly advised to use the Card Watcher while looking for the cards. Here's a map marked with all the spots and info by CyricZ[gamefaqs.gamespot.com] as well as a table with all the locations described:

#
Name
Location
1
Giraffe Stag Beetle
In the Coliseum
2
Hercules Beetle
Substory 78
3
Empress Cicada
Inside Kyushu No.1 Star
4
Queen Alexandra Birdwing
Sold at Purgatory
5
Minminzemi Cicada
Sold at Ebisu Pawn
6
Iwasakikusa Cicada
Northwest of Millenium Tower save point
7
Seven-Spotted Ladybug
Between Don Quijote & Poppo Showa St.
8
Stag Beetle
Behind Serena
9
Damselfly
In a tree at Public Park 3 (1st-Person-View required!)
10
Giant Japanese Mantis
Substory 74
11
Miyama Stag Beetle
In the Tenkaichi Alley backlot
12
Paper Wasp
At Club SEGA Nakamichi
13
Sawtooth Stag Beetle
East of Smile Burger in a small space between buildings
14
Honey Bee
Southeast of the T-Junction south of Kotobuki Drugstore
15
Japanese Rhino Beetle
Given by Professor at beginning
16
Old World Swallowtail
North of Cafe Alps between buildings (1st-Person-View required!)
17
Western Hercules Beetle
Near southeastern save point
18
Small White
Southeast of Kyushu No.1 Star
19
Ashy Gray Ladybug
Win 20 Battles against the Professor (grinding Tomohiro works!)
20
Wasp King
Substory 76
21
Autumn Darter
North side of Shellac
22
Walking Flower Mantis
In the Parking Lot south of the Champion District
23
Atlas Moth
Near Park Boulevard Taxi Stand
24
Atlas Beetle
East of the southern Champion District exit
25
Orange Ladybug
At the dead end of Champion District
26
Kuwana's Ladybug
Inside Club SEGA Nakamichi
27
Asian Giant Hornet
Near Kamuro Theater
28
White-Tailed Skimmer
Northwest of Vincent
29
Giant Petaltail
In West Park behind the benches (1st-Person-View required!)
30
Devil's Flower Mantis
Near Kanrai
COLLECTION 2005 - SKILLFUL BUGS
Aside from Insect Cards, there are also Skill Cards. Again, it's highly advised to use the Card Watcher while looking for the cards. While collecting cards, you will get to complete the Minigame Point by eventually having collected 45 cards. Here's another map marked with all the spots and info by CyricZ[gamefaqs.gamespot.com] as well as a table with all the locations described:

#
Name
Location
1
Cartwheel Kick
Near Hotel District taxi stand
2
Face Masher
Given by Professor at beginning
3
Elbow Drop
South of Kazama Family Office
4
Super Elbow Drop
Sold at Ebisu Pawn
5
Kestrel Punch
Northwest of the Hotel District save point
6
Super Kestrel Punch
Inside Cafe Alps
7
Finish Breaker
Inside Purgatory
8
Last Resort
Substory 75
9
Omni Choke
Given by Professor at beginning
10
Strangle Hold
Near northwestern taxi stand
11
Romero Special
Near Mach Bowl
12
Super Romero Special
Substory 73
13
Leg Splitter
At the street corner southeast of Mach Bowl
14
Super Leg Splitter
Sold at Ebisu Pawn
15
Tie Breaker
Substory 77
16
Finish Time
Substory 72
17
Body Slam
Given by Professor at beginning
18
Tomoe Nage
North of Poppo Tenkaichi St.
19
Giant Swing
Substory 71
20
Super Giant Swing
Inside Pocket Circuit Stadium
21
Piledriver
Inside MEB
22
Super Piledriver
Sold at Purgatory
23
Taunt
Near northeastern save point
24
Counter Heal
Sold at Purgatory
25
Double Drop
In the Parking Lot southeast of Beam
26
Super Double Drop
Sold at Purgatory
27
Banana Split
West of Pink Alley save point
28
Mystic Heal
Sold at Purgatory
29
Tornado Backfist
Inside Purgatory

There's no 30th skill card! Don't try looking for it.
BLOODSPORTS 2005 - KAMUROCHO'S COLISEUM
Throughout Chapter 5 of this game, you will eventually stumble upon the Underground Purgatory, a massive underground hiding spot for expensive brothels, Kamurocho's greatest information broker and the Coliseum where people fight to compete in being the strongest fighter in Kamurocho. Unfortunately for them, Kiryu is about to get in their way...

All you really need to complete here is winning 50 Coliseum tournaments in total, winning every Coliseum tournament at least once and defeating 25 unique opponents! Winning every tournament once will give you The Strongest Fighter.

You will start off with Rank F and can go all the way up to Rank S. Winning the tournaments just gives you Coliseum Points, which you can exchange for stuff from the Coliseum Shop, such as the Paintings that you need to get in order to make Komaki train you. Otherwise, there's no other benefit to winning a tournament.

50 tournaments can also take a really long while to accumulate, so I suggest playing Breakout GP, in case you won every tournament already and are just trying to get the other 30 wins the fast way. Breakout GP is the most efficient one in this regard, as you can just select Brass Knuckles, then punch a wall and then try to punch your challenger out of the ring. It doesn't change the fact that this is absolutely tedious, but 50 tournaments means 150 won fights. By any means.

Since you also need to defeat 25 unique opponents, here's a table of where to find them:
Opponent
Encountered In
Unlock Requirement
Akira Kondo
Exhibition T./Screaming GP
Hurricane Nozaki
Exhibition T./Scorpion GP
Coyote Miyamoto
Exhibition T./Screaming GP
Daniel Feldman
Exhibition T./Scorpion GP
Brian Higo
Exhibition T./Screaming GP
Grasshopper Hoshino
Screaming GP/Street Fight GP
Isamu Kumada
Scorpion GP/Street Fight GP
Komaki's Training
Kenzo Higurashi
Scorpion GP/Street Fight GP
Garo Sai
Screaming GP/Street Fight GP
Renjuro Moriya
Scorpion GP/Burning GP
Koji Urasawa
Burning GP/Hyper GP
Gaowayan Pramuk
Burning GP/Hyper GP
Raizo Shiba
Burning GP/Hyper GP
Komaki's Training
Don Gan
Weapon Master GP/Breakout GP
Brother Shinen
Hyper GP/Magnum Force GP
Sekishusai
Weapon Master GP/Breakout GP
Gary Buster Holmes
Burning GP/Magnum Force GP
Charon Martinez
Street Fight GP/Hyper GP/Magnum Force GP
Razor Yasu
Weapon Master GP/Breakout GP
Lucha Hawk
Magnum Force GP/Maximum GP
Hunter Oya
Weapon Master GP/Breakout GP
Kokuei Riku
Weapon Master GP/Breakout GP
Shinichi Shinohara
Magnum Force GP/Maximum GP
Substory 58
Hannya-Man
Breakout GP/Maximum GP
Majima's Rank SS E-Mail
Sotaro Komaki
Maximum GP
Komaki's Training
Masami Onitake
Maximum GP
COMPLETION 2005 - BOB UTSUNOMIYA
There are no temples here! Instead, you will find Kiwami Bob Utsunomiya at the southern Tenkaichi Street Entrance and claim your unlocks directly from him. He will also let you claim the Kiwami Fun Pack, the Kiwami Street Pack, the Kiwami Fun Pack 2 and the Kiwami Street Pack 2.

REDEEMABLE STUFF
Outfits
  • Dragon Tattoo Outfit (Shirtless)
  • Prison Escapee Outfit (From Chapter 1's Prison)
  • Black Suit (From Chapter 4's Funeral)
  • Snakeskin Jacket (Majima's Signature Jacket)

Healing Items
  • Toughness Emperor
  • Tauriner ++
  • Staminan Royale
  • Toughness Infinity
  • Tauriner Maximum
  • Staminan Spark

Weapons & Gear
  • Modified Model Gun
  • Stone of Enduring
  • Marlin cannon
  • Sacrifice Stone

Instant Cash
  • Gold Plate
  • Platinum Plate

Pocket Circuit
  • Extra Balanced Motor
  • Extra Slim Tires
  • Boost Gears
  • Speed Frame Plus
  • Killer Bee (Car)
  • Godspeed Motor
  • Super Slim Tires
  • Godspeed Gears Plus
  • New Bumper Plate

COMPLETIONIST REWARDS

Adventure
  • Gotta Go Fast Lv. 1 makes you dash longer and recover faster.
  • Key Keeper gives you the Locker Key Watcher (beeps near Coin Locker Keys).
  • Gotta Go Fast Lv. 2 makes you dash even longer and recover even faster.
  • Trouble Finder gives you the Trouble Finder (marks Substories on the map).
  • Gotta Go Fast Lv. 3 makes you dash much longer and recover much faster.
  • Card Captor gives you the Card Watcher (beeps near MesuKing Cards).
  • Bottomless Stomach lets you eat even at full health.
  • Gotta Go Fast Lv. 4 makes you dash very long and recover very quickly.
  • Socks of Fortune gives you the Ebisu Socks (generates cash per step).
  • Unstoppable lets you dash infinitely.

Battle
  • Nouveau Riche Influx starts spawning Nouveau Riche enemies around town.
  • Yakuza Training gives you Yakuza Training Gear (increases gained XP).
  • Altered Beast gives you the Beast Amulet (boosts Beast Style Damage).
  • 777 Dragon gives you the Lucky Binding (increases gained XP).
  • Yinglong Tonfa gives you the Yinglong Tonfa (powerful weapon).
  • Dragon Shirt gives you the Dragon Shirt (high resistance).
  • Dragon Binding gives you the Dragon Binding (great armor).
  • Dragon Mail gives you the Dragon Mail (best resistance & armor).
  • Beads of Good Fortune gives you Beads of Good Fortune (reduces enemies around town).
  • Golden Pistol gives you the Golden Pistol (infinite ammo handgun).
EPILOGUE - EX-YAKUZA FOR GOOD
If you're here, that means, you got everything done off the Completion List, earned every Skill, completed every Substory, beaten the game on Legend difficulty and gotten every single achievement with that!

Fantastic job! Now, you'll never wanna see this game ever again!

Like you saw, many tedious things just came from somewhat lazy AI design and numbers that wanna keep you for 30 hours longer in the game, not just 3. The minigames were mostly straight up RNG grinding which is just ridiculous design, but the Substories delivered and the gameplay was a big strongpoint for me.

Honestly though, all 4 styles are cool and all, but why is the Dragon Style only good at about the Finale of this game? Such a wasted opportunity.

Anyway, as the story ends in 2005, it all starts again Yakuza Kiwami 2, some time after the events of this big drama story here.

Just go and play something fun for a change. And thanks for reading.

ありがとうございますね!
5 Comments
Division 24 Feb, 2024 @ 5:48pm 
Same, those people made pretty good guides and few others from other websites and videos, I learned Mahjong of course it went well for the future titles.
No More Justice  [author] 24 Feb, 2024 @ 11:45am 
Oh damn, that's really nice of you. :JudgmentCrane:
In truth, I didn't make all this completely by myself. The videos and most information are mostly coming from devilleon7 and CyricZ. These guys are the real madlads. All I did was compile all the information and make a guide that I would've wanted back when I was in the grind. :JudgmentTiger:
Division 24 Feb, 2024 @ 3:32am 
Wow, thank you once again for this guide. I used your LAD0 guide and this one is pretty good, this pretty much helped my guide also. Keep up the work :)
No More Justice  [author] 5 Jan, 2024 @ 8:01am 
No, thank you for sticking with the grind until the end :JudgmentTiger: :JudgmentCrane:
You earned the 100%!
Bruce Lee 4 Jan, 2024 @ 11:19am 
Totally loved this guide, " I´ll drink to that" Thanks a lot