Everafter Falls

Everafter Falls

39 ratings
Everafter Falls: Tips for early game
By thorthonesch
I have compiled a few tips and observations to aid you in starting a good economy in Everafter Falls from the very beginning. It's like planting a seed together and watch it sprout. What shape you'll give it while you nurture and prune it is up to you... I've only pointed to some branches. The beauty of Everafter Falls lies in its complexity, its ever-growing canopy of bigger and smaller, less visited, branches.
4
5
   
Award
Favorite
Favorited
Unfavorite
Introduction
I have played Everafter Falls for over 80 hours across three game files. It’s been a long time since I encountered a game to give me the spring-fever (in this case, summer-fever!) as Stardew Valley used to: the curse to never progress beyond spring because you always discovered something new that made you readjust your strategy and start all over again.

To be fair, I did manage to make it to spring (which, here, means almost a year as you start in summer) before I stopped to decant my findings in this little guide of tips I learned and thought of sharing.

Life in Everafter Falls is constraint-free; you play at your own pace and not fear missing on anything. It’s true, you are given a few quests from the very beginning that will direct you in your wanderings, but it feels more like you’re introduced to the basic mechanics of the game: foraging, fishing, mining, bug/pigeon catching. Which activity you choose to dabble in is totally up to you. Except that the longer you spend in this universe, the richer it reveals to be: so much to do, places to explore, museum to fill in, secrets to uncover, crops to steal, voodoo enchantments to undo etc., etc…

Remember when Tobias asked you twice: “Are you sure you want this tapper from me? … Think carefully before you answer.” That’s when the seed of doubt was planted, the nagging feeling that you’re missing something, that life in Everafter Falls may not be as carefree as it appeared.

It all started with a seed, or it should have, but you didn’t pay attention. Now it’s the end of summer and you get a glimpse at the production chain you should have started from the moment you first woke up from the simulation you call life on Earth. To make maple syrup, you need bottles (that is, glass maker and super glue (that is, box tree sap and pine sap (that is, tapping kit))) and maple sap (that is, tapping kit). And that’s how we get back to the seed, or rather seeds, of box trees, pine trees and maple trees you should have planted. So, let’s start again, this time minding the seeds.
Initial set-up: Money making
You start with a sword (good for cutting grass and harvest crops, as well as critters in the mine/dungeon), a pickaxe and an axe. All these tools can be upgraded once you have the money and the proper bars. Open your inventory and check out the crafting tab. Scan all the recipes to get a feel for what can be crafted from here. Cut enough trees to make a chest, a bug net, and have an extra 10 wood. Find Calvin, craft the fishing rod and complete his quest for a mandatory card before fishing proper (I strongly suggest choosing the slower reel speed).

Now that you have all the tools, it’s time for the first decision making: how to make money early game: farming (crops or animal husbandry), fishing, foraging?

My answer is beekeeping. And to prove my point I’ve worked out the profitability of crops (in gold per day) in a spreadsheet which you can access here:

Everafter Falls Spreadsheet [docs.google.com]

Most crops will give you something in the range of 9-12 gold/day. If you just sell the unprocessed honeycomb, you make 77.5 gold/day. A full beehive produces honeycombs every couple of days; two honeycombs can be further processed into 1 jar of honey (you need 1 bottle and a fruit and honey press). But there is more: placing just 1 pink bee together with 3 normal bees is guaranteed to give you pink honeycomb and your profit will jump to 150 gold/day (with the latest version 1.1.15).

Question is: how expensive is it to set up for beekeeping? I’d say not more expensive than setting up for farming. To farm enough to start a good income you need a good amount of money to invest into seeds, and an upgraded pet who can water more and more. It doesn’t sound like much, but it requires a lot of time of waiting and doing other things (foraging and fishing) before cashing in.
For beekeeping you need (from the very first day) to start shaking trees and have a bug net at the ready. Shaking the trees (any trees, including fruit trees like mulberry or palm) has a chance to scatter a bee (and more rarely a pink bee), silkworm, cocoons and caterpillars. The bees and silkworms are what you are after. Before making the beehives, you need silk rope; and to get silk rope, you need silkworm farms. You’ll also need quite a lot of wood, which means cutting down grass in order to get more tree seeds that you can replant. So, beekeeping is all about shaking trees, cutting trees and cutting grass.

Ten days in, with a bit of luck, I already had a couple of pink honeycombs in the works. A dozen bees were waiting in the chest for the necessary silk rope.


As you go about this, I advise to make a little grove with 3 of the following trees: boxing tree, pine tree, and maple tree for tapping. I aim for 10 of each. With all the rope you process from cutting the grass (everywhere on your farm except for the area you eventually plan to use for the coop and barn—animals eat the grass outside) and enough raw copper from the mines, you’ll be able to make tappers ahead of time.

Here is my set up after the first ten in-game days.


As you cut grass, you’ll come across some rare seeds: water tree seed, fire tree seed and puffle tree seed. After donating each to the museum you can plant the rest on your farm in a special place of your choosing. These trees (together with orb trees and cherry blossom trees) can only be tapped with a delicate tapping kit.
First small projects
Your first crafting projects will be: shell crusher for bricks, spinning wheel for rope and silk rope, furnace for bars, and ultimately beehives. As you start getting some money in (by which time you must have advanced enough in the mines), start upgrading your tools to copper. When you get your copper axe you can cut the tree stump on the northern beach for access to a surprise cave and, also, for your first free orb tree. Once you get the iron pickaxe you can break the big lump of stone to the left of Daisy’s shop to gain access to a cave/shortcut. (To break the big stone at the northern beach you’ll need a gold axe.)

Plant a few crops (at least one of each for the current season), beside the free seeds you get in the mail and from Freya. You could and should be steadily working towards completing the museum.
Whenever you get a couple of hours to spare try some fishing and foraging, but do not immediately sell the proceeds. First, you should donate everything you can to the museum. Also, don’t neglect using the free terrarium in the museum: by now you have a good supply of frogs, nymphs, and cocoons.* After that, there are still some things you should avoid selling. You should check out lydocia’s guide Should I sell or craft? to get an idea of what you’ll need down the line.

But for starters: keep a butterfly and a blue lake frog (before even donating them—Cedric would like to take a look, and afterwards you can donate them), at least 6 sardines, and all the berries (yummyberries and everberries). Berries are key to attracting pixies, see below; plus they don’t even fetch a good price. In fact, you should also keep the cheap mushrooms and turn all cheap shells into bricks. For the early game, you should only sell shells and mushrooms over, say, 20-25 gold.

*Note: You’ll get museum points as you complete each collection. You can redeem them for perk cards or some other gifts. I’d recommend to invest your first 2 points in getting the master key: not only it will open any chest without disintegrating but, since the update, it will also open all community gates.

Another aspect of the game you should never ignore is to always keep the bug net on you and never forget to run after the pigeons for a chance of catching one. Not only you’ll be rewarded (sometimes handsomely with unique seeds), but your reward always comes by mail, so more letters to shred at Pip and Pepper’s place. Every 6 shredded letters you get a fragment; 3 fragments and 2 super glue will make a blank card which can then be printed into a perk card.
First big projects
Aamy’s Projects

Check the console inside Aamy’s house after finishing her quest, to see all available projects (the barn upgrade will unlock once you build the first barn). In my opinion, the first big projects worth doing as soon as possible are the Solar Panel Wings and Greenhouse. The first will produce a sun ball every 3 sunny days, so it’s worth doing it quickly and letting it do its work in time. Sun balls can be used with an evaporator (and a few other machines) for an instant triple output; extremely handy when processing, for example, orb sap or other very expensive saps.
The greenhouse does what it says on the label; plant any crop—and fruit trees!—for an all-year-round harvest. So, I suggest that any fruit trees you get or buy to be planted in the greenhouse. The same applies for at least the 4 unique seeds (dragonfruit, merryberry, bluemato, and square watermelon) that you can only get from chests or pigeon rescue rewards.

More expensive projects are the Ether Collector and Barn and/or Barn upgrade.

Pixie Farming
When you unlocked the pixie cave, you must have wondered how are you to amass hundreds of pixies to get all those rewards. You’ve only seen a couple of shrines in town (one needing to be repaired, the other behind a community gate) and the chance to get a pixie from rather expensive offerings is horrendous! Yes, you know you can craft a bottle of everberry juice for a sure guarantee, but how many everberries can you collect? Definitely not enough for hundreds of pixies!

The answer is: craft your own pixie shrines… not one, not even a dozen, but maybe a couple dozens. Then, use all those saved up cheap yummyberries or white mushrooms, or anything you have an excess of and doesn’t sell for much. You’ll get 2-4 pixies every couple of days. What to do with all these pixies? Let’s see…

You can assign (or bind) pixies to various resources; and the output can be retrieved the next day from the chest by the shrine to the right of your farm. Red pixies double the output of your machines and make them more efficient. Green pixies can harvest from trees, grass, berry bushes. Blue pixies can harvest from rocks and ores. Rainbow pixies (the rarest kind) can harvest from any of the above while also reducing the production time.

You get your first couple of pixies, free of charge, by completing Fin’s quest. I like to place the green one on the Wisdom Tree (the big white tree in the south part of the map) and the blue one on the rainbow rock hidden behind Daisy’s house (you need to position yourself correctly for it since you won’t see it. See image below: the rainbow rock is to the right of the marked white rock, which will give geodes instead, also very useful. And you can pick up an extra moonflower here to donate to the museum if you want.) The white wood and the shards I’ll gather in time will prove useful for pixie shrine building and other crafting projects.


Alternatively, there is another rainbow stone available to “tap,” if you follow the narrow cliff on the left side of the big tree to the left of the blacksmith; see image below. Here, you can also shake the starfruit trees if they’re in fruit and fish up the fallen fruits. Later on, there will be at least a shiny white stone, a rainbow stone and some gold ores available in the cave you can open up with the iron pickaxe at the left of the Animal Centre.


When you open the last tab in your inventory, it gives you a list of stats and also the available number of pixies you can bound. To start with, you can bind up to 9 pixies. I would bind at least one on the Dream Tree next to Dawn’s house (for dark wood), maybe some gold ores, and definitely keep some for your machines, especially the Fruit and Honey Press/presses, and the Evaporator. After that, I would donate the pixies in the cave to increase the number of pixies I can bind, get my pixie friend, and obtain a first blessing. Moreover, it is advisable to always put a pixie in a delicate tapping kit. As you can see, pixies are always in demand; and you should focus a lot of your resources towards obtaining them as early as possible.
Other tips
Once you get your infrastructure going, you can take your time and discover all the secrets this game has to offer or attempt to 100% the museum etc. In my longest run, where I made it to spring, I ended up with the following set-up (besides a greenhouse, upgraded coop and 2 upgraded barns), and I could call myself financially secured:


Before parting ways and wishing you happy gaming, I’ll just make a list of a few other smaller tips, that you might have ignored:

  • You can harvest from NPC's indoor potted plants. I've made a map with the icons for each crop and its location; I've also marked the name for all places of interest.
    Dawn's and Pip & Pepper's office (not house): bluemato
    Museum: soybean
    Cid's store: soybean and chili
    Hersha's house (not bakery): pumpkin, carrot, and merryberry
    Freya's store: potato
    The Print Shop: lemon
    Bram's house: blueberry and merryberry


    There are also fruit trees that you can harvest; see section below.
  • You can also steal from inaccessible crops and berry bushes if you can reach them with your fishing rod (upgraded versions or certain orbs can increase your reach). Sometimes you need only step outside Freya’s shop to complete her quest for seasonal crops.
  • And speaking of fishing stuff other than fish... You can 'fish' for the lily flowers, including the lily pods, lily buds, and lily pads. And (!), if you throw a lily pod (not pad) in the water, it will grow into another lily after a few days. Planting 9 lily pods in a 3x3 square has a chance of growing into a giant lily flower: but all flowers need to be of the same colour. Just keep picking the undesired colours until you obtain 9 of the same.
  • Soot puffs. Catch them all! And then donate them to the big soot tank inside the museum; you’ll like the rewards you’ll get! Depending on your luck finding them, you might even invest in a soot grower or two. These machines (obtained as rewards from the museum or festivals) will grow a soot puff the next day after placing, which continues to grow for as long as it’s left in the machine.
  • After completing one of the earliest quests, involving the rescue of a pigeon, there will be a pigeon at the Animal Centre waiting to become your friend. But first you’ll need to earn his trust by gifting him various things; each day he’ll request a different thing. Make a habit to check with him everyday and see what he wants.
  • Leave tree stumps on your farm or in town where you get to check often. Mushrooms will spawn on the stumps. Some rare mushrooms will only spawn on certain stumps (like the stump of an orb tree if you can afford to cut it!) … or so I’ve heard.
  • Think twice before printing cards; check exactly which card you need and make sure it’s not maxed out.
  • And think three times or more before attaching orbs to your legendary jewellery. Once attached they cannot be changed or swapped. You can still get your orbs back if you smelt the piece at the blacksmith, but why would anyone destroy their legendary rings?
  • You can purchase a teleport stone from the Animal Centre. I wish we could place more than one. I always find the need to have one by the mines, one by the pixie cave, and one at home… alas, I can only have one. It’s not expensive and players usually forget about it. You can teleport to the chosen location from the special button in your inventory.
  • You can also buy a support drone for 2,500g from Cid’s store. It may seem expensive, but it gives you at least some more inventory… so, worth it.
  • Try to complete Hersha’s cooking quest as quickly as you can (that means buying the flour and butter rather than waiting to process them yourself) and, once you do, attend all cooking events; they take place on the 15th and the 30th of each season. You may not be able to win the first prize, or the second, but should be able to take the third. And rewards keep improving the more events you attend.
  • If you ever wondered how to reach certain things too far away even for your Epic Fishing Rod equipped with the blue mod (+1 casting distance)... There is also a red fishing mod, in a secret place.
    And here it is how to get it:

    Nothing will be ever out of your reach... well, except for those fruit trees that need to be shaken in order to grab their fruit.
Fruit Trees on Map
There are 11 types of fruit trees in Everafter Falls; 8 of them are already available in the world to be harvested in their seasons: avocado, cherry, mulberry, orange, totonut, wurple, palm, and starfruit. The remaining three--apple (Su + Au), durian (Wi + Sp), zorpian (all year)--need to be grown by the players themselves.

Almost all can be bought in stores (check Freya's rotating stock in different seasons; all purchasable saplings cost 3,300g); Durian can be exchanged at Cid's store for a yellow prize key and Wurple at Freya's store for a pink prize key; some are rewards from festivals or even the cooking events; Zorpian is a late game thing.

Here are the trees that you can find on the map; most can be harvested outright (if the right seasons!); others are behind community gates and need either a community gate key or the master key.


I've made a map with the approximate location of the trees; below is a detailed description for each of them.

Totonut trees:
  1. to the left of Cid’s House; access from Cid’s house (the backdoor to the garden); only after completing the quest “Grass Cutting”
  2. at the very NW corner of the map, walk up the stairs at the left of the bench where Pip and Pepper spend their evenings (can be shaken and fish out the fruit). There is another one here, on the isolated island on the left that is unreachable with my rod (and it might need shaking)

Mulberry trees:
  1. at the NE corner of the Animal Centre
  2. at the NW corner of Freya’s Store, just before the bridge
  3. two trees just below the Aquarium in the middle of the map
  4. at the NW corner of the Museum

Wurple trees:
  1. to the left of Edgar’s Print Shop, behind community gate, next to the Avocado tree
  2. to the left of Dog’s tree house; can be shaken and fish out the fruit
  3. South of Pip and Pepper’s house, as you enter the map from the Aquarium area, behind community gate

Palm trees:
  1. on the NE beach there are 9 palm trees
  2. on the NW beach there are 3 accessible palm trees; plus 2 more on the isolated island to the left (again, unreachable with my rod, and they might also need shaking)
  3. players who chose mote as their starting type of farm, will also have a few palm trees next to their house

Cherry tree: in Freya’s garden (I don’t know how and when it can be accessed; my epic fishing rod with +1 casting distance mod couldn’t reach it and, besides, it might need to be shaken first)

Starfruit trees: 2 trees along the West side of the Tree of Seasons; behind community gate. Yet, they can be reached to shake and then pick up the fruit with a fishing rod (or just visit Atlas the next day) by walking on the cliff; see my image above about the rainbow stone.

Avocado tree: to the left of Edgar’s Print Shop, behind community gate, next to a Wurple tree

Orange tree: at the SE corner of Aamy’s house, behind community gate

And here are the trees on the map:

Closing remarks
There are so many other aspects of the game that could have been mentioned: animal husbandry, pixies cave and rewards, dungeons and bosses, Cedric' rocket, giant lilies etc. And, maybe, if I have the time, I might add a section here and there (as I've done for the fruit trees). For the most part, I've spent my efforts collecting more data for my spreadsheet.

I can only hope that the present guide aided you in making some of the early-game choices. For the rest, it is all up to you. I’ve planted the seed, now it’s your turn to nurture it. Happy farming and happy gaming!
Addendum 1: Choices_Perk Cards
I have decided to place content at the end of my guide, rather than constantly edit my guide to incorporate any new additions. It’s a small compromise to make, at the expense of a more organic storytelling.
And to some extent, every single playthrough of Everafter Falls might tell a slightly different story if you were to choose differently when given the opportunity… and opportunities are plenty.

Perk Cards

In fact, not even a week in, and you’ll be asked to make your first choice: cardboard tastes the same (yummy!), but it comes in different flavours.
That’s how the player is introduced to the concept of perk cards which, depending on your choices, could significantly impact your game play.

First thing to note is that, no matter the order you choose to unlock them, all cards will be available to you. When presented with a choice of two cards for example, you choose one of the two, and not one at the expense of the other. Sooner or later, you’ll have the opportunity to choose the other card, or print it, or get it as a quest reward. No cards are missable!

Cards come in different background colours (red, blue, and yellow). The colour of the background marks the price you need to pay (in addition of providing a blank organic card) to have it printed at the Print Shop. Yellow cards are not available to print from the beginning of the game; you need to wait for a quest to unlock them.

Dog will present you with the first card choice, a yellow card!, as a reward for the first quest: A Spooky Deal (go to sleep at 1 AM instead of 12 AM) or Petrichor (guaranteed rain every 6 days). So, which should you choose, especially since it’s going to be a while until your next yellow card?

I always chose going to sleep later and never regretted it… in fact, Petrichor is still a card I need to unlock, having unlocked all other yellow cards. If you go for honey as your money making, the farming you’ll do on the side (just enough for museum and/or quests) doesn’t justify the need for no-watering days. Farming doesn’t become a chore or more than your pet can handle; besides, you can always choose to upgrade the maximum job queue of your pet with the red card Pet Training. But having one extra work hour each day, well, it makes you more efficient each day.

How about other cards? In what order to unlock those? Some quests will reward you with cards but, for the early stages of the game, most of the cards you’ll get are rewards for completing museum collections. (I still think that sooner rather than later you’ll find that you desperately need access to resources behind community gates; at that point, you should spend two points to unlock the master key from the museum.)

With a bit of luck, you could have the first museum collection (the tree seed collection) within the first couple of days… and there is your first card. I like to choose the red card Healing Bond (first of possible 3 levels), which enables your pet to slowly heal you over time. Until you get the hang of fighting in the dungeon/mines, it will come in very handy and prolong your stay underground. You can always break some rocks while waiting for the healing effect. But if you don’t like fighting and postpone doing it to the very last moment, then Skilled Merchant (get a bonus percentage for anything you sell) is a very good bet.

There are two blue cards that can only be unlocked from a very special place: the pixie cave you gain access to when you upgrade your axe to iron and break the stump on the NE beach. Once you gain access, you can release pixies from your carrying bottles by interacting with the pixie guardian. Here is the prize board:


Once you release 7 pixies, you’ll be tempted to choose the Pixie Friendship card, which increases the maximum boundable pixies. If you followed my suggestion to build a lot of shrines on your farm (aim for 30 or so over time), it won’t take long until you reach 30 released pixies and can choose another card. I suggest this time to go for Pixie Synergy for a couple of reasons. There are some resources you’ll need a lot of (shards, geodes, white wood, among others); you can get them by increasing the number of pixies, or by having the same pixies harvest more without any effort on your part—and you want those resources to build over time. Plus, you may find some gear (rings/amulets) that increase pixie synergy (it only works if you have already unlocked at least one Pixie Synergy card). You only need to remember to wear the gear overnight, then switch in the morning to the usual.

How about pixie blessings? Having spent a lot of time in Discord and reading about other players’ experiences, I am convinced that the most beneficial blessing to unlock first is the Pigeon Ally, which increases both the number of pigeons on the map and the chances that some will be catchable.

Here is the complete list of pixie blessings:
  • Shroom ally: 2 more mushroom per patch + up to max 8 patches/day
  • Pigeon Ally: 3x the chance for flightless pigeon + 2 more pigeon clusters/day
  • Animal Ally: extra produce dropped every day + extra produce when feeding favorite food
  • Life Aura: permanent 36% HP
  • Strength Aura: permanent 18% to player attack power (after all equipment bonuses are applied)
  • Speed Aura: permanent 10% to movement speed (after all equipment bonuses are applied)

Catching more pigeons will give not only more letters (that can be shredded for fragments and assembled into cards to be printed for perk cards), but sometimes quite handsome rewards. Pigeons follow a rarity system (black, white, and pink are the rarest) and the rare ones gift you specific rewards: the black pigeon will give legendary gear, the white pigeon will give an animal (any animal, including late game ones like the black alpaca or pink chicken etc.), the pink pigeon will give tree saplings (orb or wurple included). The rest will reward seeds (sometimes, unique seeds; see my spreadsheet) or treasure chests. To fully profit from the rewards, and if you’re not adverse to save-scumming, you need to open such letters at the beginning of the day and reload until you get a worthy prize.
Addendum 1: Choices_Fishing Mods
Your second quest will most probably be to craft a fishing rod for Calvin (talk to him to start the quest). As a reward, you’ll get to choose between 3 fishing mods. That’s a toughie if you’ve never played the game before or watched other people playing it; and that’s because of its unique fishing game.

Let’s look at the mini-game: the fishing hook is at the centre top of your screen. Below the hook, there are two rotating wheels with an opening/gap. If you manage to stop each wheel such that its opening is aligned with the top hook, you’ll be able to catch the fish for each aligned wheel.

This is not a game where skill comes into play; it’s more eye/hand coordination and good reflexes. Some people love the mini-game, but most hate it. Or they hate it, until they discover that the green mod makes a huge difference and fishing becomes fun again.

The green mod decreases the reel speed and it is a good starting mod for fishing. Better rods will allow you to equip more mods. If you still have problems with fishing, go for the orange mod next which increases the gap size. With the yellow fishing mod you add another wheel to the mini-game, which means you can hook up to a maximum of 3 fish at a time if you align successfully all three wheels.
Addendum 1: Choices_Dungeon/Mines
The dungeons are not a choice; if you want to progress into the story you need to beat the dungeons, one room at a time, pillar by pillar. The choices come into play when deciding what gear to wear and what orbs to equip for said gear.

Let’s look at the stats (you can see them in the second to last tab in your inventory):
  • Attack Power: the damage you deal to enemies; the sword will also affect this stat; your pet/drones will scale their attack based on this number;
  • Attack Speed: the speed you swing your sword and, hence, dispatch enemies. It becomes very important especially in the 4th pillar where the mobs are in big numbers and try to gang up on you. If you get a high enough speed attack, you might kill them before they get a chance to attack you; but this only works for melee mobs;
  • Crit Chance: like with most other games, each swing of the sword has a percentage chance to be a crit hit (increased damage);
  • Luck: I couldn’t say with absolute certainty all that it may influence. But increased luck my double resources dropped either when harvesting (crops, mushrooms, shells, trees) or gathering from machines, or fishing, or mining. I’m not sure if it affects geode breaking, chests opening etc.
  • Movement speed: always beneficial, even in situations you wouldn’t think of, like the cooking events you can participate twice a season (on the 15th and the 30th).

You’d like to improve in all areas, but your choices will be limited.
First, the gear you find will come with some base stats and, optionally, some empty orb slots, the more the better. In my experience, a good ring or amulet is one with 3 empty orb slots.
You’ll find gear from defeating the duck enemies in the dungeons, chests in the dungeons (the rooms will have a specific symbol), chests as rewards from pigeon rescue, chests from fishing, breaking geodes (rarer geodes reward better gear). Defeating the final boss in the first 3 pillars will always reward you with a piece of legendary gear. You may leave the final battle for the next day and reload that day until it drops the gear you wanted (it gets tedious pretty quickly).

If and when you find a good (doesn’t need to be extraordinary, the good are rare enough!) piece of gear, abstain from immediately attaching whatever orbs you have. Wait until you’ll be rich enough in resources/money to craft the orb+ (each orb+ takes 3 orb of the same type + 10 mithril bar + 1 orb syrup; see Processors, in my spreadsheet for a detailed description of each orb+).

Below is an example of what I consider a good ring I found in the first pillar, to which I attached normal orbs. Since then, I wasn’t able to find a similar base-stats ring with 3 empty orb slots. Currently, you cannot swap equipped orbs. You can recover the orbs used in gear, by smelting the gear at the small furnace in Bram’s store; but that, obviously, destroys the gear in the process.


Bear in mind that you can equip only 3 rings and 1 amulet (buying the yellow card Amulet Plus for 15,000g from The Print Shop, lets you add a second amulet).

Second, you can be aided by your pet/drones who will attack mobs and/or heal you with the right cards unlocked. Check your card list from the last tab in the inventory and see what you can improve. You start with space for 1 drone; print the yellow card Drone Plus to equip a second drone. Circuit Overload is a card that allows to equip up to 3 parts to your drones (whether equipped drones, water drones and harvest drones). Drone parts affect the area your drones use for watering/harvesting: better drone parts, bigger the area (from blue to yellow, the most expensive). In the case of your equipped drones, drone parts translate into the number of ‘points’ you can assign to either Inventory, Attack Laser, or Healing Aura. A maxed-out drone (i.e., a drone equipped with 3 gold drone parts) will have 9 ‘points.’
To further increase the efficiency of your attack drones, buy the card Pew Pew! for 25,000g from the Print Shop.

Third, you can permanently increase your stats by a small amount from special bottles (usually offered by the pooklets you save in the dungeon, but also as rewards from some events). I don’t have a full-proof argument which are best. You may try and choose one of each of the most popular choices: attack power, movement speed, HP. Or you may focus on only one stat, hoping that you won’t need an orb dedicated to that stat.

Below I inserted an image of two sets of stats. To the left is my everyday gear maxed for luck (with the gear I have at my disposal by the end of the 1st year). To the right is the gear I used in beating the 4th pillar. I found it to be the bare minimum I needed to make some progress. But these stats, and this is important!, were aided by a pet (with water bolt and healing cards maxed out) and two drones, each with at least 2 points in attack and healing.


(The 4th pillar is the farthest I’ve advanced in this game. Any dungeons after this point may require a lot better gear.)

So, which are the most important stats? I’d say attack power is the most important (especially if using pet/drones, and why wouldn’t you?). You can run around the enemies and let pet/drones do the fighting; this technique is especially useful for the gang of ranged mobs you’ll encounter in the 3rd and 4th pillar. It’s been suggested that you need over 50 Attack Power and close to 100 to finish the 4th dungeon. I think this is unfeasible for most players, unless they’re extremely lucky with gear drops. Around 25-30 attack is more realistic, together with maxed out pet/drones.

For the melee mobs of last two pillars, you should pair the attack power with attack speed. 40 to 50 attack speed should dispatch most enemies before they have a chance to hit you. You can stand your ground for a few swings, and run again to regain health if things get hairy.

And, trust me, things will get hairy more often than not. That's why you should also have a healthy amount of HP that will allow you to survive a few hits. Aim for over 100 HP, closer to 150. The biggest mistake you can make that will kill you in the 3rd and 4th pillar (no matter how high your HP) is to enter a room and stop in the doorway while you take your time to analyse the situation. You should always be on the run from the moment you enter; and be ready to avoid any projectiles coming towards you whether from the mobs or the statues. Don’t be afraid to get out of the room to regain health before taking up the fight again. If you have your drones, a good strategy, especially for the most difficult rooms, is to keep popping in and out of the room just enough for the drones/pet to send a salvo without you taking any damage.

Of the remaining stats, movement is extremely important and it will aid you beyond the fighting in the dungeons. Luck and crit can more easily be covered with equipment designed especially for them and the situations you mean to use them. Luck gear is my everyday gear, and I’ve tried to adjust it with orbs that would make it equally useful in dungeons. But an argument can be made that, if I were to have separate gear for the dungeons, I could increase the luck gear a lot more. My problem is that it’s relatively hard to judge how luck behaves: is 130 luck a lot better than 100, or a lot worse than 150? So, I settled on 130 luck and it seems to me that I hit lucky drops often enough.
Addendum 1: Choices_To sell or not to sell…
As with most other farming games, it pays to be a hoarder. And, yet, some things can be safely sold without regrets (at least from my gameplay which amounts to 1 year in, and 4th pillar dungeon completed).

All crops, fruit from fruit trees, forage, fishing etc. can be donated to the museum. The choice becomes: beyond the museum collections, what should I keep and what should I sell.
  • Crops. As a rule of thumb, when I play farming games, I like to plant all crops available in their season and keep a stock of each. I start with a small stock of 10, and then increase it to, say, 100, maybe even a full stock of 999 (depending on the crop and its uses).
    You want to keep a healthy stock of crops because it may be requested in the board quests; it could be an animal’s favourite food (higher chance to get the rarest product when an animal is fed its favourite food); it is a cooking ingredient (if you want to complete the cooking collections in Hersha’s basement). Besides, a regular chest should be able to accommodate all crops/fruits that are in the game.

  • Forage and Critters: shrooms of all types, lily flowers (including pads, pods, and buds), berries, tree seeds. I never sell Inoki Shrooms or Button Shrooms: with a sell value below 10g they make good offerings to my many pixie shrines. To make some money initially, I usually sell shrooms (in excess of the 10 I keep in storage) over 20g.

    These are all the shrooms used in cooking: Valley Shroom, Springfall Shroom, Button Shroom, Mountain Shroom, Oyster Shroom, Caramel Fan Shroom.

    Never sell berries, better make juice with them (read their description to see when and how to use).

    Never sell lily pods (or seeds): you’ll need a lot of them if/when you decide to grow giant lilies. In fact, after fishing about 10 of each flower, bud, pad (don’t forget to replant those to continue having a good supply), you should always let the lilies outside your farm reach seed stage and then fish out the pod.

    Tree seeds are obtained from cutting trees with an axe or grass with the sword. The rare elemental seeds I get, I plant them on my farm to be tapped with a delicate tapper (preferably with a pixie added to the tapper). The rest of the seeds I plant in designated areas (my farm, or the open areas south of Atlas and Aamy’s), to ensure a constant supply of wood.

    When it comes to critters I catch with the bug net, I sell all after initially donating them to the museum. Exceptions: keep 1 butterfly for Cedric; keep 1 blue lake frog for Cedric too. Cedric won’t keep the critters, so don’t be afraid to complete his quests if you haven’t yet donated them to the museum; you can do it afterwards.

    Never sell soot puffs, but donate them all to the tank inside the museum, for some nice rewards. Aim to make a soot puff of size 300 as soon as possible.

  • Fish. Here things are simple: after donating the first specimen to the museum, sell all except for a few. Most are not worth that much, but it will be some cash while you spend hours trying to complete the collections.

    Do not sell the following: Squid, Neon Bulbfish, Orange Bubblo, Octopus (used to make ink and/or cooking); Mackerel, White Bubblo, Pinkbelly Grazer, Salmon, Bluefin Tuna (used in cooking); 6 Sardine (for a quest). Also, never sell seaweed: you’ll need at least 7 dried seaweed (from processing seaweed in the Food Refiner) to complete the sushi recipes.

  • Shells. After donating, sell the most expensive above, say, 60g. The rest have other uses: while most can and should be used in making bricks, keep black pipi, small sand dollar, and big sand dollar (for crafting shell crusher, silkworm farm and shell extractor, respectively); and blue starfish and striped cowrie (for inks).

  • Gems, Shards, Geodes. I never sell any of them. Also, I used to fulfil the quests for unordinary stones for Hersha, but then I stopped; they’re more useful to break open than the money from the quest.
    At some point, I might be persuaded to sell some gems over a stack of 50 (or maybe 100?... oh, the hoarder in me!).
    Almost all shards are very useful for crafting, and you’ll need lots and lots of them. Some gems are used in crafting or quests.

  • Basic crafting resources: all types of wood, stone, coal, ores, quartz, grass etc. etc. Never sell, but keep for crafting. In fact, you might end up buying lots of resources from Cid’s store if you find it easier to make more money in the same amount of time it would take you to collect the resources yourself.
Addendum 2: Giant Lilies
I’ve struggled for the longest time to understand how the setup for giant lilies works. I always had more unanswered questions after reading other guides out there. When I tried to get to the answers myself, I discovered that the waiting time and/or luck were atrocious; in fact, I still haven’t yet obtained a giant lily myself. But I am almost confident that I have a good representation of the whole process by now.

First of all, let’s look at the grow cycle of the lilies.


  1. Seeded pod. You can plant a lily anywhere in the water by throwing a pod in the desired location. The pod is the very seed that forms at the end of the grow cycle; not to be confused with pad. After the pod was seeded, it will take 4 days to grow into a pad.
    Note: this is the only stage where the Lotus Luminescence has effect! If you equip the Lotus Luminescence before throwing the pod in the water, it will grow into a pad the very next day, thus cutting 3 days of waiting. You can unequip the ring after you seeded the pod.

  2. Pad-Bud-Flower. In five days time, a bud will grow on the pad. Another 5 days later, the bud will turn into flower. And, then, the flower remains in bloom for another 5 days; after that it turns into a seed/pod.
    The moment the seeded pod becomes a pad, the colour has already been randomly decided. If it turns out not to be the colour you wanted, you need to fish out the flower (and the pad!) and reseed a pod. If you only remove the flower, the pad will keep producing flowers of the same colour every 10 days (5 days from pad to bud and 5 days from bud to flower)

  3. Pod/Seed. Once the flower turns into pod/seed, it will stay a pod/seed until you remove it with your fishing rod. The pod does not carry the colour of the flower. Once the pod is planted somewhere else, it will be randomly assigned a colour when reaching the pad stage.

Given the above, the steps for growing a giant lily have become, hopefully, clear. The entire process is a very long one and prone to the whimsicality of the RNG god.

  1. Start by planting 9 pods in a 3x3 grid; if you have Lotus Luminescence, wear it while doing the planting. Place a stone label signpost nearby.
  2. 4 days later, or the very next day if you wore the Lotus Luminescence, you’ll have a field of lily pads. Wait 10 more days and you’ll have flowers. Choose the colour you want to keep and assign it to the already prepared label signpost. Remove (using the fishing rod) all other flowers, including the pads underneath and replant the spots with new pods; don’t forget to wear the Lotus Luminescence.
  3. Repeat step 2 untill all colours in the 3x3 grid are the same colour.
    Of course, by now the correct original flowers have transformed into pods and you can no longer see their colour. That’s why you used a label signpost to remind you what colour to keep. If you only kept the correct colours along the process, all flowers at the pod stage should be the same colour, and the correct one.
    See the image below. This is the farthest I got in my attempt.


  4. When you get to the last missing one, things get simple if you use the Lotus Luminescence when planting. The game will 'know' if you hit the correct flower at the pad stage. So, if they haven't turned into a giant lily, you can fish out the pad and plant again, every other couple of days, with Lotus Luminescence equipped. Keep doing that until they turn into a giant lily. (Note: for those who don't mind it and have the patience for it, once you're down to the last pad, and have just replanted the day before with amulet equipped, you can reload the day first thing in the morning until you get the giant pad. I suppose you can do this when you're down to the last two, and have just replanted them, but it could take a lot longer.)
    If you don't have the amulet, go buy it! Kidding: no, it's just that you need to wait for the whole process, until you get to bloom, and then start again if the colour is not right.
    In other peoples' experiences, the game checks for a 3x3 grid of same-colour lilies, and if it finds them, they are turned into lilies. It is not a chance to be turned giant but guarranteed; and, also, it seems like the flowers need not be in sync at the same stage of their growing process. (When my own experiment will be done, and if I had conflicting results, I'll review this step.)
    I can confirm now that the plants in the 3x3 grid need not be in sync. I've just managed to obtain my first giant as you can see in the image below. The day before the merging, the giant pad looked just like the grid below: most at seed stage, one not yet having a bud, and one I've just replanted.

Because of the length of the process, you should start your experiments from the moment you manage to gather about 10-15 pods from around the world.
Addendum 3: Quests
The following is a list of all the quests I’ve completed in my playthrough so far: I’m not done, still in Spring Year 1, having just completed the 4th pillar.

The table lists all the quests that have been logged in the Journal tab, with their rewards, but it does not specify the conditions for unlocking it. Some quests might be timed (always unlock on a specific date), or they may have some (not obvious) prerequisite. I think Bram’s quest, which unlocks the recipe for bombs, can only come after completing the first pillar and lifting the curse from the second rune.
For most other quests, it is hard to tell, and I wouldn’t want to start you on a wild goose chase. Still, there is some advantage to knowing what rewards you can expect from what quests, and this is the main reason I’ve decided to gather this information. (I’ll keep adding to it, as I unlock more quests.)

Quester
Quest
Requested Item
Reward
Dog
A Difficult Task
pick up red cup from table in treehouse
yellow card
Calvin
Fishing for a Fun Guy
craft fishing rod and fish up the shroom next to the Aquarium
fishing mod
Daisy
Your Little Companion
N/A
reunite with your cat
Daisy
Pigeon in Need
take pigeon to Pip
red card
Dawn
The Cursed Eve Rune
help lift the curse: get moonflower
eve rune
Fin
Pixie in a Bottle
ask Dawn for pixie bottle and deliver it to Fin
small pixie bottle
Bram
Community Job Board
50 wood
unlocks community board: new quests are posted on multiple-of-5 days: 5th, 10th, 15th…
Cid
A Handy Signpost
craft and place information signpost, interact with it while holding a machine
furnace
Cedric
Flutterflies
any butterfly (you don’t lose the critter)
health potion
Freya
Summer Seasonal Crop
a randomly chosen summer crop
500g
Tobias
A Promise Made
maple syrup
tapping kit
Aamy
The Weather Contraption
deliver the materials to Aamy’s desk: 30 wood + 2 copper bar + 5 rope
ball of sun
Hersha
Helping Hersha Cook
buy/craft 1 butter and 1 flour and combine them in the Mixing Bench at the Bakery
unlocks the cooking events, held on the 15th and 30th of each season, on top of existing festivals; rewards vary
Dawn
A Yummy Potion
9 yummyberries
yummyberry juice
Tobias
A Promise Kept
put a pixie in the delicate tapping kit at the tree next to Dawn’s
delicate pixie tapping kit + 1 museum credit
Pete
Grass Cutting
cut grass in Cid’s backyard (you also gain access to Cid’s totonut tree)
blue card
Hersha
A Strand of Hair
talk to Edgar, then talk to Cid
community gate key + (later on) Edgar plushie
Freya
Fall Seasonal Crop
a randomly chosen fall crop
water drone
Aamy
Spare Water Drone
20 copper ore
water drone
Cedric
The Blue Frog
blue sky frog (either catch or grow in terrarium from a small tadpole; you don’t lose the critter)
blue drone part
Edgar
Spell Reversal Potion
bring elf stone, totonut oil, and strand of hair to Dawn; then take potion to Cid
heart poster
Dawn
The Cursed Era Rune
moonflower + water sap + cursed rune
era rune
Bram
An Explosive Item
10 coal + 1 rope
1 bomb + recipe for bomb
Daisy
Their Favorite Food
everberry juice
red card
Cid
Prize Key Incentive
6 sardines
pink prize key
Edgar
Missing Files
fish the memory stick
unlocks the ability to print yellow cards
Edgar
Pink Puffle Ink
puffle sap
organic paper fragment
Freya
Winter Seasonal Crop
a randomly chosen winter crop
community gate key
Cedric
The Fusion Core
ion sphere
Cedric plushie
Tobias
Pink Honey
pink honey
bottle of starlight
Dawn
The Cursed Aft Rune
moonflower + fire essence + cursed rune
aft rune
Dog
An Important Letter
deliver letter to Ren
N/A
Edgar
Black Squid Ink
squid
organic paper fragment
Aamy
Spare Solar Panel
3 iron bars
solar panel
Freya
Spring Seasonal Crop
a randomly chosen spring crop
organic paper fragment
Dawn
An Important Favor
ask Atlas about moonstone: deliver to Atlas 1 of each color lotus flower + orb syrup + fire essence
moonstone
Dawn
The Cursed Ter Rune
moonflower + moonstone + cursed rune
ter rune
Pepper
In Memory of Fin
green ink + black ink + red ink + white alpaca thread
Fin plushie
Edgar
Golden Orb Ink
orb tree sap
organic paper fragment
Dawn
The Cursed Sacred Tree Rune
moonflower + phantom sphere + ion sphere + cursed rune
sacred tree rune
Freya
Summer Seasonal Crop
a randomly chosen summer crop
500g
Bram
??? (last quest to bring Fin back: asking for materials to make a body for Fin)
10 iron bar + 1 emerald + 3 solar panel
metal-bodied Fin
20 Comments
galocinejo linux 18 Jan @ 10:42am 
Is there no way to get stat bottles without saving ghosts? I'm undecided between raising Attack or Movement Speed, if I choose attack I'll do well in dungeons, but the map of this game is quite big and time is too limited, I see it's better to be fast than to do damage, but I still can't decide.
thorthonesch  [author] 19 Jul, 2024 @ 2:16pm 
Thank you for your comments; it means a lot to me. And don't worry: nothing is really missable in this game. If you like your save file so far but you think you've missed something, just wait for the next opportunity. Discover the game at your own pace and have fun.
Sandrina 19 Jul, 2024 @ 2:23am 
Thank you so so so much for this guide!! I've been searching the internet up and down for information and this is perfect! Now to decide if I start new after 8 hours or just keep playing and making slow progress, I mean, every opportunity will eventually come again with the seasons. I guess. 😅
But again, thank you, this has helped me so much.
(I play on the switch so it wasn't my initial thought to look here for info. If you want more people to find this, maybe post a link in the official discord? Maybe the developer could pin it somewhere, I'm sure they appreciate your work! It's incredibly helpful!)
Keruin 16 Jul, 2024 @ 4:09am 
@thorthonesch i am doing exactly the same; it's just not shakable :(
Tnx for the img: at least now i know it's not me doing something wrong )
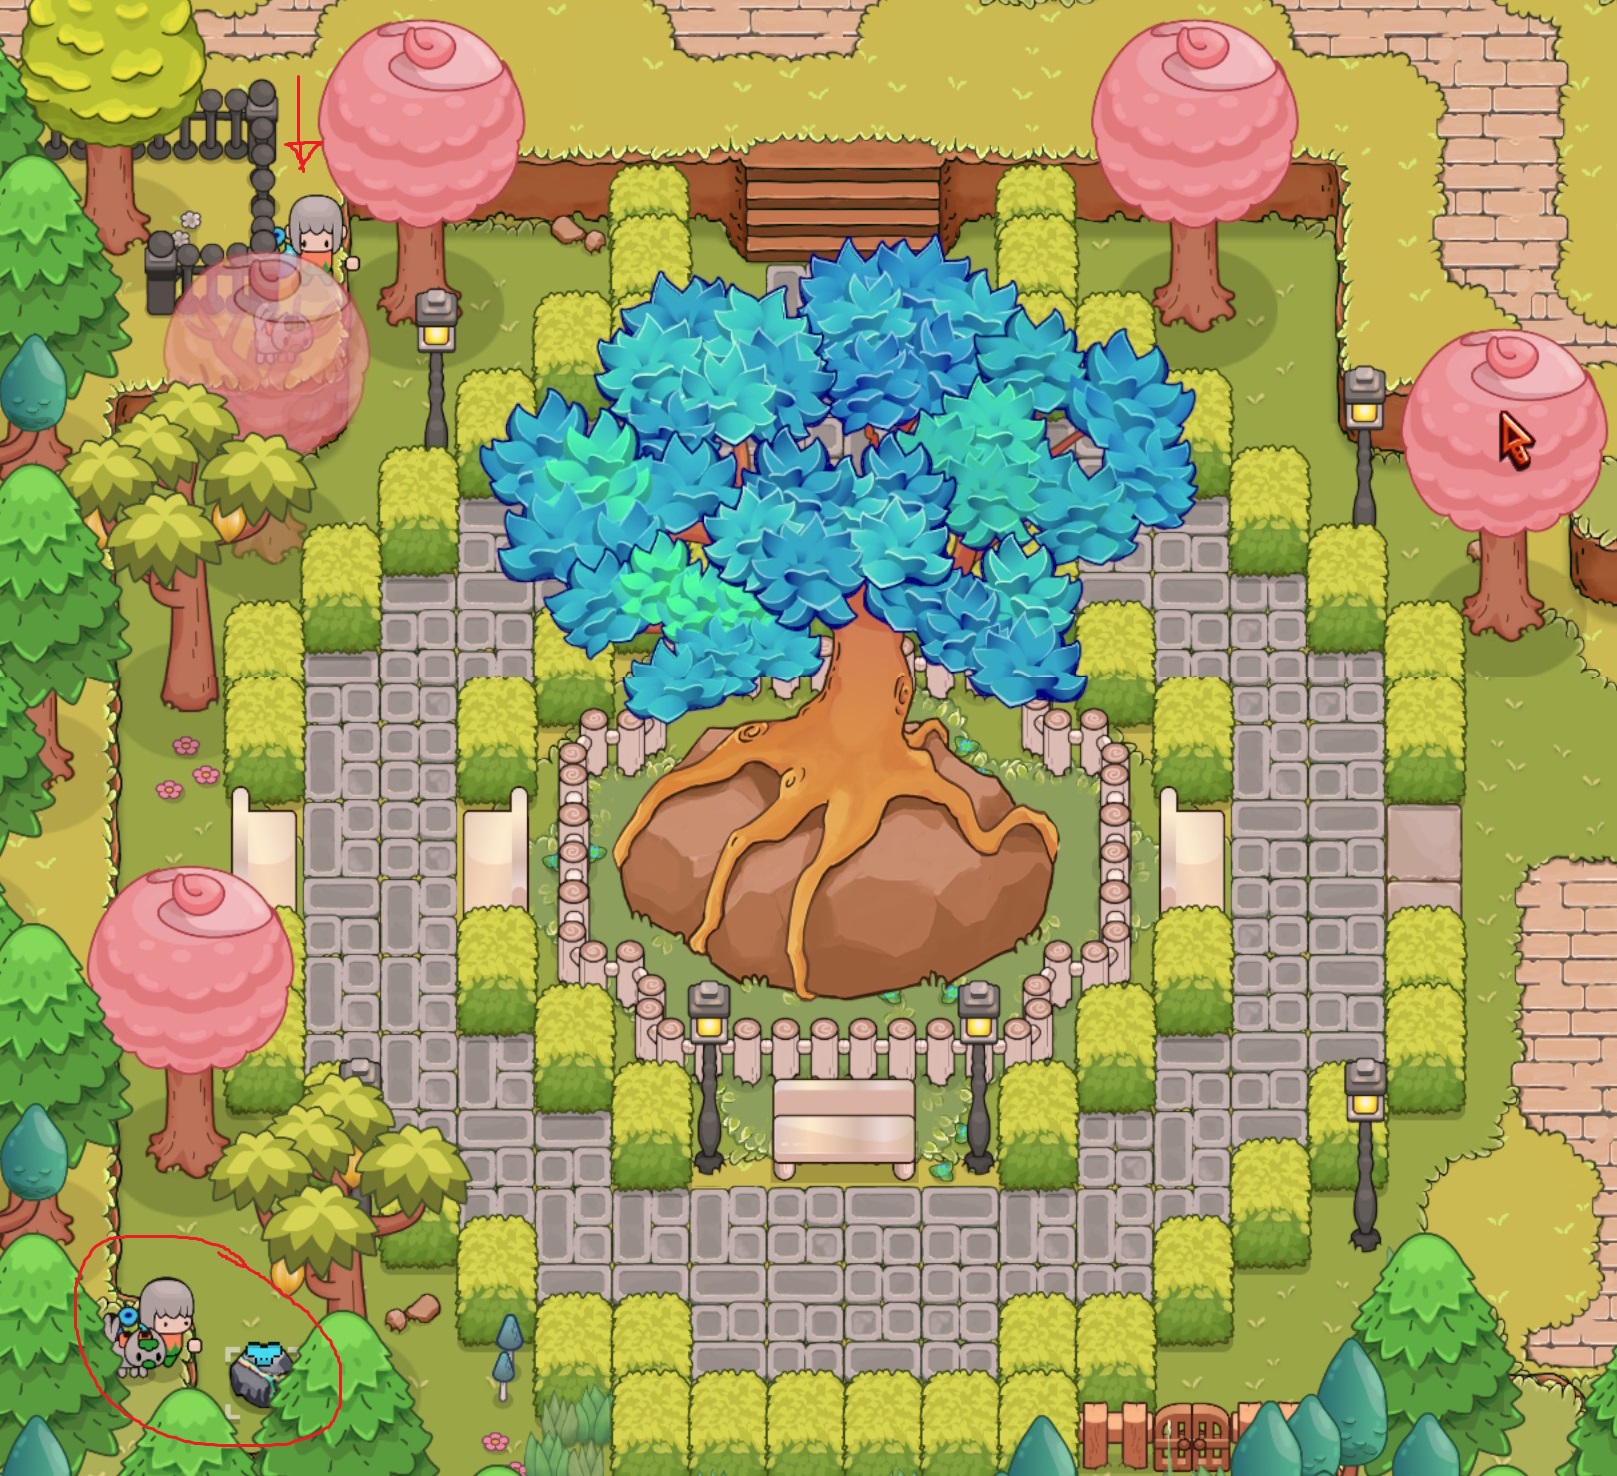
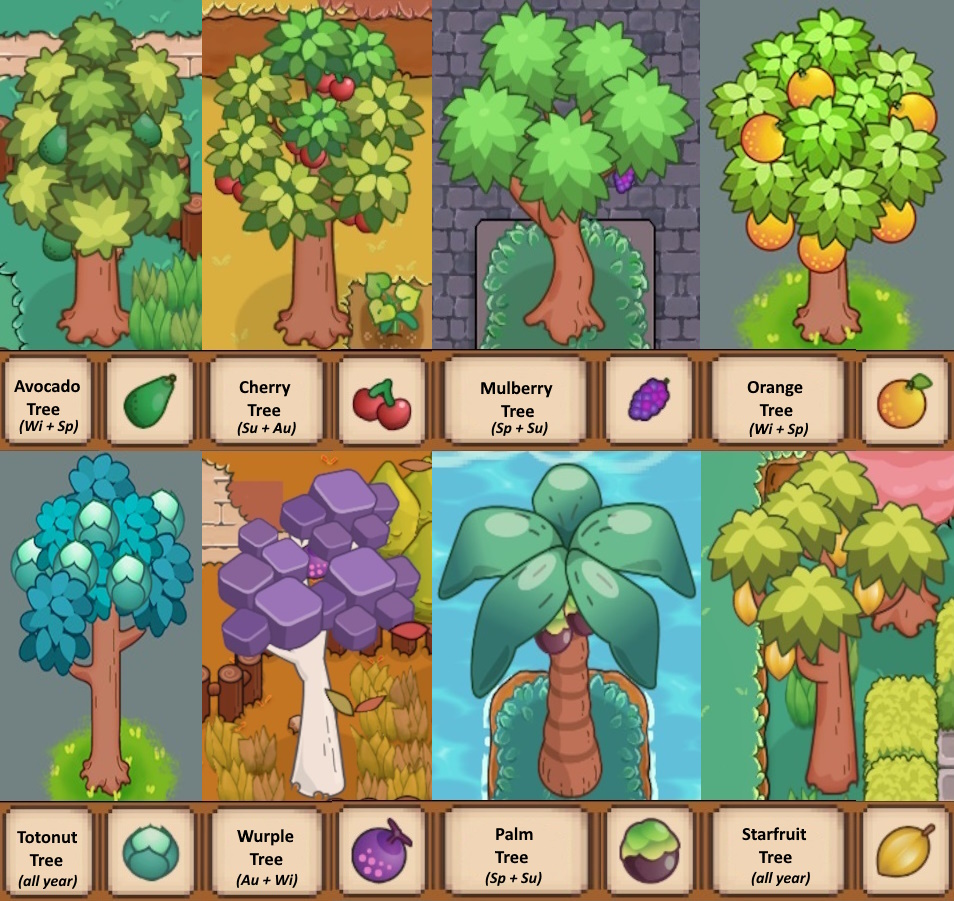
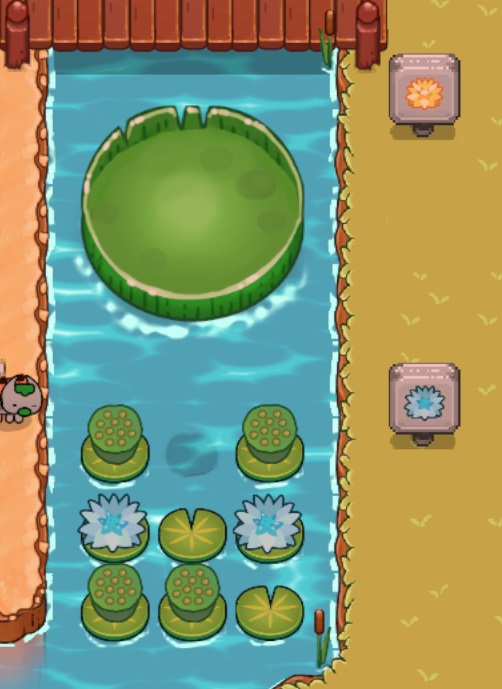
Btw i remember now i was once able to shake similar tree - palm at the very east of the north beach. I was really suprised (cause it was first time i was able to shake one of these); though it didn't happen again.
thorthonesch  [author] 16 Jul, 2024 @ 1:01am 
@Keruin It is defnitely a bug; totonut is the only fiddling for me; I had no problems is wurple. What is more fiddling is to fish out the fallen fruit (if I'm exasperated, I just pay Atlas the next day, for whatever I dropped and never picked up).
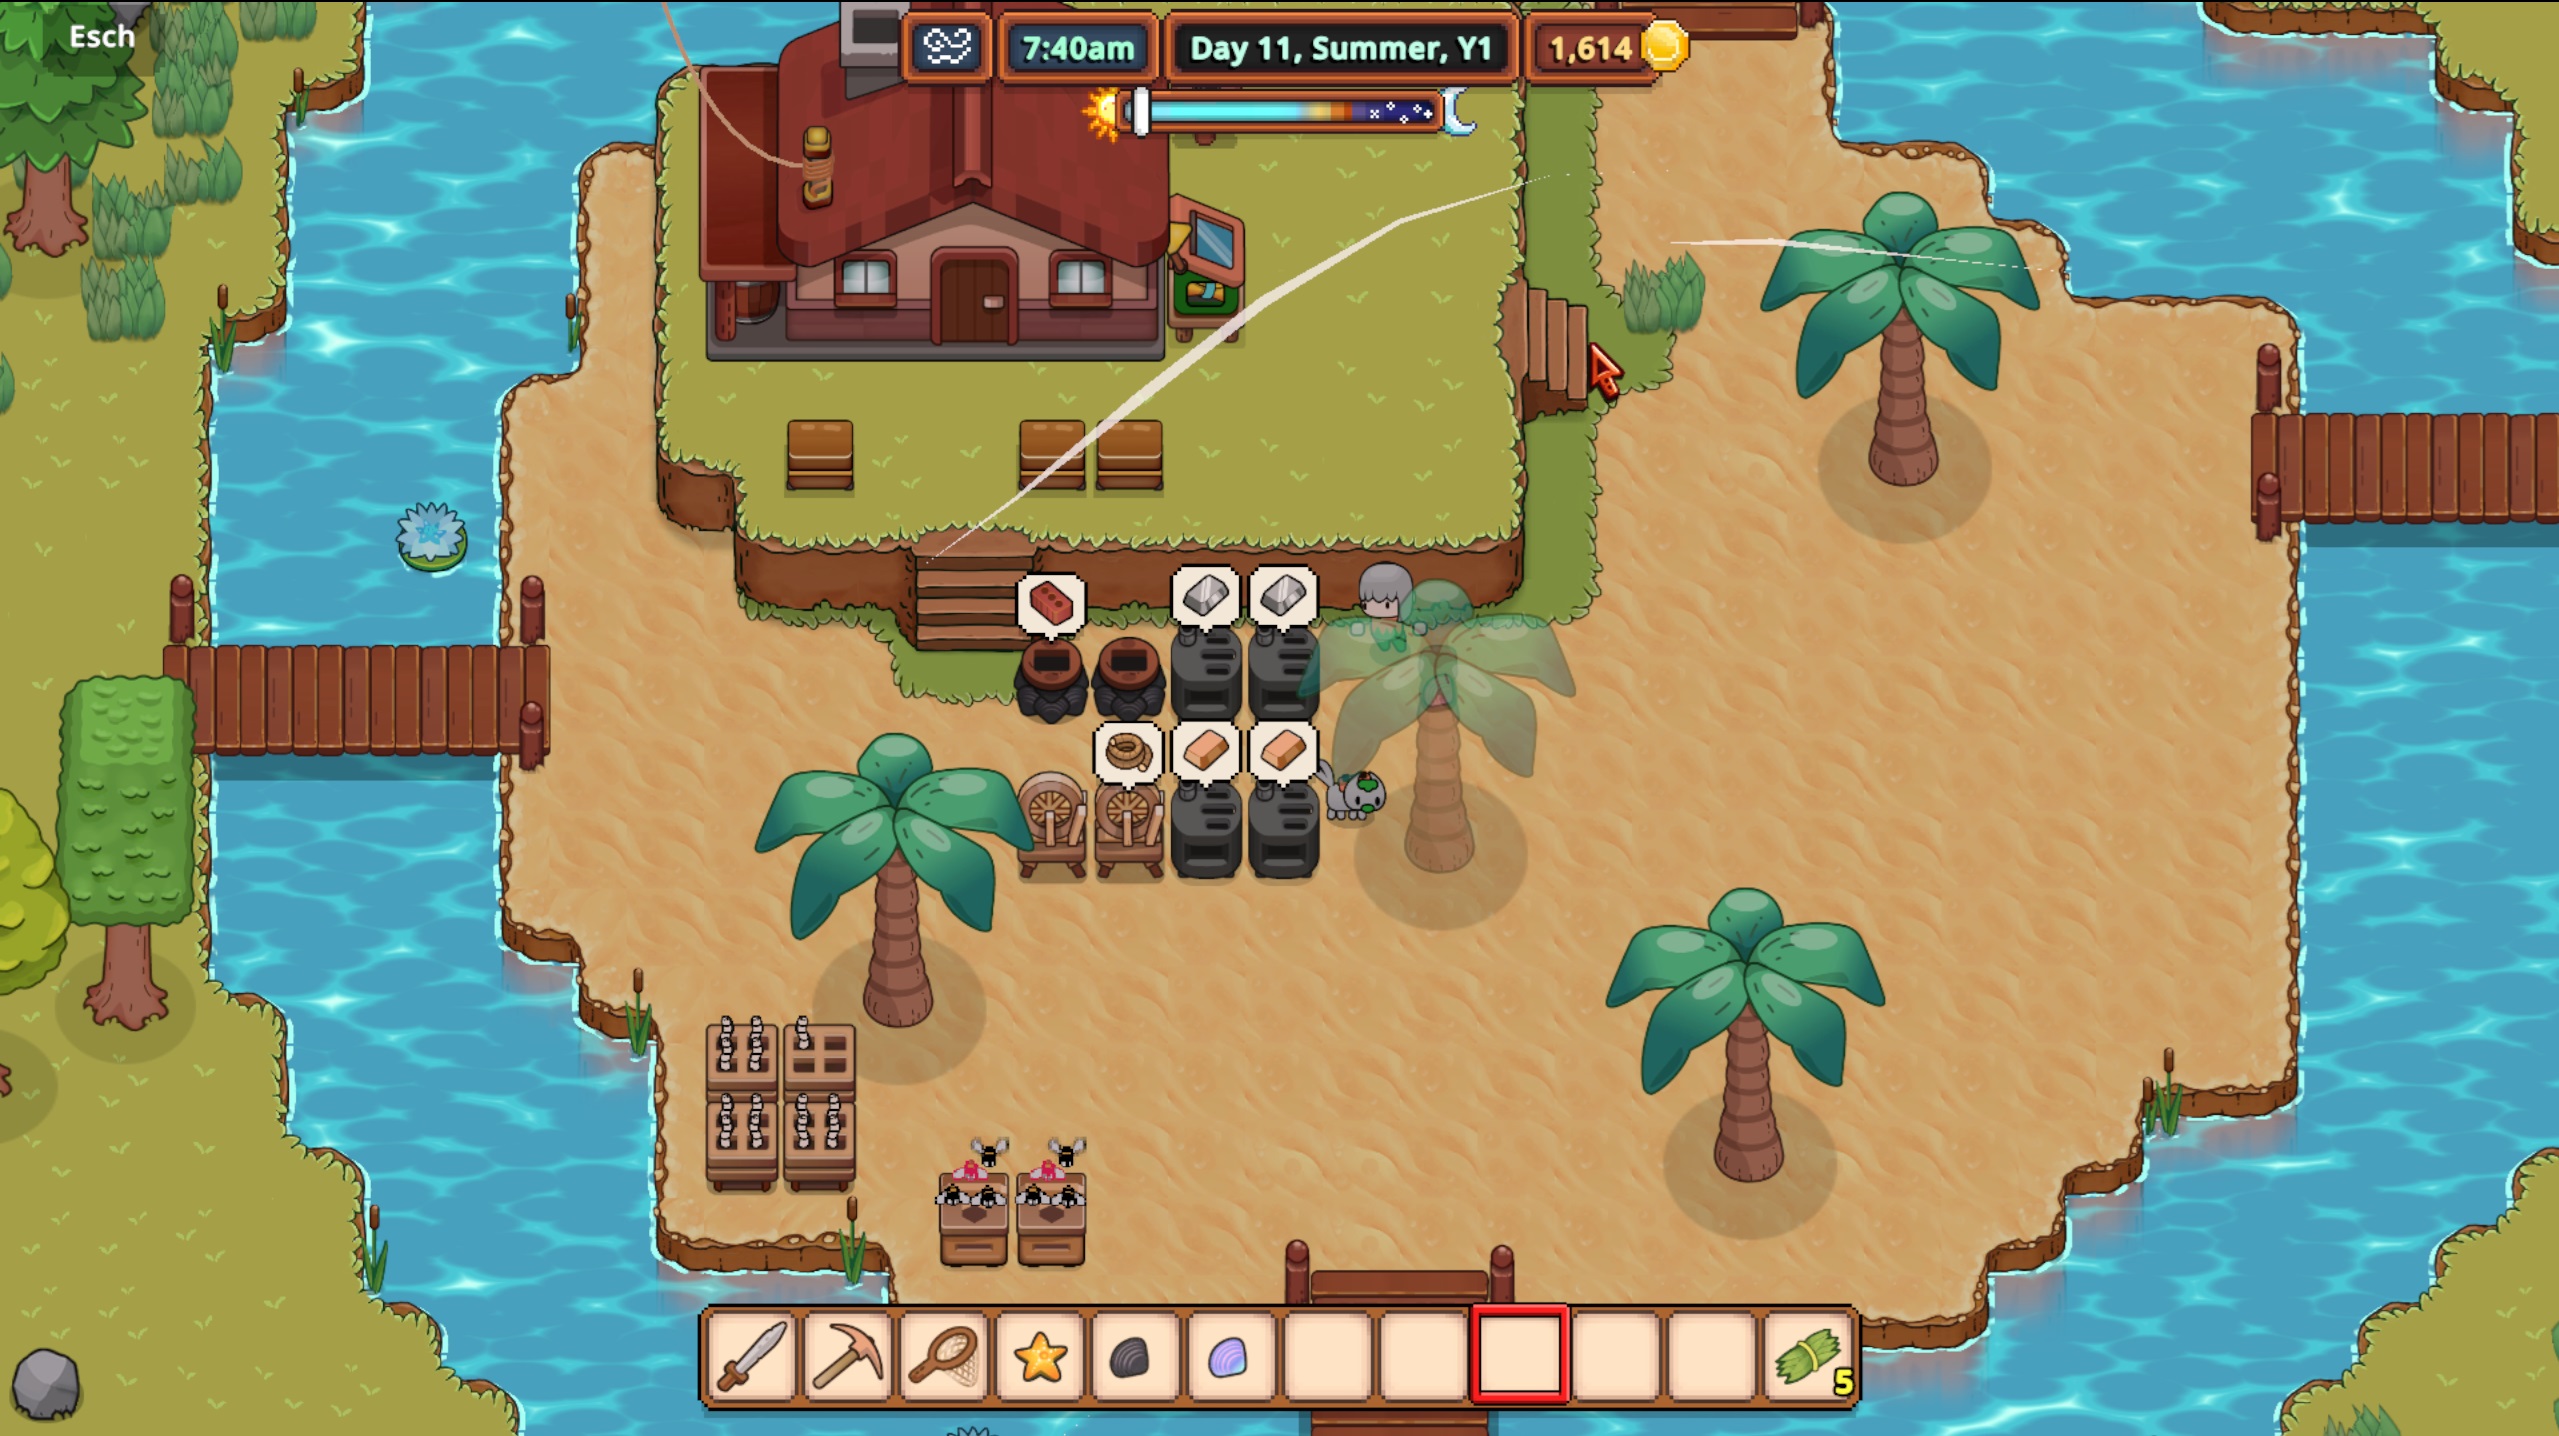
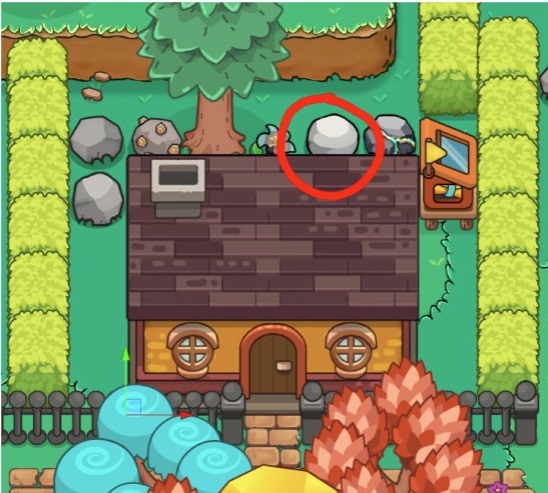
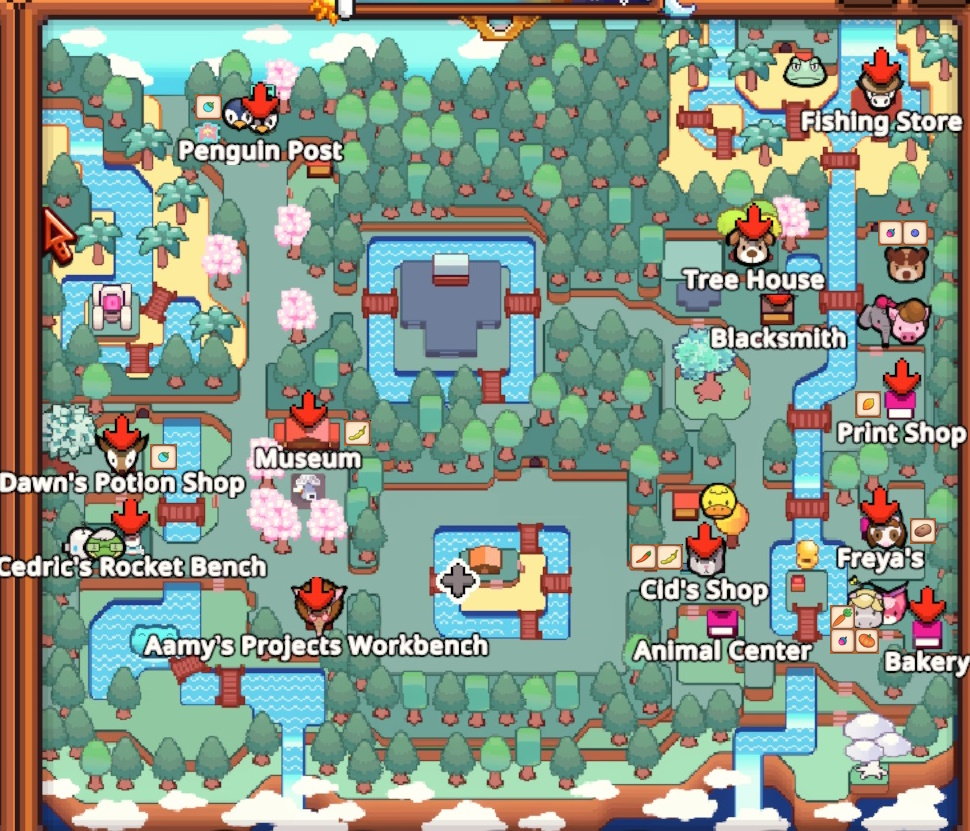
I've checked and here is where I stand to shake the trees, no tools in hand (I think I had gold ore in my hands when I took the image):
https://imgur.com/a/N92RFpT
Keruin 15 Jul, 2024 @ 1:23am 
Yummyberry juice finally worked on Totonut, but not on Wurple (i've tried in winter twice in different places around it), and shaking tree didn't work.
And yes, they both were fruited (it shows 3 fruits on it).
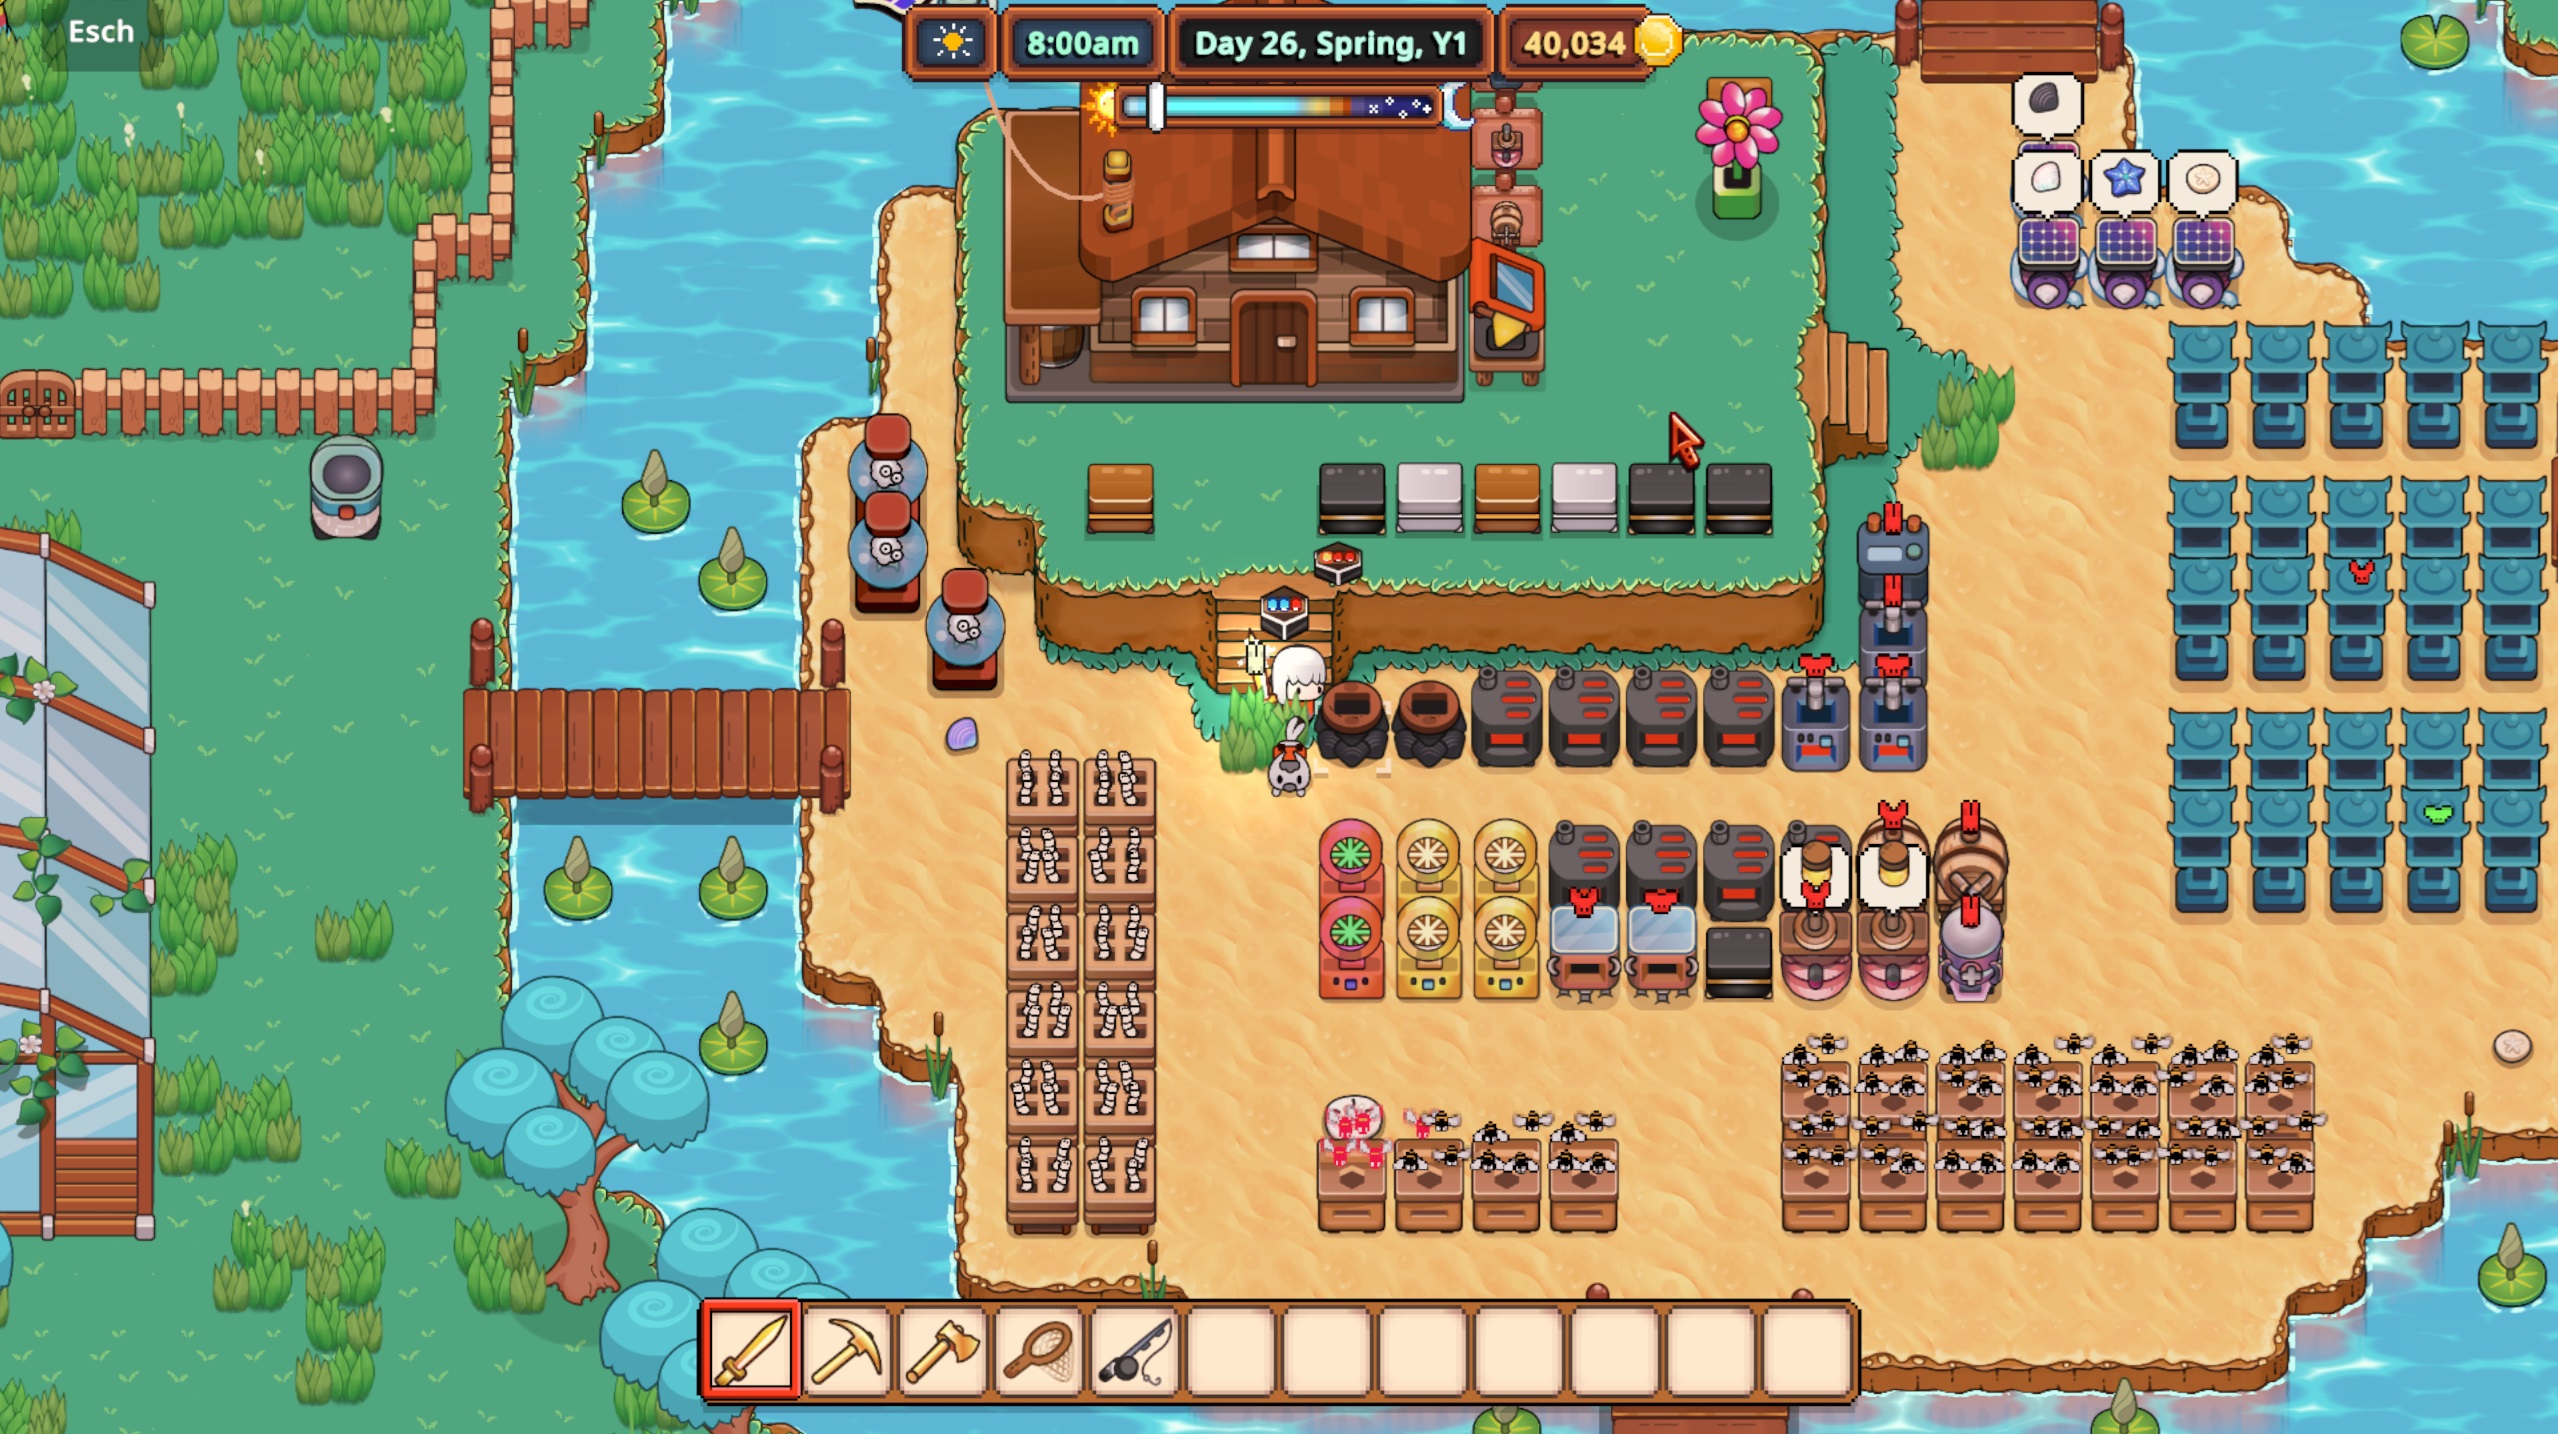
Maybe it's really a bug :( I just wasn't sure if those trees could be actually harvestable.

Thank you anyway for the guide and help!
thorthonesch  [author] 14 Jul, 2024 @ 10:37pm 
Don't know how to help then; it works for me. Just to make sure that's what happens to you: you can see the fruit hanging in the tree, but you cannot shake it, not even harvest it by cosuming yummyberry juice next to it... and you don't have such problems with any other tree, say other totonut and wurple trees. Maybe the tree hasn't fruited yet (it takes some time). Otherwise, I'd try to post it as a bug on Discord.
Keruin 14 Jul, 2024 @ 9:11pm 
UPD. Lightning Hands ddin't help with this.
Keruin 14 Jul, 2024 @ 8:45pm 
I even tried Yummyberry juice standing next to the tree (dunno if it works on trees at all, but in this case it certainly didn't)
Keruin 14 Jul, 2024 @ 8:16pm 
thorthonesch, I've been dancing around those trees like three in-game days already, with tools and empty-handed, moving back and forth, left and right, still nothing =(
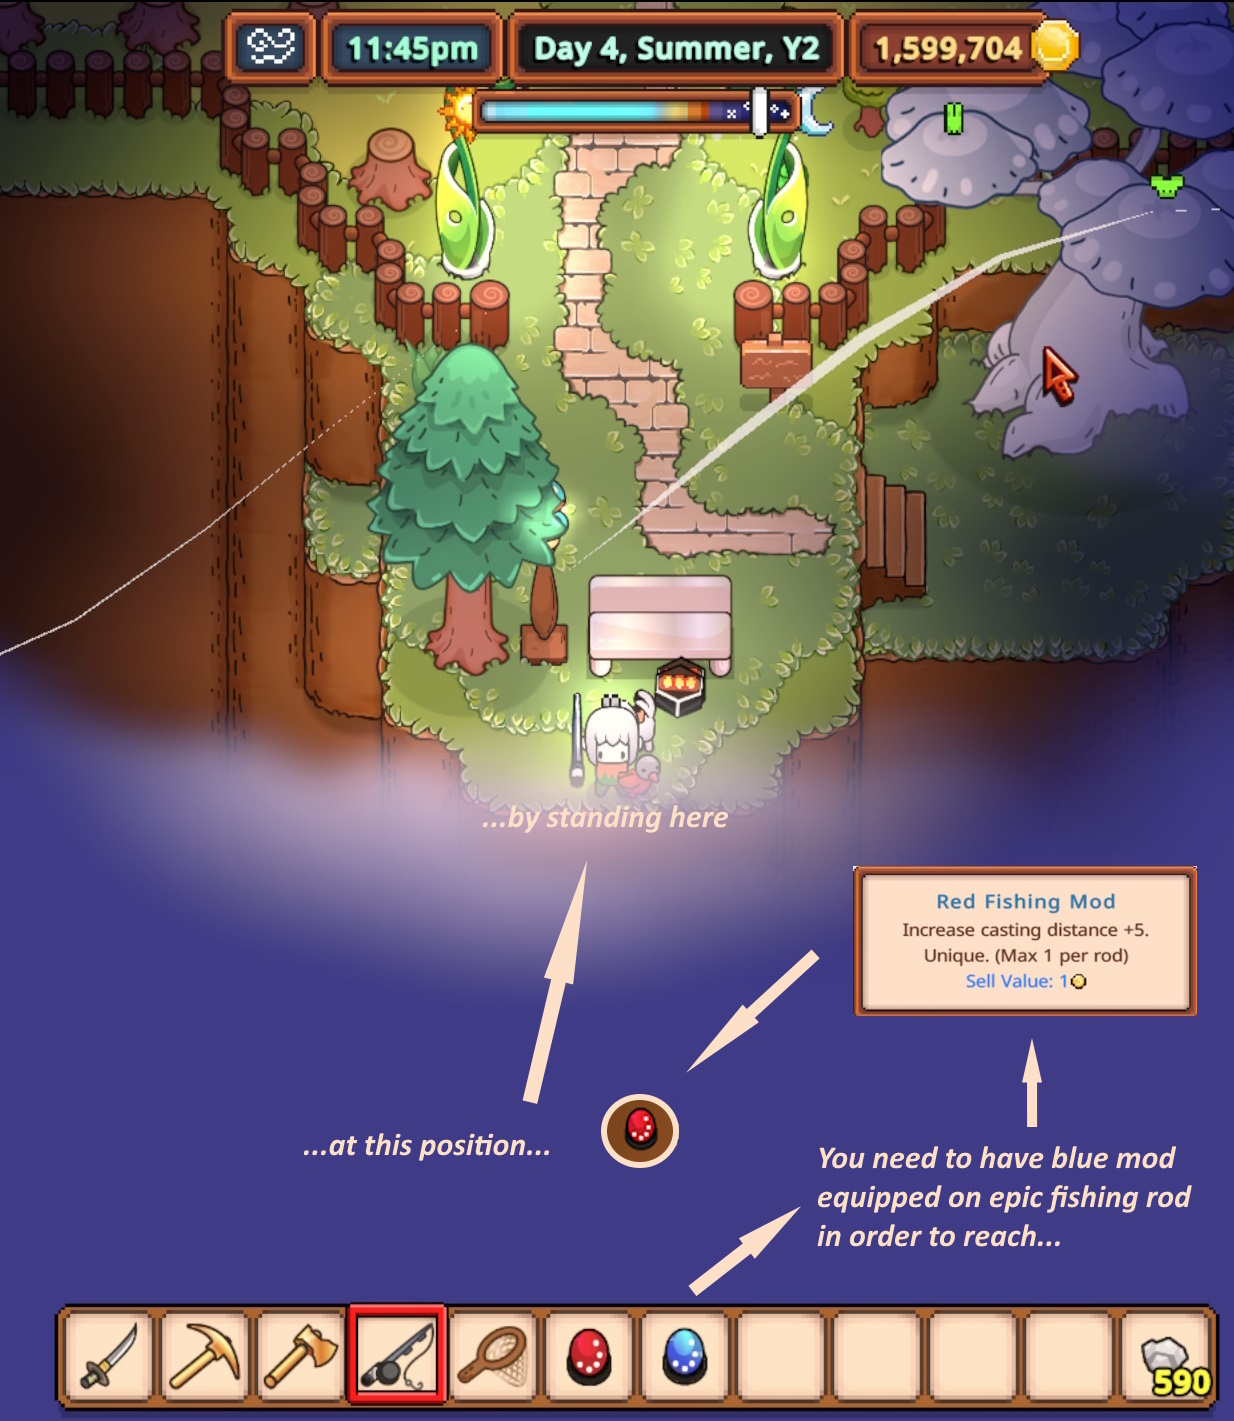
I dunno, maybe I need Lightning Hands card?