Katawa Shoujo

Katawa Shoujo

153 ratings
100% Completion Step-by-Step
By geekahedron
This is an updated version of the walkthrough I created on the original KS forums back in 2012. Following these steps, and using the save points, will allow you to reach every scene in the game and unlock 100% of the extra content and gallery, without too many extra steps. It is possible to reach every ending without viewing every scene, and some scenes have very particular steps you must follow to find them.

There are a few points in this walkthrough where you should STOP and go back to a previous save without reaching an ending; these branches will ensure that you unlock every seen and gallery frame along the way. Sections of save blocks and choice selections that are in italics do not contribute to the completion of the paths or the gallery, but are there to get the "Bundle of Choices" achievement for seeing every checkbox (select every single possible option in the game at least once).

It's not intended for most people who probably (and should) want to play the game a few times before looking for a walkthrough or flowchart. This might be useful for someone who is simply wanting to unlock the whole game from scratch on a clean install, for example (which I myself have done), and wants to just do it fast for the sake of having everything unlocked. I also tried to arrange it so that if someone was playing for the first time and doing nothing but following this walkthrough, it would be a decent experience.

This is a simple guide to unlock the entire game without having to pore over flowcharts and figure out what's missing, etc. I think it's pretty straightforward to understand, if you're looking at it while playing the game. I added spoiler tags to the scene names to make the decision points stand out better in the list.

Note that while I have broken the guide down into sections, you will need to play this walkthrough in the order presented for the save states to work as intended. And of course, where I have denoted to delete or overwrite saves that are no longer needed in this walkthrough, you can of course create all new save points if you wish to keep them (but beware that doing so may introduce confusion if you will then have multiple save states with the same scene names).
4
4
2
2
2
   
Award
Favorite
Favorited
Unfavorite
Prologue / Act 1 (Kenji ending)
Prologue
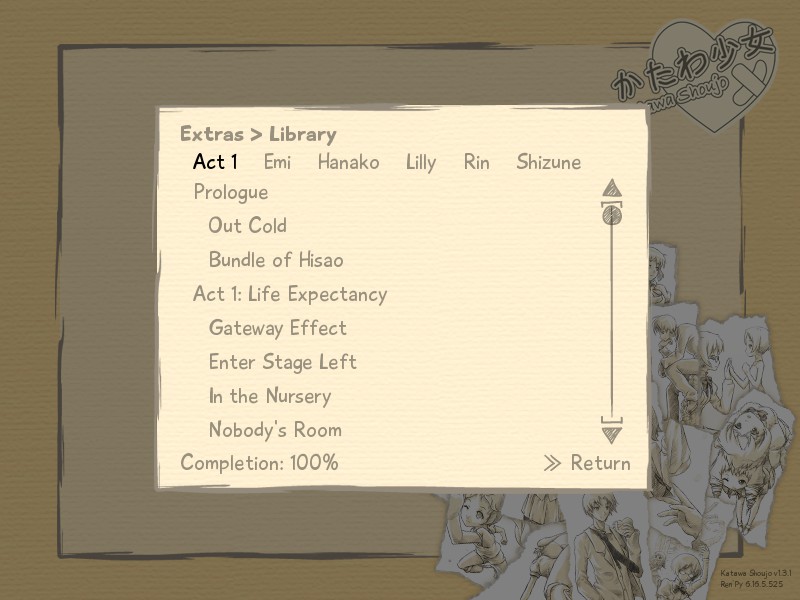
  • Scene: Out Cold
  • Scene: Bundle of Hisao

Act 1: Life Expectancy
  • Scene: Gateway Effect
  • SAVE: at decision screen (create a new save state)
  • Choice: Why?
  • STOP
  • LOAD "Gateway Effect"
  • Choice: Yeah, of course.
  • Scene: Enter Stage Left
  • Scene: In the Nursery
  • SAVE: at decision screen (overwrite "Gateway Effect")
  • Choice: I think I got everything I need to know
  • STOP
  • LOAD "In the Nursery"
  • Choice: "Ask about Shizune's deafness.
  • STOP
  • LOAD "In the Nursery"
  • Choice: Ask about the library.
  • Scene: Nobody's Room
  • Scene: Smalltalk
  • Scene: Risk vs. Reward
  • SAVE: at decision screen (overwrite "In the Nursery")
  • Choice: It's a trap, it's smarter to play defensively here.
  • STOP
  • LOAD "Risk vs. Reward"
  • Choice: She has a point. Attack aggressively!
  • Scene: Psueduo Tea Cosy
  • Scene: Shared Library
  • SAVE: at decision screen (overwrite "Risk vs. Reward")
  • Choice: Hi! I'm new here. Hisao Nakai. We're in the same class.
  • STOP
  • LOAD "Shared Library"
  • Choice: I'm sorry, I didn't mean to startle you.
  • Scene: Bizarre and Surreal
  • SAVE: at decision screen (overwrite "Shared Library")
  • Choice: She wasn't cute.
  • STOP
  • LOAD "Bizarre and Surreal"
  • Choice: She was cute.
  • Scene: Lunch Evolution Theory
  • SAVE: at decision screen (Create a new save state)
  • Choice: Read my book.
  • STOP
  • LOAD "Lunch Evolution Theory"
  • Choice: Go talk with Hanako.
  • Scene: Meet Cute
  • Scene: Sip (Part 1)
  • Scene: It Builds Character
  • Scene: A Private Lunch
  • Scene: Waylay
  • Choice: Maybe.
  • Scene: The Other Green
  • Scene: The Running Girl
  • Scene: Soap
  • Scene: Cold War
  • Choice: Hey, come on. Cut me and Lilly some slack...
  • Scene: Above and Beyond
  • Scene: Paint by Numbers
  • Scene: Invisible Hat
  • Scene: No Recovery
  • Scene: Foot and Mouth
  • Scene: Mind Your Step
  • SAVE: at decision screen (Create a new save state)
  • Choice: I don't really want to talk about it.
  • Scene: Support
  • Scene: Don't Panic
  • Scene: The Deep End
  • Achievement: Kenji's ending
Lilly Neutral Ending
Act 1 (Continued)
  • LOAD "Mind Your Step"
  • Choice: Sorry, I'm not in very good condition.
  • Scene: Support
  • Scene: Sip (Part 2)
  • SAVE: at decision screen (overwrite "Mind Your Step")
  • Choice: Go for a walk into town.
  • Scene: Don't Panic
  • Scene: Promise of Time
  • Achievement: Promise of Time (Finish Lilly's Act 1)

Act 2: Past
  • Scene: Earl Grey
  • Scene: A Pound Sterling
  • Scene: Presents and Presence
  • Scene: Unidentified Drinking Object
  • Scene: The Day After
  • Scene: A Brief History of Thyme
  • SAVE: at decision screen (overwrite "Bizarre and Surreal")
  • Choice: Avoid the subject.
  • STOP
  • LOAD "A Brief History of Thyme"
  • Choice: Tell the truth.
  • Scene: Little Wing
  • Scene: Bon Voyage


Act 3: Present
  • Scene: Day by Day
  • Scene: Minor Discord
  • SAVE: at decision screen (overwrite "A Brief History of Thyme")
  • Choice: Ignore his insane ramblings.
  • STOP
  • LOAD "Minor Discord"
  • Choice: Humor him.
  • SAVE: at next decision screen (overwrite "Minor Discord")
  • Choice: Keep it to myself.
  • STOP
  • LOAD "Minor Discord"
  • Choice: Ask about Hanako.
  • Scene: Dissonance
  • Scene: A World Away
  • Scene: Renewal
  • Scene: Northern Sojourn
  • Scene: Prelude
  • SAVE: at decision screen (overwrite "Minor Discord")
  • Choice: Wave her off.
  • STOP
  • LOAD "Prelude"
  • Choice: Address it.
  • Scene: Crescendo
  • Scene: Diminuendo
  • Scene: Gray Outlook
  • Scene: Rhapsody in Blue
  • Scene: The Momentary Present
  • SAVE: at decision screen (overwrite "Prelude")
  • Choice: Talk about school.
  • STOP
  • LOAD "The Momentary Present"
  • Choice: Talk about Hanako.

Act 4: Future
  • Scene: Slow Steps 'Fore a Waltz
  • Scene: Pajamas and Suits
  • Scene: Correct Procedure
  • Scene: Out and About
  • SAVE: at decision screen (Create a new save state)
  • Choice: Drop the subject.
  • Scene: A Morning's Reverie
  • Scene: Blackout
  • Scene: Context
  • Scene: A Faraway Future
  • Scene: Farewell
  • Achievement: Farewell (Reach Lilly's neutral ending)

Lilly Good Ending
Act 4 (Continued)
  • LOAD "Out and About"
  • Choice: Mention the letter.
  • Scene: A Morning's Reverie
  • Scene: Blackout
  • Scene: Context
  • Scene: A Faraway Future
  • Scene: Farewell
  • Scene: False Cadence
  • Scene: Under a Maudlin Sky
  • Scene: Under a Bright Sky
  • Achievment: Lilly's good ending
  • Post-credit Scene: Forwards, with Gusto!

Hanako Bad Ending
Act 1 (Continued)
  • LOAD "Sip (Part 2)" (You may now delete "Out and About" save)
  • Choice: Go to the library.
  • Scene: Don't Panic
  • Scene: Nc5xb3
  • Scene: Movement
  • Achievement: Movement (Finish Hanako's Act 1)

Act 2: Hide and Seek
  • Scene: To Town, To Town
  • Scene: Tea Leaves
  • SAVE: at decision screen (Overwrite "Sip (Part 2)")
  • Choice: What do you think, Hanako?
  • Scene: Office Confessional
  • STOP (at "Rise and Shine" scene in bedroom, after conversation with Misha and Shizune)

Act 2 (Continued)
  • SAVE: LOAD "Tea Leaves"
  • Choice: I've done enough work for the council already.
  • Scene: Chess and Slides
  • Scene: Rise and Shine
  • Scene: Mad Hatter
  • Scene: Small Change
  • Scene: Absenteeism
  • Scene: Equivalent Exchange

Act 3: Castling
  • Scene: Invitation
  • Scene: Shady Encounter
  • SAVE: at decision screen (overwrite "The Momentary Present")
  • Choice: Deny it.
  • STOP
  • LOAD "Shady Encounter"
  • Choice: Admit it.
  • Scene: Antiques and Pie
  • Scene: Falling
  • Scene: Treading Softly
  • Scene: Reaching Out
  • Scene: One More Year
  • Scene: One Piece of Paper
  • Scene: Stripes and Solids
  • Scene: Beginning of the End
  • SAVE: at decision screen (Overwrite "Tea Leaves")
  • Choice: How about we call it a day?

Act 4: Scars
  • Scene: Truancy
  • Scene: Faraway Presence
  • Choice: Trust my own judgement.
  • Scene: Misstep
  • Achievement: Misstep (Reach Hanako's bad ending)


Hanako Neutral Ending
Act 3 (Continued)
  • LOAD "Beginning of the End"
  • Choice: Do you want to go into the city?

Act 4: Scars
  • Scene: Truancy
  • Scene: Faraway Presence
  • SAVE: at decision screen (Overwrite "Beginning of the End")
  • Choice: Trust my own judgement.
  • Scene: Cut Petals
  • Achievement: Hanako's neutral ending

Hanako Good Ending
Act 4 (continued)
  • LOAD "Faraway Presence"
  • Choice: Agree with Lilly.
  • Scene: Continuing Melody
  • Scene: Shanghai Studiousness
  • Scene: His Past
  • Scene: City Rendezvous
  • Scene: Whispered Touch
  • Scene: Indeterminate Future
  • Scene: Adulthood
  • Achievement: Hanako's good ending

Rin Bad Ending
Act 1 (continued)
  • LOAD "Lunch Evolution Theory"
  • Choice: Wait for Shizune and Misha to come to a decision.
  • Scene: Short Sharp Shock
  • Scene: Detour Ahead
  • Scene: A Private Lunch
  • Scene: Waylay
  • Choice: Yes.
  • Scene: The Other Green
  • Scene: The Running Girl
  • Scene: Soap
  • Scene: Cold War
  • SAVE: at decision screen (Overwrite "Lunch Evolution Theory")
  • Choice: Hey, come on. Cut me and Lilly some slack...
  • Scene: Above and Beyond
  • Scene: Things You Can Do
  • Scene: Exercise
  • Choice: Take it easy.
  • Scene: Invisible Hat
  • Scene: No Recovery
  • Scene: Foot and Mouth
  • Scene: Mind Your Step
  • Choice: Sorry, I'm not in very good condition.
  • Scene: Support
  • Scene: An Aesthetics
  • Scene: Creative Pain
  • SAVE: at decision screen (overwrite "Shady Encounter")
  • Choice: I just kinda stuck with her, I think.
  • STOP
  • LOAD "Creative Pain"
  • Choice: I'm interested in the art club.
  • Scene: Don't Panic
  • Scene: Clouds in my Head
  • Achievement: Clouds in my Head (Finish Rin's Act 1)

Act 2: Disconnect
  • Scene: A Wider Field of Vision
  • Scene: Studies in Grayscale
Note: The following optional section is a long one, but it will ensure that you see and select each of the many checkbox options in this act.
  • SAVE: at decision screen (overwrite "Creative Pain")
  • Choice: I wish I was as good as you.
  • Scene: Interstitial
  • Scene: Self Study
  • Scene: Hisao's Smile
  • Scene: Things You Like
  • Choice: It's refreshing.
  • Scene: Target Audience
  • Scene: Eternity in an Hour
  • Scene: Underwater and a Maple with a Name
  • Choice: I want to be more like Emi.
  • Scene: Iwanako's Regret
  • Scene: In Her Own Image
  • SAVE: at decision screen (overwrite "Faraway Presence")
  • Choice: You'd be wasting your talent otherwise.
  • STOP
  • LOAD "In Her Own Image"
  • Choice: Because it would be exciting.
  • STOP
  • LOAD "In Her Own Image"
  • Choice: You should aim high.
  • STOP
  • LOAD "Studies in Grayscale"
  • Choice: You're Amazing!
  • Scene: Interstitial
  • Scene: Self Study
  • Scene: Hisao's Smile
  • Scene: Things You Like
  • Choice: It makes me feel like I'm stuck.
  • Scene: Target Audience
  • Scene: Eternity in an Hour
  • Scene: Underwater and a Maple with a Name
  • Choice: I want to be more like Rin.
  • Scene: Iwanako's Regret
  • Scene: In Her Own Image
  • SAVE: at decision screen (Overwrite "In Her Own Image" or "Faraway Presence")
  • Choice: You won't get a chance like this again.
  • STOP
  • LOAD "In Her Own Image"
  • Choice: I think you'd be a big hit.
  • Scene: Umbrella Logic Cake
  • Scene: Six Meters Closer to Heaven
  • Scene: Indecision
  • Scene: Signal Interference
  • Scene: Dandelions
  • Choice: What about Emi?

Act 3: Distance
  • Scene: 22nd Corner
  • Scene: The Scent of Light
  • Scene: Things you Can't Give Up
  • Scene: BADAAN!
  • SAVE: at decision screen (overwrite "Studies in Grayscale")
  • Choice: I want to be with her more.
  • STOP
  • LOAD "BADAAN!"
  • Choice: I can't leave her alone either.
  • STOP after reaching "The Edge of the World"

Act 2 (continued)
  • LOAD "In Her Own Image"
  • Choice: It isn't like you at all to hesitate like this.
  • STOP
  • LOAD "In Her Own Image"
  • Choice: You won't get a chance like this again.
  • Scene: Umbrella Logic Cake
  • Scene: Six Meters Closer to Heaven
  • Scene: Indecision
  • Scene: Signal Interference
  • Scene: Dandelions
  • Choice: What about me?
Act 3: Distance
  • Scene: 22nd Corner
  • Scene: The Scent of Light
  • Scene: Things you Can't Give Up
  • Scene: Rose-Tinted Glasses
  • SAVE: at decision screen (overwrite "BADAAN!")
  • Choice: I want to understand her.
  • STOP
  • LOAD "Rose-Tinted Glasses"
  • Choice: I want to support her.
  • Scene: The Edge of the World
  • Scene: The Context of Rin
  • Scene: Fast Forward
  • Scene: Self-Destruction
  • Scene: Reverse Escapism
  • Scene: Boundless
  • SAVE: at decision screen (overwrite "Rose-Tinted Glasses")
  • Choice: Why did you turn away from being an artist?
  • STOP
  • LOAD "Boundless"
  • Choice: Is that why you're being so supportive of Rin?
  • Scene: Delirium
  • Scene: Things You Hate
  • SAVE: at decision screen (overwrite "In her Own Image")
  • Choice: I need to understand.
  • STOP
  • LOAD "Things You Hate"
  • Choice: Then explain.
  • Scene: Shards of Ire
  • Achievement: Shards of Ire (Reach Rin's bad ending)

Rin Neutral Ending
Act 3 (continued)
  • LOAD "Things You Hate"
  • Choice: It doesn't matter.

Act 4: Dream
  • Scene: Illusions for People
  • Scene: Demised
  • Scene: The Scene
  • SAVE: at decision screen (Overwrite "Things you Hate")
  • Choice: But aren't you happy people are interested in your paintings?
  • Scene: Wavelength
  • Scene: Blue Period
  • Scene: The World Only You Can See
  • Achievement: The World Only You Can See (Reach Rin's neutral ending)

Rin Good Ending
Act 4 (Continued)
  • SAVE: LOAD "The Scene"
  • Choice: But if you found someone like that, then what?
  • Scene: Desperate Glory
  • Scene: Problems of Self-Referential Logic
  • Scene: Measuring Shadows
  • Scene: Raison d'etre
  • Scene: Without Breathing, Without a Sound
  • Scene: Proof of Existence
  • Achievement: Can you seize the day? (Reach Rin's good ending)

Shizune Bad Ending
Act 1 (Continued)
  • LOAD "Cold War"
  • Choice: Don't drag me into this! I've done my part!
  • Scene: Proof of Competency
  • Scene: Event Horizon
  • Scene: Exercise
  • SAVE: at decision screen (Overwrite "Cold War")
  • Choice: Take it easy.
  • Scene: Invisible Hat
  • Scene: Home Field Advantage
  • SAVE: at decision screen (overwrite "Rose-Tinted Glasses")
  • Choice: Kick them out of my room.
  • STOP
  • LOAD "Home Field Advantage"
  • Choice: Try to dodge the subject.
  • Scene: No Free Lunch
  • Scene: Shanghaied
  • Scene: Don't Panic
  • Scene: Throwing Balls
  • Achievement: Throwing Balls (Finish Shizune's Act 1)

Act 2: Learning to Read
  • Scene: Message Passing
  • Scene: Talk to the Hand
  • Scene: Chinese Whispers
  • Scene: Advanced Game Theory
  • Scene: Bread, Scissors, Paper
  • Scene: Interlace
  • Scene: Spring Into Action
  • Scene: Past Imperfective
  • Scene: When Stars Embrace


Act 3: Sleight of Hand
  • Scene: Force Feedback
  • Scene: United Nations
  • Scene: Use-Mention Distinction
  • Scene: Family Plot
  • Scene: Pangrammatic Window
  • Scene: Closer
  • Scene: Confrontation
  • Scene: The Anchor
  • Scene: Roadmap
  • Scene: Acute Triangle
  • Scene: Dewey Decimated
  • Scene: Tongue-Tied
  • SAVE: at decision screen (Overwrite "The Scene")
  • Choice: Comfort Misha
  • Scene: Look Aside

Act 4: To My Other Self
  • Scene: Grand Strategy
  • Scene: Off by One
  • Scene: Invasion
  • Scene: Parfait
  • Scene: Present Tense
  • Scene: Spiral
  • Scene: Terminal
  • Achievement: Terminal (Reach Shizune's bad ending)

Shizune Good* Ending
  • SAVE: LOAD "Tongue-Tied"
  • Choice: Refuse.
  • Scene: Look Ahead

Act 4: To My Other Self
  • Scene: Grand Strategy
  • Scene: Off by One
  • Scene: Invasion
  • Scene: Parfait
  • Scene: The Summit
  • Scene: Succession
  • Scene: Sneaking Mission
  • Scene: Infinity
  • Achievement: Can you tell me what you think? (Reach Shizune's good ending)

Emi's Bad Ending
  • LOAD "Exercise" (You may now delete "Tongue-Tied" save)
  • Choice: Go for it.
  • Scene: Slow Recovery
  • SAVE: at decision screen (overwrite "Home Field Advantage")
  • Choice: Yeah, I sure was having fun fun fun at the nurse's office...
  • STOP
  • LOAD "Slow Recovery"
  • Choice: I don't want to talk about it, okay?
  • SAVE: at decision screen (overwrite "Slow Recovery")
  • Choice: I'll go with Shizune, after all I'm in the Student Council now.
  • STOP
  • LOAD "Slow Recovery"
  • Choice: I'll go to lunch with Emi and her friend.
  • Scene: Foot and Mouth
  • Scene: Support
  • Scene: An Aesthetics
  • Scene: Proper Exercise
  • Scene: Don't Panic
  • Scene: Is Carnival!
  • Achievement: Is Carnival! (Finish Emi's Act 1)

Act 2: Form
  • Scene: Morning Run
  • Scene: Clouds, Time Travel, and Thou
  • Scene: Questions That Need Answering!
  • Scene: Second Time's the Worst
  • Scene: An Apple a Day
  • Scene: Track Meeting
  • Scene: Down that Medicine Now
  • Scene: Piracy on the High Seas
  • Scene: Famous Last Words
  • SAVE: at decision screen (overwrite "Slow Recovery")
  • Choice: Keep quiet.
  • STOP
  • LOAD "Famous Last Words"
  • Choice: Offer to run with Emi.
  • Scene: Tracking absences.
  • Scene: Dropping By
  • Scene: The First Morning After
  • Scene: The (Real) Beginning

Act 3: Perspective
  • Scene: Eet Ees... Scienca
  • Scene: Definitions
  • SAVE: at decision screen (overwrite "Famous Last Words")
  • Choice: Press Emi.
  • STOP
  • LOAD "Definitions"
  • Choice: Let it rest.
  • Scene: Invisible Rock
  • Scene: Lunch and Science
  • Scene: Up, Down, and Up Again
  • Scene: Storage Space
  • Scene: After-School Plans
  • Scene: Detached
  • Scene: Phantom Pain
  • SAVE: at decision screen (overwrite "Definitions")
  • Choice: No. I have other things to do.
  • STOP
  • LOAD "Phantom Pain"
  • Choice: I Suppose I can spare a few minutes.
  • Scene: Debate Expresses Doubt
  • SAVE: at decision screen (overwrite "Phantom Pain")
  • Choice: No, this is my problem.
  • STOP
  • LOAD "Debate Expresses Doubt"
  • Choice: Sure, why not?
  • Scene: Guess Who's Coming... Never Mind
  • SAVE: at decision screen (Overwrite "Exercise")
  • Choice: Go after her.
  • Scene: Instant Replay
  • SAVE: at decision screen (Create new save state)
  • Choice: Downplay the issue.
  • Achievement: Instant Replay (Reach Emi's bad ending)

Emi's Good Ending
Act 3 (Continued)
  • LOAD "Instant Replay"
  • Choice: Give in and let Misha know
  • STOP when you get to the splash screen for Act 4 (There is a gallery image from "Instant Replay" that is only found with this set of choices, so you cannot backtrack immediately)


Act 3 (Continued)
  • SAVE: LOAD "Guess Who's Coming... Never Mind"
  • Choice: Talk to her mom.

Act 4: Motion
  • Scene: A Swing and a Miss
  • Scene: Saving Throw
  • Scene: Whispers of the Past
  • Scene: Hooray for Socks
  • Scene: Clean Teeth
  • Achievement: Can you stand up for yourself? (Reach Emi's good ending)
  • Achievement: Congratulations! (100% Complete)
  • Achievement: Bundle of Choices (See every choice in the game)

One more thing...
One more step is needed to unlock the final Steam achievement.
  • From the main menu, click on "Extras"
  • Choose "Gallery"
  • Go to the last page (9)
  • Click on the last image (the picture with all of the girls)
  • Achievement: Congratulations! (100% complete)


If you are missing any of the achievements after finishing this guide, open the "Extras" menu and then "Library" to confirm that the completion percentage on that screen does in fact show 100%. If not, you missed a step, but you can browse the library scenes to figure out what is missing. You can use my flowcharts guide to figure out how to reach the scene you are missing.
TL;DR 100% Completion
This is a list of the choices to make at each decision screen, and when to save and load, in order to get 100% completion of the scenes and endings in the game.

Note: This short version does not include all the steps necessary to get the "Bundle of Choices" achievement, but those steps are in the sections above (the steps that are written in italics).

  • > Yeah, of course.
  • > Ask about the library.
  • > She has a point. Attack aggressively!
  • > I'm sorry, I didn't mean to startle you.
  • > She was cute.
  • SAVE: at decision screen (Create a new save state)
  • > Go talk with Hanako.
  • > Maybe.
  • > Hey, come on. Cut me and Lilly some slack...
  • SAVE: at decision screen (Create a new save state)
  • > I don't really want to talk about it.
  • Achievement: Kenji's ending

  • LOAD "Mind Your Step"
  • > Sorry, I'm not in very good condition.
  • SAVE: at decision screen (overwrite "Mind Your Step")
  • > Go for a walk into town.
  • > Tell the truth.
  • > Humor him.
  • > Ask about Hanako.
  • > Address it.
  • > Talk about Hanako.
  • SAVE: at decision screen (Create a new save state)
  • > Drop the subject.
  • Achievement: Farewell (Reach Lilly's neutral ending)

  • LOAD "Out and About"
  • > Mention the letter.
  • Achievment: Lilly's good ending

  • LOAD "Sip (Part 2)" (You may now delete "Out and About" save)
  • > Go to the library.
  • SAVE: at decision screen (Overwrite "Sip (Part 2)")
  • > What do you think, Hanako?
  • STOP (at "Rise and Shine")

  • LOAD "Tea Leaves"
  • > I've done enough work for the council already.
  • > Admit it.
  • SAVE: at decision screen (Overwrite "Tea Leaves")
  • > How about we call it a day?
  • > Trust my own judgement.
  • Achievement: Misstep (Reach Hanako's bad ending)

  • LOAD "Beginning of the End"
  • > Do you want to go into the city?
  • SAVE: at decision screen (Overwrite "Beginning of the End")
  • > Trust my own judgement.
  • Achievement: Hanako's neutral ending

  • LOAD "Faraway Presence"
  • > Agree with Lilly.
  • Achievement: Hanako's good ending

  • LOAD "Lunch Evolution Theory"
  • > Wait for Shizune and Misha to come to a decision.
  • > Yes.
  • SAVE: at decision screen (Overwrite "Lunch Evolution Theory")
  • > Hey, come on. Cut me and Lilly some slack...
  • > Take it easy.
  • > Sorry, I'm not in very good condition.
  • > I'm interested in the art club.
  • > I can't leave her alone either.
  • STOP (at "The Edge of the World")

  • LOAD "In Her Own Image"
  • > You won't get a chance like this again.
  • > What about me?
  • > I want to support her.
  • > Is that why you're being so supportive of Rin?
  • SAVE: at decision screen (overwrite "In her Own Image")
  • > Then explain.
  • Achievement: Shards of Ire (Reach Rin's bad ending)

  • LOAD "Things You Hate"
  • > It doesn't matter.
  • SAVE: at decision screen (Overwrite "Things you Hate")
  • > But aren't you happy people are interested in your paintings?
  • Achievement: The World Only You Can See (Reach Rin's neutral ending)

  • SAVE: LOAD "The Scene"
  • > But if you found someone like that, then what?
  • Achievement: Can you seize the day? (Reach Rin's good ending)

  • LOAD "Cold War"
  • > Don't drag me into this! I've done my part!
  • SAVE: at decision screen (Overwrite "Cold War")
  • > Take it easy.
  • > Try to dodge the subject.
  • SAVE: at decision screen (Overwrite "The Scene")
  • > Comfort Misha
  • Achievement: Terminal (Reach Shizune's bad ending)

  • LOAD "Tongue-Tied"
  • > Refuse.
  • Achievement: Can you tell me what you think? (Reach Shizune's good ending)

  • LOAD "Exercise" (You may now delete "Tongue-Tied" save)
  • > Go for it.
  • > I don't want to talk about it, okay?
  • > I'll go to lunch with Emi and her friend.
  • Achievement: Is Carnival! (Finish Emi's Act 1)
  • > Offer to run with Emi.
  • > Let it rest.
  • > I Suppose I can spare a few minutes.
  • > Sure, why not?
  • SAVE: at decision screen (Overwrite "Exercise")
  • > Go after her.
  • SAVE: at decision screen (Create new save state)
  • > Downplay the issue.
  • Achievement: Instant Replay (Reach Emi's bad ending)

  • LOAD "Instant Replay"
  • > Give in and let Misha know
  • STOP when you get to Act 4 (This will path continues to Emi's good ending, but you will miss two scenes)

  • LOAD "Guess Who's Coming... Never Mind"
  • > Talk to her mom.
  • Achievement: Can you stand up for yourself? (Reach Emi's good ending)

  • From the main menu, Extras > Gallery
  • Open page 9
  • Select and view the final picture
  • Achievement: Congratulations! (100% Complete)
18 Comments
geekahedron  [author] 17 Apr @ 6:07am 
I don't know about "easy" but you could try expanding your save file in a game resources viewer (like grviewer.com) and search for items in the "0.store.unseen_labels" group. The choices are only stored by number, and I don't have a mapping of what numbers correlate to which in-game choices, but that's where I would start.

Honestly, though, it's probably faster to turn on fastest text display and skip after choices and just run through this whole guide, easy enough to do in probably 10–15 minutes while multitasking.
guthrum06 14 Apr @ 1:12pm 
Is there like...an easy way to see which choice I am missing? I followed this guide (I thought), but must have missed one somewhere, and don't really want to go all the way back through. Does it show in the game files or something?
geekahedron  [author] 3 Feb @ 4:00am 
"Bundle of Hisao" is the very first achievement, awarded just for finishing the prologue. If you don't have it, try starting a new game and going through the opening cutscene again.
76561199175333210 1 Feb @ 3:33am 
How to get "bundle of hisao"? Ive finished all game, but didnt get this achievement
Iradeluck2 24 Jan @ 12:18am 
i want to finish a game with %100 achievement. Maybe i can try this with Katawa Shoujo. Thanks for guide!
Mamoru The Zombie 18 Dec, 2024 @ 3:32am 
I came all the way through Rin's and Act 1's routes searching everything I had missed... Turns out I never denied my affection towards Hanako in Shady Encounter scene.

21 achievements unlocked, thanks a lot!
Isaac Alves 30 Nov, 2024 @ 10:02am 
thanks for the work :spiffo::spiffo:
Reweekes 22 Nov, 2024 @ 8:51am 
Didn't get the 100% achievement even though I completed it :CryingGhost:
geekahedron  [author] 11 Nov, 2024 @ 6:26am 
It is possible to complete the game and view every scene to get the 100% completion achievement but still miss out on the "Bundle of Choices" achievement. There are a few scenes with selections that may not appear depending on previous choices.

Act 1 — Slow Recovery: If you choose "I sure was having fun" the second set of options will not appear.

Rin's Act 2 — In Her Own Image: This is a likely culprit. There are six possible options for this scene, but you only see three, corresponding to the choices in the earlier scenes in the same act.

Rin's Act 3 — Things You Hate: You may not see the "It doesn't matter" option depending on earlier choices.

My flowcharts guide may be a easy way to find each of those points in the game.

Otherwise, it's possible that there is a choice that you just missed. The steps above (particularly the ones in italics) are carefully written to make sure that you see and select every choice to get the Bundle of Choices.
Sosi Member 10 Nov, 2024 @ 4:25am 
Thanks a lot! I passed the game twice and didn't expect I could miss two options for the "Bundle of Choices" achievement :lunar2019piginablanket: