Tactical Breach Wizards

Tactical Breach Wizards

56 ratings
100% Complete Achievements
By Wurstinator
All Achievements and Confidence in post-game (WIP)
2
   
Award
Favorite
Favorited
Unfavorite
Foreword
Hey. This will be a guide for hopefully all achievements in the game. "Will be", because it's a work in progress. Sorry for that!

This guide is not supposed to be a walkthrough for the main story; instead, it will assume that you have already finished it and are in post-game now. That means all characters are unlocked and at max level.

Confidence goals will all be done on hard difficulty. Other achievements might be done on other difficulties.
Achievement List
Just a complete list of all achievements currently in the game with a short description of how to get them. Most are covered implicitly by finishing the main story or getting all Confidence.

The following achievements are obtained implicitly by finishing the main story:

The Break
Extraction
Resistance
Counterheist
Who Needs Therapy? (Jen, Still)
Back From A Dark Place
Shields Down
Hair Of The Dog
Stop Hitting Yourself

The following achievements are obtained by finishing all Confidence Goals:

Overseer
The Witchest
Doctorate
High Priest
Dogged
The Final Insult
The Broom Closet
Zero Day Delivery
One Turn Wonder
Confident
Own It
Back On The Streets
Improvised Window
Jaywalker
Wizards Don't Walk
Swiss Army Life
Thin Ice
Mushroom Cloud
Complete The Look
Rigged

The following achievements are obtained by finishing all Confidence Goals, I think, but I have to double check again because I'm not 100% sure:

Radical Planking
Off Leash
Window Cleaner
Letting You Shine
Movable Object


The following achievements are obtained by finishing the dream missions:

Realistic Dreams
Wildest Dreams
Heat Signature
Proven

The following achievements are additional challenges:

Force Feedback
Outside The Box
Look Both Ways
Unsanctioned Op
Tinker
Closed Loop
Tactical Exit
This Might Sting
Legless
God Speed
Six Shooter
Unstoppable Force
Revisionist History
Gunpoint
Get Em Both Ways
The Needlessly Hard Way
What Did I Miss?
Three for Three
Time Bomb
Lights Out
Back Yourself Up
Someone Go Get Her
It Takes A Village
Individual Achievement Guides (1)
Note: I obtained some of these achievements during my normal playthrough before writing the guide, so I cannot verify with certainty that these strategies work - let me know if they don't.

Force Feedback

Can be obtained easily on Mission 3-4: The B Team. Play Level 1 and pick Banks and Dall.
Use Transference with Banks from the topmost enemy to any other unit. Then lign up with that enemy from the opposite side of the room with Dall and charge at them. This will transfer 13 knockback.

Outside The Box

Not a difficult achievement, but annoying. You have to play the first mission ("The Asset") and in the final level, use 3 Bolt Burst with Zan to attack the hostage.

Warning!

You cannot replay the mission normally from your campaign screen. At this current moment, the only way to play "The Asset" is to start a new game or use Mission Select from the main menu, both of which override your campaign progress.
Hopefully this will be fixed in the future but currently, I would advise you to back up your entire save directory to restore it afterwards.

Comment by Muffin_Gaming (I didn't verify this myself):

Originally posted by Muffin_Gaming:
Simply select the mission from the Mission Select screen in the Main Menu.
The Mission Select screen lets you replay the game starting from any point, including the very first mission, this will reset your campaign progress back to the first mission though, to undo this, simply go back to Mission Select and start the game from the mission you were up to last.
If you have already beaten the game, select the last mission from the Mission Select screen and skip through both sections and the cutscenes. After the credits sequence, you'll be right where you left off before you went back to get the achievement in The Asset.

Look Both Ways

Can be obtained on Mission 2-6: The Pyromancer. Play Level 1 and pick a team including Banks. Her "Death's Floor" perk from the anxiety dream makes this achievement easy to obtain.
Use the two other characters than Banks to get rid of the Neutraliser enemy. Then set a Death's Door on the opposite wall of Steve Clark, next to a tile that is being targeted by his attack. Use Death's Floor to teleport Bori to that tile and move to the Foresee phase.

Tinker

Start any mission (like 2-1: Achievable Dreams) and open the menu to set the difficulty to "Custom". Finish the level.

Closed Loop

Easy to obtain on Mission 2-1: Achievable Dreams. Let Jen pick up the mana and use chain bolt on two enemies and finally on herself.

Tactical Exit

Can be obtained on lots of missions, for example Mission 2-1: Achievable Dreams. Run to the window to the left with Jen. Use Gale Grenade to push herself out.

This Might Sting

Can be obtained on Mission 2-3: The Necromedic. In Level 1, enter the room with Banks and the other character. Pick up the mana with Banks and use Resurrect on the other character.

Legless

Easy to obtain on Mission 1-2: Rushwater Reunion.
In Level 1, play with Jen and Banks. Give Banks the perks Lightheaded and Overreaction. Use Sedative Cocktail centered on some enemy and Transference to that enemy as well. The enemy should have 3 Unstable now and can be knocked back by Static Blast.

Alternatively, see the guide for "Unstoppably Force".

God Speed

Easy on Mission 3-1: Basic Training.
In Level 2, pick Jen. Broom Breach to the leftmost window and walk to the green zone. Static Blast the Air Canister next to you, Take Cover, and you're done.

Six Shooter

Can be done on Mission 3-2: Lockdown.
In Level 2, pick Banks with the "Big Head" perk. Walk up to the right reachable mana, pick it up and bouncing back from the top wall, you are able to hit six enemies at once.

Unstoppable Force

Can be obtained in Mission 3-4: The B Team, Level 5.
Breach the left door with Dall and the right door with Banks. For Banks, you want the perks Death's Floor, Lightheaded, and Overreaction. For Dall, you want the perk Momentum.
With Banks, collect the mana right in front of the door and use Death's Floor to teleport the Chapel Shepherd enemy to the top wall opposite of Dall. Use Sedative Cocktail and Transference to give him 3 Unstable. Charge them with Dall.

Revisionist History

Pick any level with a team size of at most 4, for example Level 1 of Mission 1-2. Use any members other than the default selection (the same character can be picked multiple times) and start.

Gunpoint

Mission 1-3: Out For Blood, Level 1.
Bring both characters into cover behind the low blocks right in front of the door and end the turn. A fourth tracker enemy will spawn. Now Take Cover with one character again and run forward with the other. They should be targeted by all four Tracker enemies now.

Get Em Both Ways

Can be obtained in Mission 2-5: Exit Strategy, Level 2.
Move Banks to the mana to the left and pick it up. From that position, you can hit the second from the left Heavy Gunner with a Spectral Skull two times (the third from the right will not work as the enemy needs to be at least one tile away from a wall). Roughly aim at the right end of the red door behind them.

The Needlessly Hard Way

Somewhat annoying but not too difficult on Easy difficulty.
The general plan is to use Dall's charge to deal massive damage and overcome the high armor of the Siege Cleric. The "Momentum" perk helps here. You also want all perks for Swap to make the positioning easier.

Your first step should be to close all Reinforcement Doors and get rid of all other enemies, just to make everything less stressful.

Then you want to bring the Siege Cleric on one of the long free hallways, marked by the red lines in the screenshot below.


Most likely, the Siege Cleric will not be compliant by themselves, as they tend to move towards tight corners. So letting Dall collect some mana and use Swap potentially multiple times in one turn is key here. Playing on Easy let's you mostly ignore the mines instead of heaving to defuse them first, which makes the task a bit less daunting.

Comment by James Vagabond: You can Transference from a Weapon Cache to the Siege Cleric, which makes the setup for a good Charge much easier.

What Did I Miss?

Can be completed together with "Someone Go Get Her" on Easy difficulty, so see that section of the guide.
Individual Achievement Guides (2)
Three for Three

Can be obtained on Mission 2-4: The Meet, Level 1.
Pick two Zans and Jen for your team. Give Zan all perks for Predictive Bolt and no other. Jen needs to have the "+1 Use Per Encounter" for Gale Grenade.
Start by positioning the three characters as in the screenshot below.


Place a False Prophet in front of the left Zan and right next to the window. Use a Gale Grenade to move enemy 4 (from the screenshot) up. Now both Zans can use their Predictive Bolt toward the top right.

Use Jen's Chain Bolt on: the False Prophet; enemy 1; the Air Canister next to enemy 3. This will trigger both Predictive Bolts and kill both enemy 1 and 3.

Finally, use Predictive Bolt again with the right Zan. Use the remaining Gale Grenade with Jen to knock enemy 2 into the line of fire.

Time Bomb

Easy to obtain in Mission 3-4: The B Team, Level 5.
Give Zan the Time Bomb perk and pick up the mana in front of the doors with him. Group the three other characters close together and use Time Boost with Zan to hit all three.

Back Yourself Up

Can be obtained in Mission 3-4: The B Team, Level 5.
This seems a bit janky to me, as the perk descriptions required don't quite match the reality.
Pick a team with Zan and give him "Supportive Fire", "Supportive Fire II", and "Hurtful Lie". Collect the mana and place a False Prophet next to the Chapel Shepherd enemy that does not block your line of fire.
Spawning the False Prophet should attack the enemy twice. Now use 3 Bolt Burst with the real Zan on that enemy. The False Prophet should attack it again too. This should trigger the achievement.

Someone Go Get Her

This can be done together with "What Did I Miss?" on Easy difficulty. I will not provide a turn-by-turn breakdown but rather a description of the general plan.

Pick Zan as your only character. You pretty much want all perks for 3 Bolt Burst and Predictive Bolt but none for False Prophet, especially not "Hurtful Lie". Round 1 is just about surviving. From Round 2 on, Jen will be there and you can kill one clone per turn with the two of them.

The general idea is: Move Zan to be in a line with Liv. Place a False Prophet between the two as close as possible to Liv. Use Predictive Bolt in the direction of the False Prophet and Liv. Now when Jen uses Static Bolt on Liv, she will swap with the False Prophet, causing the Predictive Bolt to trigger.

This will instantly kill the first and second clone. The third clone will survive with one HP. My preferred way of killing the final clone is to use Chain Bolt, although that might require some retries if the positioning is bad. If you Chain Bolt both Liv and her swap target (marked by the purple circle), she will be hit. Your goal is to deal one point of damage to her with the knockback.

Finally, to kill her real self. This has to be done by Banks and Dall. If you want to do the two achievements separately, you can simply use Transference on some enemy and Liv and use Dall to deal massive damage for "What Did I Miss", and in another attempt use the extra time you have to get better positioning and follow the strategy below.

The key to knock Liv's real self off the map is Transference. It transfers both Damage and Knockback (retaining direction), so you have to have some luck with the positioning of all enemies. Use Transference on either and enemy or one of your characters other than Dall and target Liv. Then use Dall's charge on the protectee to knock Liv off.

An example of my board is in the screenshot below. From there, I can use Dall's Swap with Banks to get in a position to charge a protected Zan and knock Liv off the map.


It Takes A Village

Check out the Confidence guide for the mission. This is basically covered by obtaining all five Confidence goals in one go. Considering the length of this mission, at least on hard difficulty, this shouldn't be much more of a challenge than doing the goals individually. So I will count this as "Mostly covered by the Confidence achievements".

Comment by JAG:

Originally posted by JAG:
you specifically need to clear all of the confidence goals within a single level playthrough (hit Liv with Chain Shock, etc.) and then complete the level. From what I've observed, other types of hits don't count, and the achievement doesn't get awarded until after the level completion.
Confidence Setup
Unless mentioned otherwise, this is the default perk setup for all characters that I use to perform these strategies:


That doesn't mean that this is an optimal setup - I actually believe the opposite, that there are certainly better specs. But at least for the main story Confidence Goals, they are usually easy enough that you have some leeway or they are super specific that you need an exact setup anyway.

That being said, at the current patch you unfortunately do not have unlimited respec points in the post-game and respeccing manually for each mission is annoying, so I'll say that these are probably the most important perks you should go for; the rest aren't that important and can probably be switched out:

Zan
  • 3 Bolt Burst: +1 Damage and Supportive Fire
  • False Prophet: all three

Jen
  • Static Blast: Point Blank and Refreshing Jolt
  • Gale Grenade: +1 use per encounter

Banks
  • Sedative Cocktail: Lightheaded

Dall
  • Charge: Momentum
  • Censer Slam: +2 Damage
  • Swap: Friendly Fire and Swap with Objects
  • Riot Block: Wall Mode

Rion
  • Impaling Vine: Frostfingers
  • Spore Bomb: +1 use per encounter and Intelligent
Confidence: Act I
Mission 1-1: The Asset

There are no Confidence Goals here.

Mission 1-2: Rushwater Reunion

There are no Confidence Goals here

Mission 1-3: Out For Blood

Level 1: Lobby

Zan: Finish with all team members at full health

Pretty basic, just don't get hit. You can take out the sharpshooter from behind the upper wall in the first room (where one of the tracker enemies starts at).

Jen: Defenestrate 2 hostiles with Gale Grenade

Not hard if you give Jen the "+1 Use" perk for Gale Grenade. Two enemies are right next to the window in the second room and can be hit from the spawn position of one of the tracker enemies.

Level 2: Pillars

Zan: Let a single teammeate perform 2 actions in one turn

Easy: Collect the mana with Zan and use Time Boost on Jen. The Refreshing Jolt perk helps here to actually find two targets for Static Bolt within the turn.

Jen: Deal with all enemies by the end of turn 1

The first Confidence Goal that is not entirely trivial.
You want to breach the lower door with Jen and the upper door with Zan.
Zan can collect the mana next to his door to knock out the topmost enemy (in cover) with False Prophet, then use 3 Bolt Burst to knock out the downmost enemy.
Jen can collect the mana in the small passage in front of her and knock out the last three enemies with a Chain Bolt.

Level 3: Corridors

Zan: Cause Predictive Bolt to fire before the Foresee phase

This is pretty much intended for this mission. Use Zan's 3 Bolt Burst on the sharpshooter enemy and then Predictive Bolt on the closed door. Use the laptop with Jen to open the door and the shot on the enforcer enemy will be triggered.

Jen: Defenestrate three hostiles in one turn

Becomes much easier if you use two Jens, especially with a few Gale Grenades. You can get this easily on round 1 because the upper Jen can hit most targets in the lower hallway from in front of the laptop.

Mission 1-4: The Traffic Warlock

Level 1: The Traffic Warlock

Zan: Finish with all team members at full health

Jen: Defenestrate Steve Clark, traffic warlock

Should be easy to do both at the same time.

Start the first turn by collecting the left mana with Zan and the right mana with Jen. Then, using the Refreshing Jolt perk, push Steve Clark backwards and move Jen out of the way of his attack.

At the start of the second turn, Steve Clark should move close enough to one of the open windows to be thrown out by Jen with Gale Grenades. From that point on, just use 3 Bolt Burst and Static Bolt to knock out the spawning enemies and seal the doors.
Confidence: Act II Mission 1-3
Mission 2-1: Achievable Dreams

Level 1: Warlock

Jen: Defenestrate 3 hostiles in one turn

Use Jen to collect the mana and use Chain Bolt on the Traffic Warlock and Grenadier enemies. Then hit the Air Canister, e.g. with a Gale Grenade.

Mission 2-2: The Blacksite

Level 1: Twin Turrets

Zan: Prevent 2 reinforcements in total

There is only one reinforcement door but it has a counter of 9, so all you need to do is seal that door within the first 7 turns. If you can beat the level at all, then you can get this Confidence Goal.

Jen: Finish by the end of turn 3

I don't think Jen is a good choice here because there are few windows. I like Rion but Dall is probably usable as well.

For turn 1, grab the mana and use False Prophet with the all perks. Rion's Impaling Vine takes care of the turret with the help of Supporting Fire. The Predictive Bolt should take care of the reinforcement.


Same strategy as before: Rion's Impaling Vine and False Prophet. Zan should still have enough mana from the False Prophet being killed before. Thanks to "Useful Fiction", the False Prophet can also seal the door.


Level 2: Mainframe

Zan: Finish with all team members at full health

Jen: Finish by the end of turn 2

Can easily be done together and you could probably finish within a single turn if the game didn't force you to wait.

In turn 1, collect the mana and send out the False Prophet with Zan. This knocks out the regular enemy.

In turn 2, Zan can move to the laptop and hack it, disabling the turret. You can then send out the False Prophet to seal the door and knock out the reinforced enemy to finish the mission.

Level 3: Heavy Duty

Zan: Cause Predictive Bolt to fire before the Foresee phase

Jen: Finish by the end of turn 3

Can be done together.

In turn 1, collect the mana with Zan to left and use a False Prophet to block the shot of the Heavy Gunner. Also set up a Predictive Bolt to shoot down the Heavy Gunner as soon as the False Prophet vanishes.

With Jen, breach the door to the right and Static Bolt the Tracer enemy into the Electric Wall. Then use the laptop to hack the turret. Finally, use Gale Grenade to push the False Prophet into a wall and deal one knockback damage to it. This will trigger the Predictive Bolt on the Heavy Gunner and finish Zan's goal.


In turn 2, let Zan move forward and summon a False Prophet in front of the reinforcement door. It will both take care of the new enemy and seal the door, finishing the mission.


Level 4: The Cell

Zan: Cause Predictive Bolt to fire before the Foresee phase

Jen: Finish by the end of turn 4

Can be done together.

On turn 1, you want to use 3 Bolt Burst to push the Tracker enemy into the Sharpshooter's overwatch. Then summon a False Prophet to take care of the Sharpshooter as well. Let Jen Static Bolt the turret for some extra damage too.


On turn 2, move Jen up to stand between Zan and the newly spawned enemy. Predictive Bolt towards Jen and use Refreshing Jolt to get Jen's move back. Then move her towards the lower sealed door and close it, also causing the Predictive Bolt to fire and Zan's goal to complete.


Continuing on turn 2, move Zan up and summon a False Prophet to both hack the turret and take care of the Heavy Gunner that just spawned.


On turn 3, just walk up with Zan and send another False Prophet to deal with the last enemy and seal the door.

Mission 2-3: The Necromedic

Level 1: Intro

Jen: Finish by the end of turn 3

Banks: Use Death's Door to eliminate 1 hostile

Can be done together.

The first turn is simple. Use Sedative Cocktail on the three enemies in front, centering on the Heavy Gunner. Put a Death's Door behind the Heavy Gunner and Static Blast them into it with Jen. Take cover with both characters and let the Sedated status take care of the other two.


In turn 2, you should be able to blow up the Explosive Canister next to the reinforcement door to knock out the newly spawned enemy. Then, you can Static Blast (+ Point Blank) Banks directly in front of the door and seal it.

Give Transference to Jen targeting the remaining Sharpshooter enemy and run straight for the laptop.

Level 2: Lead Medicine

Jen: Finish by the end of turn 2

You have to start turn 1 by running Jen into the mine, collecting the mana on the right with Banks, and resurrecting her. After that, you can defenestrate the Tracer enemy at the window with Sedative Cocktail.

Turn 2, you should be to use Static Blast and Sedative Cocktail to take care of the two enemies and run one of the two characters to use the laptop and the other to seal the door. Gale Grenades might be needed, depending on the positioning.

Level 3: Broom Breach

Jen: Finish by the end of turn 1

You have to seal two doors and disable three enemies in one turn. Banks will take care of both in the lower right room, Jen of all three in the upper left room.

Start by using Broom Breach to bring Jen in front of the laptop. Static Blast and a Gale Grenade will take care of the enemies and you can move Jen to seal the door.

For Banks, you want to move her to seal the door and use Transference to redirect the damage the Heavy Gunner will deal to her to themselves.

Banks: Use Death's Door to eliminate 1 hostile

Before using Broom Breach, use a Point Blank Static Blast to push the Heavy Gunner into a Death's Door. Then continue as above, using a Gale Grenade to remove the other two enemies. You won't be able to finish on turn 1, so two Tracker enemies will spawn, but Static Blast and Sedative Cocktail / Transference can take care of them.
Confidence: Act II Mission 4-5
Mission 2-4: The Meet

Level 1: Spectral Skull

Zan: Have the team use 5 different abilities in one turn

Jen: Finish by the end of turn 2

These two goals can be done together.

Zan by himself can already use 3 abilities with the mana at the start: False Prophet and 3 Bolt Burst take care of two enemies in the first room. Predictive Bolt on the False Prophet prepares to take care of another one.


You want to blow up the Air Canister with Banks to knock out the third enemy in the first room and push away the False Prophet and trigger the Predictive Bolt. Finally, Jen can Static Bolt the last Tracker into the Electric Wall.


For turn two, only the Heavy Gunner remains and a Zan with his clone should be able to take care of them easily.

Banks: Hit 3 enemies with a single Spectral Skull

An easy line to hit three enemies from the mana pickup tile can be seen in the screenshot below. Finishing the mission afterwards shouldn't be much more difficult than for the other two Confidence Goals.


Level 2: Officers

Jen: Deal with all enemies by the end of turn 1

Banks: Hit 3 enemies with a single Spectral Skull

Can be done together.

With Banks, you want to pick up the lower left mana from the lower left tile. From there, you can shoot a Spectral Skull to hit all three enemies.

Jen can take care of two others with two Gale Grenades and a Static Blast. Zan's 3 Bolt Burst does the final enemy.

Level 3: Reaching The Meet

Jen: Finish by the end of turn 2

Banks: Transfer 4 damage at once

Can be done together.

Jen can take care of the left Heavy Gunner with Death's Door from Banks, and also close the Reinforcement Door after.

Zan picks up the mana and sends his False Prophet right in front of the Heavy Gunner. A 3 Bolt Burst and Sedative Cocktail together with Supportive Fire take care of the two Officer enemies.

You want to use Transference with Banks on the target of the Heavy Gunner to the Heavy Gunner then, which takes care of Bank's goal in the Foresee phase. Finally, Zan wants to prepare a Predictive Bolt towards the doors.


Jen can almost solo turn 2. Broom Breach to the laptop to hack the turret. The Broom Breach again to the window between the two doors, Static Blast an enemy + Supportive Fire and close the right door. If the other enemy positioned right, you can knock them out with a Gale Grenade and the help of the Explosive Barrel too.

All that remains is Zan sealing the last door himself or sending a False Prophet to do so.

Mission 2-5: Exit Strategy

Level 1: Entry Strategy

Zan: Have the team use 5 different abilities in one turn

Jen: Finish by the end of turn 1

Can be done together.

Move Banks to the tile top-left of the left mana and move Zan to the lower-right of it.

Banks uses Sedative Cocktail on the two Tracker enemies and Transference on herself to the Heavy Gunner.

Zan picks up the mana and uses False Prophet on the tile next to him. The False Prophet will take care of one Tracker and a 3 Bolt Burst takes care of the other.

Finally, Jen deals with the Officer with a Point Blank Static Blast and then uses the laptop.


This will give you Zan's goal immediately and Jen's goal in the Foresee phase.

Level 2: Heavies

Zan: Let a single teammate perform 3 actions in one turn

Jen: Finish by the end of turn 4

Banks: Cause 6 extra total knockback by making enemies unsteady

Can all be done within one go.

Move all three characters into the room and have Zan collect the mana. A Sedative Cocktail plus a Gale Grenade can push two of the Heavy Gunners out the window. Static Blast + Supportive Fire removes the third and 3 Bolt Burst deals with the sharpshooter. Predictive Bolt on the left door to remove the next enemy.


Banks runs out of the dropped grenades, throws a Sedative Cocktail on the newly spawned Heavy Gunner (triggering Supportive Fire) and places a Death's Door behind the other one. Jen can Static Blast them into it and then seal the left door.

Zan runs up to the second mana and uses both Time Boosts on Banks who can then finish the Heavy Gunner with Sedative Cocktails. By this point, you should have both Zan's and Banks' goals.


A new Heavy Gunner spawns but can be taken down easily with 3 Bolt Burst, Sedative Cocktail, and Static Blast. If the positioning works out, you can actually have Jen seal the second door this turn. If it doesn't you can just repeat the same thing for turn 4.


Level 3: Neutralisers

Zan: Prevent 5 reinforcements in total

Jen: Finish by the end of turn 1

Banks: Transfer 4 damage at once

Can all be done at once.

Redeploy Zan two swap positions with Jen and Breach with Zan. Then Breach with Banks from the other door which makes the Neutraliser target her. Zan can then use 3 Bolt Burst to take care of the enemy.

Jen runs into the room, refreshes her move with Static Blast on the Heavy Gunner, and seals the left door.

Banks runs into the room and with the help of two Gale Grenades seals the other door. She then uses Transference on herself to the Heavy Gunner.

Level 4: Junction

Zan: Prevent 9 reinforcements in total

Jen: Defenestrate 2 hostiles in one turn

Can be done together.

Start turn 1 by moving Banks close to the first mana. Zan can then move into the room (not all the way) and 3 Bolt Burst the Neutraliser.

Move Jen next to one of the windows and Gale Grenade the Tracker enemy to move him next to their window, and another one to defenestrate them.

Jen can use Broom Breach to enter the same window the enemy just went out off and Static Blast the Heavy Gunner to achieve Jen's goal. Finally, she can use her refreshed move to close one of the doors and obtain Zan's goal.


I won't go into details on how to finish the level here, as you are not really left in a disadvantageous position by completing the goals. Zan's False Prophet and knocking Heavy Gunners around is an easy way to finish the level in one or two more turns.
Confidence: Act II Mission 6-7
Mission 2-6: The Pyromancer

Level 1: The Less Lethal Pyromancer

Zan: Have the team use 9 different abilities in one turn

Jen: Knock the Traffic Warlock into a Death's Door

Banks: Use Resurrect on a teammate (living or dead) who has no mana left

Can all be done together.

Redeploy Zan to switch with Jen and Breach the lower door with him. Jen runs into the room next to the window to have the Neutraliser target her. Zan can then 3 Bolt Burst the enemy and run to collect a mana.

Send out the False Prophet. This will both attack the Pyromancer two times and attract attacks from the Pyromancer and the Turret.

Move Banks into the room close to the laptop and place a Death's Door behind the Traffic Warlock.


Continue the turn by pushing the Traffic Warlock into the door with Jen's Static Blast. (Jen's goal)

Throw a Sedative Cocktail onto the Pyromancer followed by a Gale Grenade to knock them into something and deal more damage.

Use Jen's Broom Breach to transfer to the window next to Banks who can then use Resurrect on Jen. (Banks' goal)

Jen can then use her refreshed move to seal one of the doors.

Finally, use Transference on the False Prophet to the Pyromancer. This will award Zan's goal and knock out the Pyromancer in the Foresee phase.


What remains to be done is close the second door and get rid of all enemies. This can be done in one turn but since there is no time pressure you might also take your time if you want to. I won't go into detail here.

Mission 2-7: Anxiety Dream (Jen)

Level 1: Backdoor

Jen: Defenestrate 3 hostiles in one turn

Slightly annoying because you only start with two enemies (not counting the Turret).

Have "Real Jen" Broom Breach to the right laptop (that opens the security door) and use it. Static Blast the Stun Barrel into the Heavy Gunner to disable them for this turn, then move and seal the right door. Take Cover from the Turret.

Have "Also Jen" Broom Breach behind the Sniper and then Static Blast the Turret. Move in front of the laptop but don't hack it yet.


"Real Jen" can run up to the Heavy Gunner and defenestrate them. "Also Jen" can throw a Gale Grenade to defenestrate the Sniper and newly spawned Neutraliser, then hack the Turret.

The rest of the level is free.

Level 2: No Problem

Jen: Defenestrate at least 100% of the hostiles you take out

I believe this goal looks much harder than it actually is on the first glance.

I won't go into turn-by-turn detail because you'll need several turns and I am not sure whether the enemy moves are deterministic.

In general, you want to save Gale Grenade and Broom Breach for situations that you really cannot get out of, but most of the time it shouldn't be necessary. Jen has a larger move range than the Enforcer enemies, so with Refreshing Jolt you can outrun them. Note that you can run through enemies as well.

Consider the situation in the screenshot below. It might look like a tough spot but actually, the upper Jen can just move through all the enemies close to her like shown, then Static Blast to defenestrate one of them, then move again to the lower right hallway to get out of range.


In case it isn't obvious: If there is no Foresee phase, you are out of range of all enemies and can continue to the next turn. Otherwise, you can just Rewind to the start of the turn and try again.

Level 3: High Achiever

Jen: Finish by the end of turn 3

Rion works really nice here instead of Jen. (You'll still have "Also Jen").

Use Rabid Bite on the topmost Officer, then seal the left door. Impale Vine yourself towards the desk and Take Cover from the Turret.

Jen can Static Blast the closest Officer into a table, knocking them out, then proceed to Breach the left of the two doors.


In turn 2, start with Jen by using a Gale Grenade to push the newly spawned Officer closer to the others. Rion should be able to take out three with one Spore Bomb and another one with Impaling Vine.

Finally, let Jen run to the laptop and hack the Turret. It will take care of the last Officer, finishing the mission on turn 2.

Level 4: Another Steve

Jen: Make a Steven hit another Steven with Ghost Traffic

On turn 1, let both Jens run into the room. One Static Blasts the Tracker into the Sharpshooter shot, the other defenestrates the Sharpshooter with a Gale Grenade and refreshes her move on the Traffic Warlock. Both can then move further up towards the doors.


On turn 2, one Jen Static Blasts the newly spawned Enforcer and seals the left door. The other Jen Static Blasts something else (e.g. an Explosive Barrel) and activates the laptop. Probably, the Traffic Warlocks will position themselves right next to a wall so you cannot complete the goal yet.


On turn 3, the Traffic Warlocks hopefully stand in front of the desks at the top right. The Jen that hacked the laptop can seal the door, Static Blast the new Enforcer, and then run out of the Crush Hour hitbox. The other Jen simply Broom Breaches as close to the green zone as possible.

To achieve the Confidence goal, Gale Grenade one Traffic Warlock in front of the other, like shown in the screenshot:


On turn 4, just move to the finish line.
Confidence: Act III Mission 1
Mission 3-1: Basic Training

Level 1: On Board

Zan: Finish with all team members at full health

Banks: Hit 2 enemies with a single Spectral Skull

Can be done together.

Let Banks collect the mana. By bouncing of the lower right wall, you can hit both enemies and get her goal.


Zan can 3 Bolt Burst one enemy and Predictive Bolt onto the door for the next spawn. Take care of the remaining enemy with Transference.

On turn 2, Banks will be too far away to reach the Green Zone, so you'll just want to Predictive Bolt the door again and then finish on turn 3.

Level 2: Sappers

Jen: Finish by the end of turn 2

Just Broom Breach to the left-most window and run into the green zone. Gale Grenade the cleanser enemy to the side (they cancel their attack when moved), Take Cover, and you're done.

Level 3: The Shepherd

Zan: Finish with all team members at full health

Banks: Cause 3 total extra knockback by making enemies unstable

Can be done together.

Move Zan to stand between the Shepherd and Banks and collect the mana. Have Banks use Transference on Zan to the Shepherd and then throw a Sedative Cocktail onto the right Tracker enemy. This knocks out that Tracker and grant you Banks' goal.


You can now use a False Prophet on a tile right next to the remaining Tracker. The False Prophet shoots at the tracker which causes the Shepherd to fire on him. This in turn gives Zan back his mana and you can do the whole process again to knock out the Tracker.


3 Bolt Burst the Shepherd and Predctive Bolt the door.


The rest of the mission is free. In turn 2, 3, and 4, all you have to do is Predictive Bolt the door and end your turn.

Level 4: Terminal

Jen: Defenestrate 2 hostiles in one turn

Start with a Gale Grenade on the tile next to the Stun Barrel and the Shepherd. This will defenestrate one Tracker.

Move as close as possible to the other Tracker and Static Blast them. Then defenestrate both remaining enemies with a second Gale Grenade. Finish the turn by using the laptop.


Broom Breach to the left mana and pick it up. I encountered some randomness in the location of the two new Trackers but there should always be some Chain Bolt targeting which stuns both of them via the Stun Barrels.

When that's done, you just have to move Jen into the green zone.

Level 5: The Riot Priest

Zan: Finish with all team members conscious

Jen: Defenestrate 2 hostiles in one turn

Banks: Use Death's Door to eliminate 1 hostile

Can all be done together.

Zan's False Prophet abuse with the Shepherd is key of this strategy. Pick up the mana and do: False Prophet next to the Tracker. The False Prophet shoots the Tracker. The Shepherd shoots the False Prophet. Zan gets his mana back.

Repeat until both the first Tracker and the Riot Priest are down.


Now throw a Sedative Cocktail on the Shepherd. The direct damage plus the Explosive Barrel knock them out.

For the rest of the turn, I put Zan and Banks a bit further into the room for more mobility (but probably this isn't required). Then summon a final False Prophet which takes care of one Tracker and will take the shot of the other.


Turn 2 spawns Jen for you and this is also the turn where you want to get her goal. Gale Grenade the Tracker enemy out the window. Then Broom Breach down to the rest of the team and Static Blast the spawned Cleanser.


Turn 3 can be used to get Banks' goal. Just put a Death's Door somewhere (you can even place it on the respawn door) and have Jen knock the new Tracker into it. Let Zan Predictive Bolt on the door for the last enemy or just take care of them manually in turn 4.
Confidence: Act III Mission 2
Mission 3-2: Lockdown

Level 1: Downtown

Zan: Finish the level without letting any enemies attack

Jen: Finish by the end of turn 2

Banks: Hit 3 enemies with a single Spectral Skull

Perks: For this level, I used the Spectral Skull perks "+1 Damage" and "Big Head" instead of the Death's Door perks "Intercept" and "+1 Use".

Start by collecting the mana with Banks from the upper left. You can then hit and knock out all three enemies with a Spectral Skull.


With the rest of the team, just move closer to the doors and Predictive Bolt one of them.


On turn 2, one new enemy spawns. Static Blast, 3 Bolt Burst, and Sedative Cocktail easily take care of them and then you can seal both doors with Zan and Jen.

Level 2: Curfew

Jen: Defenestrate 2 hostiles in one turn
Banks: Hit 5 enemies with a single Spectral Skull
Dall: Have Dall deal a total of 10 knockback (cumulative)

Can all be done together.

Start by collecting the right mana with Banks and using a Spectral Skull to get Banks' confidence goal.


Next to get Jen's goal. "Defenestrate" in this mission means to knock the enemies into sinkholes. Push the Cleanser into their hole with a Gale Grenade and push the Tracker in front of the upper sinkhole with another Gale Grenade. Then Static Blast the Tracker into the hole.


With Zan, just 3 Bolt Burst one of the remaining Riot Priests and set up a Predictive Bolt one the enemy door.


On turn 2, you should be able to get Dall's goal right away by Charging across the room and knocking a Riot Priest into the hole.


What remains to be done is to finish the mission. Zan's False Prophet and Transference probably come in a clutch for turn 2 to not have any of your party members get hit. The general strategy is to defenestrate Riot Priests whenever possible and to not let anyone of your party get knocked out. Below is an example of my position at the end of turn 2.


Turn 3 is the same. You should be able to get rid of all or all but one enemy (which would then attack the False Prophet) here. For all following turns, you have enough firepower to knock out all spawned enemies immediately until you can close the door.


Level 3: Going To Ground

Zan: Prevent 5 reinforcements in total
Jen: Finish by the end of turn 2
Dall: Deal 5 slam damage with one Charge

Can all be done together.

Start by throwing Dall's Riot Block behind the right Shepherd and Charging into them, granting Dall's goal.

With Jen, run to the top left of the other Shepherd and Static Blast them into the wall, which knocks them out with Supportive Fire.

With Zan, you can then 3 Bolt Burst the Tracker to deal with the last enemy.


Zan then moves towards the left-most door and Predictive Bolts unto it. Banks just moves up forward.

Finally, Dall can perform some swap magic. She got a move refresh from her charge and a mana from the Shepherd counter attack, so she can move to the Riot Block, pick it up, throw it in front of the top right door, swap with it, and then seal the door.


Turn 2 should be free. Two new enemies Cleansers spawn, one of which is immediately dealt with by Zan's Predictive Bolt. Zan can then close that door and Jen can close the other. Use whatever remaining actions to knock out the final enemy.
Confidence: Act III Mission 3
Mission 3-3: The Recording

Level 1: The Golden Arms

Zan: Finish with all team members at full health
Jen: Deal with all enemies by the end of turn 1
Dall: Destroy 2 weapon caches

Can all be done together.

Jen's goal is straight-forward: you have four party member and four enemies. Banks can throw a Sedative Cocktail on the upper Absolver to knock them into the wall. Jen can Static Blast the lower Absolver into the wall. Dall can Charge the lower Tracker (also destroying a Weapon Cache in the process). Zan can 3 Bolt Burst the last Tracker, which unfortunately isn't enough, so you need a Gale Grenade them before to finish the goal.


Also target a Predictive Bolt with Zan towards the doors to take care of the upcoming Absolver right when it spawns.


In turn 2, Dall can just Charge into the Shepherd to instantly knock them out. Banks can destroy the second Weapon Cache with a Sedative Cocktail (granting Dall's goal) and the rest moves into position for the next turn.


On the third turn, if you used Predictive Bolt before, you have a single Riot Priest to deal with. Dall's Charge makes it easy.

Level 2: Protection Ring

Zan: Have the team use 9 different abilities in one turn
Jen: Defenestrate 2 hostiles in one turn
Banks: Hit 6 enemies with a single Spectral Skull

Can all be done together, although you might want to do it in separate attempts because it's not easy.

With Jen, run as far into the room as possible. With Banks, run up towards the upper mana and then Gale Grenade her to pick it up. Transference from Banks to the Shepherd. From there, you can get the 6 enemies with a Spectral Skull, but it's pixel-perfect aiming.


Run Zan into the room next to the mana and pick it up. Then use the Shepherd to perform a False Prophet loop: Send the False Prophet next to the Riot Priest. The False Prophet attacks the Riot Priest and is then killed by the counter attack from the Shepherd, giving Zan back his mana. Repeat until the Riot Priest drops. Repeat the same with the last Absolver and the Tracker next to them.


Send a False Prophet next to the Shepherd and then 3 Bolt Burst them to knock them out. A Gale Grenade from Jen should be able to defenestrate one Tracker and put the other in front of her to be Static Blasted, giving you Jen's goal.


To get Zan's goal, Jen can move to the window and Broom Breach anywhere. Banks sets a Death's door and Zan uses Predictive Bolt. (None of these are useful for the level, they just give the goal.)

After obtaining all goals on turn 1, the rest of the mission is just easy clearing out two enemies at a time for some turns.

The last turn, spawning two Riot Priests, is not trivial, but remember that there is still a mana left for False Prophet tanking, and that Riot Priests can easily be kited for a turn due to their low movement.

Level 3: The Dead Drop

Dall: Destroy at least 4 Weapon Caches by the end of turn 1

This goal is somewhat arbitrary. Pick up the mana in front of Dall and Swap with the top left Riot Priest. Censer Slam one of the Weapon Caches and that's it.

On turn 2, use Charge on the Weapon Cache by the window close to the mana, then move to the mana and pick it up. Swap with the Tracker at the laptop. On turn 3 you just finish the mission.

Level 4: The Stand

Zan: Survive 7 turns
Jen: Survive 7 turns
Banks: Survive 7 turns
Dall: Survive 7 turns

One of the more difficult missions, especially if you are looking to get all goals in one attempt. I won't provide a detailed turn-by-turn guide as the small changes due to randomness in earlier turns can mean that the last turns are vastly different.

In general, your tactic is to get rid of at least four and at best all of the five enemies that spawn every turn. This is of course made difficult by you having only four actions each turn. Consider the following tips:

  • Absolvers need a line of sight to protect their target, so standing in front of them renders them useless for a turn.
  • Cleansers cancel their attack when moved.
  • False Prophet and Predictive Bolt are your greatest friends here. The Sedated status from Banks' Sedative Cocktail can help with triggering Persistent Delusion and still dealing with all enemies.
  • For the most part, I kept the standard setup of having Zan, Jen, and Banks at the top and Dall at the bottom, but it might be useful to just Swap Dall to the top room as well, when she gets overwhelmed toward the end.
  • Shepherds should be your highest priority target, followed by Trackers. You probably won't be able to knock out a Riot Priest on their first turn, so using False Prophet or their low move range to prevent damage to your team is essential.
Confidence: Act III Mission 4 (part 1)
Mission 3-4: The B Team

Level 1: Heavy Backup

Zan: Prevent 4 reinforcements in total
Dall: Destroy 3 Weapon Caches

Start with Dall. Move her so that she lines up with the topmost Tracker enemy and Charge at them. This will cause a counter by the Shepherd and grant Dall one mana. Then move Zan up to the laptop and use it (this is important to have the right Tracker target Zan instead of Dall).


Swap Dall with the Absolver, which will cause the Tracker to shoot at the Absolver followed by the Shepherd shooting at the Tracker. Finally, 3 Bolt Burst the remaining Tracker. Before ending the turn you can Predictive Bolt as well but there is a good chance it won't trigger.


Turn 2 depends on the AI of both your allies and the enemies but there is a good chance you won't have to do anything here to knock out all enemies. Just seal the left of the two doors with Zan and shoot a Weapon Cache. Destroy another Weapon Cache with Dall.


Dall should be able to reach the second door with a Charge and seal it. Zan should be able to 3 Bolt Burst another Weapon Cache (or it might not even be needed if your allies destroyed one last turn, like in my case).

Level 2: Tipping Point

Jen: Have Jen deal a total of 12 knockback (cumulative)
Banks: Transfer 3 damage at once

With Banks, use the laptop to open the door. Then Transference from the Heavy Gunner to the Tracker behind the door that cannot attack this round. This will refund your use afterwards but still grant you Bank's goal at the end of this turn. Place a Death's Door behind the rightmost Riot Priest.

With Jen, collect the mana and Static Blast the Riot Priest into your Death's Door.


On turn 2, Sedative Cocktail the newly spawned enemy Tracker. Then move Jen up to Chain Bolt that Tracker, your own allied Tracker to the left, and the Absolver.


This will knock out both enemies. The attacks from all your allies deal with the Riot Priest.

On turn 3, Sedative Cocktail the Shepherd and Static Blast him from close range with Jen. That will knock them out and grant you Jen's goal. Again, your allies will deal with the remaining enemies for this turn before they can attack.


Turn 4 (and 5 if you need it) should be trivial. You should have three active allies and a Transference charge to deal with a Tracker and a Riot Priest.

Level 3: Firewall

Zan: Prevent 10 reinforcements in total
Dall: Have enemies collide with your Riot Block 2 times

Collect the left mana with Zan and 3 Bolt Burst the Absolver. Send a False Prophet to the two Trackers to knock one out (with Supportive Fire) and tank the other. With Dall, throw the Riot Block behind the Riot Priest and Charge them into it.

With Bori, throw a Mildfire in front of the rightmost door; you want to throw it no in the tile directly in front of the door but one further, so that 5 tiles are affected by Mildfire, not just 4. Then you can Draw Fire from all but the one directly in front of the door.


On turn 2, start with Zan and 3 Bolt Burst the Absolver. Then use False Prophet again to knock out the spawned Cleanser and tank the Tracker from last turn; you might have to move Zan for this. Dall picks up her Riot Block and Censer Slams the spawned Tracker. Bori can Mildfire the top-left door to seal it. You actually want to move him in front of your allied Tracker to block their line of sight and let the enemy Tracker kill your False Prophet.


On turn 3, the Riot Priest on the top right hopefully did not run into a corner, so you now can knock him into a Riot Block and grant you Dall's goal. Incinerate them with Bori with 5 mana for a knock out. Also close the left remaining door with Wildfire and move out of the way of your own Tracker. With Zan, 3 Bolt Burst one of the two remaining enemy Trackers.


On turn 4, deal with the spawned enemy and Wildfire the last door.

Level 4: Caught In Traffic

Jen: Finish by the end of turn 4
Banks: Transfer 3 damage at once

With Jen, run to the first door and seal it. Static Blast the Shepherd and move towards one of the windows.

With Banks, run up into the room downward and Sedative Cocktail the Shepherd. Transference from Banks to the Tracker that's targeting her, which will grant you her goal at the end of the turn.


With Jen, seal the second door and Static Blast the Shepherd for a move refresh. Then move her to the crevice next to the mana.

With Banks, Sedative Cocktail the spawned Tracker to knock them out. If that by itself isn't enough due to randomness, help out with Gale Grenades.


On turn 3, collect the mana with Jen. The Riot Priest should have run towards Jen on their turn and it should be possible to knock them into a wall with a Chain Bolt on the Cleanser -> Banks -> Riot Priest. Place a Death's Door on that wall and defenestrate the Riot Priest.


Seal the last door with Jen and let Steve finish the job.
Confidence: Act III Mission 4 (part 2)
Level 5: The Armoury

Zan: Finish with all team members conscious
Jen: Deal with all enemies by the end of turn 5
Banks: Resurrect an unconscious hostile
Dall: Destroy at least 9 more Weapon Caches by the end of turn 1

If there is an easier way that I am not aware of, let me know in the comments, but as far as I can tell, this is one of the hardest Confidence missions in the game, especially if you want to do all at once. You can make your life much easier by doing Dall's goal by itself and then "Skip Level" from the menu, which should still grant it, and do the other three on a separate attempt.

Start with Dall. Collect the mana close to the door and throw a Riot Block between Zan and the Shepherd. Swap with the topmost Weapon Cache (from the room with a closed Security Door and no windows). Charge into the other Weapon Cache to destroy 2 of them.

Next, Jen. Move to the window to the left and Broom Breach into the lower right room. Static Blast the Explosive Barrel, move back to the window after the knockback, and Broom Breach into the last room with a security door. Use two Gale Grenades to destroy the 4 Weapon Caches and be careful not to defenestrate yourself.


Raise Dall's Riot Block and Predictive Bolt onto it with Zan. Lower it again to trigger the Predictive Bolt and give Zan one mana. Move Zan to the left in front of the window and 3 Bolt Burst the last Weapon Cache to get Dall's goal. Send out a False Prophet to the top right to have it attack the left of the two enemy Trackers, then trigger Zan's Supportive Fire and the Shepherd's counter, refunding Zan's mana.

Finally, Banks. Move into the room and Transference from Banks to Dall; this will give Dall back her mana to get out of the locked room. Sedative Cocktail the remaining enemy Tracker.


Turn 2 starts like so (or similar):


Dall swaps with the newly spawned Absolver in the laptop room and uses the middle laptop to let Jen out. She then Charges to the upper laptop (but do not use it yet).

With Zan, you can know do the False Prophet + Shepherd abuse to knock out both Riot Priests. Send a False Prophet close to a Riot Priest. It will shoot on the enemy which causes the Shepherd to counter and thus refunds the mana. Repeat until desired result.


Move Banks closer to the last mana and use Sedative Cocktail and Static Blast to knock out the Shepherd.

Now you can finally use the laptop with Dall to open the door with the Absolver behind it and 3 Bolt Burst them. This grants Jen's goal.


On turn 3, Dall Censer Slams the newly spawned enemy in her room into a wall. Banks picks up the mana and Sedative Cocktails the Cleanser. Jen and Zan just deal as much damage as possible to the Riot Priest and either stun it or spawn another False Prophet to tank it.


On turn 4, 3 Bolt Burst the newly spawned Absolver and Resurrect it with Banks (Banks' goal). You could choose a more dangerous enemy, like a Riot Priest, if you want to and try to use them to your advantage, but I'd recommend this strategy.

Deal with the remaining enemies. Only a Riot Priest should survive at the end of turn 4, if anyone at all.


On turn 5, all you need to do is not have anyone be knocked out. A Shepherd spawned, so you can use the False Prophet abuse again if you want to to knock out all enemies except for them.
Confidence: Act III Mission 5-8
Mission 3-5: The Siege Cleric

Level 1: The Siege Cleric

Zan: Prevent 10 reinforcements in total
Jen: Finish by the end of turn 2
Dall: Have Dall deal a total of 10 knockback (cumulative)

Start by Redeploying and swap the positions of Zan and Dall.

Move Dall into the room to line up with the Riot Priest. Throw a Riot Block behind them and Charge for 9 knockback and instant knock out.

Have Zan seal the leftmost door and 3 Bolt Burst the Tracker next to him. Static Blast that Tracker as well and move Jen as close to the left windows as possible.

On the other side of the room, pick up the mana with Banks and Resurrect Rion. Transference from Rion to the Tracker enemy and move Rion toward the lower door.

At this point, all enemies except for the Siege Cleric should be knocked out. Use Brittling Dart and then Impaling Vine on the Siege Cleric for big damage. Also throw in a Sedative Cocktail.


Start with a Spore Bomb on the Siege Cleric and the newly spawned Tracker to knock them out. Seal the bottom-most door.

Gale Grenade the Absolver into your Riot Block or the walls to knock them out too. Have Zan move to the mana to the left and Jen next to a window and fire both 3 Bolt Burst and Static Blast on the Shepherd to knock them out as well.


The last thing to do is to Charge Dall into your Riot Block. This will do 1 knockback and grant Dall's goal.

You can now close the remaining doors with Zan (False Prophet), Dall, and Jen (Broom Breach).


Level 2: The Other Three Siege Clerics

Banks: Use Resurrect on a teammate (living or dead) who has no mana left
Rion: Cause a total of 9 bonus damage with Brittle (cumulative)

I replayed this mission several times and always got somewhat different results in enemy positioning, so there is a good chance you won't be able to follow this guide step-by-step. The general strategy still holds up though, I hope.

You might want to disable Zan's Supportive Fire perk for this level as it can actually be counterproductive to the Brittle effect. (I forgot to do that for my playthrough in the screenshots, so I had to use some awkward positioning instead sometimes.)

Start with Jen collecting the mana between the two breach doors and Static Blast the Cleanser to the right next to the Broadcast Server. Gale Grenade the Tracker into the Proximity Missile.

With Banks, move to the mana right next to the door and Sedative Cocktail the other Cleanser.

With Rion, collect the left-most mana and Steal Mana from Jen. Do an Impaling Vine and two Brittling Darts on the left Siege Cleric.

With Dall, Censer Slam the left Siege Cleric.

With Zan, walk into the room and get Resurrected by Banks (Banks' goal).


Starting position of turn 2:


Start with Rion to collect the left-most mana and using Impaling Vine and Brittling Dart on the full-health Siege Cleric closer to Rion. Throw a Spore Bomb on the two Siege Clerics next to each other to knock one out and strip the other of their armor.

With Banks, collect the right-most mana and throw a Sedative Cocktail on the damaged Siege Cleric.

With Dall, Censer Slam that Siege Cleric (to the right, so no Broadcast Servers are hit by their attack).

With Jen and Zan, collect the next mana close to them.


Starting position of turn 3:


Use Impaling Vine on the right Siege Cleric, then Transference from Rion to them. Run to collect another mana while triggering a Proximity Mine with Rion, also granting his goal. Steal another mana from Jen or Zan and put two Brittling Darts on the other Siege Cleric.

Move Jen and Zan close to the Siege Clerics and summon as many False Prophets as possible as well. The goal is to get a huge Spore Bomb. In my case, I was able to fit 7 units in the 3x3 space.


If this doesn't knock out both Siege Clerics, help out with Dall's Censer Slam.

Mission 3-6: Setting Jodasa Straight

Has no Confidence goals.

Mission 3-7: Kennedy Calls

Level 1: Tick Tock

Jen: Finish by the end of turn 2
Banks: Transfer 2 damage at once
Dall: Let no one on your side take damage except Dall

Run Rion and Banks into the safe room as far left as possible. Move Jen in front of the safe door.

Transference from Dall to Liv. This will trigger Liv's reaction and grant Banks' goal.

Line up Dall with the door. This triggers Liv's last reaction.


Static Blast the Tracker and use the move refresh to move into the green zone. Finally, Charge into the room with Dall.

Mission 3-8: Cornered

Level 1: Liv And Let Die

Has no Confidence goals.
Confidence: Act III Mission 9
Mission 3-9: Death's Door

Level 1: The Body

Has no Confidence goals.

Level 2: Passing On

Has no Confidence goals.

Level 3: The Kill Zone

Banks: Transfer 4 damage at once

Use Transference on a Banks and any enemy. Run into an Overwatch line of a Sniper with that Banks.

Level 4: Circle Of Death

Banks: Cause 3 total extra knockback by making enemies Unsteady
Dall: Have Dall deal a total of 4 knockback (cumulative)
Rion: Defenestate 1 hostile with pull

Start by throwing a Sedative Cocktail on the Heavy Gunner with the real Banks followed by another with the other Banks, which defenestrates the enemy. Then pick up a mana each with both Bankses and Resurrect Jen and Rion.

With Rion, move two tiles to the right and Impaling Vine the Tracker to defenestrate them and get Rion's goal.


Static Blast the last Tracker to defenestrate them.

On turn 2, move the one Banks next to Dall, Resurrect her, and throw a Sedative Cocktail on the spawned Tracker close by. Charge that Tracker with Dall to obtain both Dall's and Banks' goals.

Impaling Vine the Neutraliser and Sedative Cocktail the other Tracker to defenestrate them. Static Blast the Heavy Gunner for another defenestration.


Turn 3 is pretty straight forward. You have five characters (six, if you want to Resurrect Zan) to deal with a Neutraliser, a Tracker, and two Heavy Gunners.

Level 5: Resurrection Race

Banks: Use Death's Door to eliminate 4 hostiles

With the real Banks, collect the left mana, and with the other Banks, collect the right mana. From the right position, place a Death's Door behind the nearest Tracker and Sedative Cocktail them into it.


On turn 2, move the real Banks next to the lower unconscious Banks clone, and the other Banks clone next to the mana to the lower right. Resurrect the Banks clone.

With the Banks clone, place a Death's Door on the top-most left wall, right next to a Tracker. With the real Banks, place a Death's Door on the wall to the lower right of the Heavy Gunner.


Throw a Sedative Cocktail on the Air Canister to the right (-> Heavy Gunner into Death's Door), another on the Tracker next to the Death's Door, and a last one on the low health Medic. Finally, Transference from the Banks that is being targeted by the Tracker to the full health Medic.


Starting position of turn 3 can be very RNG dependent:


In this case, I threw a Sedative Cocktail with real Banks on the upper Heavy Gunner and placed the last Death's Door behind them. Another Sedative Cocktail knocks them into it, completing Banks' goal.

The rest of the mission is just dealing with the remaining enemies in any way (probably lots of Sedative Cocktails).

Confidence: Act IV Mission 1 (part 1)
Mission 4-1: Advanced Training

Level 1: Gangway

Jen: Defenestrate an enemy immediately after using Broom Breach
Rion: Deal 12 total damage with one Spore Bomb

Move Jen to a window and Broom Breach to the left-most window on the other train. Static Blast the Tracker enemy on the opposite side for Jen's goal.

Move Jen in between the two Heavy Gunners and Gale Grenade the remaining Tracker enemy closer to you. Throw a Spore Bomb hitting everyone and granting Rion's goal.


Level 2: Barrier Drones

Jen: Deal with all enemies by the end of turn 1
Rion: Deal 12 total damage with one Spore Bomb

Throw two Gale Grenades: one next to the right-most Tracker enemy pushing them towards your party, and a second one to defenestrate the Medic. Run Jen in the middle of the three remaining enemies and throw a Spore Bomb on her.


The rest of the mission requires you do knock out all enemies. It's just three Heavy Gunners and a Tracker with lots of cover, so there should be no trouble.

Level 3: Chasers

Banks: Transfer 4 damage at once
Rion: Have a Rabid enemy deal 6 total damage to other enemies

Use Rabid Bite on the Heavy Gunner. Change Form again and Impaling Vine the right Turret and throw a Spore Bomb on it to destroy it and knock out the two Tracker enemies. Move Rion further towards the door.

Move Jen towards the door as well. With Banks, use Transference from Jen to your allied Tracker and throw a Sedative Cocktail on the Heavy Gunner. Ending the turn will grant you both confidence goals.


On turn 2, Impaling Vine the Chaser and Static Blast the Heavy Gunner. Sedative Cocktail the Tracker and get everyone into cover until the Sedated effect takes care of them.


From here, it's just a normal playthrough of the mission. Rion can always one-shot the Chasers with Impaling Vine from the right position and Banks and Jen are sufficient to deal with the other enemy.

Level 4: Sabotage

Zan: Help Moss plant the bomb by end of turn 1
Dall: Deal 5 slam damage with one Charge

Collect the mana with Zan and send a False Prophet to the lower laptop. Move to collect the other mana on the top train and 3 Bolt Burst the Tracker.

Move Dall to collect the other mana on the lower train and Charge towards another mana on the top train. Swap with Moss. This will grant you Zan's goal.


On turn 2, 3 Bolt Burst the spawned Tracker and move Zan on the laptop tile. Predictive Bolt towards Moss.

Move Dall one tile towards the crates. Now, after taking four actions, the Chaser should line up with her and you can Charge them to get Dall's goal.


On turn 3, summon a False Prophet in front of Zan to knock out the Chaser. Move back towards the Medic and 3 Bolt Burst the spawned Tracker to knock them out (this assumes they moved next to a wall). Predictive Bolt towards the upper door.

With Dall, Swap with Zan and Censer Slam the Medic.


On turn 4, two Chasers spawn but one is hit by Zan's Predictive Bolt, so there is only one to take care of.
Confidence: Act IV Mission 1 (part 2)
Level 5: Countdown

I see no way of doing both confidence goals at once here. Let me know if you do.

Jen: Defenestrate 10 hostiles by the end of turn 3

Pick a second Jen instead of Dall.

With the Jen at the lower right, start with two Gale Grenades to knock the Barrier Drone Operator off the train. Then Static Blast the lower Heavy Gunner from close range for another defenestration.

With the upper Jen, use one Gale Grenade to knock off the left Tracker enemy, then Static Blast the other off the train and collect the mana.

With Rion, use the laptop and Impaling Vine the last Heavy Gunner.

With Zan, Predictive Bolt on the door next to him.


On turn 2, move the lower Jen 3 tiles away from her door and Tracker as you can. Then move the upper Jen to the left, next to the steel bars. The Chaser should move next to her so a Static Blast defenestrates them.

Move Rion away one tile from the Neutraliser and Banks at least two tiles, so that Rion is being targeted. After this, the lower Jen should be close enough to the Chaser so that she can defenestrate them with a Static Blast.

Finish the turn by defenestrating the remaining Neutraliser with Sedative Cocktail into a Death's Door, and setting up Zan's predictive Bolt on the door again.


On turn 3, move Rion to the other train and Impaling Vine the Chaser into the gap between the trains. If the positioning didn't work out, also move Banks before the Vine.

Move the upper Jen next to the Heavy Gunner and Static Blast them off the train. If you're really unlucky with the positioning, you might need to help out with a Sedative Cocktail and Gale Grenade first.

This grants Jen's goal.


What remains to be done is to move all characters to the lower train. The Jens can use Broom Breach and Rion can Rabid Bite unto Banks.

Dall: Have Dall deal a total of 30 knockback (cumulative)

With the default setup, this is pretty difficult to get, so I replaced Banks, Jen, and Zan all with a Dall.

With the right Dall, move around the create she spawns at. Throw a Riot Block behind the upper Heavy Gunner and Charge into them.

With Rion, use the laptop to open the door. Then with the left Dall (the one next to Rion) do a max range Charge on the right Tracker.

With the upper Dall, Censer Slam the remaining Tracker.


On turn 2, one of the upper Dalls should line up with the newly spawned Chaser and can immediately take them out with a Charge. The other Dall next to her can deal with the Neutraliser targeting Rion with another Charge.

If everything went well, you should reach Dall's goal already here. But there will be some more knockback in case the positioning didn't work out perfectly.

With the right Dall, Censer Slam the Heavy Gunner who should have the Barrier Drone on them. This opens up the path for Rion to move to the lower-right mana and Impaling Vine the Chaser for a defenestration.


Finally, Censer Slam the remaining Neutraliser with the lower Dall and move her as close to Rion as possible.


On turn 3, move the lower Dall next to Rion and Charge the spawned Chaser to knock them out. This will cause the other Chaser to get a hit off on the left Dall but that's fine. Take revenge by Censer Slamming them.

All that's left to be done is to get everyone on the lower train. The upper Dall can simply move and Charge her way across.

For the remaining Dall on the upper train, grab the mana and Swap with Rion. Rion should then be able to Rabid Bite one of the Dalls.

The Heavy Gunners might take out one or two of the characters but the mission can still be completed.

Confidence: Act IV Mission 2
Mission 4-1: Anxiety Dream Dall

Level 1: Blind Faith

Dall: Finish by the end of turn 1

Dream Dall does most of the action here. Start by collecting both manas.

Swap with the Tracker to the left and use the laptop. Then Charge the Riot Priest twice.


Swap with the Riot Priest in the Green Zone and Charge the Absolver. Charge back into the Green Zone and place a Riot Block on the tile to the bottom left.


Finally, with the real Dall, move around the corner and charge into the Riot Block.

Level 2: The Hotspot

Dall: Cause an enemy to shoot the person you swapped with

Start with Dream Dall and pick up the mana and Swap with the Riot Priest. Use the laptop.

With real Dall, Charge at the Weapon Cache. Then throw a Riot Block on the second laptop tile and Swap Dream Dall with the Riot Block. Pick up the mana, use the second laptop, and end the turn.


On turn 2, just pick up the mana with the real Dall.

On turn 3, the real Dall should now be targeted by two Trackers.


Swap the real Dall with the upper of the two and obtain Dall's goal. Then Charge her into the Green Zone.

Throw Dream Dall's Riot Block as close to the Green Zone as possible, Swap with it, and move in to the Green Zone to finish the mission.

Level 3: Tunnel Rats

Dall: Inflict 6 total damange from enemies hitting your Riot Block

TODO

Level 4: Unstoppable Force

Dall: Don't seal any doors before the end of turn 3

I recommend picking Rion instead of Dall here.

Collect the lower mana with Rion and Impaling Vine the Siege Cleric. Position Dall in a line with the Siege Cleric in front of the door and Charge them two times followed by a Censer Slam.

TODO

...
Confidence: Act IV Mission 3
Mission 4-3: Fort Osprey

Level 1: Empty Coffins

Zan: TODO
Jen: TODO
Banks: TODO
Dall: TODO
Rion: TODO

Level 2: Cold Storage

Zan: TODO
Jen: TODO
Banks: TODO
Dall: TODO
Rion: TODO

Level 3: Shield Generators

Zan: TODO
Jen: TODO
Banks: TODO
Dall: TODO
Rion: TODO

Level 4: Fortified

Zan: TODO
Jen: TODO
Banks: TODO
Dall: TODO
Rion: TODO
Confidence: Act IV Mission 4
Mission 4-1: Anxiety Dream Rion

Level 1: The Pit

Zan:
Jen:
Banks:
Dall:
Rion:

Level 2: Arguably, You Let The Dogs Out

Zan: TODO
Jen: TODO
Banks: TODO
Dall: TODO
Rion: TODO

Level 3: Anger Management

Zan: TODO
Jen: TODO
Banks: TODO
Dall: TODO
Rion: TODO
Confidence: Act IV Mission 5
Mission 4-5: Villa Medil

Level 1: Split Focus

Zan: TODO
Jen: TODO
Banks: TODO
Dall: TODO
Rion: TODO

Level 2: Locked Out

Zan: TODO
Jen: TODO
Banks: TODO
Dall: TODO
Rion: TODO

Level 3: Desk Job

Zan: TODO
Jen: TODO
Banks: TODO
Dall: TODO
Rion: TODO

Level 4: Time Pressure

Zan: TODO
Jen: TODO
Banks: TODO
Dall: TODO
Rion: TODO

Level 5: The Stone Table

Zan: TODO
Jen: TODO
Banks: TODO
Dall: TODO
Rion: TODO
Confidence: Act IV Mission 6
Mission 4-1: Anxiety Dream Zan

Level 1: Unsupportive Fire

Zan: TODO
Jen: TODO
Banks: TODO
Dall: TODO
Rion: TODO

Level 2: Beam Flower

Zan: TODO
Jen: TODO
Banks: TODO
Dall: TODO
Rion: TODO

Level 3: Mind Maze

Zan: TODO
Jen: TODO
Banks: TODO
Dall: TODO
Rion: TODO

Level 4: Bad Zan

Zan: TODO
Jen: TODO
Banks: TODO
Dall: TODO
Rion: TODO
Confidence: Act IV Mission 7
Mission 4-1: Counterheist The Vault

Level 1: The Gold Vault

Zan: TODO
Jen: TODO
Banks: TODO
Dall: TODO
Rion: TODO

Level 2: The Drop

Zan: TODO
Jen: TODO
Banks: TODO
Dall: TODO
Rion: TODO
Confidence: Act IV Mission 8
Mission 4-8: Counterheist The Mines

Level 1: Dust To Dust

Zan: TODO
Jen: TODO
Banks: TODO
Dall: TODO
Rion: TODO

Level 2: The Motherlode

Zan: TODO
Jen: TODO
Banks: TODO
Dall: TODO
Rion: TODO
Confidence: Act IV Mission 9
Mission 4-9: Counterheist The Roof

Level 1: Vesker's Landing

Zan: TODO
Jen: TODO
Banks: TODO
Dall: TODO
Rion: TODO

Level 2: The Black Ops Chronomancer

Zan: TODO
Jen: TODO
Banks: TODO
Dall: TODO
Rion: TODO
Confidence: Dream Training
I haven't finished this part yet, sorry :)
If you want to help by contributing, I'd be glad to add it!
Proving Grounds
I haven't finished this part yet, sorry :)
If you want to help by contributing, I'd be glad to add it!
55 Comments
TheRangerMarksman 25 Jun @ 6:19pm 
Nevermind, im an idiot.

For the last proving ground just start with banks and revive all the other teammates... For some reason i attempted to only use JUST Zan and didn't notice the team dead on the floor.
TheRangerMarksman 25 Jun @ 6:03pm 
Any updates on Proving Grounds? im having a really tough time with the final mission
Maj. Crimes 15 Apr @ 6:29am 
Thanks for the guide. "Movable Object" is not automatically obtained through confidence goals though.
Vaizox 10 Apr @ 7:28pm 
Hi, for your information, I had a serious problem with Bad Zan and the confidence goal there (I play on hard), but as it turns out, swapping Jen with Banks turns this ballbuster of a mission into a cakewalk.
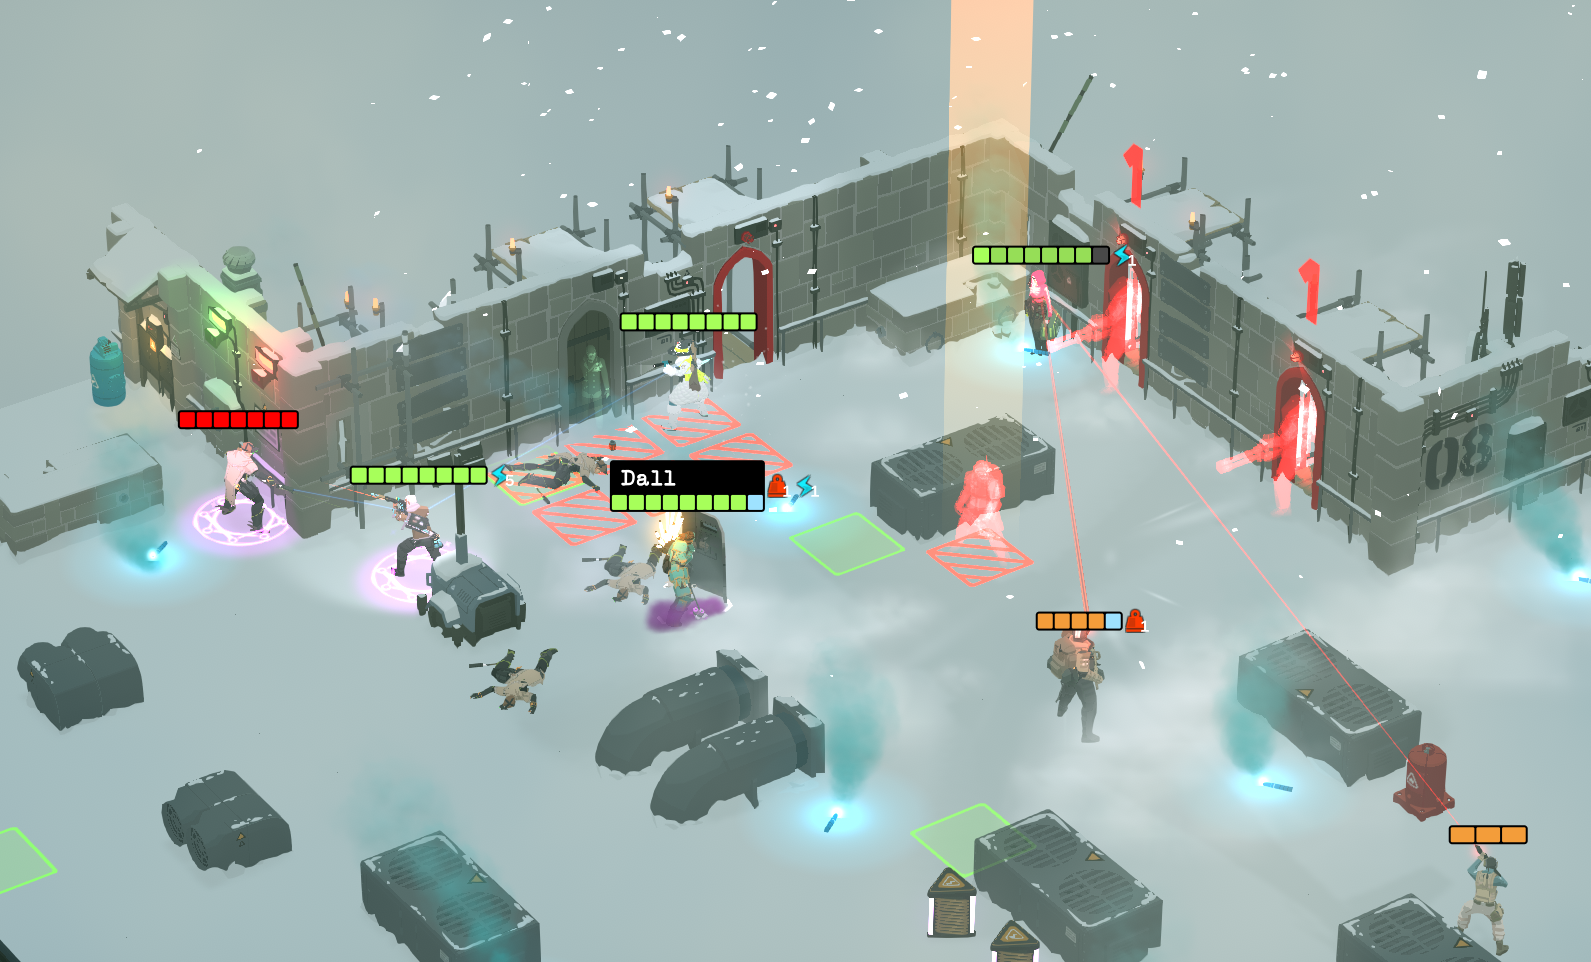
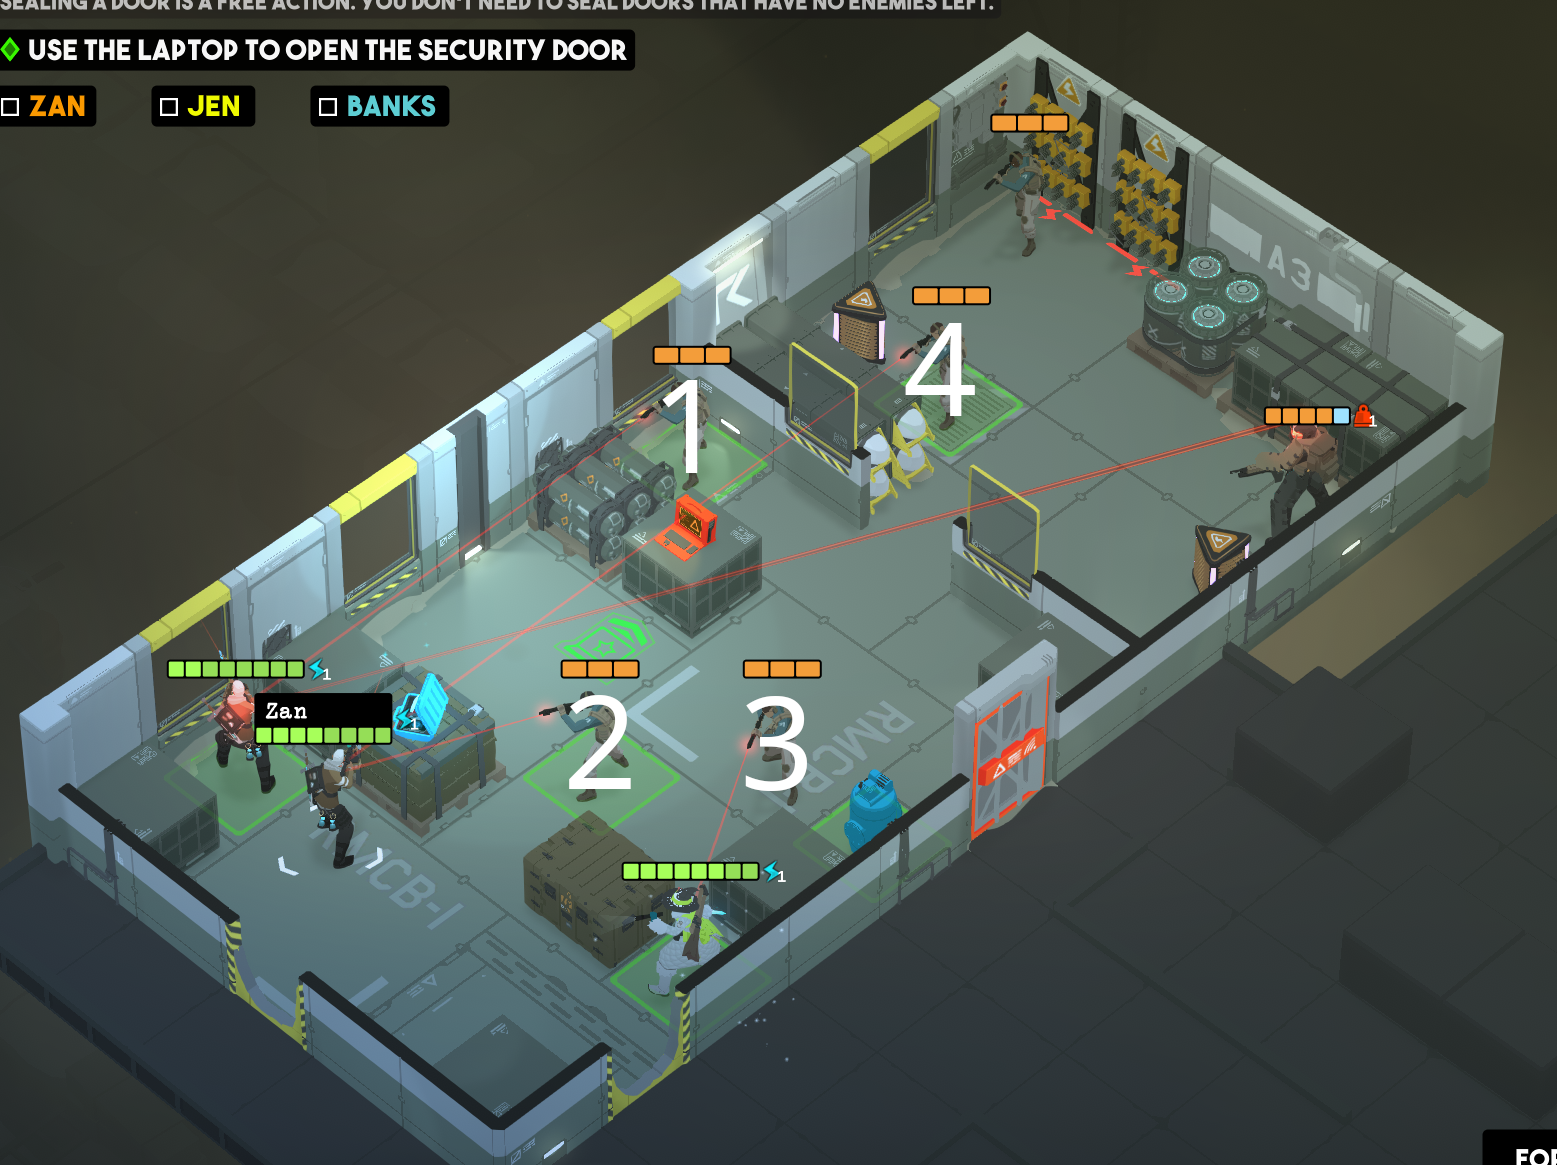
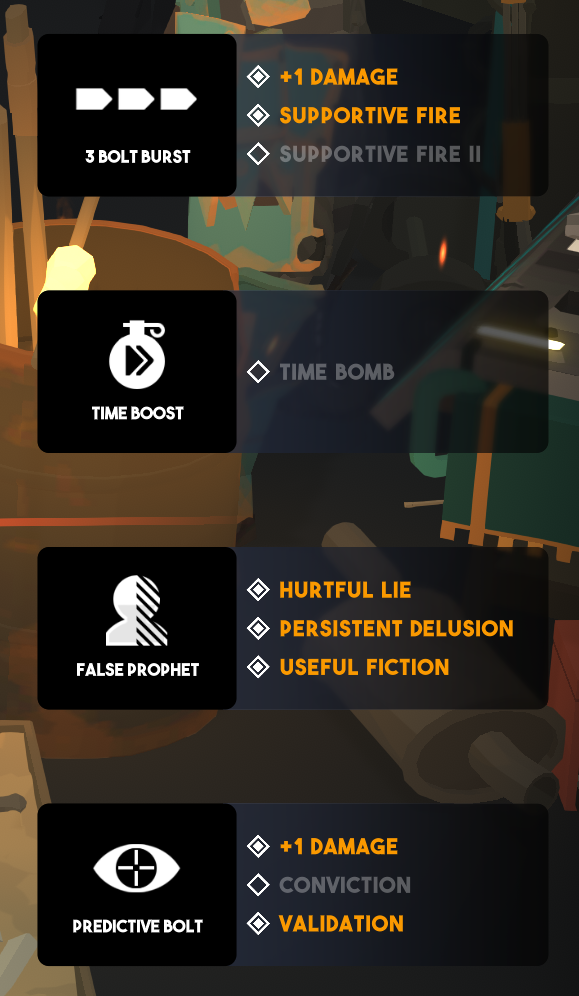
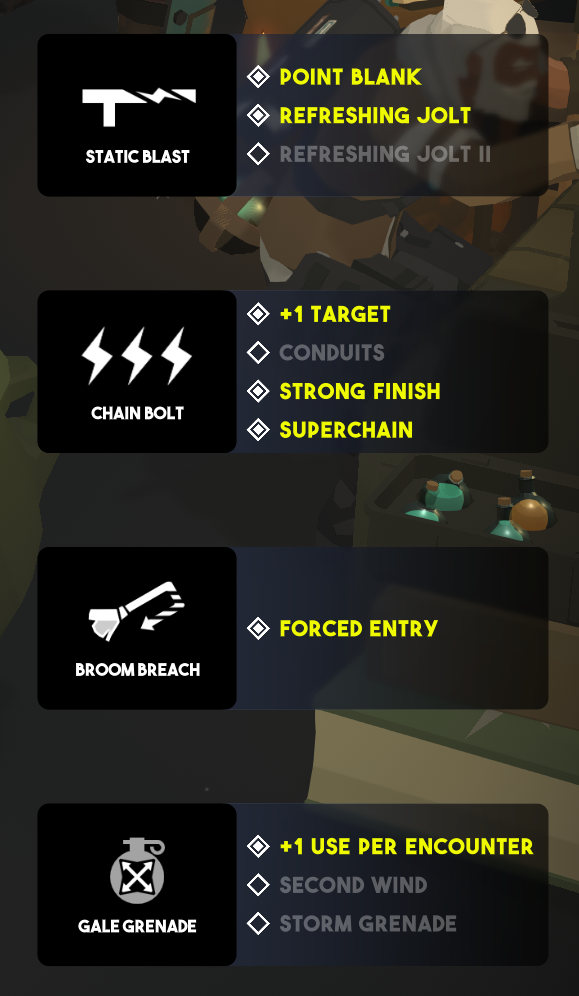
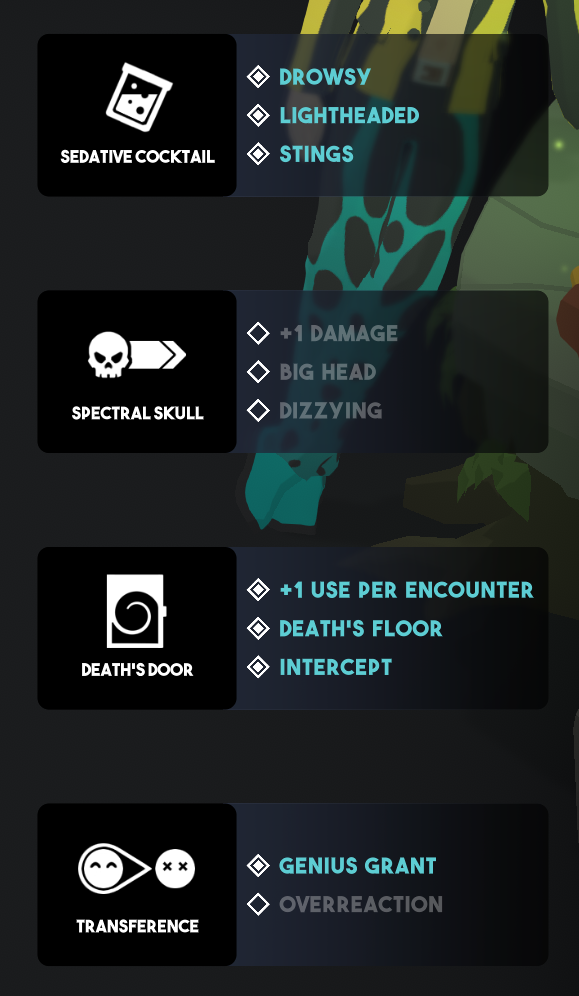
In turn 1, take intel as Banks, teleport with DD to the second intel, and grab it. Transfer damage from Banks to Big Zan, throw Sedative into Big Zan and two other goons, and duck. With Zan, clear Tracker near the window, find cover, and duck.
In turn 2, block the door and teleport behind cover with Banks and mop up the stragglers as you see fit. I hope this will help someone with that mission.
Material Defender 7 Mar @ 8:20am 
The only other move that I know of that Liv cannot dodge is the "Death's Floor" perk of death's door. Probably has to do with the fact she can't fly. It can be used to move her to any wall of your preference.
Material Defender 7 Mar @ 8:03am 
Note: you must finish The Motherload properly for the appearance order to be saved. using the pause menu to go back to hub will not save it.
Material Defender 7 Mar @ 8:00am 
For "Someone Go Get Her" and "What Did I Miss?" you can arrange the teammate order of appearance simply by the blink out order in "The Motherload" level in "Counterheist: The Mines" in Act 4. The 1st to blink out will be the 1st to show in the final battle, 2nd to blink out will be the 2nd to show, and so on.
Llamame Willis 10 Feb @ 10:14am 
Is there a chance to write the requirements for every achievement? Some of them are locked in the Steam List and I can't figure out what do i need to do to unlock them, for example "The Needlessly Hard Way", "What did i miss" and "Someone go get her".

Your guide has been really helpful for the confidence points, thanks a lot.
fejesgabee 9 Jan @ 5:23am 
For "Needlessly hard way" - You can do it on a replay after completion, simply selecting Rion as well as a starting character. Rion, Banks, Dall. Swap with the weapon cache behind the cleric, give him brittle and unsteady, and its an easy win in Turn 1.
shpasic 5 Jan @ 2:03am 
thanks, Acez!