Warhammer 40,000: Gladius - Relics of War

Warhammer 40,000: Gladius - Relics of War

38 ratings
Guide to Beating Impossible Difficulty in Gladius - The Way of the Aeldari
By Doc
This guide is intended to offer strategies, tips, and hints about the enigmatic Aeldari. With time and patience, I hope you'll be able to beat the very best the computer can throw at you! And even if you're not ready for the hardest settings, this guide should help you form your own style to get the most out of Gladius.
5
   
Award
Favorite
Favorited
Unfavorite
Introduction
The Aeldari are a fascinating and contradictory race in Gladius. They have some of the best units, and some of the worst. As a group, they posses some nearly game-breaking abilities, and have some near game-breaking flaws. Somehow the developers managed to convey the wistful, fading nobility of the species while still making them an excellent faction both tactically and strategically.

Don't want to read this ridiculously long guide? Go straight to the "Brief Summary" section for the most important points.


General Notes on Impossible Difficulty
Please refer to my General Impossible guide for non-faction specific advice on beating this difficulty. (The guide you're reading now will focus on strategy which is meant for the Aeldari specifically, particularly where it may contradict the general advice.)
https://cs2bus.com/sharedfiles/filedetails/?id=3000649357


Want to expand your prowess to other factions?

Here is my Ork-specific guide:
https://cs2bus.com/sharedfiles/filedetails/?id=3029674153

Or if you'd rather play with tanks:
https://cs2bus.com/sharedfiles/filedetails/?id=3067031734

And if you're not afraid of the Dark Gods:
https://cs2bus.com/sharedfiles/filedetails/?id=3051622207


Faction Traits
The “space elves” are not the best race to play just to win, particularly if you are relatively new to the harder difficulties. However, they have several truly unique gameplay mechanics which reflect their awesome power, hemmed by their agonizing self-doubt. With careful strategizing, they can have one of the strongest endgame positions.

Advantages
Exceptional movement. Most Aeldari units are fast and agile. Not only do they tend to move at least 4 hexes on a turn, many units can act and then move. While this seems like a minor change, this ability to hit and run greatly increases their survivability in the early game, and their lethality later.

Webway dependency. The map is littered with Webway gates which are useless to other non-Eldar races (except as targets), and mysterious to those of us who played before the Aeldari DLC was released. On larger maps these gates give the Eldar a magical ability to redeploy forces to react to any threat within their empire. They are also quick to build a second city because they can found one on any available gate.

Return of the Aeldari. This is an ability for the Autarch which adds another stack of resource output for every outpost captured by the faction. Why did I put it here, when it’s just a trait of one unit? It’s a game changer, that’s why 😊

Superb advanced units. The Scorpion may be the best tank in a game full of them, the Avatar of Khaine is the mightiest hero, and the Wraithknight is as good as most other factions’ supreme walker units without the high cost.

Great Population Growth. …but only with the ability Asuryani Arrivals. This makes your cities quite dependent on influence production.

Omniscience. Every Webway gate on the map is visible to you throughout the game. Because you can only see the tile with the gate itself, this isn’t as useful as it sounds. However, you can use the *absence* of the gates for some very important inferences from the global map:

- At the beginning of the game, a large “hole” in the starfield of gates indicates either an enemy location, or a large area of water. On a low water setting, you can easily infer the location of the bad guys.
- As the game progresses and the enemy advances, you’ll see this because your gates will be destroyed as AI empire expands. This not only gives an idea of size, but of direction, allowing you to avoid (or engage) on your own timetable.

Disadvantages
Dismal population growth. The grand ennui of the Aeldari suppress their population growth to near stagnation. If you don’t address this quickly, you will get stomped by more lively races.
Poor healing ability. Healing only comes from Spiritseers (a hero unit), and it’s weak, and only available on alternate turns. Pair this with starting units’ low armor, and you’ve got a fragile bunch of units.

Webway dependency. Webway travel is a major advantage for the Aeldari, and that’s why it’s so rough when the enemy destroys all of them as it advances. Fast travel won’t work within their empires. More importantly, you’re stuck choosing city sites based on gate locations, and destroyed gates can’t be rebuilt.

Fragile starting units. The early game is critical to your success because all gains compound over time, like bank interest. Your Guardians look cool, but can be wiped out rapidly by neutral units, leaving you unable to expand.

Poor range. Many of the Aeldari units are crippled by a combination of extremely low health and low range. This means having to bring vulnerable infantry into close range, exposing them to overwatch and counterattack. In the context of limited healing ability, this can make for a lot of turns spent waiting for units to recuperate.
Getting Started
Starting settings
We’ll use the settings mentioned in the general guide, with one exception: Turn Webway gates to “High” density. This will give you a lot more choices in city locations, and grant you the “Aeldari Omniscience” of seeing a lot of the map indirectly via your gates. Why not use the highest setting, you ask? I’ve found that at maximum density, Gates are often 4 tiles apart, which is too close together to build cities. Ironically, this can mean less choice for your second city!

I often face off against the Chaos Space Marines because of the ancient grudge against Chaos (the extra 17% damage both to and from Chaos units). However, you can beat any opponent with this faction.

Co-op pairings
I prefer to play Gladius with a friend against the AI, but I’ve tested my strategies solo to make sure they’re effective. Your Eldar are very mobile, and thus can be good partners with more “deliberate” allies, such as Sororitas or Adeptus Mechanicus. Claim Webway gates near allies and use them for transport. Everybody, including the Aeldari, pairs well with Space Marines (because of the Marines’ mobility, variety, and excellent healing of all units). The Astra Militarum’s Tank Commander can boost the already-mighty Scorpion to titanic levels.

Consider building your second city close to an allied city to allow quick reinforcement if needed. At the very least, make sure your partner preserves some gates in his or her territory. Gates are very fragile, so don’t claim them until the area is secured against neutrals. Your friend should consider playing a faction with good vehicle healing, because the Eldar have only hero healers with this ability.

Starting city
You’ll have limited choice with your first city, because it is automatically placed at the start. The ideal starting city would have four encampments within three tiles (the eventual expansion radius), and would have access to a +40% research tile, along with a high-bonus food tile nearby. Uniquely important to the Eldar…consider building near a Fermentation Pool, which will help offset the faction’s inherent slow growth rate.

The best areas will be at junctions of arctic and tropical terrain. Because you can’t choose your starting location, you’ll need to reroll the map frequently. Although I’m pretty set on starting near a Ruin of Vaul, the disadvantages of arctic terrain mean that you can easily settle for a Ruin on another type of terrain. You’ll give up a little research, but won’t cripple your food supply from the Arctic penalty.

As with the Chaos Space Marines, you should be looking for a site for your second city as you start the game. You’ll need to secure the site quickly to get it built in the first 15 turns, so it helps to have a direction in mind.
Early Game
Early goals are to kick-start research and build a very early second city. The Aeldari are second only to Chaos in their ability to quickly build a second city. Save enough production and influence so that you can claim the gate and turn it into a Redoubt (city) by turn 15 or so (on the Fast game setting).
Conserve your early units! Those two Guardians are all you’ve got for a while.

Build order
The build order from the general guide works well for the elves. I’ve added some notes below.
First, acquire the best research tile you can, and build the research building on it. (For most factions, having your research output equal to the turn number is “par.”) Then, build Asuryan's Crucibles (the infantry building) so that you can start multitasking. Guardians aren’t great, but they are inexpensive and let you rotate the wounded ones out to heal back in the city. Rangers are good supplements, but so fragile. Dark Reapers, on the other hand, will completely change your early game.

Early Aeldar mechanized units are breakable and hard to heal. I’ve found them to be more trouble than they’re worth in those economically tight early turns, and you can realistically only have two unit production buildings in the early game anyway.
To that point, the hero building is important; you may even choose to delay the Crucibles to build the Shrine of Khaine first. The advantage is that the Autarch is much tougher and can scout for the Guardians. The disadvantage is that he is expensive and only has an attack range of one hex, so he doesn’t diversify your forces much. I’d say on balance I prefer the Crucibles, but it’s a close call; either way, it’s best to have both within the first 15-20 turns.

Unit management
You start with two Guardians, each of which can be destroyed by a pair of attacks from nearly any neutral type. Do *not* lose these units. If you need to save scum, then do it! Early mistakes will compound over time to substantially hurt your later game. Heal them often…they will heal twice as fast in your city tiles, but a Compound will also give a bonus. These are so cheap and powerful that you should build at least two to supplement your initial units…otherwise you’ll be continually frustrated by having to take them out of the fight while passing your turn.

Keep the Guardians together to allow you to kill hostile units rather than slivering them. It’s really frustrating when you get those Kroot Hounds down to a single health point, but then they run off and heal. Later, you’ll see your “safe” compounds captured by the same Kroots. Set up overwatch traps in forests next to captured compounds; Stingwings and Cultists find them irresistible, and you can get a free attack when they try to reclaim the compound. Your Guardians may be glass cannons, but if they get the first shot, then they can destroy or sliver most neutral packs.
Chaos cultists are dangerous! Your units have a trait which allows them to give and receive more damage from chaos-aligned enemies…early on, this is mostly bad. Lure them back toward your city and they’ll be easy prey.

Leave the Webway gates intact.
You never know when you’ll need one as a travel point.
For some factions (like Chaos, or the Astra Militarum), the city itself is an excellent military unit, capable of slivering or killing most of the early neutral units. This is not true of the Webway Redoubts…the D-cannon looks great, with high damage and armor penetration, but it can’t overwatch and does little damage against multi-model units (e.g. Kroot Hounds).
Finally, be happy with owning 6 or 7 compounds in the early game. Haring off into the wilderness to grab that tempting Jokero trader is a sure way to get isolated and killed. I usually don’t do much active hunting until I have an Autarch and two Dark Reapers (or Rangers) to supplement my Guardians.
Technology (Tiers 1 through 4)
You’ll be tempted to always go for the highest-level technology you can afford, but don’t fall into this trap. If an early technology will help you right now, then take it! Usually, the time cost is low, and overflow research points aren’t lost, so it may not even slow you down at all. A good example is Rangers, which help address the early lack of range in your infantry.


Tier 1
The first priority is survival, so I open with the Shrine of Khaine so I can start on my first Autarch. Next is Plasma Grenades (best in the game, combining frag and krak characteristics) to let my Guardians and Autarch occasionally one-shot a neutral. Webway Cartography removes the admittedly low cost of activating a Webway gate, but in these early turns, even a few points of influence matter. Eventually you’ll need all the Tier 1 technologies, but move up to Tier 2 for now.


Tier 2
I usually take Spiritseer next, as she’s the cheapest hero and can help when the Guardians are wounded (which is often). If you’re focused on infantry instead of mechanical units (which is my recommendation), you can skip Vaul’s Summons. Transcendent Bliss is excellent eventually, but the cost and benefit are not worthwhile at this point. Banshees are worth considering after you’ve established your second city, or go back to Tier 1 and take Rangers.


Tier 3
Webway Redoubt is the one you’ve been pushing for. Now you can instantly build a second city on any claimed Webway Gate; do it, and start plotting out where your third city will go. Then it’s Dark Reapers, unless you’ve decided to use Rangers as your longshot unit. Reapers hit hard from range 3, which takes the pressure off your Guardians to rush in unsupported.
If you don’t have Asuran’s Summons, now’s the time to get it, then move up to Tier 4.

Cairn of Ulthanesh provides necessary infrastructure for loyalty, and you’ll be needing it with your second city. Exquisite Cultivation can wait until you build your first food building, and the The Farseer Skyrunner is usually the last hero I build, so he can wait. The Vaul’s Wrath Support Battery is a very weak unit generally only good for clearing tiles.


Tier 4
seems to have good stuff for all the factions. For the Aeldari, you can finally build the Bonesinger’s Chantry (the “building building building”). Don’t miss this one; it doesn’t look like a crane like it does for most factions. Research this first, and then build it as soon as possible in all cities. Note that for the Aeldari, this building provides the unique bonus of improved growth rate, making it even more critical.

After that, research Exodite Foothold to help those cities expand. The Avatar of Khaine is expensive, but is a match for any neutral non-flying unit and can lead your infantry safely into the fog of war. Extraction Efficiency and Sub-Molecular Ammunition aren’t exciting, but provide incremental improvements to your existing empire. Fire Dragons are yet another Aeldar “Range 1” infantry and thus can be skipped.


At this point, consider spending a few turns filling in technologies from earlier tiers…they should be very quick to research, and then they’ll be ready when you are.
Heroes
Heroes are a critical part of the Aeldari strategy...and they are creative and interesting to play with. Early infantry and mechanized units are fragile, and your only healing will come from a hero. Plus, the elves have an extra special hero to inspire them (or drive them into an insane rage, which is almost the same thing)!


General Tips for Heroes
Move your heroes first! Particularly the Autarch and Skyrunner; you’ll feel like a heel if you could have used the Autarch’s Command to buff a dozen units, but you didn’t select him until the end of the turn. “I’ll remember next turn,” you tell yourself. But will you? Believe me, I’ve been there.

Heroes really shine when they are kitted out properly from the Jokero encampment. I send each new hero to a Jokero encampment immediately to purchase a Tantalizing Icon. Although anything related to Slaanesh is risky for the Aeldar (well, in the lore at least), this object will add 8 influence per turn, which will more than offset the maintenance of each hero, and will act as an investment to buy future items.

Other must-have artifacts include the Zoat Hide Jerkin, and the Adamantium Weave Vest. They greatly reduce the risk of your critical heroes being wiped off the map in a single turn.
Dusk Blades are more important for Aeldar heroes than for other factions as they provide much-needed healing for your melee heroes. Once you have extra influence to spend, give nearly all your heroes the Uncreator Gauntlet, which can give you much-needed repair abilities for your vehicles. (Lore note: The Gauntlet is a piece of techno-magic which allows the Mechanicus to reverse engineer technologies by reversing the flow of time and causing them to disassemble.)


The Autarch
Autarchs are the core of any early game attack squad. They are hard to kill, and can absorb overwatch which would cripple your Guardians, allowing the Guardians to swoop in and finish the attack. The Autarch’s attack strength is moderate, but can help finish off wounded enemies. He has two support powers…the Command, which can be activated to give a small accuracy bonus to nearby units, and Autarch’s Assault, which passively improves adjacent units when the Autarch kills something. Focus on the Command power, which has an impressive three-tile radius. The Assault requires a kill, which isn’t reliable for a relatively low-damage unit.

Of course, the real strength of this hero is the level 6 “Return of the Aeldari” power. This is so strong that it can actually make the difference in winning or losing by itself (particularly with the game settings I recommend). See the “Rise of the Autarch” in the middle game section.
The lesson here is…keep your Autarchs safe! Even fully outfitted, they aren’t critical militarily, but their resource production is so profound that you might consider “promoting” them to governor (i.e. letting them sit safely in a city far from the front.) I usually risk them as second-line units, however, because of their superb Command buff, which has an enormous radius and increases accuracy for all other Aeldari units. (Accuracy is probably the best overall combat buff, for reasons involving math 😊 )


Spiritseer
A mediocre healing unit, but she’s all you’ve got. The Seer’s powers are flexible, and so the healing spell can be inverted to hurt enemies (as can the morale and armor boosts). The powers work at range two, but the heal is weak (12 points) and has a three turn cooldown, making it one of the least effective in the game. Still, the hero’s cost is low, so you’ll want to build one to support your Autarch, and more later to help your heavier units heal. Also, she can carry around a Scroll of Magnus to assist with research since she doesn’t need the front-line melee artifacts. The Spiritseer also has a potentially strong synergy with the Skyrunner (see below).

Please note that she has an easily-overlooked passive power called Spirit Mark which gives a small accuracy boost to the Wraiths (Knights, Lords, and Blades). Not worth rearranging your tactics, but I wasn’t even aware of it until recently, so I thought I’d point it out.


Farseer Skyrunner
An odd hero, the Skyrunner is a psyker on a jetbike with middling combat powers and survivability, but potentially devastating mental attacks. He is generally best at assassinating highly damage-resistant targets, with one notable exception.

Mindwar does damage based on the difference between the Farseer’s morale and the target’s. This can be quite devastating as it cuts through armor, and the Farseer’s morale is quite high, particularly at high experience levels. Use this in conjunction with the Spiritseer’s Horrify, which lowers the target’s morale substantially. Even the most heavily armored targets like Assault Terminators will melt away under this attack, assuming you’ve broken their morale.
Doom increases the damage of other units to the target. Enemy cities and superheavy units are a natural target for this effect when you’re attacking with Scorpions, Wraithknights, or even Fire Dragons. For example, Scorpion damage to a city can be raised into the triple digits with this effect active.

Eldritch Storm gives the Skyrunner a respectable attack against multi-unit groups like infantry.
Use the Skyrunner’s speed to bring items from Jokero encampments to the heroes at the front, but be sure to save a Zoat Jerkin and Adamantium Weave for him, as he can otherwise be fragile. Don’t forget to Jink before you move to reduce overwatch damage. Better yet, consider a Wide Spectrum Auspex to prevent overwatch altogether.


Avatar of Khaine
The Avatar is an amazingly strong unit for Tier 4, and thus only one can exist at any time. He is unique among heroes in starting with all abilities at full strength, and begins with 30 hit points, which dwarfs all the other Eldar heroes. Notably, he does not benefit from the typical 50% hero damage reduction, but has the almost-as-good demonic damage reduction of 33%. He strengthens adjacent units mostly defensively by making them highly resistant to morale loss…he does increase melee damage of those units as well, though this is less important as melee damage is not a strength of Aeldari infantry.

I use him to anchor groups of infantry units and other heroes as I start to push back against the strongest neutrals such as Kastelan Robots and Enslavers. Despite his despotic look, he’s not a fantastic damage dealer until you give him the usual suite of Jokero items…I recommend the Weave and the Vest, of course. But then add the Axe, the Mourning Blade, and the Dusk Blade. This will make him capable against all targets, and grant a self-heal which can keep him alive in battle (he tends to be a target for the AI). With the remaining slot, you can choose…more mobility (the Endurance Implant); more melee damage (the Powered/Lightning Gauntlet); or the more balanced Concealed Weapon System. The last one adds to all attacks, including ranged, so I typically take this one.
Middle Game - Cities
Unit and city management is about to get more complicated. This stage will have a major impact on whether you win or not, so I’m going to try to give advice to prevent the “Stagnation of the Eldar” from derailing your dreams of conquest.

Cities
If you don’t yet have two cities, this is a top priority! Aim to have it ready by turn 20, or even earlier. The second city will briefly give you a reprieve from resource shortages, and let you have a city focused on keeping these shortages at bay. If you aren’t careful, they both will likely be trending toward stagnation as your loyalty shrinks with population growth. As soon as you can, build a Bonesingers’ Chantry (the building building building 😊 ) in both cities. This is a tough decision, because they use a lot of resources and take a while to build. However, they will cut the time to build every single future building (which will number in the dozens) and unlike every other faction, Chantries increase growth rate!

I typically build my third city around turn 35, and I keep it close to the first two. You can win with two cities, but why tie your hands when the cost is just an additional loyalty building in each city? The third city will take about 20 turns to be a major contributor to your economy, so get it started as soon as possible.

To further assist with loyalty, look for Recaf Leaf compounds near cities #2 and #3. Not only do these boost the loyalty from Cairns of Ulthanesh, they also increase the reward from Transcendent Bliss.

So, now you’re noticing that your growth is painfully slow. You’re struggling to have enough population to run all these building you need to provide resource and units. Let’s understand why. First, the Aeldar have a large inherent penalty to growth. Second, as you approach your population limit, growth slows. To maximize growth you need to:

  • Keep your population limit at least six points higher than your current population. This means building housing as soon as you have your second Chantry.

  • Use Asuryani Arrivals. It’s embarrassing to admit that I didn’t use this boost at all when I starting playing this faction. If you have a reasonable population limit, then you should activate this power (within the city view screen) at every opportunity. Suddenly, you’ll go from having the lowest to having the highest growth rate. Trust me, it’s the best use of your influence. Important note: When activating Arrivals, the effect lasts five turns, but (until it’s upgraded) you can only activate it every ten.

  • Use Fermentation Pools. The 20% growth increase may not matter so much to other factions, but for the Aeldari it can be a life saver. Look for them when building your cities, particularly the first two when you may not have enough spare influence to use Asuranyi Arrivals constantly.

Expect a period of slow city progress as you research and implement all the buildings you need to grow (e.g. housing, loyalty, and electricity). This is normal, and once you’ve got the basics in place, you’ll be able to revisit other priorities such as research and production.


Webway Gates
Absolutely vital and incredibly fragile, Gates will frustrate you if get bothered about losing them. The AI opponent will systematically destroy all of them as it expands, so don’t worry about using them for advancing your armies in the late game…you won’t be able to!

Only activate gates you are certain are not in active conflict areas (unless it will immediately become a Redoubt). Creeps will travel amazing distances to kill non-neutral gates. However, since activation is free (after a level 1 technology) use it on all safe gates to make it easy to travel within your empire.

If you intend to build a city on a gate, make sure you have enough resources to build the Redoubt! Only then, activate the gate and build the Redoubt on the same turn to prevent its destruction by local wildlife. Once activated it will draw overwatch fire, but this is rarely enough to destroy it in one turn, and the damage does not carry over to the Redoubt.


Resource management
Some factions (WAAAGH!) don’t really have much trouble with resource gathering. The Aeldari are among the worst, at least in the early game. You will be constantly running low on food, or influence, or most especially energy.

At least there are technologies to help boost all of these, right? Let’s see, we’ve got food, ore, influence…wait, where’s energy? You’ll be asking yourself that a lot when playing the Craftworld Aeldari, so best to get ahead of it and make sure that one of your first two cities is a solid energy producer. In a recent Impossible solo game, my second city had multiple tiles which granted +90% energy (two Promethium Relays, a Ruin of Vaul, and desert tiles). I still barely kept up with my energy needs…well, until my Autarchs rescued me.

Middle Game - Conquest
Unit management
Expand your empire! Strategically stay to the edges of the map to avoid meeting the AI too early, and clear any corners behind your cities so that you have some compounds adding to your economy even during the invasion. Tactically, lead with your Autarch to absorb overwatch, and follow with weaker units to kill slivered enemies or take unguarded compounds. Artifacts are like gold, and should be prioritized, particularly the Siren Caster. This little gem adds two loyalty in all cities, and thus makes expansion a lot less painful in the early game.

Be thorough at cleaning creeps as you move. You’ll notice that a neutral unit often won’t attack you until you either attack first or advance into a compound within its territory. However, once you do attack, that lone Cultist will get help from its five friends, who will swoop in and kill your units. You can minimize this by staying in a group and rotating wounded units to the back.

I typically use a lot of cheap infantry backed with heroes. If you can spare the research and production, you can add in a tank or two, but they aren’t that effective, and very hard to repair.
When you have to choose, it’s usually better to finish a slivered (nearly dead) unit, rather than damage a different unit. By destroying the unit, you’ll get experience and morale, and it won’t be able to run off to heal.

Umbra deserve special mention because they’re so dangerous to the Aeldari (they even get a call-out in the story). They are hard to target for most infantry units, and when they die, they will usually kill half the squad that finished them. There’s one good point about them, however…they can’t retake your compounds, which means you don’t have to kill them to expand. If possible, leave them alone until you’re fairly advanced.


Unit Production
I used to stop with two of each unit production building, and then focus on loyalty and population for the rest of the game. Then I thought…why? The extra energy cost to build additional unit producers is negligible at this point, and I’m competing with a hyperproductive AI with three times as many cities as I have. So now I’ll build three or four unit buildings, and can produce a Crimson Hunter or eventually even a Scorpion in a single turn. There’s still plenty of room for loyalty buildings, but now I can be more prepared for the coming storm.
Middle Game - The Autarch's Secret
The Rise of the Autarch
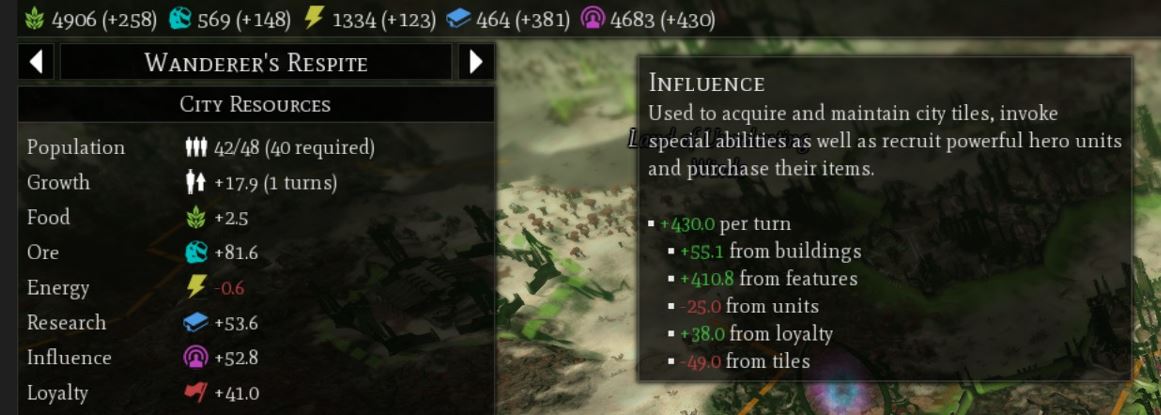
If there’s a secret to playing the Aeldari, this is it…push to get an Autarch to level 6. Suddenly, your production from every outpost you own is increased by the base amount (i.e. one Autarch with Return of the Aeldari increases Promethium Relay Pipe output from 2 to 4 power).
This effect can get quite absurd. In the screenshot, I’m producing a net of 430 influence per turn, 95% of which is coming from outposts (listed as “features” here) enhanced by four Autarchs (i.e. every “2” production becomes 10)! A similar effect is happening to all the resources.


And even though each new Autarch costs more and more influence to build, the enhanced income more than compensates. Essentially these four units will win the war of attrition with the AI by themselves. Even fully outfitted, they aren’t critical militarily, but their resource production is so profound that the loss of one or two can plunge you into a recession. Be wise and consider “promoting” them to governor (i.e. letting them sit safely in a city far from the front.)

Technology (Tiers 5-10)
Tier 5
You’ve just started building your Chantries, so Bonesinger Convocation will further improve your production. Next is Farseer’s Summons which makes the population boost a lot more sustainable. Labyrinthian Mesh Armor is unexciting but useful for most of your units as you’re likely still mainly using infantry. Skip the others, unless you are in an influence crunch…Wave Serpents can take a group of infantry through a gate for an overall discount (i.e. one ticket for a busload of passengers).


Tier 6
isn’t particularly useful. Black Librarians helps boost your research at a time when it’s probably flagging a bit. Fire Prisms are reasonably capable tanks, and are a good choice if you have a Greater Ingress which needs something to do. All the others can wait…morale and melee aren’t usually much of an issue for the Aeldari, and Hammer of Wrath is limited to just a few units.


Tier 7
This tier is a little better, with Portal Spires to open up your air unit production and Wraithblades to give you (at last!) a really tough infantry unit. Escutcheon Mountings seems like a useless technology for a useless ability. Anything that requires a unit to die in order to activate feels erratic and self-defeating. (I think the purpose is to reflect the Aeldari ability to capture the souls of their dead to help power the technology of the living). The other Tier 7 technologies are nice little boosts to units which can wait for now.

Here's where you should take a look back down the technology tree to pick up important ones you may have passed by…they’ll only take a turn to research. Consider taking any resource boosts, such as Extraction Efficiency, and take Greater Ingress and Vaul’s Summons. These three will prepare you to build your late game units.


Tier 8
Here the technology tree brings your first units worthy of the Aeldari reputation, the War Walkers and Wraithlords. With War Walkers being open-topped, multi-unit, and low armor, they can be a little fragile for my taste, but you can finally lay waste to those stubborn Kastelan Robots and Umbra, opening up more compounds to feed the Autarch’s ability.

Wraithlords finally provide a solid, relatively inexpensive unit which can stand up to the toughest creeps. As with most other Aeldari technology, the rest of Tier 8 is more evolutionary than revolutionary; Craftworlds’ Pledge is the best because it finally aligns the duration of the population boost with its cooldown.


Tier 9
It was quite a journey, but Wraithknights are worth it. Inexpensive, mobile, extremely tough, and capable of damaging separate enemy units…they will be the backbone of your resistance to the AI charge. Exodite Infrastructure at last allows the full expansion of your city radii, hopefully letting you absorb a few more compounds to boost production. Hemlock Wraithfighters are a nuanced and expensive unit, and can probably wait. The others are useful but non-critical incremental boosts.


Tier 10
The top tier is about rounding out your endgame army. Scorpions are utterly devastating to any enemy, and will anchor your final army. Doom of the Aeldari finally makes Transcendent Bliss worthwhile, and Wraithknight Starcannons greatly increase the ranged damage of your Knights. Without Dominate there’s no reason to build Wraithfighters, and Star Engines make your Scorpions the fastest superheavy ground unit in the game.
Late Game
First Contact
Eventually the dreaded moment arrives when you’ve found the enemy. Typically, you’ll spot a weak-looking scout unit and the introductory message will flash up. Tempting as it may be, don’t send your units haring off after the AI. Right behind that lone Necron warrior is a huge mass of enemy units ready to surround you, cut off your retreat, and destroy you.

Instead, pull back from the visible range. You now have two or three turns to begin consolidating and preparing for the huge wave of air units which is about to arrive. The T’au are probably the worst, with punishing overwatch, long-range attacks, and strong air units. Fortunately, late game Eldar units have excellent overwatch range. I’ve found that the AI is inordinately afraid of overwatch, and will sometimes hold back on an overwhelming attack just to avoid it.

Once those first units show up, you’re probably going to feel pretty overwhelmed. Because of various boosts, the AI units will be much tougher than similar neutrals, and far better at concentrating fire. If you haven’t lost many (or any) units so far, you’re about to get a lesson. Stay grouped up tightly, and don’t be afraid to fall back into a forest or ruin to minimize the AI’s line of sight and prevent ground units from rapidly flanking you. Keep heavy units out front to soak up damage, but cycle them when they get below half health.

Engagement
Air units are expendable! I usually have a city with three Portal Spires turning out a new aircraft every 1-2 turns, and the AI will shoot them down almost as quickly. Using Jink and Vector Dancer (before you move, not after!) means that the AI will expend a lot of attack power to kill air units, and spare the damage to your Scorpions.

If you’ve built some heavy units, you can weather that first attack. If your Scorpions and Wraithknights are far from the front (or still under construction?!?), then make an orderly retreat back toward your nearest city, buying time to fortify your lines. Crimson Hunters have great weapon range, and can rally quickly to a defensive point. Use Webway gates to bring your troops into an organized mass, and pick somewhere to make a stand.

Wounding air units will send them scurrying away, which isn’t as good as a kill, but at least puts them in the penalty box for a few turns while they heal. By now a few Scorpions have reached the front, and you can cautiously plan a few kills. Go for weak units to reduce their morale and make the stronger ones more vulnerable. Wraithknights have a “stomp” attack which is great at squishing infantry and tanks, but still leaves their main attack free for a ranged kill (or some overwatch intimidation).

Overconfidence kills! Now’s where it’s easy to make the classic rookie mistakes such as sending that damaged Scorpion forward to chase a wounded unit, or flying in three Crimson Hunters to take out a Maulerfiend, leaving them open to a vicious counterattack. Or worst of all, sending up an Autarch to be killed, tanking your entire economy.

Usually, the initial probing attacks will develop into a very Warhammer-style static front line, often stretching vast distances. The AI is excellent at flanking you, and sending groups of units tuned specifically to the weaknesses of yours. Stop any salient from forming, keep whittling away at their army while being very conservative with yours, and eventually the tide will turn.

Finally, you’ll begin to push them back, inch by inch. Now it’s a matter of patience…once you find and kill that first city, the game is (probably) in the bag, and you can either declare a win or push on to destroy the other five or six cities, and get that sweet victory screen.
Unit Guide - Infantry
Here’s my individual breakdown of Eldar units. Despite my usual mantra that “all units have their place,” I have found that Aeldari units tend to be either excellent or disappointing. I’ll try to give my perspective to assist as you develop your own. (Note that heroes have their own section above.)


Infantry
Guardians. One of the clearest examples of “Glass Cannons.” Guardians are fast and can often one-shot early game creeps, particularly with their Plasma Grenades. However, their low armor and limited range make them easy targets for Stingwings and Chaos Cultists. Despite their low cost, I don’t often build more than two.


Rangers. Rangers are so inexpensive that they can make a good supplement to your Guardian-plus-Autarch early army. If they can sit still for a turn, their sniping is quite powerful at range 3 (outside the range of all neutral creeps), and they can hide well enough to usually avoid counterattack.


Howling Banshees. A unit or two of these really helps the early game. I rush them in first to avoid overwatch and hit the enemy unit. By reducing their numbers, Banshees make it safer for the Guardians to follow up with a killing strike (i.e. less overwatch).


Dark Reapers. These guys have generally replaced my use of Rangers when I play Aeldari. They are so powerful and versatile that you can take on any neutral opponent with two or three units of Dark Reapers. They are well armored, hit at range 3 and can cycle between anti-infantry and anti-armor; best of all, they are “slow and purposeful,” which means their heavy weapons don’t require a turn of rest to work at full capacity. The only downside is their extremely low health (Six. Six!!), which means that any counterattack can be lethal. Because the two strongest creeps (Umbra and Kastellan Robots) both return damage to attackers, I highly recommend having a Spiritseer with any group of Dark Reapers.
But you won’t be doing any of that without the Firepower Pack DLC.


Fire Dragons. And now we reach the beginning of my discontent. Fire Dragons just don’t work. They are meant to be heavy infantry which can take down armored units, but they combine two really non-synergistic traits: A single hex range, and low health. This makes them easy prey for overwatch, and their relatively high experience value draws AI units like flies. Also, to use them at their best, you’ve got to waste valuable early game time researching two technologies. The addition of Dark Reapers to the roster, who are nearly as good at triple the range, have eliminated any reason to build these units. And believe me, I’ve tried!

I’ve also experimented with a tactic of using them as late-game “bait” to draw in AI units looking for an easy kill…their armor gives them a little durability, and building the units uses up some of the excess food I’ve accumulated at that point. In that vein, you can also use them as a Suicide Squad, sending them in to get the final shot on a damaged enemy tank. They will inevitably die the next turn, but it’s like trading a pawn for a bishop.

Warlocks. You want to love these guys! They teleport, have a mix of ranged and melee attacks, and feel unique in the lineup. Unfortunately, they suffer from the same mix of painfully short range, tech requirement, and low health that plagues the Aeldari units…and you have to pay for the Specialist DLC pack to use them.

One circumstance does favor the Warlocks, however. If you’re playing co-op, they can easily teleport anywhere to help an ally in trouble.


Wraithblades. A damage-resistant Aeldari unit? With some health? Ah, but no. These guys are very hard to kill, it’s true, but their miserable accuracy (50%) and lack of ranged attacks limits them badly. And they are slow! A Wraithblade can easily get stuck between two psychneueins (which it can’t attack) and take three or four turns to extract itself. The enemy AI will typically surround them with flyers and reap the experience while your morale suffers. And they use ore instead of food, so you’re cutting into your supply of Wraithknights and War Walkers by building them.
I have found a limited use for them as guards. If stationed by an artifact or in a compound near your frontier, they can prevent it from being captured by wandering kroot hounds. It’s much more cost effective to use Guardians, of course.


Wraithlords. Added by the Demolition Pack DLC, the Wraithlord is a surprisingly good addition to the game. The cost and upkeep are half that of the mightier Knight so naturally they aren’t nearly as durable. However, they are perfect for wiping out groups of pesky neutrals with their flamers. And finally, a decent two-hex ranged attack, although it’s mostly for killing single targets. I built a half-dozen in my first full game with them, and found them to be excellent at clearing and guarding those precious Outposts so necessary for the Autarch’s dominance.


Wraithknights. The light at the end of the tunnel. Wraithknights are inexpensive (60 each ore and energy, which doesn’t interfere much with your Scorpion capacity, and 8 ore per turn) and are extraordinarily damage resistant. They are well armored and have two types of damage reduction, so their 56 health goes a long way. This reliance on damage reduction rather than health means they are easier to repair for the Spiritseers in your back line, so they can be rotated in and out of battle quickly.
Offensively, they have a stomp attack which crushes tanks and infantry, and solid damage out to range 3. They should be built in numbers, and will be the mainstay of your battle lines.

Unit Guide - Mechanized
“You drive a Scorpion? The war machine of the ancients? What is that like?”
“It’s like magic, my friend. I wave my hand, and the enemy disappears.”


Shining Spears. Another unit you’d love to love, but is limited by a poor combination of traits. These jetbikes are fast, and can scout to find hidden baddies in the forests and ruins. They have decent armor, fair weaponry, and excellent ranged damage reduction. But…all attacks are range 1, and they have six health. Sound familiar? They seem designed to attack enemy heavy units, but have no damage resistance against melee, so they are routinely killed in a single hit from an Ambull or an Umbra. Use them for their scouting ability, if at all.


Vaul’s Wrath Support Batteries. Vaul must have been a fairly even-tempered god, because his wrath isn’t particularly impressive. These are necessary for clearing tiles, but they are mediocre as artillery. They are useful only if the Battery hasn’t moved, if the target is infantry, *and* the victim has little armor. Lack of overwatch and fragility make them mostly a liability in battle.


Hornet. I can appreciate the Hornet if I think of it as a straight upgrade to the Shining Spears. It doesn’t hit very hard, but at least it can attack at range 2. Hornets have the speed and skimmer abilities of the Spears, and even have the scouting ability. Best of all, they have four times the health, so they are much more likely to return from their reconnaissance missions. So why would you build Spears? If you don’t have the Escalation Pack DLC, that’s why.


Wave Serpent. A tough mid-level vehicle, the Serpent can do some damage, particularly up close. The noteworthy feature is its transport capacity (it is the lone Aeldari transport unit). This makes it nice to have in single player, because it can take multiple units through a Webway Gate for one cost. However, it’s essential in co-op! Allied infantry and heroes can load up and go through Webway gates, a huge convenience for reinforcements.


Fire Prisms. At last, a tank worthy of the name. Fire Prisms are like miniature Scorpions, with attacks out to range 3, good mobility, and (if they keep moving) decent damage resistance. Unlike their big brothers, they have very low health for a tank (36), so are best used in groups at range. I like to build them to use in my “creep task force” (units which are probably too weak to take on the AI, but are very effective at expanding into unexplored areas of the map.)


War Walkers. It’s strange to see a high-level mechanized attack unit which is open-topped and has three sub-units. As expected, these traits make Walkers pretty vulnerable. However, they benefit from seven (!) technology upgrades, long range, and they are [/b]really[/b] fast. Uniquely for vehicles, they possess Battle Focus, which allows them to attack and then move away.

After much experimenting, I’ve decided that these guys are good (if substantial) investment if played correctly. Think of them as a sort of “super Guardian.” Somewhat fragile, but capable of devastating strikes on unsuspecting AI units. Make sure to use their scout ability and Vectored Engines before moving forward into battle…this will limit any crippling overwatch from hidden enemies. Once they’ve done a strike, move them back or they will draw too much attention from strong AI units looking for an easy kill.


Scorpions. The king of tanks, with speed, range, damage reduction, and plenty of health. The fastest super-heavy, with not only 4 movement points but essentially no terrain restrictions, you can slide in a Scorpion to wipe out nearly anything in a single shot. If paired with the Farseer Skyrunner’s Doom ability, enemy superheavies can be damaged for 50-70% of their health even at range 3. At range 2, you can add in a shuriken cannon which is rarely necessary against most targets.

The downside is the cost. The Aeldar aren’t particularly adept at ore production because they can’t usually choose city sites to maximize it; this makes a Scorpion a major faction-wide investment. And once you’ve paid the 240 ore for the thing, you’ve got to dedicate 16 ore per turn just to maintain it.

Healing a Scorpion is a painful process because of the Aeldari’s lack of mechanical fixin’ prowess. I recommend sending them though a gate back to a city…there, they will heal 20% per turn (which usually translates to about 30 health at high level). This is far better than you’ll get waiting in the field for your Spiritseers, who should be focused on healing Wraithknights anyway.
Unit Guide - Aircraft
Crimson Hunter. A fairly standard air unit in terms of cost, damage, health, etc. They do have a range 3 attack, which helps preserve their health. However, with great visibility comes great vulnerability, so be prepared to replace your losses. Don’t forget to jink!


Hemlock Wraithfighter. An oddball fighter which is possibly the game’s only “support aircraft.” They have the Aeldari curse (in Gladius) of a strong range 1 weapon in a unit with low armor and relatively low health. They are also quite expensive to build and maintain. This makes them poor attack vehicles, as they will be targeted and destroyed nearly instantly by the AI.

However, they excel at two things, so you should always build one or two Wraithfighters. Dominate, the Tier 10 technology, lets Wraithfighters completely paralyze a target *at range 2.* When an enemy aircraft (or other strong unit) swoops in to harass your back lines, it can be frustrating when you don’t have quite enough firepower to take it down before it will inevitably leave to go heal. However, the Wraithfighter can maneuver quickly to paralyze the unit, buying extra time to finish it off.

The other support power is Shrouding. I keep the Wraithfighters in the back, near the healers. When I’ve gotten a Crimson Hunter or two healed back into fighting form, I’ll use the Shroud to give them a substantial damage reduction before returning them to the front lines. This greatly increases survivability and may help soak some overwatch for other advancing units.
Brief Summary
Short version of the Aeldari Guide
1) Build your first city to focus on research and food.
2) Research and build infrastructure, a Crucible (infantry building), and a Shrine of Khaine (hero building.)
3) Build an Autarch and some Rangers or Dark Reapers. Expand with your units to capture outposts, generate influence, and find a second city site.
4) Build a second city within 20 turns, focused on production, food, and/or energy, depending on shortages (but if in doubt, favor energy).
5) Use Asuryani Arrivals to keep growth high enough to populate your new buildings.
6) Move up the tech tree focusing on infrastructure improvements. For units, research all heroes, Dark Reapers, possibly Banshees, and maybe Wraithlords (Wave Serpents if you’re going that route). Strongly consider a third city by turn 35 or so as a forward outpost or to fill in missing production. Later, focus on Crimson Hunters, Wraithknights, and the juggernaut Scorpion.
7) Meet the enemy and do not engage initially. You should be ready for total war by turn 70-80.
8) Use Webway gates to consolidate your heavy units against the inevitable air assault
9) Advance to victory by surviving the initial standoff, rotating wounded units, and finally moving steadily forward.

***Super Secret Aeldari Strategy*** Autarchs (at level 6) will supercharge your economy!!! Build lots in the midgame!!!

General Tips & Co-Op Notes
Quick tips:
  • Negative loyalty is twice as bad as positive loyalty is good (-2% versus +1% per point). Therefore, *stay out of negative loyalty situations.*

  • Assume every forest and ruin is full of enemies until you’ve scouted it. Avoid overwatch traps!

  • Attack units you can destroy, because this will simultaneously raise your morale and lower theirs. For this reason, carefully consider the order of your attacks to maximize these advantages.

  • Move rear-echelon units forward *before* landing the killing blow with a different unit. Any unit within three tiles will gain experience and morale.

  • The Jokero trading items can turn a mediocre hero into a near-invulnerable tank. If you don’t know what to buy, non-combat heroes should start with the Tantalising Icon to avoid negative influence. All heroes should consider the Zoat Jerkin, the Adamantium Weave, and Endurance Implant in that order. Fighting heroes should eventually shop for the Dusk Blade, Axe of Blind Fury, and Mourning Blade of Lazaerek. Note that all three of the latter only aid melee attacks.

  • Building a lot of good early-game units (such as heroes) is a good substitute for building a few mid-game units, and lets you focus research elsewhere.

  • Even though later Eldar units are amazingly strong, they should be deployed as combined arms. The AI is remarkably good at countering single-unit strategies.

Co-op notes:
Aeldari make great co-op partners because of their mobility through the Webway and ability to build cities anywhere on the map. Use Warlocks to support your allies anywhere on the map; build Wave Serpents to transport their units when you need assistance.
Remind partners not to destroy gates near their cities, and consider building near them to truly unite your empires.

Conclusion
The Craftworld Aeldari can be a wonderful faction to play, mixing strategy and tactics, and rewarding patience with excellent end-game fighting ability. They definitely require time to learn because of the early game restrictions on growth and city placement, but there’s no thrill quite like vaporizing your enemies with Scorpions.

I hope you’ve enjoyed the guide and learned some things you didn’t know, even if you’re not playing Impossible just yet. Good luck, and please leave comments to help me improve.
14 Comments
Doc  [author] 16 Mar @ 1:22pm 
That's great! One of the toughest achievements!
Aneerah 16 Mar @ 9:18am 
Lovely guide. Got my Rhana Dandra achievement today following most of your tips ^^
Katzedrale 8 Dec, 2024 @ 6:10am 
I see, but I'm looking forward to the result.
Doc  [author] 8 Dec, 2024 @ 6:06am 
I did kinda hide the punchline, didn't I? It's actually difficult to explain easily, but it has to do with micromanagement of buildings...one of the reasons that the T'au struggle is their need for much more micromanagement than the other factions.
Katzedrale 8 Dec, 2024 @ 5:51am 
I'm curious, may I ask what the breakthrough is?
Doc  [author] 8 Dec, 2024 @ 5:34am 
Thank you for the compliment! After having played the T'au a dozen times or so, I'm not convinced they are reliably viable on Impossible. I recently made a 'breakthrough,' though, so it's possible...we'll see!
Katzedrale 8 Dec, 2024 @ 3:58am 
Very good guides! I am looking forward for your tau guide! ^^
Doc  [author] 16 Nov, 2024 @ 5:06pm 
Thanks so much for the kind words!

In my "humble" opinion...very much so! In versus, you'll notice the differences between factions much more dramatically, but at least the guide will help you keep your development moving forward.
BlackTeo 16 Nov, 2024 @ 3:45pm 
You doing great work with those guides:) I gotta ask, how useful they are in multiplayer? I'm often playing with friends, but kinda suck, if I apply these guides to my playstyle, will it help me?
Doc  [author] 14 Oct, 2024 @ 6:11am 
Thank you! The main goal is just to make sure you have fun with the Aeldari...it's easy to get frustrated with their growth mechanics.