Train Sim World® 5

Train Sim World® 5

25 ratings
British Rail Signals and Signs (TSW5)
By moss
A comprehensive resource designed to help users understand the railway signalling systems used in the UK. It explains the various signals, signs, and their meanings within the context of British railways.

To fully utilise this guide, you can use the table of contents on the right hand side to find parts you are looking for. This guide has both simple and advanced explanations to try and make it easy for as many people as possible to understand its contents.
   
Award
Favorite
Favorited
Unfavorite
UK Signalling - Introduction


The railway signalling system used across the majority of the United Kingdom’s rail network relies on lineside signals to regulate the movement and speed of trains.

Today’s signalling is a sophisticated evolution of the original absolute block system, which can still be found on quieter, secondary lines. The modern network primarily employs two, three, and four-aspect colour-light signals, controlled by track circuits or axle counters. These systems ensure safe train operations by constantly monitoring which sections of track are occupied.

However, there’s a limit to what lineside signals can achieve. They are only effective for trains travelling at speeds of up to 125 miles per hour (201 km/h). Beyond this, it becomes increasingly difficult for drivers to spot and react to signals in time. This is why faster trains, like those on High Speed 1, don’t rely on traditional lineside signalling. Instead, they use advanced in-cab signalling systems, which deliver critical information directly to the driver, allowing for seamless and safe travel at high speeds.

The UK’s railway signalling system is a fascinating blend of heritage and cutting-edge technology, ensuring the safe and efficient movement of millions of passengers every day.

Did you know the UK’s railway signalling dates back to the 1830s? Early systems used hand signals and flags, with semaphore signals arriving in the 1840s. While modern trains rely on advanced systems, some heritage lines still use semaphore signals, preserving a link to the past.

Understanding Colour-Light Signal Aspects in the UK
The UK's colour-light signals use a total of seven aspects, each with a specific meaning to ensure the safe and efficient operation of trains. Let’s break them down:

Green - Proceed at the permitted line speed. A green signal means the track ahead is clear, and the train can continue without slowing down, subject to any speed restrictions for the section or train. It’s the simplest signal and ensures smooth traffic flow, letting drivers maintain their pace while staying confident that the line is safe.


Yellow - Slow down and prepare to stop at the next signal. A single yellow warns that the next signal is red. Drivers must reduce speed and approach cautiously, ensuring they can stop in time. This aspect often appears near stations, junctions, or busy sections of track where other trains may be present.


Red - Stop immediately and wait for clearance. Red signals are non-negotiable and indicate that the track ahead is occupied or unsafe. Passing a red signal without authorisation (a SPAD) is a serious safety breach. These signals protect trains, passengers, and freight by maintaining safe distances and preventing conflicts.


Double Yellow - Prepare to slow down, the next signal is yellow. The double yellow aspect warns drivers that they’re approaching a single yellow signal. This early warning is critical, especially on busy or high-speed routes, where more time is needed to adjust speed. It ensures gradual deceleration, improving safety and passenger comfort.


Flashing Yellow - A junction is set, the next signal has a junction indicator. Flashing single yellow means the train will leave the mainline for a branch or sidetrack. Drivers need to prepare for the transition, adjusting their speed as needed. This aspect is crucial for managing safe movement through junctions on complex networks.


Flashing Double Yellow - Get ready to diverge, the next signal is flashing yellow. A flashing double yellow indicates an upcoming diverging route. This gives drivers time to adjust speed and prepare for a switch to an alternative track, such as at a junction. Flashing aspects are common on complex routes, ensuring precise and safe navigation.


Flashing Green - Proceed at maximum line speed. Used only on the 140 mph (230 km/h) trial section between Peterborough and York, flashing green allows trains to travel at full speed. A steady green here means the next signal will show double yellow, ensuring sufficient warning for high-speed operation.


The Role of Two, Three and Four Aspect Signals

Two-aspect signals are the simplest, using only red (stop) and green (go). This system is effective on quieter routes where trains don't travel at high speeds. It provides clear and easy-to-understand instructions for train drivers.

Three-aspect signals add a yellow light to indicate caution. This gives drivers more warning and helps them prepare for a possible stop at the next signal. It’s commonly used on busier routes where trains need a bit more time to react to upcoming changes.

Four-aspect signals go a step further, introducing a double yellow light. This system is typically used on busy or fast routes, where trains may follow more closely. The double yellow allows for longer braking distances and ensures greater safety by giving drivers extra time to react.


Why do we need Flashing Aspect Signals?

Flashing aspects, like flashing yellow or green signals, are used to give drivers early warnings about upcoming changes. A flashing yellow indicates a diverging route ahead, letting the driver know the next signal will be steady yellow and they need to slow down.

Flashing green signals are used on high-speed lines. They allow trains to continue at full speed, but the next signal will show double yellow to prepare the driver to slow down. Flashing signals help manage complex or high-speed routes, keeping everything running safely and smoothly.

Feathers, Route Indicators and Aspect Signals
Aspect Signals (as we’ve already discussed) are the traditional traffic lights used along the railway, like red, yellow, and green lights, that tell the driver whether to stop, proceed with caution, or go ahead.

Feathers are additional signals that are often used alongside aspect signals, typically to show a diverging route. They help guide drivers when there are multiple tracks or junctions. Feathers often have a shape resembling a bird's feather and are usually used for more specific instructions about which track the train should take.

Route Indicators are signs placed at signals or points along the track that provide extra information. They show which route the train will follow or the path it's expected to take. Route indicators work with aspect signals to ensure the driver knows the route they need to take, especially at junctions or complex track layouts.


Feathers

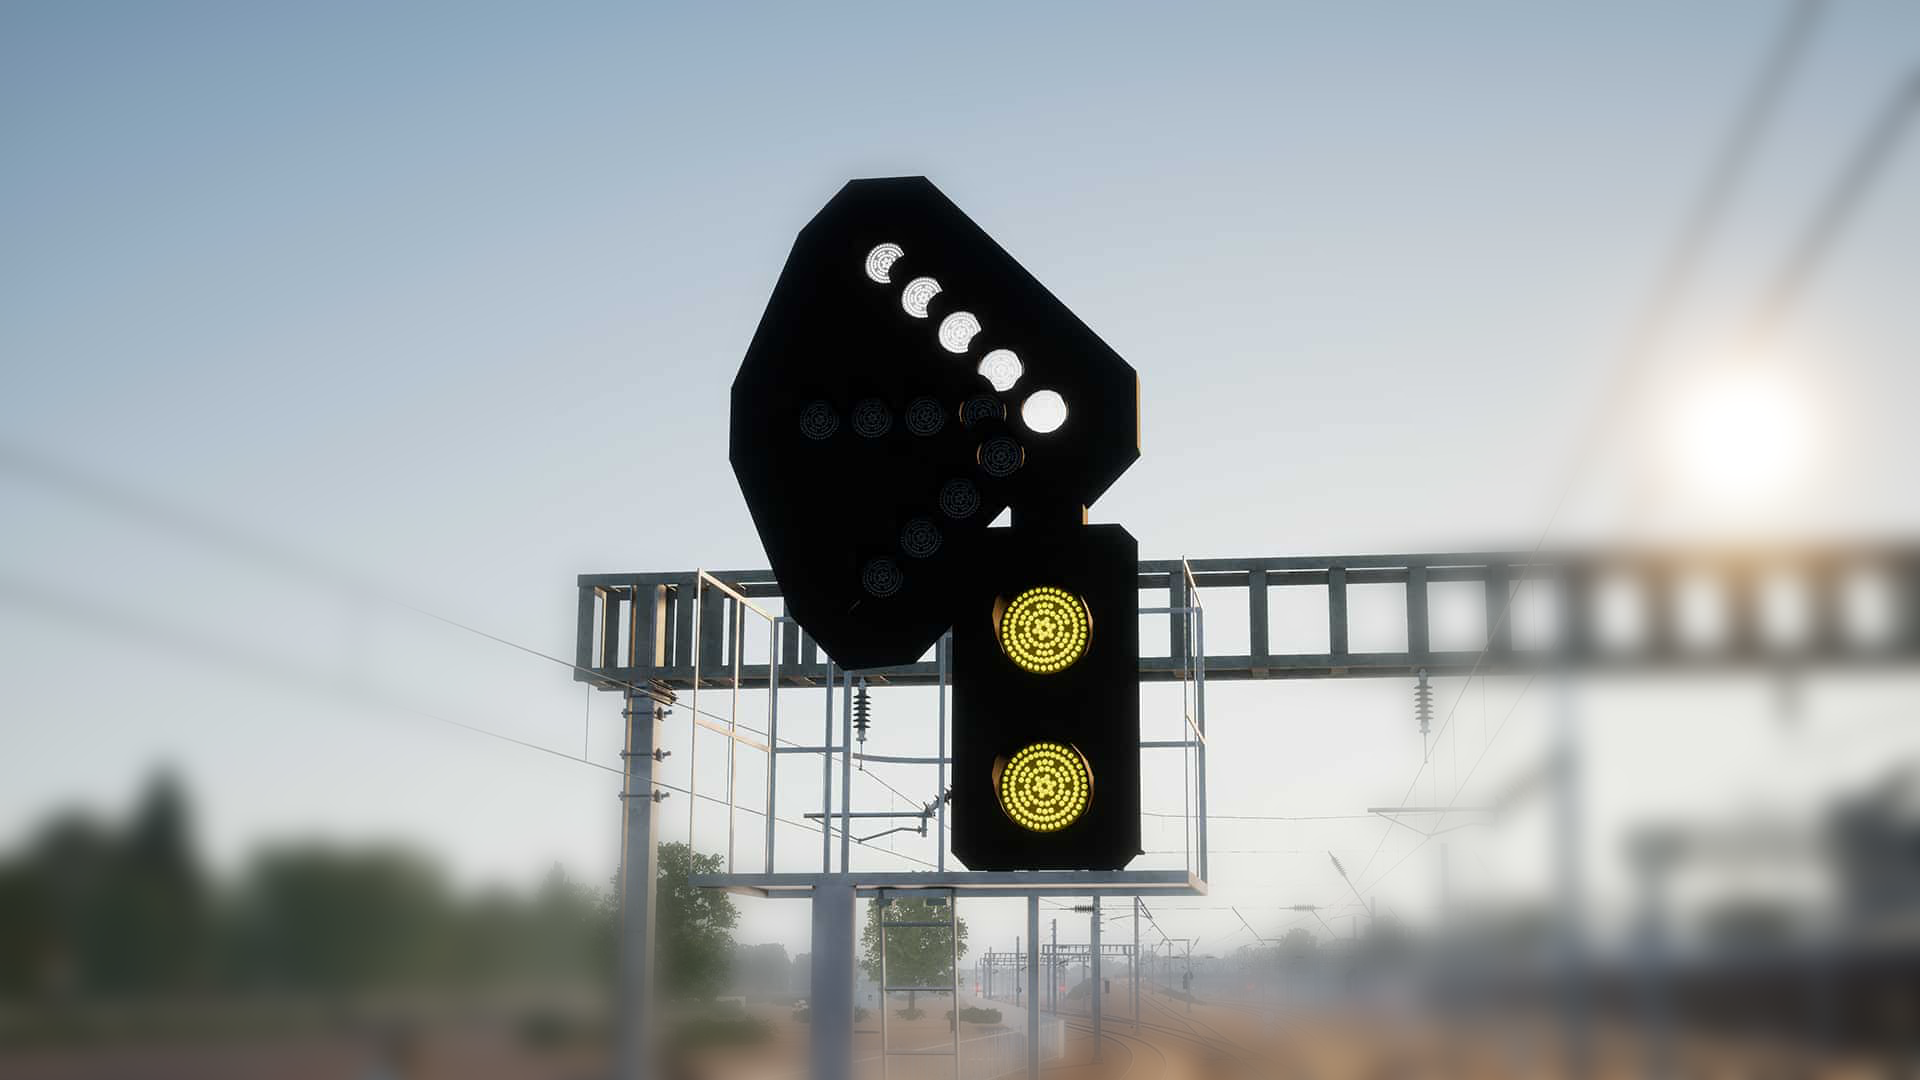
Feathers are used to indicate diverging routes. They are typically placed next to the aspect signals, often when there are junctions or multiple track options. The feather shows the driver which way the train will go, whether it’s a left or right turn or if a different route is set. Feathers have an arrow-like shape, pointing in the direction of travel. They help ensure that drivers are aware of the route change in advance, so they can adjust their speed or prepare for a switch in tracks. These signals are particularly useful in areas with complex junctions or where trains may need to change tracks frequently.

Below is an example of a Feather, ontop of an Aspect Signal displaying a Double Yellow.


Route Indicators

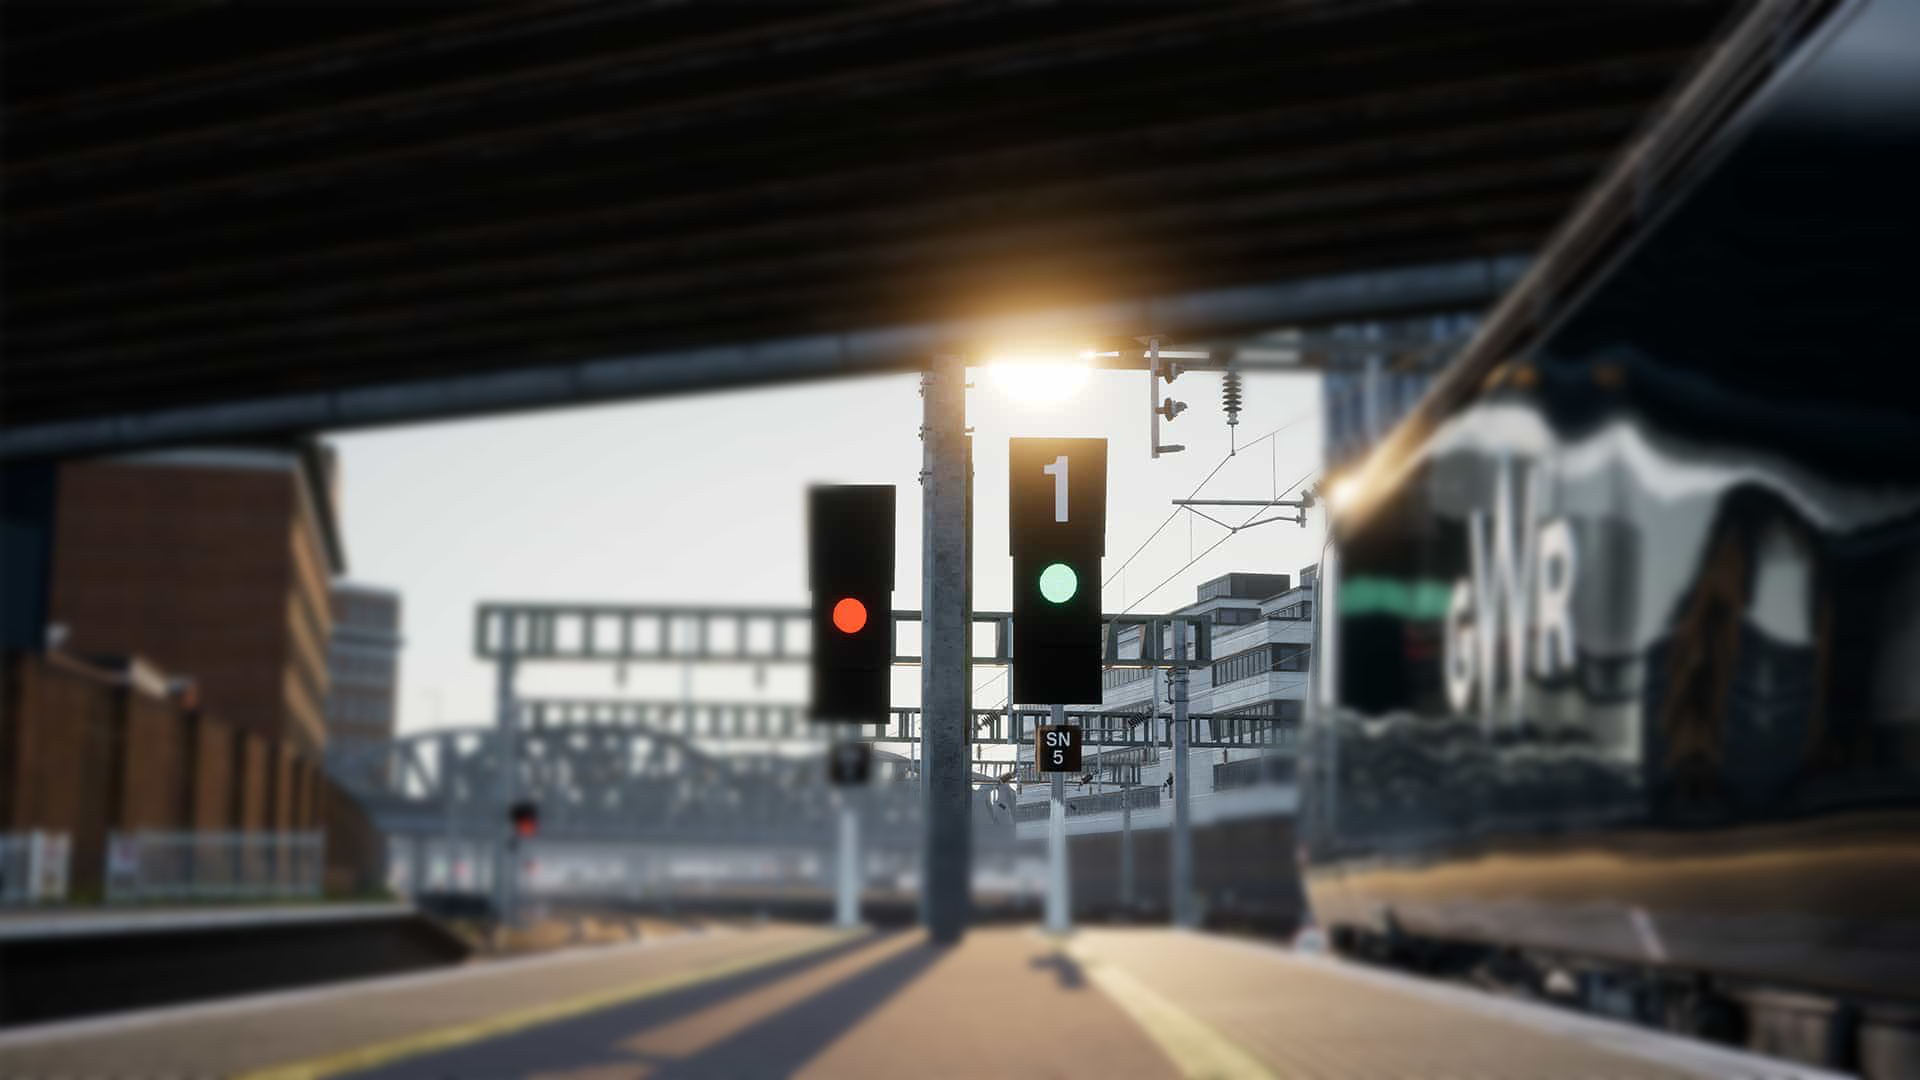
Route indicators provide specific information about the train’s route, helping drivers understand which track or route they will follow. These indicators are often used in combination with aspect signals, particularly at junctions or stations where there are multiple tracks or directions. The route indicator might display letters or numbers, which correspond to pre-set routes. In some cases, the indicator might also show additional symbols to confirm a particular path or direction. These indicators are critical for ensuring that drivers are prepared for any track changes well in advance, reducing the chances of confusion or mistakes at junctions.

Below is an example of a ‘theatre’ route indicator. At places such as London Paddington, where there are multiple tracks and routes, the starting signal theatre can inform the driver which route they are pathed on such as ‘1’ for Track 1 etc. or on approach to a terminus, which of the many platforms you are cleared into.


Banner Repeaters
Banner repeaters are used to provide drivers with an early indication of the aspect of a signal that may not be visible due to track curvature, obstacles, or distance. They act as a repeat of the main signal and are essential for maintaining safe train operations where visibility is limited. They ensure drivers have the information they need about a hidden signal further down the track, helping them prepare to slow down, stop, or proceed. Banner repeaters are mounted on posts or gantries and display a pivoting indicator or lighted disc that repeats the status of the main signal ahead.


Types of Banner Repeaters


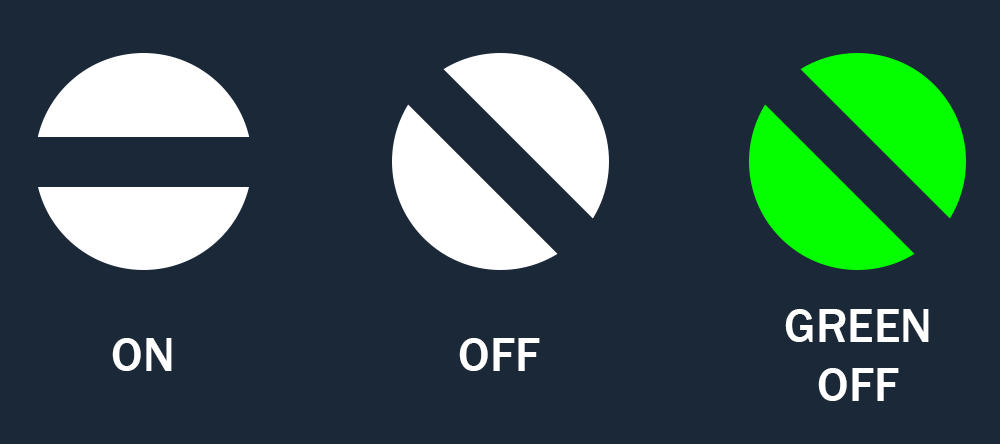
On: Displays a horizontal bar, meaning the distant signal is at danger (red), and the driver should expect to stop.

Off: Displays a diagonal bar, meaning the distant signal is showing proceed (green or yellow), allowing the driver to move forward.

Green Off: In some cases, the repeater will have a green light illuminated alongside the diagonal bar to confirm that the main signal ahead is showing clear (green). This is typically used for high-speed lines or areas where additional clarity is needed.


How Banner Repeaters Work

When a driver approaches a section of track where the next signal is not visible, the banner repeater displays the current status of that signal. For example, if the distant signal is red, the banner repeater will show "On" with a horizontal bar, warning the driver to slow down and prepare to stop. If the signal is green or yellow, the banner repeater will show "Off" with a diagonal bar, allowing the driver to proceed with caution or at line speed.
Why They’re Important

Banner repeaters are crucial in areas with poor visibility or complex track layouts. They reduce uncertainty for drivers and ensure that signals are clear, even when the main signal cannot be seen. By repeating the status of distant signals, they play a key role in maintaining safety and efficiency on the railway network.

Position Light Signals
Position light signals are used to guide trains into sections of track under caution, often in low-speed areas like yards or sidings. These signals allow movements where the line ahead may be occupied, requiring drivers to proceed cautiously at a speed that enables them to stop short of any obstruction. Modern position light signals are easy to recognise by their triangular arrangement of three lenses.

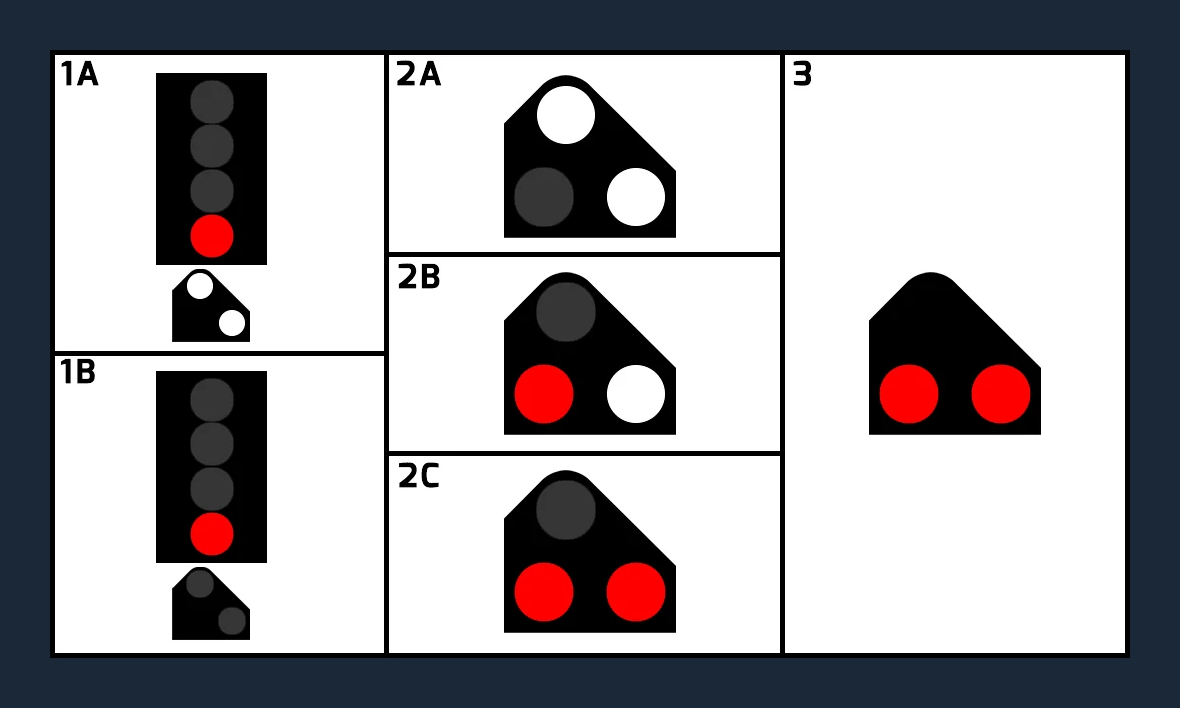
1. Subsidiary Signal: Subsidiary signals are mounted alongside main signals and are used for calling-on procedures, which allow a train to enter an occupied section of track, typically at platforms or stations.
  • 1A – Continue: The driver is permitted to pass the main signal, regardless of its aspect. This is usually displayed when a train needs to move forward into an occupied platform.
  • 1B – Stop: The driver must obey the aspect displayed on the associated main signal. This prevents unsafe movements while waiting for clearance.
2. Ground Position Light: Ground position lights are often found on standalone posts, unaccompanied by a main signal. These are most commonly used for shunting movements in yards or depots.
  • 2A – Continue: The signal displays a diagonal pair of white lights, allowing the driver to proceed cautiously for shunting purposes.
  • 2B – Stop (pre-1996): The signal displays a single red light alongside one white light, indicating that the train must stop. This older configuration was phased out in favour of a simpler design.
  • 2C – Stop (current): The signal now displays two horizontal red lights, ensuring clarity and preventing confusion with other signal types.
3. Limit of Shunt Signal: This is a specific type of ground position light that is used exclusively to indicate stop. It cannot display any aspect allowing movement, ensuring that trains do not proceed beyond a safe point for shunting operations.


Position light signals are an essential part of railway operations, enabling safe and controlled movements in complex areas while ensuring drivers remain vigilant and proceed with caution. The combination of clear light patterns and specific uses makes these signals invaluable for managing low-speed traffic in busy sections of the network.

Permissable Speed Indicators
In the UK, every railway line has a maximum speed limit known as the Permissible Speed. These speeds are essential for maintaining safety and efficiency, and they vary depending on the section of track. A permissible speed indicator is a sign that marks a change in the speed limit, alerting train drivers to adjust their speed accordingly. These signs are vital for ensuring smooth and safe train operations.

The maximum speed for each section of track is listed in Table A of the Network Rail Sectional Appendix, which train crews must study as part of their Route Knowledge training. When a speed limit increases, it only takes effect after the entire train has passed the speed indicator, including the rear of the train. This rule helps prevent derailments, as speeding up too soon could cause instability, particularly for long or heavy trains.


Types of Permissible Speed Indicators


1. Permissible Speed Indicator
This is the most common type of sign, displaying the maximum speed permitted on a section of track. The speed is shown as a bold white number on a black background.
  • Example: A sign showing 125 indicates the train may proceed at a maximum speed of 125 mph (201 km/h).


2. Differential Permissible Speed Indicator
  • This type of sign displays two numbers, providing different speed limits for specific types of trains.
  • The lower number applies to freight trains and slower-moving vehicles.
  • The upper number, shown below a horizontal line, applies to passenger trains, postal trains, parcel trains, and light locomotives.
  • Example: A sign showing 70 above a line and 40 below means passenger trains may travel at 70 mph (110 km/h), while all other trains are restricted to 40 mph (64 km/h).


3. Diverging Permissible Speed Indicator
This sign indicates the maximum speed for a diverging route, such as a track branching off to the left or right.
  • The speed shown only applies if the train takes the diverging route, not the current path.
  • Example: A sign showing 40 with an arrow pointing left means the maximum permissible speed on the diverging route is 40 mph (64 km/h). If the train stays on the mainline, the sign does not apply unless another sign is present.


Why Permissible Speed Indicators are important

Permissible speed indicators are critical for keeping trains running safely and on time. By ensuring drivers know when to adjust their speed, these signs help reduce derailment risks, maintain passenger comfort, and protect track integrity. They are a key part of the UK's railway safety system, working hand-in-hand with route knowledge to create a reliable and efficient rail network.

Authors Notes
Thank you for taking the time to read this guide on British railway signalling! I hope it has been both informative and engaging, whether you're a railway enthusiast, a train simulator player, or simply curious about how the UK's railways operate. It’s been a pleasure putting this together, and your interest motivates me to keep expanding and improving this resource.

This guide is a work in progress, and there’s always more to cover. Below is a checklist of topics I plan to add in the future to make this guide even more comprehensive. If you have any feedback, suggestions, or questions, please feel free to share them, I’d love to hear your thoughts!

To be added
  • Trackside Signs: Covering whistle boards, warning boards, and more.
  • Temporary Speed Restrictions (TSRs): Explaining how temporary speed limits are implemented and indicated.
  • Electrification Signs: Signs specific to electrified routes, including neutral sections and pantograph instructions.
  • Signal Placement: Why signals are positioned where they are and their impact on safety and visibility.
  • Historical Context: A look back at how signalling has evolved from semaphore signals to modern systems.
  • Miscellaneous Signals: Additional signals and boards, such as level crossing indicators, stop boards, and shunting limits.


This guide was created using resources found in-game and additionally from:

https://en.wikipedia.org/wiki/UK_railway_signalling
https://train-sim-world.fandom.com/wiki/UK_Signalling
https://www.networkrail.co.uk/stories/signals-explained/
https://www.railsigns.uk/
4 Comments
rmHawk765 15 Jun @ 2:52am 
I think that not enough emphasis is put on the fact that the NR signalling system is a route signalling system, and that the signals do not actually give any sort of speed indication. Users familiar with speed signalling systems like those in mainland Europe will probably be quite confused without this being specifically stated. In the flashing yellow descriptions, the fact that the driver must use their route knowledge to know what speed to slow down to is not mentioned. Also, there is no information on Enhanced Permissible Speed (EPS), Multiple Unit (MU), Advance Warning Indicator (AWI, aka Morpeth) and metric speed boards, all of which are present in TSW, and it is not in the 'To be added' section. PoSA signals are also not mentioned but these are quite new and not in any TSW route if my memory serves me correctly.
john 18 Apr @ 3:47am 
The use of the words "distant signal" when referring to a signal to which a banner repeater repeats could be confusing - particularly in a semaphore signalled area. Perhaps better to say the stop signal to which it relates? Being picky here - a distant signal will never show a red stop aspect, as that's not what it's there for.

A number of new readers may not understand the terminology SPAD as used - Signal Passed At Danger.......

And perhaps a little more detail on Absolute Block semaphore signal areas, as some of the routes in TSW are historical. They actually hold the key to all modern signalling and interlocking - no more than one train in one section of track at any one time except in exceptional (controlled) circumstances.

Good guide though. Well done that man!
Quince99 31 Mar @ 2:30am 
This is excellent - thank you. Having played literally thousands of hours of original TF and TF2, it gives a clear and concise guide about realistic signal placement within the game when creating a UK-style network.

Is there a way to download this article for future reference?
Bombardier 27 Jan @ 10:59pm 
це дуже потужно! Привіт з України!:flagukraine::flagukraine::flagukraine: