The Isle

The Isle

Not enough ratings
How to play ptera (2025)
By Drabalia
A guide for starting as Pteranodon in The Isle: Evrima.
Controls, stamina, food, nesting, mutations and thermals.
   
Award
Favorite
Favorited
Unfavorite
Starting, map, coordinates
To access Evrima:
The Isle > Properties > Betas > Beta Participation > Evrima

Customize your ptera as colorful as you want. Camouflage isn’t important when you spend most of your time above ground.

You currently can't choose your spawn location. Its about half-half between West Access and around the Dam Lake.


You can't see the map ingame. But you can copy your coordinates by clicking on it in the TAB (top right) and paste it in one of these websites: They also have many interesting features.

https://vulnona.com/game/map/# map: Gateway (v0.20)
https://www.islemaps.com/
Controls

Default keybindings

WASD
movement
SPACE (tap)
land: jump (x3 to take off)
air: gain altitude (+decrease speed)
to start flying from latching or mid-air while falling
CTRL 
land: crouch
air: lose altitude (+increase speed)
Z 
(recommend to rebind)
land: switches between walking and trotting
air: airbrake
SHIFT 
land: sprint
air: speedgain
X
night vision
Q (hold)
scent to find food, water and navigate with the compass
(being stationary gives you the maximum range)
E (hold)
eat and drink
G (tap)
land: pick up a chunk of meat, drop
air: toggle auto circling
G (hold)
pick up a whole small animal
H
rest (and regen stamina the quickest way)
sleep for safely logging off
TAB
character profile
N (hold)
court
build a nest
LMB
bite attack
snatch up small animals while flying
RMB (hold)
latch to basically anything: trees, rocks, walls
skim water
ALT+LMB
(ground only)
strike bite
for better control enable (Settings > Gameplay > Manual Alt Attack)
ENTER
chat
write /unstuck in it if you get stuck somewhere

Airbrake (Z): I recommend rebinding it to something more convenient (I use Mouse 5). It really improves maneuverability.

Calls and grouping
with default keybindings: 1, 2, 3, 4, F
  • Broadcast: Loud, long-range call for locating friends or drawing attention (good or bad).
  • Friendly/Group: Shows that you mean no harm and send/accept group invites.
  • Threaten: A warning to intimidate others or start a fight.
  • Scared: A distress signal, often used to alert allies to danger or ask for help.
  • F call is the same sound that plays when you type in chat.

    Stats and night vision


    Grow time: 1 hour 25 minutes.
    Growth stages: Hatchling: 1%, Juvie: 26%, Sub-Adult: 39%, Adult: 70%
    Flying speed: 54 km/h (cruising speed) – 108 km/h (max speed when holding shift)
    Running speed: 28.5 km/h (for 68 seconds and 540 meters)
    Swimming speed: 13 km/h (for 33 seconds and 119 meters)

    Pack Limit: 6 members
    Nest Type: collect 10 sticks
    Max egg amount: 4


    Press X to toggle night vision.

    Its effectiveness varies by species and weather conditions. On very dark nights, even night vision might not help much. You can improve visibility greatly through your system settings:
    • Windows Key > search "calibrate" > Calibrate Display Color
    • next, next, next
    • set the scale to maximum

      Flying and stamina


      Pteras have pretty good stamina, they can fly and glide for a long time.
      But they have horrible stamina regen. It takes about 4-5 minutes. So focus on preserving it.

      Take off
      stamina use
      what type
      how to do
      6 - 8%
      basic takeoff
      tap SPACE 3 times
      (1 space to jump, 1 to flap, 1 to begin flying)
      0%
      from a higher position like top of a rock/tree
      sprint/walk/fall off, then midair TAP SPACE
      from a latched position TAP SPACE


      You can save yourself from falling to your death with Tap SPACE:


      Land
      To land slow down by holding Z and aim your camera at your landing spot. For a quicker descent, also hold W. Hold them until you touch down. If you release Z without enough speed, you'll stall and fall straight down.


      Long distance flying using only stamina
      How to: Take off then aim slowly upwards while holding W until your wings begin flapping.
        This video is sped up 16x. The upward climb (holding W) took 3m35s, and the glide lasted 8 minutes, for a total of 11m35s. The wing flaps during the glide are part of the animation, no input was used.


        Some notes
        • Generally try to not use SHIFT or hold SPACE, as they consume a lot of stamina.

        • Sync SPACE taps with the wings downward flap to use stamina more efficiently while flying.

        • Stamina regenerates while latched if you're above 20%, or while standing if above 25%.

        • You can’t latch if you have 0% stamina.

        • You can still take off when Wounded, but not with Fractured Legs.

        • Sadly pteras can not dive into or take off from water, so try not to fall in. Swimming out consumes a lot of stamina, and in large bodies of water you will probably drown.

        • Using RMB while latched will drop you straight down.

        • Zoom in with the middle mouse wheel for tighter camera control. It helps a lot when flying through dense forests, almost like switching to first-person mode.

        • To travel long distances use thermals and slipstreams.

        • Perfect diet increases stamina regen.

        • Dont be afraid of flying close to objects. Lets say there is a herrera on that tree.


          Food and water


          Stomach drops from 100% to 0%: 50m
          Water drops from 100% to 0%: 45m


          Examples of all ai food and catching them:


          Tips
          • LISTEN to the animals sounds. The frog and chicken are obvious. The fish splashes. The crab digs the sand. The psittaco makes a very unique sound that can be heard from quite far.
          • Bushes also rustle if animals run through them.
          • Adult pteras can carry crabs, frogs, rabbits, chickens and pterodactylus. Tap G to pick up a chunk of meat, Hold G to pick up the whole animal.
          • Kill animals quickly on the ground with ALT+LMB.
          • After you spawn, eat anything because hunger drains very fast in the beginning.
          • Bait pterodactylus (=bird) by flying around with a piece of meat.
          • Save always a piece to get birds repeatedly for infinite meat.
          • Vomit sickness prevents nutrient gain, lick salt to recover.

          Perfect diet

          Diet types
          Stay where you want your food to spawn. Need fish and frogs? Stay next to water. Need chicken or rabbit? Stay in the middle of a field (hiding in a bush or on a tree). Many times they spawn very close and they even have a few seconds of no movement or hostility (chickens fight back).
          (This is recommended when you are going for perfect diet, not when you are starving.)

          Gastrolith
          As you grow, it becomes harder to fill your hunger with all three diet types. This is where pecking at a gastrolith rock helps. The effect only lasts for 1 minute, so you need to stay nearby. The best strategy is to chase the bigger preys toward the gastrolith, then kill and eat it there. This way, you can immediately peck the stone again between bites, without wasting stamina flying back and forth.

          Slower nutrition decay
          Enhanced Digestion is a hidden mutation that causes your nutrition bars to drain 10% slower.
          You can unlock it by maintaining a good diet (or better) for a long time. Check for this mutation around 75% growth.


          Water
          Getting water is much easier. Fly until you find a safe spot to drink. The more water, the less likely you will get eaten.
            Reniculate Kidneys (hidden mutation)
            • This lets you drink saltwater, which makes survival even easier.
            • Unlock it by drinking saltwater until the "Fluid Deficient" status disappears.
            • Do it near plenty of food and water so you can recover after vomiting.
            • Licking salt fixes vomit sickness.

            Mutations


            Every player gets to choose 3 mutations as they grow, unlocked at:
            • 14% growth – first mutation (when you spawn)
            • 39% growth – second mutation (about 30m of gameplay)
            • 100% growth – third mutation (about 1h 25m of gameplay)
            If you forget to choose one before the next unlock stage, you’ll miss out on that slot entirely.

            If you nest and raise hatchlings, they will inherit 3 chosen mutations of the parents randomly and be able to pick 3 additional mutations of their own as they grow.

            All available mutations for pteras below. Some only unlocks for specific mutations slots. If its not specified, its all slots.

            The floor is lava (Recommended for new players)
            • Efficient Digestion . . . Food drains 20% slower
            • Sustained Hydration . Water drains 20% slower
            • Reabsorption . . . . . . . Recover water during rain

            Combat ptera
            • Accelerated Prey Drive . . 10% more damage to animals with low health
            • Congenital Hypoalgesia . 15% less incoming damage when fighting larger species
            • Hemomania . . . . . . . . . . . 5% extra damage on bleeding target

            Chill beach-life and nesting
            • one of the floor is lava
            • Prolific Reproduction (2) (Female Only)
                                  Increased health and stamina regen for your babies. They also require less food and they grow faster.
            • Enhanced Digestion (2/3)
                                  Slower nutrition decay. Hidden mutation, unlocks by maintaining a good diet (or better) for a long time. Check for this mutation at around 75% growth.
            • Reniculate Kidneys (2/3)
                                  Can drink saltwater. Hidden mutation, unlocks by drinking saltwater until the effect 'Fluid Deficient' disappears from your status report. Do this where there are plenty of food and freshwater.
            Other options
            • Hematophagy . . . . . . Eating gives 15% water
            • Osteophagic . . . . . . . Able to eat bones. Hidden mutation, unlocks by eating bones.
            • Reinforced Tendons: Jumping costs less stamina: 3% -> 1,5%. Hidden mutation, unlocks by
                                  jumping 50 times.
            • Hypermetabolic Inanition (2): The less hunger you have the more damage you deal.
            • Traumatic Thrombosis (2): Prevent death from blood loss if resting.
            • Heightened Ghrelin (2): Increases the amount of food you can eat and before you vomit.
                                  Hidden mutation, unlocks by having full stomach for a while.
            • Multichambered Lungs (2/3): Reduced stamina regen threshold. Hidden mutation, unlocks
                                  by using a lot of stamina. Check for this mutation after 75% growth.
            • Cannibalistic (2/3):. . Unlocks by eating multiple full stomachs of pteras. You will suffer
                                  muscle spasms which will heal overtime.
            • Augmented Tapetum (2/3): Better night vision. Hidden mutation, unlocks by killing 4-12
                                  players during the night.

            Not recommended or its situational
            • Enlarged Meniscus: . . . . . . . . . . . . Fall damage hits stamina before draining health
            • Osteosclerosis: . . . . . . . . . . . . . . . .Resist/Reduce fracture damage by 20%
            • Cellular Regeneration: . . . . . . . . . .Recovers health 15% faster
            • Hydro-regenerative: . . . . . . . . . . . Recover health 25% faster during rain
            • Gastronomic Regeneration (2) . . .Eating gives health
            • Featherweight: . . . . . . . . . . . . . . . .Your footprints fade 50% faster
            • Wader: . . . . . . . . . . . . . . . . . . . . . . 25% less hindered when wading through shallow water
            • Epidermal Fibrosis: . . . . . . . . . . . . 15% increase bleed resistance
            • Photosynthetic Tissue: . . . . . . . . . 5% faster health regen and moving speed during the day
            • Nocturnal: . . . . . . . . . . . . . . . . . . . 5% faster health regen and moving speed during the night
            • Increased Inspiratory Capacity: . . 15% increased O2 Capacity
            • Hydrodynamic: . . . . . . . . . . . . . . . 15% increased swimming speed
            • Submerged Optical Retention: . . . 5% increased underwater vision range
            • Infrasound Communication: . . . . . 50% less noise when talking in chat
            • Advanced Gestation (Female Only): 50% faster egg gestation


              Combat and health


              Practice pecking at AI first to get a feel for how low you need to fly. LMB (bite) has decent range, so you don’t need to dive too close. If you do, you risk colliding with your target, falling, and getting eaten.

              Circle above and strike. Headshots deal the most damage, but they’re riskier since enemies may bite back.

              Fighting anything that can jump is not recommended.

              You can still fly up and shake off a Troodon if it pounces on you.

              Water is your enemy. Pteras can't take off from water. Falling in will drain stamina fast, and in deep areas, you’ll likely drown.

              Use ALT+LMB on the ground for a stronger attack.

              Bleed does not stop you from flying, but if you're low on stamina, you're vulnerable. Rest often latched to trees/rocks and heal far from the ground. Watch out for Herreras climbing to you resting spots.

              Fractures (broken legs) prevent takeoff. Avoid risky landings and collisions.

              Salt rock heals vomit sickness or being poisoned.

              Pteras don't get attacked by bees in sanctuaries.
                Nesting

                • Group up with an opposite gender ptera.
                • Court by holding N facing each other. (at least 70% grown)
                • Once bonded, the female can gestate eggs
                • Information of the eggs and nest can be reached via TAB > NEST
                • Eggs grow over time before they are ready to be laid.

                Building the nest
                • Choose a safe, elevated location (tree branch, rock, etc).
                • Hold N to place the nest.
                • Gather 10 sticks: use Q to scent them, G to pick them up, E to add to the nest.
                • After the nest is built, eggs can be laid by the female standing over the nest and pressing E.
                • Keep the eggs temperature stable, not too cold, not too hot.

                Joining Settings
                • You can choose who is allowed to join as a hatchling under the NEST section:
                  • Private – Only players with the code, which you can accept/decline.
                  • Public – Open for anyone to join.

                Raising Hatchlings
                • Babies can’t eat regular food. Feed them by regurgitating with E directly into their mouths.
                • Begging ends at 13.2% growth. After that, they must find regural food and water.
                • Hatchlings inherit 3 random mutations from the parents, then choose 3 more as they grow.

                Additional Nest Info
                • You can only have one nest at a time.
                • There is a 5-minute cooldown before placing a new nest.
                • Nests can be destroyed by attacking them.
                • If one of the parents dies, the nest is automatically destroyed.
                • Stick collection is known to be buggy.

                Thermals, slipstreams


                Thermals: Warm air that lifts you up without using stamina.
                • Found above huge rocks and have to be very close to see some particles flying upwards.
                • Activation times varies (see picture)
                • Not during heavy rain or storms.

                Slipstreams: Wind that pushes you forward with little stamina use. Flying against slows you down and takes more effort.
                • Found at tree canopy height and have to be very close to see some particles flying sideways.
                • Active between 6:00 – 12:00
                • Not during heavy rain or storms.


                  Future content
                  (These features have been mentioned, but nothing is guaranteed)
                  • Infrared vision
                  • New alt attack


                      4 Comments
                      Tunnel Bait 2 Jul @ 8:32pm 
                      Nice guide, this is really well put together and hopefully can help others become masters of the skies too.
                      I have only a couple of small mentions to compliment your work.

                      -It should be emphasised that, as recommended changing your "Air-Brake" keybind to a mouse button or something more convenient will improve your gameplay experience significantly.

                      -Holding down Q for one full animation whilst standing (as a rule of thumb) will grant you the maximum range for your scent ability with every dinosaur. Sound cues will help too.
                      Tunnel Bait 2 Jul @ 8:31pm 
                      -For maps and finding your location;
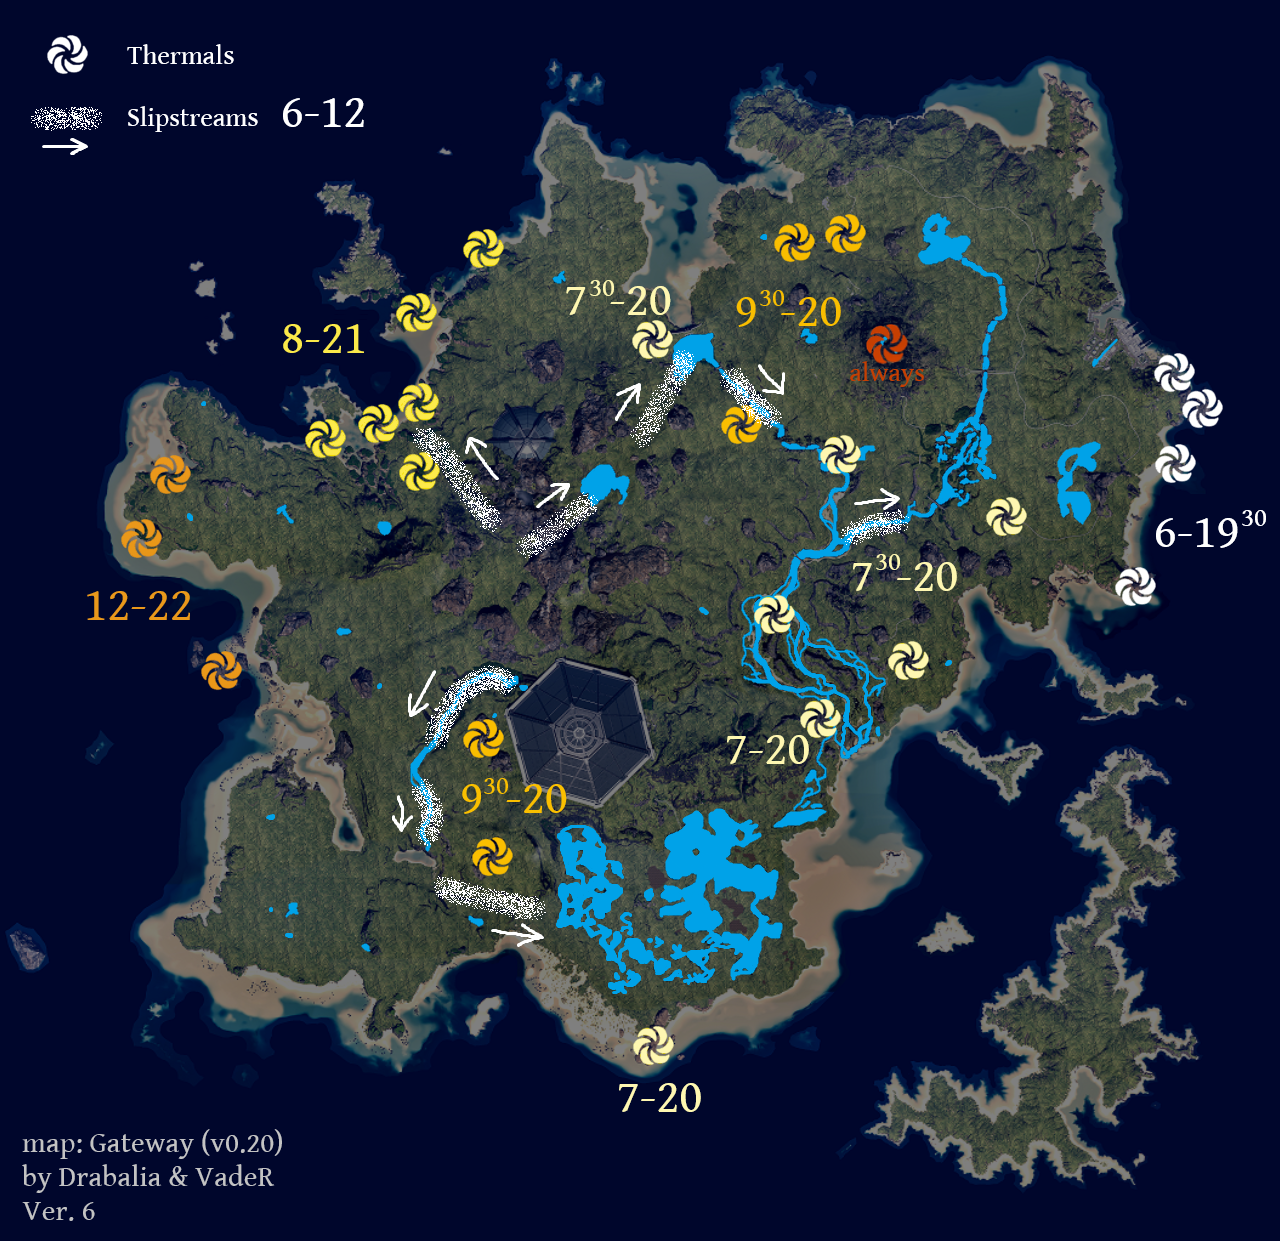
                      Firstly you will want a reliable and frequently updated map, I STRONGLY recommend using Vulnona, https://vulnona.com/game/map/#
                      Click [_Close_] which appears in the centre of the page
                      On the top left of the screen select your map in the dropdown selection: Select the map "Gateway" with the most recent date.
                      Under that dropdown is a box, "Location"____xxx, yyy"
                      Simply paste your co-ordinates here and press show.

                      Whilst in-game, press "TAB" and simply left-click on your co-ordinates shown at the top right of the window. (That will copy your current co-ordinates to your clipboard).

                      Vulnona also has many features for map data you can toggle on and off the sides, I encourage messing with the options in Map Data yourself as even AI spawns and patrol zones are very accurate and represented clearly.
                      Also known user uploaded locations of hazard spots to avoid, such as un-escapable terrain and areas which can get you stuck until starvation.
                      guillotine sandwich 28 Jun @ 8:11am 
                      Nice guide man. Didn't miss a single thing.:steamthumbsup:
                      miho4boco 27 Jun @ 5:33pm 
                      Thanks for the map but i have no clue where i am without a in game map so i find it very hard to find any food or anyone else.
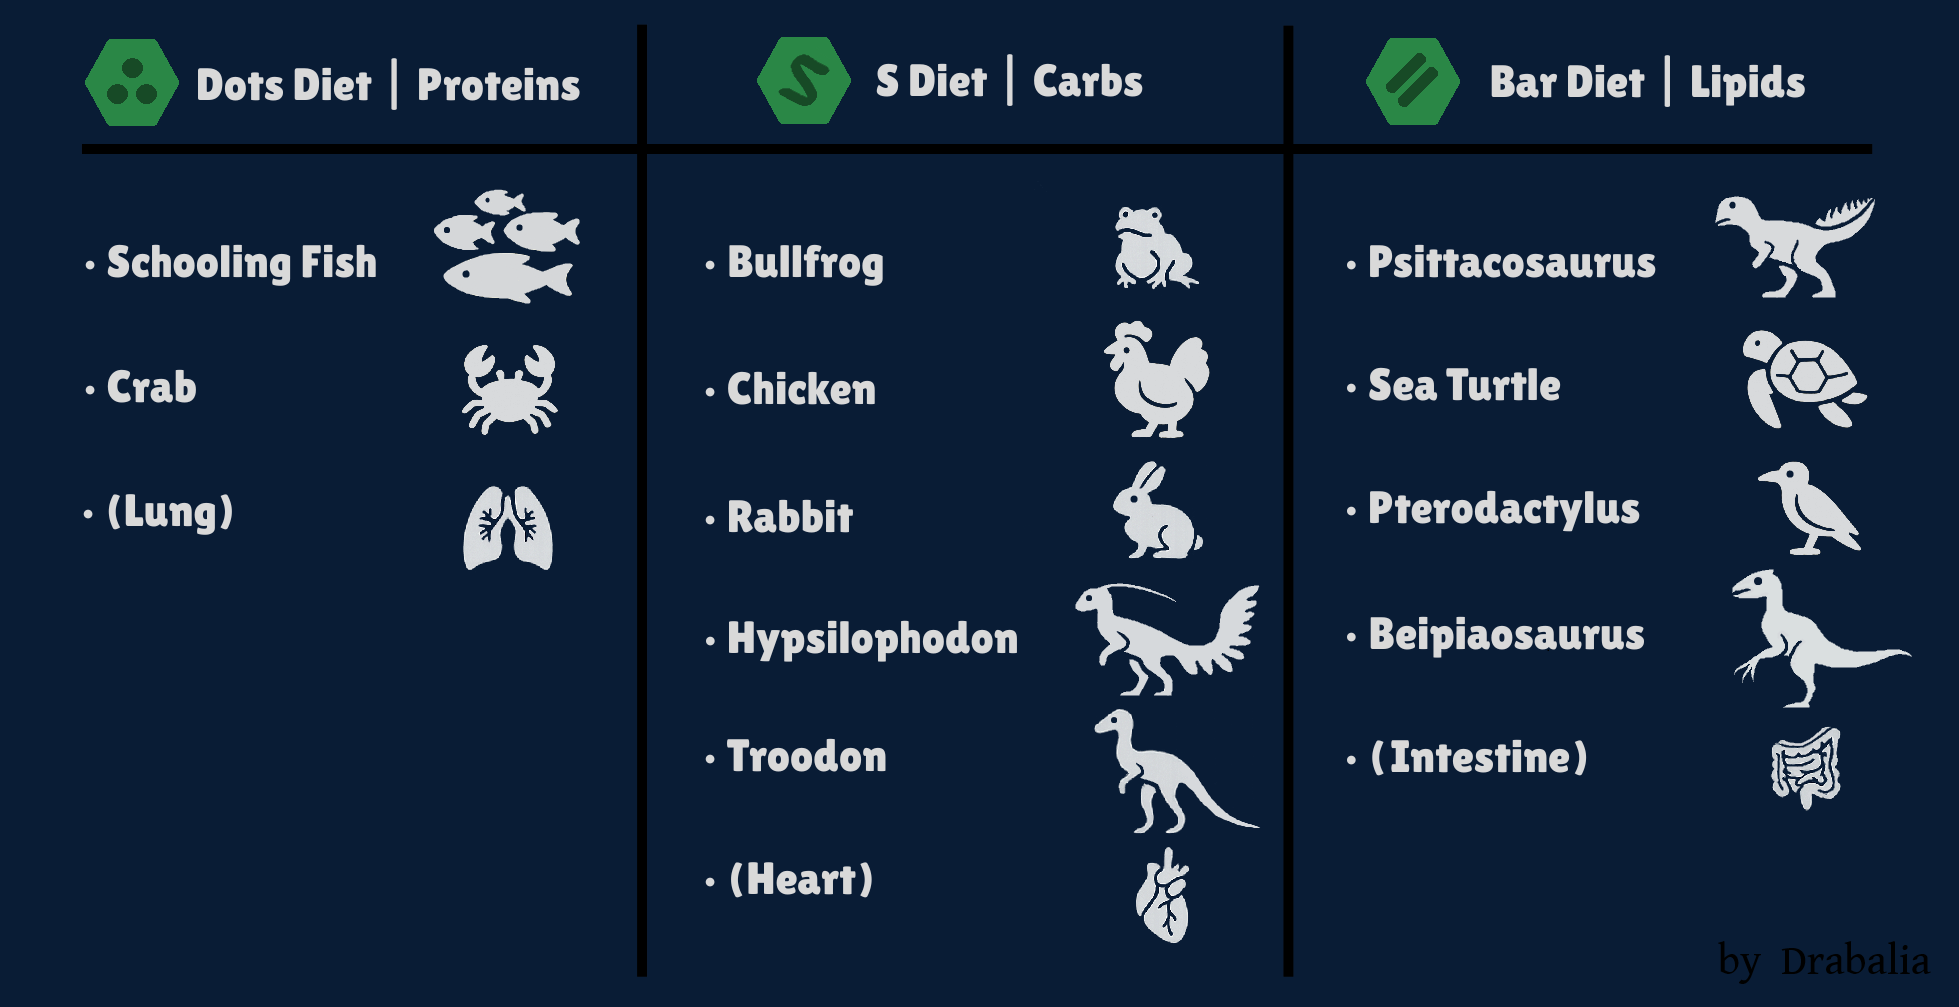
                      i had a look at the islemaps.com page which is very helpful with the food lists.