Distance

Distance

28 ratings
[EN] USE OF TELEPORTER
By Guizmodo
As you know, the teleporter requires an entrance and an exit. But how to position them correctly ? This guide will explain everything to you.
   
Award
Favorite
Favorited
Unfavorite
1. What positioning mode use
First of all, check that you are in "Local Space" in the "EDITOR" tab. If you are in "Global Space", click the "Switch to Local Axis" button.

Why be in "Local Space" rather than "Global Space" ? Simply because the "Local" mode gives you the basic direction of the objects in the editor. The "Global" mode will allow, however, to move objects on the axes bases "X", "Y", and "Z" of the editor.

Explanation in images :
2. How to position a teleporter
Back to the teleporter. As you know, the teleporter requires an entrance and an exit. But how to position them correctly ? And well we're just going to help us with the blue arrow of the Gizmo that corresponds not only to the "Z" axis, but also in the direction of operation. And as you guessed, this means that for the entry of teleporter, the blue arrow will indicate the direction in which the vehicle is entered; and for the exit, the blue arrow will indicate the out direction of the vehicle.

Explanation in images :

Useful information : The green arrow ("Y" axis) represents the vehicle roof while the blue arrow ("Z" axis) represents the traveling direction of the vehicle.
3. Exit teleporter with CheckPoint
The exit of the teleporter ("TeleporterExit") has an option "CheckPoint" that can turn on or off by checking or unchecking the "TriggerCheckPoint" box located in the "PROPERTIES" tab. This option, which is enabled by default when you insert the object in the level, allows the player to respawn at that location in the event of voluntary or involuntary disintegration. So it is very important to set the exit direction teleporter to avoid player to reappear facing a wall or in the wrong direction of the race. With the blue arrow Gizmo in "Local" mode, you do not risk more badly positioned this item and all players will be excited to practice your circuit without disappointment.
4. Examples of positioning
Example 1


Example 2


Example 3


Example 4


Exceptions : Regarding of arenas in the game mode "Reverse Tag", if you create two separate rooms, do not worry about the blue arrow, but you are focusing on the green arrow that represents you the roof of the vehicle for the teleporter.

Explanation in images :
The environment of space, or large areas without gravity, still in the game mode "Reverse Tag", three arrows Gizmo do not matter. Indeed, in the space we are free to go where we want.
5. The links
The possibilities of links are endless and some of them are complicated to explain. But fear not, I will explain with examples to make it easier to understand.
5.1 "Teleporter" - "TeleporterExit"
The most logical of all, it's the link "Teleporter" - "TeleporterExit". We have one entrance and one exit, and is useful to get from point "A" to point "B" in a world where one wishes to avoid over decorate with buildings. All the more so we have the ability to enable or disable a "CheckPoint" at the exit of teleportation.

Explanation in images :


The configuration is as follows :


All "LinkID" must have the same value. If you want to make two teleports (A to B and C to D), will require that the "LinkID" of A ("Teleporter") and B ("TeleporterExit") are "0" and that the "LinkID" C ("Teleporter") and D ("TeleporterExit") are "1". If you add a third teleportation, in this case the "LinkID" E ("Teleporter") and F ("TeleporterExit") should be "2" and so on ... Remember to carefully observe the direction of teleportation helping you blue and green arrows in the "Local" mode of the game editor.
5.2 "Teleporter" - "Teleporter"
The least known and yet used in the story mode of the game, it's the link "Teleporter" - "Teleporter". We always have one entrance and one exit, but it works this time in one or two directions. Let me explain. You can make an only direction teleport from point A to point B as the link "Teleporter" - "TeleporterExit" but this time without "CheckPoint". But you can also make two directions teleportation : the first direction from point A to point B, and the second direction from point B to point A. The disadvantage is that there will be no "CheckPoint" with this link mode. You will need to add either the object "EmpireCheckPoint", "EmpireCheckPointHalf", "CheckPointNoVisual" at the output of "Teleporter". But in what cases can you use this link teleportation ? And well you can use it in all your circuit creations, but it is most useful in the game mode "Reverse Tag" if you realize two arenas.

Explanation in images :


The configuration for the two directions is as follows (recommended) :


The configuration for a single direction from point A to point B is as follows :


The fact of putting all "LinkID" of "Teleporter" A and B will allow to link them and creates a two-way teleportation. That is to say that the "LinkID - TeleporterEntrance - A" will steer the vehicle towards the "LinkID - TeleporterExit - B" while the "LinkID - TeleporterEntrance - B" will steer the vehicle towards the "LinkID - TeleporterExit - A"


Now, when you put a different value to "LinkID - TeleporterExit - A", the "LinkID - TeleporterEntrance - B" can not steer the vehicle to the "LinkID - TeleporterExit - A", thereby creating a link to a single direction.


Be careful that no "LinkID" of the object "TeleporterExit" is identical with "LinkID - TeleporterExit" of the object "Teleporter", otherwise you will get a link between "Teleporter" - "TeleporterExit" instead of the link "Teleporter" - "Teleporter".
5.3 "Teleporter" - "Teleporter" - "TeleporterExit"
Always in trouble not to increase your project, you can achieve a double link. That is to say a "Teleporter" teleport the vehicle to a second "Teleporter" teleporting in turn the vehicle toward a "TeleporterExit" with his "CheckPoint" on or off according to your choice. To what use this double bond ? Well, simply to help you to realize circuit loops in your level allowing players to interbreed if they do not all take the same direction when they come out by the "Teleporter" B and thus to make your level completely exceptional.

Explanation in images :


The configuration for the double link is as follows :


In this configuration we find the link "Teleporter" - "Teleporter" in one direction, combined with the link "Teleporter" - "TeleporterExit". So here we have the "LinkID - TeleporterEntrance - A" that will steer the vehicle towards the "LinkID - TeleporterExit - B" but the "LinkID - TeleporterEntrance - B" can not steer the vehicle to the "LinkID - TeleporterExit - A". As the "LinkID - TeleporterExit - C" has the same value as the "LinkID - TeleporterEntrance - B", the vehicle will be directed from "LinkID - TeleporterEntrance - B" to "LinkID - TeleporterExit - C".


6. Conclusion
Now that you know properly configured the teleporters and you know the three types of possible links, you can realize that there is a multitude of possibilities in the level conception. Give free rein to your imagination and please share your creativity through the "Workshop Distance" on "Steam". I look forward to discover your creations. It was a pleasure to have you helped ! See you soon on the game "Distance".

Guillaume
(my Steam account : GT91240)
10 Comments
BEPISMAN.exe 31 Dec, 2019 @ 9:34am 
thanks
ℕ𝕦𝕜𝕒ℂ𝕠𝕝𝕒V2 30 Sep, 2017 @ 3:37pm 
A+++ Guide <3!
Host 7 Jul, 2015 @ 6:08am 
I think this is a simpler rule for LinkIDs:

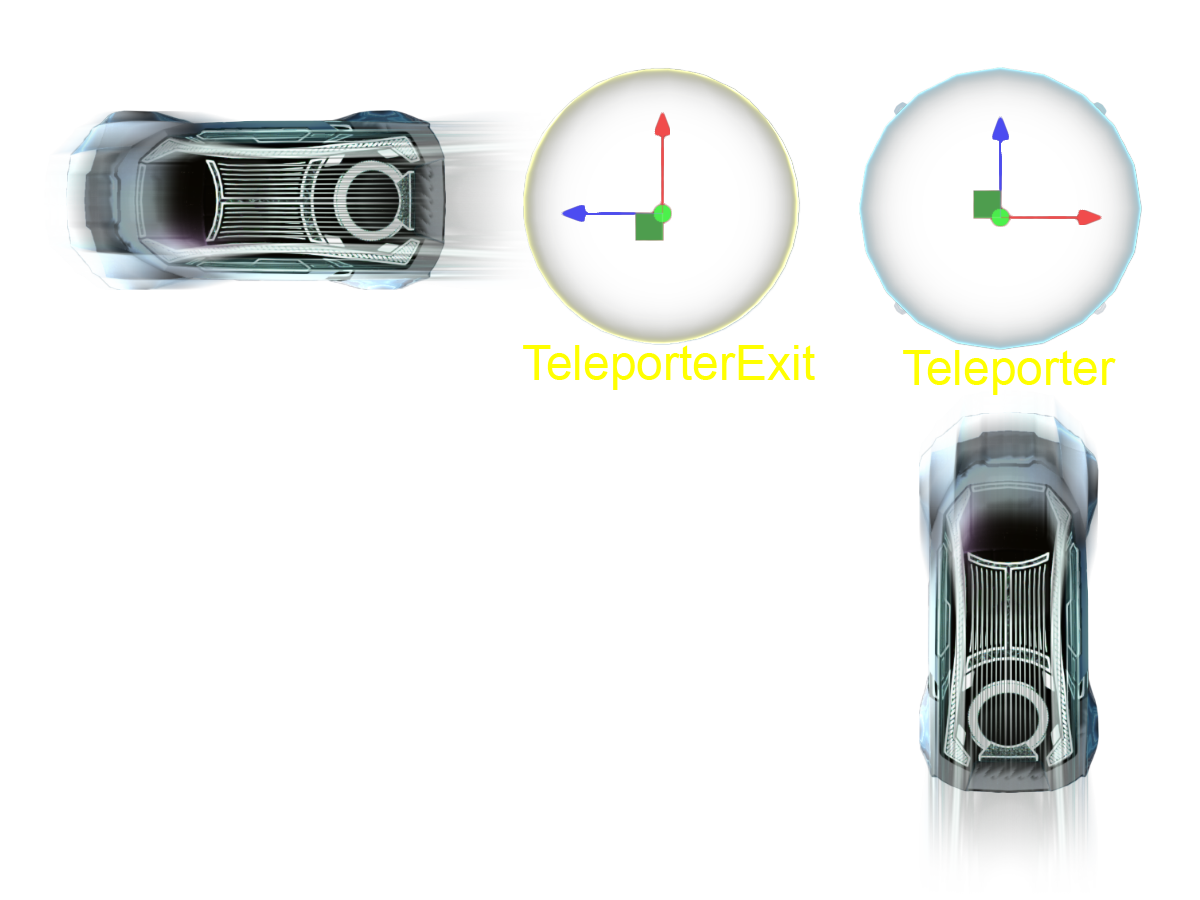
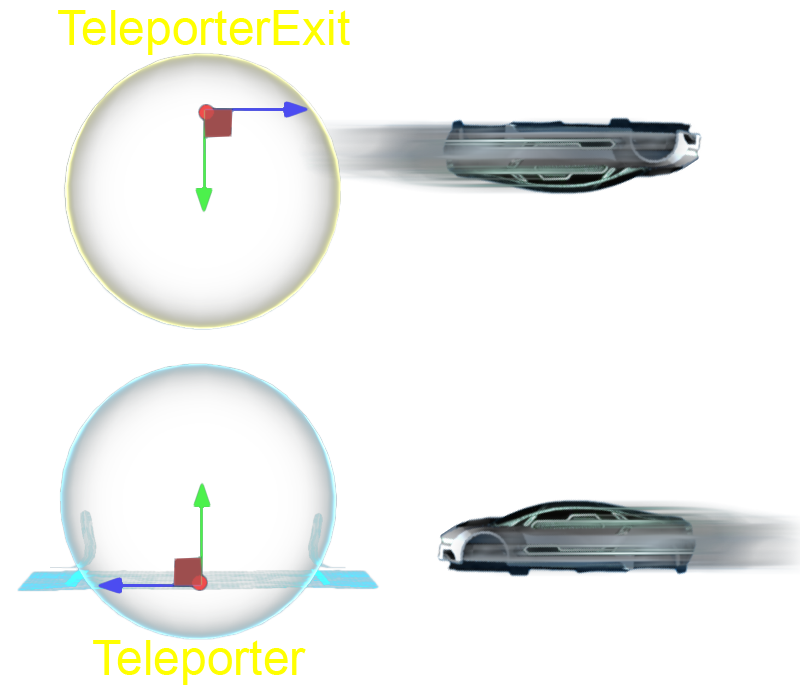
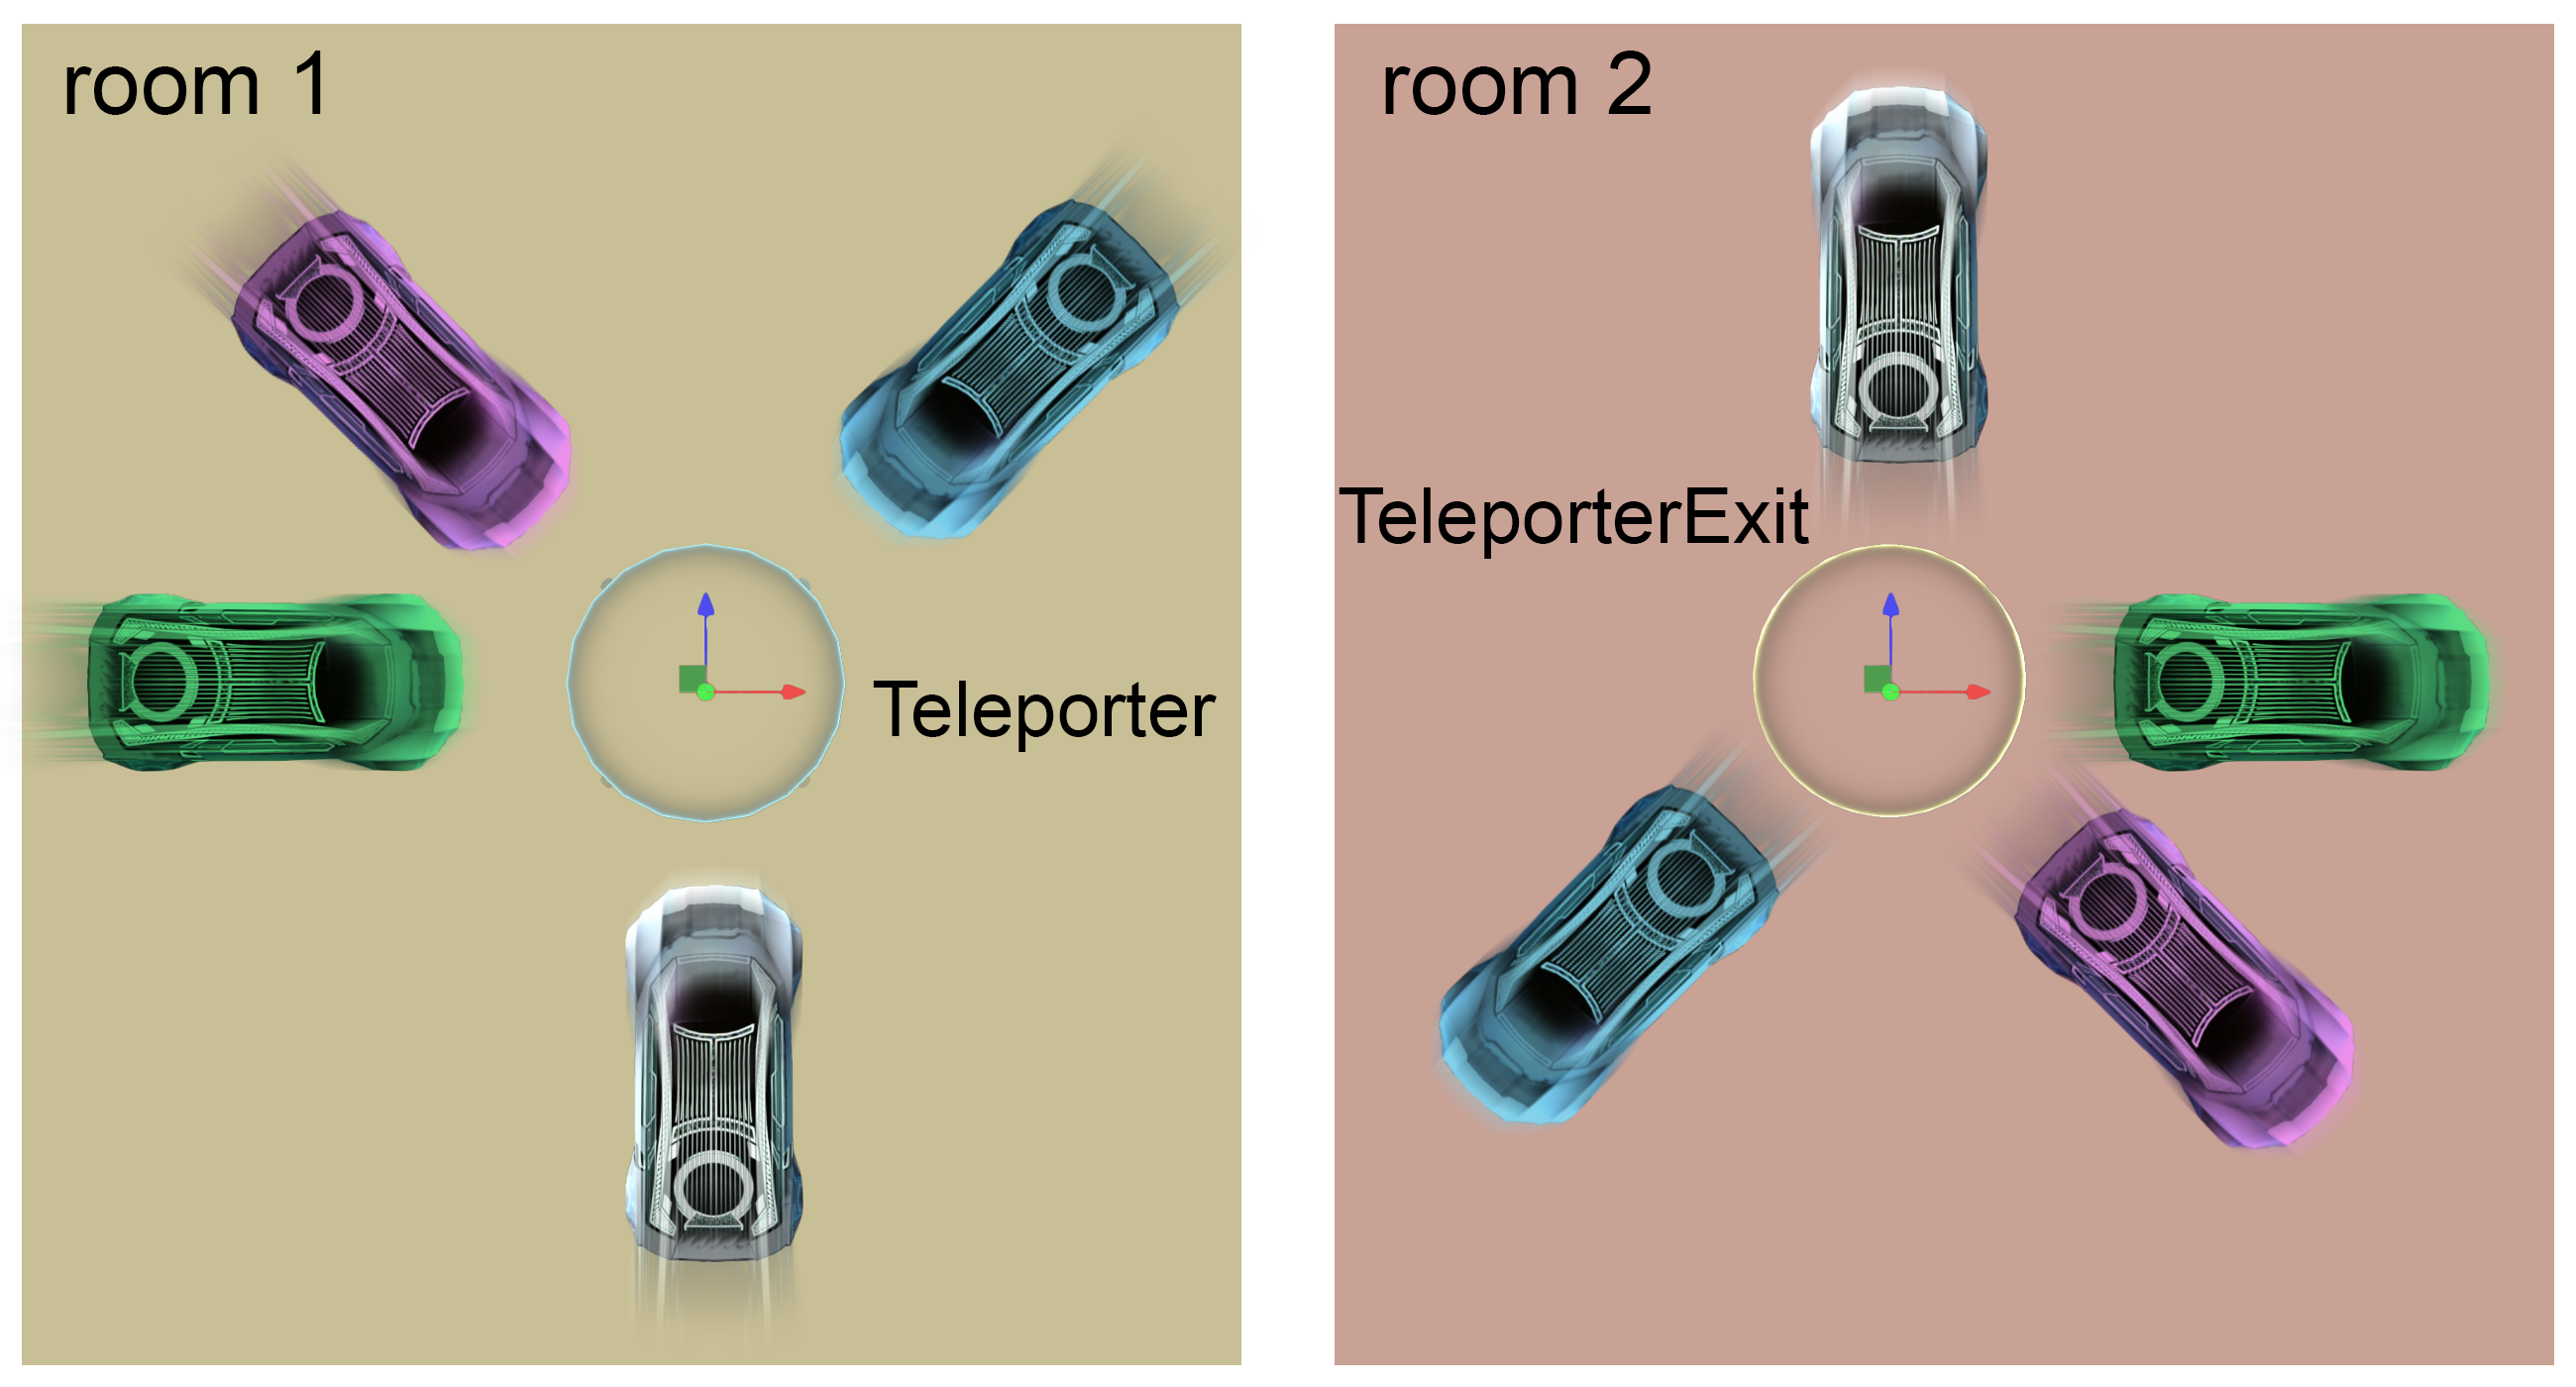
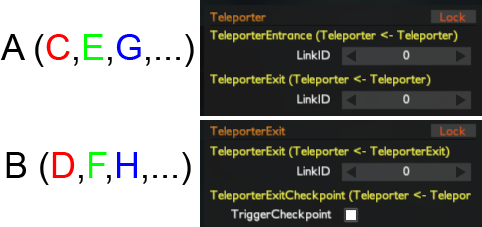
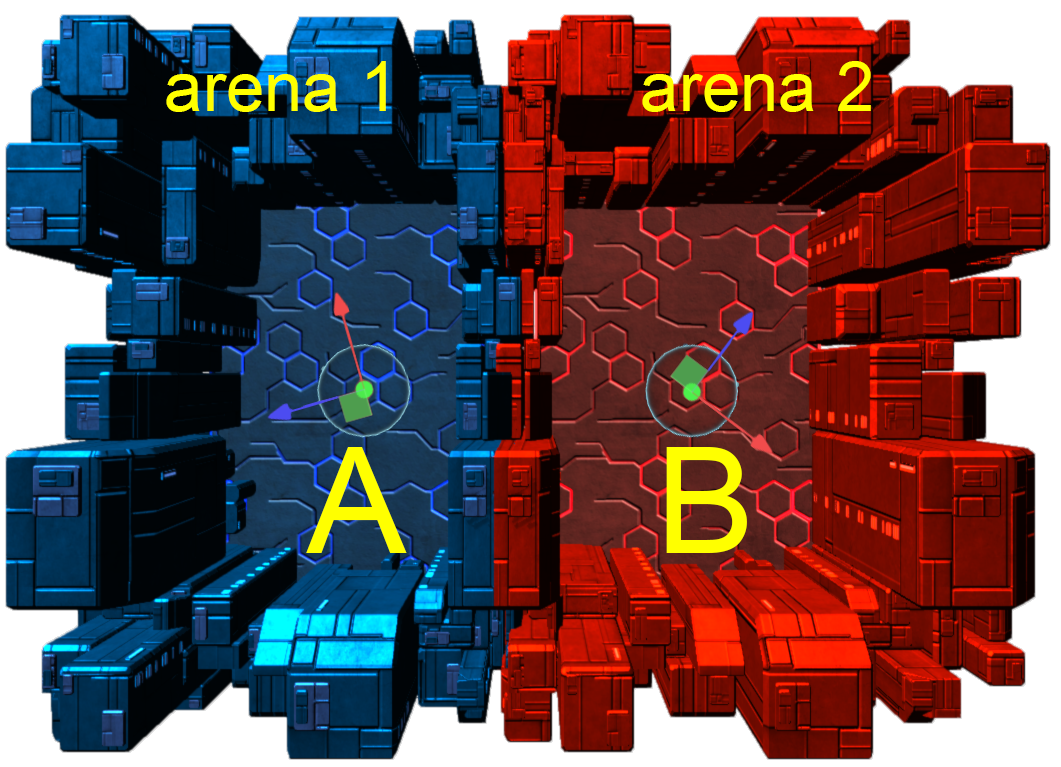
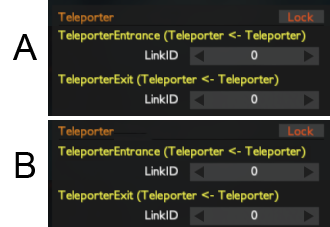
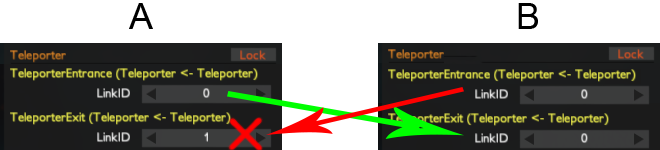
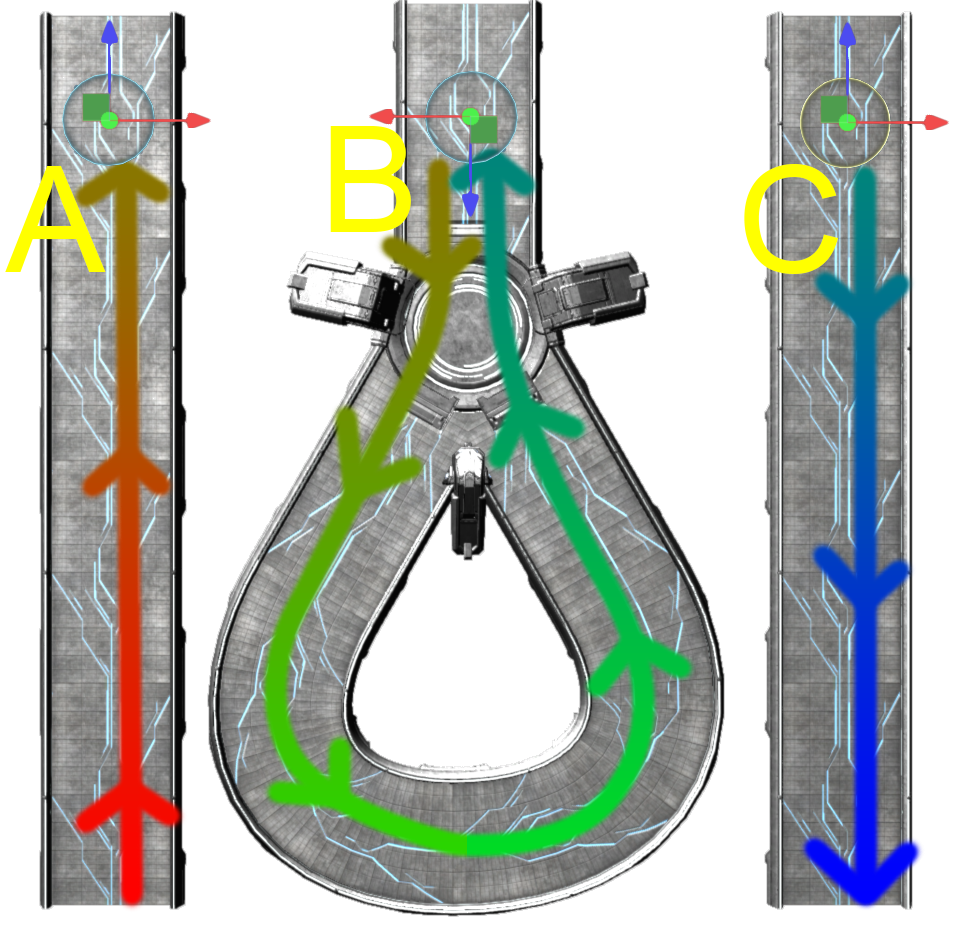
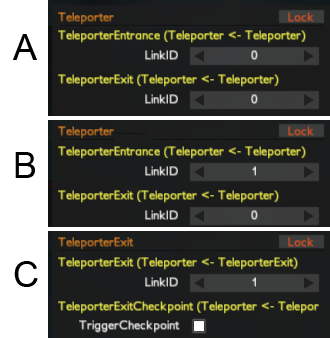
1. Give each TeleporterExit LinkID a unique number.
2. For every teleporter that you intend to use as an entrance, set its TeleporterEntrance LinkID to the same number as the exit's TeleporterExit LinkID.

This removes any ambiguity.
Guizmodo  [author] 26 Jun, 2015 @ 11:34pm 
Thank's snakeeye98 . The objective of this tutorial is that everyone can take advantage of teleporters. So I did my best to make this tutorial the easiest and the most understanding as possible. :)
snakeeye98 26 Jun, 2015 @ 5:41am 
Very good and also optical very attractive guide :3
Guizmodo  [author] 7 Jun, 2015 @ 2:05am 
Hi theJudeAbides it is quite possible to do as you wish. To do so, it is necessary that the "LinkID TeleporterEntrance" of teleporters are equal to "LinkID TeleporterExit" the output teleportation and that the "LinkID TeleporterExit" of teleporters has the same number and at the same time different from all other objects transporter. We can thus link an infinite number of teleporter (1, 5, 17, 34, ...) to single-output.

image explanation : click here [fbcdn-sphotos-h-a.akamaihd.net].
theJudeAbides 6 Jun, 2015 @ 5:14am 
Is it possible to have two teleporters lead to the same exit teleporter? For example, let's say your main path splits into two going in two different directions, and at the end of each path there is a teleporter which both lead to a single teleporter exit which takes you to the finish.

It seems like this should be possible.
Guizmodo  [author] 27 Apr, 2015 @ 7:07am 
Thank's Broscar
See you soon on " Distance " ;)
Broscar 26 Apr, 2015 @ 6:44am 
What a great guide.
A+ man :)
Guizmodo  [author] 25 Apr, 2015 @ 12:14am 
It's great Nic . I wish you a good creativity full of imagination.