Project CARS

Project CARS

409 ratings
SuperSic's Super Sick Tuning Guide
By RotGoblin
This tuning guide is an attempt to explain and help you understand how tuning works in this game, and how each different value will affect your car in game.

Tuning takes time and patience, but hopefully with the help of this guide you'll be setting personal best laps all day.
   
Award
Favorite
Favorited
Unfavorite
Introductions


THIS IS A WORK IN PROGRESS, IT IS BEING UPDATED CONSTANTLY
If you have any suggestions, I will listen.

It seems that some of you guys are having some issue getting your head around all the tuning options available in Project CARS. You're not alone, it's still giving me a headache but i've found a few tricks and settings that are obviously giving me a little advantage at the moment.

So why should you listen to me?
Because i'm trying to help you. I don't claim to be the fastest guy in the game, because i'm not. But i'm not slow either. In the header is 4 different cars on 4 different tracks, and i'm top 3 on all of them. I'm not a driving god, I just like tuning. And maybe with some tuning help you can beat me and the other true aliens out there.

If you are a clean driver, feel free to add me on steam as a friend. I currently spend most of my time in GT3, GT4 and Touring Cars, but I am branching out to other car disciplines slowly.
Part 1 - Drive Systems and Engine placement
The first thing that people need to understand is the different drive systems implemented in the game, as this drastically effects the tuning setup.

Front Wheel Drive:
These tend to be your low end road cars, and the Clio Cup touring car class. Front engine'd cars that are trying to turn and accelerate through the front end means that at speed these cars are constantly fighting themselves.
So a general tuning setting for front wheel drive cars is to make the front fairly soft, allow for a reasonable amount of body roll and improve the traction, because if the front wheels break contact with the ground, you'll just end up with truckloads of understeer.
This has an unfortunate side effect of making the rear a bit loose, i'm still working on a "cure" for this myself, and essentially my options so far have been a rear end that's a bit drifty, which costs you mid corner speed, or a rear end that wants to hospitalise you when you go on the brakes, which when you get it right, is fast as all hell, but when you get it wrong, it goes oh so very very wrong.

The most important tuning aspects for these front wheel drive cars are:
Suspension Spring Rate
Sway Bars
Brake Duct
LSD/Differential
Camber


So you can skip ahead to those sections if you wish.

4 or All Wheel Drive:
There aren't many 4WD cars in this game, currently they consist of the Audi R8 V10 PLUS, Mercedes-Benz A45 AMG and the Mitsubushi Lancer Evo X FQ400.
4WD systems are heavy, you have extra weight due to each axle having to be a powered unit. So it has to be taken into account that these cars will take longer to brake, and will run wider in turns. To compound on this fact 4wd itself will push a car wide mid corner because the front axle is overloaded with power, and wants to push wide and understeer like a FWD car, and the rear is impatiently shoving the front around the bend like a snow plough and just compounding the issue even further.
So why bother with 4WD? Acceleration. My god can these things get out of a bend quick. Extra weight makes extra grip, and having each wheel dragging and pushing you forward with the right settings these cars go like the clappers. So really you only need to figure out how to make the damned things turn at a reasonable speed.

Now the Merc A45 AMG and the Evo FQ400 have very little tuning settings, so you can soften up the front for extra grip similar to a FWD car, and then you just gotta hope for the best. I was hoping for some YAW control or weight tuning settings but we have to make do with what we're given. So i'd run a shallower rear camber to make the rear grip more the front, soften up the front suspension for initial turn in, soften the rear sway bar, and pretty much coast these cars into a bend off the throttle, aim for your exit point, and just gun it. Worry about your entry and exit speed and let the rest work itself out.

The Audi R8 at least has some differential tuning, but it's still a bit on the naff side. I'd probably set the differential settings fairly weak to allow great mid corner speed and just let the fat engine power you out.

So unless SMS brings in YAW control which will let you slide the power ratio between the front and rear axle's, your limited to tuning these cars. Most importantly you'll be tuning the:

Camber
Spring rate
Bump rates
Rebound Rates


Rear Wheel Drive:
This is the meat of the game, and so it rightly should be as at this moment in history, time and space, a rear wheel drive car is the fastest way around a circuit. The front wheels do the turning, the rear wheels do the accelerating, nothing gets confused.
A 4 wheel drive car will out accelerate a Rear wheel drive car in most circumstances, but under braking and mid corner speed a RWD car will just smoke the 4WD.

The important thing to note with these RWD vehicles is the placement of the engine. When in the vehicle selection, the car info screen will tell you the vehicle drive setup, which in this case is RWD, and then the engine placement.
My Ginetta GT3 car for example is listed as RWD Front.
This is important to the tuning.

The placements listed in this game are:
Front Engined (because us Brits are stubborn)
Rear Engined (Because the Germans are even more stubborn)
Mid-Engined (because everyone else knows better)


A Mid Engined RWD vehicle is always going to be inherently more stable than a Front Engined, or Rear Engined vehicle.

Generally speaking the engine can be sat lower down in the car, creating a lower centre of gravity, great for turning, and a nice central weight distribution for the car to pivot around when turning.

Don't get me wrong, however. Front and Rear engines have their advantages too. A front engine car has a lot of front end grip, so you can usually brake harder, and turn in quicker and attack corners harder than a Mid Engine'd vehicle.
But come the mid corner all that weight up front is going to try to drag your sorry ass wide. So you're looking for a setup that gives you a quick turn in to hug the apex, and a grippy rear so you can nail it out of the corner.
This is personally my favourite driving style. The stop and squirt. Go on slow, roll it through the apex and just hit the gas as hard as the rear will allow you to aim yourself at the exit and onto the next corner.

A rear engine car has, unsurprisingly, all it's weight over the rear (who knew?), This is predominantly a Porsche design as most other companies have realised how stupid this is and moved to Mid Engine. But Zee Germans will not give in and are coming up with all sorts of crazy technology to balance their cars and keep them competitive. It's frankly why most Porsche cars have looked the same since 1980. Because if they change it too much than their weight distribution will go to hell and they'll have a very big hospital bill from their angry test drivers.
So why have they stuck with this? I mean under braking a Rear Engined car just wants to rotate around and reverse into a corner killing you and anyone in front of you, because it's easier to stop something by pushing from the front, than it is to drag it from the rear. And IF you get it into the corner without dying.. Suddenly the front weighs as much as a bag of skittles, realises it has no grip and spears you off outside the track limits to a horrible fiery death.
But if you've got this far, and you've hit the brakes, and made it through the turn, you get to the fun part about rear engines...
All your weight is sitting in the back.. And it's sure as hell faster to push something forward than it is to pull it. So it squats down on it's little fat bum and accelerates like a bat out of hell.
So what does this mean for you?
Well it means "Zee Germans have spent a lonk time tunink zee car to make sure it is not wiz zee killink of you."
Tweak a rear engine'd car too much from factory settngs and you might just die.
This doesn't mean it's impossible, it just means you have to be very careful. So my recommendations will be to focus on the front springs and sway bar to get it to grip through the bends, and spend a lot of time working on the brake balance and differential to make sure you go into a corner still facing forwards.

Brake Balance
Brake pressure
Differential
Spring rate
Sway Bars
Part 2 - In Depth Tuning Analysis
The first thing to note here is that tuning takes time. Set yourself aside an hour or so for each car to find a base setting you like. Why? Because to fully understand how each tuning affects the way the car drives you should only really tweak 1 or 2 settings at a time. Tweak them, do a couple of timed laps, go back, tweak a couple more, or make further adjustments to the ones you already changed, do a couple more timed laps.

This does take time, and you're not always looking for the fastest time, you're looking for pace AND consistency. Take it from me, it's no good being fast if you throw yourself off the track 3 laps out of every 5.

But once you have a basic setup for a vehicle, logic dictates that that base setting will roughly translate to a similar car, allowing you to speed up the tuning process for that vehicle. But do not expect to be able to swap your Front Engined RWD setup straight onto a Mid-Engined car as you'll soon find yourself with no front end grip and probably spending a lot of time facing backwards.

Now on to each individual tuning setting and a rough guide to how it effects the way your vehicle drives.
Tyres & Brakes


Tyre Compound: Most cars are limited to just dry and wet weather tyres. They speak for themselves. Some come with an Intermediate tyre, this will generally be a go between dry and wet weather tyres, giving you a reasonable amount of grip in both conditions. The downside is that if a track dries up completely these tyres will overheat and go off quickly, leaving you with no grip, and no chance. So only choose intermediate tyres when the weather is constantly shifting and going full dry or full slick is too risky. But allow yourself time to pit in for a change of tyres if the weather were to swing too far in one direction.

Soft Tyres will give you the most amount of mid corner grip, for the least amount of duration. I have heard mention of Soft Slicks on a good setup lasting for 20 laps, so in most cases these will be the choice for you.
In hot weather soft tyres are at their best. They will fall apart faster but will also give the maximum amount of grip.

Hard Tyres are for endurance racing, they provide less grip for a much longer amount of time, so with fuel permitting you can go longer stints without pitting in to change tyres. I am yet to test this in game but a hard tyre in real life will give you greater feel under braking, and are less likely to lock up under heavy braking BUT only if the tyres are fully up to temperature. You might find yourself running hard tyres under cold conditions for braking stability, but adjust the tyre pressure to match the conditions.

Medium Tyres are obviously something in-between. More grip than a hard tyre, lasts longer than a soft tyre.

=======================================================================

Tyre Pressure: Tyre pressure is incredibly important. A lower pressure will provide a greater surface area, and therefore grip, but will also overheat faster. A high pressure will provide less initial grip, but with less side to side movement should provide greater stability under cornering, and should provide better feedback under braking.

You'll often find yourself running a higher tyre pressure on the drive wheels, to stop them from overheating, but don't have a drastic difference between the tyres as this will cause an imbalance in the vehicle and likely make you lose overall grip.


=======================================================================

Brake Pressure:
This is your overall braking strength. A higher % will stop you quicker, but will also lock up much easier. And if you lock up you will find stopping much more difficult and a lot slower. Brake pressure is directly linked to the Brake Balance, if you move the brake balance towards the rear of the car, you will need a higher % of pressure to get equal stopping power, this might give you a better temperature balance between the 4 wheels, but move the brakes too far towards the rear, or make them too strong, and you will start spinning under braking.


Move the balance towards the front of the car, and you might find yourself having to lower brake pressure %, due to the brakes locking up too easily. Lower the pressure too much and people will outbrake you, and you'll be an easy overtaking target.
And move the brakes too far forward and your car will run wide under braking.

If you find yourself trail braking into corners then you'd want a slight bias towards a front brake balance, however if you find a car understeering on corner entry, you might be able to fight this with a little bias towards the rear of the car.

Brake balance goes hand in hand with the differential settings. So keep those in mind when adjusting these. The differential under braking might stop a car from spinning under braking when running a rear brake bias.

Brake Duct: This is actually very important. If your ducts are too open your brakes will not hold their temperature and you will lose time in the braking zones. If your brakes are too closed the brakes will overheat and you'll find yourself with very little stopping power.
An added complication is that the wind pressure flowing past the brakes make a difference to the downforce of your car. Closed brakes actually increase downforce!
Not massively, but you might find those extra tenths you've been searching for in the twisty sections by closing up the brake ducts slightly. But as with the tyres... Watch those temps. Keep them around or under 1000 degrees celcius for a lot of cars.

========================================================================

Traction Control Slip: This is only available to those with Traction Control enabled.
A lower % will mean that the tyre will spin less before the traction control kicks in, this will cost you power but gain you grip. Low settings are useful in the rain.
A high % will allow the wheels to spin a little more freely, this can give you a little more exit speed but also opens you up to a higher risk of spinning. A high percentage in bad weather could leave you in the barrier.
Aerodynamics & Chassis


Front Downforce
A greater angle here makes more air resistance over the front of the vehicle. This will result in greater front end grip when turning, but only at high speeds.
Front downforce has a big effect on your top speed on long straights, and has little effect in slow speed corners, so be careful when adjusting this value.

I have found that on some tracks with long straights, and then a collection of tight corners rather than sweeping bends, I am actually running no front downforce at all.

You can also run less front downforce on a car that is spinning under braking. Because sometimes this is caused by the front having too much load under braking, and the rear simply carrying more speed and trying to overtake the front.
Less downforce means less load. You can also decrease the load with lower braking pressure and/or stiffer front springs.

Rear Downforce
A larger amount of rear downforce keeps the rear of the car loaded through fast corners. And you can make fairly large adjustments to the rear wing without damaging top speed too badly.

The extra rear downforce will help the rear tyres grip through the mid-corner, but bear in mind that this amplifies your own tuning settings, so a setting that favours an understeering rear for exit grip will be made to run wider through a bend by the downforce, and you may be faster with a lower setting.

On the flip side, high rear downforce should help you stop a car from spinning mid corner, allowing you to run a tuning setting that is more favoured to oversteer.
But be careful, during slow corners there isn't enough wind pressure to help you, and you might find yourself wheelspinning and rotating the car on the exit of slow, tight corners.

========================================================================

Weight Jacker:
Used for Oval racing, this will move some of the car weight to the front inside of the vehicle to help keep the front end loaded and gripping through the bends. This should make the car turn slightly on the straights however.

========================================================================

Lateral Weight Bias:
I am yet to tinker with this setting so this is only theorywork, but in theory this will adjust the centre of gravity in the car towards the inside of the track, so for circuits with a lot of left hand turns and only a small handful of rights, you could load up on weight on the left side of the car and make turning left a lot easier, and a lot grippier, however making turning right much harder as the car will be trying to run itself wide, because all the weight is on the outside of the corner.

Longitudinal Weight Bias:
This moves the centre of gravity in the car forwards or backwards.
In short, put more weight over the front wheels and you'll have more turn-in grip into a corner. But the rear wheels may become unloaded and skittish, and you might struggle to keep the rear of the car in-line through the bend. Not advisable for tracks with long straights, or off-camber corners where the track is sloping away from the apex, because the rear wheels need the grip to push you around.

Put more weight over the rear wheels and you'll gain corner exit grip, and a lot more traction. This will aid accelerating. The front end though will be lighter and won't be able to attack into a turn, nor hold an apex as well as a car with a more central or frontal weight bias. Not advisable for fast flowing tracks.
Alignment


Steering Ratio:
In short this is how far your steering wheel or analog stick has to turn, for the cars wheels to turn lock to lock.

If you find a car too twitchy even with small hand movements, you could try moving this slider more towards being slow. This will require you to turn the wheel more, to get the same amount of turning from the car, meaning you have more fine control.

On the other hand, if you have a car where you're crossing your arms a lot, and finding that you wish it would turn a bit quicker, then try moving this slider towards Fast. This will require you to turn your wheel less to get more angle out of the cars steering. I would be very careful adjusting the setting this way for keyboard and pad users.

========================================================================

Left & Right Caster Angle:
A lower angle on the caster angles will help a car turn in quickly, and a greater caster angle can help stabilise a car that is too twitchy when changing direction.
This does not have a huge effect, but for fine tuning it's a nice place to start.

========================================================================

Camber Angles:
A negative camber angle means that the top of the wheel is closer to the body of the car, and the bottom of the wheel is sticking outwards.

A car with more negative camber will have less grip for accelerating and braking in a straight line, but when cornering the wheels run flatters as the car leans through the bend. So for fast sweeping corners a greater negative camber might help you hold a faster line, whereas less negative camber, and therefore a flatter wheel, might struggle for grip.

A greater camber angle will benefit from a slightly softer Sway Bar setting, allowing the car to put it's weight on to the outside wheels, because the weight is now on the outside wheel, and the wheels greater camber angle is making it run flatter to the ground when turning, you will suddenly find yourself with more corner grip.
But go too soft, and you might find that you lose overall grip.

Front Camber Angles:
This is the angle that the front wheels sit at. A greater angle here might aid mid corner grip on fast bends, but if your car is front wheel drive it will struggle to accelerate on the flat, however it will accelerate better on the exit of faster corners.

Rear Camber Angles:
This is the angle of the rear wheels. Similar to the front wheels a greater angle could see you hold a better line through fast corners. But in a rear wheel drive car a greater angle will see the car have less grip when accelerating and braking unless turning.

========================================================================

Toe-in Angles

Similar to Camber, a toe in angle is where the wheels point inwards or outwards. Greater angles will gain you stability, but coast you some straight line speed.

A negative angle sees the wheels point toward the outside of the car. This will help a car turn into a corner quicker, and change direction quicker, at the cost of some stability.

A positive angle sees the wheels point toward the inside of the vehicle, this will make turning more difficult but slow the car when changing direction, making it more stable.

I will often run a positive toe-in angle on the rear wheels on cars that struggle with spinning under braking.
Suspension
Page 4 - Suspension


Suspension tuning can make or break your setup. Get it right in here and you can find those crucial tenths of a second.. Get it wrong and you could ruin your entire setup. Apart from the tyres, everything else you change on the car has to come through the suspension, so if this bit is wrong, the rest of it will never feel right.

So if you're not confident playing with these settings yet, I would suggest leaving them at default. But, here's a run through if you want to experiment:

Ride Height:

Does exactly what it says on the tin. This is the effectively the distance from the floor to your cars body. A lower car has a lower centre of gravity, this means it hugs the floor better, making it more aerodynamic.
A taller car will struggle more in corners due to its higher centre of gravity, but will travel better over bumps and kerbs.
Realistically, you want to set your car as low as you can for each individual track, and how low you can go is set by how many kerbs you have to use, how tall the kerbs are, and if the track is bumpy, how many times the car is "bottoming out" on a lap. This is where the sump plate or bodywork of the car is grinding along the tarmac.

However, higher ride height values do gain an advantage by making braking and accelerating smoother. The suspension has further to travel before locking creating a more stable drive. If you are having problems locking up under braking, or the car is a little too twitchy coming out of slow corners, try slightly raising the ride height.

IMPORTANT: Making the front of the car lower than the rear of the car increases front end grip, and vice versa. So with cars that struggle with holding a line try making the front a bit lower than the rear.

==========================================================================

Spring Rate:

This is how strong the springs are in your cars suspension. Softer springs create body roll, whereas stiffer springs can create scenarios where you are lifting a wheel up through corners.

Softer spring rates will mean that wheel is allowed to move more freely up or down, on exceptionally bumpy tracks this can help the steering wheels, or the driving (powered) wheels to keep in contact with the ground rather than bouncing up or down. This means more grip, and more stability.
But a softer suspension will bottom out sooner, so a higher ride height will normally need to be used to balance this, also make similar adjustments to the Bump Stops that are in the Damping page of the tuning.

A stiffer spring setting will mean that wheel will move less up or down, use this to make a more rigid drive for fast, smooth circuits. When the car has no bumps to deal with you are losing time in the corners and possibly under braking by having the springs too soft. Soft means too much body roll, and your car may be too high, and you're just wasting potential grip. So for a track like Monza you'd be running stiffer spring rates, stiffer sway bars and a low ride height. But don't forget about those bumpy chicanes, make it too stiff and you may spin out there.

Softer springs at the front will increase initial turn into corners, good for hitting apex's. Stiffer at the front makes for good smooth mid-cornering and exits.

Softer springs at the rear make RWD cars squat down under power, giving immense grip when accelerating, but will make the rear wobble like blancmange in the corners.
A stiffer rear spring rate will give less initial accelerating grip, but you might find the rear has more mid corner grip. Use this on a track to track basis.

==========================================================================

Sway Bars:

Sway bars control how much the car can roll on it's suspension side to side.

Body roll can be used to create grip on the outer tyres, because the cars weight will roll to the outside of a corner when you are turning, with the correct camber and sway bar settings a softer spring rate can help you get the power down earlier, but you will suffer with the car running wider in longer turns. Softer settings are for tight and twisty tracks.

Stiffer settings are used to stabilise the cars body, reducing body roll and making a car keep a tighter turn in, especially on the longer flowing corners. This means less grip on the outside wheels though and can cause you to lose overall grip. Too stiff can be a disaster, but get it right and it can completely change your cars performance.

For example, in a car that doesn't like to turn in, you try hitting the apex and it just keeps drifting wide, you could lower the front spring rate AND lower the front ride height together to gain a little more grip.

But in a car that can hit the apex of a corner, but then drifts wide on the exit of bends try making the suspension firmer at the front and rear so it rolls less, it will be harder to hit your apex, but when you get it right it will be much faster overall.
Dampers
Page 5 - Dampers


Below is a quick problem solving sheet that will hopefully help tune a vehicle for those who don't want to go too in depth with the damping.

For those that do, please keep reading.


First, here's a quick description of damping, and to follow is sort of a golden rule...

The compression of a shock (pushed up and made shorter) = BUMP
The extension when the tire is unloaded (forced back out) = REBOUND


And the Golden Rule, break it at your own risk..

FRONT REBOUND SHOULD BE STRONGER THAN REAR COMPRESSION.

So your Front Slow Rebound Settings need to be stiffer/higher than your Rear Slow Bump settings.
And your Front Fast Rebound Settings need to be stiffer/higher than your Rear Fast Bump settings.

========================================================================

Bump Stops:
This is extra compression on top of your suspension coils, these raise the height of the vehicle which can be useful in stopping a car from bottoming out, but they can also be useful for adding stiffness to the overall suspension.

A lower Bump Stop will mean the car will sit slightly lower, but this also makes the suspension slightly softer, this can be useful when reducing how twitchy a car can be.

A higher Bump Stop means the car sits higher, which can add body roll, but also causes the suspension to stiffen up, which can be handy if you need a car to turn in a little tighter, or change direction with more ease.

========================================================================

Slow Bump:
Slow Bump can be used to control oversteer, a softer setting here creates a little understeer, where a higher, stiffer setting can create oversteer.

Here you can control each wheel individually, so you can tinker specific settings for each course, where one may need a stiffer left rear for exiting a flowing right hander (Barcelona GP) or a track with plenty of short, sharp left corners, which might need a softer front left (Zolder)

========================================================================

Fast Bump:

The direct opposite of Slow Bump, these settings control suspension understeer.

A higher, stiffer Fast Bump setting can be applied to a car that is over-turning, where you're finding yourself having to counter-correct each corner entry due to turning in too tight.

Whereas a slightly softer setting might gain you a little more mid-corner grip, slightly increasing the oversteer.

As with Slow Bump, you can control each wheel individually.
========================================================================

Slow Rebound
Slow Rebound controls how quickly your suspension sets into a corner, this means how quickly the car settles, stabilises, and grips around each bend.

Stiffer settings at the front creates front oversteer, meaning more turn in and hopefully more mid-turn grip.
On the flip side, softer settings at the rear create more rear grip, which pushes the front around the corner, also aiding in creating oversteer. Whereas if you made both the front AND the rear stiffer, you might cause understeer as the rear doesn't have enough grip to keep the front loaded through the bend.

========================================================================

Fast Rebound
Fast rebound controls how quickly your suspension sets after going over bumps and kerbs. Similar to the Slow Rebound this is how fast your car stabilises and settles after hitting a kerb.

Be warned though, if you make the car settle too quickly, and you go from bump to bump, like in a chicane, you might find yourself losing control as the car bounces up and down, where a softer, slower rebound setting means the suspension stays loaded over the first, and the second kerb and then settles afterward.

This is serious fine tuning, but it can make life so much easier when a problematic car keeps spinning over bumps.

In short, a stiffer front and a softer rear will make a car more stable over kerbs.
Differential


Limited Slip Acceleration Lock
This increases the traction when accelerating. And works a bit like traction control but is far more useful.
In FRONT WHEEL DRIVE cars, high settings here allow the drive wheels to grip, and pull the car through the bends, this allows you to accelerate harder out of bends. It does cause some understeer so you must adapt to this, but it can give you the edge pulling out of sharp bends

In REAR WHEEL DRIVE cars, you have to be more careful. More grip exiting corners sounds like a good thing until your car spits you out of the corner backwards. If the rear has TOO much grip it can cause issues, so lower settings here can actually make a car more drivable. Finding the right setting here can make a lot of difference in your lap time.

===================================================

Limited Slip Deceleration Lock
Low settings here make a car more edgy under braking, so for a drift tuning or simply a setting where you want to back the car into the corners, low settings here are better.

High settings stabilise a car under braking, making it more controllable. This does cost you some mid corner speed, but can be essential in stopping a car from spinning on the brakes.

===================================================

Limited Slip Preload
This is the amount of slip in the axles before the differential takes effect.
Low settings make the car more agile and let the car have more freedom before kicking in.
High settings make the car less agile, but can make the other Limited Slip effects happen quicker.
Use this to strengthen or weaken the other effects.

===================================================

Viscous Lock
High settings here effectively trade some of the cars agility for more traction. If you're doing a lot of slow corners and need to punch out of them quickly, you can try increasing the viscous lock.
Increase it too far though and you might struggle to change directions quick enough, and hurt your overall lap time.

===================================================

Radiator
This is the amount of cooling the radiator provides for your car. When mechanical damage is enabled overheating the water or oil temps could mean an early retirement.

But open the radiator too much and you'll create wind resistance, and make your car slower.

On the other hand close the radiator and you'll gain overall speed, but your temperatures will rise. Try to find the sweet spot for each car/track combination.
You can find those missing extra tenths here.
Gearing


For most cars the gearing is pretty straight forward, the individual gears don't allow any real modification outside of the important final drive. And this is where you should start regardless.

Final Drive:
This is the absolute top speed gear ratio for the vehicle. To get those most out of your car you want to be just short of revving out at your max speed when you get to the end of the longest straight on each track.

The extra couple of miles per hour are to allow for slipstreaming in racing.

But if the gaps between ratios mean just topping out and running out of gear, or having far too much gear left at the end of the straight, i'll choose the shorter gears to get the most out of my acceleration. Personal preference, but test both for yourself.

If your gears are too long, and you don't get into the final gear and start revving out then move the slide a click or two towards acceleration, if you find the gears are too short and you're revving out before the end of the main straights, try a click or two towards top speed.

But on some of the Open Wheel cars and the top GT classes, the individual gears are more adjustable.

The rest is down to personal preference, but you'll often find several corners on a map where you have to just about click up a gear and run in low rpm through the bend, this is where an extra click to the right on that gear might let you run the corner without shifting. Less time shifting is more time spent going forwards.
But do remember that some cars perform better at lower rpm, and instead a click left on that gear might actually give it more mid corner grip and exit speeds.

I personally prefer a longer 1st and 2nd gear for tighter corners, and then a fast flowing change through the rest of the gears, though some of the really peaky cars have so much torque that gears that are close together make for easier driving.

==========================================================

Peak Speed Sensitivity: Yet to find a car that uses this setting. If anyone knows what does please let me know so that I can play with the tuning, thanks.

Engine


Fuel Load
This is the amount of fuel the car will be sent out with in Practice and the Race.

You will want to do a couple of laps of practice and find out how much fuel your car uses per lap, then times that by the number of laps in the race. For example:
6 lap race, 2.7l of fuel per lap = Fuel load of 16.2l minimum, add an extra litre or two for comfort just in case of spins, off track excursions or extra fuel usage during the race, so run 18l

Why is this important? Less fuel means less weight. Less weight means faster accelerating, faster braking, and tighter cornering.
And fuel is HEAVY.

Qualify Fuel Load
This is the amount of fuel you'll be using to qualify with.

Normally I run 10l of qualifying fuel. This gives me 1 lap to warm up my tyres, and then 2 hot laps before having to pit in.

Just the same as the race fuel, the less fuel in your car the better, so if you are good at 1 lap "superpole" dashes, drop down to 6 litres and give it your all.
Don't forget that in the qualifying you want the grippiest tyres you can choose, generally the softer the better.

======================================================

Wastegate Pressure
This is effectively turbo pressure.

If you're driving a turbo car that is just too powerful and you keep spinning under power, lower the pressure. You'll lose straight line speed, but you'll lap faster due to less mistakes.

If you find the car controllable and want to get more out of it, increase the wastegate pressure. But BE WARNED, this increases wear on the engine and can cause a mechanical failure, and may cause an increased fuel useage too.

======================================================

Brake Mapping
This, in my opinion, is one of the more important tuning settings when first setting up a car.

A low setting here makes the car more agile, it will turn better at slow speeds and change direction quicker. But it will make the car more slippery under braking.

A high setting here can be life saving when you have a car that keeps trying to spin under braking. Find yourself hitting the brakes and losing control? Try moving this slider to the right.
You'll lose some cornering ability, and you will use more fuel, but it's better to be slightly slower than it is to be backwards in the barrier.

======================================================

Restrictor
This is for giving yourself a handicap. A lower setting here will restrict the airflow to your cars engine and reduces power. So if you want a greater challenge, dial this back and try to keep up. This can also be used to create equality between drivers.

Interestingly though you could experiment by restricting the engine on cars with really strong torque steer. Similar to turning down the turbo, restricting the engine will make some cars a lot more driveable. It's not a perfect fix, but it's better than crashing.
50 Comments
Amatrius Kemo 7 Jul, 2018 @ 11:43am 
This is a very detailed guide compaired to the others I have seen here on steam. Coupled with the profiler and driver coach apps, this will help. I never considered tweeking cars until I discovered that my 125cc kart could not make a turn to save it's life.
onezerorising 2 Sep, 2017 @ 11:55pm 
This is great. I'd like to add that the first thing anyone should try adjusting is their driving. By which I mean if you can't drive (maybe/probably slower than the entire field) a consistent lap you're not going to have a baseline 'feel' for the car when you start your tweaking. This is not to say that in most cases there aren't a few basic tweaks that will aid stability under braking or steering response for example, but that unless you're fairly consistent with a car 'out of the box' it'll be less than obvious what differences your tweaks are making. Which will make track-to-track adjustments difficult: What 'works' at Donnington might be useless at the Nordschliefe....

But, yeah. Aside from that. Good job :)
przmr 27 Aug, 2017 @ 1:56pm 
Cool :)
em_t_hed 25 Jul, 2016 @ 10:49am 
you fail to mention about how easy it is to misdiagonse Fast Bump/Rebound settings.

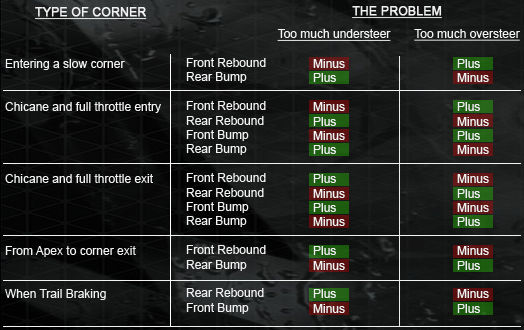
Say you're driving Nordschleif, and you're going through the first section with all its bumps and turns before the 1st long straight that ends in a small hill with a right turn just after the hill. All those previous turns have bumps in them that will aid in adjusting Fast Bump/Rebound settings.

If when driving at a decently fast pace, you hit a bump with not enough Bump damping, it's easy to misdiagnose that as not enough rebound damping simply because when you hit that bump, the tire shot so fast up into the wheel well pushes the spring up so hard that it goes beyond the capabilities of the Fast Rebound damping even if you've got the Fast Rebound damping to its highest setting
em_t_hed 25 Jul, 2016 @ 10:25am 
you dont mention that if the ride height to a vehicle someone is tuning is locked, more then most likely the spring rates, sway bars, dampers will also be locked as well... they just want you to figure out what those settings are

you don't mention that if the car gives you all the latitude you could want, that once you change a setting for one thing that you'll more then most likely have to adjust everything else also.

for example, if you adjust downforce, you then have to recalculate the spring rate, then adjust ride height for that spring rate, then adjust the force applied by the sway bar, to then come to a ball park number for dampers.
em_t_hed 25 Jul, 2016 @ 10:18am 
Do the math, because it works.
em_t_hed 25 Jul, 2016 @ 10:16am 
And your explanation for the dampers are all wrong. As you're not accounting for weight balance, spring rates, what lateral Gs you expect, downforce or no downforce, and use of sway bars or not. All of the aforementioned come into play when coming up with a baseline tune for dampers.

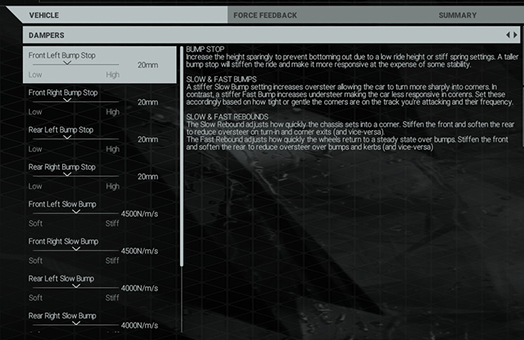
Mind you when i say calculating for dampers, i mean Slow Bump/Rebond dampers. The Fast Bump/Rebound settings can't be calculated in this game as those are about car's unsprung weights...

The Fast Bump/Rebound settings have to be tuned by feel, watching the front end, and watching the rear end while driving. I suggest using all available driving views to aid in tuning the Fast Bump/Rebound dampers.
em_t_hed 25 Jul, 2016 @ 10:16am 
a tuning guide with no math is no tuning guide at all. The theory behind all the differnt parts helps, but with the vast difference from one end of a slider to the other end on any given part is like finding a needle in a haystack.

The math in this is super simple and really straight forward... i suggest using it. it will give a baseline tune in a matter of mins and from there you can slowly adjust.
thebugmancometh 2 Jun, 2016 @ 11:21am 
Just wanted to say thanks. Like a couple others, I wasn't even aware there were multiple tuning tabs. @_@

A couple minor adjustments to sway bars and gearing ratio, combined with less fuel and a couple other tweaks shaved nearly 7 seconds off my lap-time on the Mazda Raceway Laguna Seca with the Mclaren 12c GT3. I can actually accelerate out of corners! XD
White Gemini 8 May, 2016 @ 5:23am 
pfff i feel stupid had no idea there were more settings under vehicle tab , oh boy i was hoping for more transmision / gear settings :D