Fractured Space

Fractured Space

107 ratings
Basic Strategies - The Anthill Strategy Guide (outdated, the game is just Gamma now and Gamma is the game)
By Serafine
This guide is heavily outdated.
The entire game now boils down to "Go to Gamma and don't die before Gamma, Gamma wins the game and nothing else".
The shortened pygmy lanes are pretty much meaningless, it is basically impossible to capture a base without the Gamma buff and the Gamma 3 buff now removes the lanes from the game entirely as it allows you to jump directly to the enemy base and smash the crap out of it with the overpowered Gamma 3 buff and a ridiculous capture strenght boost.

But I let the guide stand here anyway, so you can see what a good FPS strategy game this once was before they ruined it by making it more casual pewpewpew-pewpew-pewpewpewpew.


The Anthill Strategy Guide (teamwork for solo players)


This guide mostly isn't about teamwork in the strong sense, it's about what YOU as a single player can do to make your team win the game.
It emphasizes on the same strategy ants employ to create and maintain their hives. Ants do not have a high command that constantly gives them orders, instead every single one of them does it's best to work towards the benefit of the hive while communicating with the others in it's immediate periphery.
There are even some clans that work according to this scheme though most of them do in fact have a high command and a clear leader. In random matches however there is no leader, so it's best to stick to the anthill concept there.

This guide will cover most regular strategies during the individual stages of the game (opening, early game, midgame, late game) as well as a few of the more advanced ones that actually do require some true teamwork.
   
Award
Favorite
Favorited
Unfavorite
Basics
The minimap


This is the minimap. It is one of your most valuable resources and you can increase it's size by pressing tab.
The minimap tells you where your teammates are, where your enemies are (well, at least the ones that can be seen by your team or by the bases that belong to your team), if Gamma is open, and it helps you to anticipate your enemies' movements before they actually hit their destination.

The big map even tells you what ships your team mates are flying and if they are dead or alive – and when you click on their names or their arrows the UI will highlight the corresponding entry (so you can either find out who that lonely arrow at the enemy forward base is or which arrow that Brawler is that just requested help).


The chat


This is the chat. Press enter to write a message and ctrl to switch between team (blue) and global (white) chat. Not only does the chat allow you to talk to your team mates, it also gives you valid information, like when a player in your team jumps to a sector or when one of your team mates disconnects.


Some general dos and don'ts:

! Lemming trains
The most important thing after the game started is to not create a lemming train. NEVER put all five ships into a single lane and only ever put 4 ships into one lane if you have a very good reason and a plan. If you see that there's already 3 ships in a lane (watch the chat) don't go there and if you're already there switch lanes (or tell someone to do so).
During mid/late game a massive assault may be needed to push a lane and win the game (or to stop an enemy lemming train) but still, don't leave your other lane undefended. Certain ships (Equalizer, Enforcer, Hunter) can traverse an entire lane very quickly and - especially during late game - do serious damage to your base or even win the game before you can jump home and defend.

! Focus fire
When fighting an enemy fleet focus all your combined fire on one ship (preferably the healer) to take it down quickly (and tell your team mates to do so if needed). There is no point in spreading your team's fire all over the entire enemy team and not killing one ship in end. This is especially true for Gamma battles where a single kill can give you the upper hand in the capture competition.

! Take cover
Mining stations (and asteroids) are not just decoration. The middle one is a great piece of cover against Watchmen while you're advancing towards it. To use it as cover just leave the forward base by flying BELOW the station shield and adjust your position in a way that the middle mining station is between you and the enemy Watchman. Adjust elevation if needed and you should take almost no hits. This even works for Heavies.

! Don't jump while someone is shooting at you
Just don't do it. You take massively increased damage during the jump warm-up and it MULTIPLIES with the increased damage caused by broken armor. All those bonuses add up to point where several weapons (charged LR cannon, Pioneer nuke, Interceptor nuke) can oneshot you and even a Hunter does 5000 damage per salvo under these circumstances. You don't want to get hit by that. So if you have any escape mechanism (blink, boost) at least try to get some distance before you push the jump button. Most of the time though it's better to just go down guns blazing, especially during early game.

And NEVER EVER hit jump home in a fight. It takes even longer to warm up than the regular jump and is guaranteed to get you killed. If you really really need to, use jump to move to another sector and immediately after your arrival hit jump home (if you're in a Hunter you want to use blink between the jumps to prevent an enemy from dropping right on top of you while your home-jump spools up).

! Don't go for an instant base rush
Before you are at least level 4 (better level 6) there is no point in going directly for the enemy base. At low levels your capture rate so low that you will get killed by either defenders or the base turrets before you've captured even 5%. Better concentrate on the mining stations, that way you will quickly get enough levels to attack the main base.

! Be aggressive at Gamma
Attack the enemy team and attack them with force. Focus fire and take down one or two ships as quickly as possible. You may try and go for the healer but if you have several strong damage dealers (Brawler, Reaper, Interceptor, Enforcer, Hunter, etc.) you can actually just focus a ship down and the healer won't be able to keep it alive. Taking out a single enemy ship is enough to give you the advantage in capture power and you will start to make Gamma your own. Kill two of them without loosing one of your ships and you almost won.

Do NOT try to hide in cover taking pot shots at the enemy. You are NOT playing world of tanks.
You cannot out-cap the enemy but when you're hugging cover what you do is you give hostile close combat ships like the Brawler the chance to sneak up to you and screw you over. Also there are several area weapons like Flak that pretty much ignore cover and will slowly wither you down no matter where you're hiding.

! Play safe
A solid defense is ALWAYS better than a desperate offense. When you see enemies are approaching your forward base and nobody seems to care then go there and defend! In mid or late game the capture of one of your forward base can easily ruin your day - if there's more enemy ships deeper in the lane you might instantly have a full-scale invasion on your home base at hand.
CONQUEST GAME MODE
We will first take a look at Conquest, one of the two game modes of Fractured Space. Conquest, other than Frontline, has several very different game stages, each with different gameplay and objectives.
During the opening and early game stages each team will work towards putting them into a better position to end the match during the midgame stage or – if that fails – in the endgame stage.
Opening Strategies (1/2)
Currently you can ignore this entire section as the first mining station has been set to capped from the start, effectively removing any strategy from the game opening stage.

During the game opening the primary goal of both teams is to get two mining stations in each lane. There are certain ships that are better suited to take either the first mining station or the middle one and a few that may choose freely depending on your lane fleet composition.
We will go through all of them and see the reasons for this.


Ships that should take the first mining station

- Disruptor
The Disruptor is a relatively fast ship. It has low damage and cannot really hold it's ground against a Hunter or an Enforcer , but it can give repair drones to an ally fighting over the middle station and immediately blink to him for more fire support after it captured the first mine.

- Watchman and Overseer
The Watchman and the Overseer are long range fire support ship that seriously don't want to get into any form of close combat. During the game opening, when all enemies are outside their effective range anyway, they are the most prefect ships to capture the first mine as this position also allows them to give better fire support than from the forward base (this is especially true for the asteroid lane).

- Ranger
The Ranger is a light long range Watchman and usually it can't hold a mining station against a combat ship, even with the mines.

- Raider
Although the Raider is strong in very 1v1 it's not good for directly contesting a mining station. Enemies can easily get past it's screen or force it out of the capture zone.

- Infiltrator
The Infiltrator is a long ranged hit&run attacker and as such has a hard time winning a direct close range fight against a medium or heavy combat ship. However the first mining station is a perfect steppingstone to deploy Ion Drones from and then help out in the unfolding fight over the middle mining station.

- Protector
As a long range support ship the Protector can't win a fight against a combat ship or a light attacker. But the first mining station is perfect for firing the repair beam at any allied ship fighting for the middle station. Also the Protector can give long range support fire from there if it has the heavy smart gun.

- Reaper
The Reaper excels at midrange combat and as such doesn't want to get involved in a close range brawl with mobile attackers that can get above/below or behind it where it cannot fight back effectively.

- Sentinel
Although the Sentinel is quite fast it lacks the firepower to contest a mining station against a dedicated combat ship and so should take the first “safe” one. Also it has the weapon range to give fire support to the middle of the lane almost from the first mining station.

- Raven
The Raven is a powerful mid-range supporter but it doesn't close range engagements as it is very squishy.


Ships that should take the middle mining station

- Brawler
The Brawler has very short ranged weapon and is extremely effective at taking a mining base. No Hunter or Enforcer pilot wants to fly in that capture circle if he knows that there is a Brawler lurking on the other side that could concuss and dispatch him within a few seconds.

- Persecutor
The Persecutor has a very low range and limited ammunition regeneration so it cannot afford to waste shots at medium range. It plays a role similar to the Brawler and should immediately move up to the middle station but not use all of it's blinks to get there.

- All heavy ships (Colossus, Destroyer, Leviathan, Gladiator)
Heavies are slow and shouldn't waste any time flying the huge detour that's required to cap the first mine. Also heavies usually are good pushers that can overwhelm most opposition due to their sheer firepower and armor - and if they can't chances are high that they might at least hold their ground until the ship that captured the first mine can help them out.


Ships that can do both

- Hunter
Usually the Hunter should go for the middle as it is a fairly tanky high damage combat ship, but it can also get the first one if there are only heavies or Brawlers in it's lane. Despite it's tankyness the Hunter is actually a quite mobile ship that can use it's blink ability to get from the first mining station into the battle over the middle one quickly. Also the Hunter's cannons have a good range which allows it to give effective support fire even long before it enters the battle.

- Pioneer
The Pioneer is as versatile as the Hunter and can freely choose it's options. Although due to it's low durability and high ranged guns it is technically better at giving support fire from afar it is agile enough to win a fight against anything but a Brawler or a heavy on it's own.

- Equalizer
As a low DPS high range support fire ship the Equalizer should usually go for first mining station but can do the middle one if there is no hostile fast combat ship in the lane. Thanks to boost gate the Equalizer is fast enough to grab the middle station before any slower ship can reach it. However the Equalizer lacks the firepower and armor required to contest the station against a combat ship and must retreat if one gets there before it can fully take over the station.

- Ghost, Infiltrator and Black Widow
None of these ships can actually contest the middle mine against a combat ship nor are they fast enough to get there first, but if one of them is in a 3-ship lane and there is another ship that can take the first mine the cloaker should go for middle one to support the combat ship there.

- Enforcer
Usually the Enforcer should immediately boost for the middle mining station and use the cap mod drone to take it before the enemy can even get there, however it can also be a solid option to take the first mining station as quickly as possible and then advance to the middle one, especially when there's a slower close range ship like a Brawler or a Colossus already going for the middle mining station.

- Venturer
Usually the Venturer should move up to the middle of the lane as fast as possible, place a shield buoy behind the mining station and hunker down. However the ship has a fairly decent range and may also take the first mining stations if there are more appropriate ships already going for the middle one.

- Interceptor
The Interceptor has the same downsides as the Persecutor – low range (at least on it's primary gun) and limited ammunition (it has a weapon that does immense DPS while active but overheats rather quickly). Limited fire arcs make it harder to apply full damage to the enemy so preferably it should get the the middle mining station first to welcome the enemy on it's own terms (before they can hide behind the station and keep out of the Interceptor's main firing arcs).
It may however also opt to take the first mining station and then flank the middle one from the far side, so it has perfect firing arcs on anyone who's trying to hide behind the station.
Unusual Opening Stategies (2/2)
The two-staged rocket
This is a special opening strategy where a Colossus hooks up two Enforcers and boosts them across the lane. When the Colossuss boost timer hits one second (remaining) the Enforcers fire their boosts to get out even further. This enables the Enforcers to instantly reach the third mining station, nuke any weak ship there, and quickly take over the mine with the help of their cap mod drone, while the Colossus contests the middle one.
The advantage is that this opener can easily plunge the enemy team into chaos and completely deny them the entire lane. The main issue is that somebody has to go back and cap that first mining station.

Crossed/chained boostgates
Due to the size of the boost gate (it actually is not a gate but a sphere) it can be used by multiple ships flying into multiple directions. Just strafe sideways of the ship that moves towards the middle station, fire your boost gate at it and after the your ally is gone use it to catapult yourself towards the first station.
It is also possible for multiple Equalizers to chain their boost gates or provide a starting boost to an Enforcer or Colossus before these fire up their own boost engines.
Early Game Strategies (1/3)
During the early game your primary goal should be to grab and hold as many mining stations as possible. Kills are mostly worthless due to the short respawn time, but if your team manages to hold more mining stations than the enemy you can very quickly achieve a level advantage and get into a superior starting position for the midgame.
Usually this works best by just taking and defending the middle station. An assault on the third mining station will open up your lines and make you vulnerable for a counter attack - especially if some of your ships die during the assault the enemy may quickly grab the middle mining station before you can reinforce your defense there. So if you try to grab it make sure you don't overstretch your front line.

Don't bother with the enemy forward base - you cannot hold it anyway (fresh enemy reinforcements will drop right into your face) and attacking the enemy base at such a low level would be suicide. That of course doesn't count if you have a fleet of powerful close combat ships that benefit from enemies jumping in close to them, like Colossi or Brawlers - these should indeed go on and capture the forward base.
Also it is always an advantage when you can take out the enemy forward base's sensor beacon early on, something a lot of ships can actually do while they're taking the third mining station (the range between the mining station and the forward base is about 14k, Pioneer, Venturer, Sentinel and Reaper weapons have that range and most missiles as well).

Usually killing the enemy ships and getting the mining stations goes hand in hand but it doesn't have to. Fast ships can afford to die more often than heavies because they can re-enter the battle quicker, so if you're playing a fast composition against a team that consists of mostly heavies you might be able to afford a few sacrifices for the greater good.


Ships that are good at stealing mining stations

- Sentinel
Immense speed bursts and high range weapons allow to slide past enemy lines while still shooting at them the whole time. Lack of firepower makes direct combat not a good option, especially when alone.

- Equalizer
Very fast, it can easily slip past the enemy and take over a mining station. Watch out for hostile Hunters and Raiders though.

- Raider
High speed and an impenetrable shield allow this ship to flank the enemy fleet and hide behind a mining station to recharge it's shield.

- Ghost, Infiltrator and Black Widow
All of these ships are kinda fast and when they cloak you never see them coming. Ghost and Widow can easily nuke most light ships before taking over a mining station while the Infiltrator with it's huge AOE blast can still deal damage even when completely hidden behind a station (also the Ion drones slow the ship they attack).

- Enforcer
The Boost makes the Enforcer very very fast for a short amount of time, so it can just dash beyond the enemy fleet. Cap mod drone allows it to cap a station significantly faster.

- Hunter
Though not a very fast ship the blink makes it very mobile (unless you have the short-ranged quick blink which doesn't really work well for stealing stations).

- Disruptor
Very fast and equipped with a powerful self-repair the Disruptor can easily snap a mining station and then blink up to 20k back to an ally.


Ships that are good at attacking/pushing a lane

- Hunter and Pioneer
High mobility, good range, high damage and decent armor make these ships perfect lane pushers. They can hammer enemy ships from afar and finish them off at close range. They can also provide powerful support fire for heavies.

- Leviathan
The Leviathan is the fastest of all heavies as long as it doesn't fire the tempest cannon. The beam is very deadly at close range and can easily melt away smaller ships. But the one thing that makes it the perfect lane pusher is the jump beacon. As long as there are not two or more high damage ships concentrating fire on the Leviathan it can even set up a jump point while in combat - the ship is so tanky it can just eat the damage and - after the egg has been layed - smash any opposition with the help of incoming reinforcements (which hopefully contain a healer as well).

- Brawler
The Brawler is not a lone wolf. It needs support, but with some buddies around it's a frightening lane pusher as it creates a 5k zone of death around itself nobody dares to enter.

- Colossus
Boost enables the Colossus to close distance quickly, just don't fire it too early. It's sheer mass and constant area damage put a great pressure on enemy ships and can easily force them off a point. Note however that, like the Brawler, the Colossus is not a lone wolf and doesn't like to fight alone.


Ships that are good at defending a lane

- All heavies (Colossus, Destroyer, Leviathan, Gladiator)
Heavies tend to be big, slow and heavily armored and as such are perfect for defense. Just jump to the lane where the enemy is closest to your forward base (preferably closer than the middle mining station) and attack them directly. Even if you die you will do significant damage and be back before they can make any serious advance.

- Brawler
The Brawler is a fearsome close combat opponent and nobody wants to get within 5k of it. As such it is the prefect defender when the enemy is close to or even at your mining station. Just remember that if you're going to jump to a forward base that is swarming with enemy ships you should adjust your armor facing prior to the jump (so they can't immediately hit your weak nose when you drop out of subspace).

- Persecutor
Basically the Persecutor plays the same role as the Brawler – it deals very high damage at very close range, which makes it a prefect choice for defense scenarios.

- Hunter
The Hunter is not only good at attack, harassment and capture, it's also really really good at not loosing a lane. A good Hunter can significantly hamper the enemy advance by slowly retreating (blink) and hammering the incoming hostiles from afar for as long as possible. In fact the Hunter is the only ship that can do this so well.

- Reaper
The Reaper has a fearsome midrange firepower and can really hammer ships apart at ranges between 8 and 15k. It is also quite maneuverable and able to back off with a decent speed (use strafe and backwards thrust at a ~35° angle).
Early Game Strategies (2/3)
Ships that are good at supporting other ships in a lane

- Hunter
Regular and heavy cannons have a great range and enable the Hunter to provide good support fire from afar. Blink allows the Hunter to periodically adjust it's position, dance around at the outskirts of an engagement and quickly jump in for the killing blow.

- Disruptor
Although it doesn't do much damage the Disruptor has a powerful detect-slow and the disarm can easily decide an even duel when timed well. Healing drones are great at repairing ships, but watch out for flak and fighters.

- Equalizer
The long range tracking weapon may not deal massive damage but in combination with a combat ship that can stack up to a kill pretty fast. Osprey torpedo is the perfect trolling weapon against smaller ships and Watchmans.
Don't forget that the Equalizer has a detect drone that detects cloaked ships and does damage to small craft or a recon buoy that tracks every non-cloaked ship and small craft wing within a huge 20k area.

- Watchman
Obviously this ship can't do much more than giving long range fire support, as it's essentially a flying gun with an engine strapped to the back. Mark target is great for amplifying the damage of an Enforcer or Ghost though and you shouldn't underestimate the Watchman in close combat - as long as no ship gets behind it it can still deal tremendous damage even at ranges below 5k while shrugging off enemy fire with it's 75% damage reduction shield.
Most important thing is to remember that the optimum range for both the Railgun and the LR cannon is about 35k, so move up to that distance. You're not helping when you hug the forward base and poke enemies at 45k for 50 damage per shot.

Overseer
Just like Watchman the Overseer can be incredibly helpful when it concentrates on taking down the enemy support ships (Protector, Disruptor, Venturer). As soon as the enemy healers are dead the rest of their team can often be taken out with ease.

- Reaper
The Reaper has a very high forward firepower but doesn't like close range engagements where it can easily be outmaneuvered by faster ships. This makes it the prefect long range fire support ship.

- Paragon
The bombers and fighters have quite a good range and can give valuable fire support, especially against fast moving targets like Equalizers, Rangers or Raiders. Also don't underestimate the Carrier in direct combat - it may not have a high damage weapon but the sheer amount of health allows in to contribute to the fight for quite some time.

- Disruptor and Protector
Both ships are healers and have access to shutdown or disarm abilities. The Protector is a bit better at defending due to the shield, while the Disruptor is more mobile. A well-played supporter can really be a game-changer (ever more so in mid and late game) - a heavy ship or a Brawler with proper healing support is almost indestructible.

- Ghost, Infiltrator and Black Widow
Both of them have cloak which enables them to join the fight to their conditions. While the Ghost excels at doing enormous damage to high health targets the Infiltrator is most effective against light ships that he can slow with his Ion drones and heavily damage with his Ion blast when they collected 5 stacks. Just be aware that you won't get Equalizers with this as they can purge the stacks or boost out of the blast radius.

- Enforcer
Similar to the Ghost his vessel features impressive burst damage but lacks armor. The Enforcer is a perfect close range fire support ship and does very well in smaller engagements (1v1, 2v2) but doesn't like to be focused down by multiple enemy ships. Also it is very vulnerable to disables of any kind.

- Destroyer
The Destroyer is a formidable heavy-killer but quickly gets into serious trouble when engaged by smaller ships.

- Venturer
With it's 33% damage reduction shield buoy, a powerful AOE heal and a shot that instantly breaks any armor the Venturer is a very valuable support craft that can easily turn a fight. The instant hit beam also does very well at hitting fast ships like Equalizers and Sentinels.

- Raven
The Raven cannot afford to take a lot of damage but has an energy drain effect on literally every weapon and ability it possesses (except the beam). It is most effective against ships that are energy-dependent, like Protectors, Hunter, Enforcers and other Ravens. Also the energy drain ability is a very good tool for detecting cloakers.
Early Game Strategies (3/3) - Gamma 1
The Gamma station opens up for the first time in a match at the 8 minute mark. While it gives a decent buff to the team that gets it it's importance is often overestimated.

During early game resources are the most important thing. Gas is just a temporary buff, resources on the other hand are an investment that carries you through the middle and late game stages. If your team has only two mining stations while the enemy has four and you are devoting your entire fleet to a four-minute brawl over Gamma you are essentially giving the enemy a free level (probably more like one and a half levels) which will put you at a huge disadvantage even if you get Gamma.
If the entire enemy team goes for Gas1 it is often better to just ignore Gas1 instead of abandoning your lanes during the early game stage.

However this also depends on your fleet setup - if you have a lot of powerful close combat ships you will probably win the fight at Gamma quickly and can return to your lanes in no-time, without giving the enemy free resources and with a nice boost.


Ships that are good at taking Gamma 1

- Raider
The Raider is really not the best ship for a Gamma station brawl but it is fast and can entirely deflect fire from one direction for quite some time. As such it is the perfect scout to move in before the station goes online (at T -45) and start the cap asap. If enemies jump in the Raider can hide between the station structures and wait for reinforcements while it vomits mines at close-by enemy ships.

- Hunter
Fairly tanky, powerful weapons and can reach the station almost instantly (blink).

- Enforcer
Mobile ship with high damage weapons and blink2target. The cap mod drone really helps to win the capture battle, just remember that you need to be there first to start the capture.

- Brawler
The 5k death bubble does well in all close range encounters and Gas is one of them.

- Colossus
Despite being a Heavy the Colossus has boost which allows it to get to the station get (or back to a fighting position in the lane) quickly. Also it's huge area effect weapons are gold when enemy ships are trying to hide behind the station pylons to delay the capture until their reinforcements arrive.


Ships that are bad a taking Gamma 1

- All heavies except the Colossus
These vessels are slow and they shouldn't give up their forward position in a lane unless they have a good reason or are at the base/FB for repairs anyway. This counts most for the Leviathan - a quick Gas capture paired with a jump beacon can easily win you an entire lane. You may even be able to jump to the enemy base and do some serious damage to it.

- Reaper and Displacer
These ships don't like close-range engagements and get into trouble quickly when there's a hostile Hunter, Enforcer or Brawler at Gamma. They can be valuable assets but they're not ideal.

- Watchman an Overseer
The Snipers can't help capping the station as they are rather helpless at close range. They might be useful for taking down enemies that are within the bubble though. Depends on how many enemies jumped to Gamma.
Midgame Strategies (1/3)
During the midgame the situation gets a bit mixed up. Your overall goal is to assault the enemy base and end the game but more often that's not easy to achieve and you need to get an advantage in levels or players alive first.

Your primary goal should still be to hold as many mining stations as possible, although you can afford to loose some of them for a brief duration if that gets you an advantage like the Gamma boost or wiping most of the enemy fleet off the map.
In midgame the level thresholds get quite high, so it becomes more difficult and time-consuming to achieve a level advantage. On the other hand the respawn timer rises with the ship's level so kills are more rewarding (as they remove the enemy ship from the game for quite some time) and the downtime after getting killed starts to hurt. So during midgame it becomes more important to stay alive and as such support ships start to shine. A well-played Protector can really be a game changer.

Midgame is the most complex stage of the game. In a balanced match it is constant back and forth with both teams trying to dictate the flow of battle. All the ship evaluations from the early game stages are still true, but the midgame adds some additional strategic elements to the game.

Steamroller

When three ships turn out insufficient to take down a forward base you might indeed want to funnel most of your firepower into one lane. This is rather dangerous because it leaves your other lane pretty much undefended, so watch your minimap and if you see an enemy ships approaching there jump over and defend the forward base.

Ships that are good as part of a steamroller
Ships that do well are basically all ships that are good at pushing a lane and supporting other ships (see above). Ships that have crowd control abilities (area effect weapons, disable, slow, shutdown) or any form of (self-)healing are exceptionally valuable.

Ships that are good at defending the weak lane
Ships that are very good at surveying a lane alone while the rest of the team pushes on the other side are ships are very good at avoiding damage and kiting (see below).

If your steamroller does well the enemy team might even panic and send all their ship to mount a defense allowing your lonely "weak lane defender" to capture an entire lane uncontested.

Ships that are good at defending against a steamroller
This strongly depends on how soon you see the steamroller crawling up the lane. If it's still far away long-range ships like Watchman, Overseer, Destroyer and Reaper can soften it up before it hits your forward base which will make the defense rather easy.

If it's already at your forward base you need durability and high damage. Your most important goal is to not let the enemy capture that forward base which is best done by placing either a heavy (Leviathan, Colossus, Destroyer, Gladiator) or a Brawler inside the cap circle and to dispatch them as quickly as possible. As always go for the healers first and watch out for jump beacons if there is a Leviathan around.


Kiting
A ship that kites uses it's superior speed and weapon range to stay outside the effective range of an enemy ship while slowly battering it down.
Ships that excel at kiting are basically all ships that can avoid damage while they pummel the enemy at range such as the Equalizer, the Sentinel, the heavy cannon Hunter, the Ranger, the Infiltrator and to a lesser extend the Reaper and the Raider.
The goal of the ship that is kiting is not necessarily to destroy the enemy ship but to persuade it into a chase it cannot win (which effectively takes the target out of the game) or to lure it into a trap (a Ghost waiting nearby or a Hunter/Enforcer/Brawler hiding behind an asteroid.

Kiting can be incredibly effective during early game when for example an Equalizer succeeds in drawing the attention of the entire enemy lane fleet and prevents them from getting any mining station so they quickly get a level disadvantage, but in teams with random players it inherits the risk that your team mates will abandon their mining stations and try to join you in your fight making the entire strategy backfire, so use it carefully.

Ships that are good against kiting ships
These are basically all ships with powerful long range weapons or abilities to quickly change position. Pioneer, Hunter, Raider, Watchman, Displacer and Ranger work well. Ghost and Infiltrator might work, too. However it is often better to just ignore the ship that's trying to kite you, especially when you have a healer close-by that can just out-repair all the damage done.


Backdooring
While this strategy might net you a quick win in early midgame (if the enemy team is slow and doesn't react properly) it becomes really interesting in late midgame and late game.
A fast ship - doesn't really matter which one as long as it is fast - swiftly passes the enemy lane fleet and captures their forward base. As soon as the station went down the entire team jumps to the enemy base to take it over as fast as possible.

Ships that are good at backdooring
Every fast ship. Equalizer and Enforcer work exceptionally well due to their sheer speed and Raider can use it's screen to deflect enemy fire while it performs the cap. Cloakers can work as well, but might get into trouble when a ship with powerful detect (Disruptor, Ranger, Raven) is present.

Ships that are good against backdooring attempts
The best way to prevent a backdoor attempt is placing a heavy or a Brawler inside the station area. Usually fast ships cannot defeat them quickly in direct combat, however be careful if the attacking ship is an Enforcer which packs quite a punch.
Cloakers are best countered by ships with detect but even a medium combat ship (Hunter, Pioneer, Venturer) just sitting in the combat circle is usually enough to prevent them from doing anything. If you know there's a cloaker in the area but cannot find him just stay in the station area, keep moving around and wait until he gets bored and goes away (you can call up the tactical map from time to time and hover your mouse cursor over the Ghost's entry which will highlight in on the tactical map – as soon as you see him at another place you can leave your forward base).


Cross-backdooring
So you got one enemy forward base. But why stop there? From the enemy main base sector you can jump to the other lane and take that forward base, too. Not only does this allow you to get easy kills on ships like the Watchman or the Reaper when you appear behind them but it also allows your team mates in that lane to join the assault on the enemy main base. Those two or three additional ships can easily decide whether the game ends now or your assault fails.

Every ship can do that although mobile low damage ships perform best. Missing an Equalizer or a Raider for some time is better than sending out a Colossus or a Leviathan.


Jump beacons
Currently there is only one ship capable of creating an additional jump point that is not in a fixed location, more might follow. It might require some amount of teamwork but is a great tool to focus firepower in a lane. Best points to drop a beacon are at the middle of a lane (that will immensely help your Watchman), just before the enemy forward base and - obviously - within the enemy base area.
With the help of a jump point an organized team can quickly create a massive steamroller before the enemy has a chance to react properly.

Jump beacon on the Leviathan takes 10 seconds to power up, jump takes 7 seconds. So if you activate the beacon just before you jump to the enemy base you can minimize the time you're vulnerable. This can really be a life saver.
Midgame Strategies (2/3) - Assault on the enemy base
Assault on the enemy base
So you've breached the enemy froward station and you're eager to take down there base.

The most important thing to consider here is - can you actually take it? You need more ships in the capture zone than the enemy team (unless your ships have a higher level, then equal numbers are enough although the capture process will be rather slow), so if you have two attackers and the enemy team has three ships in the capture area you cannot capture it and there is no point in trying.
Better concentrate on taking out the base defenses, because even if you die that will make your next assault a lot easier. Although the base defenses are not particularly powerful (especially during late game your levels give you a massive resistance against their damage) the sheer number of bullets a fully operational base can spit out will still get you killed fairly quickly.

The second thing to consider is the Gamma timer. Is Gamma coming up during the next 2 minutes? Then it is better to not attack because if you're dead when the fight over Gamma starts your team will most likely loose that fight which can quickly lead to a crushing defeat, especially when it's Gamma 4 time.


So if everything's alright, you maybe even got Gamma and you're about to attack the enemy base, what should you do?

The most important thing is to attack with force. Two ships will most likely not be able to take the base unless the defenders are all dead and won't respawn in the next 30 seconds or the enemy team has a really really slow reaction speed.
To avoid getting killed by a superior enemy fleet wait until your team mates are ready to jump, so you don't go in just to get slaughtered one by one.


When you're in the enemy base sector, as stated above take out the base defenses first because even if your assault fails that's an investment that will last.

Also frequently open up forward bases (if the enemy closes them) so your respawned team mates can join the base battle again. Leviathan beacons are a very valuable source here, just make sure you do drop them when your team mates are ready to jump so it doesn't get wasted.

If you loose three ships while the enemy doesn't and it's clear that you cannot kill them or lure them out of the capture area then leave and re-assemble your fleet at one of the forward bases (sometimes it's even better to completely break off the assault and jump home) and start a new attack when you have the strength to actually bring things to an end. That is way better than get your entire team killed and subsequently loose most of the lanes you’ve conquered before.


Base races
Sometimes a situation arises where both teams have taken out the enemy forward base and are about to jump each others main bases. The whole situation turns into a race of who can capture the other team's station faster.

The most important thing to know here is: Base races are BAD. And unless you're entirely sure that there is no way you are going to loose this race then abort your assault and go back to defend your main base. You can kill the enemy ships and then still take down their base while they are all dead. If you're in doubt leave one ship behind that keeps the forward base open.
Even if the situation looks good the enemy might send a few ships back that may manage to delay your capture just for the few seconds they need to get theirs done.
Midgame Strategies (3/3) - Gamma 2 and 3
Gamma Power 2
The second Gamma Power offers the same bonus as the first one but gives a decent resistance to base damage on top of that. If your team clearly dominates the match this is your tool to end the match early. Get it and then invade the enemy base as fast as possible before the bonus wares off.

In a rather balanced match Gamma2 is more important than Gamma1 because it comes at a point were it's no longer that easy to achieve a level advantage, but you can still live without it. If the enemy gets it just mount a good defense, stay together, let them come to you and fight rather defensively until the bonus wears off.

One important note here. When you want Gamma2, go there EARLY. Like at least 30 seconds before it comes up, better 60. There's nothing worse than arriving at Gamma just to see that the entire enemy fleet already hugs the station.

Also don't stay at Gamma after the station has been captured by either team. Get out there as fast as possible. The ONLY reason to stay at Gamma after the cap is when the enemy team got the bonus and you have a good chance to kill most of them before they can jump out. Because dying will make them loose the bonus. Otherwise - get out!


Gamma Power 3
This thing can be a game ender and you do want it - and if you can't get it you do at least not want the enemy to have it.

Getting there early is even more important than with Gamma2. At the time when Gamma3 comes up the capture power of ships has already gone pretty much through the roof so a single ship can capture Gas3 within 10-15 seconds, which means that if you haven't been there before the capture started there is nothing you can do about it.

Once you got Gamma3 go directly for the enemy base (or kill their team and then take their base).
Late Game Strategies (1/2)
Late game is probably the most straight forward stage in a match. When both teams have reached level 9 the fighting about the mining stations is over and there only one goal left: Destroy the enemy base.
Every late game strategy aims on either killing the entire enemy team or making a quick strike to take down their base. Respawn times are high, so if one team manages to kill most of the other teams' ships while staying alive it will most likely win the match.


Sneak attacks
During late game the capture power of ships goes through the roof. A single ship can easily capture an enemy base in less than 20 seconds. So a valid strategy is to hide behind an asteroid close to the enemy forward base and when they have all moved out you go in, take over the forward base, jump to their base and capture it. This works even better when there are allied ships in the lane, prepared to follow you within a second. Together with them you can easily overpower a single defender before the rest of the opposing team can hop in to defend.

Ships that are good at mounting a sneak attack

- Cloakers (Ghost, Infiltrator, Black Widow)
Obviously both are cloaked and can't be seen by the enemy. Just make sure that you're far enough away from the forward base to not be revealed by nervous Hunter, Ranger or Disruptor firing a detect blast.

- Equalizer
One of the fastest ships in the game but also one of the tiniest ones the Equalizer can easily hide behind any scrap of dirt. And it has boost gate which allows it to instantly reach the main base after it jumped there.

- Enforcer
The Enforcer can traverse up to 20k in a few seconds and the cap mod buoy gives it an absolutely ridiculous capture speed. During late game it can easily take a forward in less than five seconds.

- Hunter
The Hunter is not the fastest ship (actually it's rather slow) but it's a very mobile one. This is especially true for the ranged blink Hunter which is able to blink 15k in a split second. It can easily pass the entire defending lane fleet and capture the station when there's nobody in the bubble. Sure, the Hunter will probably die, but if there's another mobile ally ship in the lane that one can instantly blink/boost into the main base capture area and take it over before the surprised enemy fleet can jump back and stop it.

- All other fast nimble ships
Basically any fast ship that fits behind a rock can mount a sneak attack, that includes the Sentinel, the Raider, the Ranger, the Disruptor and even the Protector.


Counter attacks
These often happen after one team tried to take the enemy base and got (almost) entirely wiped out while the majority of the defending team stayed alive. The survivors now have about one minute to mount a counter offensive while their opponents are entirely unable to do anything about it (because they're respawning).
Fast ships can easily cross a lane and capture a forward base within less than a minute and that's enough for their team mates to jump to that now undefended main base - and almost certainly win the match. Some strategies from the opening chapter (like the two-staged rocket or chained boosts/boostgates/blinks) work well here, too.

As a good pilot you should prevent such a situation from happening and if you cannot capture it leave the enemy base BEFORE your entire team gets killed. You're not helping anyone when you throw yourself in the meatgrinder alongside them.


Ships that are good at spearheading a counter attack
These are basically all fast small ships, although Enforcers (ranged boost) and Equalizers perform the best due to their speed abilities.
Late Game Strategies (2/2) - Gamma 4
Gamma Power 4
Gamma 4 is the ultimate game-ender and you really really want it - and if you can't get it you do at least not want the enemy to have it.
Gamma4, aside from giving the same buffs Gamma3 offers, allows you to ignore the enemy forward bases and directly jump to the enemy base from any adjacent sector.

Getting there early is of utmost importance, loosing Gamma 4 is a really hard blow and can easily make you loose the game.

Once you got Gamma4 go directly for the enemy base and end the game.

If the enemy team gets Gamma 4 hunker down inside your base, use slow and disable ability to delay the enemy assault and concentrate fire as much as possible to take out the attackers as quickly as possible. Loosing Gamma4 does not equal an automatic defeat if your defense is well-organized.

After you've repelled the enemy attackers either try a counter-attack (leave one ship at your base in case an Equalizer or Enforcer that still has the Gamma4 buff tries a quick cap) or wait for the next Gamma4. If your team is level 9 there is no point in capping mines anymore – lane domination means nothing and even if the enemy team has every single mining station it doesn't matter at all.
Your only objective is to capture the enemy base, nothing else matters anymore.
FRONTLINE GAME MODE
You can ignore this entire section as they choose to remove Frontline from the game instead of actually fixing the issues it had.

Frontline is the second game mode FS offers.

Though it still can be roughly devided into opening, early game, midgame and endgame stages the transitions aren't as clearly as in Conquest and strategies therefore must be a lot more adaptive.


Some general dos and don'ts (Frontline addition)

! Stay mobile
Frontline features in-sector jumps that allow you to relocate quickly. This is useful for close combat ships that can drop right on top of opponents as well as longer ranged ships that can easily jump into perfect striking distance.
There is no need to fly across the entire map when a jump point next to mining station is available.

! Don't stay close to open jump points
In Frontline half of the jump points are accessible for both teams via in-sector jumps. If you stay too long at one of those you're running the risk of having an enemy close combat ship (Brawler, Enforcer, Persecutor, Colossus) jump right in top of you.

! Watch the sudden death timer
Frontline has a sudden death timer. It's in the upper middle of the HUD where in Conquest the Gamma timer would be. Once that timer has run down ships can no longer respawn, so be careful with engaging the enemy when it's a one minute and below – if the engagement takes longer than you anticipated you might end up getting killed right after the timer reached zero, leaving your team at a big disadvantage.

! Do not leave your base unattended
There are multiple ships (Enforcer, Leviathan, Equalizer, Infiltrator, Ghost) that can very very quickly end the game if they manage to somehow sneak up to an undefended base. Do not let this happen. Always keep an eye on your base and your backyard areas.
Opening Strategies
During the opening of the match teams generally try to conquer and hold two of the three mining stations.
It doesn't matter which ones these actually are, although the middle mining station is the least accessible one as it does not have any nearby jump point, so if you manage to conquer and hold the middle mining during the first engagement you are likely to keep it for some time.
Early/midgame/late game strategies
Frontline doesn't have any specific early, mid or late game stages. During the time between the opening and the endgame (sudden death) teams will try to gain a lead on levels (capture and hold mining stations) or end the game (capture the enemy base) – and if that fails gain a level advantage for the endgame.

As the bases are just small forward bases devoid of any defensive armament they can be attacked right from the start. Although an immediate full-scale assault cannot be recommended certain ships like the Enforcer or Equalizer are formidable harassers and by attacking the enemy base early they might be able to force some enemy ships to go back and defend their home base thus weakening the enemy presence in the center of the map.

Leviathans are also very powerful in Frontline and should never be left unattended. A single Leviathan that managed to sneak up to your base (don't laugh, as soon as the base sensor is gone that's actually quite easy) and deploy a jump buoy can quickly ruin your day when all of it's team mates drop in.

Frontline, much more than Conquest, requires you to stay on the move.
Fast ships like the Equalizer or the Raider should concentrate on capping mining stations, using the jump points to quickly move from one end of the middle “lane” to other and occasionally threaten the enemy base.
Larger ships like the Colossus or the Destroyer are formidable pushers and defenders but too slow for surprise base assaults. They should only attack the enemy base when their team is with them and their goal is to cap a significant portion of the enemy base, if not outright ending the game.
Endgame strategies
Other than Conquest, Frontline does actually have a true endgame stage, the “sudden death”.
During sudden death respawn, upgrading and base repairs are disabled, so it is most important to get back to a base for upgrades and repairs before the timer has completely run down to zero.

Do NOT engage just before the sudden death timer runs out, if you die you will not be able to get back into the battle. Likewise, if you have a heavily damaged enemy vessel in front of your guns just before the timer runs out better wait those few seconds (if you can afford) to make sure he's not coming back.

Sudden death also shuts down the mining stations which means that if you achieved any level advantage at that point you will keep it until the game ends.

Healers are the most valuable ships during sudden death as they are your only way of repair. Defend your healer and kill the enemy one. Being the only team with a healer is often a decisive advantage in Frontline's endgame.
Appendix
Well, that's pretty much it. The only things left to say are: act smart, get into proper weapon range (yes, I'm looking at you Destroyer, Sniper and Leviathan players) and use your point defense.

Thank you for reading this wall of text.

Good hunt!
24 Comments
WhatsUnderMyKilt 2 Sep, 2022 @ 2:33pm 
I miss this game in it's earlier format. I feel like they would have made more money from a dedicated group of fans than to try to broaden the appeal (i.e. dumb it way down). Shame.
alexbali255 2 Sep, 2022 @ 11:36am 
ah, memories ;-;
Cpt. Cocaine 2 Dec, 2019 @ 3:23am 
This reminds me of how much fun I used to have playing this game...
minimum 11 Feb, 2018 @ 4:26pm 
not this outdated _ remains a good guide ,) even a loong complete good guide ,) thanks ,)

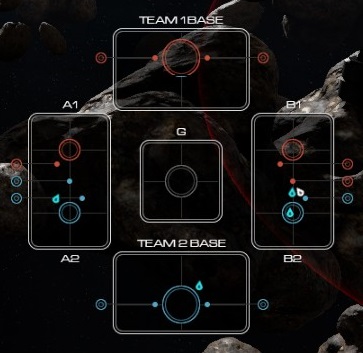
about gamma & heavies _ centurion is a good gamma rusher ,) boost there and shield = job done

enforcer's boost is now reduced to zero _ thats the main outdate of this guide
Major_P0tat0 1 Mar, 2017 @ 11:19pm 
this guide would be useful if i could find a GAME
tosac 12 Aug, 2016 @ 9:21am 
no problem loa. I am looking forward to the update
Serafine  [author] 12 Aug, 2016 @ 8:59am 
Thanks for the hint, I'm gonna do this after the next update =) (it's getting a "sectors" part now that there are actually more than two).
tosac 12 Aug, 2016 @ 8:49am 
hey, i think that this guide need alot more attention. If you agree you should feel free to share it here http://cs2bus.com/groups/GuideShowcase/discussions/0/353915309352842511/
And your guide should get a little boost ;), have a good day
SmellyTerror 10 Aug, 2016 @ 7:39pm 
Thanks heaps for the guide - really good overview of the game. My friend and I joked that it should be the last stage of the tutorial to read this.
J4R 20 Jun, 2016 @ 5:04am 
@Copycat80: I like to use th Superlifter as a ranged fire-support and kite-healer. Lots of gamer language ;) but don't be confused. Basically, the ships huge speed allows you to evade at least 50% of the incoming fire. Your range of 20K will help you in that. It is totally possible to solo-kill a Gladiator in a 1 on 1 engagement with a superlifter, as long as you stay above it, strave and heal yourself!
For healing, it works somewhat similar, although you don't have the range. Tkae 15K as your drone's max range, except if a Colossus is shooting at your ally. He will shred the Buoys before they reach their target. either heal from range and use cover, or fly above your team or below, and use cover aswell. The last method is good for situations where you have multiple teammates in a lane. However, ask them not to spread out too far, as a superlifter's heals will easily get outgunned when it needs to zap around and heal two allies at the same time.