Tormentum - Dark Sorrow

Tormentum - Dark Sorrow

79 ratings
A complete guide through Tormentum
By Leica
My first guide, please read this only if you really don't know what to do, because it contains spoilers.
   
Award
Favorite
Favorited
Unfavorite
A little welcome
Welcome to this guide through Tormentum: Dark Sorrow.
I will try to show everything in the game so it will contain lots of spoilers.

If you need help with out spoiler: Try everything and look on everything you may find the solution maybe where you didn't expect it and if you stuck somewhere try something other first.

So have fun.
Part One: The Crastle
Out Of The Cell
So you want the Spoilers here we go: There if a achievement for not look into the notebook so be careful with the lower left corner.

After the intro you will find yourself in a prison cell, awaiting torute by the knight so it is time to escape!

First, you should look on the paper on the wall near the window, we will need the information on it later.

Next click on the skull of the bed, it will fall down and the red marble thing ends in the hole in your prison cell so we need to get it out there. So for that, we will take a look at the skeleton on the floor. Click on him and his arm fells of. Take it.

Use the skeleton arm in your inventory in the lower right corner to fetch the marbel thing which turns out as a crystal eye.

Now we will look out of the window. Click on the item in the crows beak.

After that we will start to get out of the cell.

Look at the door and use the metal plate you got form the bird to remove the screws. You see the first major puzzle!

Inside the mechanism you will see 2 big and 3 small cogs one of it in red the rest in blue. On the panel are pegs in different colors. Some are blue and red, others only blue. To open the doore we want to get all the cogs to fit into the Mecanism and get the brown cog at the top turning.

You can use the good old trial and error method or just place the cogs like this:[/previewimg]

Before you leave you should pick up the piece of the mirror beneath the window outside of your cell. After that you are ready to go!
The Stone Angle
Speak to the guys in front of the stature and thy will tell you what you need to proceed:
Eyes, so I can see. Heart, so I can feel. Light, to Dispel the darkness. The stone angle will show you the way if you meet these three conditions.

First pick up the mirror piece on the chair to the right and move on to the area on the right.

You will enter an area with a well in the middle and cages which are hanging around.

Pick up the mirror piece next to the well, there is another one in the cage on the far right. Open the cage an pick up the mirror piece. Now you ahve all four mirror shards.

In the back of the area is a hole with three wooden boards. Remove them by clicking on them and take the heart.

Do you remember the note form your cell? Yes? Good! We need this one in this area. Take a look at your notebook (or not if you want the achivement).

on the note ate seven cages and under the fifth cage is an X so there we start. Click on every cage which is lowered. The right order is 5, 3, 4, 1

If you look again at the well you will find another crystal eye. Take that as well.

Now you return to the room with the stone angle.

Put all shards in the mirror on the left.

Put the heart in the statue's chest and the eyes into the skulls above the angle.

Look at the candles at the foot of the angle, pick the piece of wood and light the candles with it.

A beam of light should appear and is redirected by the mirrors. You have to adjust the agnle's wings and mirrors to create a pentagram.

Follow these Steps or try on your own:

Click the left wing once.
Click the right wing twice.
Click the right mirror three times.

The stature will ''disappear'' and reveal a slim door.

For this puzzle you want the bottom half to fit with the top half, but in the bottom par is a missing
piece which we got in our cell so place the rusty metal plate into the puzzle and begin.

The result should look like this:

Click on the door to continue. We will not be able to go back to this area so if you want to take a last look do it (but there are no important things).
The Talking Door
The room we will enter is a strange room with skeletons in pods being electroculted. click on the skeleton in the center and take the head. Now look at the skeleton on the right and put the head here. Thats all we can do at the moment so we move on to the right.

Feel free to talk to the door, but we can't do anything here either, so keep on moving to the right.

You will find our fellow prisoner, the talking rat. Speakt with him or not, pick up the rod on the ground and return to the pod room.

Use the lever on the stragen device on the ground. We can't use it right now so look on it. Can you see the symbols on device. They are the same as those in the backside of the room with
the pods so move your cursor from left to right to see the symbols in the windows. Enter those in the order you see them into the device.

The result should look like this:
Pull the lever.

Talk to the ghost, he will give you a key. This is the key we need to proceed through the big talking door. So go back to the right and look at the pedestal in the center. Place the key in the pestal.

Look at the Mechanism that has been revealed in the door's chest.
Move the parts so that it look like this:

Take the broken piece that has been revealed in the pedestal and the statues will separate so that you can move into the next area.
Jester, Spider, Worm
To start, we talk to the jester. He will give you a blade.

This is the moment we can talk about the moral choices for the ending: There is a good and a bad ending depends on your choises and in the end you will have to make one evil decision ''undone'' so if you want al achievements you have to play at least twice.
Move to the right and you see a guard and the women the jester wants you to kill.Talk to the guard, he will tell you that mechanism for the door is broken.
beyond this, we can't do anything, so we return to the throne room.

Go to the left area. You’ll see a room with stairs leading down into the floor out of sight. From behind the wall, we see a kind of giant statute watching us. He won’t let us go down the stairs, so just keep moving left.

You will find another guard. Talk to him and take the shovel he gives you. That drawing he showed looked familiar, right? Go back to the room with the talking door and use the shovle on the cracked soil to the right. Take the gold nugget in the hole you dug.

Return to the guard and give him the nugget. Pick up the hand-shape medallion he tosses on the ground. Use the medaion on the spinning dial on the door to the furnace. It will stop spinning and allowes you to solve the puzzle.

This one is simple. Click the layers until i looks like this:
Enter the furnace room. Check the locker to the left. Take the weights. Look inside the furnace and take the bone. Look at the picture on the right wall for a new note. Return to the throne room.

Use the bone on the chained monster’s dish and take the weight. Go back to the room with the stature. Put two weights on the dish to the left, two on the right. That brings down the panels, blocking the statues view of you. You can now go down the stairs.

Look at the two paintings and take the ruby eyes. In the lower left of the room is a red wheel. Take it as well.

Move to the area to the right. It’s a dining room blocked off by a cage, but we don’t need to do anything here now. Keep going to the right. We’re at a room where a door’s pieces keep revolving. To the right of that, a face in the wall is chained up.

Look to the lower right corner and look for the key we need to unlock the face in the wall.
Use the key on the lock. The revealed face will tell you that his brother is the door and that he will let you into the kitchen if you can put him back together. He will tell you that his brother has:

Big wide open eyes. A long nose which lets him smell everything inside the castle. He is not very talkative, though, his mouth is always shut.

Using those clues we get this:
Enter the kitchen. Take the lantern hanging on the wall. Look in the sink. Take the belt. Take the skinning knife on the far left. Open the cabinets and take the two skulls inside. Look at the note on the stove.

We have some of the items we need for the furnace, but not all of them. It’s time to pursue another goal.

Return back to the room with the two paintings. Head down the hole.

There’s a puzzle here, and it is possible to solve this without the hint you get later on, but it’s unnecessary. Look at the note on the wall. Head down the next hole.

We’re now in the sewers. See the box with the gears? Look at that and use the leather belt on them.

The water will lower and we can head down the ladder. Do so.

Pick up the medallion piece and return to the dining room.

Look at the blue disc on the cage bars. Put the medallion pieces in.

We saw a note related to this on the screen where the guard was torturing the prisoner. If you look at the note, it pretty much just gives you the answer, but if you’re going for the Total Recall achievement, just follow this.

From the top going clockwise click the six marbles in this order:

1, 4, 2, 6, 5, 3

Read the note on the left of the table. Take the meat and the ruby eye in the statures chest. Go back to the bottom of the sewer.

Look at the circular discs on the spider emblem to the left. Put the ruby eyes into the empty slots.

Remember the moral choices I talked about early here is the first one to make.

Evil Turn the line of ruby eyes to the right to kill the guard.
Good Turn the line of ruby eyes to the left to fix the door.

Next we will look at the puzzle in the torture room. Look at the pannel if you remember the note in the dining room, it gave us the order we need to click on the springs. From left to right I will number them 1-5. Here's the solution if you don't want to use the notebook:
1, 1, 1, 4, 4, 3, 3, 5

After that we have another decision to make.

Evil Choose the left button and kill the knight.
Good Choose the right button to distract the knight.

He will drop a key, pick it up and go back to the spider room (talk to the guard if you didn't killed him) and talk to the female prisoner. After that use the blade on her.

Evil Kill her.
Good Set her free.

Next we will enter the spider room with using the key we got from the knight.

Open the drawer and look at the note inside. The illustration is the solution for the followig puzzle.

Open the Drawer on the left side of the room and look inside.

You want red on top, green on the right and blue on the left.

To turn the mechanism use the arrow and have in mind that green and blue always goes top and red goes to the bottom right.

Place th colors like the combination from the ilustration with the skull:
after that hit the button right next to the arrow. Take the melted piece of metal.

Examine the puppet and place the metal piece in it's forhead. Use the lever. Take the spider leg and the bird's nest which you can finde in the barred window. Return back to the throne room.

Depending on your decision you will see the jester or the prisoner on the throne. Speak to him or her and take the coin. Go to the furnace room.

Put the valve wheel on its place to the right. Place the bird's nest inside the furnance and place the two skulls in the empty space above that. Hit the dark button below the two skulls. Time to cook.

On the stove you will find a pot with water put the meat and the spider leg into it. Hit the button. Take the meat back and return to the room with the rat prisoner.

Give the poisoned meat to the worm. Examinate the leaver in the middel of the room. Put it to the left or right to activate the buttons.

Evil Left button
Good Right button

Take the coin on the ground and head down the ladder.

Read the note on the left and Examine the pile of bones. Move the bones to get the key.

Use the knife on to the dead worm. Take the tear-shaper emerald and leave this area.

Now you can go out the door to the right.
Close To Freedom
Head down the rope until you reach the bottom.

Talk with the cloaked woman. Take the cloth off the round structure and climb back up the rope.

Enter the Glowing hole. Look at both paintings: Head left and ust the cloth to cover the left door. enter the right door.

Examine the chest to the right. And move the parts like this to get access to the key hole.
Use the key on the keyhole and take whats inside the chest. Now talk to the sistressed an fellow in the chair. Click the items on the table.

This puzzle has two stages.

Solution No 1

Solution No 2

After that take a look at the picture of the female prisoner in th corners are the symbols from the two paintings earlier. Move them so that it looks like this:

The painting will move aside and reveal a doorway. Enter it.

Place the lantern you got in the kitchen on the dresser to the right. Check the dresser drawer and cabinet. If you are wondering what taedium vitae means, is something like 'tired of life''. Take the tear-shaped emeral and open the coffins. You will find a coin.

Return back to the room wit the covered door. On the left you find a strange machine. Put the crystal into it and return back to the woman infront of the gate.

Give the woman the three coins and pick up the emerald she leaves behind. Use all your stones on the gate and leave.
Part Two: A Train To The Frozen Tears
The Mine
First we need to pick up the wheel that's on the ground and look into the rusrty cart to find a photo of the train we ar looking for. Move to the right.

Speak to the sad statue with the crows and make sure to check every signs frome here on forward. Those apply to an achievement. Head to the right again.

Take the doll and speak to the guardian on the bridge. Go back to the sad statue and take the path up leading to the mines.

Ignore the house and move on to the left.

We find a mine card outside of the mine entrance to the left of this s a wooden sign. This has the solution for a later puzzle so we look at that one. After that we go into th mine.

On the left inftont of the elevator is a wheel on the ground, take it and go out and place both wheels you found on the cart.

Head left. A bird-like creature will speaks to you. Check the grated drain pipe in the upper right. Take the iron crank hidden there and return into the mine. Move to the left and use the crank on the wheel and use it. Pick up the button.

Move back to the right and place the button on the elevator. Press it and enter the elevator.

Head left and open the little box in front of the monster. Take what is inside. Head back and examine the dool faces.

This is solution for the puzzle:
Use the mechanisem you found in the box on the space right next to the puzzle. Then push the button of the drill. Move back to the left. Take the part of the monster mon the ground and go left again.

Look at the carving in the wall for an achievement and pick up the flashing crystals to the left.
Examine the chast and take the rope. Go back outside to the little house.
Home Of The Rat
Use the green crystals on the lantern and enter the house.
You get to see more results of your choices from earlier. Take the stone tile offered. Examine the picture above the fireplace. Open the drawer to the left. Take the wooden figure and give the rat child the rag doll.

In the upper right corner you can find a flat metal piece on a hook. Take it. Head down the ladder and look in the barrel just in front of the ladder. It's the solution for the next puzzle. Check out the basket to the left for another figure. Look at the shelves to the left to start th puzzle.

the figures should be placed like this:

Enter the new door. You have the next choice, examine the panel on the wall near the door. Take the melat plate and place it on the pannel. Clickingthe top or bottom panels reveals an arrow to move the cage up or down.

Evil Press the button that drops the cage down.
Good Press the button that raises the cage and frees the prisoner.

After that decision you will get a train ticket you need later. Leave the house and head back to the bird creature.
The Storm Egg
Move the on up until you arrive at the tower. Examine the sign infront of you.

The sign we looked on at the outside of the mine contains the solution:

5, 2, 4, 1, 3

After that there is another puzzle which can be solved like this:
But i think there are some other ways posible too.
After that switch on the triger on the left to kill the monster. Now enter the tower.

Read all books for an achievement and head up the stairs.

Take the tile offered to you, ring the bell three times, take the key, look in the telescope to the right and look left two, down one and left one to see this:

Head up the ladder and use the key on the egg's cage and take it. use the rope on the hook to get down.

Now you have to make another moral choice. You can give the egg the bird man or the sad statur.

Evil Give the egg the bird man.
Good Give the egg the statue.

Both choices will result in receiving the key needed to open the stone infront of the statue. Open it and take what is inside.

The Crown Of A King
Once you’re done, it’s time to return to the first area where we saw the photo of the train in the mine cart.

Go to the statues in the background. Examine the stairs of the statue in the middle and place the missing tiles into the puzzle to start. The picture should look like this:

Enter the doorway. Examine the plaque to the right. Push the smoking part of the cube.

Examine the cube for another puzzle. It is a memory game and im afraid that it is all random so I can not really help you :/ but I's sure you get through it with out me.

After completing that you can move on.

You will enter an execution chamber. Take a look in the bucket next to the chair to find a note with some information we will need:

Their masks they don, the righteous five
That fateful day which none survive.
Twice the charge through the body surge-
‘Twas not enough for sins to purge.


In the sink you will find more:

The gathered cheer as life falls away.
Eyes feasting on this rite of decay.
Thrice bound, body charred, dry mouth’s last breath.
Another victim sentenced to death


Examine the clock on the wall and put the executioner on five, the electricity bolt on to the two and the rope on the three, like this:

Pull the lever to the right of the window and speak to the ghost. Take the crown and exit the area.

You have the next choice to make give th crown to the lizard or to the rat.

Evil Give it to the rat.
Good give it to the lizard.

Whatever your choice, you will get a piece to complete the puzzle on the hill where the lizard's tower is. So go up there if you are not there.
Start The Train
Look behind the tower and place the piece you got into the panel.

in the uper corners of the panel you can see the direction of the patterns. Click the arrows to rotate the discs to solve the puzzle. it should end like this:

Take the red cube from the structure and return to the rat's house and head down stairs into his torture chamber. To the left you will find a machine needed to compress the cube into a fuel cell. On the wall you find a diagram how to use the machine.

Now return back to the bridge and give the guard the part of the monster so that you can pass.
Examine the door of the train and make the shape we saw in the telescope, like this:
Enter the train and give the man all parts he needs: The fuel cell, the ticket and the train parts.
Part Three: Truth In A Statue
The Fog Of Evil
After you exit the train you can move to the left to see some soliders or you move straight to the right to see the stature we are looking for. Move to the right and talk to the man with the hat. Enter the house and look at the drawing over the fireplace. Speak once again with the man.

Go back outside and go to the left untli you reach the soliders one of them will drop a key to open the gate. Pick it up and go back to the gate to open it.

To solve the puzzle you have to slide the blocks so that green one ends on the other side of the box.

Step 1
Raise the long vertical block.

Step 2
Move the bottom two horizontal blocks to the right and lower the center vertical block.

Step 3
Move the green block and the long horizontal block to the right.

Step 4
Raise the left vertical block on the bottom up to the top.

Step 5
Move the green and long horizontal block back to the left.

Step 6
Raise the center vertical block and move the bottom horizontal blocks to the left.

Step 7
Slide down the center vertical block and the long vertical block. Slide the green block all the way to complete the puzzle.

After you solve the puzzle go through the gate.

Pick up the glowing flower on th boat and follow the path. Take the flower to the left and keep following the path you will find another flower.

Go back to the boat and enter the little cave.

Go left and talk with the man facing the wall. take the flower he offers you go to the right and put all flowers into the machine .

The jester appears and you have to chose: Free him or leave him for dead

Evil Leave him.
Good Free him.

After that speak again to the man. He will give you powder to disperse the fog. Take it and look into the hole he was standing infront of for an achievement. Leave the cave and go back to the soliders.

Use the powder on the fog.
Paintings Of The Blind
Head to the cathedral in the back. To open the door click on the pillars with the drawings and put them together like this:

The right on should look like this:

Enter the cathedral and look for an achievement on every painting (you can do this with restoring them to save time). Head straight and enter the door on the left. Tlak to the blind man and take the brushes he offers you.

The cat will give you three knives and marks the paintings you should cut.

Evil Cut the paintings.
Good Restore the paintings (If you want to do this you can combine it with the achievement for looking at the picktictures).

When you are done you can leave the place.
Rest In Peace?
Turn to the left and see the result of your choice for who takesthe crown. Speak to the fellow siting on the right he wants you to find the one who brought this destruction.

return to the blacksmith's house and follow the trail of blood to the top of the house where you find the bird man (and a part of wonderful soundtrack). He is dying and just wants to be left alone.

You are teleported back to the villager from before and have the last choice:

Evil Reveal the bird man's location.
Good Keep the bird man's location secret.
Discover What You Are
The villager will leave and you can use the instrument.

You can see some notes, right-side up and the same notes on the instrument upside down. you just have to play the melody in the right order by maching the simbols. If you count the keys from left to right the melody would be:
5, 5, 8, 7, 4, 6, 6, 9, 1, 2, 12, 5

Do not worry about beeing to slow just play them in the right order.

Take the disc that appears and go one screen back. Examine the floor on the left and put the disc into it.

It is another puzzle which is solved like this:

Pick up the metal and go back to the blacksmith give him the metal and take the sword. return now to the statue and use the sword on it. Enter the portal.

Go to the right and talk to the the cloaked people which tell you to choose between the key of light and darkness. If you choose the key of darkness, you are forgiven for one evil choice you made. If you haven' committed evil acts you still can choose the key of darkness without any consequents. After your decision go two times left, talk to the hooded figure and enter the opening and the elevator.

Place the key on the scale and enjoy the ending of Tormentum Dark Sorrow


______________________________________________________________________________

I hope this guide was helpfull for you, if you have something to add feel free to commente.
:)
7 Comments
IC XC NI KA 2 Jul, 2019 @ 8:43am 
"If you count the keys from left to right the melody would be:
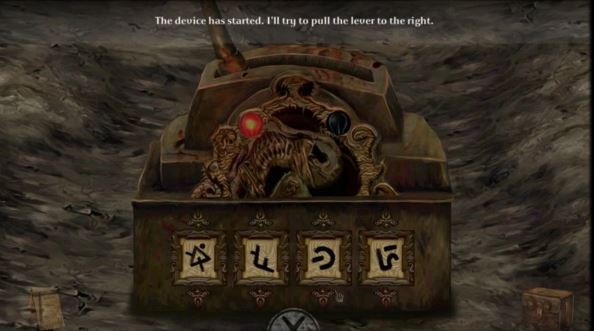
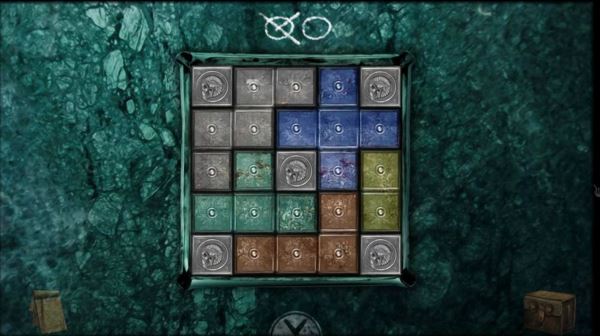
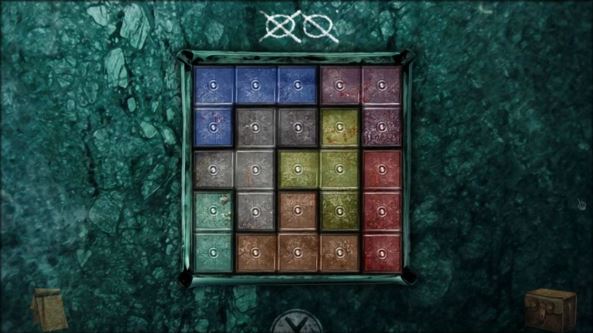
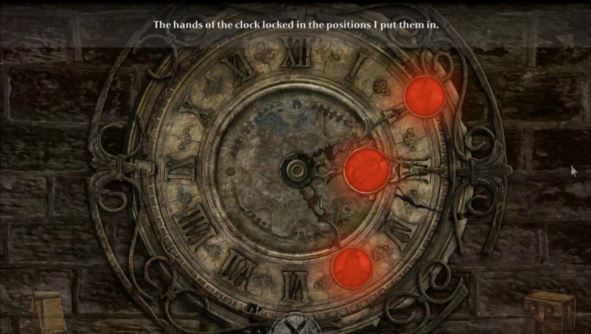
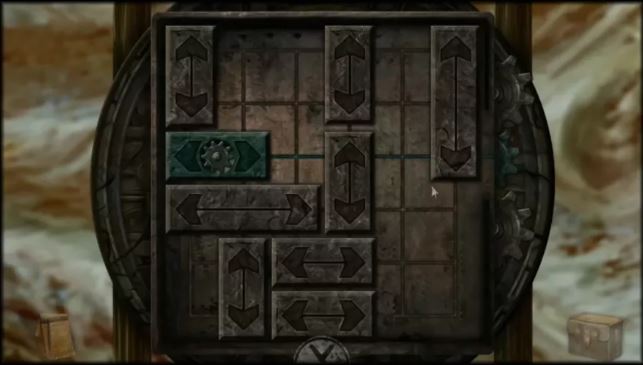
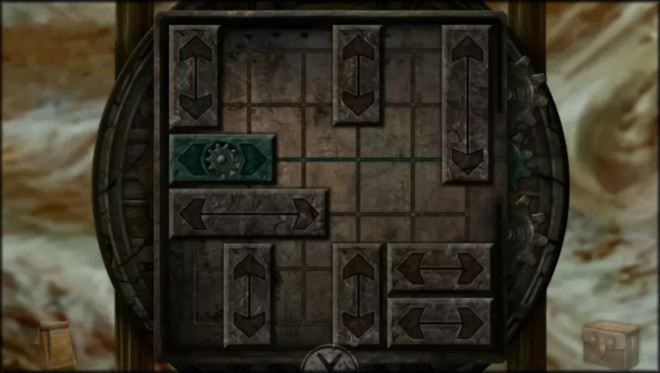
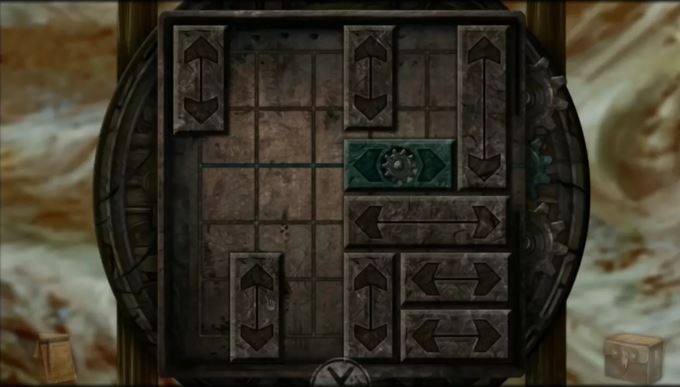
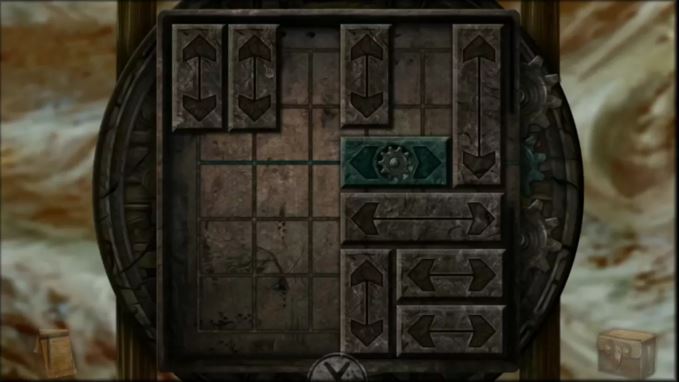
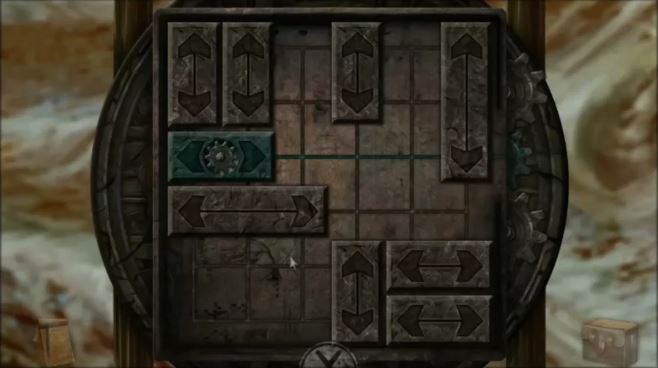
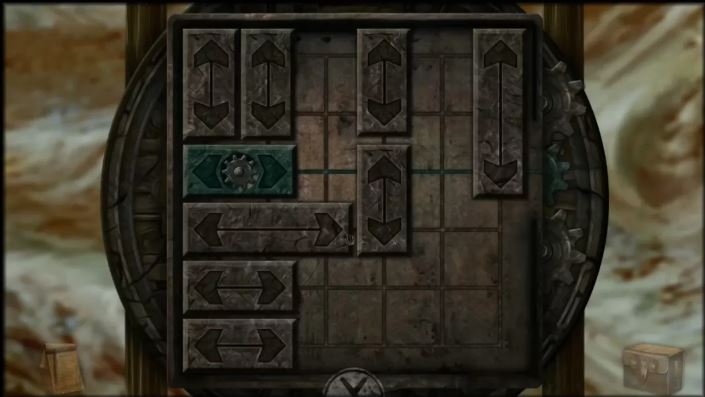
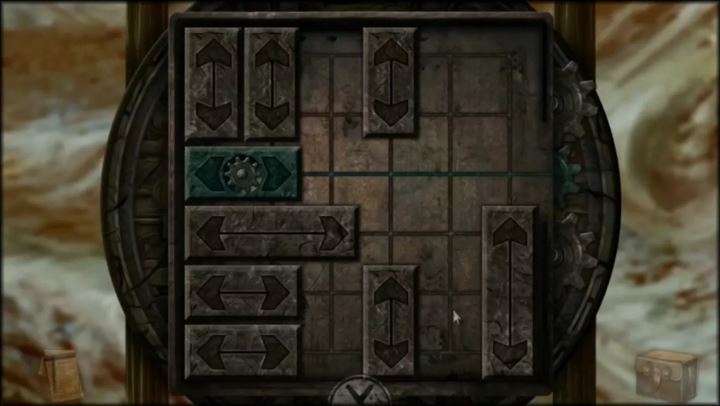
5, 5, 8, 7, 4, 6, 6, 9, 1, 2, 13, 5"

I wonder if you did it on purpose to lure people or if its an error but theres only 12 keys so 13 is false, replace it by 12.
Meat-King, The Ultimate 1 Jul, 2018 @ 2:21pm 
Thank you for the excellent guide! :golden:
Protis Bloodmoon 27 Jun, 2017 @ 4:08pm 
Thanks for this guide
TotoTurbo 1 Jan, 2017 @ 8:29am 
Thanks for the guide
blariog 7 Oct, 2016 @ 10:04am 
Thanks for the guide.
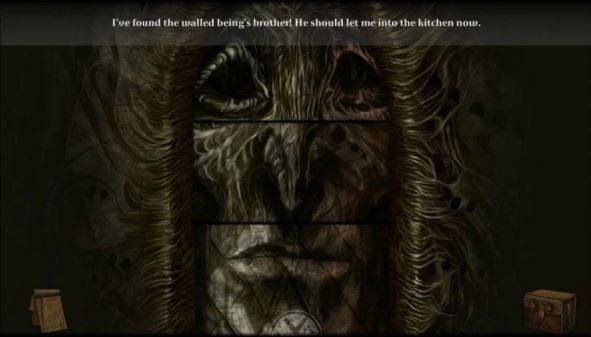
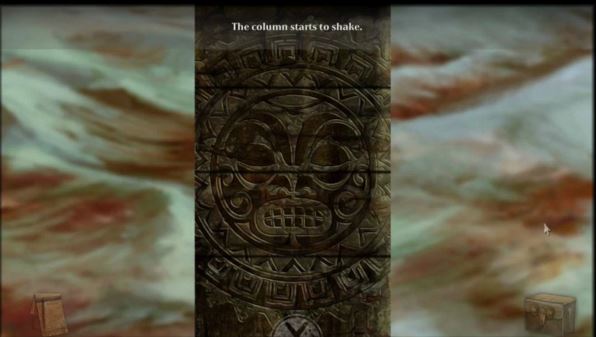
About the moral choices: if I don't know anything about what's happening at some point I do not have any choice. E.g. letting the spider out... :/
Aqvilinus 18 Aug, 2016 @ 6:54pm 
Great guide, thanks!
IKillYouBabyToday 24 Jul, 2016 @ 9:58am 
Mate, ty for guide (very like book guide)!