Motorsport Manager

Motorsport Manager

384 ratings
Understanding the Simulation
By 1224
This guide will try to give you an understanding of the simulation which should help you improve your race strategies and as a guide on the start of a rebalancing mod in order to make the game more challenging and therefore interesting.
2
4
7
2
   
Award
Favorite
Favorited
Unfavorite
Understanding the Simulation
This guide will try to give you an understanding of the simulation which should help you improve your race strategies and as a guide on the start of a rebalancing mod in order to make the game more challenging and therefore interesting.
Warning!
The following guide contain game information that can lead you to understand the game to a degree that it will become easier for you to win over the AI and therefore making the game to easy.
Disclaimer
I’m in no way affiliated with the creators or publishers of this game. The knowledge I present have been gathered through many years of following motorsport, education in Automotive engineering, working with vehicle simulation/simulators both racing and road cars and of course studying the simulation data files from the game. These guides are made for the Single Seater Series however most of the data is the same for the GT part of the game.
Understanding Set-up
The best way to achieve a good set-up is to just to do out laps and sharing the set-up information between team mates. The difference in set-up between teammates are usually negligible and you will get 95+ % by copying a 100 % set-up from one driver to the other. This also goes for the mechanics recommendations so your starting set-up should be taken from overlaying the two different recommendations. After the combined range is collected you spread out the set-up within that range with around 15-20 % difference between the two drivers. Following here are some graphs with examples for starting set-up based on initial mechanic’s recommendations.


Set-up example 1

In this example the first mechanic says set-up between 20-70 % and the second mechanic says between 30- 80 %. This means a combined recommendation at 30-70 %. With this data I would set driver 1 to 40 % and driver 2 to 60 % (I always have driver 1 as the lower of the two just for consistency).


Set-up example 2

In this example the first mechanic says set-up between 10-50 % and the second mechanic says between 40- 70 %. This means a combined recommendation at 40-50 %. With this data I would set driver 1 to 41 % and driver 2 to 49 %.


Set-up example 3

In this example the first mechanic says set-up between 0-40 % and the second mechanic says between 20- 60 %. This means a combined recommendation at 20-40 %. With this data I would set driver 1 to 21 % and driver 2 to 39 %.

The 20 %-unit split between the two drivers help you when they come in between their first stint. You usually get feeback in one of the following combinations:
  • Very Poor + Poor/Ok: This combination mean that the optimal set-up is more extreme than the driving giving Poor/Ok feedback. If the Very Poor is 40 % and Poor/Ok is 60 % the optimal is probably above 70 %
  • Very Poor + Great: Optimal Set-up is probably a bit more extreme than the Great driver
  • Poor + Great: Slightly less than the Great driver
  • Poor/Ok + Good: 5-10 % less than Good driver
  • Ok+Ok: Right between the two drivers
  • Excellent+Any: No comment

With this change you’ll usually get at least great on all 3 settings for both drivers except for the first combination.

Never be afraid of experimenting with any setting that is on Great in order to try and get it to Excellent. The difference between Great and Excellent is usually the same as the size of the circular head of the indicator. Since you have the button to revert a set-up to a previous stint and the orange indicators on the bars when hovering over the buttons you should have enough information in order to do a mix between different set-ups.

Using this strategy, I basically always have two confirmed 95+ % set-up within 10 minutes of practice. The struggle however is to balance between getting the perfect set-up and getting tire/race/qualifying knowledge. Given that a horrible set-up in the base game will lose you 1 seconds per lap and maximum tire+race knowledge will gain you 0.5 seconds per lap (0.83 per level and type) it might be useful to sacrifice the final 5 % of the set-up in order to get an extra level of knowledge.

The best advice here is to never try to get any knowledge that you are not going to use, meaning that before qualifying starts you should have already decided what strategy you plan to use as your plan A. One other advice is to always put engine and driving style to maximum which might give you and extra lap or two depending on practice length, since you are not going to use the practice tires in the race anyway you might as well destroy them completely.
Understanding Qualifying Out Lap Mini Game
The challenge with the heating mechanic for the qualifying is that the brakes and tires heat up at different rates with the brakes being much faster to both gain and lose heat. This proves very difficult when approaching the end of the lap since there usually is a corner right before the temperatures lock which means that the brakes goes into overheat if you drive at a decent to high pace. To counter this either make sure your brakes are cold coming towards the last corner or drive slow enough so the driver does not have to brake.

However, the biggest challenge is trying to find a clean lap so you are not held up by a slower car or someone on an in/out lap since this can cost you several seconds. Trying to guard yourself from cars coming out of the pit is almost impossible when you are out on the warm-up lap. You can however avoid cars on the out lap by being out of sync with the rest of the cars which can be achieved by not exiting the pit until the other cars are partway through their hot lap meaning that when your drivers start their hot laps the AI should be close to entering the pits after their runs. This might however lead to you making one flying lap less than the opposition depending on the qualifying time limit.

Overall advice for qualifying is that you should focus on finding the gap since the warm-up mechanic have been de-valued by the developers, since completely wrong temperatures only will lose you 0.25 seconds on your hot lap in the base game.
Understanding Tires
The tires in the game work in two different dimensions; compound and track selection. The compound affects two things in the game; when phase 4 starts (more on tire phases later), the temperature range of the tire and the rate of temperature changes.
Temperature range in the tire specifies at what ambient temperature the tire will heat up/cool down by itself when running on Neutral driving style. These values in the base game are:
  • UltraSoft 16-17
  • SuperSoft 17-18
  • Soft 19-20
  • Medium 22-23
  • Hard 26-27
  • Intermediate 22-23
  • Wet 24-25
The further you are from these values the bigger the effect of the self heat-up/cool-down
The track selection dimension of the tires affect phase 1-3 of the tire.

Tire phases
The tires in Motorsport manager have 4 phases:
  • Fresh
  • Normal
  • Worn
  • Cliff
The size of the first 3 phases depends on the track and what softness the tire is on that track, meaning that the softest tire on all tracks regardless if it is UltraSoft or Soft will behave the same in the first 3 phases, except for the temperature behavior on all tracks. The first, second and third phases are defined by their length in number of laps and how much time they lose per lap. Whereas the fourth phase is defined by tire wear and the time it loses per lap.
The first three phases are affected by the game length but phase 4 is not.

Tire phases for Short game length with duration and time lost per lap in the base game
Phase\Tire
Softest
Mid
Hardest
Fresh
4 laps/0.0 s
3 laps/0.75 s
3 laps/1.5 s
Normal
3 laps/1.25 s
6 laps/1.75 s
6 laps/2.0 s
Worn
2 laps/4.0 s
2 laps/3.5 s
4 laps/2.5 s

Tire phases for Medium game length with duration and time lost per lap in the base game
Phase\Tire
Softest
Mid
Hardest
Fresh
4 laps/0.0 s
3 laps/0.75 s
5 laps/2.0 s
Normal
4 laps/1.0 s
8 laps/2.0 s
10 laps/2.5 s
Worn
3 laps/5.0 s
4 laps/3.5 s
5 laps/3.0 s

Tire phases for Long game length with duration and time lost per lap in the base game
Phase\Tire
Softest
Mid
Hardest
Fresh
9 laps/0.0 s
5 laps/0.75 s
9 laps/1.5 s
Normal
7 laps/1.5 s
17 laps/1.75 s
18 laps/2.0 s
Worn
4 laps/3.5 s
6 laps/3.5 s
9 laps/2.5 s

The following graphs show time difference between the different tires when taking into account the first three phases of the tires with a pit stop (20 seconds lost per stop) when the tires get to the end of their Worn phase. They do not take into account the difference the fuel makes on the lap times nor that the fuel takes different time to refill.

The zero line (blue) is the speed of the softest tire on each track when the other tires are above that line they are slower up to that point of the race and when they are below they are ahead on the track. The big jumps in the graph indicates pit stops. When the orange/gray line moves down the softest tire just did a pit stop and when they move upwards they made a stop themselves.


Delta time for different tire strategies for Short game length across a race without fuel


Delta time for different tire strategies for Medium game length across a race without fuel


Delta time for different tire strategies for Long game length across a race without fuel
As can be seen in the graphs the difference between the tire strategies is quite small for the short and medium race with the best strategy differing slightly on the number of laps in the race. Whereas for long races the softest tire is seen as being the best from lap 26 until the end of eternity.
The next sets of graphs is done in the same way but with fuel added to the lap times however pit stop time is still not affected.


Delta time for different tire strategies for Short game length across a race with fuel


Delta time for different tire strategies for Medium game length across a race with fuel


Delta time for different tire strategies for Long game length across a race with fuel

As can be seen in these graphs the short game length is still fairly balanced with best strategy differing depending on the number of laps in the race. However for both the medium and long race lengths the softest tire is clearly the fastest with the softest being roughly a full minute faster than the other strategies.

Getting into the worn phase of the tire is not that bad and you should not be afraid of going into it if it means that you can do one less pit stop. When working through the first three phases of the tires there is no indication in the game showing you which phase you are in.

Cliff phase for all game lengths with tire wear level for reaching the cliff and amount of time lost/lap
Tire
UltraSoft
SuperSoft
Soft
Medium
Hard
Cliff Start
20 %
15 %
10 %
5 %
0 %
Time lost
8 s
8 s
8 s
8 s
8 s

The big killer for the tires is the cliff and thankfully they have given us indications on when we are approaching it as well as when a driver is in it. The approach of the cliff can be seen by the tire wear indicator in the game and comparing it to the values given in the table above. When you reach this amount of tire wear the pace of the car will slow down and you will lose 8 seconds each lap. This is also indicated by the car in the game through the flashing of the red light at the back of the car.

Intermediate/Wet driving
The following graph shows the operating conditions for each tire type. As can be seen the overlap between the different tires is small. This together with the big time loss (20 seconds for dry and wet tires and 10 seconds for intermediates) when the tires are out of their window means that the drying/build up conditions become tricky. The crossover between dry and intermediate tires is between 10-12 % of track wetness and 60-65 % for the crossover between intermediate and wet tires. Considering that the track quite easily can gain/lose 5-15 %-units of wetness in one lap of racing means that everyone will be caught out with the wrong tires for at least part of a lap. So it is crucial to time your pit stop correctly or you’ll lose a lot of time.


The problem with the time loss for a tire in the wrong operating condition is that you lose the same time regardless if you are driving in conditions dryer or wetter than what the tire is designed for. For example, driving a brand new intermediate tire in 11 % dampness the tires will lose 3.2 seconds compared to the softest new tires on fully dry surface. Whereas if you try to use the same tires in 9 % dampness you will lose 12.8 seconds, 0.4 seconds faster due to it being dryer but losing 10 seconds due to b
Understanding Pit Strategies
When you decide on what pit speed strategy to use you should think about how much time you lose by messing it up compared to the time you gain by doing it fast. This was especially stupid when the game was first released, it has been improved with patches. In the beginning a mistake on tires or fuel usually cost you between 0.3-1 seconds whereas you automatically gained 2 seconds just by choosing the fast strategy so even if the mechanics messed up you effectively gained timed by stressing through the pit stop. Now the penalty for messing up is much bigger with a mistake of the tires costing ~7 seconds but the percentage of mistakes have been reduced.

When you’re in a series with unlimited pit crews you should aim for using the same amount of time in all 3 areas of the stop; tires, fuel and repairs. Meaning that if you do refueling for 10 seconds then you should also try to do repairs for 10 seconds even if it is the first stop in the race and all parts are at ~70 %. This is particularly necessary at the beginning of a season when all your parts have low reliability so you don’t end up at a point towards the end of the race where you have to repair 4 parts and instead having done repairs throughout the race you can limit it to only having to repair 1-2 parts at the end.
Understanding Engine Mode
The time lost per lap per lap of fuel is a number that says how much time you lose for a given lap depending on the current fuel level in the car. This means that if you put in 20 laps of fuel on long session the first lap you will lose ~1.95 seconds due to the weight of the fuel, the second lap you will lose ~1.85 second and the 11th lap in that stint will lose you 0.95 seconds due to fuel.
  • Short Game Length: 0.25 s
  • Medium Game Length: 0.15 s
  • Long Game Length: 0.10 s
Burn rates and Time differences for different engine modes

SuperOvertake
Overtake
High
Medium
Low
Time Gain/Loss per lap (Short/Medium/Long)
-3.0/-3.0/-2.0 s
-2.25/-2.4/-1.6 s
-0.6/-0.9/-0.6 s
0/0/0 s
+0.6/+0.6/+0.4 s
Fuel Burn Rate
300 %
250 %
140 %
80 %
50 %
Adj. Burn Rate
1.6 laps of fuel/lap
1.4 laps of fuel/lap
1.2 laps of fuel/lap
0.9 laps of fuel/lap
0.7 laps of fuel/lap

The fuel burn rate value declares how fast you are using the fuel when you are using it and since the engine is not producing the entire lap it is not fully corresponding to what is useful for the player. Therefore I’ve introduced the adjusted burn rate which gives an approximate number to the amount of fuel used for each lap of racing. So for example for a 10 lap race you would need 16 laps of fuel if you drive constantly in SuperOvertake, 14 laps for Overtake, 12 laps for High, 9 laps for Medium and 7 laps for low. These are probably the most unreliable numbers that are given in this guide but the good thing is that these numbers are stable with slight adjustments to the track burn rate and possible driver traits. So, when you have found your numbers early in the season you will be able to use these for the remainder of the season. This can be checked by just doing one lap in practice on each engine mode and checking the fuel level at the start and end of the lap.

These 2 data sets together give a new set of data over what would be the fastest over a stint. Using the adjusted burn rate together with fuel weight and performance gain. The time lost values are in comparison to a lap on medium engine mode with no fuel on board. The Driving Lost value indicate the time lost/gained while on track without refueling which is what happens in the first stint.

Short Game Length 10 lap stint
SuperOvertake
Overtake
High
Medium
Low
Starting Fuel
16 laps
14 laps
12 laps
9 laps
7 laps
Refuel Time
11.2 s
9.8 s
8.4 s
6.3 s
4.9 s
Time Lost 1st Lap
0.8 s
1.08 s
2.25 s
2.14 s
2.26 s
Time Lost Last Lap
-2.80 s
-2.08 s
-0.45 s
0.11 s
0.69 s
Driving Lost
-10 s
-5 s
9 s
11.3 s
14.8 s
Total Lost
1.2 s
4.8 s
17.4 s
17.6 s
19.7 s

Medium Game Length 15 lap stint
SuperOvertake
Overtake
High
Medium
Low
Starting Fuel
24 laps
21 laps
18 laps
13.5 laps
10.5 laps
Refuel Time
16.8 s
14.7 s
12.6 s
9.5 s
7.4 s
Time Lost 1st Lap
1.64 s
1.66 s
2.58 s
2.61 s
2.63 s
Time Lost Last Lap
-2.84 s
-2.26 s
-0.78 s
0.09 s
0.67 s
Driving Lost
-9.0 s
-4.5 s
13.5 s
20.3 s
24.8 s
Total Lost
7.8 s
10.2 s
26.1 s
29.7 s
32.1 s

Long Game Length 20 Lap Stint
SuperOvertake
Overtake
High
Medium
Low
Starting Fuel
32 laps
28 laps
24 laps
18 laps
14 laps
Refuel Time
22.4 s
19.6 s
16.8 s
12.6 s
9.8 s
Time Lost 1st Lap
1.12 s
1.13 s
1.74 s
1.76 s
1.77 s
Time Lost Last Lap
-1.92 s
-1.53 s
-0.54 s
0.05 s
0.44 s
Driving Lost
-8.0 s
-4.0 s
12.0 s
18.0 s
22.0 s
Total Lost
14.4 s
15.6 s
28.8 s
30.6 s
31.8 s

As can be seen in the tables the SuperOvertake and Overtake modes are always the fastest options whereas the choice between High and Medium is harder when taking into account the refueling time. One thing to remember though is that the SuperOvertake and Overtake modes will increase the wear rate on the engine and gearbox. But if you get the reliability of these above 90 % you normally can run at Overtake mode for the entire race anyway giving you a huge advantage. Even when giving a worse value for the adjusted burn rate value you would still need an adjusted burn rate value of 2.0 laps of fuel used per lap of driving for the Overtake mode before it starts to lose time over a race compared to the medium setting.
Understanding Driving Style
To be Improved

Name
Attack
Push
Neutral
Conserve
Back Up
Time Gain/Lost per Lap
-1.75/-1.5/-1.5 s
-0.88/-0.75/-0.75 s
0/0/0 s
+0.88/+0.75+/0.75 s
+1.75/+1.5+/1.5 s
Tire Wear Rate
140 %
120 %
100 %
80 %
60 %


As can be seen the difference between the different driving styles is big however the issue with the driving styles is that it also affects the tire temperatures and it is still unclear how the tire temperature affect the wear and performance and it is hard to isolate this and therefore I have not been able to do the test required to fully understand the driving styles. Personally, I try adjust the driving style in order to try to keep the tire temperature in the correct window because at the time I started playing the game this would seem like the logical option since it seems rooted in real racing. However after getting to know the game better I would not be surprised if keeping the temperature correct is not the fastest option for doing a race and that you instead should just max out the instant speed cause you will gain enough of an advantage so that you actually can do one extra stop without losing any time in the long run.
Understanding Sponsors
There are a couple of things to know about the sponsors.
First, unless you are tight on cash do not sign any sponsors until right before a race. You will not lose any sponsor offers from the time they are given until the race so wait until you have the maximum amount of offers (3 per slot) before you select.

Secondly, think which one will give you the most cash per race of the contract not the highest value of just the contract.

Sponsor examples
Name
Upfront Payment
Per Race Payment
Nr of Races
Total Value
Value per Race
Hablar Hablar
0
200k
10
2000k
200k
Brutus Tyres
500k
100k
6
1100k
183.3k
La Paz Telecom
750k
0
4
750k
187.5k

Just looking at the money the best would be Hablar Hablar followed by La Paz. Since you basically never will be put into the situation where you will have to drive a race without a full sponsorship package.

Thirdly, for the bonus sponsors you should think about how often you will use that sponsor objective, for example if you are one of the top teams and always chose the hardest/most rewarding bonus objective then the other two sponsor slots should be selected only based on their upfront value/race ratio, with of course exceptions for any home race bonuses.

Finally, you should think about if your marketability has the chance of increasing during the length of the contract. With the sponsors above (all being 3 stars) you might want to select La Paz Telecom if you think that your team level will increase to 4 stars within the next 4 races so that you can sign a 4 star sponsor as early as possible.
Understanding Car development
The most basic thing to learn about the car parts and levels is that the individual values of a part is not important for the lap times the car can produce. What is however important is the rank of your part in relationship to what everyone else is having. So if everyone else have an engine with performance rating 240-260 it does not matter if your engine is 239 or 1 you will still lose the same amount of time per lap in both cases.

How it is done is that it takes each of the parts of the car and ranks it between 1-20 together with all other cars and based on the rank it gives you a “penalty”, the amount of the penalty can be seen in the table below. When all 6 parts on the car has been compared all the penalties are summed up for each car which then gives how much slower that car will be than an ideal car. The penalty is the same for all part categories.

Time lost per lap based on ranking of individual part categories for different session lengths
Rank
Short
Medium
Long
1st
0 s
0 s
0 s
5th
0.33 s
0.25 s
0.17 s
10th
0.48 s
0.36 s
0.24 s
15th
0.60 s
0.46 s
0.31 s
20th
0.73 s
0.55 s
0.37 s

This means that the extreme scenario, with one car being the best in all categories and one the worst, would result in a difference in ideal lap times with 4.38 seconds on Short game, 3.3 seconds on Medium and 2.22 seconds with Long game session setting

Using all this information results in the conclusion that you should not focus on developing parts where you are way behind your competitors or in categories where you are already in the lead.
Advanced Modding
You might have noticed that I have refered to the data presented here as being from the base game. This is because it is possible to adjust the data used here. This is done through a file called SingleSeaterDesignData/GTDesignData that is bundled together in the resources.assets file.

I’m currently in the process of trying to rebalance the game to make it more challenging and interesting where different stratergies can actually be used where the winner will be decided on who maximizes their strategy in terms of driving style, engine mode and traffic instead of just picking the softest tires and going flat out all the time.
42 Comments
Tommi 25 Nov, 2021 @ 5:47am 
when the tire is in forth phase it costs 8 seconds per round on every set
Antoniys 7 Nov, 2021 @ 11:05pm 
what happens to the tires after the third phase?
Mist 11 Jul, 2021 @ 10:02pm 
Excellent ! Hope to have any updates on the guide.
Kilowatt 25 Jun, 2021 @ 7:41am 
what a fake infos
GoldenAura 17 May, 2021 @ 6:05pm 
I reference this guide all the time, great work.
Dyus 30 Mar, 2021 @ 12:10pm 
Absolutely amazing work you've done here, mate. I don't know if you're still following this post or have any updates on the studies you done with this game's code, but I'ld love to pick your brain about it. Stellar job, really impressive. Best of luck to you!
Bjørn 17 Mar, 2020 @ 7:46pm 
can you fix the grandma' driving? in real racing, overtakes are quite often done by swift moves around drivers that are slower, in this game, if you come up to someone slow, in some cases even blue flagged drivers, you just go right behind them and stay there for a lap and a half.
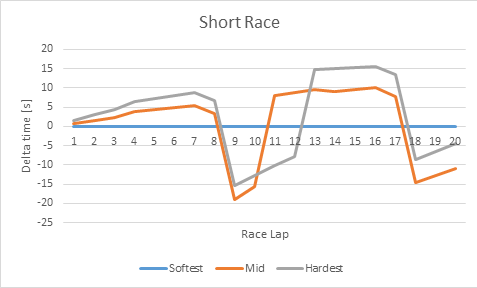
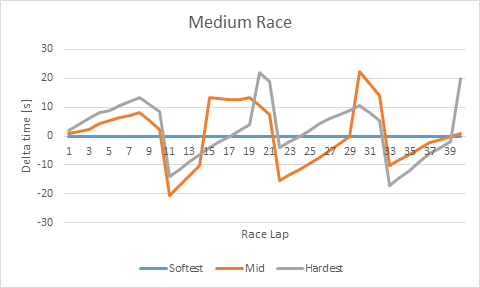
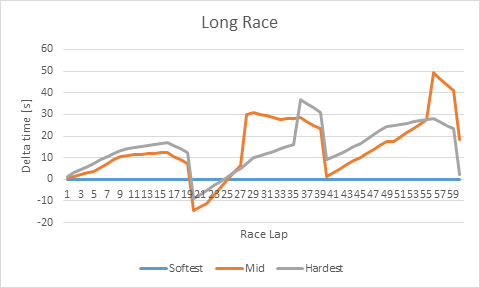
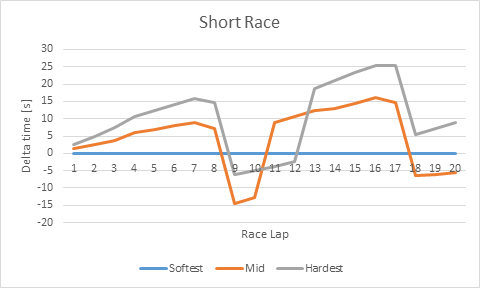
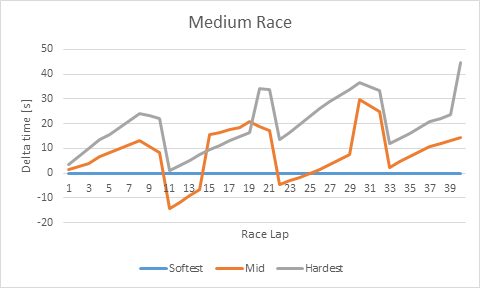
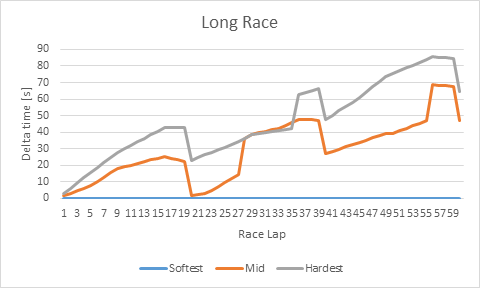
90% of the time in the first couple of laps, everybody goes in a single file snake around the track like it was a parade...
This game has great management stuff, but the 3D game mechanics seem first of all to be waay to simple, especially in areas of tire wear and driving modes. and the "AI" both of your drivers and competition are extremely grandma' driving.
Dennis 10 Nov, 2019 @ 4:28am 
Is a ranked 1 car as fast as a rank 2 car?
FiddyTrickPony 7 Apr, 2019 @ 5:30pm 
Thank you for the guide! I wasn't able to find performance increase/decrease values with different driving styles and engine modes anywhere else.
[33°] NuSpeak 31 Mar, 2019 @ 2:05pm 
I find the key to always achieving ‘excellent’ setups in every category during practice is to start the sliders at one far end of the spectrum, then continuously send the drivers out and back. Starting the bar at one end of the bar gives you instant feedback on which side(s) you need to shift focus to, and this method works consistently well through patching or other updates. I even make it a mini-game of my own to try to guess as accurately as possible after the first run. Never simulate a practice session! Simulating qualys works out fine usually, but practice is essential to do yourself, and you can realistically achieve 98-99% setup every time.