STAR OCEAN THE SECOND STORY R

STAR OCEAN THE SECOND STORY R

114 ratings
FAQ, Mechanics and Tips
By ElCid
Some of the most frequent questions about the game, as well covering fundamentals and tips.
4
3
   
Award
Favorite
Favorited
Unfavorite
Introduction and Disclaimer
This guide will cover all the most common asked questions, and also provide plenty of tips to new players and veterans alike. I hope it's useful to you.

The character artwork I use in the banners come from both The Second Story R and also Anamnesis. All rights reserved.

Here are my other guides:
https://cs2bus.com/sharedfiles/filedetails/?id=3069776676

I also strongly recommend checking Jedo's guide to help with the treasure hunting:
https://cs2bus.com/sharedfiles/filedetails/?id=3069947732

And Almighty Boof's excellent Remaking Guide:
https://cs2bus.com/sharedfiles/filedetails/?id=3077681964
FAQ


”What’s the difference between the protagonists?”
In terms of gameplay, Claude is a close-range fighter who wields a sword, while Rena is a symbologist focused on healing and support.

Starting the game with one or the other has absolutely no change in the story whatsoever, but allows the player to experience things from the perspective of the respective character, with each one also having their own personal arcs. If the player wants more space traveler lore, go with Claude. If wanting more world-building lore, go with Rena.

Starting characters also have exclusive recruitment:
⭐Claude can recruit Leon.
⭐Rena can recruit Dias.

In addition, certain Private Actions with specific party members can only be unlocked depending on the starting character.


”Can I miss content?”
Yes, however, in this Remake they made sidequests and Private Quests far more accessible by marking them on the map, which, in addition to the new fast travel mechanic, makes tackling side content a lot easier and nearly impossible to miss if you constantly check the map.

Time-sensitive sidequests and Private Actions will always have a tiny hourglass next to their icons.

There are, however, very few limited-only unique items that are either finite or can only be obtained in a very small time-window (such as the Sprite's Bracelet).


"How do I buy / sell multiple items?"
I see this being asked a lot in the forums and Reddit. While in the shop menu, simply press the assigned button on-screen (Triangle on PlayStation, Y on Xbox, X on Switch) and it'll change from "Buy" / "Sell" to "Buy Multiple" / "Sell Multiple", allowing the player to select multiple items before the checkout, like in the original game.


”Can I recruit all characters?”
In short: sadly no. There are 13 playable characters, but the party limit is up to 8 characters (4 in the main party, 4 in the reserve).

One of the signature traits of the Star Ocean series is that the player can recruit specific characters through the story, but cannot recruit everyone.

Below a small infographic regarding the intricacies of character recruitment.


Characters that automatically offer to join the party through story progression:
⭐ Celine, after completing Krosse Cave.

⭐ Bowman, after completing Linga's Sacred Grounds.

⭐ Dias, shortly after arriving at the Lacuer Front Line Base. Only in Rena's story.

⭐ Leon, after arriving at the Eluria Settlement. Only in Claude's story.

⭐ Noel, after completing the Cave of Crimson Crystals.

Certain characters are locked once another one is recruited:
⭐ Recruiting Ashton prevents the player from recruiting Opera and vice-versa.

⭐ Recruiting Precis prevents the player from recruiting Bowman and vice-versa.

Other character restrictions include:
⭐ Recruiting Opera, finding Ernest later in the game, but refusing to recruit him, will cause Opera to permanently leave the party. If the player doesn't want to recruit Ernest but keep Opera, they can simply avoid triggering the events that lead the party to him (finding his research lab in the depths of the Mountain Palace and finding Opera's ship in the Sacred Forest).

⭐ The aforementioned case of Leon being exclusive to Claude’s story and Dias to Rena’s.

⭐ Welch will only join if the player has 4 or more characters in the party.

⭐ Chisato has special event triggers in Centropolis, North City and Cave of Crimson Crystals that leads to her recruitment.

Recruitment Suggestion
This is my personal suggestions for party compositions that ensures first-time players will be able to recruit and play each and every character in the game, split between two save files. With the New Game+ mode allowing to change protagonists, recruiting everyone while keep progress is a lot easier now.

Claude's Story
1) Claude
2) Rena
3) Celine
4) Opera
5) Bowman
6) Ernest
7) Leon
8) Chisato

Rena's Story
1) Rena
2) Claude
3) Celine
4) Ashton
5) Precis
6) Welch
7) Dias
8) Noel


”How important are the Friendship Levels?”
In short, these are tied to the endings. Aside from the main story ending, characters have their own endings which are dependent on the Friendship Level. Characters with high levels for each other are more likely to have an ending together (and if they’re from opposite genders this can sometimes result in romantic endings).

There are also solo endings which only happen if a character didn’t develop a high Friendship Level with any other character. In addition, there are even special endings which can be unlocked by doing very specific (and often time-sensitive) Private Actions involving certain NPCs.

High Friendship Level also unlocks new Private Actions, and two specific characters (Welch and Precis) can unlock Special Arts through them.

Lastly, high friendship level also affects the hidden “Rage” status effect, which happens when a character who falls in battle has a high relationship level with one or more characters in the party during the fight. This will cause the character with the highest affection level towards the knocked out ally to be enveloped in a fiery aura, which doubles their physical damage. This effect lasts for around 30 seconds, of if the enraged character is KO’ed. The Berserker Ring accessory grants the same effect, but permanently.


"What do colored combat numbers mean?"

🤍 White: normal damage

🩶 Grey: resisted damage

❤️ Red: elemental weakness damage

🧡 Orange: critical damage


"How do I use the Fish Baits and the Fishy Fragrance?"
The Fish Baits can be changed in the Fishing Specialty Menu, but players can also swap baits on the go when they're in front of a body of water and the fishing icon appears; just press the assigned button (R1 for PlayStation, LB for Xbox and R for Switch).

The Fishy Fragrance is a special item that allows the player to get a bite every single time, and increases the chances of getting rarer fish and multiple catches at once. In order to use it, simply move near a body of water where you can fish and press the trigger in your controller (R2 for PlayStation, RT for Xbox and ZR for Switch). If you stay idle, this will actually show on your screen, alongside the amount of Fishy Fragrances you have (displayed as "chums").
Changes from the original game


While a lot of things were kept intact (the story, settings and character recruitment), this remake has some huge notable changes compared to the original game and the PSP port:

⭐ Characters's hitboxes were adjusted for all their attacks, as well speed. Basic Attack combos flow much better into each other and into Special Arts. Balances across the board for all characters (Ernest is good now!).

⭐ All Special Arts and Symbology Spells were reworked, with some having extra properties attached, such as a chance to inflict debuffs. Most notably, many spells now have multi-hit properties to help the symbologists compete with the fighters, and the vast majority of spells don’t pause gameplay anymore (save for the "ultimate" spells).

⭐ Special Arts now have attributes to deal more damage to HP, to Shields or Balanced. All offensive spells from Symbology deal balanced damage.

⭐ New combat mechanics have been introduced to add more depth to fights (more info below).

⭐ Players can now fast travel at pretty much any time, and also track the campaign, time sensitive quests and Private Actions on the map.

⭐Players start with nearly all Combat Skills and Specialty / Item Creation skills available to learn right at the start. Guilds (where you’d buy the skills in the original game) now instead offer sidequests for Item Creation in exchange for various rewards.

⭐ Characters in the reserve will now gain 1/5th of the total experience earned in battle. This includes characters that are in the Assault Action formation (except for the cameos).

There are WAY more changes, but these are just the major ones. If you want to see all changes, check out the dedicated article[starocean.fandom.com] from the Wikia page (which I made back when the demo launched and have been filling since).
New Combat Mechanics


Break System
All enemies now have shields aside from their healthbars, which is part of the Break System. This functions similarly to the Stagger System in Final Fantasy VII Remake, where dealing damage to enemies will raise a gauge and stun them.

In The Second Story R, consecutively damaging an enemy will progressively deplete their shields. Once all shields are destroyed, the enemy will be broken, which leaves them stunned and vulnerable for a few seconds. While broken enemies are subject to the following conditions:

⭐Any damage taken from player characters will be critical hit and ignore their defense stats.

⭐More Bonus Spheres for the Bonus Gauge will appear.

⭐Enemies will be completely vulnerable as their shields slowly replenish, at which point they can be broken again.

All characters have Special Arts that are "Shield-Focused", meaning they will deal more damage to shields than normal. All Symbology Spells deal balanced damage between HP and shields.

There are many other ways to increase the damage done to enemy shields, such as certain Factors. accessories, as well two new Combat skills: Breaker (randomly increases damage to shields) and Heavy Hitter (randomly increases the amount of shields depleted on a successful Just Counter).

In battles that feature Enemy Leaders, breaking them will cause a chain reaction that breaks all other nearby enemies automatically, regardless of their shield levels. Later, players can unlock a key item, through the Challenge Mission rewards, that makes breaks to ANY enemy cause chain reactions.


Bonus Gauge
During battle, the player can collect spheres that build towards a gauge with up to three levels; each level grants passive bonuses depending on the player's current Formation equipped in the Tactics Menu, up to three different levels based on the amount of spheres collected.

Bonus Spheres can be acquired through a variety of conditions in battle:

⭐Defeating an enemy.

⭐Landing a critical hit.

⭐Breaking an enemy.

The level of the Bonus Gauge will persist after battle. However, the gauge will reset to zero if the following happen:

⭐The player-controlled character is knocked out.

⭐The player fails to perform a Just Counter and is broken instead.

⭐The player is ambushed by the enemy in a Back Attack.

There are, however, ways to remedy these penalties and make the gauge resetting less punishing, such as some accessories, Factors and Combat Skills.


Just Counter System
Also simply called "Counter", it's one of the most important mechanics in the game. It allows players to completely negate damage from enemy attacks and retaliate, teleporting the character behind the enemy to attack.

This is done by pressing the dedicated button, which makes the character backstep; this animation lasts for 22 frames and it has no invincibility frames by itself; only when triggering a counter. The window of opportunity of the counter is until frame 14.

A successful perfect counter will completely negate the damage, granting invincibility frames, and also makes the character move at high speed behind the enemy and strike. In addition, a perfect counter attack will remove one shield from the enemy. Lastly, the character will recover 25% of their max MP (this value becomes higher if the character’s HP is low).

Timing is crucial, as doing it too early or too late will result in a counter failure, which stuns the player character and COMPLETELY reset the bonus gauge. If you press the backstep button while taking damage, it'll also break the character.

Mastering the counter system is key to success in this remake, especially on the Universe Difficulty.

Counter Cancel
A simple, yet advanced technique where the player interrupts the animation of the perfect counter with a Special Art or Symbology Spell. By pressing the shortcut for Arts / Spells right when triggering the perfect counter, the character will use the assigned ability instead of a normal attack (spamming the button works).

There is a possible bug regarding counter canceling. When doing it with a spell, the caster will have invincibility frames while chanting the spell. This also works for fleeing battles; by performing a perfect counter and immediately opening the battle menu before the attack is triggered and selecting Escape, the character will have full invincibility frames. This was present in the demo, but hasn't been changed in the final version of the game.


Assault Action System
This system allows the player to summon characters in the reserve party to perform Special Arts or Symbology Spells. Some important things to note:

⭐The player can set up to 4 characters for Assault Actions.

⭐Each character can have their own Assault Action set (both offensive and defensive abilities), each with their own indvidual cooldowns. Defeating enemies and triggering battle skills quickens the cooldown.

⭐Multiple Assault Actions cannot be used simultaneously; only one at the time, but they can be used successfully.

Cameo Assault Action
Players can also acquire special jewels that allows to summon characters from other Star Ocean games. These cameo characters are not actual party members nor have any impact on the story; while they don't level up, the damage calculation of their Assault Action is scales with the character with the highest ATK or INT in the active party.

Also, it's important to note that Assault Action damage is NOT affected by the Surpass Damage Limit Combat Skill, even if you have it fully upgraded on a character; the max damage of Assault Actions will always be 9999.


Laeticia Jewel: found at the end of Krosse Cave. Summons Laeticia Aucerius from the sixth game in the series, The Divine Force. She attacks with Ultime Camui, which deals damage in a large area around her.

Fayt Jewel: use Assault Action 50 times. Summons Fayt Leingod from the third game in the series, Till the End of Time. He attacks with Vertical Raid, which deals multi-hit damage in a downwards angle from the air.

Raymond Jewel: rewarded after catching 22 different types of fish and reporting to Reel in Harley (or L'Aqua). Summons Raymond Lawrence from the sixth game in the series, The Divine Force. He attacks with Extreme Daredevil, winding up and launching himself with the aid of D.U.M.A. to deliver a powerful haymaker.

Edge Jewel: trade one Harbor Amago or six Divine Char with Reel in Harley. Summons Edge Maverick from the fourth game in the series, The Last Hope. He attacks with Celestial Sword, swinging his blade upwards in an arc to demolish the enemy's shields.

Roddick Jewel: complete 30 Guild Missions. Summons Roddick Farrence from the first game in the series, First Departure. He attacks with Omega Double Slash, jumping forward while swaying his blade.

Fidel Jewel: complete 30 Guild Missions. Summons Fidel Camuze from the fifth game in the series, Integrity and Faithlessness. He attacks with Ethereal Blast, where he jumps in the air with energy wings, channeling energy and releasing it to damage all enemies in the battlefield.
General Tips


Tailor your experience
This game can be as hard or as easy as you want it to be depending on how you play. As aforementioned, Gemdrops added tons of quality-of-life changes that makes this game more comfortable in general.

Veterans of the original game will know that it's possible to break the game within the first hour and get extremely powerful items that will trivialize the rest of the game. These aren't glitches, and the fact they're optional paths you can take just show how customizable this game is.

Some of the things you can take note to make your journey more enjoyable are:

Challenge Missions: while they look overwhelming at first due to the huge lists, the vast majority of Challenge Missions will be completely organically as you simply play the game (e.g. Use Art 10 Times; Break the shields of 50 Enemies; Get 10% of the Item Encyclopedia). Many Challenge Missions can be completed fast and provide a useful items very early in the game. They're also a very good source of Fol.

Guild Missions: these appear periodically in towns. They all involve Item Creation and Specialty, and they're all very simple, often being "Learn X Item Creation" or "Craft X Item with Y Item Creation" (in this case most of the time the Guildmaster will give you the materials).
Party members will often comment when new Guild Missions are available as you're strolling around towns.

Item Creation and Specialties: it's possible to learn all Item Creation and Specialties right off the bat when you unlock them in Krosse. While not all can be used at the start of the game due to required items and materials, you can start playing around with those you can to unlock useful items.

Exploration: towns, dungeons and the overworld will always have something interesting to explore. You can find treasure chests as well Unique Spots, which give EXP and items.


Always save before Private Actions
Triggering Private Actions in The Second Story R is much simpler than in the original title, as the player can freely swap between the Normal Mode and Private Action Mode at any given time while inside a town (except during story bits).

Nearly all of them will affect character relationship levels, and some can even start Private Action chains that lead to secret endings or special items. Many also require prompts where you must give a reply to the character, and a wrong reply can result in a decrease in affection level or cancelling a trigger of a future Private Action.

All towns now have Save Points, but they will disappear temporarily while the player is in Private Action Mode.


More Hits!
Multi-hit Special Arts and Symbology Spells truly shine in this game, because not only you’ll have more damage-per-second, but Combat Skills and status ailments trigger chance are based on each individual hit. Factors also take in consideration every hit, which can make certain combinations very potent (i.e. HP Drain).

For characters with exceptional normal attack combos, such as Ashton, Welch, Chisato and Claude (especially with the Aeterna), you’ll want to equip them with the Meteor Ring or Ring of Lightspeed, which adds one and two extra hits to each normal attack, respectively.


Dungeon Grinding
Dungeons will always have, before the boss battle, a Healing Save Point, which fully recovers your entire party’s HP and MP. Players can use this to their advantage to grind, by clearing all enemies in the dungeon, saving in the Healing Save Point, and loading the save file; this will respawn all enemies in the dungeon without the player having to exit and reenter it.


How to get early Replication
Normally, you can only get the Magic Camera once you reach the Lacuer continent, as it's sold in Linga. However, you can start replicating a bit earlier in the game.

You can pickpocket a green-haired man at the hall in Krosse Castle for a Magic Camera. And after finishing the Forest of Symbols segment in Marze, the shop in Harley will start selling Magic Film.

If you want to start even earlier, the Bugbears in the Forest of Symbols drop Pet Food. You can summon Eagles with Familiar Level 9 to buy Magic Film.


Improving Item Creation and Specialties directly
This is a nifty shortcut that was added for the remake. While in the Improve > IC/Specialty menu, you can swap between upgrading the individual skills or the Item Creation and Specialties themselves by pressing the assigned button (Square on PlayStation, X on Xbox and Y on Switch).

Points will be spent on the assigned skills to make leveling more easily. In addition, while in this mode, you can even see which are the respective Item Creation / Specialty skills related.


Fol Farming
Note: getting Group Appraising is important to increase the amount of Fol you get while selling items.

Early Game
A very effective way to make money at the start, as soon as you unlock Item Creation when Celine joins the party as a guest at Krosse, is through Cooking. While this method gets vastly outclassed later, it’s still a reliable and fast way to make a quick buck in the beginning until unlocking better methods. The best place to do this is in Arlia; by buying Eggs and Dairy (the cheapest ingredient in the game), cooking them and selling the results for easy profit.

Mid to Early-Late Game
The second method involves using the Contraband Super Specialty, which is unlocked by having at least two characters with Level 4 Pickpocketing and one with Level 1 Duplication.

This strategy also involves Duplication. The Magical Camera can be first bought in Linga (or pickpocketed at Krosse Castle), while the RIRICA can be created through the Machinery Item Creation.

The process for money making using Contraband is really simple:

  1. Create a Forged Document (it can be done even with low level Contraband).
  2. Make copies of it using the Duplication Item Creation (recommended around Level 7 for higher success chance).
  3. Use the Group Appraising Super Specialty to increase the selling price.
  4. Sell all the duped Forged Document except for one.
  5. Rinse and repeat from step 2.

Using Contraband has a chance to reduce the relationship levels between ALL characters in the party EACH time it’s used. If you're worried, save before using it.

Mid to Late Game
Once the player has developed the Master Chef Super Specialty enough, they can employ a more profitable technique, which involves using it to make Sole in Wine Sauce (one Seafood and one Fruit). This food is notable as it gives the player an increased chance to produce Nectar when using Master Chef with any ingredients. Nectars can be sold for over 150.000 Fol each, which cannot be duplicated.

Purity Trick
The skill Purity grants a set amount of Fol per level. Players can use that to their advantage when using Guest characters they don’t plan on recruiting permanently. For instance, if the player has Rena as the protagonist, they can max out Leon’s Purity when he temporarily joins the party, since he cannot be permanently recruited.


Unlimited SP and BP
Through Master Chef, you can make two items can make SP and BP farming significantly easier in the early game:

⭐Sashimi: grants 2 SP to the character. Made with two Seafood.

⭐Vegetable Stir-Fry: grants 2 BP to the character. Made with two Vegetables.

These ingredients have very cheap costs, which makes this method even easier to pull right at the start of the game, especially when combined with the tip above of cooking and selling Eggs and Dairy products.
Skill Tips


Which skills to improve first
As aforementioned, unlike in the original game, Skills are no longer bought at Guilds, instead being available by default to learn using SP (Skill Points) and BP (Battle Points). There are some “secret” skills that are obtained through the game, though; most of them are rewards from completing Challenge Missions.

SP is used to learn & upgrade Item Creation and Specialties. These skills, aside from being pivotal to the success rate of each those mechanics, also often grant passive effects such as increased attributes, discounts at shops, and increased effects from healing items.

BP is used to upgrade Special Arts / Symbology and also to learn & upgrade Combat Skills (most of those have a small chance to trigger based on their level).

Whether the character is a fighter or a symbologist, the most important Skill in the game is Determination, which reduces the SP cost of ALL other Specialty Skills per level.
Max this before spending SP on anything else⭐.

As a rule of thumb, you'll want to max Determination, and then purchase the first level of each and every skill to have all Item Creation and Specialties available. Same thing for Combat Skills, depending on the type of character (fighters don't need to learn Hasten Speech, for example).

Best Combat Skills

Surpass Damage Limit: arguably the most important Combat Skill in the entire game for any character. It allows to increase the damage dealt above 9999, up to 99999. This is a secret Combat Skill unlocked by completing the Legend Challenge Mission to deal 40 million damage cumulatively over the course of the game.

Godspeed: this is possibly the second best Combat Skill, though tailored for fighters. It passively increases movement speed, but also has a chance to make the character “teleport” to his target at lightning speed. This is pivotal for combat, especially when you need to swap to targets that are attacking your backline (i.e. Symbologists). I strongly recommend maxing this as soon as possible, or at the very least upgrading it to Level 5 and investing on the other skills. Symbologists can benefit from this skill too, but mainly to increase mobility in order to flee from enemies.

Backstab: this works exactly like Godspeed, but has a chance to teleport the character right behind the enemy. This is a secret Combat Skill unlocked by completing the Beginner Challenge Mission to learn 20% of the Combat skills with one character.

Breaker: increases the chance of doing extra damage to enemy shields. This skill affects all sources of damage, whether it's normal attacks, Special Arts of Symbology Spells. This is a secret Combat Skill unlocked by completing the Expert Challenge Mission to break four enemy shields at once.

Hasten Speech: an absolute must for symbologists and it's the first Combat Skill you'll want to learn. It decreases the cast time of all spellcasting.

Concentration: random chance to grant super armor to the user while chanting spells. Useless for fighters. Very useful if you're not using the Square Shift 1 & 2 Formations;

Power Burst / Trance: random chance to increase attack power / spell damage. Very straightforward.

Best Specialty Skills

Knife / Technology: both increase STR by a whopping 10 per level. A must for fighters.

Mineralogy / Faeriology they increase INT by 3 and 2 per level, respectively, which increases all magic damage and healing. A must for symbologists.

Aesthetic Design: increase ATK, INT, AVD and HIT by 6 per level. A huge stat boom useful for all characters.

Danger Radar: increase STM by 3 per level. Very useful in the early game since characters tend to burn their MP really fast, and high STM allows to recover more HP and MP per battle.

Herbology: increase the recovery from Blueberries and Blackberries by 3% per level. When maxed, this makes these herbs recover 52% of HP and MP. Can make most food items obsolete.
Getting powerful items earlier


There are various useful items that can be obtained very early in the game, and they're generally pretty simple to obtain. While some may break the game, others are just generally useful without shifting the balance of the difficulty.

Goodie Box
This consumable item will grant the player three random items (in a pool with over 200); one of these items is the Sword of Marvels, which is one of the best weapons in the game (1100 ATK and has 100% guaranteed hits) until you get other more powerful weapons in the endgame. You can save scum and reload the game until you get this sword, but I strongly recommend not doing this on your first playthrough as it can trivialize over half the game.

⭐ The easiest method to get the Goodie Box is by completing one of the Challenge Missions, specifically the one that requires filling 10% of the item encyclopedia. The quickest way to achieve this early in the game is by Fishing, as well using Cooking and Crafting.

⭐ There is also an old man next to the inn in Marze, who can be pickpocketed for the Goodie Box.

⭐ You can also get an unlimited supply of Goodie Box by trading them with Reel for certain fish.

⭐ Lastly, Goodie Boxes can also be created through Art, at least level 4, by selecting the “Create Strange Goods”. The chance is pretty low, though.

It's important to note that Goodie Boxes CANNOT be duplicated with Replication.

Benefaction Card
This item works similarly to the Goodie Box, but only grants a single item. The item pool appears to be more or less the same as the Goodie Box. It can also be made through the Art Item Creation.

⭐ The easiest method to get the Benefaction Card in the early game is by checking the Unique Spot near Kurik, which rewards the player with the item.

It's important to note that Benefaction Cards CANNOT be duplicated with Replication.

Meteor Ring
This is easily one of the best accessories in the game for characters with powerful Basic Attacks (i.e. Claude, Ashton, Welch). It increases the number of hits per Basic Attack by 1 hit.

⭐ The earliest method to get the Meteor Ring is by completing one of the Challenge Missions, specifically the one that requires breaking enemies 50 times, which should be pretty easy to do by just playing the game normally. The best place to do this in the early game, however, is at Salva Mines, near the recovery save point, and repeatedly fight the enemy icon near it, which will always spawn a couple of Vorpal Bunnies; Rena can instantly break their shields with a single cast of Crush.

⭐ Another Meteor Ring can be obtained once reaching the Lacuer Kingdom, by finding the "Gift from the Sky" unique spot (a massive crater found north of Linga).

It's important to note that Meteor Rings CANNOT be duplicated with Replication.

Later, players can get Rings of Lightspeed, which add 2 extra hits instead; the first one can be found in a Private Action in Fun City after entering Phynal the first time (and being defeated in the scripted battle).

Faerie Ring
This is easily one of the most powerful accessories in the game, especially at the start when MP recovery is scarce. This ring reduces MP cost of all Special Arts and Symbology Spells by 50%.

⭐ The Faerie Ring can be easily acquired through Crafting, with Claude, using a Green Beryl.

The Faerie Ring can be duplicated through Replication.

Earring of Readiness
This accessory prevents back attacks. In this game, getting back attack can be a death penalty since it leaves characters vulnerable for several seconds, on top of completely resetting the bonus gauge. For that reason, the Earring of Readiness plays a huge role. Even more importantly, it works even if equipped on a character in the reserve.

⭐ The Earring of Readiness can be easily acquired through Crafting, with Claude or Celine, using a Diamond. Earrings can only be equipped female characters that are over 20 years old (i.e. Celine, Welch, Opera and Chisato). However, Rena is able to equip this particular ring too (Precis can't).

Berserker Ring
This accessory puts the character in a permanent Enraged state, doubling all physical damage in battle. It’s perfect for fighters that have powerful Special Arts, and is easily one of the most powerful and useful accessories through the entire game.

⭐ The Berserker Ring can be easily acquired through Crafting, with Claude, using a Ruby.

⭐ Later in the game you can acquire a Berserker Ring Kit as a Guild Quest Reward.

The Berserker Ring can be duplicated through Replication.

Shield Ring and Ring of Resistance
Possibly two of the most powerful defensive accessories in the whole game. The Shield Ring reduces physical damage by 90%, while the Ring of Resistance reduces magical damage by 90%. The drawback is that both accessories have a 10% chance to break per damage taken (even if the damage is 0).

⭐ The Shield Ring can be easily acquired through Crafting, with Rena or Celine, using a Star Ruby.

⭐ The Ring of Resistance can be easily acquired through Crafting, with Claude, using a Crystal.

⭐ Both rings can also be bought at Reel’s shop (on Harley and L’Aqua), and are also rewards from the Challenge Mission to Appraise 10 items.

Both rings can be duplicated through Replication.

Sprite’s Bracelet
This unique accessory can only be found at Kurik. By entering Private Action Mode before the town is destroyed, the player can find a NPC called Philia. By pickpocketing her, the player can obtain the Sprite’s Bracelet; it's a one of a kind accessory, meaning that if the player fails to do the Private Action they cannot obtain it anymore. It's one of the very few missables in the game.

This accessory has a chance to give random items by simply walking around. It’s not required to be equipped on the leader to work, and works even if equipped on a character in the reserve party and during Private Actions.

The item pool of the Sprite's Bracelet includes very rare items like Counterfeit Medals, which reduce all experienced required for the current level 1. This item can be crafted through Contraband.

Later in the game the player can find the Pixie’s Bracelet and Fortune's Bracelet, which are a better versions of the Sprite’s Bracelet, boasting improved item pools. The beauty of this is that these three accessories stack, meaning the player will periodically get three free items.

It's important to note that both the Sprite's Bracelet, the Pixie's Bracelet and the Fortune's Bracelet CANNOT be duplicated with Replication.
Combat Tips


Control the flow of battle
One of the biggest mistakes of new players do is trying to force through enemies. While this worked in the original The Second Story, and can work in the endgame of The Second Story R, it's still advised to not try to power through enemies and tunnel vision.

The way enemy AI works is that they'll often prioritize:

⭐ The closest player character.
⚠️Some enemies will do the opposite and target the furthest character (which often tends to be the symbologists).

⭐ Characters doing high damage.

Once the enemy has a target set, they will move towards the character and won't stop until they reach their target or get staggered by an attack. You can use this to your advantage to perform baits and pull enemies away from more frail allies, or clutter foes together for big area-damage. This is very valuable against melee-only enemies.


Constantly swap between characters
The player character AI is, unfortunately, very limited. Symbologists will often stand still as enemies approach, and end up taking free damage. So always keep an eye to the battlefield and swap between characters to keep them off harm's way.


Build a balanced team
The Star Ocean series has always been notorious for huge spikes in difficulty, especially in dungeons. Because of that, building a team that can deal with a variety of different situations is important. The most basic type of team is:

⭐ A fighter that excels in single target damage (e.g. Dias, Ashton, Welch).

⭐ A fighter that excels in area-of-effect damage (e.g. Claude, Precis, Chisato).

⭐ A Symbology user (i.e. Celine, Leon, Noel).

⭐ A healer (i.e. Rena, Noel).

Of course, you can mix this, such as having two spellcasters or three fighters. You can even forgo the dedicated healer; for instance, Opera is a fighter, but she has access to Healing Star, which is capable of healing the whole party without requiring a cast time.

With the new Break System playing a major role in combat, you’ll want, ideally, each fighter equipped with a Shield-Focused and HP-Focused ability to ensure they can hold on their own. Some characters excel at breaking more than others.

The Assault Action system further supplements teambuilding as you can have assist skills from other characters to cover weak points in your team, or reinforce its strengths. For instance, if the player is using Celine in the main party, they can have Leon in the reserve with a powerful spell that overlaps with Celine’s and unleash massive damage in a large area. Or have both Rena and Noel in the reserve with healing spells for a team with no dedicated healer.

Symbologists in general tend to be very useful for Assault Actions as there is no casting time; when you summon a symbologist they'll immediately use their spell as soon as they appear.


Fleeing battles safely
Unless you have a Veda Idol (obtained from Art), always flee battles with one of your symbologists by going to the bottom of the screen, and then swap to a fighter and bait enemies around. Since only one ally is required to escape in order for the whole party to flee. That way you avoid taking unnecessary damage.

You can also become completely immune to damage by performing a Just Counter Cancel, pulling the menu and selecting the escape. The character will have full invincibility frames while attempting to flee.
Endgame Tips


Duplicate everything!
The Replication Item Creation is an incredibly tool to help players save materials or even to duplicate certain pieces of equipment.

While you can't duplicate everything, there are plenty of things you can, most notably:

⭐ Equipment with the Masterwork factor.

⭐ Legendary cooking materials, such as Wobbly Slime and Gelatinous Slime, which can be used to make food items that grant massive bonuses to EXP, SP, BP and Fol gains.

How to find Tok's shop
Tok's shop, also known as "For a Few Fol More", is a secret place in Energy Nede that sells a bunch of rare goodies. Among them is the Magical Rasp, which enables more advanced items to be created with Blacksmithing. This is the only place in the game to buy Magical Rasp.

The Magical Rasp is a very expensive item, so it's recommended to use a Cinderella's Glass and having Group Appraising maxed out before buying it.

To find the secret shop, you must acquire the Psynard in the Cave of Crimson Crystals. After that, fly to the southwest part of Energy Nede. Tok's shop can be found on a small island sitting between Princebridge and the Field of Might.

[Click on the image to expand]


Ultimate EXP Farm
The fastest and most effective way to level to 255 after finishing the Maze of Tribulations is:

⭐ Set difficulty to Earth.

⭐ Max out Train on all characters and turn it on.

⭐ Set the Square Shift 2 in the Formation menu. Make sure you have your Bonus Gauge at max stacks.

⭐ Create at least one Experience Card through Art.

⭐ Create at least one Amoeba Soup through Cooking using Gelatinous Slime or Wobbly Slime (both can be found in the Maze of Tribulations). Amoeba Soups are also a rare drop from any type of slime enemy in the Maze.

⭐ Duplicate the Experience Card and Amoeba Soup through Replication.

⭐ Compose the Devil's Aria through Music using the Silver Trumpet.

⭐ Use a Amoeba Soup.

⭐ Play Devil's Aria Level 8 to fight the Tyrant Dragon.

⭐ Use a Experience Card and defeat the boss.

⭐ You'll get over over 5 million EXP from all the buckets of experience bonuses.


AFK Farming
While this is less effective than the method above, it can be done at pretty much any point in the mid to late game:

⭐ Get the Scouting Specialty and the Bodyguard Super Specialty; ideally you'll want both maxed or at least around level 5 ~ 7. For Scout it's better to activate on someone who has the Wild Instincts Talent (not necessary though). Make sure to turn both ON in their respective menus.

⭐ Equip two Rings of Avoidance (30% of chance to trigger Bodyguard) on each active party member. Those can be made through the Crafting Item Creation by using Philosopher's Stone (Rena can make them).

⭐ If you want to do this earlier in the game (as getting Philosopher Stones in the early game can be tricky), you can use Intimidation Pendants instead (15% chance), which can be crafted with Crystals (also by Rena).

⭐ Sit on a dungeon or the world map where and enemy icons are green (meaning you're far above their level) and win by doing absolutely nothing.

Bodyguard might not activate ALL the time even when maxed, and you'll may occasionally have to fight if one of the monsters manage to sneak first. Make sure that your party is potent enough to handle fights on their own.


Universe Teambuilding: "Hold the Backline!"
The difficulty becomes truly brutal in lategame Universe. Lots of bosses in the Maze of Tribulations can kill the party in two or even one attacks. To make matters worse, the party member AI still is, for the lack of a better word, really dumb. Your party members will often walk straight into enemy attacks and get themselves killed.

To avoid having to babysitting your squad, an effective strategy is to make backline team compositions for boss battles, where the only frontline character is the player controls. Many characters have Special Arts with global range, meaning they can be put far behind and just spam them:

Claude: he can be put using Air Slash, which has piercing however, the move is painfully slow. He can be put with Rock Explosion, Sword Bomber or Phase Gun, though he won't be able to sit in the backline spamming. Ideally, you should be controlling Claude if he's part of your main team.

Rena / Celine / Leon / Noel: Symbologists tend to fall behind fighters even though spells now deal multi-hit. They should generally be safe if equipped with defensive accessories (such as the Colorless Scarf) while they spam spells. Make sure to disable all weak spells and buffs; if you want to use Angel Feather or Reflection, do so manually.

Ashton: having him with tri-Ace works the best, even though it takes forever; however, this move hits whole screen, and he's invulnerable while swinging his blade. Alternatively, you can put him with Dragon's Breath, but he may end up being targeted. If Ashton is featured in your main party, he's best as the player-controlled character.

Precis: Forcefield is all she needs. Combo Link it with itself and she'll be spamming to her heart's content. If she has her Ultimate Weapon with HP Drain, she has nothing to worry about it.

Bowman: Bowman is problematic as all his Arts have low range or put him in harms way. You can try having the AI just with Poison / Inferno Pellets. He becomes very sturdy with his Ultimate Weapon anyway.

Welch: Mythril Fist or Nibelungaling! work the best; both hit everything on screen. Anything else she'll be eating free damage.

Opera: the vast majority of Opera's abilities have massive range, but her Tracking Plasm is arguably the best. Also, her Healing Star has global range, meaning she heal the whole party no matter where she is. You can also give her Hyperlauncher, but it has a bit of a long duration and may put her at risk.

Ernest: Bed of Roses has global range and hits like a truck if he has his Ultimate Weapon. Combo Link it with itself and it becomes a very spammable, very effective Art, similarly to Precis' Forcefield.

Dias: Air Slash all day.

Chisato: 100,000 Volts has pretty long range but works better in normal battles. It is her safest move to not put a target on her back, though.


How to easily defeat Iselia Queen
If you don't want to use the Bloody Helmet / Armor cheese, there is a "legit" way to defeat her that isn't so cheesy, but it's pretty effective (although more time consuming).

Basically you'll want to spam Megabombs (which deals damage equal to half of the enemy's current HP, up to 99.999) while in the Escape Shift Formation, which at max stacks have a 50% chance to make items not consume when used. This can be combined with the Item Master factor (20% chance to not consume items), which further increases this chance to 70%.

With this strategy, the player can defeat Iselia Queen by simply spamming the Megabombs; it takes around 50 Megabombs to completely defeat her without attacking once (in Galaxy difficulty).

Extra preparations include:

⭐ Ideally you'll want to do this with a single character and with the Bunny Shoes / Valiant Boots / Valkyrie Boots equipped for the extra movement speed.

⭐ Equipping the Silver Charm (made with Crafting by using Silver with Claude) is also useful as it's cheap to make, and it grants immunity to instant death, which will negate Iselia's Word of Death. This accessory also grants absorption against Light and nullifies Darkness, which will negate Iselia's Meteor Swarm and Star Flare.

⭐ Equip a Reverse Doll (revives the character once but breaks the item) in case things go south.

Credits to Nekomimi Maid for the strategy
Conclusion
This Remake truly brought so many quality-of-life changes that I wish that every JRPG from now on takes notes from this game.

I hope this guide has been useful! I have others in the oven that I'll post "soon".

Till next time!
Special Thanks
  • @Louis Cypher for pointing out my mistype regarding the Sword of Marvels.
  • @capocapy for pointing out my mistype regarding the Forged Check / Document.
26 Comments
ElCid  [author] 26 Jan @ 6:42am 
I really hope The First Departure gets a remake treatment of this caliber!

But I'm personally hoping they'll do a remake of The Blue Sphere; could even recycle assets from The Second Story R.
ElCid  [author] 6 Sep, 2024 @ 5:46am 
@Dasin6

In the Remake? Absolutely. Ernest is much better than Ashton. Bed of Roses is ridiculously spammy. But in the OG titles, especially the PS1 version, Ashton was arguably the best character in the game and could solo Iselia Queen without resorting to the Bloody Armor.

Sadly Ashton was nerfed in the Remake, but they didn't buff the already bad things he had since the original game (namely his poor mobility and painfully slow Special Arts).
Dasin6 5 Sep, 2024 @ 11:02pm 
"ernest is good now!". maybe it just me but id choose ernest over ashton, ashton in the original liked to miss and get stuck in his own animations while ernest is the 2nd best spammer(only cus fast moving targets easy evade his moves....). but sadly cluade dias chisato opera and rena kinda shined to hard for ernest to get any real amount of playtime
ElCid  [author] 4 May, 2024 @ 8:22pm 
@Klim
Oh! I didn't notice that. As a rule of thumb earrings in general can't be equipped by Rena and Precis. Thanks for letting me know this one can! Updated the guide.
Klim 4 May, 2024 @ 12:21pm 
The guide says that the Earring of Readiness can only be equipped by a female character over 20 years old, but Rena can equip this.
ElCid  [author] 28 Mar, 2024 @ 7:00am 
@ICountFrom0

Hehe, yes! Such a nice free patch we got. I've been playing around with the building the "True Ultimate Weapons" and I'll add it to this FAQ soon.
ICountFrom0 28 Mar, 2024 @ 12:08am 
"Added "CHAOS" difficulty."
I am SO GLAD that I had my confusion explained to me before I saw this.
ElCid  [author] 22 Mar, 2024 @ 3:10pm 
@ICountFrom0

There was never a 4th difficulty in the original.

Earth and Galaxy were the default ones, and Universe was unlockable through Voice Collection.
ElCid  [author] 22 Mar, 2024 @ 5:49am 
@ICountFrom0

Sadly there isn't a new unlockable difficulty. I was really hope there was one to make New Game+ feel more challenging.
ICountFrom0 19 Mar, 2024 @ 7:01am 
I remember that in the PS1 version higher difficulties were unlocked via the sound test. Four total. Is there a 4d equivalent?

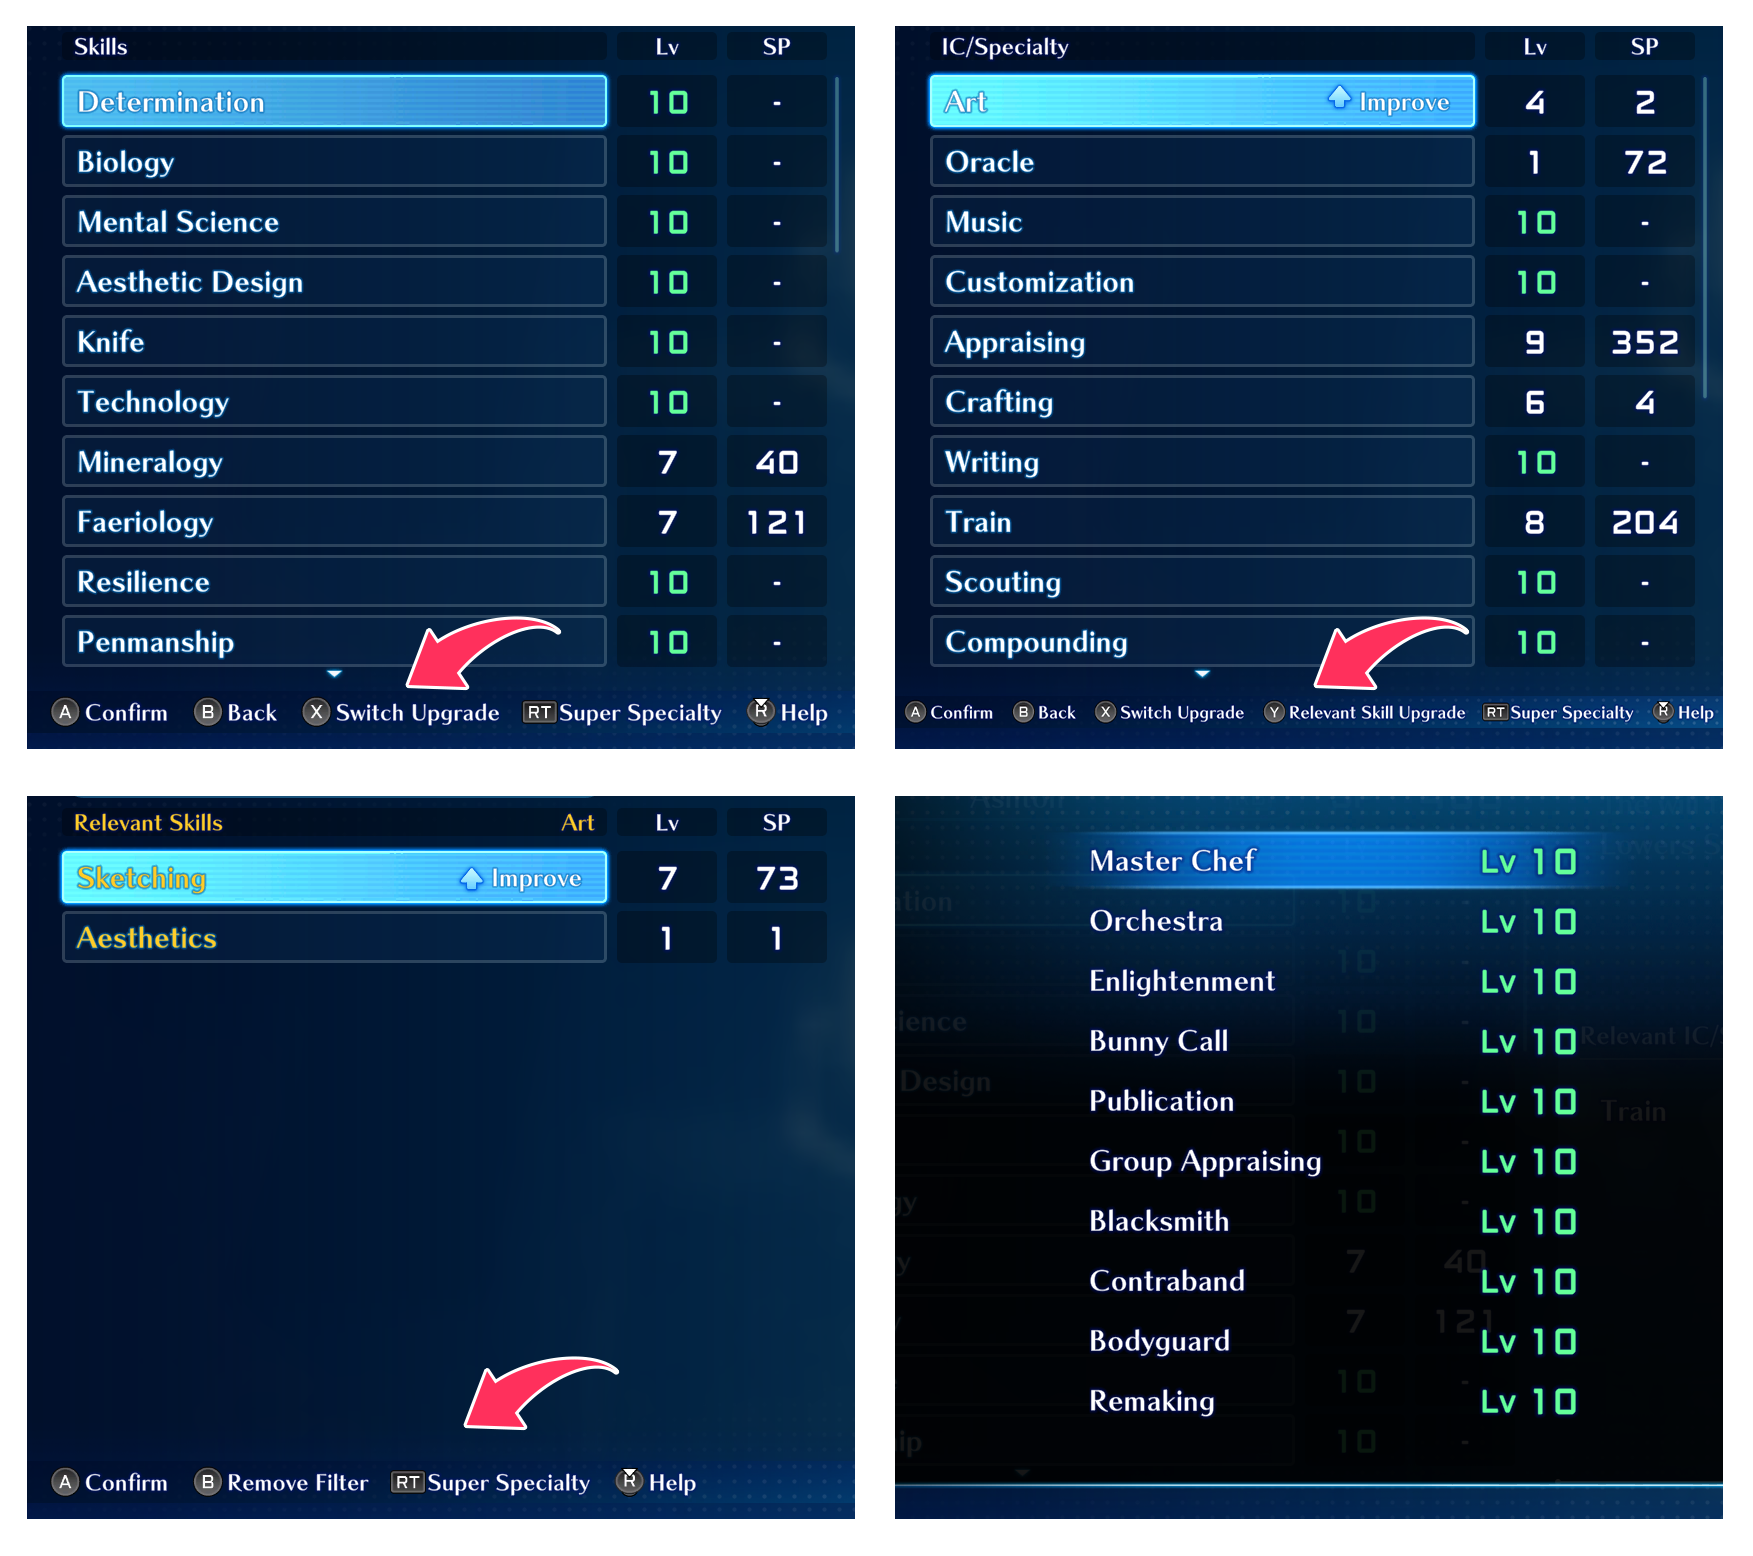
Best money though, barking up the wrong tree, every single one of you. If you can just get 66% price modification, Cinderella (25), Kasuzuke (10), Secret Ledger (10), and some amount of group appraisal, then find a store with the special grape juice.

The "juice" will now sell for more then it costs, the prices won't reset back until after you leave the shop. Pickpocket the first "juice" and it won't matter how high the price got, more outlandish the price, the better, the more millions per second.